Kettle - Kettle AARKE - Free user manual and instructions
Find the device manual for free Kettle AARKE in PDF.

| Product type | Electric kettle |
| Brand | Aarke |
| Model | Kettle (A1240-A1253, A1271-A1289) |
| Maximum capacity | 1.7 L (estimated) |
| Rated power | 2200 W (estimated) |
| Supply voltage | 220-240 V AC (estimated) |
| Main materials | Brushed stainless steel |
| Dimensions (L x D x H) | 22 x 18 x 25 cm (estimated) |
| Net weight | 1.2 kg (estimated) |
| Power cord length | 75 cm (estimated) |
| Temperature adjustment | Yes, temperature cycle selection |
| Automatic shut-off | Yes, at boiling or set temperature |
| Overheat protection | Yes, dry boil protection |
| Rotating base | Yes, 360° power base |
| Descaling filter | Removable, dishwasher or hand washable |
| Sound signal | Yes, can be enabled/disabled |
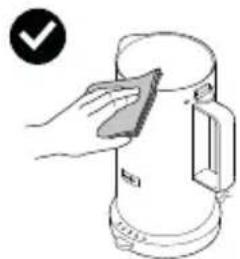
| Exterior cleaning | Soft damp cloth, no abrasive products |
| Recommended descaling | Every 2 months with descaling solution |
| Usage | Domestic, clear filtered cold water only |
| Warranty | 2 years (estimated, subject to sales conditions) |
Frequently Asked Questions - Kettle AARKE
User questions about Kettle AARKE
0 question about this device. Answer the ones you know or ask your own.
Ask a new question about this device
Download the instructions for your Kettle in PDF format for free! Find your manual Kettle - AARKE and take your electronic device back in hand. On this page are published all the documents necessary for the use of your device. Kettle by AARKE.
USER MANUAL Kettle AARKE
Model A1240-A1253, A1271-A1289
PLEASE READ THESE INSTRUCTIONS CAREFULLY BEFORE USE. SAVE FOR FUTURE REFERENCE.
Graphics and drawings in this manual are solely for illustration purposes and are subject to variations from actual product.
Components

Lid

ON/OFF and temperature setting button

Jug

Pouring spout

Handle

Limescale filter

Lid opening button

Temperature indicators

Power base

Power cord
Important safeguards
This appliance is for domestic household use only, it is not suitable for commercial use. When using electrical appliances, basic safety precautions should always be followed to avoid fires, electric shocks, burns, or other injuries and damage. Read these operating and safety instructions carefully. Contact our customer service for information on examination, repair, and adjustments; do not attempt to repair the appliance yourself.
Read all instructions
- This appliance can be used by children aged from 8 years and above if they have been given supervision or instruction concerning use of the appliance in a safe way and if they understand the hazards involved. Cleaning and user maintenance shall not be made by children unless they are older than 8 and supervised.
- Keep the appliance and its cord out of reach of children aged less than 8 years.
- Appliances can be used by persons with reduced physical, sensory or mental capabilities or lack of experience and knowledge if they have been given supervision or instruction concerning use of the appliance in a safe way and understand the hazards involved.
- Children shall not play with the appliance. If children are present while the appliance is in use, keep them a safe distance away.
- Use the appliance according to this instruction, any misuse may cause electric shock or other hazards.
- If the supply cord is damaged, it must be replaced by the manufacturer, its service agent or similarly qualified persons in order to avoid a hazard.
-
The appliance is only to be used with the power base provided.
-
This appliance is intended to be used in household and similar applications such as:
-
staff kitchen areas in shops, offices and other working environments;
- Farmhouses;
- by clients in hotels, motels and other residential type environments;
-
bed and breakfast type environments.
-
Do not operate the appliance if damaged, after an appliance malfunctions or it has been damaged in any manner.
- Avoid spillage on the connector.
- Heating element surface is subject to residual heat after use.
- This appliance is not intended to heating liquid other than water. Only fresh, filtered, cold water should be used in the appliance. Do not use hot water.
- Do not use the appliance if it has a loose or damaged handle.
- This appliance must be plugged in to an earthed socket outlet.
- Before you connect the appliance to the mains power supply, make sure that the voltage indicated on the rating plate, located on the bottom of the appliance matches the voltage in your home. If it does not, contact your dealer and do not use the appliance.
- The appliance will switch off automatically when the water has reached set temperature. If you want to stop the heating process before the appliance automatically switches off, press the button on the base.
- The appliance is designed to disconnect the live electrical supply from the element abnormal operating conditions. If the appliance is accidentally switched on without water, the boil dry protector will operate.
- If the appliance ever boils dry, the power indicator will go out. Allow 15 minutes to cool before refilling with cold water. The safety cutout will automatically reset during this time.
- Place the appliance on a stable flat surface.
- Always fill the appliance with water before switching it on. Never fill in water more than the maximum acceptable water level. If the appliance is overfilled, boiling water may be ejected.
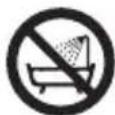
- Do not use this appliance outdoors or in damp areas.
- Ensure that the appliance is switched off before removing it from its base.
- Do not remove the appliance from its power base during operation.
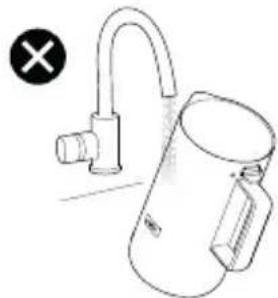
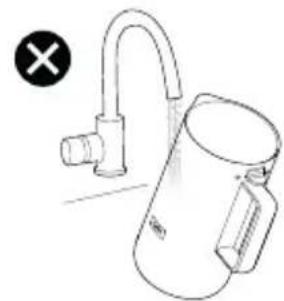
- Never immerse the appliance or cord in water or any other liquid. Do not allow liquid to penetrate the electrical parts of this appliance.
- Prevent children from pulling on the mains cord or knocking the appliance over.
- Ensure that the mains cord does not overhang the worktop surface.
- The outside surface of the appliance may get hot during use, please take care when using the appliance and use intended handle or buttons.
- Never use the appliance with the lid open.
-
To disconnect the appliance, first turn the appliance off then remove the plug from the wall outlet. Do not pull on the cable to disconnect from mains supply and do not unplug with a wet hand.
-
Do not open the lid when steam is coming out of the spout.
- Do not use the appliance with walls and furniture, in case of damaging the walls and furniture by steam.
- Unplug from outlet when not in use and before cleaning. Allow to cool before putting on or taking off parts, and before cleaning the appliance.
- Do not clean the appliance with abrasive cleansers, steel wool pads, or other abrasive material. How to clean the surfaces in contact with food, please refer to section
. - Do not place the appliance on or near a hot electric or gas burner, or in a heated oven.
Operating Your Product
Before first use
Remove packaging materials, labels, and stickers from the appliance, except for the rating label located under the appliance and power base. Clean the appliance by filling it with clear, cold water to the "MAX" level mark. Turn the appliance on to allow the water to boil. Let the appliance cool down for 5 minutes before repeating the process. Boil water in the appliance at least 2 times before boiling water for drinking and wipe with damp cloth.
Using the product
1 Connect the appliance to the mains power supply.
2 Press the lid opening button to open the lid and fill up the appliance with the desired amount of water. Make sure you do not fill below minimum or above the internal maximum filling level mark.
3 Close the lid and make sure it snaps in correctly.
4 Place the appliance on the power base.
5 Press the power base button to activate it. Press the button repeatedly to toggle through the temperature settings and stop when the light is at the desired option.
6 3 seconds after selecting the temperature the appliance will start heating the water, which is indicated by the selected temperature light starting to pulsate.
When water reaches the desired temperature setting, the light will stop pulsating and become stable and the unit will make a beeping noise.
After 10 seconds the light will dim and continue to display the current temperature as the water cools.
PLEASE NOTE!
- The heating process can be stopped at any time by pressing the power base button or lifting the appliance from the power base.
-
Caution! The upper part of the appliance becomes hot during and after boiling.
-
Beeping notifications can be enabled and disabled by long pressing the power base button. Enabled notification will be indicated by a double beep and disabled notification by one single beep.
- Make sure that your local water quality is approved for drinking without boiling or boil the water first and let it cool down to right temperature. Be aware that the reached temperature may vary depending on water level in the appliance and local circumstances. Always double-check temperature manually if serving your baby.
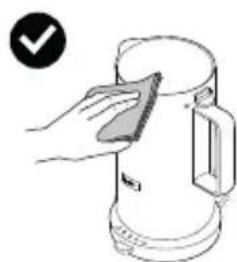
Cleaning and maintenance
Proper cleaning and care when necessary will ensure years of service from this appliance. Clean it after use for each time.
Always unplug the appliance and make sure sufficient cooling down before cleaning.
- Do not immerse the appliance in water when cleaning.
- Use a soft, damp cloth to clean the outside of the appliance. Do not clean the appliance with abrasive cleansers, steel wool pads, or other abrasive materials.
- Re-install the appliance on its base after cleaning and drying.
Dscaling the prodcut
We recommend that you descale your appliance once every two months. Prepare descending solution to descaler manufacturer's specification in separate container, fill the appliance and boil. Clean the appliance by filling it with fresh, filtered, cold water to the MAX line. The descale filter can be removed and put into the dishwasher machine or cleaned by hand.
Lime filter cleaning
- Press the tab to unlock the filter and remove it.
- Clean the filter with regular dish soap or put it in the dishwasher.
- Insert the hooks into the slots and push the tab upwards to lock the filter in place.
Disposal

This symbol on the product or on its packaging indicates that the product may not be treated as household waste. To recycle your product, please take it to an official collection point that can remove
and recycle electric parts in a safe and professional way. Follow your country's rules for the separate collection of electrical products.
Customer care and service
When contacting Customer Service, ensure that you have the following data available: Model and serial Number. The information can be found on the rating plate. Due to the Aarke policy of continual product development; specifications, colours, and details of our products and those mentioned in this manual are subject to change without notice.
Troubleshooting
For troubleshooting please contact customer support, support@aarke.com, or scan the QR code.
Aarke reserves the right to change products, information and specifications without notice.

Model A1240-A1253, A1271-A1289
LEES DEZE INSTRUCTIES VOOR GEBRUIK ZORGVULDIG DOOR. BEWAREN VOOR TOEKOMSTIG GEBRUIK.
Model A1240-A1253, A1271-A1289
LAES DENNE VEJLEDNING OMHYGGELIGT FØR BRUG. GEM DEN TIL FREMTIDIG REFERENCE.
Model A1240-A1253, A1271-A1289
PRZED UZYCIEM NALEZY UWAZNIE PRZECZYTAC TE INSTRUKCJ. ZACHOWAJ JA NA PRZYSZLOsC
Mudel A1240-A1253, A1271-A1289
ENNE KASUTAMIST TUTVUGE POHJALIKULT SELLE
KASUTUSJUHENDIGA. SÄLITAGE EDASPIDISEKS KASUTAMISEKS.
Modelis A1240-A1253, A1271-A1289
LUDZU, PIRMS LIETOŞANAS UZMANİGİ IZLASIET SO PAMACİBU. SAGLABAJIET TURPMAKAI ATSAUCEI.
Model A1240-A1253, A1271-A1289
PRED UPORABO POZORNO PREBERITE TA NAVODILA. SHRANITE ZA PRIHODNJO UPORABO.
Model A1240-A1253, A1271-A1289
POZORNE SI PRECITAJTE TENTO NAVOD UZ PRED POUZITIM. ULOZTE SI NA BUDUCE POUZITIE.
Modello A1240-A1253, A1271-A1289
LEGGERE ATTENTAMENTE LE ISTRUZIONI PRIMA DELL'USO.CONSERVARE PER RIFERIMENTO FUTURO.
Model A1240-A1253, A1271-A1289
PRIJE UPORABE PAŽLJIVO PROČITAJE OVE UPUTE. SPREMITE ZAKASNIJI OSVRT.
Grafikoni i crtezi u ovim uputama namijenjeni su isključivo za ilustraciju i mogu se razlikovati od stvarnog proizvoda.
Dijelovi
A Poklopac
Model A1240-A1253, A1271-A1289
PRED POUZITIM SI PECLIVE PRECTETE TENTO NAVOD. ULOZTE JEJ PRO BUDOUCI POUZITI.
MANUAL DE INSTRUCTIONSI
FIERBATOR ELECTRIC AARKE 1,2 I/foz 40,6 Model A1240-A1253,A1271-A1289
CITITI CU ATENTIE ACESTE INSTRUCTIONS UNI INAINTE DE UTILIZARE PASTRATI PENTRU CONSULTARE ULTERIOARÄ.
Model A1240-A1253, A1271-A1289
LUTFEN KULLANMADAN ONCE BU AÇIKLAMALARI DİKKATLICE OKUYUNUZ. GELECEKTE KULLANMAK ÜZERE SAKLAYINIZ.
Model A1240-A1253, A1271-A1289
SILA BACA ARAHAN INI DENGAN TELITI SEBELUM PENGGUNAAN. SIMPAN UNTUK RUJUKAN PADA MASA HADAPAN.
Joo Jai j 8 aI Jl aig c Ic g iinllg jolll Jn Jn Jn Jn Jn Jn Jn Jn Jn Jn Jn Jn Jn Jn Jn Jn Jn Jn Jn Jn Jn Jn Jn Jn Jn Jn Jn Jn Jn Jn Jn Jn Jn Jn Jn Jn Jn Jn Jn Jn Jn Jn Jn Jn Jn Jn Jn Jn Jn Jn Jnn

Jaeio JswyuyyI IxxiaIg yjxglg gao
cdoa0d0d
aagjgljll: jlll aill llll llll gjjg jss sllll aod go Jolglll sic Aarke aolw l jbi. tlll llll aagl o jg clogleall o jg jg jg jg jg jg jg jg jg jg jg jg jg jg jg jg jg jg jg jg jg jg jg jg jg jg jg jg jg jg jg jg jg jg jg jg jg jg jg jg jg jg
Jaw! jgyd yduu gdo Jydl I do o
g>luoljIb581olssl
. support@aarke.com yc slaell go Jolgill jg Jbc81 glwss

Jaw! bnnn nnnn nn nnnnnnnnnnnnnnnnnnnnnnnnnnnnnnnnnnnnnnnnnnnnnnnnnnnnnnnnnnnnnnnnnnnnnnnnnnnnnnnnnnnnnnnnnnnnnnnnnnnnnnnnnnnnnnnnnnnnnnn
- a|b|l oxl jc j4
5
6w8,slll
jJr jll 1c bdo. abuui aIbll ocl jj 1c beol .golll Jgog g ic oogg .dJrJlal
jg3r0
J 1
7
J 1 J 1 J 1 J 1 J 1 J 1 J 1 J 1 J 1 J 1 J 1 J 1 J 1 J 1 J 1
8aJllJrJl
10 2
.
8aJllJrJl
P
.
iIw jalell no yolall jll 4u w .08g jull lslil
·o2c0j j 1e jra
a 1 a 1 1 1 1 1 1 1 1 1 1 1 1 1 1 1 1
- 1
a aal oall oall ool al 1 j n no sll
oal aol .aaiol oal aol l j sl jsl gsl slal
ggl gl jll gsl gss w bgs gls gll jy jn
jab pab! ll y gld slal no qaa. aal
aalll
Ogall Jsw JswdJwJwJwJwJwJwJwJw
10 1
.aaee
·
j 1 j 8. j 1 j 1 j 1 j 1 j 1 j 1 j 1 j 1 j 1 j 1 j 1 j 1 j 1 j 1 j 1 j 1 j 1 j 1 j 1 j 1 j 1 j 1 j 1 j 1 j 1 j 1 j 1 j 1 j 1 j 1 j 1 j 1 j 1 j 1
. dolgoa,bii
Jlgl JgJgJgJgJgJgJgJgJgJgJgJgJgJgJgJgJgJgJgJgJgJgJgJgJgJgJgJgJgJgJgJgJgJgJgJgJgJgJgJgJgJgJgJg
.duwslj d4
·2awj.1Jlω
. jIgJlblawI gI
.
·
2gao slzolj
.
alaii
8gJ .jIgJ JUoJ UoJ JSLUuWu
.
aliljoolebcbl
jil. aabijg
·ssloglaLwC
.1JwJgJdJg
Joo
aljol
JlIaLdOxlc Ic Ie JgJzIooIe aolalollg 1oLdIg Aizll Jg J
JzIyIyIyIyIyIyIyIyIyIyIyIyIyIyIyIyIyIyIyIyIyIyIyIyIyIyIyIyIyIyIyIyIyIyIyIyIyIyIyIyIyIyIyIyIyIyIyIyIyIyI y
JzJ.1JzJzJzJzJzJzJzJzJzJzJzJzJzJzJzJzJzJzJzJzJzJzJzJzJzJzJzJzJzJzJzJzJzJzJzJzJzJzJzJzJzJzJzJzJzJzJzJzJzJzJ z
aillp
- 2
pJc Jc Jc Jc Jc Jc Jc Jc Jc Jc Jc Jc Jc Jc Jc Jc Jc Jc Jc Jc Jc Jc Jc Jc Jc Jc Jc Jc Jc Jc Jc Jc Jc Jc Jc
| • √2 √3 √4 √5 √6 √7 √8 √9 √10 √11 √12 √13 √14 √15 √16 √17 √18 √19 √20 √21 √22 √23 √24 √25 √26 √27 √28 √29 √30 √31 √32 √33 √34 √35 √36 √37 √38 √39 √40 √41 √42 √43 √44 √45 √46 √47 √48 √49 √50 √51 √52 √53 √54 √55 √56 √57 √58 √59 √60 √61 √62 √63 √64 √65 √66 √67 √68 √69 √70 √71 √72 √73 √74 √75 √76 √77 √78 √79 √80 √81 √82 √83 √84 √85 √86 √87 √88 √89 √90 √91 √92 √93 √94 √95 √96 √97 √98 √99 √100 √101 √102 √103 √104 √105 √106 √107 √108 √109 √110 √111 √112 √113 √114 √115 √116 √117 √118 √119 √120 √121 √122 √123 √124 √125 √126 √127 √128 √129 √130 √131 √132 √133 √134 √135 √136 √137 √138 √139 √140 √141 √142 √143 √144 √145 √146 √147 √148 √149 √150 √151 √152 √153 √154 √155 √156 √157 √158 √159 √160 √161 √162 √163 √164 √165 √166 √167 √168 √169 √170 √171 √172 √173 √174 √175 √176 √177 √178 √179 √180 √181 √182 √183 √184 √185 √186 √187 √188 √189 √190 √191 √192 √193 √194 √195 √196 √197 √198 √199 √200 √201 √202 √203 √204 √205 √206 √207 √208 √209 √210 √211 √212 √213 √214 √215 √216 √217 √218 √219 √220 √221 √222 √223 √224 √225 √226 √227 √228 √229 √230 √231 √232 √233 √234 √235 √236 √237 √238 √239 √240 √241 √242 √243 √244 √245 √246 √247 √248 √249 √250 √251 √252 √253 √254 √255 √256 √257 √258 √259 √260 √261 √262 √263 √264 √265 √266 √267 √268 √269 √270 √271 √272 √273 √274 √275 √276 √277 √278 √279 √280 √281 √282 √283 √284 √285 √286 √287 √288 √289 √290 √291 √292 √293 √294 √295 √296 √297 √298 √299 √300 √301 √302 √303 √304 √305 √306 √307 √308 √309 √310 √311 √312 √313 √314 √315 √316 √317 √318 √319 √320 √321 √322 √323 √324 √325 √326 √327 √328 √329 √330 √331 √332 √333 √334 √335 √336 √337 √338 √339 √340 √341 √342 √343 √344 √345 √346 √347 √348 √349 √350 √351 √352 √353 √354 √355 √356 √357 √358 √359 √360 √361 √362 √363 √364 √365 √366 √367 √368 √369 √370 √371 √372 √373 √374 √375 √376 √377 √378 √379 √380 √381 √382 √383 √384 √385 √386 √387 √388 √389 √390 √391 √392 √393 √394 √395 √396 √397 √398 √399 √300 √301 √302 √303 √304 √305 √306 √307 √308 √309 √310 √311 √312 √313 √314 √315 √316 √317 √318 √ |
J

Jlww 40,6/1.2 Aarke aL
A1240-A1253,A1271-A1289jLJ
LgJgJgJgJgJgJgJgJgJgJgJgJgJgJgJgJgJgJgJgJgJgJgJgJgJgJgJgJgJgJgJgJgJgJgJgJgJgJgJgJgJgJg
g g aagaaaagaaagaaagaaagaaagaaagaaagaaagaaagaaagaaagaaagaaagaaagaaagaaagaaagaaagaaagaaagaaagaaagaaagaaagaaagaaagaaagaaagaaagaaagaaagaaagaaagaaagaaagaaagaaagaaagaaagaaagaaagaaagaa
Jll
wall a
aannn aaabjj
0j12j1
aIbI Iw
F
G
H
0
J
1b20A 1a J
B
112jj D
all ocl E
aogo 1b
responsible forestry
FSC ^® C187882