TG1800SB - Grill plate GORENJE - Free user manual and instructions
Find the device manual for free TG1800SB GORENJE in PDF.
User questions about TG1800SB GORENJE
0 question about this device. Answer the ones you know or ask your own.
Ask a new question about this device
Download the instructions for your Grill plate in PDF format for free! Find your manual TG1800SB - GORENJE and take your electronic device back in hand. On this page are published all the documents necessary for the use of your device. TG1800SB by GORENJE.
USER MANUAL TG1800SB GORENJE
natural_image
Black rectangular electric grill with grille and control knob (no visible text or symbols)TG1800SB
text_image
Technical diagram of a heat exchanger with labeled components including inlet, outlet, and internal grid structure
text_image
Exploded view diagram of a battery pack with numbered parts for identificationtext_image
Technical diagram of a heat exchanger with labeled components including inlet, outlet, and internal grid structure
text_image
Exploded view diagram of a battery pack with numbered parts for identificationtext_image
Technical diagram of a rectangular heater with labeled components including heat exchanger, cooling fins, and outlet ports.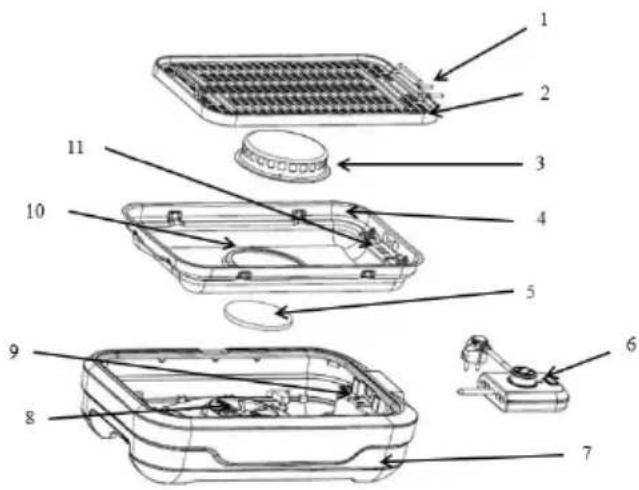
text_image
Exploded view diagram of a battery pack with numbered parts for identification- Kuka
- Ploča za roštilj
- Regulator temperature
- Indikator zagrevanja
-
Dugme za kontrolu ventilatora
-
Izvodni priključak grejača
- Ploča za roštilj
- Poklopac ventilatora
- Posuda za sakupljanje tečnosti
- Filter
- Sklop za uključivanje i kontrolu temperature
- Baza uređaja
- Otvor za uvlačenje dima
- Izvor napajanja
- Dovod vazduha
- Otvor za priključivanje
Opis dodatne opreme
| Dodatna oprema | Funkcija |
| Ploča za roštilj | Koristi se za pečenje govedih odrezaka, svinjskih kotleta, piletine (bataci, karabataci, prsa), svinjetine, slanine itd. |
| Poklopac ventilatora | Koristi se za pokrivanje dovoda vazduha da bi se sprečilo da ulje i ostaci hrane padnu na lopaticu ventilatora. |
| Posuda za sakupljanje tečnosti | Koristi se za sakupljanje ulja, masnoće i ostataka hrane nakon pečenja. |
| Filter | Koristi se za filtriranje dima od ulja koji apsorbuje ventilator. (U normalnim uslovima upotrebe, npr., ako pečete govedinu na roštilju, filter se može koristiti oko 20 puta pre nego što treba da se zameni. Prilikom pečenja svinjetine, filter treba zameniti nakon 8-10 upotrebe.) |
text_image
Exploded view diagram of a battery pack with numbered parts for identificationImportant safeguards:
Save these instructions.
This product is intended for household use only.
Do not immerse this product into water.
Main Functions:
- Detachable non-stick grill/griddle plates ensure effortless food release and quick clean-up.
- Detachable grease tray
- Adjustable temperature control probe with power-on indicator for more precise cooking
Important safeguards
- This appliance can be used by children aged 8 years and above and persons with reduced physical, sensory or mental capabilities or lack of experience and knowledge if they have been given supervision or instruction concerning use of the appliance in a safe way and if they understand the hazards involved.
- Children shall not play with the appliance.
- Cleaning and user maintenance shall not be made by children without supervision.
- Cleaning and user maintenance shall not be made by children unless they are older than 8 years and supervised.
- Keep the product and its cord out of the reach of children aged less than 8 years.
- : Caution, hot surface

When using electrical appliances, basic safety precautions should always be followed, including the following:
Read all instructions.
Do not touch any hot surface. Use handles or knobs.
To protect against electrical shock, do not immerse the cord, plugs or the appliance in water or other liquid.
Close supervision is necessary when any appliance is used by or near children.
Unplug from outlet when not in use and before cleaning. Allow to cool before putting on or taking off parts, and before cleaning the appliance.
Do not operate any appliance with a damaged cord or plug, or after the appliance malfunctions or if it is damaged in any manner. Return the appliance to the nearest authorized service facility for examination, repair or adjustment.
Use of accessory attachments not recommended by the appliance manufacturer may cause injuries.
Do not use outdoors.
Do not let the cord hang over the edge of a table or counter, or touch a hot surface.
Extreme caution must be used when moving an appliance containing hot oil or other hot liquids.
To disconnect, remove the plug from the wall outlet.
Do not use this appliance for other than intended use.
If the supply cord is damaged, it must be replaced by the manufacturer or its service agent or a similarly qualified person in order to avoid a hazard.
Never connect this appliance to an external timer switch or a remote control system in order to avoid a hazardous situation.
Save these instructions.
This product is intended for household use only.
Do not immerse this product in water.
DO NOT THROW AWAY THESE INSTRUCTIONS.
INSTRUCTIONS FOR USE
IMPORTANT: ALWAYS UNPLUG THE POWER CORD FROM THE
ELECTRICITY MAINS BEFORE FITTING OR REMOVING SINGLE
ATTACHMENTS OR BEFORECLEANING THE APPLIANCE.
This appliance is marked according to the European directive 2012/19/EU on Waste Electrical and Electronic Equipment (WEEE).
This guideline is the frame of a European-wide validity of return and recycling on Waste Electrical and Electronic Equipment.
Parts of the appliance
Know your grill

text_image
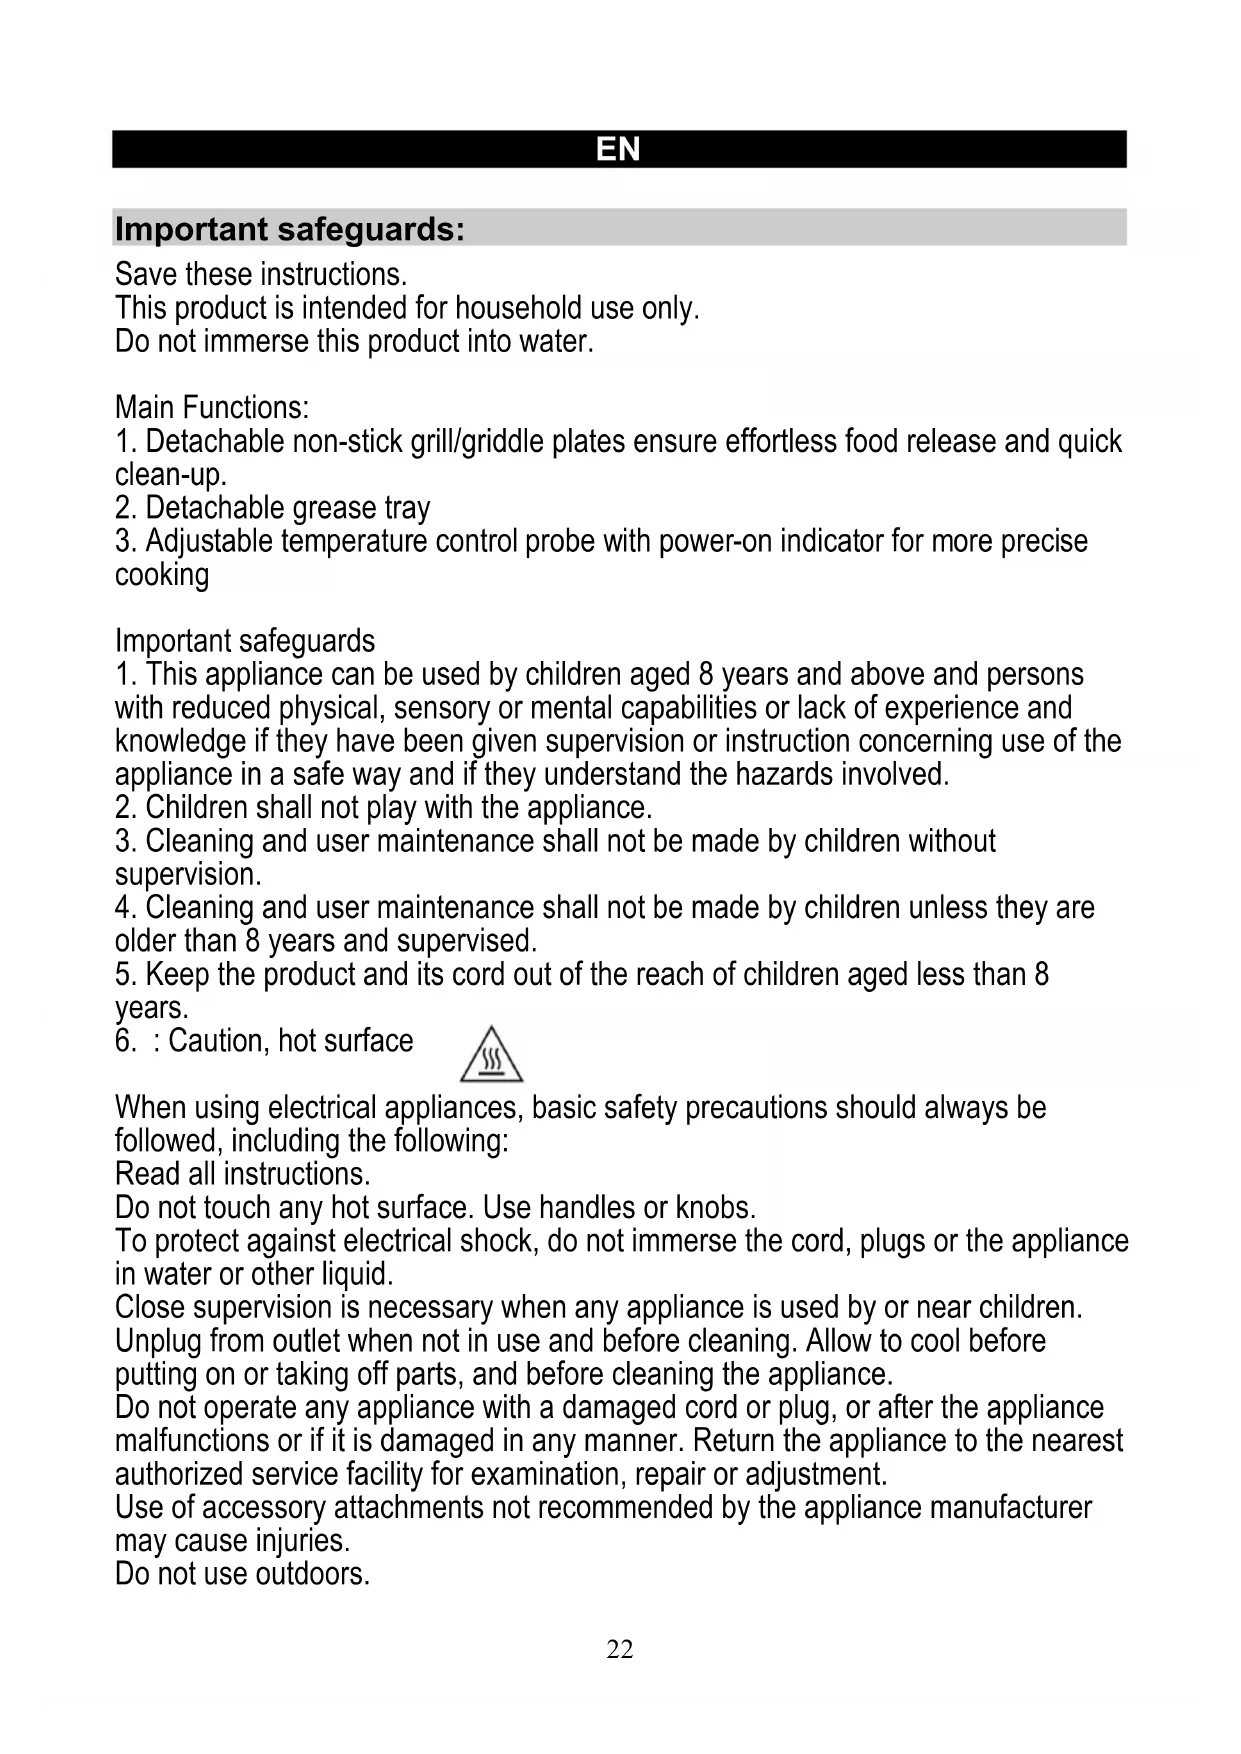
Technical diagram of a battery pack with numbered parts for identification and assembly reference.- Hook
- Grill plate
- Temperature control knob
- Heating indicator
-
Fan control button
-
Lead-out terminal of heating element
- Grill plate
- Fan cover
- Drip tray
- Filter
- Temperature control and power assembly
- Unit base
- Smoke-absorbing port
- Power socket
- Air inlet
- Connecting hole
Introduction for accessories
| Accessory | Function |
| Grill plate | It is used for roasting beef steaks, pork chops, chicken (drumsticks, thighs, breast), pork, bacon etc. |
| Fan cover | It is used for covering the air inlet to prevent oil and residue from falling onto the fan blade. |
| Drip tray | It is used for collecting oil, grease, and food residue from cooking. |
| Filter | It is used for filtering the oil smoke absorbed by the fan. (Under the normal use, e.g., if grilling beef, the filter can be used around 20 times before it needs to be replaced. When grilling pork, the filter should be replaced after 8-10 uses.) |
Before using the grill for the first time
- Unpack the appliance. Check and make sure the appliance and its accessories are complete and in good condition.
- When the grill plate is used for the first time, it can be cleaned with neutral detergent and then dried.
- Please make sure that there are no foreign objects in the appliance, and that the drip tray, filter, fan cover, and grill plate are properly installed in correct sequence.
- Insert the temperature control and power assembly into the appliance correctly, making sure that it is installed firmly in position when connected.
- Do not use metal spatulas, knives, and other metal tools.
Note: Before using the appliance for the first use, turn it on and let it heat up without any food for at least 10 minutes. Ventilate the room if any unwanted odour occurs. The appliance may produce some smoke when you use it for the first time. This is normal.
Preheating
- Correctly install the grill plate. Connect the appliance to power supply and then turn the temperature control knob to your desired setting. The heating indicator lights up and the appliance starts to preheat.
- Press the fan control button and its corresponding indicator lights up. Then, the fan starts to absorb the oil smoke.

text_image
min MAX Heating indicator Fan control buttonHeating area
- After 4–5 minutes, the heating indicator turns off, which means the preheating is completed.
- The heating indicator will be alternately turned on and off during operation; this is normal. If you hear a "click" sound during operation, this is also normal: it is caused by thermal change of the heater.
- The fan control button is an independent switch that can be activated as needed.
Cooking
| Setting | Temperature °C | Application (only for reference) |
| Min setting | 60–100 | For warming food |
| Medium setting | 140–180 | For cooking food with slow fire |
| High setting | 200–240 | For grilling meat, steak, bacon, and streaky bacon |
After cooking
- Turn the temperature control knob to the "min" position.
- Unplug the appliance.
- Remove the temperature control and power assembly.
- After the grill plate has cooled down completely, remove the grill plate by proceeding as follows:
- first, lift the left end of the grill plate (the end opposite to where the temperature control and power assembly was connected);
- then, slide the grill plate towards the lifted end until the two connecting pins on the opposite side are no longer inserted in the two holes in the drip tray;
-
finally, lift the grill plate on the other end (i.e., the end where the temperature control and power assembly was connected) and remove it.
-
Clean the appliance by following the instructions in the section "CLEANING AND MAINTENANCE".
Cleaning and maintenance
- Keep the grill plate free from leftovers or stains.
- Please unplug the appliance after you have turned it off.
- The grill plate can be cleaned only with a piece of soft cloth soaked with diluted neutral detergent, after the appliance has cooled down completely.
- A wooden spoon or a bamboo stick can be used for turning over the food during cooking. Please do not use metal scrapers or spatulas.
- Please wipe the appliance with a piece of cloth soaked with water.
- Please clean any oil stains with diluted neutral detergent.
- The parts cleaned with detergent must be rinsed with water and then dried with a soft and dry cloth.
- Please remove the food at the gap of the main body with a toothpick.
- To avoid electric shock or malfunction, do not immerse the entire body in water.
- Clean the grill plate, fan cover and drip tray with a sponge and neutral detergent, then rinse them with water and dry them with a dry cloth.
Environment
Do not throw away the appliance with the normal household waste at the end of its life, but hand it in at an official collection point for recycling. By doing this, you help to preserve the environment.
Guarantee & service
If you need information or if you have a problem, please contact the Gorenje Customer Care Centre in your country (you find its phone number in the worldwide guarantee leaflet). If there is no Customer Care Centre in your country, go to your local Gorenje dealer or contact the Service department of Gorenje domestic appliances.
For personal use only!
GORENJE WISHES YOU A LOT OF PLEASURE WHEN USING YOUR APPLIANCE
We reserve the right to any modifications!
RO
text_image
Technical diagram of a rectangular heating element with numbered parts labeled 1 to 5
text_image
Exploded view diagram of a battery pack with numbered parts for identificationtext_image
Technical diagram of a rectangular heating element with numbered parts labeled 1 to 5
text_image
Exploded view diagram of a battery pack with numbered parts for identificationtext_image
Technical diagram of a rectangular heating element with numbered parts labeled 1 to 5
text_image
Exploded view diagram of a battery pack with numbered parts for identificationtext_image
Exploded view diagram of a battery pack with numbered parts for identificationTENTO NÁVOD NA OBSLUHU NEVYHADZUJTE.
NÁVOD NA OBSLUHU
DÔLEŽITÉ: PRED TÝM, AKO JEDNOTLIVÉ NÁSTAVCE UMIESTNITE ALEBO ODSTRÁNITE, ALEBO PRED ČISTENÍM SPOTREBIČA NAPÁJACÍ KÁBEL VŽDY VYPOJTE Z ELEKTRICKEJ SIETE.
Tento spotrebič je označený v súlade s európskou smernicou 2012/19/EU o odpade elektrických a elektronických spotrebičov (WEEE).
text_image
Exploded view diagram of a battery pack with numbered parts for identificationTYTO POKYNY NIKDY NEVYHAŻUJTE.
PQKYNY K POUŽITÍ
DÜLEŽITÉ: PŘED UCHYCENÍM NEBO ODSTRANĚNÍM JEDNOTLIVÝCH KOMPONENTŮ PŘÍP. PŘED ČIŠTĚNÍM ZAŘÍZENÍ VŽDY ODPOJTE NAPÁJECÍ KABEL OD ELEKTRICKÉ SÍTĚ.
text_image
Exploded view diagram of a battery pack with numbered parts for identificationtext_image
Exploded view diagram of a battery pack with numbered parts for identificationtext_image
Exploded view diagram of a battery pack with numbered parts for identificationtext_image
Technical diagram of a rectangular device with numbered components, likely a gas or cooling unit.
text_image
Exploded view diagram of a battery pack with numbered parts for identificationtext_image
Technical diagram of a portable electric heater with labeled components
text_image
Exploded view diagram of a refrigerator with numbered parts for identification- Përpara pastrimit,
- Pas përdorimit.
text_image
Technical diagram of a portable electric heater with labeled components