
YT-82950 - Compressor Yato - Free user manual and instructions
Find the device manual for free YT-82950 Yato in PDF.
| Product type | Cordless compressor |
| Reference | YT-82950 |
| Brand | Yato |
| Battery nominal voltage | 11.1 V |
| Battery capacity | 2.2 Ah |
| Charging voltage | 5 V (USB) |
| Nominal pressure | 10 bar / 150 PSI |
| Air flow | 25 L/min |
| Hose length | 25 cm |
| Weight | 1 kg |
| Battery type | Lithium-Ion |
| Charging time | ~4 hours |
| Functions | Automatic shut-off at target pressure, unit selection (PSI/BAR/kPa/kg/cm²) |
| Maximum continuous use | 15 minutes |
| Included accessories | USB cable, flexible hose, Schrader adapter, cone adapters, needle |
| Maintenance | Clean with a damp cloth, do not immerse |
| Safety | Wear safety glasses, do not exceed maximum pressure |
| Storage | Temperature 0-40°C, relative humidity <85% |
Frequently Asked Questions - YT-82950 Yato
User questions about YT-82950 Yato
0 question about this device. Answer the ones you know or ask your own.
Ask a new question about this device
Download the instructions for your Compressor in PDF format for free! Find your manual YT-82950 - Yato and take your electronic device back in hand. On this page are published all the documents necessary for the use of your device. YT-82950 by Yato.
USER MANUAL YT-82950 Yato
CE
PL D RUS UA LT LV CZ SK H RO E F I NL GR
natural_image
Close-up of a hand holding a black mechanical component with a small metallic connector, shown from two different angles (no text or symbols visible)
natural_image
Close-up of a black mechanical component with cylindrical ends and a tapered shaft (no visible text or symbols)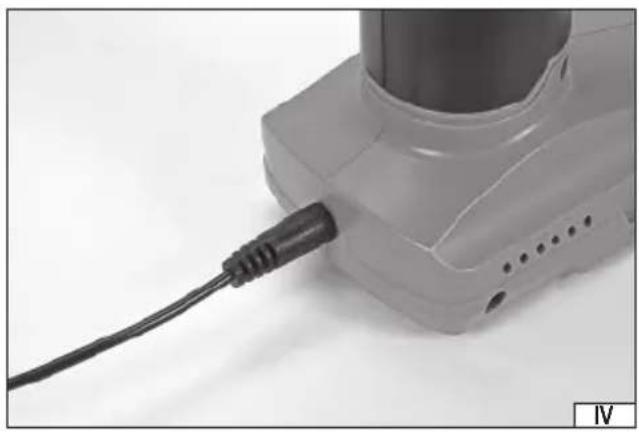
natural_image
Close-up of a white handheld device with a black cable inserted, showing no visible text or symbols.
natural_image
Two identical mechanical components with a lock mechanism, shown from different angles (no text or symbols visible)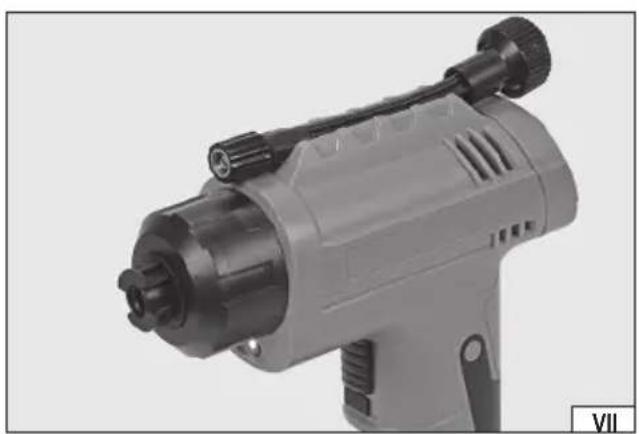
natural_image
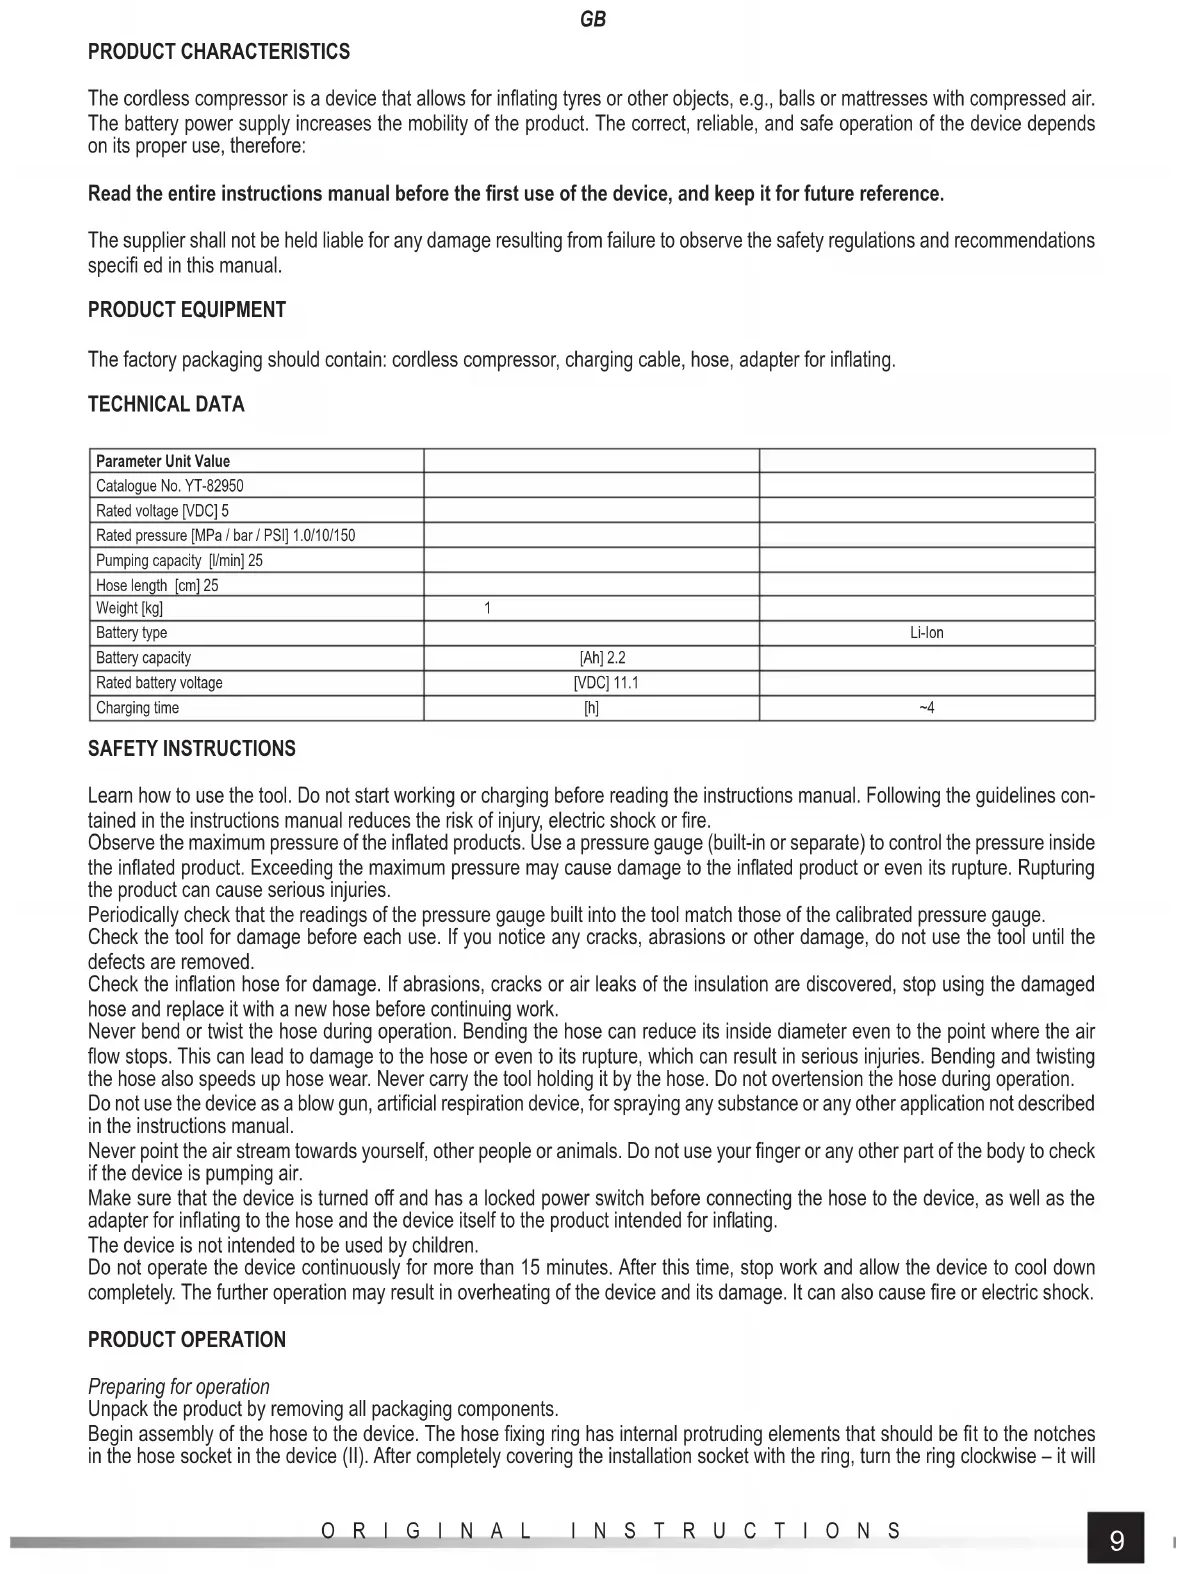
Close-up of a gray electric drill putter with black adjustment knobs (no visible text or symbols)- housing
- grip
- power switch
- power switch lock
- hose socket
- hose
- hose adapter
- control panel
- display
- charging cable
D
Read the operating instruction
Wear protective goggles
Schutzbrille tragen
Wear hearing protectors
Gehörschutz tragen
This symbol indicates that waste electrical and electronic equipment (including batteries and storage cells) cannot be disposed of with other types of waste. Waste equipment should be collected and handed over separately to a collection point for recycling and recovery, in order to reduce the amount of waste and the use of natural resources. Uncontrolled release of hazardous components contained in electrical and electronic equipment may pose a risk to human health and have adverse effects for the environment. The household plays an important role in contributing to reuse and recovery, including recycling of waste equipment. For more information about the appropriate recycling methods, contact your local authority or retailer.
WYPOSAŻENIE PRODUKTU
PRODUCT CHARACTERISTICS
The cordless compressor is a device that allows for inflating tyres or other objects, e.g., balls or mattresses with compressed air. The battery power supply increases the mobility of the product. The correct, reliable, and safe operation of the device depends on its proper use, therefore:
Read the entire instructions manual before the first use of the device, and keep it for future reference.
The supplier shall not be held liable for any damage resulting from failure to observe the safety regulations and recommendations specified in this manual.
PRODUCT EQUIPMENT
The factory packaging should contain: cordless compressor, charging cable, hose, adapter for inflating.
TECHNICAL DATA
| Parameter Unit Value | ||
| Catalogue No. YT-82950 | ||
| Rated voltage [VDC] 5 | ||
| Rated pressure [MPa / bar / PSI] 1.0/10/150 | ||
| Pumping capacity [l/min] 25 | ||
| Hose length [cm] 25 | ||
| Weight [kg] | 1 | |
| Battery type | Li-Ion | |
| Battery capacity | [Ah] 2.2 | |
| Rated battery voltage | [VDC] 11.1 | |
| Charging time | [h] | ~4 |
SAFETY INSTRUCTIONS
Learn how to use the tool. Do not start working or charging before reading the instructions manual. Following the guidelines contained in the instructions manual reduces the risk of injury, electric shock or fire.
Observe the maximum pressure of the inflated products. Use a pressure gauge (built-in or separate) to control the pressure inside the inflated product. Exceeding the maximum pressure may cause damage to the inflated product or even its rupture. Rupturing the product can cause serious injuries.
Periodically check that the readings of the pressure gauge built into the tool match those of the calibrated pressure gauge.
Check the tool for damage before each use. If you notice any cracks, abrasions or other damage, do not use the tool until the defects are removed.
Check the inflation hose for damage. If abrasions, cracks or air leaks of the insulation are discovered, stop using the damaged hose and replace it with a new hose before continuing work.
Never bend or twist the hose during operation. Bending the hose can reduce its inside diameter even to the point where the air flow stops. This can lead to damage to the hose or even to its rupture, which can result in serious injuries. Bending and twisting the hose also speeds up hose wear. Never carry the tool holding it by the hose. Do not overtension the hose during operation.
Do not use the device as a blow gun, artificial respiration device, for spraying any substance or any other application not described in the instructions manual.
Never point the air stream towards yourself, other people or animals. Do not use your finger or any other part of the body to check if the device is pumping air.
Make sure that the device is turned off and has a locked power switch before connecting the hose to the device, as well as the adapter for inflating to the hose and the device itself to the product intended for inflating.
The device is not intended to be used by children.
Do not operate the device continuously for more than 15 minutes. After this time, stop work and allow the device to cool down completely. The further operation may result in overheating of the device and its damage. It can also cause fire or electric shock.
PRODUCT OPERATION
Preparing for operation
Unpack the product by removing all packaging components.
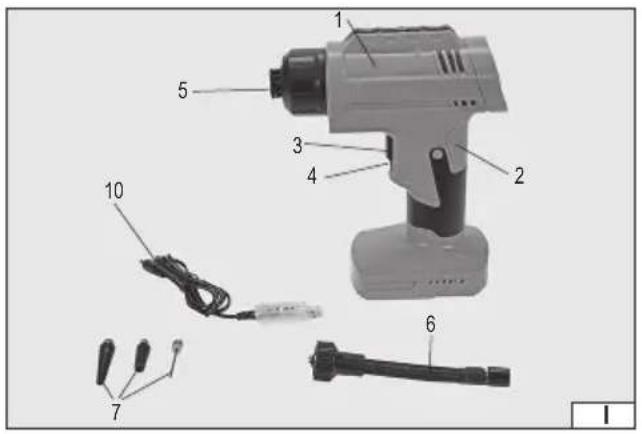
Begin assembly of the hose to the device. The hose fixing ring has internal protruding elements that should be fit to the notches in the hose socket in the device (II). After completely covering the installation socket with the ring, turn the ring clockwise – it will
GB
ultimately install the hose to the device. The ring edge of the correctly installed hose fits around the entire circumference of the device housing (II).
To disassemble the hose, rotate the hose ring counter-clockwise and then remove the hose ring from the installation socket.
After disassembly, store the hose by pressing it into the socket on the top of the device (VII).
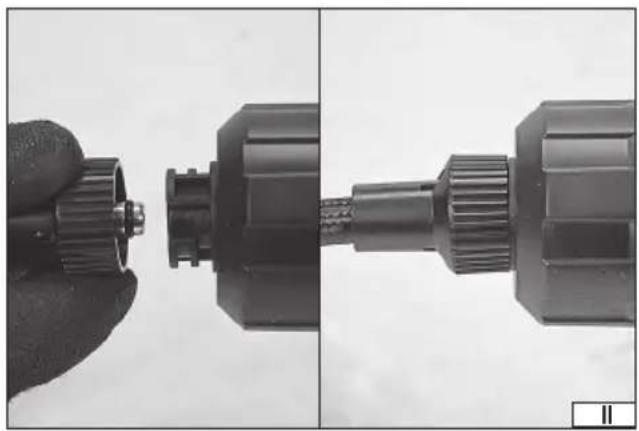
Depending on the type of valve in the inflated product, you can use an adapter, which must be screwed into the hose connection (III). The hose without an adapter is designed to inflate Schrader valves, the so-called car valves. The supplied conical adapters allow you to inflate mattresses and other products equipped with a soft socket without thread. A thin adapter, the so-called needle, allows for inflating balls.
Charging the battery
Only the cable supplied with the product can be used to charge the battery. The cable should be connected to the device's charging socket and then to a USB charging socket, e.g. of a computer or in a charger equipped with such a socket.
The charging process is indicated by the red light illumination on the cable plug, and the end of the charging is indicated by the green light illumination.
The device should be under supervision throughout the charging process. Immediately after charging, disconnect the charging cable from the charger and then from the device.
WARNING! Leaving the device with a fully charged battery connected to the charger will lead to irreparable damage to the battery and may cause fire or electric shock.
It is not possible to use the device while charging the battery.
The display shows the battery symbol (V), which approximates the battery charge status. The more the battery symbol is filled, the higher the battery charge level.
Safety instructions for battery charging
Caution! Before starting charging, make sure that the charger body, cord and plug are not cracked or damaged. It is forbidden to use a defective or damaged charger! Use only the supplied accessory charger to charge the batteries. Use of another charger may result in fire or damage to the device. The battery should only be charged in a closed, dry room, protected against unauthorised access, especially by children. Do not use the charger without the constant supervision of an adult! If you need to leave the room where the vacuum cleaner is being charged, disconnect the charger from the mains by removing the charger plug from the socket. If smoke, odours, etc. are escaping from the charger, remove the charger plug from the socket immediately! The product is supplied with an uncharged battery and should therefore be charged according to the procedure described in the manual before use. Li-ion (lithium-ion) batteries do not have the so-called "memory effect", which allows them to be recharged at any time. However, it is recommended to discharge the battery during normal operation and then charge it to full capacity. If, due to the nature of work, it is not possible to use the battery in such a manner every time, it should be done at least every several work cycles. Never discharge the batteries by closing the battery contacts, as this will cause irreparable damage! Also, do not check the battery charge status by closing the contacts and checking sparking.
Battery storage
If possible, it is recommended to disconnect the battery from the product for storage. Proper storage conditions will help to extend the life of the battery. The battery lasts for about 500 charge-discharge cycles. Store the battery in a temperature range from 0 to 30 degrees Celsius at a relative humidity of 50%. To store the battery for a longer period of time, it should be charged to approx. 70% of its capacity. In case of prolonged storage, the battery should be periodically charged once a year. Do not over-discharge the battery as this will shorten its life and may cause irreparable damage. During storage, the battery will gradually discharge due to leakage. The self-discharge process depends on the storage temperature, the higher the temperature, the faster the discharge process. If the batteries are stored incorrectly, the electrolyte may leak. In case of leakage, secure the leak with a neutralising agent, in case of electrolyte contact with eyes, rinse eyes thoroughly with water, and seek medical attention immediately. It is forbidden to use the device with a damaged battery. If the battery is completely used, return it to a specialist waste disposal centre.
Transport of batteries
Lithium-ion batteries are treated as hazardous materials according to legal regulations. The user of the device can transport the product with the battery and the batteries themselves by land. Additional conditions do not have to be met. If you entrust transport to third parties (e.g. courier service), follow the regulations for the transport of hazardous goods. Before shipping, please contact a qualified person. It is forbidden to transport damaged batteries. During transport, the disassembled batteries should be removed from the product, the exposed contacts should be secured, e.g. sealed with insulation tape. Protect the batteries in the packaging in such a way that they do not move inside the packaging during transport. National regulations for the transport of hazardous materials must also be observed.
Inflating
Set the target pressure before inflating. The device will automatically stop pumping when the target pressure is reached. This method of inflating prevents the accidental exceeding of pressure.
If the maximum pressure of the inflated product is not known, check the product and the documentation attached to it or contact the product manufacturer.
GB
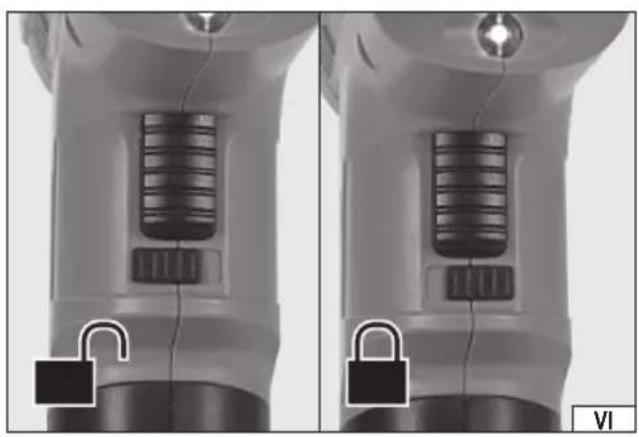
Make sure that the power switch has been locked before starting the device i.e. The lock has been moved to the right as far as it will go when viewed from the front of the compressor (VI).
The product must be started by pressing the button marked SET. You can change the pressure using the buttons marked “+” and “-”. The button marked “+” increases the pressure setting and the button marked “-” decreases the pressure setting. The setting is visible on the display. When the setpoint indication stops flashing, it means that the target pressure has been set.
Install the hose to the gun and, if necessary, the adapter. Install the hose to the product to be inflated.
Unlock the power switch by sliding the lock to the left as far as it will go (VI).
Press and release the pressure on the power switch; the compressor will start pumping. The pressure increase can be observed on the display. When the target pressure is reached, the gun will automatically stop pumping.
The pumping process can also be interrupted manually at any time by pressing the power switch.
When pumping is finished, secure the power switch with a lock against accidental pressing and then disconnect the hose from the pumped product. A short hiss of expanding air may be heard when disconnecting the hose. This is a normal phenomenon of expansion of the air in the hose.
The product is switched off by pressing and holding the SET button until the display goes off.
Changing the pressure unit
When the display is switched on, press the SET button; the indication of the pressure unit changes in the following cycle: PSI – BAR – KPA – KG/CM ^2 . The pressure unit symbol is shown on the display.
MAINTENANCE, TRANSPORT AND STORAGE
The product does not require any special maintenance. Clean the casing of the product with a slightly damp cloth, then dry or leave to dry after finishing work. Never immerse the product in water or any other liquid. Do not use alcohol, acids or corrosive or abrasive agents to clean the product.
Always carry the product by holding the handle or, if there is no handle, by holding the casing. Never carry the product by holding the hose and/or the power cord. Always carry the product unplugged with the plug and the clamps disconnected from the power source.
It is recommended to store and transport the product in the packaging supplied with the product or in other packaging protecting it from moisture and dust. The temperature in the storage place should be in the range of 0 - 40 °C and the relative humidity RH < 85%, without condensation.
GERÄTEBESCHREIBUNG
CARACTÉRISTIQUES DU PRODUIT
- D
- WYPOSAŻENIE PRODUKTU
- PRODUCT CHARACTERISTICS
- PRODUCT EQUIPMENT
- TECHNICAL DATA
- SAFETY INSTRUCTIONS
- PRODUCT OPERATION
- GB
- Charging the battery
- Safety instructions for battery charging
- Battery storage
- Transport of batteries
- Inflating
- Changing the pressure unit
- MAINTENANCE, TRANSPORT AND STORAGE
- GERÄTEBESCHREIBUNG
- CARACTÉRISTIQUES DU PRODUIT
Brand : Yato
Model : YT-82950
Category : Compressor