
WSE3200 - Welding machine SCHEPPACH - Free user manual and instructions
Find the device manual for free WSE3200 SCHEPPACH in PDF.
| Product type | Flux-cored wire welding machine (MIG without gas) |
| Brand | Scheppach |
| Model | WSE3200 |
| Mains voltage | 230 V / 50 Hz |
| Open circuit voltage (U0) | 31 V |
| Working voltage (U2) | 16.25 - 18.5 V |
| Welding current (I2) | 45 - 90 A |
| Duty cycle (X) | 90 A: 10% | 45 A: 60% (per 10 min) |
| Insulation class | H |
| Protection rating | IP21S |
| Thermal protection | Yes (automatic cutoff with indicator light) |
| Wire diameter | 0.6 - 0.9 mm |
| Max coil weight | 1 kg |
| Device weight | 12.5 kg |
| Cooling | Forced air cooling (AF) |
| Delivery contents | Welding machine, torch, ground clamp, shoulder strap, brush/hammer, flux-cored wire spool, welding helmet, manual |
| Main functions | Arc welding with self-shielding flux-cored wire, current adjustment (2 positions), wire feed adjustment, overload protection |
| Maintenance | Regular dry cleaning, no internal maintenance, check cables |
| Wear parts | Ground clamp, torch nozzle, current feed nozzle |
| Safety | Wear gloves, mask, dry clothing; do not use in rain; unplug before maintenance |
Frequently Asked Questions - WSE3200 SCHEPPACH
User questions about WSE3200 SCHEPPACH
0 question about this device. Answer the ones you know or ask your own.
Ask a new question about this device
Download the instructions for your Welding machine in PDF format for free! Find your manual WSE3200 - SCHEPPACH and take your electronic device back in hand. On this page are published all the documents necessary for the use of your device. WSE3200 by SCHEPPACH.
USER MANUAL WSE3200 SCHEPPACH
WSE3200
natural_image
Close-up of a black metal bracket with cutouts and mounting holes (no text or symbols visible)
natural_image
Interior view of a vehicle chassis with mounting feet and a black cylindrical component mounted on the backrest (no text or symbols visible)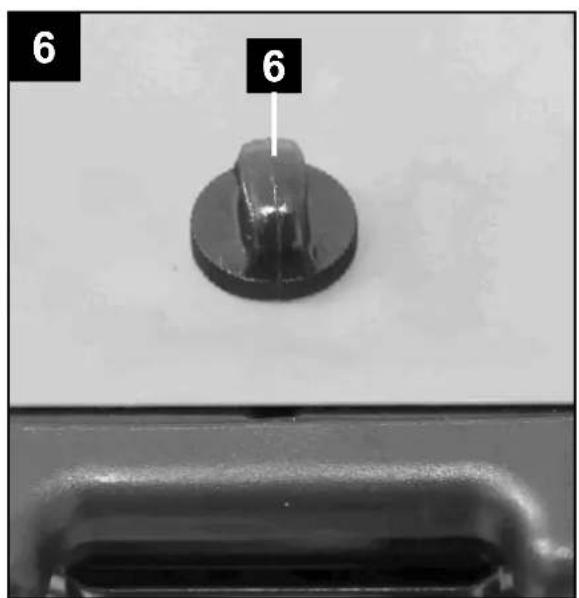


natural_image
Close-up of a black mechanical clamp or bracket component on a metal frame (no visible text or symbols)


natural_image
Close-up of a mechanical clamp or tool with no visible text or symbols, featuring a small inset diagram (no readable text or symbols)
Explanation of the symbols on the equipment
 | Caution - Read the operating instructions to reduce the risk of inquiry |
| EN 60974-1 | European standard for welding sets for manual arc welding with limited on time. |
 | Single-phase transformer |
 | Symbol for self-shielding cored-wire welding |
 | Suitable for welding with increased electric risk |
 | Power input; phase number, as well as Alternating current symbol and rated value of the frequency |
 | Rated idling voltage |
 | Mains voltage |
 | On-load factor |
 | Welding current |
 | Welding voltage [V] |
 | Rated maximum mains current |
 | Effective value of the highest line current [A] |
 | Protection type |
| H | Insulation class |
 | Caution! Risk of electric shock! |
 | Inhaling welding smoke can be hazardous to your health. |
 | Electromagnetic fields can interfere with the functionality of pacemakers. |
 | Welding sparks can cause an explosion or fire. |
 | Arc rays can damage the eyes and injure the skin. |
 | Do not use the device outdoors and never in rain! |
 | Do not throw old equipment away with household waste. |
 | The product complies with the applicable European directives. |
Table of contents: Page:
- Introduction...... 17
- Device description....17
- Scope of delivery....17
- Safety information 18
- Proper use....19
- Technical data 20
- Montage 20
- Function....20
- Starting up....21
- Electrical connection 21
- Maintenance and care....22
- Storage....22
- Disposal and recycling 22
- Troubleshooting 23
1. Introduction
Manufacturer:
scheppach
We hope your new tool brings you much enjoyment and success.
Note:
According to the applicable product liability laws, the manufacturer of the device does not assume liability for damages to the product or damages caused by the product that occurs due to:
- Improper handling,
• Non-compliance of the operating instructions, - Repairs by third parties, not by authorized service technicians,
- Installation and replacement of non-original spare parts,
- Application other than specified,
- A breakdown of the electrical system that occurs due to the non-compliance of the electric regulations and VDE regulations 0100, DIN 57113 / VDE0113.
We recommend:
Read through the complete text in the operating instructions before installing and commissioning the device.
The operating instructions are intended to help the user to become familiar with the machine and take advantage of its application possibilities in accordance with the recommendations.
The operating instructions contain important information on how to operate the machine safely, professionally and economically, how to avoid danger, costly repairs, reduce downtimes and how to increase reliability and service life of the machine.
In addition to the safety regulations in the operating instructions, you have to meet the applicable regulations that apply for the operation of the machine in your country.
Keep the operating instructions package with the machine at all times and store it in a plastic cover to protect it from dirt and moisture. Read the instruction manual each time before operating the machine and carefully follow its information. The machine can only be operated by persons who were instructed concerning the operation of the machine and who are informed about the associated dangers. The minimum age requirement must be complied with.
In addition to the safety notices contained in this operating manual and the particular instructions for your country, the generally recognised technical regulations for the operation of identical devices must be complied with.
We accept no liability for damage or accidents which arise due to non-observance of these instructions and the safety information.
2. Device description (fig. 1 - 2)
- Burner nozzle
- Burner button
- Burner
- Hose assembly with direct connection
- Earth cable with earth clamp
- Locking mechanism
- Carry strap (already attached)
- Cover for wire feeding device
- Combination wire brush with slag hammer
- Cored-wire roll
- Contact tip
- Switch for setting the welding current
- On/off switch
- Overload protection indicator lamp
- Adjusting wheel for wire feed (potentiometer)
- Welding mask
- Plastic frame
- Knurled screws + nuts
- Handle
- Ancillary glass
- Protective glass for the welding mask
3. Scope of delivery
- Welding machine
- Hose assembly, complete
- Earthing clamp, complete
- Carrying strap
- Combination wire brush
- Cored-wire roll
- Welding mask, complete
- Operating manual
Unpacking
- Open the packaging and remove the device carefully.
- Remove the packaging material as well as the packaging and transport bracing (if available).
- Check that the delivery is complete.
- Check the device and accessory parts for transport damage.
- If possible, store the packaging until the warranty period has expired.
ATTENTION
The device and packaging materials are not toys! Children must not be allowed to play with plastic bags, film and small parts! There is a risk of swallowing and suffocation!
Important information
Please read the directions for use carefully and observe the information provided. It is important to consult these instructions in order to acquaint yourself with the machine, its proper use and safety precautions.
4. Safety information
Please note
IMPORTANT
Use this equipment only for the purpose for which it is designed, as described in these instructions.
Handling this system incorrectly may be hazardous for persons, animals and property. The user of this system is responsible for his/her own safety and for the safety of others. Read these operating instructions and follow all the regulations.
- This device is not designed to be operated by persons (including children) with impaired physical, sensory or mental capabilities, or who have insufficient experience and/or insufficient knowledge unless they are being supervised by a person who is responsible for their safety or they are receiving instructions about how this device is to be used. It is forbidden for children to use this device!
- Repairs and/or maintenance work must be left strictly to qualified personnel.
- For your own safety, use only accessories and additional equipment that are expressly cited in the operating manual or have been recommended by the manufacturer.
- Ensure that the appliance is looked after properly. To ensure that sufficient air can be drawn in through the ventilation slits, the appliance should not be constricted or placed next to a wall while it is operating.
- Make sure that the appliance is correctly connected to the mains supply. Do not subject the mains lead to any tensile stress.
- Unplug the appliance before you change its position.
- Pay attention to the condition of the welding cable, the contact tip, the burner and the earthing clamp. Wear on the insulation or on the parts carrying the electrical power can lead to a hazardous situation and reduce the quality of the welding work.
- Arc welding generates sparks, molten metal particles and smoke, so the following is required: Remove all inflammable substances and/or materials from the working area.
- Ensure that there is adequate ventilation.
- Do not weld on tanks, vessels or pipes that have contained inflammable liquids or gases.
- Avoid direct contact with the welding circuit. The off-load voltage arising between the contact tip and the earthing clamp can be dangerous.
- Do not store or use the appliance in wet or damp conditions or in the rain.
- Protect your eyes with specially designed goggles (DIN EN 166 & DIN EN 169 degree of protection 9-10). Wear gloves and dry safety clothing that are not contaminated by any oil or grease to ensure that your skin is not exposed to ultraviolet radiation from the arc.
- Do not use this welder to defrost pipes
- Always pay attention and watch what you are doing. Never carry out work with this device if you are distracted or under the influence of drugs, alcohol or medication. Just a moment of carelessness when using this device can result in serious accidents and injuries.
Remember!
- The radiation from the arc can damage your eyes and cause burns on skin.
- Arc welding generates sparks and droplets of molten metal; the welded workpiece may start to glow and will remain very hot for a relatively long period of time.
- Arc welding releases vapors that may be harmful.
• Every electric shock is potentially fatal. - Do not approach the arc within a radius of 15 m unprotected.
- Protect yourself (and others around you) against the possible hazardous effects of the arc.
- Warning: Depending on the mains connection conditions at the connection point of the welding set, other consumers connected to the mains may suffer faults.
- Protect yourself and others in the vicinity from the hazardous effects of the electric arc.
Important!
If the supply mains and circuits are overloaded, other consumers may suffer interference during the welding work. If you have any doubts, contact your electricity supply company.
Sources of danger during arc welding
Arc welding results in a number of sources of danger. It is therefore particularly important for the welder to comply with the following rules so as not to place himself or others in danger and to avoid endangering people and equipment.
- Have all work on the mains voltage system, for example on cables, plugs, sockets, etc., performed only by trained electricians. This particularly applies to configuring intermediate cables.
- If an accident occurs, disconnect the welding power source from the mains immediately.
- If electric touch voltages occur, switch off the welding set immediately and have it checked by an expert.
- Always check for good electrical contacts on the welding current side.
- Wear insulating gloves on both hands for welding. These offer protection from electric shocks (idling voltage in the welding circuit), harmful radiation (Heat and UV radiation) and from glowing metal and slag spatter.
- Wear firm, insulated footwear. Your shoes should also protect you in wet conditions. Open toe footwear is not suitable since falling droplets of glowing metal will cause burns.
-
Wear suitable clothing, do not wear synthetic clothes.
-
Do not look into the arc with unprotected eyes, use only a welding safety shield with the proper safety glass in compliance with (DIN EN 166 & DIN EN 169 degree of protection 9-10) standards. In addition to light and heat, which may cause dazzling and burns, the arc also gives off UV radiation. Without proper protection, this invisible ultraviolet radiation causes very painful conjunctivitis, which will only be noticeable several hours later. In addition, UV radiation will cause sunburn-type symptoms on unprotected parts of the body.
- Also, persons in the vicinity of the electric arc must be advised of the hazard and equipped with the necessary protective equipment. Protective partitions or walls may have to be erected.
- Ensure adequate ventilation for welding, particularly in small rooms since the process causes smoke and harmful gases.
- Do not carry out any welding work on tanks that have been used to store gases, fuels, mineral oil or the like, even if they have been empty for a lengthy period of time, since any residue will result in a danger of explosion.
- Special regulations apply in areas where there is a potential risk of fire and/or explosion.
- Welds that are exposed to large stresses and must comply with safety requirements may only be completed by specially trained and approved welders. Examples of such welds include pressure vessels, rails, trailer hitches, etc.
- Note: It must be noted that the protective conductor in electrical systems of appliances may be destroyed by the welding current in the event of negligence, for example if the earth terminal is placed on the welding set casing to which the protective conductor of the electrical system is connected. The welding work is completed on a machine with a protective conductor connection.
- The fuses on the supply cables to the mains sockets must comply with the relevant regulations. To comply with these regulations, only fuses or circuit breakers suitable for the cross-section of the cables may be used. The use of too high a fuse may result in the cable burning and fire damage to the building.
Constricted and wet areas
When working in constricted, wet or hot areas, use insulating supports and intermediate layers as well as slip-on gloves made of leather or other nonconductive materials to insulate your body against the floor, walls, conductive parts of the machine and the like.
If you use small welding transformers for welding in places with an increase electrical risk, for example in constricted areas with conductive walls, (tanks, pipes, etc.), in wet areas (which make work clothes wet) and in hot areas (perspiration on work clothes), the output voltage of the welding set when idling must not exceed 48 V (effective value). Therefore, the appliance may not be used for these purposes because its output voltage is higher than this.
Safety clothing
- While working, the welder must protect his entire body from radiation and burns by wearing suitable clothing and a face guard.
- Slip-on gloves made of a suitable material (leather) must be worn on both hands. They must be in perfect condition.
- Suitable aprons must be worn to protect clothing from sparks and burns. A safety suit and, if necessary, head protection must be worn if required by the type of work in question, e.g. overhead welding.
- The protective clothing used as well as all accessories must be in compliance 89/686/EWG with the "Personal safety equipment" EU Directive.
Protection from radiation and burns
- Provide information about the risk to eyes at the working site in the form of a poster with the wording "Caution – do not look at the flames". Workplaces are to be screened off wherever possible so that personnel in the vicinity are protected. Unauthorized persons are to be kept away from the welding work.
- The walls in the immediate vicinity of stationary workplaces should not have a light color or a sheen. Windows up to head height are to be protected against radiation passing through them or reflecting off them, for example by coating them with a suitable paint.
- Flying welding sparks can cause painful burns and so the following instructions must be observed:
- Always wear a protective leather apron
- Always wear leather gloves
- Wear suitable headgear for overhead welding work
- Always wear sturdy and insulated footwear
Risk of injury from flying pieces of slag
The slag is hard and brittle once solidified. Afterwards, this will be smashed to small sharp-edged pieces with the slag hammer. These can cause dangerous eye injuries. For this reason, protect your eyes with suitable protective goggles when removing the slag.
Indirect electrical contact
Injuries due to live parts in the event of electrical parts being opened up or being defective. Always pull out the mains plug before carrying out maintenance work. Only operate via an RCD breaker.
5. Proper use
The machine is to be used only for its prescribed purpose. Any other use is deemed to be a case of misuse. The user / operator and not the manufacturer will be liable for any damage or injuries of any kind caused as a result of this.
Please note that our equipment has not been designed for use in commercial, trade or industrial applications. Our warranty will be voided if the machine is used in commercial, trade or industrial businesses or for equivalent purposes.
Pacemakers
Persons using an electronic life support device (e.g. a pacemaker) should consult their doctor before they go near electric sparking, cutting, burning or spot-welding equipment in order to be sure that the combination of magnetic fields and high electric currents does not affect their devices.
6. Technical data
| Mains voltage U_1 | 230 V / 50 Hz |
| Off-load voltage U_0 | 31 V |
| Working voltage U_2 | 16,25 - 18,5 V |
| Welding current I_2 | 45 - 90 A |
| Duty cycle X | 90 A ~ 10%45 A ~ 60% |
| Safeguarding 16 A | |
| Protection category H | |
| Insulation class IP 21S | |
| Type of cooling AF | |
| Welding wire ∅ 0,6 - 0,9 mm | |
| Weight of the welding wire reel | max. 1 kg |
| weight 12.5 kg | |
Subject to technical changes!
Duty cycle X
Based on a ten minute period for example, this means that it is permitted to weld continuously at 60% for six minutes and then the machine must be allowed to cool for four minutes.
7. Montage
Installing the welding shield (Fig. 2 + 3 + 4 + 5)
- Place the ancillary glass (20) in the recess in the welding mask. Then place the protective glass (21) on the ancillary glass and fasten it in place with the plastic frame (17).
- Fasten the frame in place by turning the fasteners (3a).
- Fasten the handle (19) onto the welding mask using the three knurled screws and nuts (18).
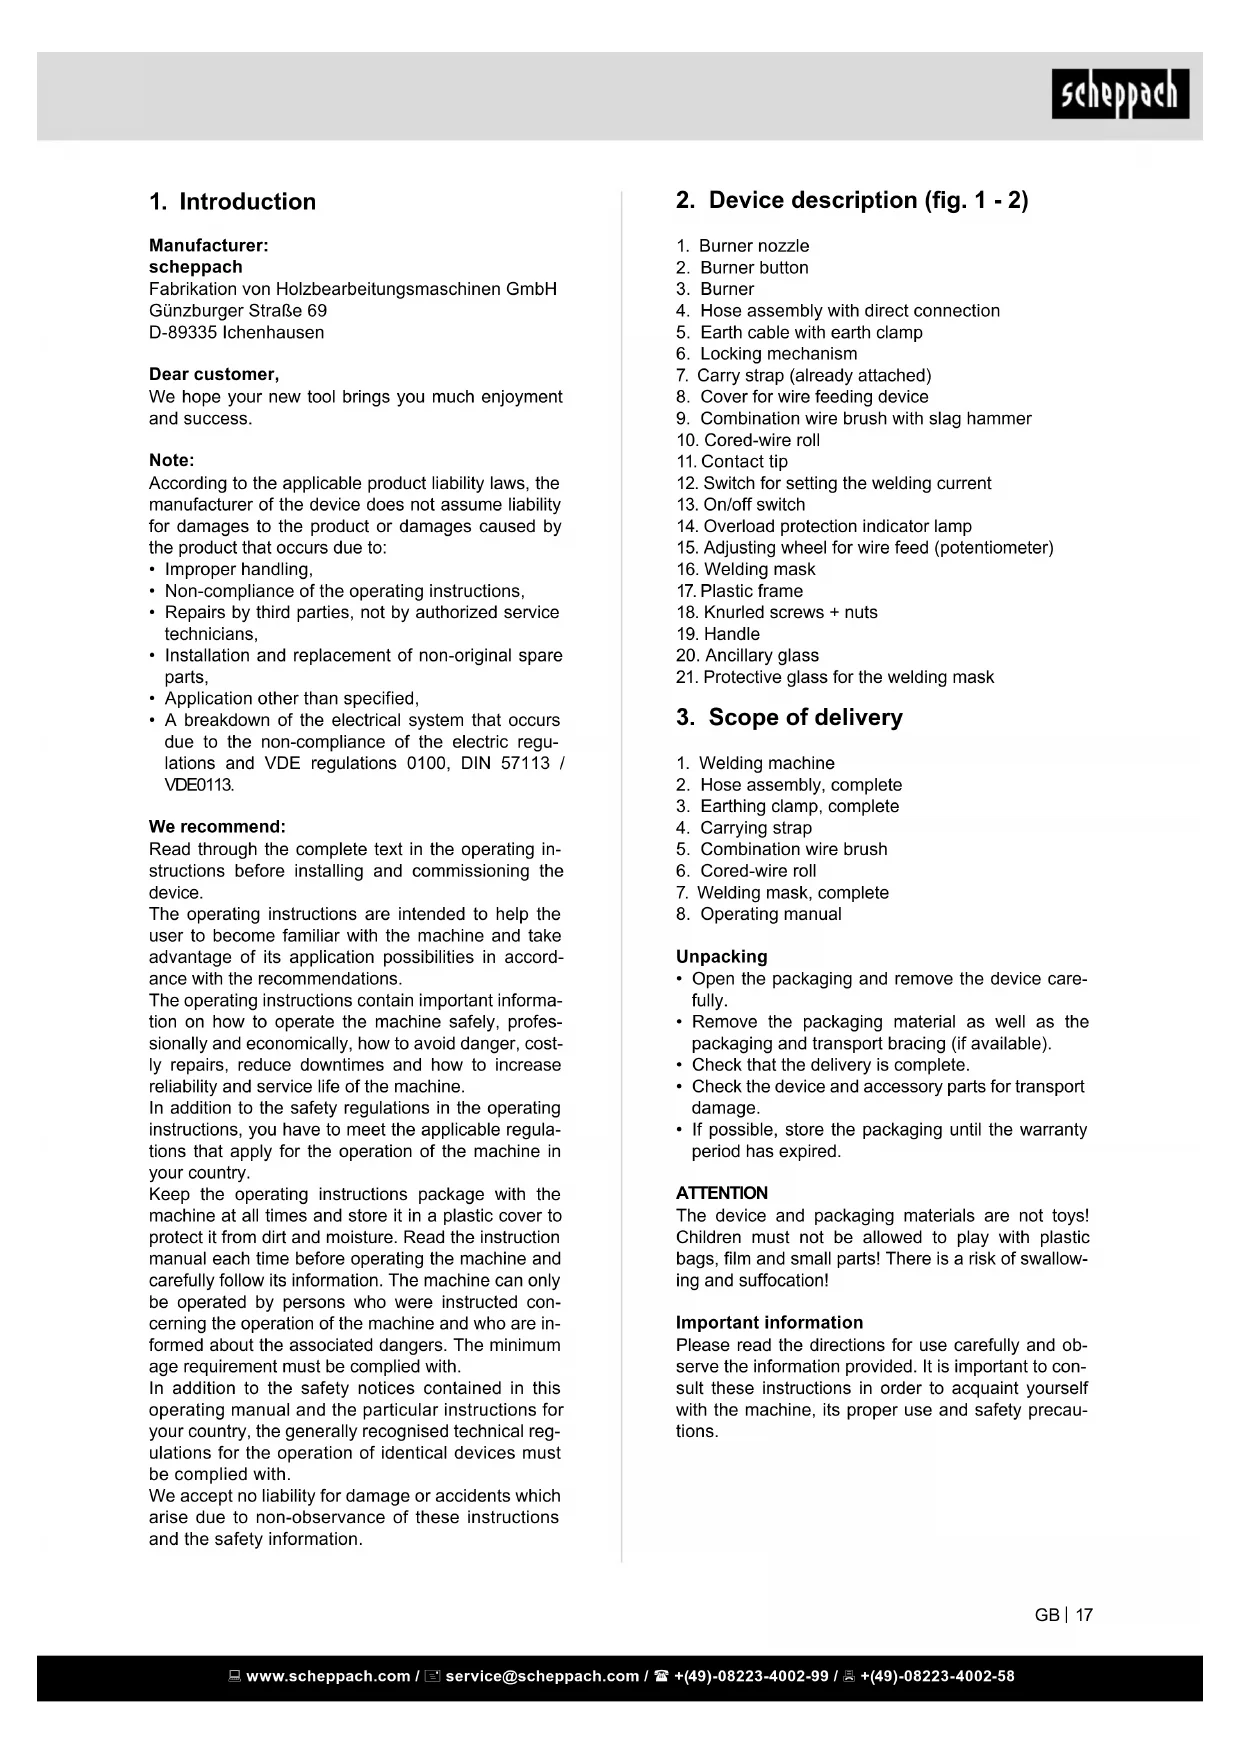
Installing the welding wire reel (fig. 6 - 13)
- Open the cover for the wire feeding device (8) by turning the lock (6) clockwise and folding the cover upwards.
- Now you can see the wire feeding device and the welding wire reel (fig. 7).
- Unlock the reel mounting by turning it 90° counterclockwise and then pull it off the shaft.
- Remove all packaging from the wire reel (10) so that it can unroll freely.
-
Fit the wire reel (10) onto the reel mounting. Ensure that the reel will unwind on the same side as the wire guide (7c).
-
Now press the adjusting screw (7b) upwards and slide the pressing roller (7a) to the side (Fig. 9).
- Unscrew cover (7d) to check the feed roller (10a).
- The corresponding wire thickness is marked on the top side of the feed roller (fig. 10). If the size stipulated there does not match with the actual wire thickness, turn the feed roller or replace it if necessary.
- Now take the wire end off the edge of the reel and trim it with side cutters or wire shears. Ensure that the wire does not become loose or unroll.
- Now feed the wire through the wire guide (7c) along the feed roller and into the hose assembly fitting.
- Tension the pressing roller (7a) again.
- Remove the burner nozzle (1) by simply pulling it off. Unscrew the contact tip (11) too.
- Route the hose assembly (4) as straight as possible as it runs away from the welding machine.
- Switch the welding machine on by setting the on/off switch (13) to the "ON" position.
- Now press the burner button (2) to activate the wire feed. Press the button until the wire emerges from the front of the burner. When doing so, pay attention to the feed roller. If this is slipping, re-tension the pressing roller (7a) with the adjusting screw (7b).
- Do not touch the welding wiring during this procedure as there is a risk of injury with this!
- As soon as the wire projects ca. 5 cm from the front, release the burner button again. Then switch the machine off again and pull out the mains plug!
- Now, screw the contact tip (11) on again and ensure that the contact tip matches with the diameter of the welding wire used.
- Finally, re-attach the burner nozzle (1).
8. Function
On / Off switch
Switch the device on by setting the on/off switch (13) to "ON". The switch (13) illuminates. Switch the device off by setting the on/off switch (13) to "OFF". The switch (13) is no longer illuminated.
Welding current
The desired welding current can be selected with the switch (12). If the switch is set to the top position, the welding current is 90A and the duty cycle is 10%. If switched to the bottom position, the welding current is 45A with a duty cycle of 60%.
Wire feed
In order to achieve constant welding, the adjustment wheel (15) can be used for the fine adjustment of the wire feed. It is recommended to start with a medium setting and then reduce or increase the feed rate if required.
Overload protection
The welding machine is equipped with a thermal protective device, which interrupts the welding current supply automatically as soon as a higher temperature is reached. In this case, the indicator lamp (14) illuminates. If the overload protection device is triggered, allow to device to cool down for ca. 15 min. Once the indicator lamp has extinguished, the device is ready for use again.
9. Starting up
Connecting to the mains power supply
Before you connect the power cable to the mains power supply, make sure that the data on the rating plate is the same as that for your mains supply.
Connect the machine to a properly installed protective contact socket, with at least 16A circuit breaker.
Danger! The mains plug may only be replaced by a qualified electrician.
Welding preparations
Connect the earth terminal (5) direct to the part to be welded or to the support on which the part is resting. Ensure that the earth terminal is in direct contact with the part to be welded. You should therefore avoid coated surfaces and/or insulated materials.
The electrode holder cable has a special clamp at one end, which is used to secure the electrode.
The welding safety shield must be used at all times for welding. It protects your eyes from the radiation emitted by the arc and nevertheless enables you to watch the welding process.
Welding
- Put on appropriate clothing for welding, see „Protective clothing“ point.
- Switch the device on.
- Select the desired welding current and the wire feed rate to suit the welding wire diameter, the material thickness and the desired penetration depth.
- Hold the welding mask in front of your face and guide the burner nozzle to the point on the workpiece that you wish to weld and actuate the burner switch to create the electric arc.
- Once the arc is lit, the device feeds wire into the weld pool. If the spot is large enough, guide the burner slowly along the desired edge. The distance between the burner nozzle and the workpiece should be kept as short as possible (never larger than 10 mm). If necessary, swing the burner nozzle slightly in order to enlarge the weld pool a little.
- For those with little experience, the initial difficulty lies in creating a stable electric arc. This means the correct setting of welding current and wire feed rate.
-
The optimum setting of the welding current and wire feed rate can be determined by trial and error on a test piece.
-
A well adjusted electric arc creates a soft, even buzzing sound. The penetration depth should be as deep as possible but the weld pool should not drop through the workpiece.
- If there is a rough or hard crackling sound, reduce the wire feed rate or switch to a higher power level (increase welding current). If the wire feed rate is too high and/or the welding current is too low, the welding wire cannot melt properly and repeatedly dips into the weld pool on the workpiece.
- A quiet, muffled sound with a flickering electric arc indicates that the wire feed rate is too low. Increase the wire feed rate or switch to the lower welding current setting. If the welding current is too high, the wire melts before it has even reached the weld pool. This results in drops forming on the welding wire as well as a sputtering and unsettled arc.
- The slag should only be removed from the seam once it has cooled. If continuing with an interrupted weld seam, the slag should first be removed from the point of attachment. The electric arc is struck in the weld groove, guided to the connection point, properly melted there and then continued along the weld seam.
- Attention! Always used tongs to move hot, welded workpieces. Ensure that the burner is always set down on an insulated surface after welding. Always switch the welding machine off and pull out the plug after the welding work is complete and during breaks.
10. Electrical connection
The electrical motor installed is connected and ready for operation. The connection complies with the applicable VDE and DIN provisions.
The customer's mains connection as well as the extension cable used must also comply with these regulations.
Damaged electrical connection cable
The insulation on electrical connection cables is often damaged.
This may have the following causes:
- Passage points, where connection cables are passed through windows or doors.
- Kinks where the connection cable has been improperly fastened or routed.
- Places where the connection cables have been cut due to being driven over.
- Insulation damage due to being ripped out of the wall outlet.
- Cracks due to the insulation ageing.
Such damaged electrical connection cables must not be used and are life-threatening due to the insulation damage.
Check the electrical connection cables for damage regularly. Make sure that the connection cable does not hang on the power network during the inspection.
Electrical connection cables must comply with the applicable VDE and DIN provisions. Only use connection cables with the marking „H05VV-F“.
The printing of the type designation on the connection cable is mandatory.
AC motor
- The mains voltage must be 230 V\~
- Extension cables up to 25 m long must have a cross-section of 1.5 mm ^2 .
Replacing the power cable
Danger!
If the power cable for this equipment is damaged, it must be replaced by the manufacturer or its after-sales service or similarly trained personnel to avoid danger.
Connections and repairs of electrical equipment may only be carried out by an electrician.
Please provide the following information in the event of any enquiries:
Type of current for the motor
• Machine data - type plate
• Machine data - type plate
11. Maintenance and care
Danger!
Always pull out the mains power plug before starting any cleaning work.
Cleaning
Keep all safety devices, air vents and the motor housing free of dirt and dust as far as possible. Wipe the equipment with a clean cloth or blow it with compressed air at low pressure.
We recommend that you clean the device immediately each time you have finished using it.
Clean the equipment regularly with a moist cloth and some soft soap. Do not use cleaning agents or solvents; these could attack the plastic parts of the equipment. Ensure that no water can seep into the device. The ingress of water into an electric tool increases the risk of an electric shock.
Maintenance
There are no parts inside the equipment which require additional maintenance.
Service information
Please note that the following parts of this product are subject to normal or natural wear and that the following parts are therefore also required for use as consumables.
Wear parts*: Earth clamp, burner nozzle, contact tip
* Not necessarily included in the scope of delivery!
12. Storage
Store the device and its accessories in a dark, dry and frost-proof place that is inaccessible to children. The optimum storage temperature is between 5 and 30°C.
Store the electrical tool in its original packaging. Cover the electrical tool in order to protect it from dust and moisture.
Store the operating manual with the electrical tool.
13. Disposal and recycling
The equipment is supplied in packaging to prevent it from being damaged in transit. The raw materials in this packaging can be reused or recycled. Never place batteries in your household refuse, in fire or in water. Batteries should be collected, recycled or disposed of by environment-friendly means.
The equipment and its accessories are made of various types of material, such as metal and plastic. Defective components must be disposed of as special waste. Ask your dealer or your local council.
Old devices must not be disposed of with household waste!

This symbol indicates that this product must not be disposed of together with domestic waste in compliance with the Directive (2012/19/EU) pertaining to waste electrical electronic equipment (WEEE). This product must be posed of at a designated collection point. This is cur, for example, by handing it in at an author-collecting point for the recycling of waste elec-and electronic equipment. Improper handling the equipment may have negative consequences the environment and human health due to poly hazardous substances that are often con- in electrical and electronic equipment. By poly disposing of this product, you are also con- ing to the effective use of natural resources
You can obtain information on collection points for waste equipment from your municipal administration, public waste disposal authority, an authorised body for the disposal of waste electrical and electronic equipment or your waste disposal company.
14. Troubleshooting
The table below contains a list of error symptoms and explains what you can do to solve the problem if your tool fails to work properly. If the problem persists after working through the list, please contact your nearest service workshop.
| Malfunction Possible cause Remedy | ||
| The machine will not switch on | No mains voltage | Check the socket, mains cable, cable, mains plug; have these repaired by a qualified electrician if necessary. |
| The main fuse has tripped Check the main fuse | ||
| On / off switch defective Repair by customer service department | ||
| Motor defective Repair by customer service department | ||
| No ignition spark | Earth clamp not connected to the device / Earth clamp not fitted on the workpiece | Connect the earth clamp to the welding machine / Fit the earth clamp on the workpiece |
Günzburger Straße 69
D-89335 Ichenhausen
Cher client,
Sécurité anti-surcharge
Günzburger Straße 69
D-89335 Ichenhausen
Austatud klient!
Günzburger Straße 69
D-89335 Ichenhausen
Arvoisa asiakas
CE - Declaration of Conformity
CORED-WIRE WELDING MACHINE - WSE3200
| 2014/29/EU | 2004/22/EC | 89/686/EC_96/58/EC | 2000/14/EC_2005/88/EC | ||||
| X | 2014/35/EU | 2014/68/EU | 90/396/EC | ||||
| X | 2014/30/EU | X | 2011/65/EU* | ||||
| Annex V | |||||||
| Annex VINoise: measured L_WA = xx dB(A); guaranteed L_WA = xx dB(A)P = xx KW; L/∅ = cmNotified Body:Notified Body No.: | |||||||
| 2006/42/EC | |||||||
| Annex IVNotified Body:Notified Body No.:Certificate No.: | 2010/26/EC | ||||||
| Emission. No: | |||||||
Standard references:
EN 60974-1:2012; EN 60974-10:2014; EN 12100:2010;
This declaration of conformity is issued under the sole responsibility of the manufacturer.
CE - Declaration of Conformity
| X | 2014/29/EU | 2004/22/EC | 89/686/EC_96/58/EC | 2000/14/EC_2005/88/EC | |||
| 2014/35/EU | 2014/68/EU | 90/396/EC | Annex V | ||||
| 2014/30/EU | 2011/65/EU* | Annex VINoise: measured L_WA = xx dB(A); guaranteed L_WA = xx dB(A)P = xx KW; L/∅ = cmNotified Body:Notified Body No.: | |||||
| 2006/42/EC | |||||||
| Annex IVNotified Body:Notified Body No.:Certificate No.: | 2010/26/EC | ||||||
| Emission. No: | |||||||
Standard references:
EN 175:1997-08; EN 166:2002-04; EN 169:2003-02;
This declaration of conformity is issued under the sole responsibility of the manufacturer.


- Table of contents: Page:
- Introduction
- Manufacturer:
- scheppach
- Note:
- We recommend:
- Device description (fig. 1 - 2)
- Scope of delivery
- Unpacking
- ATTENTION
- Important information
- Safety information
- IMPORTANT
- Remember!
- Important!
- Sources of danger during arc welding
- Constricted and wet areas
- Safety clothing
- Protection from radiation and burns
- Risk of injury from flying pieces of slag
- Indirect electrical contact
- Proper use
- Pacemakers
- Technical data
- Duty cycle X
- Montage
- Installing the welding shield (Fig. 2 + 3 + 4 + 5)
- Installing the welding wire reel (fig. 6 - 13)
- Function
- On / Off switch
- Welding current
- Wire feed
- Overload protection
- Starting up
- Connecting to the mains power supply
- Welding preparations
- Welding
- Electrical connection
- Damaged electrical connection cable
- AC motor
- Replacing the power cable
- Danger!
- Maintenance and care
- Cleaning
- Maintenance
- Service information
- Storage
- Disposal and recycling
- Old devices must not be disposed of with household waste!
- Troubleshooting
- Cher client,
- Sécurité anti-surcharge
- Austatud klient!
- Arvoisa asiakas
- CE - Declaration of Conformity
- Standard references:
Brand : SCHEPPACH
Model : WSE3200
Category : Welding machine