MINK - Car seat Kindercraft - Free user manual and instructions
Find the device manual for free MINK Kindercraft in PDF.
| Product type | Child car seat (group 0+, 0-13 kg) |
| Dimensions (L x W x H) | Approximately 44 x 67 x 58 cm (estimate) |
| Product weight | Approximately 5 kg (estimate) |
| Use | Rear-facing only |
| Safety standard | UN ECE Regulation No. 44 (group 0+) |
| Vehicle attachment | Three-point seat belt with retractor |
| Child restraint system | Height-adjustable 5-point harness |
| Additional functions | Rocker, bouncer, sun canopy, removable reducer |
| Stroller compatibility | Compatible Maxi-Cosi® adapters (subject to change) |
| Materials | Plastic, foam, fabric (removable cover) |
| Cover care | Hand wash below 30°C, mild detergent, air dry |
| Plastic parts care | Water and mild soap, avoid solvents |
| Belt care | Water and mild soap |
| Spare parts available | Cover, sun canopy, reducer, shoulder pads |
| Warranty | 24 months, extendable to 120 months upon registration (www.kinderkraft.com) |
| Brand | Kindercraft |
| Model | MINK |
Frequently Asked Questions - MINK Kindercraft
User questions about MINK Kindercraft
0 question about this device. Answer the ones you know or ask your own.
Ask a new question about this device
Download the instructions for your Car seat in PDF format for free! Find your manual MINK - Kindercraft and take your electronic device back in hand. On this page are published all the documents necessary for the use of your device. MINK by Kindercraft.
USER MANUAL MINK Kindercraft
text_image
See HOW TO use me!at youtube.com/kinderkraftofficial or kinderkraft.com
natural_image
Illustration of a baby car seat with black straps and blue buttons (no text or symbols)CZ NÁVOD K OBSLUZE
text_image
Anatomical diagram of a medical device with labeled parts, including a top view and a side-view illustration.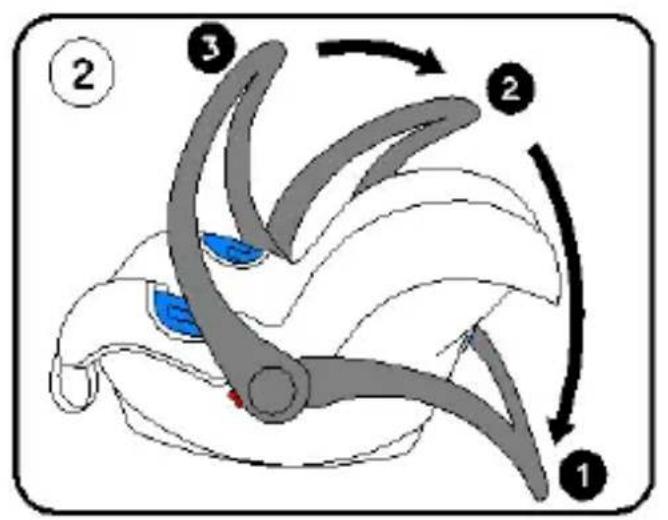
flowchart
graph TD
    A["Step 1"] --> B["Step 2"]
    B --> C["Step 3"]
    C --> D["Step 2"]
    D --> E["Step 3"]
    E --> F["Step 2"]
    style A fill:#f9f,stroke:#333
    style B fill:#bbf,stroke:#333
    style C fill:#bfb,stroke:#333
    style D fill:#ffb,stroke:#333
    style E fill:#fbb,stroke:#333
natural_image
Illustration of a car seat with blue and red buttons, no text or symbols present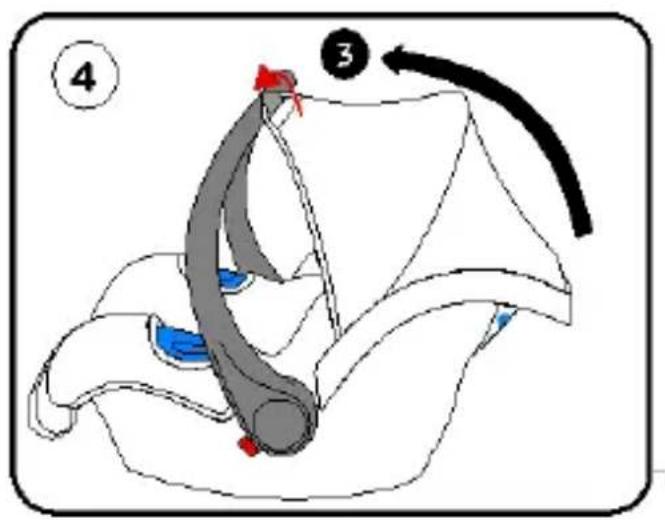
text_image
Medical diagram showing a surgical procedure with labeled steps 3 and 4, including anatomical structures and color-coded zones.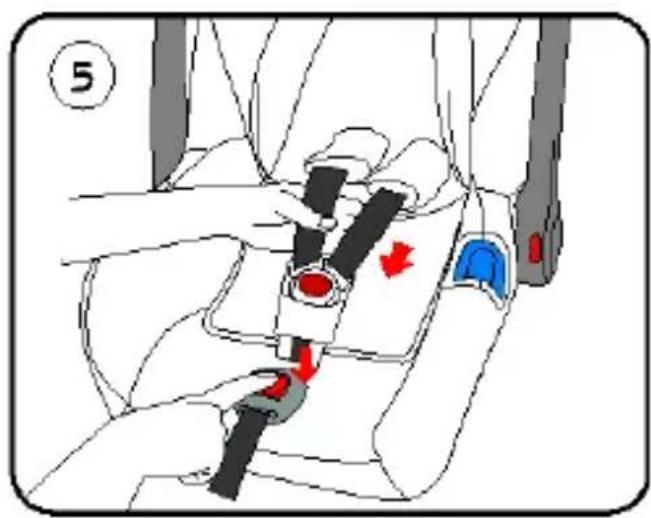
text_image
⑤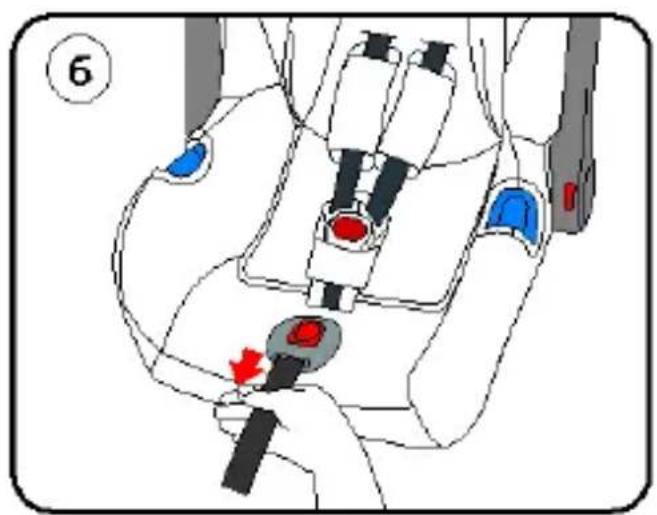
text_image
6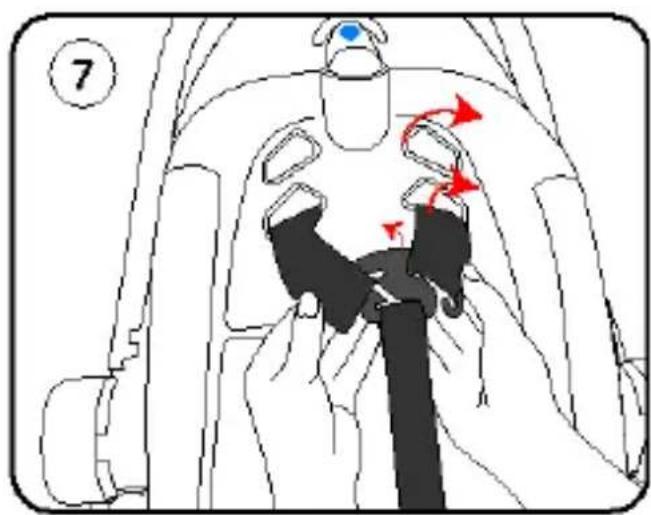
text_image
7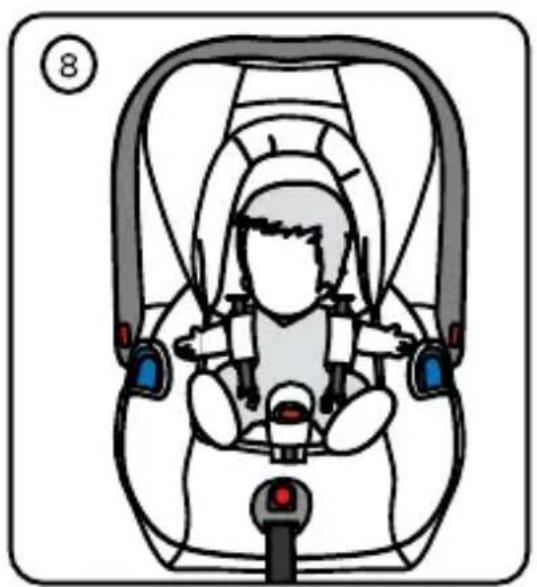
natural_image
Illustration of a person inside a car seat with blue and red buttons, no text or symbols present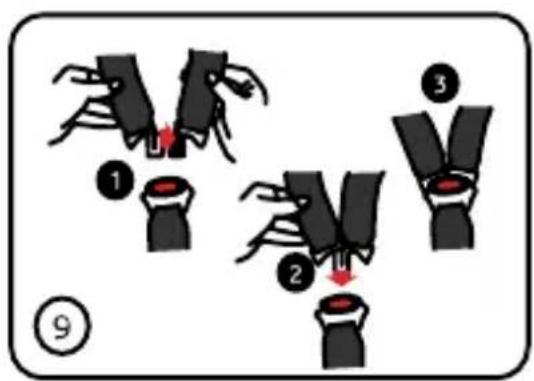
text_image
Diagram illustrating three-step mechanical assembly steps with numbered components and red arrows indicating motion direction.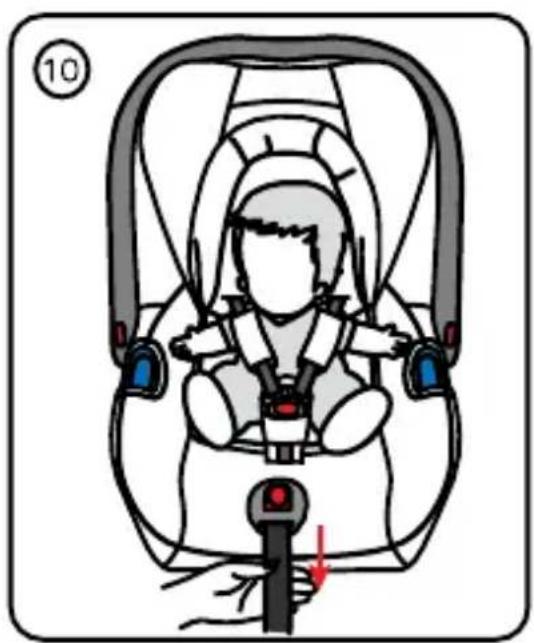
natural_image
Illustration of a person inside a car seat with a red arrow indicating the seatbelt (no text or symbols)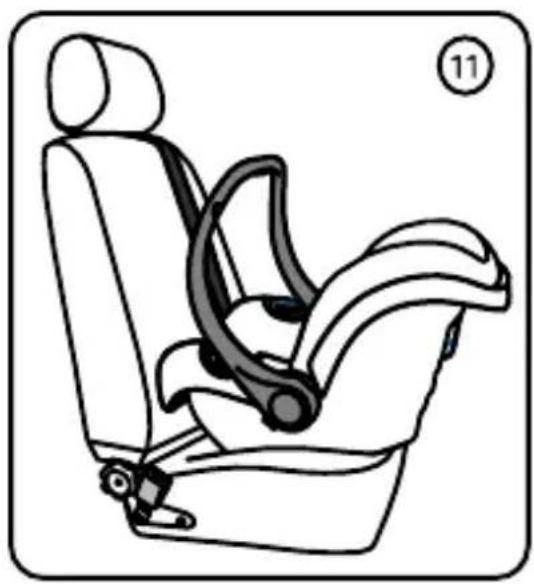
natural_image
Line drawing of a car seat with a seatbelt and seatbelt buckle, no text or symbols present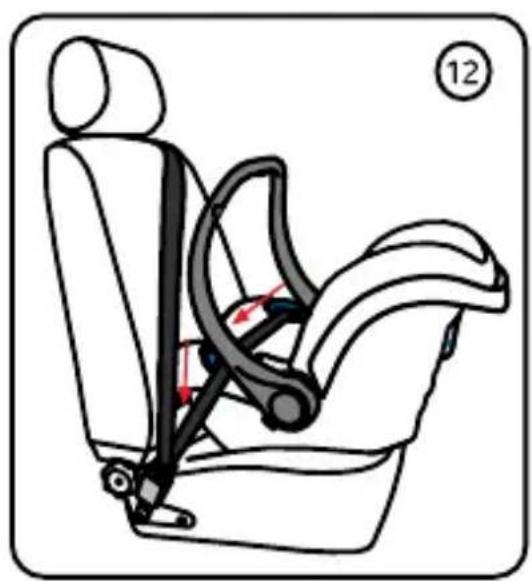
natural_image
Illustration of a car seatbelt with a belt buckle and seat, no text or symbols present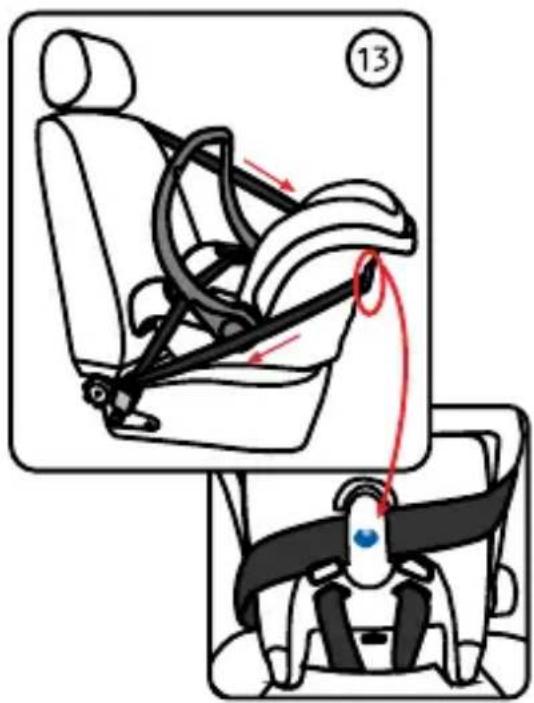
text_image
Diagram illustrating car seatbelt usage with numbered instructions and directional arrows indicating movement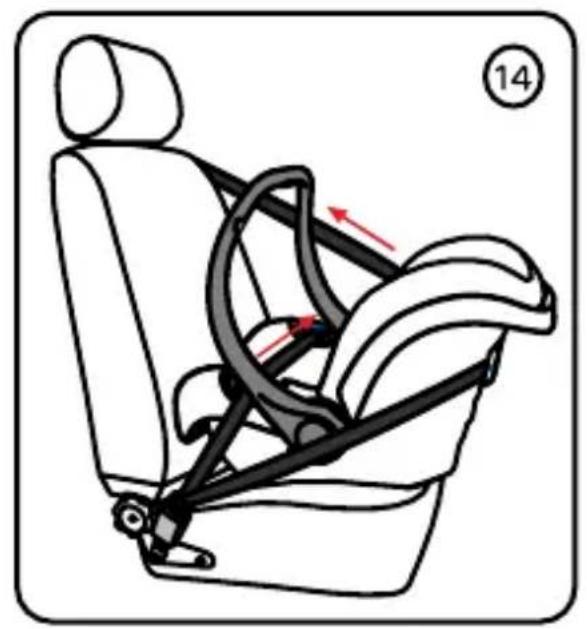
natural_image
Diagram of a car seatbelt with red arrows indicating motion or force, no text or symbols present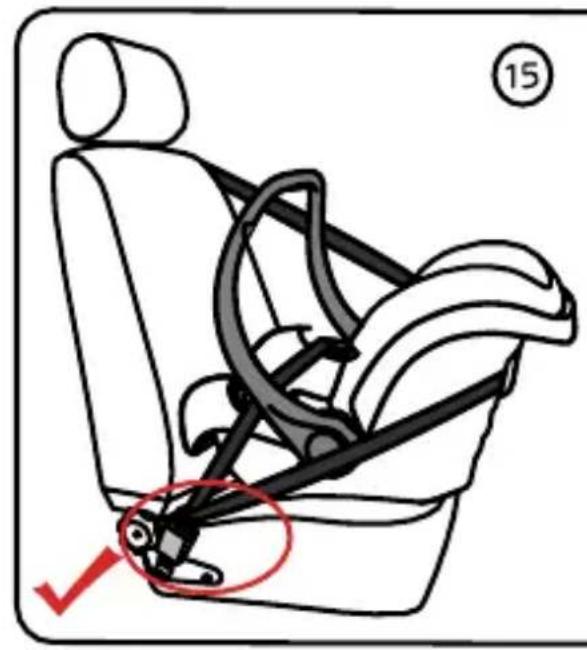
text_image
Diagram of car seatbelt mechanism with numbered label (15) and red checkmark indicating a specific seatbelt component.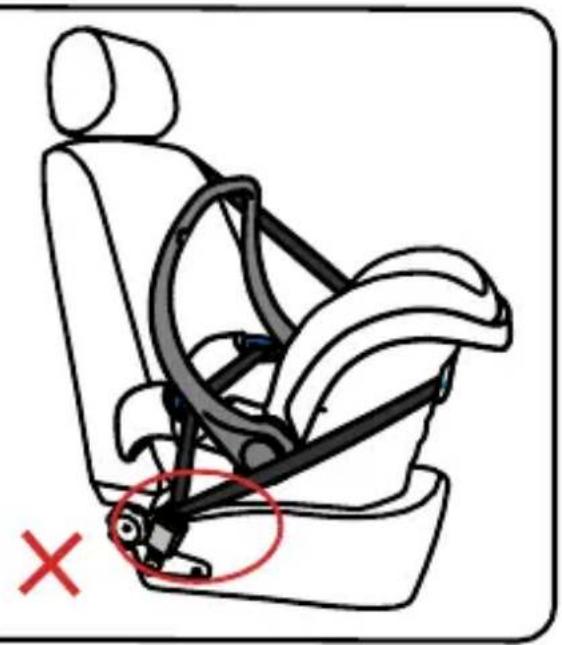
natural_image
Line drawing of a car seat with a red X mark indicating the angle of the seat (no text or symbols present)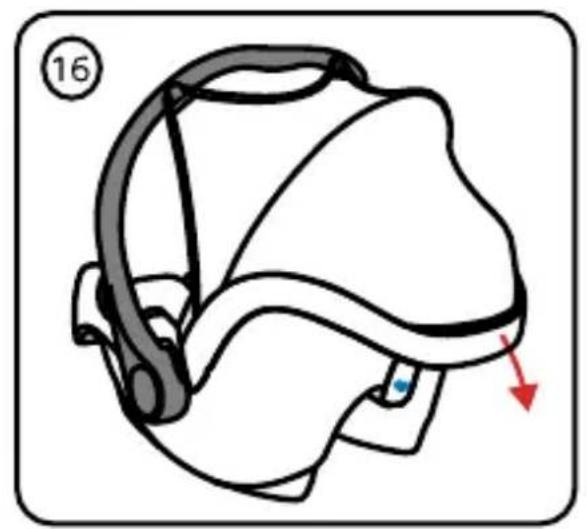
natural_image
Line drawing of a helmet with a red arrow indicating motion (no text or symbols)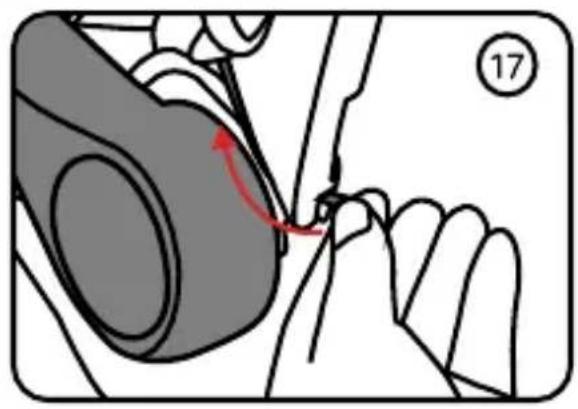
text_image
Diagram showing a mechanical assembly with a red arrow indicating direction and numbered label 17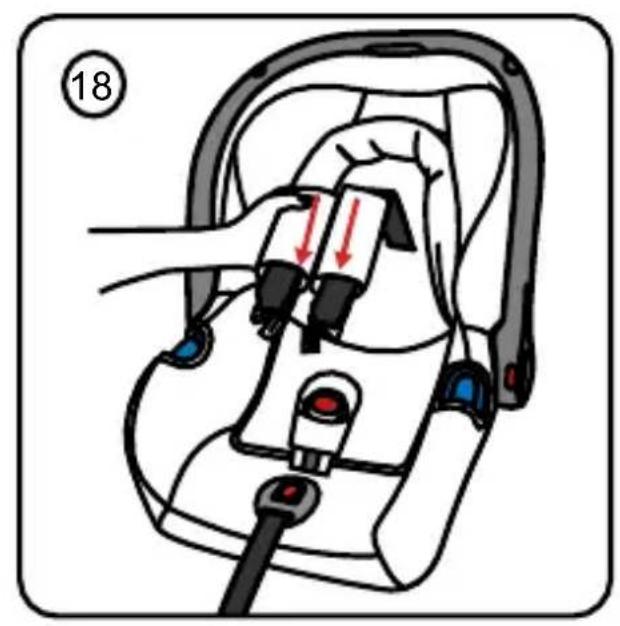
text_image
18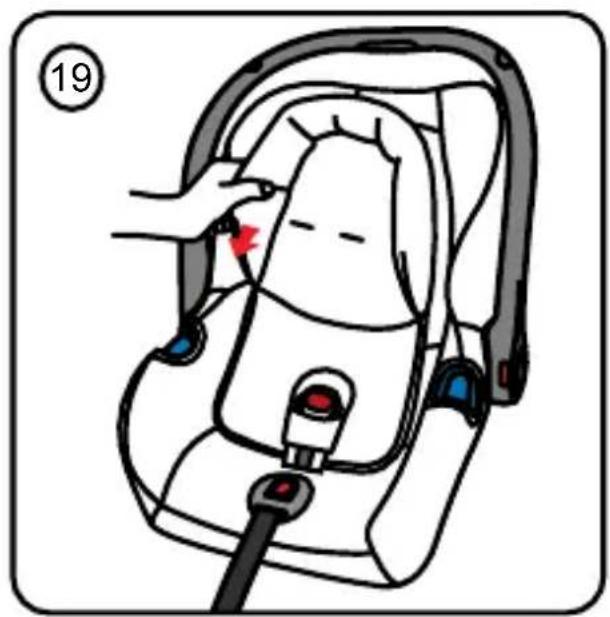
natural_image
Illustration of a car seatbelt with a hand adjusting the seatbelt, showing no text or symbols.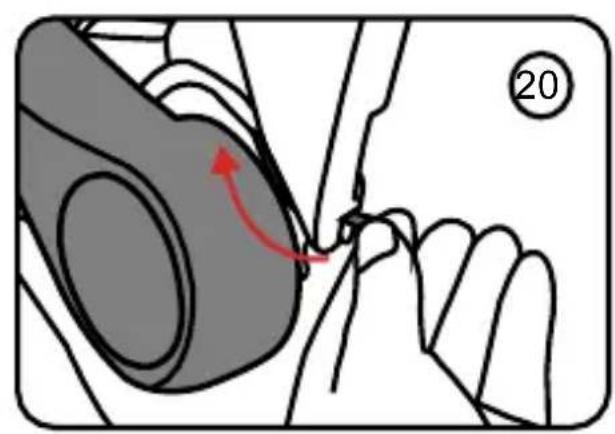
text_image
20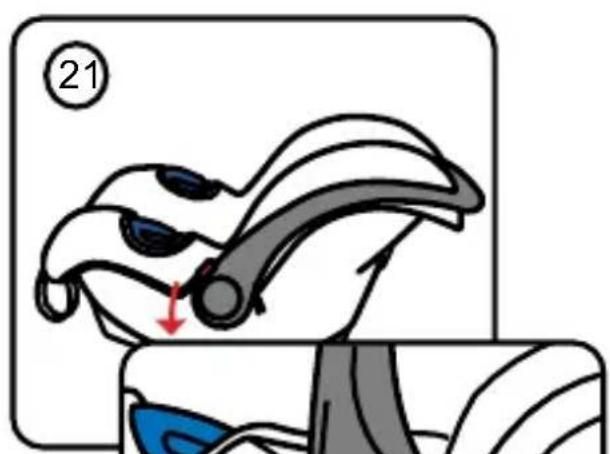
natural_image
Illustration of a bird's head with a red arrow pointing to the nose, showing anatomical details (no text or symbols)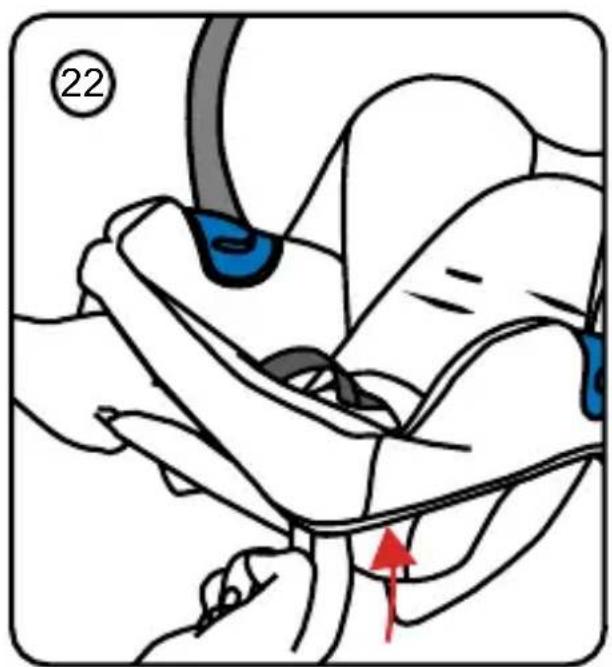
natural_image
Illustration of a car seatbelt with blue eyes and a red arrow indicating a specific seat (no text or symbols present)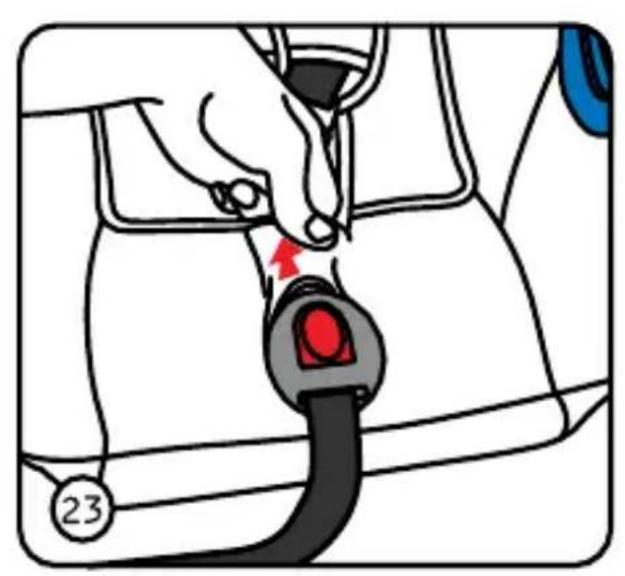
natural_image
Illustration of a car seatbelt buckle being inserted, showing the grip and seat (no text or symbols)
natural_image
Illustration of a hand performing a medical or therapeutic procedure on a patient's torso, with no visible text or symbols.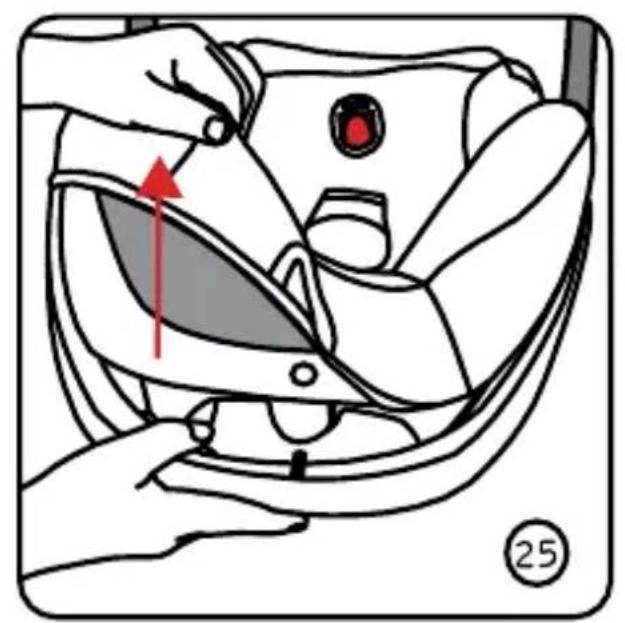
natural_image
Illustration of a car interior showing hand positioning and a highlighted seat area (no text or symbols)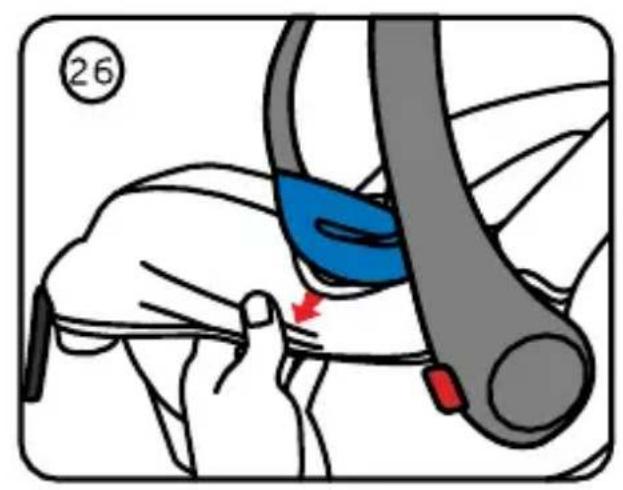
text_image
26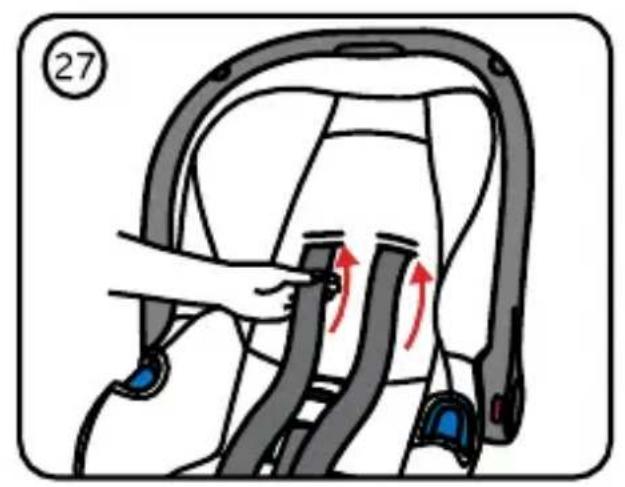
text_image
27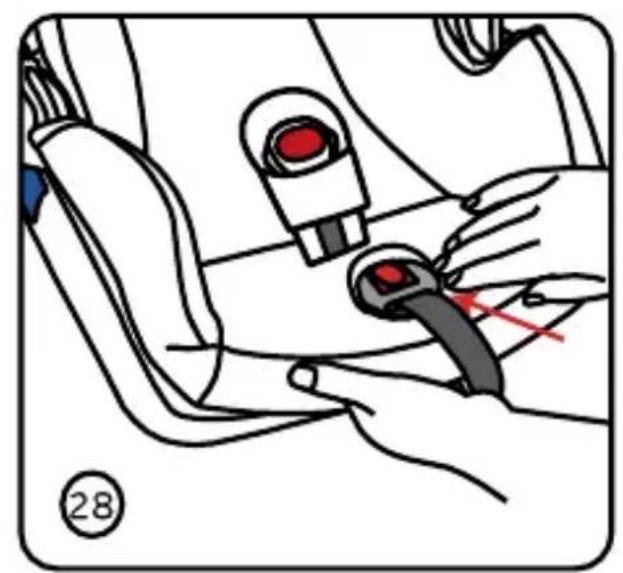
natural_image
Illustration of a hand holding a medical device with a red arrow indicating a point of interest (no text or symbols present)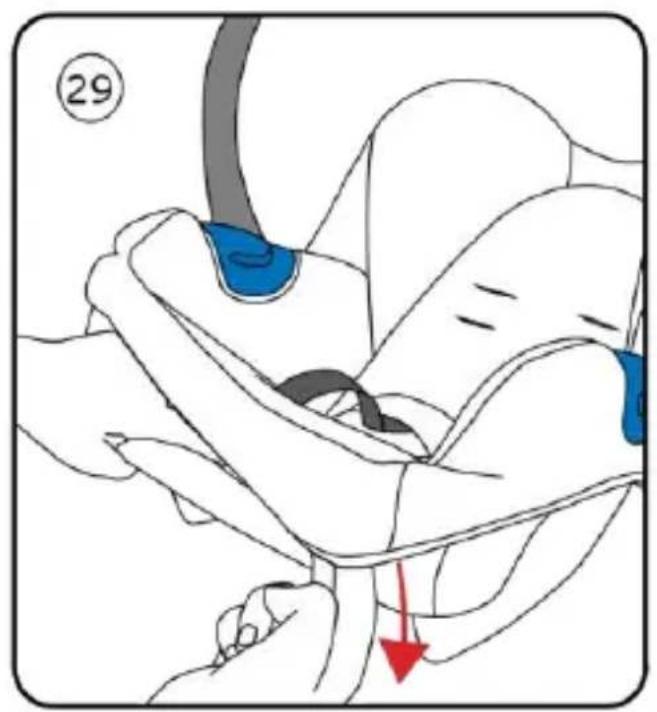
text_image
29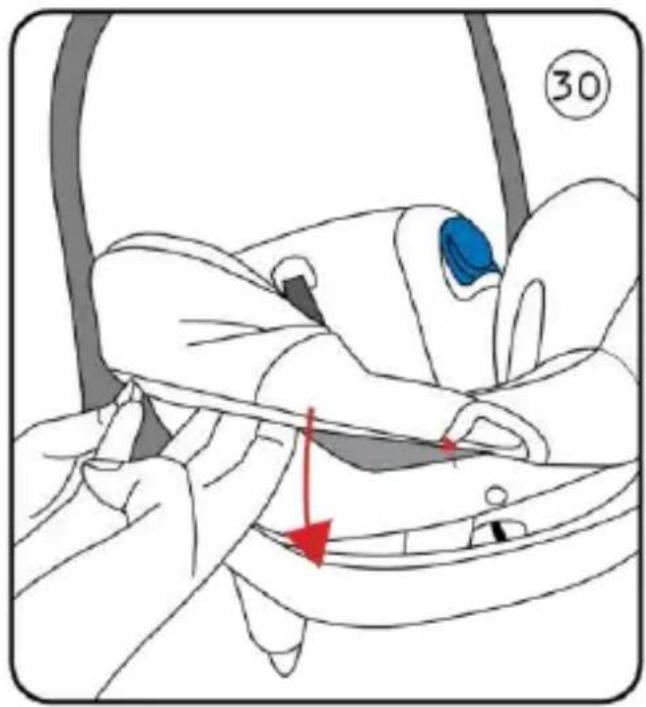
natural_image
Illustration of a car interior with hand positioning and a red arrow indicating movement (no text or symbols)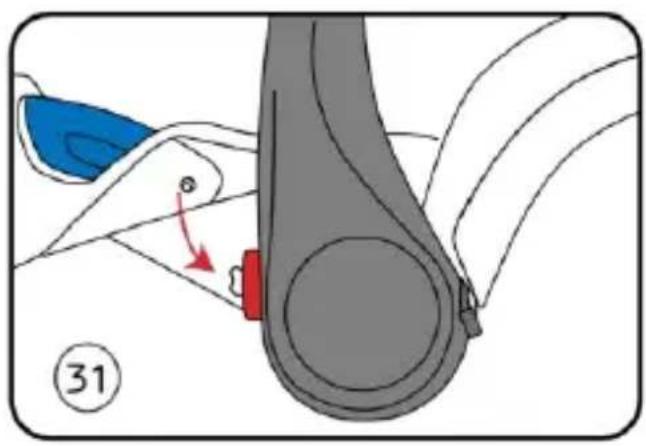
natural_image
Mechanical assembly diagram showing a belt drive mechanism with a blue component and red directional arrow (no text or symbols)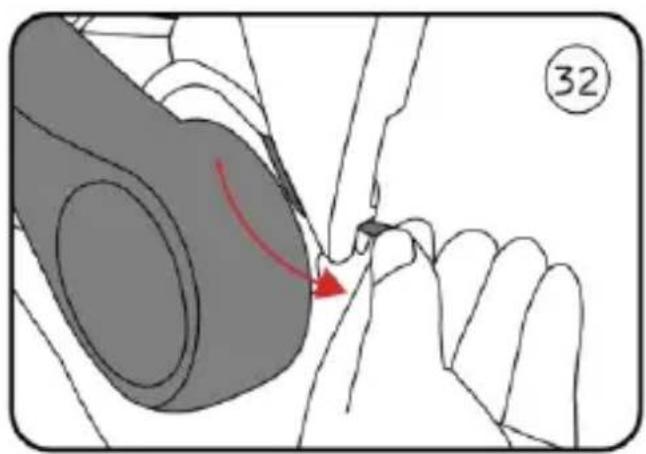
text_image
32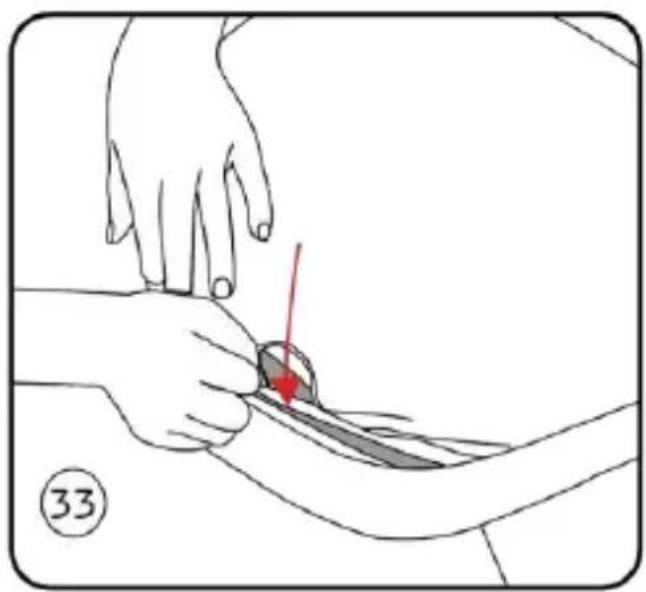
natural_image
Illustration of a hand performing a medical procedure on a patient's arm, with a red arrow indicating the point of interest (no text or symbols present)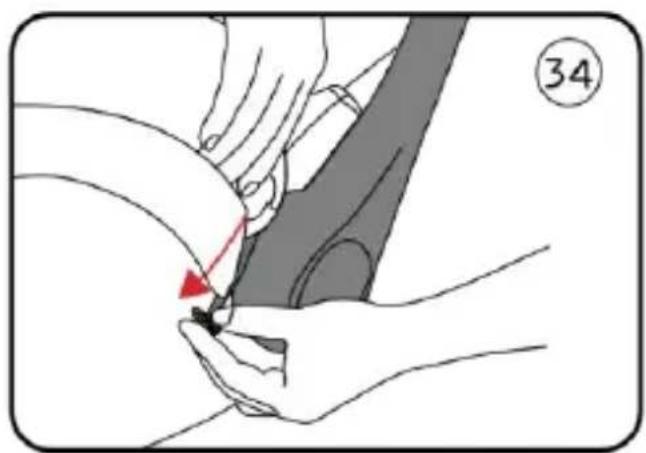
natural_image
Illustration of a medical procedure showing hands performing a catheter insertion (no text or symbols present)CZ
Please read through these instructions carefully before using the child car seat for the first time. Your child's safety is your responsibility and may be affected if you do not follow these instructions.
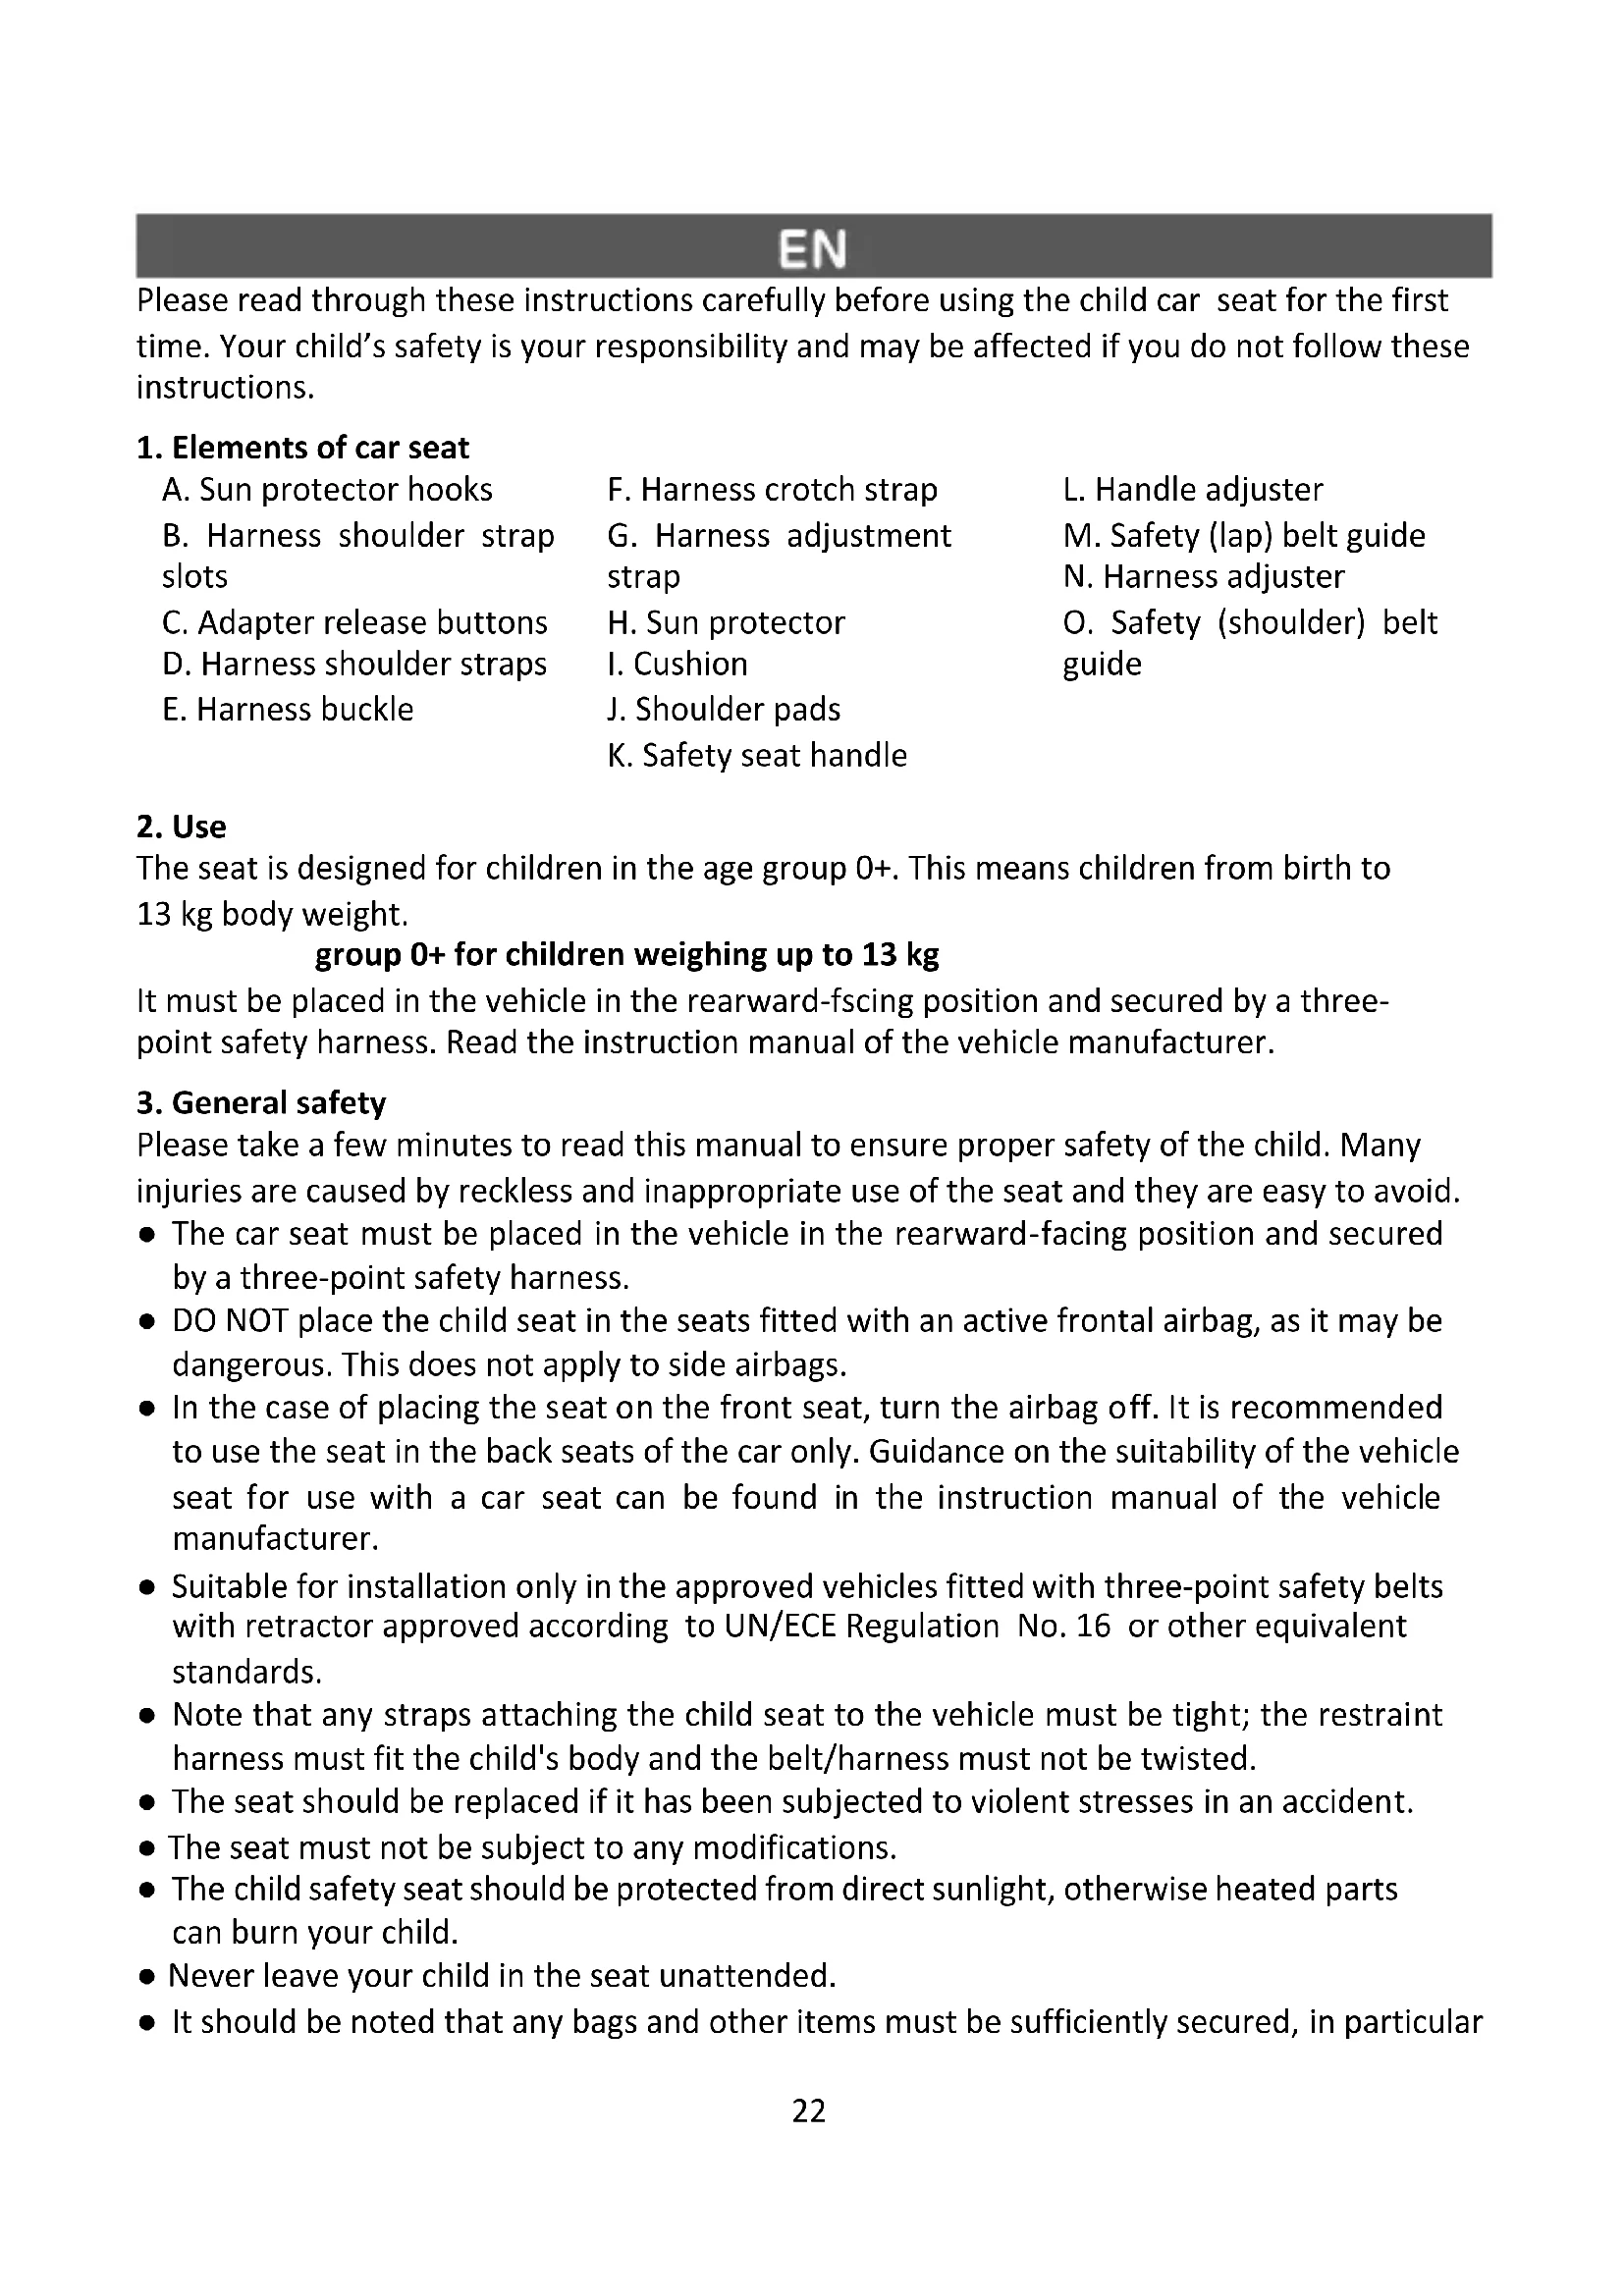
1. Elements of car seat
A. Sun protector hooks
B. Harness shoulder strap slots
C. Adapter release buttons
D. Harness shoulder straps
E. Harness buckle
F. Harness crotch strap
G. Harness adjustment strap
H. Sun protector
I. Cushion
J. Shoulder pads
K. Safety seat handle
L. Handle adjuster
M. Safety (lap) belt guide
N. Harness adjuster
O. Safety (shoulder) belt guide
2. Use
The seat is designed for children in the age group 0+. This means children from birth to 13 kg body weight.
group 0+ for children weighing up to 13 kg
It must be placed in the vehicle in the rearward-fscing position and secured by a three-point safety harness. Read the instruction manual of the vehicle manufacturer.
3. General safety
Please take a few minutes to read this manual to ensure proper safety of the child. Many injuries are caused by reckless and inappropriate use of the seat and they are easy to avoid.
- The car seat must be placed in the vehicle in the rearward-facing position and secured by a three-point safety harness.
- DO NOT place the child seat in the seats fitted with an active frontal airbag, as it may be dangerous. This does not apply to side airbags.
- In the case of placing the seat on the front seat, turn the airbag off. It is recommended to use the seat in the back seats of the car only. Guidance on the suitability of the vehicle seat for use with a car seat can be found in the instruction manual of the vehicle manufacturer.
- Suitable for installation only in the approved vehicles fitted with three-point safety belts with retractor approved according to UN/ECE Regulation No. 16 or other equivalent standards.
- Note that any straps attaching the child seat to the vehicle must be tight; the restraint harness must fit the child's body and the belt/harness must not be twisted.
- The seat should be replaced if it has been subjected to violent stresses in an accident.
- The seat must not be subject to any modifications.
- The child safety seat should be protected from direct sunlight, otherwise heated parts can burn your child.
- Never leave your child in the seat unattended.
- It should be noted that any bags and other items must be sufficiently secured, in particular
on the parcel shelf, as otherwise in the event of a collision this can lead to injury.
- The seat cannot be used without the cover.
- Do not use replacement covers other than those recommended by the manufacturer, since it is an integral part of the safety seat.
- It is recommended to keep the car seat instruction manual for the entire period of its use.
- Do not use anchorages other than those described in the instruction manual and marked in the child seat.
- All rigid items and plastic parts of the child seat must be located and installed in such a way to avoid, under normal operating conditions of the vehicle, blocking by a sliding seat or vehicle door.
- Regularly check the technical condition of the harness, paying special attention to the fasteners/holders, seams and adjustment elements.
- Discontinue use of the car seat if its parts are damaged or loosened.
- In case of an emergency situation, it is important to quickly unfasten the seat belts. This means that the harness release button is not fully secured; make sure that your child does not play with the buckle.
- Make sure that the belt is properly placed in the guides. The safety belt buckle must be below the belt guide (Fig. 1 M).
- You should give your child a good example and always fasten your belts. An adult with unfastened safety belts may also be a threat to the child.
- Before each trip by car, make sure that the seat is properly secured.
- The car seat must be protected even when not in use. Unattached seat can cause injuries to passengers even during emergency braking.
- Caution! Do not place the seat on platforms such as a table, countertop, bed, etc. due to a risk of falling.
IMPORTANT! KEEP FOR FUTURE REFERENCE
Using the car seat as a reclined cradle (EN 12790:2009)
WARNING!:
- Never leave the child unattended.
- Do not use the reclined cradle once your child can sit unaided.
- This reclined cradle is not intended for prolonged periods of sleeping.
- It is dangerous to use this reclined cradle on an elevated surface, e.g. a table.
- Always use the restraint system.
- This product does not replace a cot or a bed. Should your child need to sleep, then its should be placed in a suitable cot or bed.
- Do not use the product if any parts are damaged or missing.
- Do not use accessories or replacement parts other than those approved by the manufacturer.
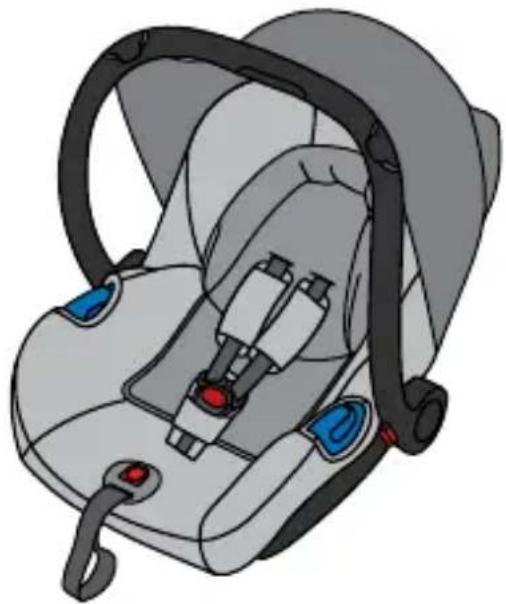
4.1 Adjusting handle position (Fig. 2)
Simultaneously push the handle adjuster on both sides (L). Then place the handle in the desired position. Release the button when near the ideal position, adjust the handle slightly until you hear a “click”.
Handle positions:
1 Stable position/bouncer
2 Rocker position
3 In car safety position
4.2 Cushion (Fig. 3)
The seat cushion supports and protects your baby's head and back. The cushion (Fig. 3E behind the head and back) can reduce the pressure on baby's waist (After your baby grows up, the cushion can be removed to provide more space inside the seat).
4.2 Using the sun protector (Fig. 4)
The sun protector is used to prevent direct sunlight on your child's face. When using the sun protector, first adjust the handle to position 3, then fasten the sun protector to the handle. When the sun protector is not in use, release the buttons of the handle and fold it back to uncover the inside of the seat.
4.4 Adjusting harness strap length
Releasing – push and hold the adjuster (N), then lift the shoulder straps (Figure 5).
Tightening – pull the adjustment strap (G) at the front of the seat until the harness lies flat on and fits tightly to the child's body (Fig. 6).
4.5 Adjusting the position of harness straps (Fig. 7)
When the child grows up, the shoulder straps must be removed from the metal buckle (on the back of the seat) and inserted in a higher slot in the backrest and re-insert in the metal buckle. Make sure that the straps are not twisted. Adjust shoulder strap height so that the strap enters the car seat backrest just below the child's shoulders.
5.1 Fastening the child in the seat
- Place the child seat on a flat surface, and then set the handle in a stable position (Figure 2, position 1).
- Loosen the shoulder straps (Fig. 5).
- Press the red button on the harness buckle (E) to release the straps.
- Set aside the two buckle fasteners.
- Place the child in the seat, then place the shoulder straps on the child's shoulders (Figure 8).
Note: Do not twist or cross the shoulder straps. - Put together the two buckle fasteners, and then insert them in the buckle (E). A “click” sound can be heard as a sign of locked buckle (Fig. 9). Note: the proper location of the buckle is near your baby’s crotch rather than his/her belly.
- Pull the adjuster strap (G) in the arrow direction to fasten the harness straps (Fig. 10). Ensure that the shoulder straps fit well to the child's shoulders. Proper tension is provided if two fingers fit in the space between the shoulder strap and the child's chest.
5.2 Installing in vehicle
- Switch the seat handle to the car safety seat position (Figure 2, position 3), then place the seat on the back car seat near the backrest. The seat must be placed in the rearward-facing position (Fig. 11).
- Pull out the safety belt as much as possible. Place the lap belt over this seat and lock the car belt buckle (Fig. 12).
- Then place the lap belt in the belt guide (M) marked in blue located on the sides of the child seat.
- Pull the shoulder belt over the child seat through the blue belt guide on the back of the child seat (Fig. 13).
Note: Tighten the belt up and make sure that the car safety belt has not twisted or slipped from the guides.
- Push the baby seat to the car seat.
- Pull the lap belt horizontally to fasten it. Then, pull the shoulder belt to tighten the other parts of the safety belt (Fig. 14).
Note: Make sure the child safety seat is fixed well and stable. Check the belt and make sure it runs correctly.
Do not place your baby car seat too close to the car seat belt buckle (Fig. 15).
5.3 Installing the seat in stroller frame
Place the car seat on the stroller so that the child faces the stroller push handle. Before placing the seat in the stroller, always engage the safety brake to prevent uncontrolled movement of the stroller. Place the stroller frame adapters in the holes in the seat and push down until you hear a "click".
Removing from the stroller: Before removing the seat, engage the safety brake in the stroller. Release the lever on the sides of the seat (Fig. 1, part C). The seat is unlocked and can be removed.
The seat has connectors compatible with the Maxi-Cosi® standard, so it can be mounted on a number of stroller frames.
6.1 Removing the cover and sun protector
- Place the carrying handle in the car safety seat position (Fig. 2, position 3). Pull the plastic part aside and move it down slightly, as shown in Figure 16.
- Release the sun protector hooks in the gap in the direction of the arrow shown in Figure 17. Lift and remove the protector from the seat.
- Press the red button on the harness buckle (E) to release the straps.
- Remove the shoulder pads (Fig. 18) and the cushion (Fig. 19).
- Place the carrying handle in the car safety seat position (Fig. 2, position 3). Release the cover hooks in the gap in the direction of the arrow (Fig. 20).
- Undo the hook on the edge of the cover downwards in the direction of the arrow. Release the cover hook (Fig. 21).
-
Remove the cover from the edge of the seat on both sides (Fig. 22).
-
With one hand, hold the front edge of the seat. Put the fingers of the other hand under the cover through the crotch strap opening (F). Pull the cover in the direction of the arrow until you see a small gap between the harness adjuster (N) and the cover (Fig. 23).
- Lift the cover on the side of the headrest in the direction of the arrow shown in Figure 25.
- Pull the cover towards the lap belt guides (M) until you see a small gap, and then pull the material from under the guide (Fig. 26). Pull out the crotch strap with the buckle (E, F) through the opening in the cover.
Note: For safety reason, frequent removing is not recommended.
6.2 Installing the cover and sun protector
- Put the cover onto the shell. Put the crotch strap with the buckle (E, F) over the opening in the cover.
- Thread the shoulder straps (D) through the holes (B) in the backrest (Fig. 27) and place the strap pads.
- Pull the harness adjuster (N) through the opening in the cover. Then smooth the cover out (Fig. 28).
- Tighten and secure the cover on the front edge of the seat (Fig. 29).
- Tighten and secure the cover on the seat headrest (Fig. 30).
- Attach the hooks to the corresponding slots on both sides of the seat (Fig. 31).
- Place the seat carrying handle in the car safety seat position (Fig. 2, position 3). Pull the elastic strap and attach it in the corresponding slots on both sides of the seat (Fig. 32).
- Attach the sun protector to the seat and place it in the space between the seat and the plastic element (Fig. 33). Holes in the protector and cover must match, so that they can be secured with the mandrel in the plastic element. Pull the plastic part aside and put it on the seat.
- Pull the elastic strap and attach it in the corresponding slots on both sides of the seat (Fig. 34).
6.3 Cleaning
Use the original cover only, since it is essential for the safety of the seat.
The cover can be removed. Clean the cover in warm water (lower than 30^ C) with mild detergent, dry naturally. No drying.
- Plastic parts can be cleaned with soap and water. Do not use strong detergents (for example solvents).
- Straps and tethers can be cleaned in soap water.
- Shoulder pads can be removed and cleaned in soap.
7. Warranty
- All Kinderkraft products are covered by a 24-month warranty. The warranty period begins on the date of releasing the product to the Buyer.
- The warranty is valid for products sold in the following countries: France, Spain, Germany, Poland, United Kingdom, Italy.
-
In countries not listed above warranty terms and conditions are determined by the Seller.
-
It is possible to extend the warranty period to 120 months (10 years). Full text of the terms and conditions and warranty extension registration form are available at WWW.KINDERKRAFT.COM
- The warranty is valid only in the country where the purchase was made.
- Complaints should be submitted by completing the form available at WWW.RMA.KINDERKRAFT.COM
- The warranty shall not cover:
a. claims arising from product specifications, as long as they comply with those specified by the manufacturer in the instruction manual or other documents of a legislative nature;
b. product damage caused by improper maintenance or use of inadequate chemicals;
c. colour change (discolouration) when the product has been exposed to direct sunlight against the instructions provided in the instruction manual;
d. tear, wear, crack of fabric/plastic that is the fault of the Customer;
e. reduction in the quality of the product and consumables due to normal wear and tear;
f. products which have not been used according to specifications;
8. The warranty period for accessories attached to the device is 6 months from the date of sale, with the exception of mechanical damage.
9. These guarantee terms and conditions are complementary to the Customer's rights in relation to 4KRAFT sp. z o.o. The warranty shall not exclude, limit or suspend the rights of the Customer arising from the provisions on the warranty for defects in the goods sold.
- Full text of Warranty Terms and Conditions is available at WWW.KINDERKRAFT.COM
ES
EN In the interests of our Clients - we are at your disposal! If you have a problem with the product you received, contact us in the most convenient way for you!