
RP250YDL - Dust collector HiKOKI - Free user manual and instructions
Find the device manual for free RP250YDL HiKOKI in PDF.
| Product type | Dust collector |
| Brand | HiKOKI |
| Model | RP250YDL |
| Dust category | L (compliant with NE 60335-2-69) |
| Mains voltage | 230 V ~ |
| Frequency | 50/60 Hz |
| Nominal power consumption | See rating plate |
| Tank volume | Approx. 30 L (estimate) |
| Main functions | Vacuuming dust and liquids, PressClean, blowing, automatic mode |
| Power outlet for tool | Yes (for automatic start/stop) |
| Filter cleaning | PressClean by air pulse |
| Liquid safety system | Automatic shut-off float |
| Filter material | Pleated filter + non-woven or PE bag |
| Included accessories | Hose, nozzle, floor nozzle, brush nozzle, crevice nozzle, adapter, rigid tube, hook, hose holder |
| Recommended maintenance | Emptying and cleaning after each use, regular filter replacement |
| Warranty | According to national regulations, repairs by authorized center |
Frequently Asked Questions - RP250YDL HiKOKI
User questions about RP250YDL HiKOKI
0 question about this device. Answer the ones you know or ask your own.
Ask a new question about this device
Download the instructions for your Dust collector in PDF format for free! Find your manual RP250YDL - HiKOKI and take your electronic device back in hand. On this page are published all the documents necessary for the use of your device. RP250YDL by HiKOKI.
USER MANUAL RP250YDL HiKOKI
natural_image
Line drawing of two vacuum cleaner units with coiled hoses and ventilation pipes (no text or symbols)RP250YDLRP300YDL


text_image
Technical diagram of a vacuum cleaner with numbered parts and close-up insets for detail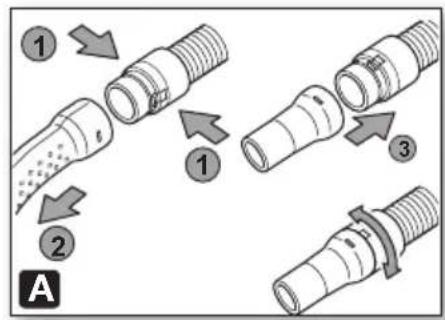
text_image
① ② ① ③ A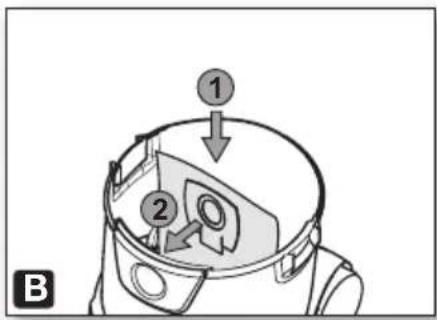
text_image
① ② B
text_image
60 mm ① C
natural_image
Line drawing of a vacuum cleaner with labeled parts (no text or symbols present)
text_image
D 11 12 ② ①
text_image
"PressClean" 4 3x E| RP250YDL | RP300YDL | ||
| K | - | L | L |
| A (L x B x H) | mm | 392 x 374 x 550 | 398 x 391 x 658 |
| U | V | 220-240 | 220-240 |
| F | Hz | 50/60 | 50/60 |
| I | A | 4,3 | 4,3 |
| N | - | H05RR-F | H05RR-F |
| P_1 | W | 1000 | 1000 |
| p_U1/p_U2 | hPa | 210 / 230 | 210 / 230 |
| V_l/s1/V_l/s2 | l/s | 60 / 66 | 60 / 66 |
| D_max1/D_max2 | m3/h | 216 / 238 | 216 / 238 |
| V | I | 25 | 30 |
| m | kg | 6.6 (7.8)* | 7.8 (9.2)* |
| L_pA | dB (A)±2 | 72 | 72 |
| L_WA | dB (A) | - | - |
* Weight according to EPTA-Procedure 01/2003 (including Hose, Pipe, Floor nozzle).
| EU AUSRUSSIA | ||
| U (V) 230P1max: [IMAGE]Σ + (W)Imax | 240(W)3600(A) | 2600240016 |
natural_image
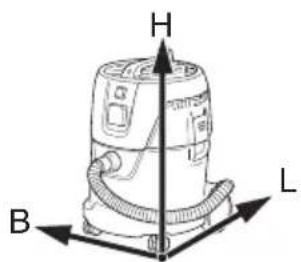
Diagram of a vacuum cleaner with labeled directional axes (H, L, B) and no textual annotations or symbols beyond labels.A

natural_image
Simple line drawing of a curved object with a circular hole and a rectangular slot, resembling a stylized letter or symbol (no text or symbols present)G

B

natural_image
Simple line drawing of a mechanical component on a flat surface (no text or symbols)H

©

natural_image
Line drawing of a coiled cable or hose with a dotted cap, no text or symbols present①

text_image
(2 pcs.)D

J
E
K

F

| Deutsch English Français Nederlands | ||||
| Symbole⚠ WARNINGDie folgenden Symbole werden für diese Maschine verwendet. Achten Sie darauf, diese vor der Verwendung zu verstehen. | Symbols⚠ WARNINGThe following show symbols used for the machine. Be sure that you understand their meaning before use. | Symboles⚠ AVERTISSEMENTLes symboles suivants sont utilisés pour l’outil. Bien se familiariser avec leur signification avant d’utiliser l’outil. | Symbolen⚠ WAARSCHUWINGHieronder staan symbolen afgebeeld die van toepassing zijn op deze machine. U moet de betekenis hiervan begrijpen voor gebruik. | |
 | Der Anwender muss die Bedienungsanleitung lesen, um das Risiko einer Verletzung zu verringern.Wenn die Warnungen und Anweisungen nicht befolgt werden, kann es zu Stromschlag, Brand und/oder ernsthaften Verletzungen kommen. | To reduce the risk of injury, user must read instruction manual.Failure to follow the warnings and instructions may result in electric shock, fire and/or serious injury. | Pour réduire les risques de blessures, l’utilisateur doit lire le manuel d’utilisation. Tout manquement à observer ces avertissements et instructions peut engendrer des chocs électriques, des incendies et/ou des blessures graves. | Om het risico op verwondingen te verminderen, moet de gebruiker de instructiehandleiding lezen.Nalating om de waarschuwingen en instructies op te volgen kan in een elektrische schok, brand en/of ernstig letsel resulteren. |
 | Tragen Sie immer einen Augenschutz. | Always wear eye protection. | Toujours porter des verres de protection. | Draag altijd oogbescherming. |
 | Stets Gehörschutz tragen. | Always wear hearing protection. | Porter des protections anti-bruit en permanence. | Draag altijd gehoorbescherming. |
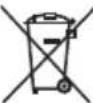
 | Nur für EU-Länder Werfen Sie Elektrowerkzeuge nicht in den Hausmüll! Gemäss Europäischer Richtlinie 2002/96/EG über Elektro- und Elektronik- Altgeräte und Umsetzung in nationales Recht müssen verbrauchte Elektrowerkzeuge getrennt gesammelt und einer umweltgerechten Wiederververtung zugeführt werden. | Only for EU countries Do not dispose of electric tools together with household waste material! In observance of European Directive 2002/96/EC on waste electrical and electronic equipment and its implementation in accordance with national law, electric tools that have reached the end of their life must be collected separately and returned to an environmentally compatible recycling facility. | Pour les pays européens uniquementNe pas jeter les appareils électriques dans les ordures ménagères! Conformément à la directive européenne 2002/96/EG relative aux déchets d’équipements électriques ou électroniques (DEEE), et à sa transposition dans la législation nationale, les appareils électriques doivent être collectés à part et être soumis à un recyclage respectueux de l’environnement. | Alleen voor EU-landen Geef elektrisch gereedschap niet met het huisvuil mee! Volgens de Europese richtlijn 2002/96/EG inzake oude elektrische en elektronische apparaten en de toepassing daarvan binnen de nationale wetgeving, dient gebruikt elektrisch gereedschap gescheiden te worden ingezameld en te worden afgevoerd naar een recycle bedrijf dat voldoet aan de geldende milieu-eisen. |
 | Stehen Sie niemals auf der Staub-Absaugung. | Never stand on the dust extractor. | Ne jamais se tenir sur l’extracteur de poussière. | Ga nooit op de stofafzuiger staan. |
 | Warnung Warning Avertissement Waarschuwing | |||
| Italiano Español | Português Svenska | |||
| Simboli⚠ AVVERTENZADi seguito mostriamo i simboli usati per la macchina. Assicurarsi di comprenderne il significato prima dell'uso. | Símbolos⚠ AVISOA continuación se muestran los símbolos usados para la máquina.Asegúrese de comprender su significado antes del uso. | Símbolos⚠ AVISOA seguir aparecem os símbolos utilizados pela máquina. Assimile bem seus significados antes do uso. | Symboler⚠ VARNINGNedan visas de symboler som används för maskinen. Se till att du förstår vad de betyder innan verktyget används. | |
 | Per ridurre il rischio di lesioni, l'utente deve leggere il manuale delle istruzioni.La mancata osservanza degli avvertimenti e delle istruzioni potrebbe essere causa di scosse elettriche, incendi e/o gravi lesioni. | Para reducir el riesgo de lesiones, el usuario deberá leer el manual de instrucciones.Si no se siguen las advertencias e instrucciones, podría producirse una descarga eléctrica, un incendio y/o daños graves. | Para reduzir o risco de lesão, o utilizador deve ler o manual de instruções.Se não seguir todas as instruções e os avisos, pode provocar um choque eléctrico, incêndio e/ou ferimentos graves. | Användaren måste läsa bruksanvisningen för att minska risken för personskador.Underlåtenhet att följa varningarna och instruktionerna nedan kan resultera i elstötar, brand och/eller allvarliga skador. |
 | Indossate sempre le protezioni oculari. | Utilice siempre una protección ocular. | Utilize sempre proteção para os olhos. | Ha alltid ögonskydd. |
 | Indossare sempre I dispositivi di protezione acustica. | Utilice siempre protecciones auriculares. | Use sempre proteção auditiva. | Bär alltid hörselskydd. |
 | Solo per Paesi UE Non gettare le apparecchiature elettriche tra i rifiuti domestici.Secondo la Direttiva Europea 2002/96/CE sui rifiuti di apparecchiature elettriche ed elettroniche e la sua attuazione in conformità alle norme nazionali, le apparecchiature elettriche esauste devono essere raccolte separatamente, al fine di essere reimpiegate in modo eco- compatibile. | Sólo para países de la Unión Europea¡No deseche los aparatos eléctricos junto con los residuos domésticos!De conformidad con la Directiva Europea 2002/96/CE sobre residuos de aparatos eléctricos y electrónicos y su aplicación de acuerdo con la legislación nacional, las herramientas eléctricas cuya vida útil haya llegado a su fin se deberán recoger por separado y trasladar a una planta de reciclaje que cumpla con las exigencias ecológicas. | Apenas para países da UENão deite ferramentas eléctricas no lixo doméstico!De acordo com a directiva europeia 2002/96/CE sobre ferramentas eléctricas e electrónicas usadas e a transposição para as leis nacionais, as ferramentas eléctricas usadas devem ser recolhidas em separado e encaminhadas a uma instalação de reciclagem dos materiais ecológica. | Gäller endast EU-länder Elektriska verktyg får inte kastas i hushållssoporna!Enligt direktivet 2002/96/EG som avser äldre elektrisk och elektronisk utrustning och dess tillämpning enligt nationell lagstiftning ska uttjänta elektriska verktyg sorteras separat och lämnas till miljövänlig återvinning. |
 | Non sostare mai sull'estrattore di polvere. | Nunca permanezca en el extractor de polvo. | Nunca se coloque no extrator de pó. | Stå aldrig på dammutsuget. |
 | Avvertenza Aviso Aviso Varning | |||
| Suomi Norsk Dansk Polski | ||||
| Symbolit⚠ VAROITUSSeuraavassa on näytetty koneessa käytetyt symbolit. Varmista, että ymmärrät niiden merkityksen ennen kuin aloitat koneen käytön. | Symboler⚠ ADVARSELFølgende symboler brukes for maskinen. Sørg for å forstå betydningen av disse symbolene før maskinen tas i bruk. | Symboler⚠ ADVARSELDet følgende viser symboler, som anvendes for maskinen. Vær sikker på, at du forstår deres betydning, inden du begynder at bruge maskinen. | Symbole⚠ OSTRZEŻENIENastępujące oznaczenia to symbole używane w instrukcji obsługi maszyny. Upewnij się, że rozumiesz ich znaczenie zanim użyjesz narzędzia. | |
 | Loukkaantumisriskin vähentämiseksi käyttäjän on luettava käyttöopas.Jos varoituksia ja ohjeita ei noudateta, on olemassa sähköiskun, tulipalon ja/tai vakavan henkilövahingon vaara. | For å minske faren for skade må brukeren lese instruksjonsboken.Hvis du ikke følger alle advarsler og instruksjoner kan bruk av utstyret resultere i elektrisk støt, brann og/eller alvorlig personskade. | Brugeren skal læse betjeningsvejledningen for at mindske risikoen for skader.Det kan medføre elektrisk stød, brand og/eller alvorlig personskade, hvis alle advarslerne og instruktionerne nedenfor ikke overholdes. | Aby zmniejszyć ryzyko odniesienia obrażeń, użytkownik powinien przeczytać instrukcję obsługi.Nieprzestrzeganie ostrzeżeń oraz wskazówek bezpieczeństwa może spowodować porażenie prądem elektrycznym, pożar i/lub odniesienie poważnych obrażeń. |
 | Käytä aina suojalaseja. Ha | alltid på deg vernebriller. | Brug altid beskyttelsesbriller. | Zawsze nosić okulary ochronne. |
 | Käytä aina kuulosuojainta. | Bruk alltid hørselsvern. | Brug altid høreværn. | Zawsze nosić słuchawki ochronne. |
 | Koskee vain EU-maitaÄlä hävitä sähkötyökalua tavallisen kotitalousjätteen mukana! Vanhoja sähkö- ja elektroniikkalaitteita koskevan EU-direktiivin 2002/96/ETY ja sen maakohtaisten sovellusten mukaisesti käytetyt sähkötyökalut on toimitettava ongelmajätteen keräyspisteeseen ja ohjattava ympäristöystävälliseen kierrätykseen. | Kun for EU-land Kast aldri elektroverktøy i husholdningsavfallet! I henhold til EU-direktiv 2002/96/EF om kasserte elektriske og elektroniske produkter og direktivets iverksetting i nasjonal rett, må elektroverktøy som ikke lenger skal brukes, samles separat og returneres til et miljøvennlig gjenvinningsanlegg. | Kun for EU-lande Elværktøj må ikke bortskaff es som almindeligt aff ald! I henhold til det europæiske direktiv 2002/96/EF om bortskaff else af elektriske og elektroniske produkter og gældende national lovgivning skal brugt elværktøj indsamles separat og bortskaff es på en måde, der skåner miljøet mest muligt. | Dotyczy tylko państw UE Nie wyrzucaj elektronarzędzi wraz z odpadami z gospodarstwa domowego! Zgodnie z Europejską Dyrektywą 2002/96/WE w sprawie zużytego sprzętu elektrotechnicznego i elektronicznego oraz dostosowaniem jej do prawa krajowego, zużyte elektronarzędzia należy posegregować i zutylizować w sposób przyjazny dla środowiska. |
 | Älä koskaan seiso pölynerottimen päällä. | Du må aldri stå på støvsugeren. | Stå aldrig på spånsugeren. | Nigdy nie należy stawać na odkurzaczu. |
 | Varoitus Advarsel Advarsel Ostrzeżenie | |||
Original instructions
1. Specified Use
The vacuum cleaner is suitable for the vacuuming of dust, solid materials (broken glass, nails etc.), liquids of any kind with the exception of highly inflammable, combustible liquids, and material that is hotter than 60 °C.
This appliance is not designed for use by persons (including children) with physical, sensory or mental disabilities, or with insufficient experience and/or knowledge, unless they are supervised by a person responsible for their safety, or have received instructions on how to use the appliance by this person.
This product is designed for industrial use.
Dust containing asbestos must not be vacuumed.
Inflammable dust must not be vacuumed.
Vacuuming must never be performed on inflammable or explosive solvents, material saturated with solvent, dust that represents an explosion hazard, liquids such as petrol, oil, alcohol, thinner or material that is hotter than 60 °C. This would result in the risk of explosion and fire! You must not use the appliance in the vicinity of inflammable gases or substances.
The user bears sole responsibility for any damage caused by improper use.
Generally accepted accident prevention regulations and the enclosed safety information must be observed.
2. Special Safety Instructions

For your own protection and for the protection of your appliance, pay attention to all parts of the text that are marked with this symbol!
Never allow children to use the appliance.
Children should be supervised to ensure that they do not play with the appliance.
Caution! Only use accessories that are included with the appliance or specified Operating Instructions. The use of other accessories may impair safety.
You must not perform any work using the appliance other than the work described here.
In the event of misuse, improper operation or unprofessional repair work, our company shall assume no liability for any damage incurred.
When the appliance is not in use, leave the hose on the appliance to prevent dust accidentally escaping.
Do not operate appliances or accessories under the following conditions:
- If the appliance has recognisable damage (cracks/breaks),
- If the mains connection lead is defective or shows signs of cracking or ageing,
- If there is a suspected non-visible defect (after a fall).
Do not point the nozzle, hose or tube at people or animals.

WARNING - If any foam or water egresses, switch off the appliance immediately. Empty the container and, if necessary, the plated filter.
Never sit or stand on the appli- ance.
Always lay the connection lead and hose so there is no danger of tripping.
Do not pull the connection lead over any sharp edges and do not kink or pinch it.
If the connection lead of the appliance is damaged, it must be replaced by a special connection lead. See the section on Repairs.
Always connect to a socket with protective contact.
Do not use any damaged extension leads.
ENGLISHen
Never insert or remove the mains plug with wet hands.
Only pull on the mains plug, not on the lead.
WARNING - The plug socket on the appliance must be used only for the purposes defined in the Operating Instructions.
Do not leave the appliance unattended. If there is a long work interruption, disconnect the mains plug. Ensure the plug cannot be reconnected accidentally.
The vacuum cleaner must not be used or stored outside in wet conditions.
IMPORTANT - This machine must only be stored indoors.
Acids, acetone and solvents can corrode the appliance components.
Prior to any servicing work, clean the appliance. Switch off the appliance after each use and pull out the mains plug. Ensure the plug cannot be reconnected accidentally.
Steam cleaners and high-pressure cleaners must not be used to clean the vacuum cleaner.
The inside of the cover must always be kept dry.
Mould contamination can result if the appliance is not cleaned for an extended period, especially if used in areas where foodstuffs are processed: Always clean and disinfect the vacuum cleaner immediately after use.
Never open the appliance outdoors during rain or storms.
Do not use the appliance outdoors in cold weather.
The appliance must not be operated in areas with an explosion hazard.
Ensure that the vacuum cleaner is steady.
If the extracted air is discharged into the room, ensure there is an adequate air change rate (L) in the room. Observe the regulations that apply in your country.
Caution! This appliance contains dust that is harmful to health. Discharge and maintenance operations (including disposal of the dust collection containers) must only be carried out by qualified specialists wearing appropriate protective clothing and equipment.

Warning - general danger!
Caution! Do not use the appli- ance until you have read the rating Instructions.
WARNING - Operating personnel must receive adequate instruction in the use of this vacuum cleaner and in the materials for which it is used.
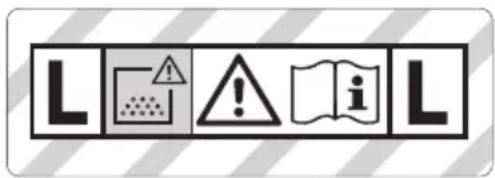
Warning sign for machines with dust class L:
text_image
L ! i LWhile the appliance is suitable for extracting substances that pose a slight threat to health, it is not appropriate for reducing wood dust in inhaled air.
Dust from material such as paint containing lead, some wood species, minerals and metal may
be harmful. Contact with or inhalation of the dust may cause allergic reactions and/or respiratory diseases to the operator or bystanders. Certain kinds of dust are classified as carcinogenic, such as oak and beech dust, especially in conjunction with additives for wood conditioning (chromate, wood preservative).
3. Overview
See page 2.
1 Switch On/Off/Automatic operation/
2 Plug socket for power tool
3 Upper part
4 Button for filter cleaning 'PressClean' (PC)
5 Exhaust port
6 S n a p l o c k
7 S u c t i o n o p e n i n g
8 Container
9 Fleece filter bag
10 PE filter bag
11 Pleated filter
12 Filter cage
4. Initial Operation

Before plugging in the appliance, check that the rated mains voltage and mains fluency, as specified on the rating label, such your power supply.
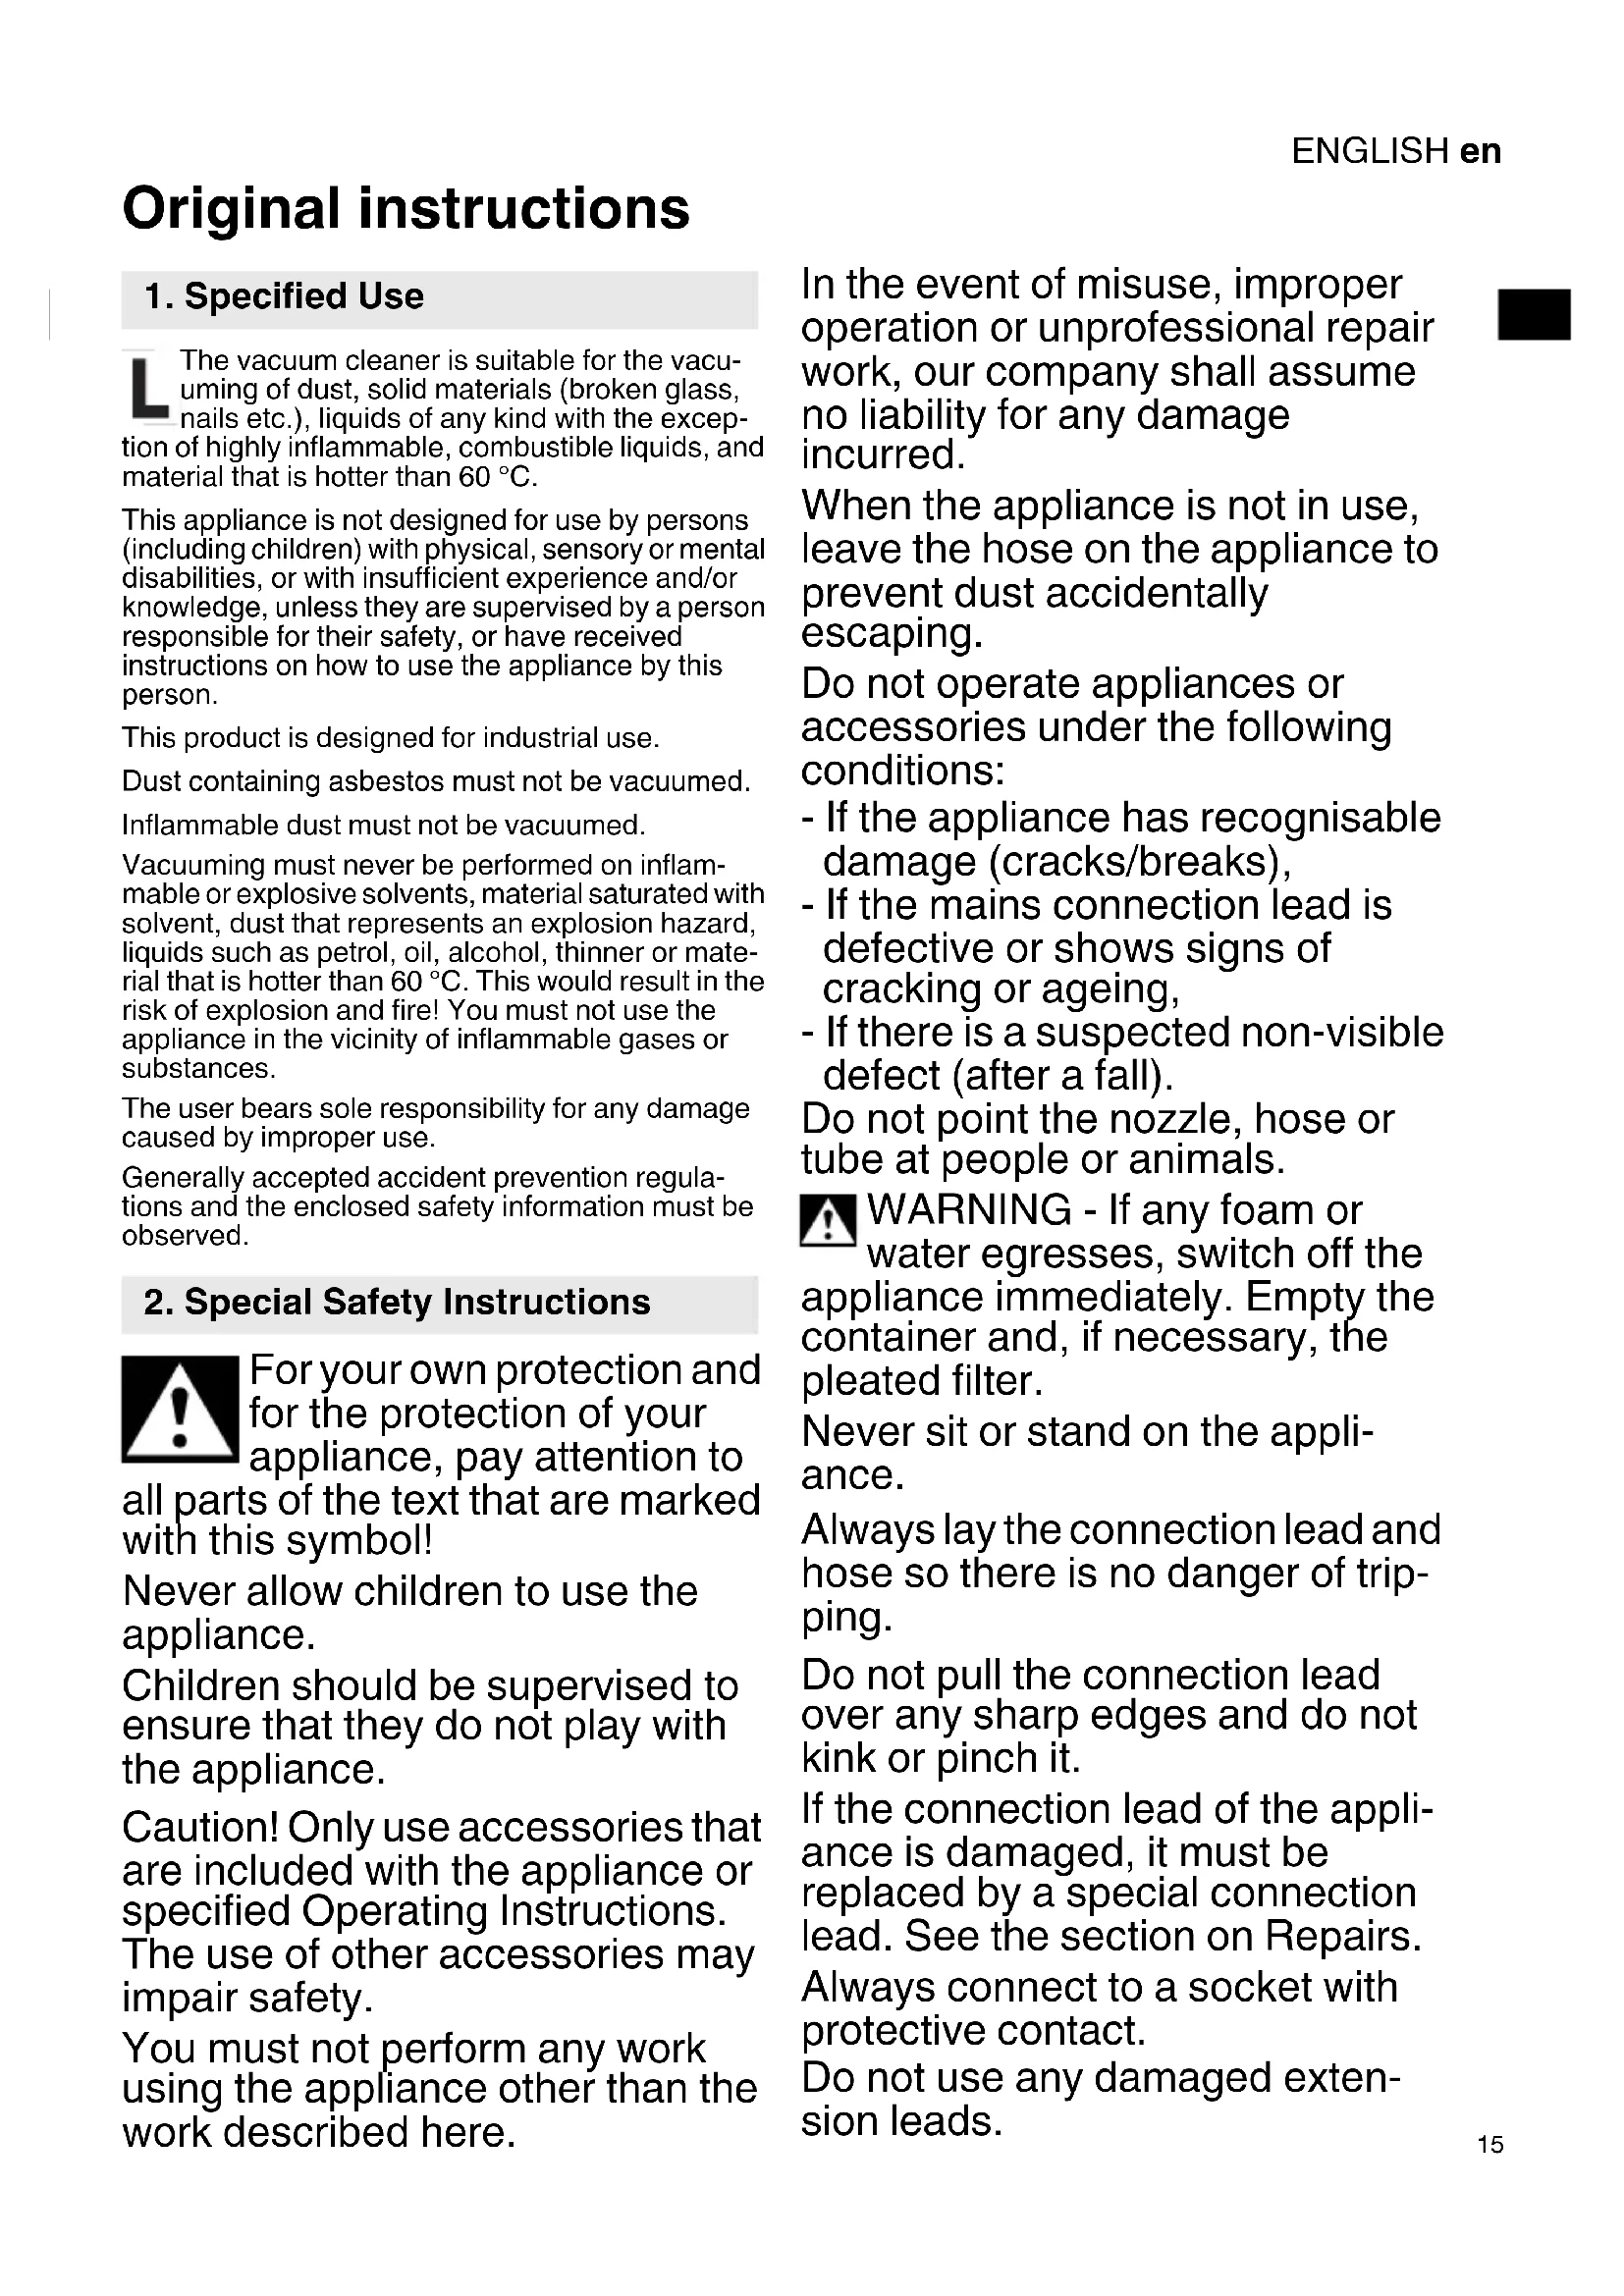
Attach the handle connecting piece or coupling to the suction hose (see illustration A, page 2.).
Prepare the suction tube as shown for storage in the repository (see illustration C, page 2.).
4.1 Inserting a Fleece Filter Bag (9)
Switch off appliance. Unplug mains cable. Ensure the plug cannot be reconnected accidentally. Open the snap locks (6). Remove the upper part (3) from the container (8).
See illustration B, page 2. Holding the new filter bag by the flange, push it together with the rubber diaphragm over the suction connection. Ensure that the rubber diaphragm is fitted over the thicker section.
Replace the upper part of the appliance on the container and close the snap locks.
4.2 Inserting a PE Filter Bag (10)
Switch off appliance. Unplug mains cable. Ensure the plug cannot be reconnected accidentally. Open the snap locks (6). Remove the upper part (3) from the container (8).
See illustration B, page 2. Holding the new filter bag by the flange, push it together with the rubber diaphragm over the suction connection. Ensure that the rubber diaphragm is fitted over the thicker section.
Spread out the PE filter bag (10) evenly across the container floor. Arrange the edges of the PE filter bag around the container rim so that the bag is firmly clamped on all sides by the attached upper part (3).
Replace the upper part of the appliance on the container, close the snap locks.
5. The Appliance
5.1 Switching On/Off, automatic operation
Select operating mode on switch (1):
0 = Vacuum cleaner off
I = Vacuum cleaner on (manual operation)
P^- = Automatic On/Off switch:
The vacuum cleaner is switched on or off by means of a power tool connected to the mains socket (2).
5.2 PressClean
See illustration E, page 2. To clean the pleated filter (11) using a strong air flow: Press the button (4) during the work breaks (press down three times) while keeping the suction opening shut (on the suction hose or on the container).
5.3 Integrated blower function
For air-cleaning, drying purposes and diverting extracted air. For this purpose, insert a suitable hose (scope of delivery) in the exhaust port (5).

Do not allow the emitted blower air to enter confined spaces uncontrollably. Ensure the
hose used is clean. Dust can be hazardous to health.
5.4 Power socket (2)

The power socket (2) is designed for connection to a power tool only.

The total maximum permissible current consumption (of vacuum cleaner and selected unit) must not exceed the value I_max (see e, page 3).
If the switch (1) is in the 'position, the vacuum cleaner is switched on or off by means of a power tool connected to the mains socket (2).
ENGLISHen
6. Use
6.1 Dry Vacuuming
Vacuum using a dry filter, dry appliance and dry accessories only. If the cartridge is damp, dust may stick and form a crust.
Always use fleece filter bag (9) or PE filter bag (10) together with pleated filter (11).
6.2 Wet Vacuuming
Never operate the appliance without inserting a pleated filter (11). Otherwise, the appliance may be destroyed and water may also escape.
You can use either fleece filter bags (9) or PE filter bags (10). The pleated filter (11) is suitable for wet vacuuming.
Before carrying out any wet vacuuming, remove the dry vacuumed material. This process will prevent severe soiling and encrustation.
The appliance has a float system that enables it to switch off the air flow when the maximum liquid level is reached. When this happens, you will hear a distinct change in the sound of the motor. Then switch off the appliance and pull the plug from the socket. Only vacuum liquids when the float is working properly (see section 8. Maintenance).
After the appliance is switched off, some water may run back out of the hose.
Before emptying, first take the suction hose out of the liquid.
If you are then going to dry vacuum, insert a dry filter. If there is frequent switching between dry and wet vacuuming, we recommend the use of a second (replacement) filter. Allow the filter, container and accessories to dry: otherwise dust may adhere to damp components.
6.3 Transport
Leave the hose on the appliance to prevent dust from accidentally being released.
Secure the suction hose or mains connection lead to the appliance using the transport bracket.
The upper part (3) must be securely sealed to the container (8) - check that the snap locks (6) are closed.
7. Cleaning
7.1 General Cleaning Instructions
Clean the container and accessories with water. Wipe the upper part (3) with a damp cloth.
Caution! This appliance contains dust that is harmful to health. Discharge and maintenance operations (including disposal of the dust collection containers) must only be carried out by qualified specialists wearing appropriate protective clothing and equipment.
Emptying the Container

Only permitted for dusts with occupational exposure limits > 1 mg/m ^3 .
- Unplug mains cable. Ensure the plug cannot be reconnected accidentally.
- Open the snap locks (6). Remove the upper part (3) from the container (8).
- Tip out the container.
Disposing of the Fleece Filter Bag
- Pull the mains plug. Ensure the plug cannot be reconnected accidentally.
- Put on a dust mask.
- Open the snap locks (6). Remove the upper part (3) from the container (8).
- Carefully pull back the fleece filter bag (9) from the suction opening (7).
- Dispose of the vacuumed material in accordance with legal regulations.
Disposing of the PE Filter Bag
- Insertmains plug.
- Switch on the vacuum cleaner and clean the filter: Press the button (4) ('PressClean' see section5.2).
- Switch off the vacuum cleaner: turn the switch (1) to the "0" position.
- Put on a dust mask.
- Open the snap locks (6). Remove the upper part (3) from the container (8). Before setting down the upper part, turn switch (1) to the "I" position so that any falling dust is vacuumed.
- Carefully pull back the PE filter bag (10) from the suction opening (7).
- Dispose of the vacuumed material in accordance with legal regulations.
8. Maintenance
8.1 General Instructions

Before performing any maintenance, always switch off the appliance and remove the mains. Ensure the plug cannot be reconnected accially.

Clean the appliance (see section 7.).
For maintenance by the user, the vacuum cleaner must be taken apart, cleaned and maintained, to the extent possible, without endangering maintenance staff or other people.
Preventive Measures
Appropriate preventive measures include: cleaning the appliance before disassembly; providing local filtered forced ventilation where the vacuum cleaner is disassembled; cleaning of the maintenance area and providing suitable personal protective clothing and equipment.
8.2 Reduction in suction power
If the suction power decreases, carry out the following steps:
- Clean the pleated filter (11): Press button (4) ('PressClean', see section 5.2)
-
Empty the container or replace the fleece filter bag (9) or PE filter bag (10).
-
Replace the pleated filter (11), or shake it out, brush it off or remove it, rinse under running water, dry and reinsert (see section 8.3).
8.3 Replacing the pleated filter (11)
- Clean the pleated filter (11) again before replacement: Press the (4) button ('PressClean', see section 5.2).
- Unplug mains cable. Ensure the plug cannot be reconnected accidentally.
- Open the snap locks (6). Remove the upper part (3) from the container (8).
See illustration D, page 2. Turn the filter cage (12) anti-clockwise (bayonet catch) and remove. Remove the pleated filter (11).
Seal the old pleated filter immediately in a dust-tight plastic bag and dispose of it in accordance with regulations.
Fit the new pleated filter as far as the limit stop, ensuring that the filter is properly and securely positioned. Insert the filter cage (12) and turn it clockwise (bayonet catch) in order to secure the pleated filter.
8.4 Water sensor

CAUTION- Regularly clean the mobile float that is incorporated in the filter cage (12) and k it for signs of damage.
8.5 Technical inspection
At least once a year, the manufacturer or a suitably qualified and trained person must carry out a dust test, e.g. to check for damage to the filter, verify that the appliance is airtight and that the control unit is functioning correctly.
For maintenance by the user, the vacuum cleaner must be taken apart, cleaned and maintained, to the extent possible, without endangering maintenance staff or other people.
Preventive Measures
Appropriate preventive measures include: cleaning the appliance before disassembly; providing local filtered forced ventilation where the vacuum cleaner is disassembled; cleaning of the maintenance area and providing suitable personal protective clothing and equipment.
When carrying out maintenance or repairs, it is essential to dispose of any contaminated objects that cannot be adequately cleaned. These objects must be disposed of using impermeable bags and in accordance with the applicable regulations for removing such waste.
9. Troubleshooting
Reduction in suction power:
See the instructions in the section on Cleaning.
- Is the pleated filter (11) dirty? Clean the cassettes.
- Fleece filter bag (9) full? Replace the filter bag.
- PE filter bag (10) full? Replace the filter bag.
- Container (8) full? Empty the container.
- Nozzle, tubes or hose blocked? Clean.
Appliance will not start:
• Is the plug in the plug socket?
- No power from mains?
- Mains lead OK?
• Appliance hood correctly closed?
- Has the water sensor cut off? - Empty the container; then switch on and off again.
- Switch (1) in ' position? - Set to "I" position. See section 5.1.
- The vacuum cleaner is not switched on or off by a power tool, even though switch (1) is set to the 'F' position. - Connect the power tool to the plug socket (2).

Do not interfere with the appliance.
Contact an authorised workshop or
HiKOKI's after-sales service department (see section on 11. Repairs).
10. Accessories
Use only genuine HiKOKI accessories.
If you need any accessories, check with your dealer.
See page 4.
A Fleece filter bag
B P E f i l t e r b a g
C Suction hose
D Suction nozzle
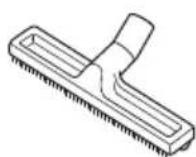
E Floor nozzle set (with floor piece and wet vacuuming piece)
F Round brush nozzle
G C rev ic en o z z l e
H Adapter
I Pipe
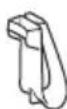
J Hook
K Pipe holder
11. Repairs
All quality power tools will eventually require servicing or replacement of parts because of wear from normal use. To assure that only authorized replacement parts will be used, all service and repairs must be performed by a HiKOKI AUTHORIZED SERVICE CENTER, ONLY.
If the supply cord is damaged, it must be replaced by the manufacturer, its service agent of similarly qualified persons in order to avoid a hazard.
12. Technical specifications
Explanatory notes on the specifications on page 3. Changes due to technological progress reserved.
K = Dust class As per EN 60335-2-69.
A = Outer dimensions
U = Mains voltage
F = Mains frequency
I = Current consumption
N = Mains connection lead
P_1 =Nominal power input
p_U1 =Max. vacuum (at fan)
ENGLISHen
p_U2 =Max. vacuum (at blower) V_I/s1 =Max. volume flow (at fan) V_I/s2 =Max. volume flow (at blower) D_max1 =Max. flow rate (at fan) D_max2 =Max. flow rate (at blower) V =Max. container volume m =Weight (without mains cable) A-effective perceived sound levels: L_pA =Sound pressure level L_WA =Acoustic power level During operation the noise level can exceed 80 dB(A).

Wear ear protectors!
Measured values determined in conformity with EN 60704.
\~ Alternating current
The technical specifications quoted are subject to tolerances (in compliance with the relevant valid standards).
GUARANTEE
We guarantee HiKOKI Power Tools in accordance with statutory/country specific regulation. This guarantee does not cover defects or damage due to misuse, abuse, or normal wear and tear. In case of complaint, please send the Power Tool, undismantled, with the GUARANTEE CERTIFICATE found at the end of this Handling instruction, to a HiKOKI Authorized Service Center.
NOTE
Due to HiKOKI's continuing program of research and development, the specifications herein are subject to change without prior notice.
m = Peso (sin cable de red)
L_pA =äänenpainetaso
L_WA =
4 Knapp for filterrensing "PressClean" (PC)
5 Utblåsningsåpning
6 Knepplås
7 Innsugsåpning
8 Beholder
9 Fleece-filterpose
10 PE-filterpose
11 Foldefilter
12 Filterstøttekurv
4. Før bruk

4.1 Sette i fleece-filterpose (9)
Kassere fleece-filterpose
Kassere PE-filterposer
natural_image
Line drawing of a quill pen with inkwell (no text or symbols)| Deutsch Suomi | |||
| GARANTIESCHEIN1Modell-Nr.2Serien-Nr.3Kaufdatum4Name und Anschrift des Kunden5Name und Anschrift des Händlers(Bitte mit Namen und Anschrift des Handlersabstempeln) | TAKUUTODISTUS1Malli nro2Sarja nro3Ostopäivämäärä4Asiakkaan nimi ja osoite5Myyjän nimi ja osoite(Leimaa myyjän nimi ja osoite) | ||
| English Norsk | |||
| GUARANTEE CERTIFICATE1Model No.2Serial No.3Date of Purchase4Customer Name and Address5Dealer Name and Address(Please stamp dealer name and address) | GARANTISERTIFIKAT1Modellnr.2Serienr.3Kjøpsdato4Kundens navn og adresse5Forhandlerens navn og adresse(Vennligst stemple forhandlerens navn og adresse) | ||
| Français Dansk | |||
| CERTIFICAT DE GARANTIE1No. de modèle2No de série3Date d'achat4Nom et adresse du client5Nom et adresse du revendeur(Cachet portant le nom et l'adresse du revendeur) | GARANTIBEVIS1Modelnummer2Serienummer3Købsdato4Kundes navn og adresse5Forhandlers navn og adresse(Indsæt stempel med forhandlers navn og adresse) | ||
| Nederlands Polski | |||
| GARANTIEBEWIJS1Modelnummer2Seriennummer3Datum van aankoop4Naam en adres van de gebruiker5Naam en adres van de handelaar(Stempel a.u.b. naam en adres vande de handelaar) | GWARANCJA1Model2Numer seryjny3Data zakupu4Nazwa klienta i adres5Nazwa dealera i adres(Pieczęć punktu sprzedaży) | ||
| Italiano Ελληνικά | |||
| CERTIFICATO DI GARANZIA1Modello2N° di serie3Data di acquisto4Nome e indirizzo dell'acquirente5Nome e indirizzo del rivenditore(Si prega di apporre il timbro con questi dati) | ПІЗТОПОІНТИКО ЕГГУНЄНЗ1Ap. Мовтёлou2Ауξων Ap.3Нμερομηνία αγοράς4'Овома кай дієúθυνση πελάτη5'Овома кай дієúθυνση μεταπωλητή(Паракалоύμε να χρησιμοποιηθεί σφραγίδα) | ||
| Español Magyar | |||
| CERTIFICADO DE GARANTÍA1Número de modelo2Número de serie3Fecha de adquisición4Nombre y dirección del cliente5Nombre y dirección del distribudor(Se ruega poner el sello del distribudor con su nombrey dirección) | GARANCIA BIZONYLAT1Tipusszám2Sorozatszám3A vásárlás dátuma4A Vásárló neve és címe5 A Kereskedő neve és címe(Kérjük ide elhelyezni a Kereskedő nevének éscímének pecsétjét) | ||
| Português Русский | |||
| CERTIFICADO DE GARANTIA1Número do modelo2Número do série3Data de compra4Nome e morada do cliente5Nome e morada do distribuidor(Por favor, carimbe o nome e morada do distribuidor) | ГАРАНТИЙНЫЙ СЕРТИФИКАТ1Модель No2Серийный No3Дата покупки4Название и адрес заказчика5Название и адрес дилера(Пожалуйста, внесите название и адрес дилера) | ||
| Svenska | |||
| GARANTICERTIFIKAT1Modellnr2Serienr3Inköpsdatum4Kundens namn och adress5Försäljarens namn och adress(Stämpla försäljarens namn och adress) | |||
HiKOKI
| 1 | |
| 2 | |
| 3 | |
| 4 | |
| 5 |
Siemensring 34, 47877 willich, Germany
Tel: +49 2154 49930
Fax: +49 2154 499350
URL: http://www.hikoki-powertools.de
Hikoki Power Tools Netherlands B.V.
Brabanthaven 11, 3433 PJ Nieuwegein, The Netherlands
Tel: +31 30 6084040
Fax: +31 30 6067266
URL: http://www.hikoki-powertools.nl
Hikoki Power Tools (U.K.) Ltd.
Precedent Drive, Rooksley, Milton Keynes, MK 13, 8PJ,
United Kingdom
Tel: +44 1908 660663
Fax: +44 1908 606642
URL: http://www.hikoki-powertools.uk
Hikoki Power Tools France S.A.S.
Hikoki Power Tools Belgium N.V./S.A.
Koningin Astridlaan 51, B-1780 Wemmel, Belgium
Tel: +32 2 460 1720
Fax: +32 2 460 2542
URL http://www.hikoki-powertools.be
Hikoki Power Tools Italia S.p.A
Via Piave 35, 36077, Altavilla Vicentina (VI), Italy
Tel: +39 0444 548111
Fax: +39 0444 548110
URL: http://www.hikoki-powertools.it
Hikoki Power Tools Ibérica, S.A.
C/ Puigbarral, 26-28, Pol. Ind. Can Petit, 08227 Terrassa
(Barcelona), Spain
Tel: +34 93 735 6722
Fax: +34 93 735 7442
URL: http://www.hikoki-powertools.es
Kjeller Vest 7, N-2007 Kjeller, Norway
Tel: (+47) 6692 6600
Fax: (+47) 6692 6650
URL: http://www.hikoki-powertools.no
Hikoki Power Tools Sweden AB
Rotebergsvagen 2B SE-192 78 Sollentuna, Sweden
Tel: (+46) 8 598 999 00
Fax: (+46) 8 598 999 40
URL: http://www.hikoki-powertools.se
Hikoki Power Tools Denmark A/S
Lillebaeltsvej 90, 6715 Esbjerg N, Denmark
Tel: (+45) 75 14 32 00
Fax: (+45) 75 14 36 66
URL: http://www.hikoki-powertools.dk
Hikoki Power Tools Finland Oy
Tupalankatu 9, 15680 Lahti, Finland
Tel: (+358) 20 7431 530
Fax: (+358) 20 7431 531
URL: http://www.hikoki-powertools.fi
Hikoki Power Tools Hungary Kft.
natural_image
Line drawing of a quill pen with inkwell (no text or symbols)| Deutsch ItalianoEG-KONFORMITÄTSERKLÄRUNGWir erklären in alleiniger Verantwortung, dass der durch den Typ und den spezifischen Identifizierungscode *1) identifizierte Nass-, Trockensauger allen einschlägigen Bestimmungen der Richtlinien *2) und Normen *3) entspricht. Technische Unterlagen unter *4) – Siehe unten.Die Leitung der repräsentativen Behörde für europäische Normen und Richtlinien ist berechtigt, die technischen Unterlagen zusammenzustellen.Die Erklärung gilt für die an dem Produkt angebrachte CE-Kennzeichnung. | DICHIARAZIONE DI CONFORMITÀ CEDichiariamo sotto la nostra esclusiva responsabilità che l’aspiratore, identificato dal tipo e dal codice identificativo specifico *1), è conforme a tutti i requisiti delle direttive *2) e degli standard *3). Documentazione tecnica presso *4) – Vedere sotto.Il gestore delle norme europee presso l’ufficio di rappresentanza in Europa è autorizzato a compilare il fascicolo tecnico.La dichiarazione è applicabile ai prodotti cui sono applicati i marchi CE. | |
| English Español | ||
| EC DECLARATION OF CONFORMITYWe declare under our sole responsibility that Dust Extractor, identified by type and specific identification code *1), is in conformity with all relevant requirements of the directives *2) and standards *3). Technical file at *4) – See below.The European Standard Manager at the representative office in Europe is authorized to compile the technical file.The declaration is applicable to the product affixed CE marking. | DECLARACIÓN DE CONFORMIDAD DE LA CEDeclaramos bajo nuestra única responsabilidad que el Aspirador, identificado por tipo y por código de identificación específico *1), está en conformidad con todas las disposiciones correspondientes de las directivas *2) y de las normas *3). Documentación técnica en *4) – Ver a continuación.El Director de Normas Europeas en la oficina de representación en Europa está autorizado para elaborar el expediente técnico.La declaración se aplica al producto con marcas de la CE. | |
| Français PortuguêsDECLARATION DE CONFORMITE CENous déclarons sous notre entière responsabilité que l’ aspirateur eau & poussières, identifié par le type et le code d’identification spécifique *1) est en conformité avec toutes les exigences applicables des directives *2) et des normes *3). Dossier technique en *4) - Voir ci-dessous.Le Gestionnaire des normes européennes du bureau de représentation en Europe est autorisé à constituer le dossier technique.Cette déclaration s’applique aux produits désignés CE. | DECLARAÇÃO DE CONFORMIDADE CEDeclaramos, sob nossa única e inteira responsabilidade, que Aspirador, identificado por tipo e código de identificação específico *1), está em conformidade com todos os requerimentos relevantes das diretivas *2) e normas *3). Ficheiro técnico em *4)–Consulte abaixo.O Gestor de Normas Europeias no escritório de representação na Europa está autorizado a compilar o ficheiro técnico.A declaração aplica-se aos produtos com marca CE. | |
| Nederlands | Svenska | |
| EC VERKLARING VAN CONFORMITEITWij verklaren onder onze eigen verantwoordelijkheid dat Nat-droog stofzuiger, geidentificeerd door het type en de specifieke identificatiecode*1), voldoet aan alle relevante bepalingen van de richtlijnen*2) en normen*3). Technische documentatie bij*4) – zie onder.De Europese Normen Manager bij de vertegenwoordiging in Europa is gemachtigd om het technisch dossier samen te stellen.Deze verklaring is van toepassing op producten voorzien van de CE-markeringen. | EG-DEKLARATION BETRÄFFANDE LIKFORMIGHETVi förklarar på eget ansvar att denna industridammsugare, identifierad enligt typ och särskild identifikationskod *1), överensstämmer med alla relevanta krav i direktiven *2) och standarderna *3). Teknisk fil enligt *4) – Se nedan.Den europeiska standardansvariga på representationskontoret i Europa är auktoriserad att sammenställa den tekniska filen.Denna försäkran gäller för produkten med tillhörande CE-märkning. | |
| *1) RP250YDL C355053RRP300YDL C355054R*2) 2006/42/EC, 2014/30/EU, 2011/65/EU*3) EN60335-1:2012+A11:2014EN60335-2-69:2012EN55014-1:2006+A1:2009+A2:2011EN55014-2:1997+A1:2001+A2:2008EN61000-3-2:2014EN61000-3-3:2013 | ||
| *4) Representative office in EuropeHikoki Power Tools Deutschland GmbHSiemensring 34, 47877 Willich, GermanyHead office in JapanKoki Holdings Co., Ltd.Shinagawa Intercity Tower A, 15-1, Konan 2-chome,Minato-ku, Tokyo, Japan | 29. 6. 2018Naoto YamashiroEuropean Standard Manager29. 6. 2018  A. NakagawaCorporate Officer A. NakagawaCorporate Officer | |
| Suomi Ελληνικά | |||
| EY-ILMOITUS YHDENMUKAISUUDESTAVakuutamme yksinomaisella vastuullamme, että pólnimuri, joka identifioidaan typin ja erityisen tunnistuskoodin *1) perusteella, on kaikkien direktivien *2) ja standardien *3) asiaankuuluvien vaatimusten mukainen. Tekninen tiedosto kohdassa *4) – katso alta.Eurooppalaisten standardien hallintaelin Euroopan edustustossa on valtuutettu kokoamaan teknisen tiedoston.Ilmoitus on sovellettavissa tuotteeseen kiinnitettyyn CE-merkintään. | EK ΔΗΛΩΣΗ ΕΝΑΡΜΟΝΙΣΜΟΥΔηλώνουμε με αποκλειστική μας ευθύνη ότι ο Αντάπτορας σκόνης, ο οποίος προσδιορίζεται από τον τύπο και ειδικό αναγνωριστικό κωδικό *1), είναι σύμφωνος με όλες τις σχετικές απαιτήσεις των Οδηγιών *2) και στα σχετικά πρότυπα *3). Τεχνικό Αρχείο στο *4) – Δείτε παρακάτω.Ο Διαχειριστής Ευρωπαϊκών Προτύπων στο γραφείο εκπροσώτησης στην Ευρώπη είναι εξουσιοδοτημένος για τη σύνταξη του τεχνικού φακέλου.Η δήλωση ισχύει μόνο για το προϊόν που είναι τοποβετημένη σήμανση CE. | ||
| Norsk Magyar | |||
| EF'S ERKLÆRING OM OVERENSSTEMMELSEVi erklærer på eget ansvar at støvsuger, identifisert etter type og spesifikk identifikasjonskode *1), er i samsvar med alle relevante krav i direktiver *2) og standarder *3). Teknisk fil under *4) - Se nedenfor.Styreren for europeiske standarder ved representantkontoret i Europa er autorisert til å kompilere den tekniske filen.Erklæringen gjelder for CE-merket på produktet. | EK MEGFELELŐSÉGI NYILATKOZATA kizárólagos felelősségünkre kijelentjük, hogy a lpari porszívó, mely tipus és egyedi azonositó kód *1) alapján azonositott, megfelel az irányelvek vonatkozó követelményeinek *2) és szabványainak *3). Műszaki fájl a *4) - Lásd alább.Az EU képviseleti iroda európai szabványügyi menedzsere jogosult a műszaki dokumentáció összeállítására.Jelen nyilatkozat a terméken feltüntetett CE jelzésre vonatkozik. | ||
| Dansk Русский | |||
| EF-OVERENSSTEMMELSESERKLÆRINGVi erklærer os fuldstændige ansvarlige for, at industri støvsuger, identificeret ved type og specifik identifikationskode *1), er i overensstemmelse med alle relevante krav i direktiverne *2) og standarderne *3). Teknisk fil i *4) – Se nedenfor.Lederen af europæiske standarder på repræsentationskontoret i Europa er bemyndiget til at kompilere den tekniske fil.Erklæringen gælder produktet, der er mærket med CE. | DEKLARAÇIJA COOTBETCTBIIA ECМы с полной ответственностью заявляем, что промышленный пылесос, идентифицируемый по типу и соответствующему идентификационному коду *1), отвечает всем соответствующим требованиям директив *2) и стандартов *3). Техническая документация в *4) – см. ниже.Менеджер по европейским стандартам в представительстве в Европе уполномочен составлять техническую документацию.Данная декларация относится к изделиям, на которых имеется маркировка CE. | ||
| Polski | DEKLARACJA ZGODNOŚCI Z WEOświadczamy na własną wyłączną odpowiedzialność, że Odkurzacz podanego typu i oznaczony unikalnym kodem identyfikacyjnym *1) jest zgodny z wszystkimi właściwymi wymogami dyrektyw *2) i norm *3). Dokumentacja techniczna w *4) – Patrz poniżej.Menedżer Norm Europejskich przedstawicielstwa firmy w Europie jest upoważniony do sporządzania dokumentacji technicznej.Niniejsza deklaracja ma zastosowanie do produktu opatrzonego znakiem CE. | ||
| *1) RP250YDL C355053RRP300YDL C355054R*2) 2006/42/EC, 2014/30/EU, 2011/65/EU*3) EN60335-1:2012+A11:2014EN60335-2-69:2012EN55014-1:2006+A1:2009+A2:2011EN55014-2:1997+A1:2001+A2:2008EN61000-3-2:2014EN61000-3-3:2013 | |||
| *4) Representative office in EuropeHikoki Power Tools Deutschland GmbHSiemensring 34, 47877 Willich, GermanyHead office in JapanKoki Holdings Co., Ltd.Shinagawa Intercity Tower A, 15-1, Konan 2-chome,Minato-ku, Tokyo, Japan | 29. 6. 2018Naoto YamashiroEuropean Standard Manager29. 6. 2018A. NakagawaCorporate Officer | ||