
RP3608DB - Vacuum Cleaner HiKOKI - Free user manual and instructions
Find the device manual for free RP3608DB HiKOKI in PDF.
| Product Type | Cordless Vacuum Cleaner |
| Brand | HiKOKI |
| Model | RP3608DB |
| Rated Voltage | 36 V |
| Motor Type | DC Motor |
| Maximum Airflow | 3.5 m³/min |
| Maximum Suction | 20.1 kPa |
| Tank Capacity | 8 L |
| Filter Class | L (light dust) |
| Wireless Technology | Bluetooth 5.0 |
| Dimensions (L × W × H) | 331 mm × 369 mm × 408 mm |
| Weight (with batteries) | 9.8 kg (BSL36A18) / 10.4 kg (BSL36B18) |
| Compatible Batteries | Multi-volt (BSL36A18, BSL36B18) |
| Power Modes | 3 (Eco, Standard, Turbo) |
| Wireless Linking Function | Yes (with compatible power tool) |
| Battery Level Indicator | Yes (on the unit and on the battery) |
| Dust Removal Mechanism | Automatic (on every stop) |
| Included Accessories | Hose, rigid pipe, flat nozzle, main nozzle, plastic bag, fittings, belt, tool bag, tool box, 2 batteries, charger, battery covers |
| Safety | Protection against overload, overheating, short circuit |
| Maintenance | Regular filter cleaning, screw check |
| Repairability | Repair only by an authorized after-sales service |
| Usage Type | Indoor only, dry |
| Noise Level | 88 dB(A) (power) / 75 dB(A) (pressure) |
Frequently Asked Questions - RP3608DB HiKOKI
User questions about RP3608DB HiKOKI
0 question about this device. Answer the ones you know or ask your own.
Ask a new question about this device
Download the instructions for your Vacuum Cleaner in PDF format for free! Find your manual RP3608DB - HiKOKI and take your electronic device back in hand. On this page are published all the documents necessary for the use of your device. RP3608DB by HiKOKI.
USER MANUAL RP3608DB HiKOKI
natural_image
Line drawing of a portable gasifier with coiled hose and control panel (no text or symbols)
en Handling instructions
de Bedienungsanleitung
fr Mode d'emploi
it Istruzioni per l'uso
nl Gebruiksaanwijzing
es Instrucciones de manejo
pt Instruções de uso
SV Bruksanvisning
da Brugsanvisning
no Bruksanvisning
fi Käyttöohjeet
1
2

3

4


flowchart
graph TD
    A["1"] --> B["2"]
    B --> C["3"]
    C --> D["1"]
    D --> E["2"]
    E --> F["3"]
    F --> G["1"]
    G --> H["2"]
    H --> I["3"]
    I --> J["1"]
    style A fill:#f9f,stroke:#333
    style B fill:#f9f,stroke:#333
    style C fill:#f9f,stroke:#333
    style D fill:#f9f,stroke:#333
    style E fill:#f9f,stroke:#333
    style F fill:#f9f,stroke:#333
    style G fill:#f9f,stroke:#333
    style H fill:#f9f,stroke:#333
    style I fill:#f9f,stroke:#333
    note right of H: AUTO
    note left of I: I
6

8
a

b


C

d
9


10
11 12


13 14


15


natural_image
Illustration of a hand holding a mechanical device with a textured surface (no text or symbols)
16 17


18 19


20


21

1

flowchart
graph LR
    A["10"] --> B["AUTO/MAN"]
    B --> C["→"]
    C --> D["AUTO/MAN."]
2

3
22

natural_image
Line drawing of a hand using a tool to adjust or install a mechanical component (no text or symbols present)1
2
3
23 24


flowchart
graph LR
    A["Device with Bluetooth icon"] --> B["Device with Bluetooth icon"]
25 26

flowchart
graph LR
    A["AUTO MAN."] --> B["Output"]
    style A fill:#fff,stroke:#000
    style B fill:#fff,stroke:#000
27


28

natural_image
Diagram showing connections between a mobile phone, cable, and internal device (no text or symbols)a

b
29
30

SAFETY PRECAUTIONS FOR THE CORDLESS TOOL
○ In order to prevent accidents, such as fires, electric shock, and injuries, be sure to follow the “Safety Precautions” stated below.
Before use, read all of the "Safety Precautions" and use the appliance correctly according to the instructions.
- Be sure to keep this instructions manual in the where it can be consulted by the user at any time.
WARNING
- Keep the workplace clean. Littered place or workbench may cause accidents.
- Pay attention to the situation around the workplace as well. Make the workplace bright enough. Do not use the appliance in places with infl ammable liquid or gas.
- Keep children away. Do not let other persons than the operator touch the cleaner or the cord. Keep persons other than the operator away from the workplace.
- Use the cleaner suitable for the work. Use the appliance only for the specified applications.
- Do not handle the power cord roughly.
- Do not carry the charger with only the power cord or pull the plug from the socket while holding the power cord.
- Keep the power cord away from heat, oil and sharp corners.
- The cleaner should be maintained carefully. Replacement of accessories should follow the instructions manual. Regularly check the power cord of the charger and ask your dealer for repairs in the event of it being damaged. If an extension cord is used, check it periodically, and when damaged, replace it.
- In the following cases, switch off the cleaner and turn OFF the main power supply:
The cleaner is not used or it is sent for repair.
Accessories, such as a hose and a fi lter, are replaced.
Danger is expected.
- Avoid sudden starting. Do not carry the appliance which is connected to the power supply with your finger placed on the switch. Confirm that the switch is off before insert the battery.
- Do the work with enough care. When you use the cleaner, pay attention to the handling method, how to do the work, the surrounding situation, etc. and perform the operation in a cautious manner. When you do the work at a distance from the cleaner, pay attention to the operation condition of the cleaner. (abnormal sound, dust blow off, emitting smoke, etc.) Exercise common sense. Do not use the appliance when you are tired.
- Check for any damaged part.
Before use, check for any damages in the protective cover or other parts and confi rm whether the appliance operates normally and performs specifi ed functions.
☐ Check for any abnormalities in all places that may affect the operation, the position adjustment and clamping state of movable portions, damaged parts or attachment state.
○ Replacement and repair of damaged protective cover and other parts should follow the provisions of the handling instructions. If there are no such provisions in the manual, please request repair from your local retailer or authorized servicing agent.
☐ If the switch fails, please request repair from your local retailer or authorized servicing agent. Avoid using the cleaner which cannot be started or stopped by the switch. - Contact the specialty store for repair of the cleaner.
○ Since this cleaner conforms to the corresponding safety standard, do not modify it.
○ Be sure to request repair from your local retailer or authorized servicing agent. Self-repair may cause accidents or injuries.
12. Never allow children, persons with reduced physical, sensory or mental capabilities, or lack of experience and knowledge to use the appliance. Children shall not play with the appliance.
13. Operators shall be adequately instructed on the use of the appliance.
e place
PRECAUTIONS FOR USE OF THE CORDLESS CLEANER
The precautions common to the cleaners have been described. For the cleaners for electric tools, follow further precautions described below:
WARNING
- Prevent the appliance from sucking in the following:
○ Generated spark during metal grinding or cutting.
○ High temperature things, such as lighted cigarette.
○ Inflammable substances (gasoline, thinner, benzine, kerosene, paint, etc.), explosive substances (nitroglycerine, etc.), combustible substances (aluminum, zinc, magnesium, titanium, red phosphorus, yellow phosphorus, celluloid, etc.) - Sharp things, such as nail and razor.
○ Wood chip, metal, stone, string, etc.
Solidification materials, such as cement powder and toner, and conductive fine dusts, such as metal powder and carbon powder.
○ Foaming liquids, such as oil, boiling water, chemical fluid, and detergent. Liquids, such as water and oil. May cause fires or injuries. - Set the fi liter correctly before use. Do not use the appliance without the fi liter or with it set in a wrong position, or do not use a torn fi liter. May cause failures, such as motor burnout.
- Do not use the appliance with its suction opening, air inlet or exhaust opening obstructed. The temperature of the motor may rise abnormally, causing troubles such as deformation of parts or motor burnout.
- Do not douse the unit with water or oil.
Doing so may result in electric shock or malfunction as the unit is not waterproofed.
- Do not topple the appliance or do not use it on its side. May cause electric shock or failures.
- To prevent deformation or breakage of the appliance due to toppling etc., the appliance should be moved calmly. Breakage, crack, or deformation may cause injuries.
- When you drop or bump the appliance accidentally, check for breakage, crack, or deformation in the appliance. Breakage, crack or deformation may cause injuries.
- When the appliance is out of condition or emits abnormal sound during use, immediately turn off the switch and request repair from your local retailer or authorized servicing agent. If you continue to use the appliance as it is, it may lead to injuries.
- This appliance is designed for industrial use. This appliance is only used indoors. Never use it outdoors. Insulation deterioration may cause electric shock or electrical fi re. This appliance shall be stored indoors only.
- Do not use the product if the tool or the battery terminals (battery mount) are deformed. Installing the battery could cause a short circuit that could result in smoke emission or ignition.
English
- Keep the tool's terminals (battery mount) free of swarf and dust.
- Prior to use, make sure that swarf and dust have not collected in the area of the terminals.
During use, try to avoid swarf or dust on the tool from falling on the battery.
When suspending operation or after use, do not leave the tool in an area where it may be exposed to falling swarf or dust.
○ Wipe clean any dust, dirt, water or other liquid which may collect on the battery connector.
Doing so could cause a short circuit that could result in smoke emission or ignition.
-
Do not dispose of the battery in fire. If the battery is burnt, it may explode.
-
Bring the battery to the shop from which it was purchased as soon as the post-charging battery life becomes too short for practical use. Do not dispose of the exhausted battery.
-
The frequency band of this product operates on electric medical devices, industrial or scientific equipment as well as local wireless stations used for id mobile objects utilized in factory production lines (radio stations that require a license) and specified low power radio stations (radio stations that do not require a license).
Use of this product in these locations may result in radio frequency interference.
-
The effective range for wireless linking is approximately 10 m. However, this range may be shortened by obstructions between the electric power tool and the cordless cleaner.
-
Prior to use, make sure that the cordless cleaner and the electric power tool can be linked when using the wireless linking function.
If used without establishing a link, the operator may breathe in the dust released by the electric power tool.
CAUTION ON LITHIUM-ION BATTERY
To extend the lifetime, the lithium-ion battery equips with the protection function to stop the output.
In the cases of 1 to 3 described below, when using this product, even if you are pulling the switch, the motor may stop. This is not the trouble but the result of protection function.
- When the battery power remaining runs out, the motor stops.
In such a case, charge it up immediately.
-
If the tool is overloaded, the motor may stop. In this case, release the switch of tool and eliminate causes of overloading. After that, you can use it again.
-
If the battery is overheated under overload work, the battery power may stop.
In this case, stop using the battery and let the battery cool. After that, you can use it again.
Furthermore, please heed the following warning and caution.
WARNING
In order to prevent any battery leakage, heat generation, smoke emission, explosion and ignition beforehand, please be sure to heed the following precautions.
- Make sure that swarf and dust do not collect on the battery.
During work make sure that swarf and dust do not fall on the battery.
○ Make sure that any swarf and dust falling on the power tool during work do not collect on the battery. -
Do not store an unused battery in a location exposed to swarf and dust.
Before storing a battery, remove any swarf and dust that may adhere to it and do not store it together with metal parts (screws, nails, etc.). -
Do not pierce battery with a sharp object such as a nail, strike with a hammer, step on, throw or subject the battery to severe physical shock.
- Do not use an apparently damaged or deformed battery.
- Do not use the battery in reverse polarity.
- Do not connect directly to an electrical outlets or car cigarette lighter sockets.
- Do not use the battery for a purpose other than those specified.
- If the battery charging fails to complete even when a specified recharging time has elapsed, immediately stop further recharging.
- Do not put or subject the battery to high temperatures or high pressure such as into a microwave oven, dryer, or high pressure container.
- Keep away from fire immediately when leakage or foul odor are detected.
- Do not use in a location where strong static electricity generates.
- If there is battery leakage, foul odor, heat generated, then is discolored or deformed, or in any way appears abnormal during use, recharging or storage, immediately remove it from the equipment or battery charger, and stop use.
- Do not immerse the battery or allow any fluids to flow inside. Conductive liquid ingress, such as water, cause damage resulting in fire or explosion. Store your battery in a cool, dry place, away from combustible and flammable items. Corrosive gas atmospheres must be avoided.
CAUTION
- If liquid leaking from the battery gets into your eyes, do not rub your eyes and wash them well with fresh clean water such as tap water and contact a doctor immediately.
If left untreated, the liquid may cause eye-problems.
- If liquid leaks onto your skin or clothes, wash well with clean water such as tap water immediately.
There is a possibility that this can cause skin irritation.
- If you find rust, foul odor, overheating, discolor, deformation, and/or other irregularities when using the battery for the first time, do not use and return it to your supplier or vendor.
WARNING
If a conductive foreign matter enters in the terminal of lithium ion battery, the battery may be shorted, causing fi re. When storing the lithium ion battery, obey surely the rules of following contents.
Do not place conductive debris, nail and wires such as iron wire and copper wire in the storage case.
To prevent shorting from occurring, load the battery in the tool or insert securely the battery cover for storing until the ventilator is not seen.
REGARDING LITHIUM-ION BATTERY TRANSPORTATION
When transporting a lithium-ion battery, please observe the following precautions.
WARNING
Notify the transporting company that a package contains a lithium-ion battery, inform the company of its power output and follow the instructions of the transportation company when arranging transport.
○ Lithium-ion batteries that exceed a power output of 100 Wh are considered to be in the freight classification of Dangerous Goods and will require special application procedures.
☐ For transportation abroad, you must comply with international law and the rules and regulations of the destination country.
☐ If the BSL36B18 is installed in the power tool, the power output will exceed 100 Wh and the unit will be classified as Dangerous Goods for freight classification.

USB DEVICE CONNECTION PRECAUTIONS (UC18YSL3)
When an unexpected problem occurs, the data in a USB device connected to this product may be corrupted or lost. Always make sure to back up any data contained USB device prior to use with this product.
Please be aware that our company accepts absolutely no responsibility for any data stored in a USB device that is corrupted or lost, nor for any damage that may occur to a connected device.
WARNING
- Prior to use, check the connecting USB cable for any defect or damage.
Using a defective or damaged USB cable can cause smoke emission or ignition.
When the product is not being used, cover the USB port with the rubber cover.
Buildup of dust etc. in the USB port can cause smoke emission or ignition.
NOTE
- There may be an occasional pause during USB recharging.
When a USB device is not being charged, remove the USB device from the charger.
Failure to do so may not only reduce the battery life of a USB device, but may also result in unexpected accidents.
- It may not be possible to charge some USB devices, depending on the type of device.
Bluetooth® WIRELESS TECHNOLOGY
The Bluetooth device equipped with this product operates on a 2.4 GHz frequency range.
To ensure proper use, please be aware of the following.
- In using this product, a radio station license is not required as this product is granted a certification of conformance to technical standards as a low power data communication system wireless station facility.
- Since this product complies with the certification of conformance to technical standards, never disassemble or modify this product.
- This product operates on the same frequency bands as those for equipment such as microwave ovens, digital cordless phones, wireless LAN systems, and other Bluetooth equipment. To avoid radio interference between the product and the aforementioned equipment, keep the units separated during use.
Radio signals may not reach the product.
- With the exception of this product's malfunction, the company is not responsible for any damage that may occur from Bluetooth communication.
- Bluetooth® mark and logo are registered trademarks of Bluetooth SIG, Inc., and are used under license.
- Individuals using pacemakers or other medical devices should contact the device's manufacturer, appropriate medical institution or dealer to verify the effects of electromagnetic wave interference.
- Do not use in the vicinity of automatically controlled devices including automatic doors and fire alarms.
Electromagnetic wave interference from the product may affect automatically controlled devices, causing malfunction or accident.
● Avoid use in crowded locations where an individual wearing a pacemaker may be present.
The electromagnetic wave emitted from the product can adversely affect a pacemaker's operation.
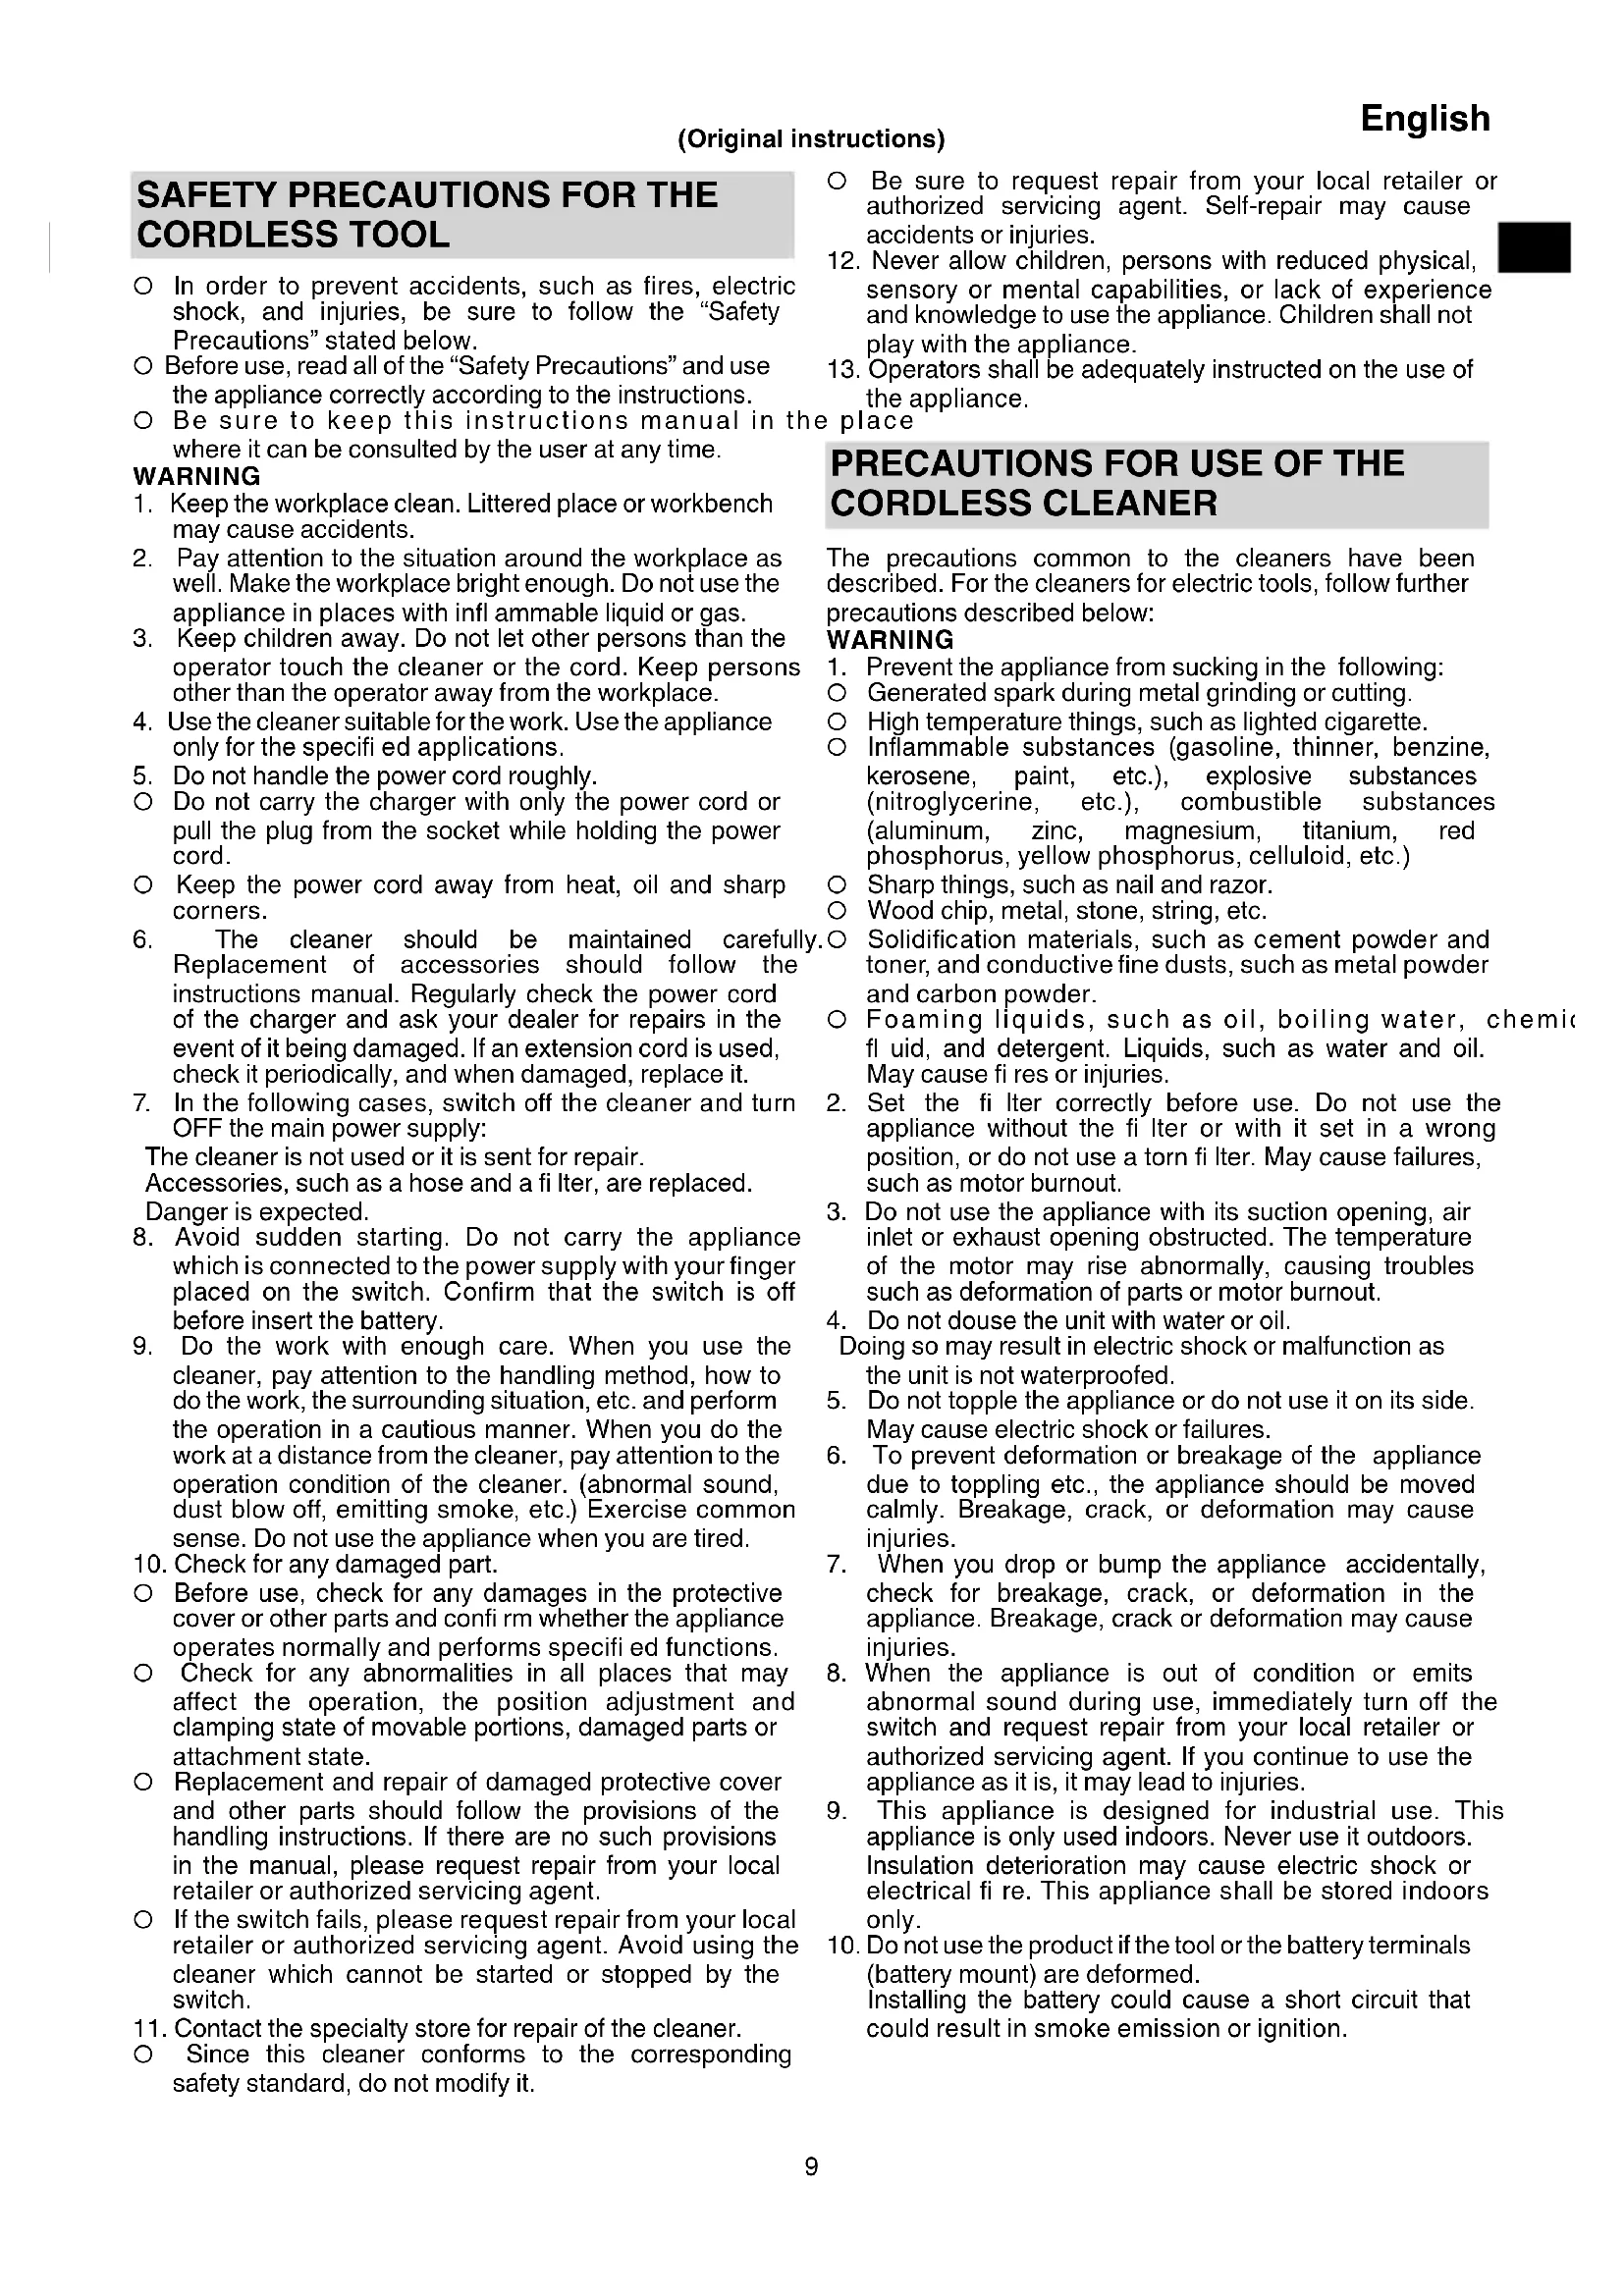
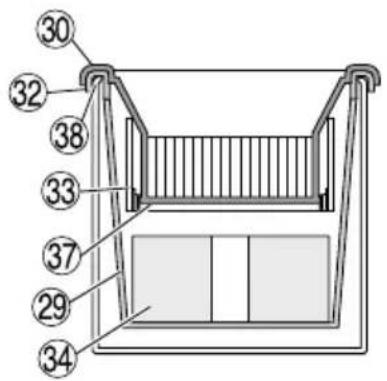
NAMES OF PARTS (Fig. 1 – Fig. 30)
| 1 | Vacuum switch | 32 | Packing of the prefi lter |
| 2 | Name plate Cloth fi lter | 33 | |
| 3 | Operation panel Filter damper | ||
| 4 | Auto/manual switch | 35 | Suction opening (Inside of the tank) |
| 5 | Remaining battery indicator switch | 36 | Filter's seam |
| 6 | Remaining battery indicator lamp (Product) | 37 | Bottom of the dust fi lter |
| 7 | Battery number Tank lip | 38 | |
| 8 | Mode display lamp Hose side | ||
| 9 | Mode change-over switch | 40 | Joint (H) |
| 10 | Auto mode display lamp | 41 | Joint handle |
| 11 | Suction opening | 42 | Pipe |
| 12 | Caster | 43 | Master Nozzle |
| 13 | Tank Hose belt | 44 | |
| 14 | Clamp | 45 | Power cord (power tool) |
| 15 | Tool box (2XC only) Lever | 46 | |
| 16 | Suction opening / Exhaust opening | 47 | Release |
| 17 | Charge indicator lamp | 48 | Fix |
| 18 | Battery Hook bolt | 49 | |
| 19 | Clamp (A) Both ends of hose | ||
| 20 | Battery guard Crevice nozzle | ||
| 21 | Groove Paper fi lter | 52 | |
| 22 | Terminal Suction hole | 53 | |
| 23 | Battery number Cardboard | ||
| 24 | Latch Fold | 55 | |
| 25 | Button | 56 | Bend |
| 26 | Hose (id 28 mm × 5 m long) | 57 | Stopper |
| 27 | Head | 58 | Rubber packing |
| 28 | Handle | 59 | Remaining battery indicator lamp (Battery) |
| 29 | Pre filter | 60 | Rubber cover |
| 30 | Dust filter | 61 | USB port |
| 31 | Plastic bag | 62 | USB cable |
SYMBOLS
WARNING
The following show symbols used for the machine. Be sure that you understand their meaning before use.
| RP3608DB(L): Cordless Cleaner | |
 | To reduce the risk of injury, user must read instruction manual. |
 | |
 | Only for EU countriesDo not dispose of electric tools together with household waste material!In observance of European Directive 2012/19/EU on waste electrical and electronic equipment and its implementation in accordance with national law, electric tools that have reached the end of their life must be collected separately and returned to an environmentally compatible recycling facility. |
 | Never stand on the cleaner. |
 | Warning |
 | Warning! The cleaner may contain hazardous dust. |
 | Dust class L (light). The cleaners are capable of picking up dust class L. Follow your country's regulations relating to dusts and to occupational health and safety. |
 | Switching ON |
 | Switching OFF |
 | Disconnect the battery |
 | Prohibited action |
 | Mode change-over switch |
 | Eco mode |
 | Standard mode |
 | Turbo mode |
 | Link/independent switch of electric power tool (sold separately) |
 | Light Off : Independent mode of electric power tool (sold separately) |
 | Light Blinking: Searching of electric power tool (sold separately) |
 | Light On: Link mode of electric power tool (sold separately) |
 | Link auto/manual switch |
 | Light Off : Manual mode |
 | Light Blinking: Pairing mode |
 | Light On: Auto mode |
 | Push |
 | Changes over when the switch is pressed |
 | |
 | Automatically changes over when pairing is complete |
 | Remaining battery indicator switch |
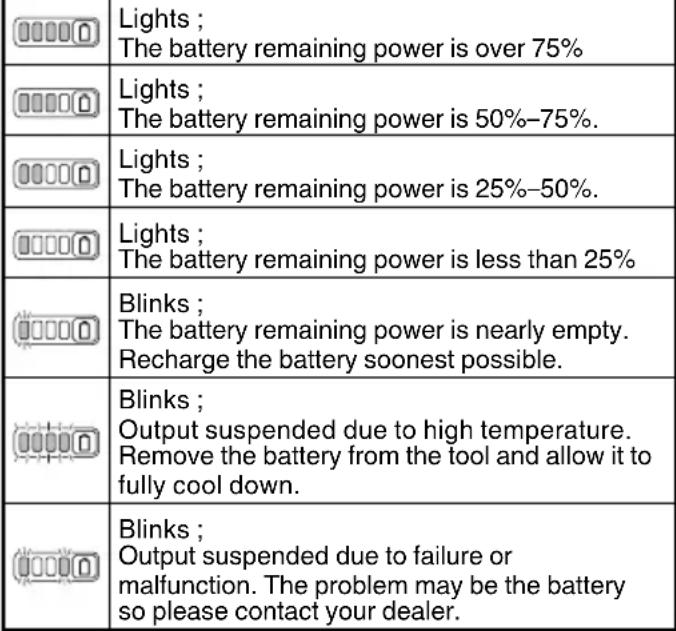
| [1548] | Lights ;The battery remaining power is over 75%. |
| [1725] | Lights ;The battery remaining power is 50%-75%. |
 | Lights ;The battery remaining power is 25%-50%. |
| [4A4K] | The battery remaining power is less than 25%.Recharge the battery soonest possible. |
Battery
 |
NOTE
To prevent the battery power consumption caused by forgetting to turn off the LED light, the light goes off automatically in about 2 minutes.
STANDARD ACCESSORIES
(1) Hose (Inner Diameter Φ28 x Length 5m)
(For connection with electric tool)....1
(2) Pipe 2
(3) Crevice nozzle 1
(4) Master nozzle 1
(5) Plastic bag (5 pcs.) 1
(6) Joint (D) 1
(7) Joint (H) 1
(8) Joint handle 1
(9) Hose belt 3
(10) Tool bag 1
(11) Tool Box* 1
(12) Battery (BSL36A18)* 2
(13) Charger (UC18YSL3)* 1
(14) Battery cover* 2
Standard accessories are subject to change without notice.
* (NN) specifications is excluded.
SELECTING ACCESSORIES
The accessories of this machine are listed on page 151.
Optional accessories are subject to change without notice.
APPLICATIONS
- General cleaning in workplaces and others.
○ Collection of fine dusts generated during grinding, cutting or drilling of concrete or wood using power tools.
SPECIFICATIONS
- Power tool
| Item\Model | RP3608DB(L) |
| Rated voltage 36 V | |
| Motor | DC motor |
| Application | Dry type |
| Max. Airflow | 3.5 m3/min |
| Max. Vacuum | 20.1 kPa |
| Details-Dry | 8 L |
| Filter Class | L |
| Bluetooth | Bluetooth Ver. 5.0Bluetooth frequency range:2.402-2.480GHz |
| Battery available for this tool* | Multi volt battery |
| Dimensions (W × D × H) | 331 mm × 369 mm × 408 mm |
| Weight** | 9.8 kg (BSL36A18 × 2pcs.)10.4 kg (BSL36B18 × 2pcs.) |
* Existing batteries (BSL3660/3626X/3626/3625/3620, BSL18xx and BSL14xx series) cannot be used with this tool.
** According to EPTA-Procedure 01/2014
English
- Battery
| Model BSL36A18 | |
| Voltage 36 V / 18 V | (Automatic Switching*) |
| Battery capacity | 2450 mAh / 4900 mAh(Automatic Switching*) |
| Available cordless products** | Multi volt series, 18 V product |
| Available charger | Sliding charger for lithium ion batteries |
* The tool itself will automatically switch over.
** Please see our general catalogue for details.
CHARGING
Before using the power tool, charge the battery as follows.
- Connect the charger's power cord to the receptacle.
When connecting the plug of the charger to a receptacle, the charge indicator lamp will blink in red (At 1-second intervals).
- Insert the battery into the charger.
Firmly insert the battery into the charger as shown in Fig. 2 (on page 2).
- Charging
When inserting a battery in the charger, the charge indicator lamp will blink in blue.
When the battery becomes fully recharged, the charge indicator lamp will light up in green. (See Table 1)
(1) Charge indicator lamp indication
The indications of the charge indicator lamp will be as shown in Table 1, according to the condition of the charger or the rechargeable battery.
Table 1
| Indications of the charge indicator lamp | ||||
| Charge indicator lamp (RED / BLUE / GREEN / PURPLE) | Before charging | Blinks (RED) | Lights for 0.5 seconds. Does not light for 0.5 seconds. (off for 0.5 seconds) | Plugged into power source |
| While charging | Blinks (BLUE) | Lights for 0.5 seconds. Does not light for 1 second. (off for 1 second) | Battery capacity at less than 50% | |
| Blinks (BLUE) | Lights for 1 second. Does not light for 0.5 seconds. (off for 0.5 seconds) | Battery capacity at less than 80% | ||
| Lights (BLUE) | Lights continuously | Battery capacity at more than 80% | ||
| Charging complete | Lights (GREEN) | Lights continuously(Continuous buzzer sound: about 6 seconds) | ||
| Overheat standby | Blinks (RED) | Lights for 0.3 seconds. Does not light for 0.3 seconds. (off for 0.3 seconds) | Battery overheated. Unable to charge. (Charging will commence when battery cools) | |
| Charging impossible | Flickers (PURPLE) | Lights for 0.1 seconds. Does not light for 0.1 seconds. (off for 0.1 seconds) (Intermittent buzzer sound: about 2 seconds) | Malfunction in the battery or the charger | |
(2) Regarding the temperatures and charging time of the rechargeable battery The temperatures and charging time will become as shown in Table 2.
Table 2
| Charger | UC18YSL3 | |||||||
| Battery | Type of battery Li-ion | |||||||
| Temperatures at which the battery can be recharged | 0°C-50°C | |||||||
| Charging voltage V 14.4 18 | ||||||||
| Charging time, approx. (At 20°C) | BSL14xx series BSL18xx series | Multi volt series | ||||||
| (4 cells) (8 cells) (5 cells) (10 cells) (10 cells) | ||||||||
| min | BSL1415S: 15BSL1415 : 15BSL1415X: 15BSL1420 : 20BSL1425 : 25BSL1430C: 30 | BSL1430 : 20BSL1440 : 26BSL1450 : 32BSL1460 : 38 | BSL1815S : 15BSL1815 : 15BSL1815X : 15BSL1820 : 20BSL1825 : 25BSL1830C: 30BSL1850C: 32 | BSL1830 : 20BSL1840 : 26BSL1850 : 32BSL1860 : 38 | ||||
| USB | Charging voltage V 5 | |||||||
| Charging current | A 2 | |||||||
NOTE
The recharging time may vary according to the ambient temperature and power source voltage.
4. Disconnect the charger's power cord from the receptacle.
5. Hold the charger firmly and pull out the battery.
NOTE
Be sure to pull out the battery from the charger after use, and then keep it.
Regarding electric discharge in case of new batteries, etc.
As the internal chemical substance of new batteries and batteries that have not been used for an extended period is not activated, the electric discharge might be low when using them the first and second time. This is a temporary phenomenon, and normal time required for recharging will be restored by recharging the batteries 2–3 times.
How to make the batteries perform longer.
(1) Recharge the batteries before they become completely exhausted.
When you feel that the power of the tool becomes weaker, stop using the tool and recharge its battery. If you continue to use the tool and exhaust the electric current, the battery may be damaged and its life will become shorter.
(2) Avoid recharging at high temperatures.
A rechargeable battery will be hot immediately after use. If such a battery is recharged immediately after use, its internal chemical substance will deteriorate, and the battery life will be shortened. Leave the battery and recharge it after it has cooled for a while.
CAUTION
☐ If the battery is charged while it is heated because it has been left for a long time in a location subject to direct sunlight or because the battery has just been used, the charge indicator lamp of the charger lights for 0.3 seconds, does not light for 0.3 seconds (off for 0.3 seconds). In such a case, first let the battery cool, then start charging.
When the charge indicator lamp flickers (at 0.2-second intervals), check for and take out any foreign objects in the charger's battery connector. If there are no foreign objects, it is probable that the battery or charger is malfunctioning. Take it to your authorized Service Center.
○ Since the built-in micro computer takes about 3 seconds to confirm that the battery being charged with UC18YSL3 is taken out, wait for a minimum of 3 seconds before reinserting it to continue charging. If the battery is reinserted within 3 seconds, the battery may not be properly charged.
PRIOR TO OPERATION
WARNING
Before use, check the following. 1 to 3 should be checked before insert the battery.
- Confirm that the vacuum switch is OFF. (Fig. 3) If, without knowing that the vacuum switch is ON, the battery is inserted, the appliance will start suddenly, causing unexpected accidents. The vacuum switch will be turned on by pushing "ON" and it will be turned off by returning it to "OFF". Be sure to check that the vacuum switch is OFF.
2. Order of use for batteries
When two batteries are installed, the battery with the least remaining power is used first until it is empty. Once empty, use is automatically switched over to the other battery.
Use is still possible with a single installed battery.
NOTE
When there is no more remaining power in a battery, immediately recharge the battery for convenient use later.
3. Check the filter
Referring to "3. Filter installation/confirmation" in "HOW TO USE" the filter should be correctly attached.
4. Inserting the battery (Fig. 4)
As you pull on the clamp lever, open the battery guard. Next, match the battery with the unit's groove and firmly press the battery in until you hear a click.
English
CAUTION
Do not touch the terminals. Doing so may result in cutting your hand on the terminals or other unexpected injury.
5. Removing the battery (Fig. 4)
When removing the battery from the unit, press the latches on both sides and slide the battery upwards to pull it out.
6. Mode change-over switch operation (Fig. 5)
During operation, the suction power will change each time the mode selection switch is pressed.
7. Auto/manual switch operation (Fig. 6)
Switches between "Auto" and "Manual" each time the Auto/Manual switch is pressed.
HOW TO USE
CAUTION
Do not use the head top as a footstool or do not sit on it. Otherwise the appliance begins to move suddenly, causing an injury.
NOTE
Handle the hose with care. Do not bend the hose by force, or do not trample it, or do not pull it to move cleaner. Moreover, do not put away the hose as it is bent. Otherwise troubles such as its deformation may be caused.
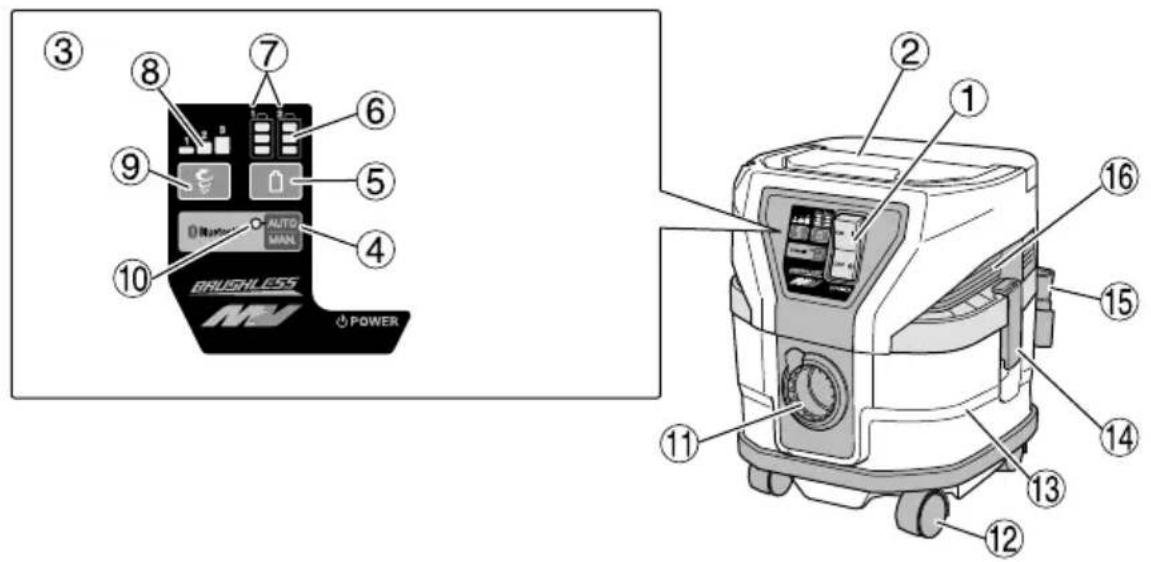
1. Connecting the hose (Fig. 7)
Press the attached hose into the suction opening of the tank until it clicks and connect it. When removing the hose, pull out the hose while pushing the button of the suction opening.
2. Attaching the plastic bag (Can be used without a plastic bag)
WARNING
Be sure to turn off the appliance and remor battery.
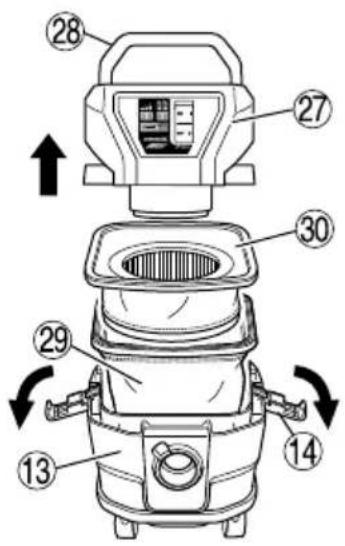
(1) Detach two clamps, pull up the head by the handle and remove it from the tank. (Fig. 8-a) Remove the dust filter and prefilter inside the tank.
(2) Insert the supplied plastic bag between the inside of the tank and the bag guide. Insert the bag fi rst along the bottom of the bag guide and then on both sides.
Do not allow the edge of the plastic bag at "A" to overlap the upper surface of the tank. Insert the plastic bag all the way into both sides of the bag guide "B". (Fig. 8 -b)
(3) After spreading the plastic bag along the inside of the tank, draw the end of the plastic bag outside the tank.
Following the directions on page 16 "Filter installation/confirmation", insert the prefilter and dust filter. At this point attach the prefilter so that the plastic bag is secured by the packing of the prefilter. (Fig. 8-c)
NOTE
☐ The edge of the plastic bag on the air intake should not extend out of the top of the tank. (See Fig. 8-c) If all of the edge of the plastic bag extends out of the top of the tank, the air intake will be blocked, obstructing dust collection.
○ When attaching the plastic bag, make sure that the slack portion of the plastic bag does not block the suction port inside the tank. (Fig. 8 -d)
3. Filter installation/confirmation
WARNING
○ Make sure the filters (dust filter and prefilter) are always installed.
Failure to do so may result in damage to the motor.
NOTE
Water cannot be sucked.
(1) Install the filter's seam so that it is on the other side of the hose air intake. (Fig. 9)
(2) Make sure the packing of the prefilter is hooked on the lip of the tank. Next, insert a filter damper at the bottom of the prefilter. (Fig. 10)
(3) Insert and attach the cloth filter to the dust filter in the direction indicated by the arrow. (Fig. 11)
(4) Match the indication of the "hose side" and insert the dust filter. (Fig. 12)
4. Attach the master nozzles, pipes, etc.
When it is used as a cleaner (Fig. 13)
Connect in order of Hose (id 28 mm × 5 m long), Joint(H), Joint handle, Pipes, and Master nozzle. Connection is done by pressing in the direction of the arrow. The suction mouth for crevices can also be attached depending on the application.
NOTE
Gradually vacuum when cleaning dust scattered across the floor and other locations. Trying to vacuum the dust all at once my result in clogging the hose or the tool itself.
5. Connect power tools (Fig. 6)
Connect Hose (id 28 mm × 5 m long).
When operating while connected to another power tool, fi x the hose with the included hose belt to avoid entangling the hose with the power tool's power cord. (Fig. 14)
Bundle the hose at an interval of approximately 1 m.
6. Inserting the battery (Fig. 4)
See "4. Inserting the battery" in "PRIOR TO OPERATION".
7. Switch ON
(1) When linking with electric power tool
"O Push vacuum switch to "ON" position. (Fig. 5)
○ Press Auto/Manual switch and select "Auto". (Fig. 6)
○ Press mode change-over switch and select 1, 2 or 3 according to application. (Fig. 5)
Press the product's Auto/Manual switch and the electric power tool's wireless linking switch to activate pairing. (See "WIRELESS LINKING FUNCTION")
○ Use the ON/OFF switch of the linked electric power tool to simultaneously operate this product.
(2) For independent operation
○ Push vacuum switch to "ON" position. (Fig. 5)
○ Press Auto/Manual switch and select "Manual". (Fig. 6)
○ Press mode change-over switch and select 1, 2 or 3 according to application. (Fig. 5)
○ Conduct floor cleaning.
NOTE
○ The product is equipped with memory function.
After switching the product OFF, switching it ON will return the mode change-over switch and Auto/Manual switch to the OFF state. Mode "3" will return to mode "2".
The product's temperature protection mechanism could be activated, depending on the operating environment, to shut the unit down. If the unit shuts down, see "TROUBLESHOOTING" on page 20.
8. Filter dust removal
The product features a dust removal mechanism that is activated each time the power is switched OFF.
If the suction worsens during operation, switch OFF the power.
The dust tank is probably full if the suction does not recover when you operate the product once again. See "Dump dusts" and follow the instructions to dispose the dust.
9. Dump dusts (Fig. 15)
WARNING
○ Be sure to turn off the vacuum switch and disconnect the battery.
○ This appliance contains dust that is harmful to he Discharge and maintenance operations (including disposal of the dust collection containers) must only be carried out by qualified specialists wearing appropriate protective clothing and equipment.
○ Put on a dust mask.
○ Dispose of the vacuumed material in accordance with legal regulations.
Before removing the head, if the appliance is pushed on its side while the tank contains liquid, the liquid will get inside the motor or switch region, causing an electric shock or motor failure.
CAUTION
- Do not impact the tank, the filter, or the head. Otherwise they will be deformed or damaged.
Although it is based on the amount of suction of dusts and liquids, dump dusts and liquids in the tank at least once a day and keep the appliance, the filter, etc. clean. Otherwise suction power fall, motor failure, bad smell or rusting may be caused. - Do not hold the clamps when you dump dusts in the tank. Otherwise the clamps may be damaged.
NOTE
When removing the plastic bag filled with dust from the tank, make sure the bag does not become caught on parts inside the tank.
○ Empty the plastic bag regularly so that it does not become excessively filled with dust.
- Do not tilt the tank with accessories inserted in the head or in the tank. Otherwise any part may be damaged.
(1) Remove the clamps (2 pieces) and raise the handle of the head.
(2) Lightly striking the inner side of the prefilter several times, remove dusts attached to the prefilter.
(3) Tilt the tank and dump dusts.
(4) Attach the dust filter, the prefilter, the head, and the clamp in the initial positions.
Drop the dust which has collected outside the filter into the plastic bag, and after removing the filter and filter cage, remove the plastic bag with the dust from the tank and dispose the bag.
10. Transportation and storage
(1) How to use the handle (Fig. 16)
When carrying or moving the appliance, hold the handle of the head part. When you do not use the handle, put it in the head part.
(2) Fixation and release of the caster (Fig. 17)
By lowering the lever of the caster with the brake, the rotation of the wheel is fixed. When releasing the fixed wheel, raise the lever. When moving with the appliance on a vehicle, fix the caster to retain the appliance. However, when you move the appliance, check that the caster is released, or the caster will be damaged.
(3) Tool box assembly (2XC only) (Fig. 18)
(4) Store the product. (Fig. 19)
NOTE
To store the hose, you can connect both ends or use the tool box.
○ In addition to connecting the battery to the product, the battery can be stored in the tool box.
11. How to attach the paper fi Iter (Optional) (Fig. 20)
WARNING
○ Be sure to turn off the appliance and remove the battery.
When using a paper filter, use it in combination with the standard dust fi iter and prefi iter.
If the paper filter gets torn, dust may get inside the motor, causing abnormal noise or fi re due to overheating.
CAUTION
When using a paper filter, avoid sucking in liquids such as water or wet dust, as this may lead to tearing of the filter.
To. Do not use a fi Iter damper.
Doing so can reduce the dust collection capacity.
(1) Open the paper filter horizontally so that the suction hole in the paper filter is over the top of the tank.
(2) Before attaching the filter to the appliance, bend the two folds in the cardboard approx. 90° in the direction of the arrow.
(3) Match the suction hole in the paper filter with the suction opening of the appliance. Insert the filter in the direction of the arrow as shown in the illustration, so that the cardboard of the paper filter goes past the stopper on the suction opening.
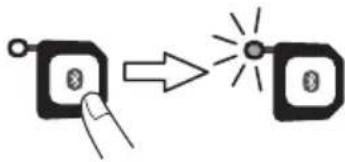
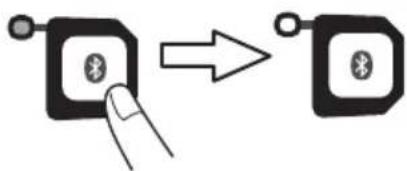
WIRELESS LINKING FUNCTION
By setting this product for "Auto" mode, the ON/OFF switch of the wireless linked electric power tool connected by Bluetooth can be used to activate or deactivate this product.
(For compatible models and specifications, refer to the latest catalogue or consult with the dealer of this product.) (Fig. 6)
Linking
To simultaneously use this product with an electric power tool with wireless linking function, pair the units by Bluetooth connection when starting work.
Make sure that the electric power tool and this product is connected by hose before taking the following steps to establish a connection.
(It does not matter whether you start the instructions with this product or the electric power tool.)
| This Product (Fig. 21) | Bluetooth Compatible Product (Fig. 22) |
| 1 Turn ON the power switch | 1 Draw the switch once |
| 2 Begin search (Select “Auto” with the Auto/Manual switch) | 2 Begin search (Press the wireless link switch) |
| 3 Connection (Pairing) complete* | 3 Connection (Pairing) complete* |
* Requires 1 to 3 seconds (time may vary depending on distance and obstructions) for both units to search (fl ashing lamps) and establish a connection (lamps lit).
NOTE
- Two or more devices cannot be connected to the cleaner at the same.
- It will take approximately 0.5 seconds for the product to activate after switching ON the electric power tool.
Also, when you switch OFF, the product will stop a few seconds later to complete vacuuming the waste in the hose.
○ While searching for a connected device (indicated by a fl ashing display lamp), drawing the switch of the power tool will activate its motor.
(The cleaner's motor will not activate during a search.)
Upon completion of the search (indicated by a lit lamp), the cleaner will be activated.
○ When pairing multiple sets, pair one set at a time.
○ While in Auto mode, the product will be automatically powered OFF if there is no operation for two hours.
○ The effective range for wireless linking is approximately 10 m.
This range may be shortened by obstructions between this product and the electric power tool.
English
○ When disconnected, this product will return to search status.
Turn Auto OFF
| Switching Auto OFF using the product |
Pressing the Auto/Manual switch of the product will activate Manual mode and break the connection. When the connection is broken, the Auto mode of the electric power tool will be automatically switch OFF.
| This Product (Fig. 23) | Bluetooth Compatible Product (Fig. 24) |
| Auto OFF (Manual mode) Connection OFF (Auto OFF (Manual mode)) | |
* Auto mode can be switched OFF by switching off the product's power.
Switching Auto OFF using the electric power tool
A long press of the wireless link switch of the electric power tool will switch to Manual mode, cutting the connection. When the connection is cut, the electric power tool will automatically begin searching.
| This Product (Fig. 25) | Bluetooth Compatible Product (Fig. 26) |
| Connection OFF (Searching) | Auto OFF (Manual mode) |
ABOUT REMAINING BATTERY INDICATOR
Remaining battery power can be verified with either the battery or with the cleaner itself. (Fig. 27)
NOTE
○ The reading for the remaining battery power may differ on the battery from that of the cleaner.
○ Use the remaining battery power as a guideline since the readings may somewhat differ due to surrounding temperature or battery feature.
- Verify the cleaner's remaining battery power when the product is powered OFF.
HOW TO RECHARGE USB DEVICE (UC18YSL3)
(1) Select a charging method
○ Charging a USB device from a electrical outlet (Fig. 28-a)
○ Charging a USB device and battery from a electrical outlet (Fig. 28-b)
(2) How to recharge USB device (Fig. 29)
(3) When charging of USB device is completed (Fig. 30)
LED LIGHT WARNING SIGNALS (Fig. 31)
This product features functions that are designed to protect the tool itself as well as the battery. If any of the safeguard functions activate during operation, the mode display lamp indicates this by blinking for about 30 seconds as described in Table 3.
In this case, follow the instructions described under corrective action.

Fig. 31
Table 3
☐ For inspection and maintenance, be sure to turn off the vacuum switch and disconnect the battery.
- Do not work with wet hands. May cause electric shock or injuries.
1. Filter maintenance
To maintain the product's suction power, frequently remove any attached dust from the dust filter, prefilter, cloth filter or filter damper. (Fig. 10)
(1) Gently tap by hand to remove dust from the prefilter, cloth filter and filter damper. Using compressed air will make the task easier.
(2) For the dust fi liter, use a brush or compressed air to clean.
Regularly wash off any dust from the dust filter with water once every month or two months.
After washing the filter, sufficiently dry it in the shade and use the filter once again.
NOTE
○ Even if the prefilter is clogged, gently tap it to clear away dust.
Scrubbing it with a brush or other tool will only shorten its lifespan.
○ Do not inflict impact on the dust filter.
Doing so may crack the resin portion of the filter.
2. Inspecting the mounting screws
Regularly inspect all mounting screws and ensure that they are properly tightened. Should any of the screws be loose, retighten them immediately. Failure to do could result in serious hazard.
3. Maintenance of the motor
The motor unit winding is the very "heart" of the power tool.
Exercise due care to ensure the winding does not become damaged and/or wet with oil or water.
4. Inspection of terminals (tool and battery)
Check to make sure that swarf and dust have not collected on the terminals.
On occasion check prior, during and after operation.
CAUTION
Remove any swarf or dust which may have collected on the terminals.
Failure to do so may result in malfunction.
5. Check for Dust
Dust may be removed with a soft cloth or a cloth dampened with soapy water. Do not use bleach, chlorine, gasoline or thinner, for they may damage the plastics.
6. Storage
Storing in a place below 40^ C and out of the reach of children.
NOTE
Storing lithium-ion batteries.
Make sure the lithium-ion batteries have been fully charged before storing them.
Prolonged storage (3 months or more) of batteries with a low charge may result in performance deterioration, signifi cantly reducing battery usage time or rendering the batteries incapable of holding a charge. However, signifi cantly reduced battery usage time may be recovered by repeatedly charging and using the batteries two to fi ve times.
If the battery usage time is extremely short despite repeated charging and use, consider the batteries dead and purchase new batteries.
CAUTION
In the operation and maintenance of power tools, the safety regulations and standards prescribed in each country must be observed.
Important notice on the batteries for the HiKOKI cordless power tools
Please always use one of our designated genuine batteries. We cannot guarantee the safety and performance of our cordless power tool when used with batteries other than these designated by us, or when the battery is disassembled and modified (such as disassembly and replacement of cells or other internal parts).
GUARANTEE
We guarantee HiKOKI Power Tools in accordance with statutory/country specific regulation. This guarantee does not cover defects or damage due to misuse, abuse, or normal wear and tear. In case of complaint, please send the Power Tool, undismantled, with the GUARANTEE CERTIFICATE found at the end of this Handling instruction, to a HiKOKI Authorized Service Center.
Information concerning airborne noise and vibration The measured values were determined according to EN60335-2-69 and declared in accordance with ISO 4871.
Measured A-weighted sound power level: 88 dB (A) Measured A-weighted sound pressure level: 75 dB (A) Uncertainty K: 2 dB (A).
Wear hearing protection.
Vibration total values according to EN60335-2-69:
a_h ≤ 2.5 m/s^2
Uncertainty K = 1.5 m/s ^2
NOTE
Due to HiKOKI's continuing program of research and development, the specifications herein are subject to change without prior notice.
TROUBLESHOOTING
Use the inspections in the table below if the tool does not operate normally. If this does not remedy the problem, consult your dealer or the HiKOKI Authorized Service Center.
- Power tool
| Symptom Possible | cause Remedy | |
| Tool doesn't run No remaining | g battery power Charge the battery. | |
| Battery isn't fully installed. Push in the battery | until a click is heard. | |
| Concrete dust has accumulated on the terminals of the battery installation compartment as well as on the battery sliding grooves. | Clean off the accumulated concrete dust with a dry cloth. | |
| Suction power is weak.Fails to suck in dust. | The tank is full of dust or water. Dispose of the | dust or water.After that, remove any dust attached to the fi Iter. |
| Filter is clogged. Conduct air blow dusting or | remove the dust attached to the fi Iter. | |
| The fi Iter is not installed.(Not set in place) | Check to see if the fi Iter is properly set. | |
| Plastic bag is incorrectly installed. Properly install the plastic bag. | ||
| Dust leaks from the vent. Filter is not installed.Filter is improperly installed. | Properly install the fi Iter. | |
| Filter is damaged. Replace the damaged fi Iter. | ||
| Tool suddenly stopped Tool | was overburdened Get rid of the problem causing the overburden. | |
| The battery is overheated. Let the battery cool down. | ||
| The product is overheated. | Allow the product to fully cool down. | |
| Attachments such as the connection adapter or joint -can't be attached -fall off | The shape or the dimensions of an attachment part does not match. | Check the model in use and make sure to use the designated accessories and attachments listed in this document or in our catalogue. |
| Battery cannot be installed | Attempting to install a battery other than that specified for the tool. | Please install a multi volt type battery. |
| Cannot be connected by Bluetooth or the connection breaks off | Pairing is unsuccessful | Fully read the electric tool's instruction manual and properly pair the tool with the product.Please note that continued use after a break may require pairing once again. |
| Affected by nearby wireless LAN or equipment emitting radio waves. | Put some distance between the product and the equipment which may be affecting the connection. | |
| Bluetooth compatible device is too far from the product | Shorten the distance between the product and the Bluetooth compatible device. | |
| Trying to connect a non-designated device | Only use electric tools designated by our company. | |
| A device is already connected | Two devices cannot be connected to the product at the same time. Select the device that you wish to use and connect it to the product. | |
- Charger
| Symptom Possible | cause Remedy | |
| The charge indicator lamp rapidly flickers purple, and battery charging doesn't begin. | The battery is not inserted all the way. | Insert the battery firmly. |
| There is foreign matter in the battery terminal or where the battery is attached. | Remove the foreign matter. | |
| The charge indicator lamp blinks red, and battery charging doesn't begin. | The battery is not inserted all the way. | Insert the battery firmly. |
| The battery is overheated. If left alone, the battery will automatically begin charging if its temperature decreases, but this may reduce battery life. It is recommended that the battery be cooled in a well-ventilated location away from direct sunlight before charging it. | ||
| Battery usage time is short even though the battery is fully charged. | The battery's life is depleted. Replace the battery with a new one. | |
| The battery takes a long time to charge. | The temperature of the battery, the charger, or the surrounding environment is extremely low. | Charge the battery indoors or in another warmer environment. |
| The charger's vents are blocked, causing its internal components to overheat. | Avoid blocking the vents. | |
| The cooling fan is not running. Contact a HiKO | OKI Authorized Service Center for repairs. | |
| The USB power lamp has switched off and the USB device has stopped charging. | The battery's capacity has become low. Replace the battery with one that has capacity remaining. | |
| USB power lamp does not switch off even though the USB device has fi nished charging. | The USB power lamp lights up green to indicate that USB charging is possible. | This is not a malfunction. |
| It is unclear what the charging status of a USB device is, or whether its charging is complete. | The USB power lamp does not switch off even when charging is complete. | Examine the USB device that is charging to confi rm its charging status. |
| Charging of a USB device pauses midway. | The charger was plugged into an electrical socket while the USB device was being charged using the battery as the power source. | This is not a malfunction.The charger pauses USB charging for about 5 seconds when it is differentiating between power sources. |
| A battery was inserted into the charger while the USB device was being charged using a power socket as the power source. | ||
| Charging of the USB device pauses midway when the battery and the USB device are being charged at the same time. | The battery has become fully charged. This is not a malfunction.The charger pauses USB charging for about 5 seconds while it checks whether the battery has successfully completed charging. | |
| Charging of the USB device doesn't start when the battery and the USB device are being charged at the same time. | The remaining battery capacity is extremely low. | This is not a malfunction.When the battery capacity reaches a certain level, USB charging automatically begins. |
HOE HET USB-APPARAAT OPLADEN (UC18YSL3)
9. Despeje as poeiras (Fig. 15)
AVISO
2. Fest plastposen (Kan brukes uten plastpose) ADVARSEL
VEDLIKEHOLD OG INSPEKSJON
ADVARSEL
natural_image
Technical line drawing of a mechanical component with no visible text or symbols00323703

natural_image
Line drawing of a quill pen in an inkwell (no text or symbols)| English Português | ||
| GUARANTEE CERTIFICATE1 Model No.2 Serial No.3 Date of Purchase4 Customer Name and Address5 Dealer Name and Address(Please stamp dealer name and address) | CERTIFICADO DE GARANTIA1 Número do modelo2 Número do série3 Data de compra4 Nome e morada do cliente5 Nome e morada do distribuidor(Por favor, carímbe o nome e morada do distribuidor) | |
| Deutsch Svenska | ||
| GARANTIESCHEIN1 Modell-Nr.2 Serien-Nr.3 Kaufdatum4 Name und Anschrift des Kunden5 Name und Anschrift des Händlers(Bitte mit Namen und Anschrift des Handlers abstempeln) | GARANTICERTIFIKAT1 Modellnr2 Serienr3 Inköpsdatum4 Kundens namn och adress5 Försäljarens namn och adress(Stämpla försäljarens namn och adress) | |
| Français Dansk | ||
| CERTIFICAT DE GARANTIE1 No. de modèle2 No de série3 Date d'achat4 Nom et adresse du client5 Nom et adresse du revendeur(Cachet portant le nom et l'adresse du revendeur) | GARANTIBEVIS1 Modelnummer2 Serienummer3 Købsdato4 Kundes navn og adresse5 Forhandlers navn og adresse(Indsæt stempel med forhandlers navn og adresse) | |
| Italiano Nørsk | ||
| CERTIFICATO DI GARANZIA1 Modello2 N° di serie3 Data di acquisto4 Nome e indirizzo dell'acquirente5 Nome e indirizzo del rivenditore(Si prega di apporre il timbro con questi dati) | GARANTISERTIFIKAT1 Modellnr.2 Serienr.3 Kjøpsdato4 Kundens navn og adresse5 Forhandlerens navn og adresse(Vennligst stemple forhandlerens navn og adresse) | |
| Nederlands $uomi | ||
| GARANTIEBEWIJS1 Modelnummer2 Serienummer3 Datum van aankoop4 Naam en adres van de gebruiker5 Naam en adres van de handelaar(Stempel a.u.b. naam en adres vande de handelaar) | TAKUUTODISTUS1 Malli nro2 Sarja nro3 Ostopäivämäärä4 Asiakkaan nimi ja osoite5 Myyjän nimi ja osoite(Leimaa myyjän nimi ja osoite) | |
| Español | ||
| CERTIFICADO DE GARANTÍA1 Número de modelo2 Número de serie3 Fecha de adquisición4 Nombre y dirección del cliente5 Nombre y dirección del distribuidor(Se ruega poner el sello del distribuidor con su nombre y dirección) | ||
HiKOKI
| 1 | |
| 2 | |
| 3 | |
| 4 | |
| 5 |
Siemensring 34, 47877 willich, Germany
Tel: +49 2154 49930
Fax: +49 2154 499350
URL: http://www.hikoki-powertools.de
Hikoki Power Tools Netherlands B.V.
Brabanthaven 11, 3433 PJ Nieuwegein, The Netherlands
Tel: +31 30 6084040
Fax: +31 30 6067266
URL: http://www.hikoki-powertools.nl
Hikoki Power Tools (U.K.) Ltd.
25 Majestic Road, Southampton, SO16 OYT,
United Kingdom
Tel: +44 1908 660663
Fax: +44 1908 606642
URL: http://www.hikoki-powertools.uk
Hikoki Power Tools France S.A.S.
Hikoki Power Tools Belgium N.V./S.A.
Koningin Astridlaan 51, B-1780 Wemmel, Belgium
Tel: +32 2 460 1720
Fax: +32 2 460 2542
URL http://www.hikoki-powertools.be
Hikoki Power Tools Italia S.p.A
Via Piave 35, 36077, Altavilla Vicentina (VI), Italy
Tel: +39 0444 548111
Fax: +39 0444 548110
URL: http://www.hikoki-powertools.it
Hikoki Power Tools Ibérica, S.A.
C/ Puigbarral, 26-28, Pol. Ind. Can Petit, 08227 Terrassa
(Barcelona), Spain
Tel: +34 93 735 6722
Fax: +34 93 735 7442
URL: http://www.hikoki-powertools.es
Kjeller Vest 7, N-2007 Kjeller, Norway
Tel: (+47) 6692 6600
Fax: (+47) 6692 6650
URL: http://www.hikoki-powertools.no
Hikoki Power Tools Sweden AB
Rotebergsvagen 2B SE-192 78 Sollentuna, Sweden
Tel: (+46) 8 598 999 00
Fax: (+46) 8 598 999 40
URL: http://www.hikoki-powertools.se
Hikoki Power Tools Denmark A/S
Lillebaeltsvej 90, 6715 Esbjerg N, Denmark
Tel: (+45) 75 14 32 00
Fax: (+45) 75 14 36 66
URL: http://www.hikoki-powertools.dk
Hikoki Power Tools Finland Oy
Tupalankatu 9, 15680 Lahti, Finland
Tel: (+358) 20 7431 530
Fax: (+358) 20 7431 531
URL: http://www.hikoki-powertools.fi

natural_image
Line drawing of a quill pen in an inkwell (no text or symbols)
natural_image
Line drawing of a quill pen in an inkwell (no text or symbols)| English Italiaho | ||
| EC DECLARATION OF CONFORMITYWe declare under our sole responsibility that Cordless Cleaner, identified by type and specific identification code *1), is in conformity with all relevant requirements of the directives *2) and standards *3). Technical fi le at *4) – See below.The European Standard Manager at the representative office in Europe is authorized to compile the technical fi le.The declaration is applicable to the product affi xed CE marking. | DICHIARAZIONE DI CONFORMITÀ CEDichiariamo sotto la nostra esclusiva responsabilità che l'Aspiratore manuale, identificato dal tipo e dal codice identificativo specifico *1), è conforme a tutti i requisiti pertinenti delle direttive *2) e degli standard *3). Documentazione tecnica presso *4) – Vedere sotto.Il gestore delle norme europee presso l'ufficio di rappresentanza in Europa è autorizzato a compilare il fascicolo tecnico.La dichiarazione è applicabile ai prodotti cui sono applicati i marchi CE. | |
| Deutsch NederlandsEG-KONFORMITÄTSERKLÄRUNGWir erklären in alleiniger Verantwortung, dass der durch den Typ und den spezifischen Identifizierungscode *1) bezeichnete Akku-Staubsauger allen einschlägigen Bestimmungen der Richtlinien *2) und Normen *3) entspricht. Technische Unterlagen unter *4) – Siehe unten.Die Leitung der repräsentativen Behörde für europäische Normen und Richtlinien ist berechtigt, die technischen Unterlagen zusammenzustellen.Die Erklärung gilt für die an dem Produkt angebrachte CE-Kennzeichnung. | ||
| Français EspañolDECLARATION DE CONFORMITE CENous déclarons sous notre seule responsabilité que l'aspirateur sans fil, identifié par le type et le code d'identification spécifique *1) est en conformité avec toutes les exigences applicables des directives *2) et des normes *3). Dossier technique en *4) - Voir ci-dessous.Le Gestionnaire des normes européennes du bureau de représentation en Europe est autorisé à constituer le dossier technique.Cette déclaration s'applique aux produits désignés CE. | EC VERKLARING VAN CONFORMITEITWij verklaren onder onze eigen verantwoordelijkheid dat de Snoerloze stofzuiger, geidentificeerd door het type en de specifieke identificatiecode*1), voldoet aan alle relevante bepalingen van de richtlijnen *2) en normen *3). Technische documentatie bij*4) – zie onder.De Europese Normen Manager bij de vertegenwoordiging in Europa is gemachtigd om het technisch dossier samen te stellen.Deze verklaring is van toepassing op producten voorzien van de CE-markeringen. | |
| DECLARACIÓN DE CONFORMIDAD DE LA CEDeclaramos bajo nuestra única responsabilidad que el Aspirador a batería, identificado por tipo y por código de identificación específico *1), está en conformidad con todas las disposiciones correspondientes de las directivas *2) y de las normas *3). Documentación técnica en *4) – Ver a continuación.El Director de Normas Europeas en la oficina de representación en Europa está autorizado para elaborar el expediente técnico.La declaración se aplica al producto con marcas de la CE. | ||
| *1) RP3608DB(L) C361163S*2) 2006/42/EC, 2014/30/EU, 2014/53/EU, 2011/65/EU*3) EN60335-1:2012+A11:2014EN60335-2-69:2010+A1:2013EN60335-2-29:2004+A2:2010EN55014-1:2006+A1:2009+A2:2011EN55014-2:1997+A1:2001+A2:2008EN301489-1 V2.2.0Draft EN301489-17 V3.2.0EN300328 V2.2.2 | ||
| *4) Representative office in EuropeHikoki Power Tools Deutschland GmbHSiemensring 34, 47877 Willich, GermanyHead office in JapanKoki Holdings Co., Ltd.Shinagawa Intercity Tower A, 15-1, Konan 2-chome, Minato-ku, Tokyo, Japan | 31. 8. 2022Akihisa YahagiEuropean Standard Manager31. 8. 2022 Osamu KawanobeGeneral Manager,Quality Assurance Division Osamu KawanobeGeneral Manager,Quality Assurance Division | |
| Português Norsk | ||
| DECLARAÇÃO DE CONFORMIDADE CEDeclaramos, sob nossa única e inteira responsabilidade, que o Aspirador a bateria, identificado por tipo e código de identificação específico *1), está em conformidade com todos os requisitos relevantes das diretivas *2) e normas *3). Ficheiro técnico em *4)-Consulte abaixo.O Gestor de Normas Europeias no escritório de representação na Europa está autorizado a compilar o fi cheiro técnico.A declaração aplica-se aos produtos com marca CE. | EF'S ERKLÆRING OM OVERENSSTEMMELSEVi erklærer på eget ansvar at trådløs støvsuger, identifisert etter type og spesifikk identifikasjonskode *1), er i samsvar med alle relevante krav i direktiver *2) og standarder *3). Teknisk fil under *4)- Se nedenfor.Styreren for europeiske standarder ved representantkontoret i Europa er autorisert til å kompilere den tekniske filen.Erklæringen gjelder for CE-merket på produktet. | |
| Svenska Suomi | ||
| EG-DEKLARATION BETRÄFFANDE LIKFORMIGHETVi förklarar på eget ansvar att denna batteridrivna dammsugare, identifierad enligt typ och särskild identifikationskod *1), överensstämmer med alla relevanta krav i direktiven *2) och standarderna *3). Teknisk fi i enligt *4) – Se nedan.Den europeiska standardansvariga på representationskontoret i Europa är auktoriserad att sammanställa den tekniska fi len.Denna försäkran gäller för produkten med tillhörande CE-märkning. | EY-ILMOITUS YHDENMUKAISUUDESTAVakuutamme yksinomaisella vastuullamme, että tyypin ja erityisen tunnistuskoodin *1) perusteella tunnistettava akkutoiminen imuri on kaikkien direktivien *2) ja standardien *3) asiaankuuluvien vaatimusten mukainen. Tekninen tiedosto kohdassa *4) – katso alta.Eurooppalaisten standardien hallintaelin Euroopan edustustossa on valtuutettu kokoamaan teknisen tiedoston.Ilmoitus on sovellettavissa tuotteeseen kiinnitettyyn CE-merkintään. | |
| Dansk | ||
| EF-OVERENSSTEMMELSESERKLÆRINGVi erklærer os fuldstændigt ansvarlige for, at Ministøvsuger batt., identificeret ved type og specifik identifikationskode *1), er i overensstemmelse med alle relevante krav i direktiverne *2) og standarderne *3). Teknisk fi i *4) – Se nedenfor.Lederen af europæiske standarder på repræsentationskontoret i Europa er bemyndiget til at kompilere den tekniske fil.Erklæringen gælder produktet, der er mærket med CE. | ||
| *1) RP3608DB(L) C361163S*2) 2006/42/EC, 2014/30/EU, 2014/53/EU, 2011/65/EU*3) EN60335-1:2012+A11:2014EN60335-2-69:2010+A1:2013EN60335-2-29:2004+A2:2010EN55014-1:2006+A1:2009+A2:2011EN55014-2:1997+A1:2001+A2:2008EN301489-1 V2.2.0Draft EN301489-17 V3.2.0EN300328 V2.2.2 | ||
*4) Representative office in EuropeHikoki Power Tools Deutschland GmbHSiemensring 34, 47877 Willich, GermanyHead office in Japan  Koki Holdings Co., Ltd.Shinagawa Intercity Tower A, 15-1, Konan 2-chome, Minato-ku, Tokyo, JapanOsamu KawanobeGeneral Manager,Quality Assurance Division Koki Holdings Co., Ltd.Shinagawa Intercity Tower A, 15-1, Konan 2-chome, Minato-ku, Tokyo, JapanOsamu KawanobeGeneral Manager,Quality Assurance Division | ||
DECLARATION OF CONFORMITY
We declare under our sole responsibility that Cordless Cleaner, identified by type and specific identification code
*1), is in conformity with all relevant requirements of the UK regulations *2) and Designated standards *3). Technical file at *4) – See below.
This declaration is applicable to the product affixed UKCA marking.
*1) RP3608DB(L) C361163S
*2) S.I. 2008/1597, S.I. 2016/1091, S.I. 2016/1101, S.I. 2012/3032, S.I. 2017/1206
*3) EN60335-1:2012+A11:2014
EN60335-2-69:2010+A1:2013
EN60335-2-29:2004+A2:2010
EN55014-1:2006+A1:2009+A2:2011
EN55014-2:1997+A1:2001+A2:2008
EN301489-1 V2.2.0
Draft EN301489-17 V3.2.0
EN300328 V2.2.2
*4) Importer and authorized person to compile the technical file Hikoki Power Tools (U.K.) Ltd.
25 Majestic Road, Southampton, SO16 OYT,
United Kingdom
Head office in Japan
Koki Holdings Co., Ltd.
Shinagawa Intercity Tower A, 15-1, Konan 2-chome,
Minato-ku, Tokyo, Japan

31.8.2022

Osamu Kawanobe
General Manager,
Quality Assurance Division


- SAFETY PRECAUTIONS FOR THE CORDLESS TOOL
- WARNING
- PRECAUTIONS FOR USE OF THE CORDLESS CLEANER
- English
- CAUTION ON LITHIUM-ION BATTERY
- CAUTION
- REGARDING LITHIUM-ION BATTERY TRANSPORTATION
- USB DEVICE CONNECTION PRECAUTIONS (UC18YSL3)
- NOTE
- Bluetooth® WIRELESS TECHNOLOGY
- SYMBOLS
- STANDARD ACCESSORIES
- SELECTING ACCESSORIES
- APPLICATIONS
- SPECIFICATIONS
- CHARGING
- Disconnect the charger's power cord from the receptacle.
- Hold the charger firmly and pull out the battery.
- How to make the batteries perform longer.
- PRIOR TO OPERATION
- Order of use for batteries
- Check the filter
- Inserting the battery (Fig. 4)
- Removing the battery (Fig. 4)
- Mode change-over switch operation (Fig. 5)
- Auto/manual switch operation (Fig. 6)
- HOW TO USE
- Connecting the hose (Fig. 7)
- Attaching the plastic bag (Can be used without a plastic bag)
- Filter installation/confirmation
- Attach the master nozzles, pipes, etc.
- When it is used as a cleaner (Fig. 13)
- Connect power tools (Fig. 6)
- Inserting the battery (Fig. 4)
- Switch ON
- Filter dust removal
- Dump dusts (Fig. 15)
- Transportation and storage
- How to use the handle (Fig. 16)
- Fixation and release of the caster (Fig. 17)
- Tool box assembly (2XC only) (Fig. 18)
- Store the product. (Fig. 19)
- How to attach the paper fi Iter (Optional) (Fig. 20)
- WIRELESS LINKING FUNCTION
- Linking
- ABOUT REMAINING BATTERY INDICATOR
- HOW TO RECHARGE USB DEVICE (UC18YSL3)
- LED LIGHT WARNING SIGNALS (Fig. 31)
- Filter maintenance
- Inspecting the mounting screws
- Maintenance of the motor
- Inspection of terminals (tool and battery)
- Check for Dust
- Storage
- Important notice on the batteries for the HiKOKI cordless power tools
- GUARANTEE
- TROUBLESHOOTING
- HOE HET USB-APPARAAT OPLADEN (UC18YSL3)
- Despeje as poeiras (Fig. 15)
- AVISO
- Fest plastposen (Kan brukes uten plastpose) ADVARSEL
- VEDLIKEHOLD OG INSPEKSJON
- ADVARSEL
- Hikoki Power Tools Netherlands B.V.
- Hikoki Power Tools (U.K.) Ltd.
- Hikoki Power Tools France S.A.S.
- Hikoki Power Tools Belgium N.V./S.A.
- Hikoki Power Tools Italia S.p.A
- Hikoki Power Tools Ibérica, S.A.
- Hikoki Power Tools Sweden AB
- Hikoki Power Tools Denmark A/S
- Hikoki Power Tools Finland Oy
- DECLARATION OF CONFORMITY
Brand : HiKOKI
Model : RP3608DB
Category : Vacuum Cleaner