
SSBD 50 B1 - Soundbar SILVERCREST - Free user manual and instructions
Find the device manual for free SSBD 50 B1 SILVERCREST in PDF.

| Product type | Soundbar |
| Model | SSBD 50 B1 |
| Brand | SilverCrest |
| Dimensions (L x D x H) | approx. 75 x 10.3 x 7.5 cm |
| Weight | approx. 1855 g |
| Power supply | 24 V DC, 1.75 A power adapter (input 100-240 V~, 50/60 Hz, 1.5 A) |
| Power consumption (on/standby) | 42 W max / < 0.5 W |
| Audio output power | 2 x 25 W RMS |
| Bluetooth version | 5.0 |
| Bluetooth range | approx. 10 m |
| Connections | HDMI ARC, Optical input (Toslink), AUX (3.5 mm jack), USB (type A) |
| Supported USB audio formats | MP3, WAV |
| Max USB device capacity | 64 GB (FAT32, exFAT) |
| Preset audio modes | Cinema, Movie, Movie 3D, Music, Music 3D, Dialog, Dialog 3D |
| Remote control power | 2 AAA batteries (LR03, 1.5 V) included |
| Package contents | Soundbar, power adapter, remote control, 2 AAA batteries, HDMI cable, 3.5 mm jack/RCA adapter cable, 2 wall mounts, 4 feet, 4 screws, 4 wall plugs, quick start guide |
| Wall mounting | Up to 2 m height, hardware included |
| Operating temperature | 0°C to 35°C |
| Warranty | 3 years |
| Care | Soft, dry cloth, do not use solvents |
Frequently Asked Questions - SSBD 50 B1 SILVERCREST
User questions about SSBD 50 B1 SILVERCREST
0 question about this device. Answer the ones you know or ask your own.
Ask a new question about this device
Download the instructions for your Soundbar in PDF format for free! Find your manual SSBD 50 B1 - SILVERCREST and take your electronic device back in hand. On this page are published all the documents necessary for the use of your device. SSBD 50 B1 by SILVERCREST.
USER MANUAL SSBD 50 B1 SILVERCREST
SOUNDBAR 2.0 DOLBY DIGITAL
Korngnnggnd ng and
BARRE DE SON 2.0 DOLBY DIGITAL
eepaae aegnne
SOUNDBAR 2.0 DOLSY DIGITAL
15
SUNDBERK 2.0 DCGY DIGITAL
图
SOUNDBAR 2.0 DOLEY DIGITAL
02
2.0 DOLBY DIGITAL HANGPROJEKTOR
图③
DOBLY DIGITAL 2.0 SOUNDBAR
BANK OF SONDO 2.0 BOCBY DIGITAL
E
SOUNDBAR 2.0 DOUBY DIGITAL
- Trademarks 18
- Intended use 18
- Package contents 18
- Technical specifications 19
- Safety instructions 19
- Copyright 21
- Connections and controls 22
7.1 Remote control 22
8.Before you start 23
8.1 Positioning 23
8.1.1 Wall-mounting (Figure C) 23
8.2 Fitting the batteries into the remote control 23
8.3 Connection options / Operating modes 23
8.4 Display information 24
- Getting started 25
9.1 Switching on the sound bar 25
9.2 Switching the sound bar off 25
9.3 Selecting a mode 25
9.3.1 "HDMIARC"mode 25
9.3.2 "OPTICAL" mode 26
9.3.3 "BLUETOOTH" mode 26
9.3.4 "USB" mode 26
9.3.5"AUX"mode 27
9.4 Volume and audio settings 27
9.4.1 Adjusting the volume 27
9.4.2 Muting the sound 27
9.4.3 Adjusting the treble and bass 28
9.4.4 Selecting the audio settings 28
9.4.5 "MOVIE" audio settings 28
9.4.6 "MOV.3D" audio settings 28
9.4.7 "MUSIC" audio settings 28
9.4.8 "MUS.3D" audio settings 28
9.4.9 "DIALOG" audio settings 28
9.4.10 "DIAL.3D" audio settings 28
- Cleaning 28
10.1 Storage when not in use 28
- Troubleshooting 29
- Environmental regulations and disposal information 29
- Conformity 30
- Warranty and service information 31
Congratulations!
By purchasing the SilverCrest sound bar you have opted for a quality product.
Before first using it, familiarise yourself with the way the sound bar works and read these operating instructions through carefully. Be careful to follow the safety instructions and only use the sound bar as described in the operating instructions and for the applications given.
Keep these operating instructions in a safe place. If you pass the sound bar on to someone else, make sure to give them all the relevant documents with it.
This sound bar fulfils all the standards and directives listed in the EU Declaration of Conformity. The manufacturer is not liable for any damage or problems caused by unauthorized modifications. Only use accessories recommended by the manufacturer. Observe the regulations and laws in the country of use.
1. Trademarks
The Bluetooth® wording and its logo are registered trademarks of Bluetooth SIG, Inc. (Special Interest Group). TARGA GmbH is using these marks under license.
The SilverCrest trademark and the SilverCrest brand are the property of their respective owners.
The HDMI® wording is a registered trademark of HDMI Licensing LLC.
USB is a registered trademark.
Dolby, Dolby Audio and the double D symbol are registered trademarks of Dolby Laboratories Licensing Corporation.
Other names and product can be trademarks or registered trademarks of their respective owners.
2. Intended use
The SilverCrest SSBD 50 B1 sound bar with Bluetooth is a information technology device which is used to playback sound from audio devices. The sound bar may be used only for private purposes, and not for industrial or commercial purposes. The device may not be used outdoors or in tropical climates.
3. Package contents
Remove the device and all the accessories from the packaging. Remove the packaging material and check that all components are complete and undamaged. If you find anything missing or damaged, please contact the manufacturer.
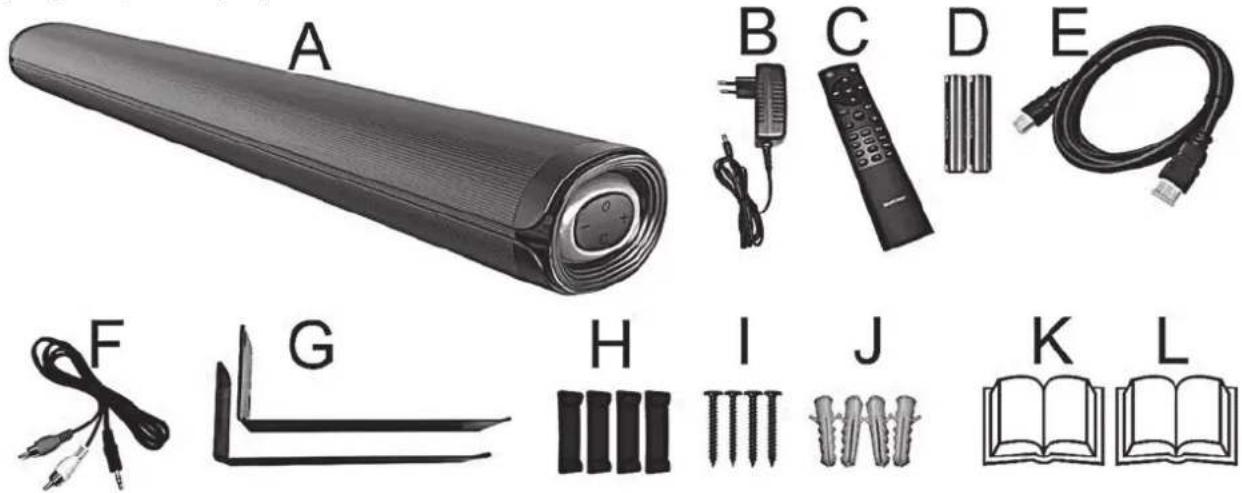
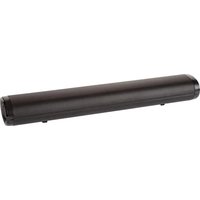
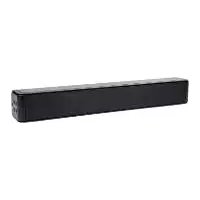
| A | SilverCrest SSBD 50 B1 sound bar |
| B | Wall plug power adapter |
| C | Remote control |
| D | 2 batteries of type AAA/LR03, 1.5 V |
| E | HDMI (ARC) cable |
| F | Adapter cable with 3.5 mm jack to Cinch |
| G | 2 wall mounts |
| H | 4 feet (also suitable for wall-mounting) |
| I | 4 screws 4 x 35 mm (for wall-mounting) |
| J | 4 rawlplugs 8 mm (for wall-mounting) |
| K | Quick Guide (linear illustration) |
| L | Quick start guide (line-art illustration) |
4. Technical specifications
SSBD 50 B1
| Input voltage/current 24 V | \( = 1/{1.75}\mathrm{\;A} \) |
| Power consumption when on / in standby mode max. \( {42.0}\mathrm{\;W} \) | / < 0.5 W |
| Speakers \( 2 \times {25}\mathrm{\;W} \) RMS | |
| Audio format at inputs Stereo PCM / Dolby Digital | |
| AUX IN jack 3.5 mm jac | \( \mathrm{k} \) |
| Digital input (SPDIF) Optical (Toslink) | |
| HDMI (ARC) cable HDMI ARC jack | |
| USB input Output current Format structure Playable audio formats Max. supported capacity of USB storage device | USB port, type A Max. \( {500}\mathrm{\;{mA}} \) FAT 32, exFAT MP3, WAV 64 GB |
| \( {\text{Bluetooth}}^{\circledR } \) specification: V 5.0 | |
| Supported profiles: A2DP, AVRCP | |
| \( {\text{Bluetooth}}^{\circledR } \) transmission power: max. \( {10}\mathrm{{dBm}} \) | |
| \( {\text{Bluetooth}}^{\circledR } \) frequency band: \( {2.402} - {2.480}\mathrm{{GHz}} \) | |
| \( {\text{Bluetooth}}^{\circledR } \) range: Approx. \( {10}\mathrm{\;m} \) | |
| Remote control power supply 2 batteries of type AAA/LR03, | 1.5V |
| Dimensions (W x D x H) approx. \( {75} \times {10.3} \times {7.5}\mathrm{\;{cm}} \) | |
| Weight without accessories approx. \( {1855}\mathrm{\;g} \) | |
| Operating temperature | \( {0}^{ \circ }\mathrm{C} \) to \( {35}^{ \circ }\mathrm{C} \) |
| Operating humidity | 85% rel. humidity |
| Permissible storage conditions | \( {0}^{ \circ }\mathrm{C} \) to \( {40}^{ \circ }\mathrm{C} \) ,max. \( {85}\% \) rel. humidity |
Power adapter
| Vendor, register of commerce number, address | TARGA GmbH / HRN: 12035 / Coesterweg 45, 59494 Soest, Germany |
| Manufacturer | FOSHAN SHUNDE GUANYUDA POWER SUPPLY CO.,LTDNo.1 of South, Jiefang East Road Xichong,Lunjiao,Shunde Foshan,Guangdong.P.R.China |
| Model code | EU: GM42-240175-2A |
| Input voltage | 100-240 V~ |
| AC input frequency | 50/60 Hz |
| Input current | 1.5 A |
| Output voltage | 24.0 V ~ |
| Output current | 1.75 A |
| Output power | 42.0 W |
| Average efficiency when in use | 87.85 % |
| Efficiency at low load (10 %) | 87.4 % |
| Power consumption at zero load | 0.07 W |
| Protection class | II |
The technical data and design may be changed without prior notice.
5. Safety instructions
Before you use this device for the first time, please read the following instructions and heed all warnings, even if you are familiar with handling electronic devices. Before using it, inspect the device for any damage. A damaged device must not be put into operation. Keep these operating instructions in a safe place for future reference. If you sell the device or pass it on, it is essential that you also hand over these operating instructions. The operating instructions are part of the product.
Explanation of symbols used

DANGER! This signal word indicates a danger with a high risk, which will lead to death or major injuries if not avoided.
WARNING! This signal word indicates a danger with a moderate risk, which can lead to death or major injuries if not avoided.
CAUTION! This signal word indicates important instructions to protect against damage to property.
This symbol denotes possible danger due to electric shock.
This symbol denotes further information on the topic.
Read the user manual! Please only use the power adapter supplied for this soundbar. Manufacturer: FOSHAN SHUNDE GUANYUDA POWER SUPPLY CO.,LTD Model name: EU: GM42-240175-2A DC voltage AC voltage Safety Class II, protective insulation This power supply is only suitable for use in inside spaces. Polarity of coaxial connector on mains power adapter The power adapter is in efficiency class VI Manufacturer's address Dolby AUDIO

WARNING! Always make sure that
- contact with water sprays or drops and corrosive liquids is avoided and the device is never operated near water; in particular the device may never be immersed in liquids (also, do not place any objects containing liquids, such as vases or drinks, on or near the device).
- no naked flames (e.g. burning candles) are placed on or near the device.
- no foreign bodies are introduced into the device;
- the device is not exposed to any extreme temperature fluctuations as this can cause moisture through condensation and cause short circuits. If the device has been exposed to extreme temperature fluctuations, wait for it to reach the ambient temperature before switching it on (about 2 hours).
the device and the power adapter are not covered. Heat can accumulate when the device is covered, therefore there is a risk of fire. - the device and the power adapter are not opened. This could cause an electric shock.
the power adapter is not touched with wet hands. This could cause an electric shock. - the mains socket used must be easily accessible at all times as the power adapter is used as a mains separation device.
the power adapter is disconnected from the mains socket in the event of lightning. There is a risk of fire or damage to property. - wall-mounting is only allowed up to 2m height only in order to avoid any further risks
Failure to heed the warnings above may cause injury.

CAUTION! Always make sure that
the device is not exposed to direct heat sources (e.g. radiators);
- no direct sunlight or bright artificial light reaches the device;
- you keep at least 1 m of space to radio frequency and magnetic sources (e.g. speakers, mobile phones, etc.) to avoid any malfunction. In case of malfunction, install the device at a different place.
- the device is not subjected to excessive shocks or vibrations.
the USB port (10) may not be used to charge external devices.
Failure to heed the warnings above could result in damage to the device.

WARNING! Batteries
Insert the batteries with the correct polarity. Refer to the diagram inside the battery compartment. Do not attempt to recharge the batteries and do not dispose of the batteries in a fire. Do not mix battery types (old and new or carbon and alkaline, etc.). Remove the batteries when the device is not to be used for an extended period. Improper use may cause explosions and danger to life. Batteries are not toys! If a battery is swallowed, seek medical help immediately. Batteries must never be opened or deformed, as this could result in chemicals leaking out which could cause injuries. If the battery fluid comes into contact with the skin or eyes, rinse immediately with plenty of water and seek medical aid.

DANGER! Personal safety
Electrical devices are not suitable for children. Persons with physical, sensory or mental impairments may also only use electrical devices within the limits of their abilities. Do not allow children or persons with reduced physical, sensory or mental capabilities to use electrical devices unsupervised unless they are instructed accordingly and supervised by a competent person responsible for their safety. Children should always be supervised to ensure that they do not play with the product. The product must not be cleaned or maintained by children. Small parts can represent choking hazards. Keep the packaging out of the reach of these people. Packaging material is not a toy.

There is a risk of suffocation.

DANGER! Wall plug power adapter

Only plug the wall plug power adapter into a suitable and easily accessible power socket. Do not touch the power adapter with wet hands. This could cause an electric shock. Unplug the wall plug power adapter from the mains in the following circumstances:
- in any dangerous situation.
- if the power adapter makes an unusual noise or gives off smoke.
- before a storm and/or thunderstorm.
- if the power adapter is damaged.
- if the power adapter has been exposed to rain, liquids or high levels of humidity.
- when you wish to clean it.
Note on mains disconnection: Please remember that the power adapter consumes a small amount of electricity even in standby mode when it is connected to the mains. To fully separate it from the mains, unplug the power adapter from the mains socket.
Please follow these instructions to avoid risk of potential fatal injury or fire! Never cover the wall plug power adapter, otherwise there is a risk of fire. Never open the housing on the power adapter. This could result in potentially fatal electrocution.

WARNING! Cables
Unplug all cables by holding the plugs and never pull on the cables themselves. Never place pieces of furniture or other heavy objects on the cables and take care that they do not become damaged, especially at the plugs and sockets. To avoid damaging them, never install the cables around hot or sharp objects. Never tie knots in cables and do not tie them to other cables. All cables must be positioned so that nobody can trip over them or be obstructed by them.

WARNING! Radio interface
Turn the device off when on board an aircraft, in a hospital, in an operating theatre or in the vicinity of electronic medical equipment. The RF signals may interfere with the functionality of sensitive devices. Keep the device at least 20cm away from pacemakers, as the RF signals could interfere with the functionality of the pacemaker. The RF signals transmitted can interfere with hearing aids. If wireless mode is switched on, do not place the device near flammable gases or in a potentially explosive area (e.g. a paint shop), as the RF signals transmitted could cause explosions or fire. The range of the radio frequency signals depends on environmental conditions. If data is transmitted via a wireless connection, it can also be received by unauthorized parties. Targa GmbH is not liable for any interference caused to RF or TV signals through unauthorized modification to this device. Furthermore, Targa accepts no liability for replacing any cables or devices that have not been specifically approved by Targa GmbH. The user is solely responsible and liable for remedying any interference caused by such unauthorized modification of this device or for replacing the device.

Servicing / Repair
Repairs are required when this device has been damaged in any way, for example, when the device housing is damaged, when liquids or objects have entered the device or when the product has been exposed to rain or moisture. Repairs are also necessary if the product is not working properly or has been dropped. If you notice any smoke, unusual noise or strange smells, switch off the device immediately and pull the power adapter out of the power socket. If this occurs, the device should not be used before it has been inspected by authorised service personnel. All repairs must be carried out by qualified service personnel.
Operating environment
The device is not designed for use in environments with high humidity (e.g. bathrooms) or excessive levels of dust. Operating temperature and operating humidity: 0^ to 35^ , max. 85% relative humidity. Please note that caring products for furniture surfaces may contain substances that can damage the rubber feet of the sound bar, so be careful if you have been using this type of products.
6. Copyright
All the contents of this user manual are protected by copyright and provided to the reader for information only. Copying data and information without the prior explicit written consent of the author is strictly forbidden. This also applies to any commercial use of the contents and information. All texts and diagrams are up-to-date as of the date of printing. Subject to change without notice.
7. Connections and controls
An ilustration of the items and controls and their corresponding numbers can be found on the inside page of the cover of this user manual.
| 1 | LED display |
| 2 | On/Standby button |
| 3 | - button (reduce volume) |
| 4 | + button (increase volume) |
| 5 | Source button (signal source selection) |
| 6 | Device feet |
| 7 | 3.5mm AUX-IN socket |
| 8 | optical digital input (Toslink) |
| 9 | HDMI ARC jack |
| 10 | USB port (not to be used for charging) |
| 11 | Power adapter socket |
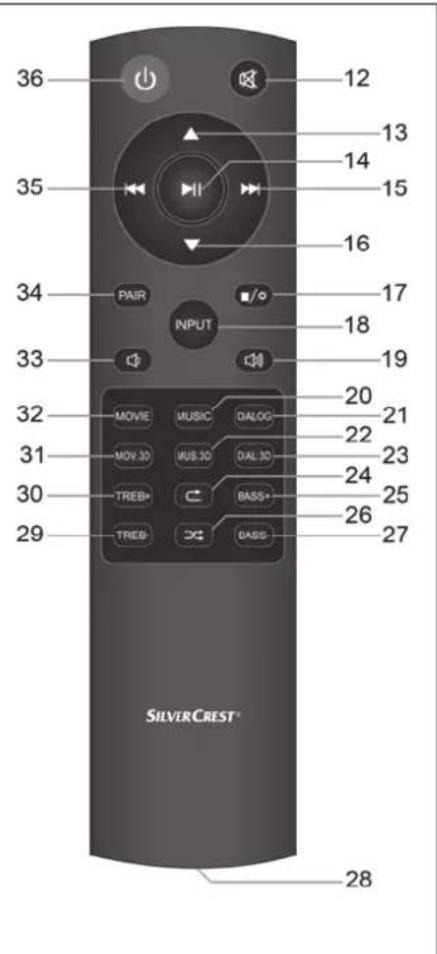
7.1 Remote control
You can use the remote control supplied to control the sound bar functions. Please see the chart below for the button functions.
| 12 | Mute |
| 13 | 1st track of next folder. |
| 14 | Pause |
| 15 | Next track |
| 16 | 1st track of previous folder. |
| 17 | Toggle display on/off |
| 18 | INPUT Select source |
| 19 | Increase volume |
| 20 | MUSIC Enables the equalizer for music |
| 21 | DIALOG Enables the equalizer for voice playback |
| 22 | MUS.3D Enables the equalizer with simulated surround sound for music |
| 23 | DIAL.3D Enables the equalizer with simulated surround sound for voice playback |
| 24 | Repeat function (title/folder) |
| 25 | BASS+ Amplify bass |
| 26 | Random |
| 27 | BASS- Attenuate bass |
| 28 | Battery compartment (on the back) |
| 29 | TREB- Attenuate treble |
| 30 | TREB+ Amplify treble |
| 31 | MOV.3D Enables the equalizer with simulated surround sound for movie playback |
| 32 | MOVIE Enables the equalizer for movies |
| 33 | Decrease volume |
| 34 | PAIR Start pairing/Unpairing |
| 35 | Previous title |
| 36 | On/Standby |
8. Before you start
Remove the sound bar and all accessories from the package and remove the plastic films. Verify that you have received all items listed.
8.1 Positioning
The ideal position for your sound bar is centrally under your TV set. You can place the sound bar on a piece of furniture or mount it to the wall.
8.1.1 Wall-mounting (Figure C)
Make sure that you use suitable wall-mounting material.
Tools/mounting material needed (not included in the package):
- Drill (depending on the wall)
- 4 screws and possibly 4 rawlplugs (depending on the wall) to fix to the wall. Please note that the screws must be suitable for the weight of the sound bar. If the screws and rawlplugs provided are not suitable for your specific circumstances, make sure that the dimensions of the screw head and shaft correspond to those provided in order to guarantee safe mounting.
Phillips screwdriver and possibly other screwdrivers, spirit level, pencil
Before drilling, make sure there are no water or gas pipes or electricity cables in the wall. If necessary, get an expert to mount the device on the wall.
- Glue 2 of the device feet supplied to each wall mount. Please see Diagram C for how to position the glue spots.
- Now place the sound bar down onto an even surface onto the device feet glued onto the wall mounts, so that the two wall mounts are inside the device feet. (6) of the sound bar. In order to achieve maximum stability, ensure the distance between the two wall mounts is as great as possible.
- Now measure the distance between the wall mounts and transfer this to the wall on which you wish to affix the wall mounts.
- Now hold the wall mounts at the height you want and mark the drill holes.
- Drill 2 holes for each wall mount. If you are using the rawlplugs supplied, use an 8mm drill bit.
- Insert the rawlplugs into the drilled holes.
- Secure the wall mounts into place with 2 screws each.
- Connect all the cables you are using to the connections on the sound bar.
- Place the sound bar down onto the wall mounts as you did when measuring the distance.
- Then, check that the sound bar is seated securely on the wall mounts on both sides.
8.2 Fitting the batteries into the remote control
Open the battery compartment (28) on the back of the remote control by sliding the battery compartment cover in the direction of the arrow and removing it. Insert the batteries (2 AAA-type batteries) with the correct polarity (+ and -). The correct polarity is labelled on the batteries and inside the battery compartment (28). Re-insert the cover of the battery compartment (28) and slide it in the opposite direction of the arrow until it locks in place. Please also refer to Figure B on the fold-out cover page.
8.3 Connection options / Operating modes


CAUTION! Make sure that the sound bar and the devices to be connected are switched off when you connect them. Please also read the user manual for the device to be connected.
The HDMI (ARC) connection only works if all the components connected are ARC-compliant. Use the HDMI (ARC) cable (E) supplied. See also the user manual for the connected device.
The cable used for playback must not exceed a length of 3 metres.
The SSBD 50 B1 sound bar lets you play sound and/or music from various sources:
Playback can be controlled using the buttons on the device or the remote control.
You can use the Source button (5) or the remote control to select the operating mode you want. The operating modes and corresponding display information can be found in the table below:
| Operating mode / Source | Input Use Display | ||
| HDMI ARC HDMI(ARC) (9) | Connection via HDMI (ARC) cable to the HDMI (ARC) jack, e.g. TV or DVD player | Hd | |
| USB | USB | Connect(10) of USB media, e.g. USB stick to play back audio files (audio formats supported: MP3 and WAV) | USB |
| AUX | AUX | Connect(11) via adapter cable (stereo jack/Cinch), e.g. DVD player or satellite receiver | AUX |
| BLUETOOTH® | — Via wireless connection, e.g. from smartphone | bt | |
| OPTICAL | OPTICAL | Connect(12) via Toslink cable, e.g. TV or digital receiver | OPH |
8.4 Display information
Every time a setting is changed on the sound bar, the LED display (1) lights up on full brightness for around 5 seconds before reverting back to the lower brightness level.
| Setting LED display | |
| "Standby" | - - |
| "HDMI(ARC)" mode Hd | |
| "BLUETOOTH®" mode bt | |
| "OPTICAL" mode OPH | |
| "USB" mode Usb | |
| "AUX" mode AUX | |
| "MOVIE" audio settings CINE | |
| "MUSIC" audio settings SONG | |
| "DIALOG" audio settings dIA | |
| "MOV.3D" audio settings CI3d | |
| "MUS.3D" audio settings SO3d | |
| "DIAL.3D" audio settings dl3d | |
| / / | V 00 to V 40 |
| "TREBLE" | t -5 to t 5 |
| "BASS" | b -5 to b 5 |
| For USB playback | Track runtime in mm:ss format |
| r/r1 | |
| DC | rA |
Press and hold the button (17) for approx. 1 second to switch off the LED display (1). Pressing the button (17) again or any other button switches the LED display (1) back on again.
9. Getting started

This user manual generally describes using the remote control.
Some basic functions (on/standby, source selection and volume setting) can also be adjusted directly from the sound bar.

The soundbar switches to standby if...
... no Bluetooth connection is established after 10 minutes.
... no audio signal or only a weak audio signal is received for 10 minutes.

In HDMI(ARC) and OPTICAL modes, please note:
If your audio source supports multi-channel playback, you need to switch it to "PCM Stereo" or "Dolby Digital" before getting started, as the sound bar will otherwise be unable to output sound. Please refer to the user manual for your audio source.
9.1 Switching on the sound bar
Connect the power adapter to the sound bar and into an easily accessible mains socket. The LED on the power adapter goes green. The sound bar has no separate main switch, it goes straight into standby mode. The LED display (1) shows "--". Press the Standby button (2, 36) to wake the sound bar up from standby mode.
9.2 Switching the sound bar off
Press the Standby button (36) to switch the sound bar into standby mode. Alternatively, you can press the Standby button (2) on the sound bar. The sound bar has no separate main switch. Please remember that the power adapter consumes a small amount of electricity even in standby mode when it is connected to the mains. To fully separate it from the mains, unplug the power adapter from the mains socket.
9.3 Selecting a mode
Press the "INPUT" button (18) to select the desired mode. Alternatively, you can toggle through the modes by briefly pressing the Source selection button (5) on the sound bar several times. The mode selected is shown as follows on the LED display (1):
| Mode Display | |
| HDMI ARC Hd | |
| OPTICAL | OPH |
| BLUETOOTH® | bt |
| USB | USB |
| AUX | AUX |
Now start playback on the connected device and control using the remote control. See the user manual for the playback device.
9.3.1 "HDMI ARC" mode

HDMI (ARC Audio Return Channel) is an extension to the conventional HDMI connection which allows ARC channel audio signals to be transmitted in both directions. In order to use this functionality, all the components used must be ARC-compliant.
Most modern TV sets, games consoles and digital receivers have an ARC output. Please refer to the user manual for the device to be connected. If the audio transmission does not work, make sure that the HDMI cable and the connection on the source device are ARC-compliant. It is possible that only specific connections on the source device are ARC-compliant.
How to connect the sound bar to a TV set is described below:
- Using an HDMI(ARC)-compliant cable (E, supplied), connect the HDMI(ARC) jack (9) on the sound bar to an HDMI(ARC) output on the TV set. Set the connected device to "PCM Stereo", "Stereo 2.0" or "Dolby Digital".
- Switch the sound bar on using the standby button (2, 36).
- Press the "INPUT" button (18) to select the HDMI(ARC) input on the sound bar.
- Switch the TV set on, the sound playback will start within a few seconds.

If your TV set supports the CEC protocol, the sound bar can be switched on and off using the TV remote control. If this is the case, the volume can also be controlled via the TV remote control. See the user manual for the TV set.
9.3.2 "OPTICAL" mode
Use this operating mode to play music from the optical digital input (8) for example from a TV on your sound bar (A). The TV must have an optical digital output. Use an optical cable (Toslink cable) to make the connection. Proceed as follows:
- Connect the Toslink cable to the optical digital output of your TV.
- Then connect the Toslink cable to the optical digital input (8) of your sound bar.
- Switch the TV set and sound bar on. Set the connected TV to "PCM Stereo", "Stereo 2.0" or "Dolby Digital".
- Start playing on the TV.
- Press the "INPUT" button (18) on the remote control to select the "OPTICAL" mode.
- You can use the volume buttons (19, 33) to adjust the volume to your requirements.
- If you wish, you can change the audio settings using the relevant buttons on the remote control.

See the user manual for the TV set.
9.3.3 "BLUETOOTH" mode

The Bluetooth device name of the sound bar is SSBD 50 B1.
If you are prompted for a PIN during the pairing process, enter "0000".
It can take a variable amount of time to establish the connection, depending on the device.
Establishing a connection
- Press the "INPUT" button (18) on the remote control to switch to Bluetooth mode.

After switching to Bluetooth mode, the sound bar automatically connects to a paired device (a steady "bt" is shown on the LED display (1)) or, if no paired device is found, automatically switches to Bluetooth pairing mode (the LED display (1) shows a flashing "bt"). If the connection to a paired device is lost, the device switches off after approx. 10 minutes.
If your playback device has not yet been paired with the sound bar, the display flashes "bt".
- Start Bluetooth scanning mode on your playback device (e.g. smartphone). It should then find the sound bar under the name "SSBD 50 B1".
- Now establish a Bluetooth connection between your playback device and the sound bar.
- Once a connection has been established, the LED display (1) shows "br" and a confirmation beep sounds.

Generally, you should only have to pair once as the playback device saves the name of the sound bar. This means you do not need to pair the devices manually when you establish the connection again.
If you wish to disconnect an existing Bluetooth pairing or switch to pairing mode, press and hold the "PAIR" button (34) on the remote control for about 1 second.
- Now start music playback from the source device. The sound is played back via the sound bar.
- You can use the ^(14) , ^(15) and ^(35) buttons on the remote control or your source device to control playback.
- You can use the volume buttons (19, 33) to adjust the volume to your requirements.
Disconnect
The Bluetooth pairing is disconnected if ...
- ... either of the devices is switched off. A confirmation beep will sound.
- ... Bluetooth is switched off. A confirmation beep will sound.
- ... the sound bar and source device are beyond the Bluetooth range (approx. 10 metres).
...you keep the "PAIR" button (34) on the remote control pressed for about 1 second.
9.3.4 "USB" mode

The sequence of the tracks/folders played is determined by the order in which they are copied to the USB stick.
In this mode, you can use the sound bar to play back audio files stored on a USB storage device, e.g. a USB stick. If connecting a USB hard drive, please note that the maximum current on the sound bar's USB connection is 500mA . Please also see the user manual for the USB hard drive.

If you want to use a hard drive as a USB playback device, use a Y-cable with a separate power supply to connect it.
Please note there can occasionally be compatibility issues between the USB storage device and the sound bar, meaning only limited functionality is available or it may not function at all. If this happens, try a different USB storage device.
It isn't possible to select USB mode when no USB device has been connected.
- Connect the USB storage device to the USB port (10) on the sound bar.
If a USB storage device is already connected, USB mode starts automatically when you switch on the sound bar. Otherwise, press the "INPUT" button (18) on the remote control to select this mode.
Use the (14), (17), (15) and (35) buttons on the remote control to control the music tracks.
- You can use the volume buttons (19, 33) to adjust the volume to your requirements.
If you wish, you can change the audio settings using the relevant buttons on the remote control.
Control functions available in "USB" mode:
| Action Function | |
| Press the button (14). | Pause / Resume current track. |
| Press the button (14) if playback was previously paused with the button (17). | Playback starts from the first track of the first folder on the USB storage device. |
| Briefly press the button (15). | Skip to next track. |
| Briefly press the button (13) or press and hold the button (15). | Skip to 1st track of next folder. |
| Briefly press the button (35). | Skip to previous track. |
| Briefly press the button (16) or press and hold the button (35). | Skip to 1st track of previous folder. |
| Press the button (17). | Pause playback, playback continues with the first track in the first folder on the USB storage device when the button (14) is pressed. |
Pressing the button (24) repeats the track currently being played (display shows "r1") or repeats all folders stored on the storage device (display shows "r").
Pressing the button (26) shuffles all the folders on the storage device (rA shown on the display).
Pressing the button (26) again exits shuffle mode (SE shown on the display) and playback reverts to the normal order.
| LED display Function | |
| r | All folders on a USB storage devices are repeated (endless playback). |
| r1 | Repeats the current track. |
| rA | Shuffle mode for all folders. |
| SE | Shuffle mode ended, playback in normal order. |

CAUTION! The USB port (10) must not be used to charge external devices.
9.3.5 "AUX" mode
Use this mode to connect a playback device with a Cinch output, e.g. a DVD player or satellite receiver. Use the adapter cable provided (F).
- Connect the Cinch output from your playback device to the AUX jack (7) on the sound bar.
- Switch the sound bar on using the standby button (2, 36).
- Press the "INPUT" button (18) on the remote control to select the "AUX" mode.
- You can use the volume buttons (19, 33) to adjust the volume to your requirements.
If you wish, you can change the audio settings using the relevant buttons on the remote control.
9.4 Volume and audio settings

Any changes to the volume and audio settings are shown on the LED display (1) for approx. 2 seconds. The display then reverts back to the standard display for the relevant mode.
9.4.1 Adjusting the volume
You can adjust the volume during playback using the volume buttons (19, 33) on the remote control. Alternatively, you can use the volume buttons (3, 4) on the sound bar. You can also hold the buttons down the change the setting more quickly. The volume selected is shown on the LED display (1) for approx. 2 seconds. If you set the volume to the lowest level "V 00", the indication "00" flashes continuously on the LED display (1).
9.4.2 Muting the sound
Press the button (12) to mute the sound temporarily. When the sound is muted, the volume level "00" flashes on the LED display (1).
9.4.3 Adjusting the treble and bass
You can adjust the treble to your requirements using the TREBLE+ (30) and TREBLE- (29) buttons.
To adjust the bass, press the BASS + (26) and BASS- (27) buttons.
9.4.4 Selecting the audio settings
The sound bar has 6 pre-set audio settings. Press the relevant button (20, 21, 22, 23, 31, 32) to select the audio setting you want. The audio settings selected are shown as follows for about 2 seconds on the LED display (1):
| Audio setting LED display | |
| MOVIE | CINE |
| MUSIC | SONG |
| DIALOG | dIA |
| MOV.3D | CI3d |
| MUS.3D | SO3d |
| DIAL.3D | dl3d |
9.4.5 "MOVIE" audio settings
Select these audio settings to select the sound settings to play back e.g. films or documentaries.
9.4.6 "MOV.3D" audio settings
Select these audio settings to select the sound settings to play back e.g. films or documentaries. Select this audio setting to give the current playback a virtual 3D surround sound.
9.4.7 "MUSIC" audio settings
This setting optimises the sound settings for music playback.
9.4.8 "MUS.3D" audio settings
This setting optimises the sound settings for music playback. Select this audio setting to give the current playback a virtual 3D surround sound.
9.4.9 "DIALOG" audio settings
Select these audio settings to select the sound settings for voice playback. This setting is recommended for news programmes, among others.
9.4.10 "DIAL.3D" audio settings
Select these audio settings to select the sound settings for voice playback. This setting is recommended for news programmes, among others. Select this audio setting to give the current playback a virtual 3D surround sound.
10. Cleaning
Switch the device off and unplug it from the mains. To clean it, use a soft, dry cloth. Never use any solvents or cleaners and never an abrasive sponge. Otherwise the sound bar housing can be damaged.
10.1 Storage when not in use

If the sound bar is not to be used for an extended period, store it in a clean, dry and cool place. Also remove the batteries from the remote control to prevent any leaking.
11. Troubleshooting
The sound bar does not power on.
- Check that the power adapter is correctly inserted into the power socket. Connect it properly if not.
- Check whether the used power socket is alive. If necessary, test the device in a different socket that you are certain is working.
No sound
- Check that the correct mode has been selected. Select the correct mode.
- Check the playback volume on the sound bar and the connected playback device.
- In HDMI ARC and OPTICAL mode: If your audio source supports multi-channel playback, you need to switch it to "PCM Stereo" or "Dolby Digital" before getting started, as the sound bar will otherwise be unable to output sound. Please refer to the user manual for your audio source.
- In "HDMI ARC" mode: Check that the HDMI(ARC) cable (E) is correctly inserted into the HDMI ARC jack (9) on the sound bar and the corresponding HDMI ARC connection on the external sound source, e.g. TV set. On a "normal" HDMI connection, the TV set can only receive video and audio signals, but not transmit them.
- In "AUX IN" mode: Check that the adapter cable (F) is correctly inserted into the AUX IN jack (7) on the sound bar and the Cinch output on the external playback device. Also check the volume setting of the external playback device connected via the adapter cable (F).
- In "Optical" mode: Make sure to connect the Toslink cable to the optical input (8) of your sound bar and to the corresponding jack of the external playback device. If necessary, remove the plastic caps from the connectors of your cable.
- In "USB" mode: Check that your USB playback device is formatted with the FAT32 file system and correctly connected and that there are suitable playback files on it. Suitable file formats: MP3 and WAV.
Cannot control the sound bar with the remote control
- The remote control batteries are low or empty. Replace them with new batteries of the same type.
The distance between the sound bar and the remote control is too great. Move them closer together.
Playback via Bluetooth® does not work
- On your smartphone / tablet, check if there is a Bluetooth® connection established to the SSBD 50 B1 sound bar. If necessary, repeat the pairing.
12. Environmental regulations and disposal information
| Devices marked with this symbol are subject to the European Directive 2012/19/EU. All electrical and electronic devices must be disposed of separately from household waste at official disposal centres. Avoid damage to the environment and risks to your personal health by disposing of the device properly. For further information about proper disposal, contact your local government, disposal bodies or the shop where you bought the device. | |
| The symbol of the crossed-out wheelie bin on conventional and rechargeable batteries indicates that they cannot be disposed of in normal domestic waste but must be disposed of separately. Where batteries contain toxic materials, the chemical symbol of the toxic material is shown underneath the symbol, with meanings as follows: - Pb: Battery contains lead - Cd: Battery contains cadmium - Hg: Battery contains mercury You are obliged by law to return used batteries. Old batteries can contain toxic materials which can be damaging to health or the environment if not properly stored or disposed of. Batteries also contain important raw materials, such as iron, zinc, manganese and nickel, which can be reused. After use, you can return the batteries to us or to a local collection point (e.g. in retail outlets or a local collection point) free of charge. Please note that batteries must be disposed of fully discharged at appropriate collection points for old batteries. If disposing of batteries which are not fully discharged, take precautions to prevent short circuits. | |
| ES/PT | Dispose of all packaging in an environmentally friendly manner. Cardboard packaging can be taken to paper recycling centres or public collection points for recycling. Any film or plastic contained in the packaging should be taken to your public collection points for disposal. |
| Only relevant for France: LETRI + FACILE "Sorting made easy" The product is recyclable, subject to advanced manufacturer responsibility and is sorted and collected separately. | ||
| a | Please note the markings on the packaging material when disposing of it, it is labelled with abbreviations (a) and numbers (b), the meanings of which are as follows: 1-7: plastic / 20-22: paper and cardboard / 80-98: composite materials. | |
| Symbol | Material | Contained in the following packaging elements for this product |
| 01 PET | Polyethylene terephthalate | The shrink film containing the batteries is made from polyethylene and can be recycled into polyester fibres, bottles for food and other liquids and food packaging. |
| 02 PE-HD | High density polyethylene | - |
| 03 PVC | Polyvinyl chloride - | |
| 04 PE-LD | Low density polyethylene | The moulding material for fixing the sound bar in the box, the inner plastic bags for sound bar, accessories, cables, wall-fixing material and remote control as well as the stickers that seal the gift box are made from low-density polyethylene and can be recycled into plastic bottles, films, etc. |
| 05 PP | Polypropylene | - |
| 06 PS | Polystyrene | - |
| 07 O | Other plastics - | |
| 20 PAP | Corrugated cardboard | The outer and inner packaging and the accessories box are made of corrugated cardboard and can be recycled into further packaging. |
| 21 PAP | Other cardboard - | |
| 22 PAP | Paper | - |
| 61 CPAP | Paper/cardboard/plastic | - |
| 64 CPAP | Paper/cardboard/plastic/aluminium | - |
13. Conformity

TARGA GmbH hereby declares that the wireless device type SSBD 50 B1 complies with Directive 2014/53/EU, ERP Directive 2009/125/EC and RoHS Directive 2011/65/EU.
The complete EU Declaration of Conformity is available for download from this link: https://www.targa.gmbh/downloads/conformity/411069_2201.pdf
14. Warranty and service information
Warranty of TARGA GmbH
Dear Customer,
This device is sold with three years warranty from the date of purchase. In the event of product defects, you have legal rights towards the seller. These statutory rights are not restricted by our warranty as described below.
Warranty conditions
The warranty period commences upon the date of purchase. Please keep the original receipt in a safe place as it is required as proof of purchase. If any material or manufacturing faults occur within three years of purchase of this product, we will repair or replace the product free of charge as we deem appropriate.
Warranty period and legal warranty rights
The warranty period is not extended in the event of a warranty claim. This also applies to replaced and repaired parts. Any damage or defects discovered upon purchase must be reported immediately when the product has been unpacked. Any repairs required after the warranty period will be subject to charge.
Scope of warranty
The device was carefully manufactured in compliance with stringent quality guidelines and subjected to thorough testing before it left the works. The warranty applies to material and manufacturing faults. This warranty does not cover product components which are subject to normal wear and which can therefore be regarded as wearing parts, or damage to fragile components such as switches, rechargeable batteries or components made of glass. This warranty is void if the product is damaged, incorrectly used or serviced. To ensure correct use of the product, always comply fully with all instructions contained in the user manual. The warnings and recommendations in the user manual regarding correct and incorrect use and handling of the product must always be observed and complied with. The product is solely designed for private use and is not suitable for commercial applications. The warranty is rendered void in the event of incorrect handling and misuse, if it is subjected to force, and also if any person other than our authorised service technicians interfere with the device. No new warranty period commences if the product is repaired or replaced.
Submitting warranty claims
To ensure speedy handling of your complaint, please note the following:
Before using your product for the first time, please read the enclosed documentation carefully. Should any problems arise which cannot be solved in this way, please call our hotline.
Always have your receipt, the product article number as well as the serial number (if available) to hand as proof of purchase.
If it is not possible to solve the problem on the phone, our hotline support staff will initiate further servicing procedures depending on the fault.
You can find this and many more manuals, product videos and installation software available for download at www.lidl-service.com. This QR code takes you directly to the LIDL service page (www.lidl-service.com). There, you can enter the item number (IAN) to access your operating manual.


Service

Phone: 0800 404 7657
E-Mail:
targa@lidl.co.uk

Phone: 1800
101010
E-Mail:
targa@lidl.ie

Phone: 800
62230
E-Mail:
targa@idl.com.mt

Phone: 8009
4241
E-Mail:
targa@lidl.com.cy
IAN:411069_2201

Manufacturer
Please note that the following address is not a service address. First contact the service point stated above.
TARGA
GmbH
Coesterweg 45
59494 Soest
GERMANY
Table des matieres
https://www.targa.gmbh/downloads/conformity/411069_2201.pdf
Cher client, chere clientele,
Cher client, chere clientele,
WAARSCHUWING! Batterijen
WAARSCHUWING! Kabels
WAARSCHUWING! Radio-interface
https://www.targa.gmbh/downloads/conformity/411069_2201.pdf
https://www.targa.gmbh/downloads/conformity/411069_2201.pdf
Service / reparation
https://www.targa.gmbh/downloads/conformity/411069_2201.pdf


- Congratulations!
- Trademarks
- Intended use
- Package contents
- Technical specifications
- Safety instructions
- Explanation of symbols used
- WARNING! Always make sure that
- CAUTION! Always make sure that
- WARNING! Batteries
- DANGER! Personal safety
- WARNING! Cables
- WARNING! Radio interface
- Servicing / Repair
- Operating environment
- Copyright
- Connections and controls
- Remote control
- Before you start
- Positioning
- Wall-mounting (Figure C)
- Fitting the batteries into the remote control
- Connection options / Operating modes
- Display information
- Getting started
- Switching on the sound bar
- Switching the sound bar off
- Selecting a mode
- "HDMI ARC" mode
- "OPTICAL" mode
- "BLUETOOTH" mode
- Establishing a connection
- Disconnect
- "USB" mode
- "AUX" mode
- Volume and audio settings
- Adjusting the volume
- Muting the sound
- Adjusting the treble and bass
- Selecting the audio settings
- "MOVIE" audio settings
- "MOV.3D" audio settings
- "MUSIC" audio settings
- "MUS.3D" audio settings
- "DIALOG" audio settings
- "DIAL.3D" audio settings
- Cleaning
- Storage when not in use
- Troubleshooting
- The sound bar does not power on.
- No sound
- Cannot control the sound bar with the remote control
- Playback via Bluetooth® does not work
- Environmental regulations and disposal information
- Conformity
- Warranty and service information
- Warranty of TARGA GmbH
- Warranty conditions
- Warranty period and legal warranty rights
- Scope of warranty
- Submitting warranty claims
- Service
- Manufacturer
- Table des matieres
- WAARSCHUWING! Batterijen
- WAARSCHUWING! Kabels
- WAARSCHUWING! Radio-interface
- Service / reparation
Brand : SILVERCREST
Model : SSBD 50 B1
Category : Soundbar