SMRB 40 A1 - Soundbar SILVERCREST - Free user manual and instructions
Find the device manual for free SMRB 40 A1 SILVERCREST in PDF.

| Product type | Soundbar |
| Brand | SilverCrest |
| Model | SMRB 40 A1 |
| Dimensions (W x H x D) | approx. 90 x 6.5 x 7.5 cm |
| Weight | approx. 1.8 kg |
| Power supply | Power adapter (input 100-240 V~, 50/60 Hz, output 18 V DC) |
| Total power | 40 W (RMS) |
| Connectivity | Bluetooth 5.0, AUX 3.5 mm input, USB input, optical input, HDMI ARC |
| Main features | Remote control, USB playback, equalization modes, wireless connection |
| Speakers | 2 full-range speakers |
| Installation | Wall-mountable (kit included) or on furniture |
| Compatibility | TV, smartphone, tablet, computer |
| Box contents | Soundbar, remote control, power cable, AUX cable, wall mount, screws, user manual |
| Cleaning | Clean with a soft, dry cloth; avoid chemicals |
| Safety instructions | Do not expose to moisture, do not open the device, unplug before cleaning |
| Operating temperature | 0°C to 40°C |
| Warranty | 2 years |
| After-sales service | Contact SilverCrest customer service or the retailer |
| Repairability | No user-serviceable parts; consult a qualified professional |
| Standby power consumption | < 0.5 W |
| Protection rating | IPX0 (not waterproof) |
Frequently Asked Questions - SMRB 40 A1 SILVERCREST
User questions about SMRB 40 A1 SILVERCREST
0 question about this device. Answer the ones you know or ask your own.
Ask a new question about this device
Download the instructions for your Soundbar in PDF format for free! Find your manual SMRB 40 A1 - SILVERCREST and take your electronic device back in hand. On this page are published all the documents necessary for the use of your device. SMRB 40 A1 by SILVERCREST.
USER MANUAL SMRB 40 A1 SILVERCREST
Operating instructions and safety instructions
NL BE
Spotify Connect....21
Music player (Musikplayer)....24
Bluetooth ^® 25
AUX in 25
natural_image
Close-up of a mechanical component with two white arrows pointing to features, no visible text or symbols.natural_image
Two white silhouette figures of bottles against black background, no text or symbols presentnatural_image
Mechanical device with a bottle and lever mechanism, no visible text or symbols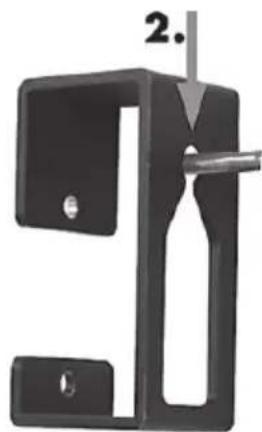
natural_image
Mechanical component with a handle and part, no visible text or symbolsLED-Anzeigen
www.spotify.com/connect
Lizenzen
https://developer.spotify.com/esdk-third-party-licenses/
Licenses
The Spotify Software is subject to third party licenses found here:
https://developer.spotify.com/esdk-third-party-licenses/
Music player (Musikplayer)
URL: http://www.multiroom-sound.com/app-download
URL: http://www.multiroom-sound.com/about
natural_image
Symbol of a trash bin with crossed lines indicating no waste or discharge (no text or labels)Safety instructions.... 42
Copyright 46
Connections and controls.... 46
Remote Control....47
Before you start 48
Choosing a location....48
Installation recommendations and notes about the EQ settings 50
SilverCrest Smart-Audio App....51
Configuring the network 51
Inserting the batteries into the remote control 52
LED indicators....52
Software update....53
Getting started 53
Switching the sound bar on....53
Establishing the Wi-Fi connection....53
Establishing the Wi-Fi connection via WPS 54
Establishing the WiFi connection via the SilverCrest Smart-Audio App....54
Setting up a device....54
Setting up a group 55
Source 55
Browse 55
Now playing....55
Spotify Connect....56
Using Spotify with your SilverCrest SMRB 40 A1 sound bar .... 56
Idle mode....58
Switching the sound bar off....58
Playing back music....58
Playback modes 58
Internet radio 58
Registering on the Internet radio portal....59
Spotify 59
Music streaming (more music services)....59
Local music....59
Music player....59
Bluetooth ^® 60
AUX in 60
Optical in 61
Adjusting the volume 61
USB port....61
SUB OUT - to connect an active subwoofer....61
Factory default values....62
Multi-room functionality....62
Cleaning....62
Storage when not in use 62
Troubleshooting....63
QR codes....64
What you need to know about setting up the network 65
Network glossary 66
Environmental regulations and disposal information ....69
Conformity notes....69
Warranty and servicing advice ....70
Congratulations!
By purchasing the SilverCrest SMRB 40 A1 Multi-room sound bar you have opted for a quality product.
Before first using it, familiarise yourself with the way the sound bar works and read these operating instructions through carefully. Be careful to follow the safety instructions and only use the sound bar as described in the operating instructions and for the applications given.
Keep these operating instructions in a safe place. If you pass the sound bar on to someone else, make sure to give them all the relevant documents with it.
Trademarks
Apple ^® , iPhone ^® and iPad ^® are registered trademarks, App Store is a service mark of Apple Inc., registered in the USA and other countries.
Google ^® and Android ^® are registered trademarks of Google Inc.
The Bluetooth ^® wording and its logo are registered trademarks of Bluetooth SIG, Inc. (Special Interest Group). TARGA GmbH is using these marks under license. The SilverCrest trademark and the SilverCrest brand are the property of their respective owners.
USB is a registered trademark.
The Spotify® logo, Spotify® and Spotify® Connect are registered trademarks of Spotify Ltd.
Other names and products may be the trademarks or registered trademarks of their respective owners.
Intended use
This SilverCrest SMRB 40 A1 Multi-room sound bar is a consumer electronics device designed to play audio from a LAN or Wi-Fi network. Furthermore it is possible to play audio files from external audio sources via cable or a Bluetooth ^® connection. The multi-room sound bar may be used only for private purposes, and not for industrial or commercial purposes. The device may not be used outdoors or in tropical climates. This sound bar fulfils all standards and directives listed in the Declaration of Conformity. The manufacturer is not liable for any damage or problems caused by unauthorised modifications. Only use accessories recommended by the manufacturer. Observe the regulations and laws in the country of use.
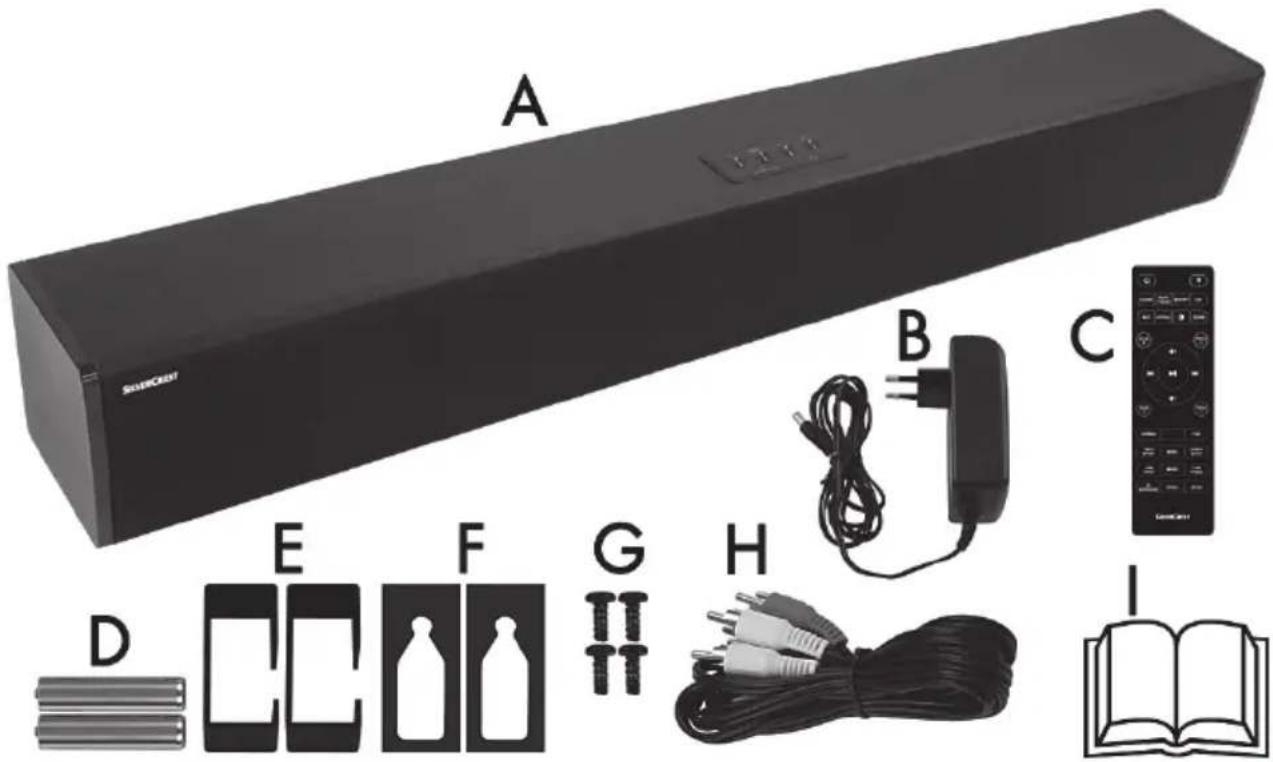
Package contents
Remove the device and all the accessories from the packaging. Remove the packaging material and check that all components are complete and undamaged. If you find anything missing or damaged, please contact the manufacturer.
natural_image
Product display of a black rectangular device with labeled parts including a monitor, cable, and a book icon (no text or symbols on main objects)| A S | MRB 40 A1 Multi-room sound bar |
| B | Power adapter |
| C | Remote control |
| D 2 | batteries of type AAA/LR03, 1.5 V |
| E 2 | wall mounts |
| F 2 | adhesive foam pads (for the wall mount) |
| G | 4 screws |
| H | RCA cable |
| I These operating instructions (line-art illustration) | |
| Drilling template (not illustrated) | |
Technical specifications
SMRB 40 A1
| Input voltage / input current 21 V / 2,100 mA, | ⊖⊖⊖ |
| Speaker 2 x 20 W RMS | |
| AUX IN jack Stereo Cinch (RCA) | |
| SPDIF input optical (Toslink) | |
| Subwoofer output Cinch/RCA | |
| Network connection 10/100 Ethernet (LAN): RJ-45 | |
| Input sensitivity 770 mV | |
| USB 2.0 output 5 V / max. 500 mA | ⊖⊖ |
| Wi-Fi Frequency Band 2.4 GHz/5GHz | |
| Wi-Fi Standard 802.11 a/b/g/n | |
| Encryption WEP, WPA, WPS | |
| Dimensions (W x H x D) approx. 930 x 122 x 120 mm | |
| Weight without power adapter approx. 4,350 g | |
| Operating temperature | 0 to 35 |
| Operating humidity | 85% rel. humidity |
| Permissible storage conditions | 0 to 40 , max. 85% rel. humidity |
Power adapter
| Manufacturer | Ktec |
| Type | KSAS0502100210HE |
| Input voltage / input current 100 to 240 V | , 50/60 Hz / 2 A |
| Output voltage / output current | 21 V ± 2.1 A, ⊕⊕ |
| Safety class | II |
The technical data and design may be changed without prior notice.
Safety instructions
Before you use this device for the first time, please read the following notes and heed all warnings, even if you are familiar with handling electronic devices. Keep these operating instructions in a safe place for future reference. If you sell the device or give it away, pass on the User Manual at the same time. The User Manual is part of the product.
Explanation of symbols used

DANGER! This symbol and the word "DANGER" denote a potentially dangerous situation. Ignoring it can lead to severe injury or even death.
WARNING! This symbol and the word "WARNING" denote important information required for the safe operation of the product and for the safety of its users.

WARNING! This symbol denotes danger for human health and risk of death and/or risk of damage to equipment due to electric shock.
Please only use the supplied power adapter (manufacturer: Ktec / Model number: KSAS0502100210HE) to power the sound bar.
This symbol denotes further information on the topic.

DANGER! Always make sure that
• the device is not exposed to direct heat sources (e.g. radiators);
• no direct sunlight or bright artificial light reaches the device;
- contact with spray, dripping water and corrosive liquids is avoided and the device is never operated near water; in particular the device may never be immersed in liquids (do not place any objects containing liquids, such as vases or drinks, on or near the device);
- no naked flames (e.g. burning candles) are placed on or near the device;
- you keep at least 1 m of space to radio frequency and magnetic sources (e.g. speakers, mobile phones, etc.) to avoid any malfunction. In case of malfunction, install the device at a different place.
- no foreign bodies are introduced into the device;
- the device is not exposed to any extreme temperature fluctuations as this can cause moisture through condensation and cause short circuits. If the device has been exposed to extreme temperature fluctuations, wait for it to reach the ambient temperature before switching it on (about 2 hours).
• the device is not subjected to excessive shocks or vibrations;
- the device is not covered. Heat can accumulate when the device is covered, therefore there is a risk of fire.
Failure to heed the warnings above may result in damage to the device or injury.

DANGER! Batteries
Insert the batteries with the correct polarity. Refer to the diagram inside the battery compartment. Do not attempt to recharge the batteries and do not dispose of the batteries in a fire. Do not mix
battery types (old and new or carbon and alkaline, etc.). Remove the batteries when the device is not to be used for an extended period. Improper use could cause explosions or leaks. Batteries are not toys! If a battery is swallowed, seek medical help immediately. Batteries must never be opened or deformed, as this could result in chemicals leaking out which could cause injuries. If the battery fluid comes into contact with the skin or eyes, rinse immediately with plenty of water and seek medical aid.

DANGER! Children and persons with disabilities
Electrical devices are not suitable for children. Also persons with reduced physical, sensory or mental capabilities should only use electrical devices within the limits of their abilities. Do not allow children or persons with reduced physical, sensory or mental capabilities to use electrical devices unsupervised unless they are instructed accordingly and supervised by a competent person responsible for their safety. Children should always be supervised to ensure that they do not play with the product. Small parts can represent choking hazards. Keep the packaging away from children and persons with disabilities.

There is a risk of suffocation.

DANGER! Power adapter
Please only use the supplied power adapter (manufacturer: Ktec / model number: KSAS0502100210HE) to power the sound bar.
Only plug the power adapter into a suitable and easily accessible power socket. Do not touch the power adapter with wet hands as this could cause an electric shock.
To unplug the power adapter from the power socket, always hold its casing and never pull from the cable. Unplug the power adapter from the mains in the following circumstances:
• in any dangerous situation
- if the power adapter makes an unusual noise or gives off smoke
• before a storm and/or thunderstorm
- if the power adapter is damaged
- if the power adapter has been exposed to rain, liquids or high levels of humidity
• before a prolonged absence, e.g. holiday
- when you wish to clean it
- The power adapter consumes electricity even in Standby mode. In order to completely disconnect the device from the mains, the power adapter must be pulled out from the power socket.
Please follow these instructions to avoid risk of potential fatal injury or fire! Never cover the power adapter, otherwise there is a risk of fire. Do not attempt to open the housing of the power adapter. This could result in potentially fatal electrocution.

WARNING! Cables
Unplug all cables by holding the plugs and never pull on the cables themselves. Never place pieces of furniture or other heavy objects on the cables and take care that they do not become damaged, especially at the plugs and sockets. Never install the cables around hot or sharp objects to avoid damaging them. Never tie knots in cables and do not tie them to other cables. All cables should be positioned so that nobody can trip over them or be obstructed by them.

DANGER! Radio interface
Turn the device off when on board an aircraft, in a hospital, in an operating theatre or in the vicinity of electronic medical equipment. The RF signals may interfere with the functionality of sensitive devices. Keep the device at least 20 cm (8 inches) away from pacemakers, as the RF signals could interfere with the functionality of the pacemaker. The RF signals transmitted can interfere with hearing aids. If the wireless mode is switched on, do not place the device near flammable gases or in a potentially explosive area (e.g. a paint shop), as the RF signals transmitted could cause explosions or fire. The range of the radio frequency signals depends on environmental conditions. If data is transmitted via a wireless connection, it can also be received by unauthorised parties. Targa GmbH is not liable for any interference caused to RF or TV signals through unauthorised modification to this device. Furthermore, Targa accepts no liability for replacing any cables or devices that have not been specifically approved by Targa GmbH. The user is solely responsible and liable for remedying any interference caused by such unauthorised modification of this device and for replacing appliances.

Servicing / Repair
Repairs are required if this device is damaged in any way, for example, if the power adapter or device housing is damaged, if liquids or objects have entered the device or if the product has been exposed to rain or moisture. Repairs are also necessary if the product is not working properly or has been dropped. If you notice any smoke, unusual noise or strange smells, switch off the device immediately and pull the power adapter out of the power socket. If this occurs, do not continue to use the device and have it checked out by an expert. All repairs must be carried out by qualified service personnel.
Operating environment
The device is not designed for use in environments with high humidity (e.g. bathrooms) or excessive levels of dust. Operating temperature and operating humidity: 0 to 35, max. 85% relative humidity. Please note that caring products for furniture surfaces may contain substances that can damage the rubber feet of the sound bar, so be careful if you have been using this type of products.
Copyright
All the contents of this user manual are protected by copyright and provided to the reader for information only. Copying data and information without the prior explicit written consent of the author is strictly forbidden. This also applies to any commercial use of the contents and information. All texts and diagrams are up-to-date as of the date of printing. Subject to change without notice.
Connections and controls
An additional illustration of the items and controls and their corresponding numbers can be found on the inside page of the fold-out cover of this user manual. You can keep this page folded out whilst reading the different chapters of these operating instructions. This allows you to refer to the relevant controls at any time.
| 1 | On/Standby button |
| 2 | Mode / Spotify button |
| 3 | - button (reduce the sound volume) |
| 4 | + button (increase the sound volume) |
| 5 | Wi-Fi/Bluetooth LED (blue) |
| 6 | POWER /AUX /OPTICAL LED (orange/green/green) |
| 7 | Wall-mounting holes |
| 8 | Bass reflex speaker openings |
| 9 | LAN port (network port, RJ-45) |
| 10 | USB port |
| 11 | SUB OUT socket (to connect an active subwoofer) |
| 12 | Left AUDIO IN jack |
| 13 | Right AUDIO IN jack |
| 14 | WPS/RESET button |
| 15 | optical digital input SPDIF |
| 16 | DC IN socket (power adapter connection, polarity ) ⊖⊕⊕ |
| 17 | Power switch (ON/OFF) |
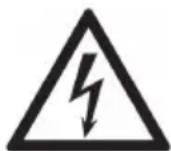
Remote Control
You can use the remote control supplied to control the most important sound bar functions without a smartphone or tablet PC. Please see the chart below for the button functions.
| 18 | On/Standby |
| 19 | MUSIC PLAYER - Switch to music player mode |
| 20 | SPOTIFY Switch to SPOTIFY |
| 21 | Mute |
| 22 | FAV Toggle between favourites |
| 23 | Switch to Bluetooth® |
| 24 | *PAIR Bluetooth® pairing mode |
| 25 | TREBLE+ Amplify treble |
| 26 | + Increase volume |
| 27 | Play/Pause |
| 28 | Next title |
| 29 | Reduce volume |
| 30 | TREBLE- Attenuate treble |
| 31 | FLAT Equalizer with neutral settings |
| 32 | MUSIC Enables the equalizer for music |
| 33 | TREBLE BOOST Equalizer with amplified treble |
| 34 | MOVIE Enables the equalizer for movies |
| 35 | LOW TREBLE Equalizer with attenuated treble |
| 36 | VOCAL Enables the equalizer for voice, e.g. for news broadcasts |
| 37 | MY EQ Equalizer with custom settings |
| 38 | 3D SURROUND Enables the equalizer with simulated surround sound |
| 39 | LOW BASS Equalizer with attenuated bass |
| 40 | BASS BOOST Equalizer with amplified bass |
| 41 | NORMAL Default equalizer |
| 42 | BASS- Attenuate bass |
| 43 |  Previous title Previous title |
| 44 | BASS+ Amplify bass |
| 45 | AUX Switch to AUX input |
| 46 | OPTICAL Switch to optical digital input SPDIF |
| 47 | I.RADIO Switch to Internet radio |
Before you start
Remove the sound bar and all accessories from the package and remove the plastic films. Verify that you have received all items listed.
Choosing a location
The ideal location for your sound bar is under the TV set. You can place the sound bar on a piece of furniture or mount it to the wall. Make sure that you use suitable wall-mounting material.
Tools/mounting material needed (not included in the package):
- Drill (depending on the wall)
- 2 screws and possibly 2 rawlplugs (depending on the wall) to fix to the wall. Please note that the screws must be suitable for the weight of the sound bar. The screw head and the screw shaft must be of at least the following dimensions to guarantee proper support:

• Phillips screwdriver and possibly other screwdrivers, spirit level, pencil
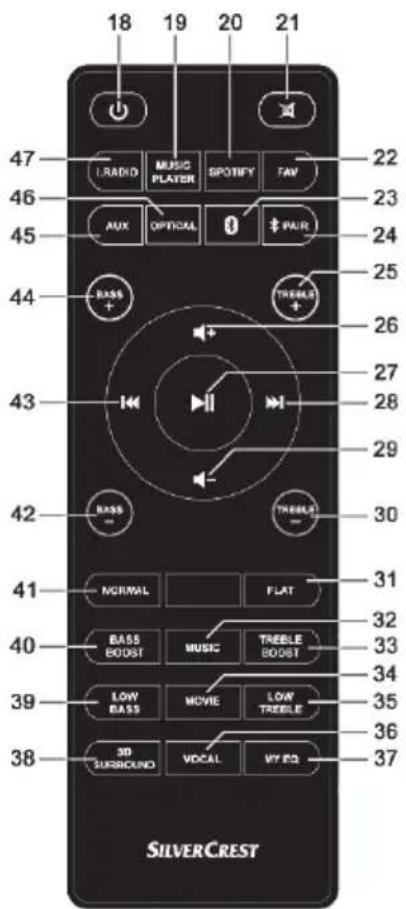
You will also need the drilling template, 2 wall mounts (E), 2 adhesive foam pads (F) and 4 screws (G), (all included in the package)
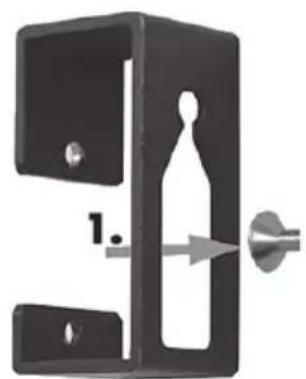
Use 2 of the screws supplied (G, arrows) to mount the wall mounts (E) to the two gaps on the back of the sound bar. To do this, insert the Philips screwdriver through the gap in the wall mount. The small round-shaped part of the gap should point upwards.
natural_image
Close-up of a rectangular electronic component with two white arrows pointing to its interior (no text or symbols visible)Use the drilling template included and mark the drill holes on the wall. Use the spirit level to mark the holes at the same height.
Depending on the wall, next drill the required holes for the screws/rawlplugs. Insert the screws and twist them until the screw head is approx. 3 to 4 mm away from the wall.

2 adhesive foam pads (F) are included in the package. They are self-adhesive and will protect the wall where you want to mount the sound bar. Break and remove the stamped-out inner part of the foam pad (F). This inner part is no longer needed. Remove the film from the back and stick the foam pad (F) to the wall mounts you have already fitted so that the gap is not covered and the foam part of the adhesive pad touches the wall when the sound bar is hung on the wall.
natural_image
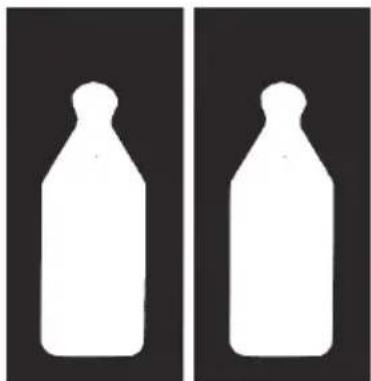
Two identical white bottle silhouettes on black background, no text or symbols presentNext place the sound bar with the two wall mounts fitted to the 2 screw heads that are slightly away from the wall.
- Centre and press.
- Firmly press the sound bar downwards until the 2 screw heads are seated behind the round-shaped part of the gap.
natural_image
Mechanical device with a bottle and lever mechanism, no visible text or symbols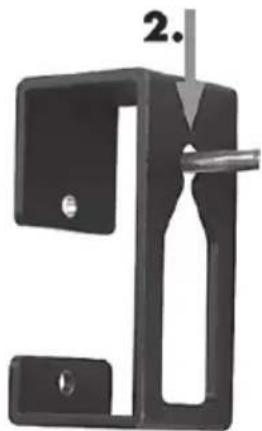
natural_image
Mechanical component with a handle and mounting bracket, labeled with number 2 (no text or symbols on the part itself)Check that the sound bar is firmly fitted to both screws. If necessary, repeat the process. It may be necessary to rotate the screws clockwise or anticlockwise a little.
Installation recommendations and notes about the EQ settings
A carefully chosen speaker location is important for obtaining a good sound. Furniture, curtains and other objects all have a slight influence on the sound.
You should always try to install the speakers around head height for the listeners.
In order to minimise any unwanted sound reflections, there should be a minimum clearance of 0.8 m behind and beside the speakers. You can check for any sound reflections by moving the speaker closer and closer to a corner of the room. The bass component will rise the closer the speaker is placed to the corner.
Negative sound reflection can also occur from the surface (shelf, chest of drawers, etc.) on which the speaker is placed. There is a difference in sound if you place the speaker on the front edge of the furniture or in the centre of it.
When delivered, the sound is set for the installation conditions described above.
If you cannot find any location that meets the above requirements, you can still adjust the speaker sound in order to optimise it for the given environment.
To do so, select the sound setting that best describes the location from the following list.
| Location / application Recommended sound setting | Effect | |
| The speaker is standing freely at the listeners' head height, minimum clearance to all walls 0.8 m. | NORMAL Factory-default configuration for optimum location | |
| FLAT Acoustically neutral frequency | range | |
| Music playback MUSIC Strong amplification of bass and treble | ||
| - The speaker is free-standing in a very large room. | BASS BOOST Slightly amplified bass | |
| - The speaker is placed in a corner or directly in front of a wall.- Wall-mounted speaker | LOW BASS Slightly attenuated bass | |
| Film and TV playback MOVIE Slight amplification of bass and treble | ||
| - The speaker is not at head height.- Sound in the room is muffled by curtains and carpets, etc. | TREBLE BOOST Slightly amplified treble | |
| - The speaker is placed in a room with large reflective surfaces like windows, plastered walls and tiled floors. - The speaker is placed in the middle of a cabinet/table | LOW TREBLE Slightly attenuated treble | |
| Audio books, podcasts, TV mode VOCAL Amplified voice, slightly attenuated treble and bass | ||
| Film and TV playback 3D Virtual surround sound enabled | ||
If you cannot obtain satisfactory results with the default sound settings, you can also adjust the bass and treble manually.
Equalizer "MY EQ"
The bass and treble values you set are saved in "MY EQ" and can be recalled by pressing the "MY EQ" button (37) on the remote control. Any modified bass and treble settings are always relative to the "NORMAL" sound setting.
SilverCrest Smart-Audio App
This app lets you control your sound bar conveniently from your smartphone or tablet PC. You can download the "SilverCrest Smart-Audio" control app from the Apple® App Store and from the Google® Play Store.
The SilverCrest Smart-Audio app allows you to navigate between the different functions, tune-in a different radio station, set the volume, etc.
Among others, the app supports the following functions:
- Access to Internet radio stations and podcasts
- Internet Radio control
- Setup and control of a multi-room system

The SilverCrest Smart-Audio app is very intuitive, however please also read the operating instructions for the SilverCrest Smart-Audio app.
http://www.silvercrest-multiroom.com
Configuring the network
The SMRB 40 A1 sound bar is connected to the network via Wi-Fi. The built-in Wi-Fi antenna receives the network router signals.
Alternatively, you can use a suitable network cable (not supplied) to connect the sound bar to your router. To do so, insert on end of the network cable into the LAN port (9) of your sound bar and the
other end into the corresponding port of your router. In this case you don't need to register the sound bar in your Wi-Fi network to control it with the SilverCrest Smart-Audio app.
In order for the sound bar to access the music files on the network, the network must meet the following requirements:
- DHCP must be enabled on the network router so the sound bar can obtain an IP address automatically.
- UPnP media sharing has to be enabled on the router.

See the operating instructions for your router.
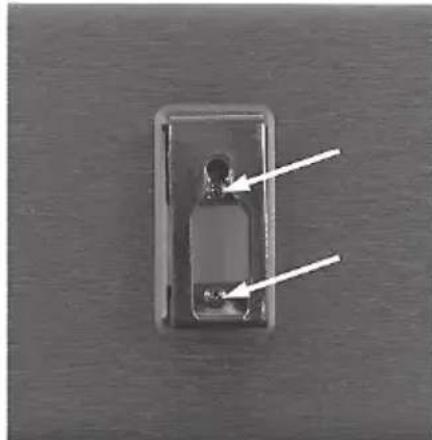
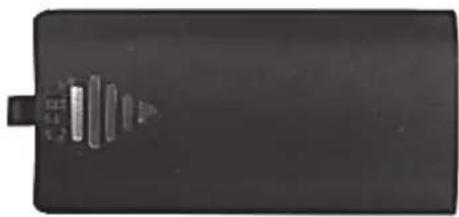
Inserting the batteries into the remote control
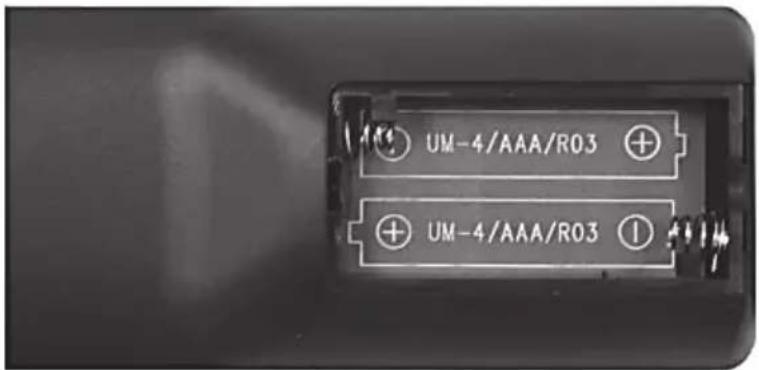
Open the battery compartment on the back of the remote control by sliding the battery compartment cover in the direction shown and removing it. Insert the batteries (2 AAA-type batteries) with the correct polarity (+ and -). The correct polarity is labelled on the batteries and inside the battery compartment. Re-insert the cover of the battery compartment and slide it in the opposite direction of the arrow until it locks in place.
natural_image
Black rectangular object with a small protrusion and internal vertical bars, resembling a battery or connector (no text or symbols visible)LED indicators
| orange LED on Idle mode | |
| yellow LED on and blue LED on Sound bar initialising | |
| blue LED flashes slowly | AP mode, waiting for network connectionPairing mode, waiting for Bluetooth ® connection |
| blue LED flashes 3 times fast, followed by a short pause | WPS mode, waiting for WPS signal from router |
| blue LED on Connected to the network | |
| green LED on • AUX mode | • SPDIF mode (optical input) |
| green and blue LEDs flashing fast Wi-Fi connection fault | |
| green and blue LEDs flashing slowly two times Maximum volume has been reached | |
Software update
As the product is constantly being developed, it can become necessary to update the software on your device. This will be notified with a corresponding notice in the app.
Please perform the software update according to the app instructions.

Please note that the update may take up to 15 minutes, depending on the Internet connection and the number of devices to be updated.
The update process:
- The update starts loading. The blue and green LEDs light up for approx. 15 seconds, then the blue LED goes out for a second and then the blue and green LEDs flash during the download (approx. 10-30 seconds).
- Then the blue LED comes on for approx. 10 to 15 seconds.
- Next, the device restarts and the update is installed. This is indicated by the blue and green LEDs flashing (approx. 1-2 minutes).
- After the update is finished, the device restarts. After the reboot, it is available in the SilverCrest Smart-Audio App again, the blue LED is now lit constantly.
Important! Please note the following:
Do not interrupt the power supply to the device while the update is running. Please wait for the update to complete. The entire process is automatic, you don't need to do anything.
If you have any questions regarding the update process, please contact our hotline, who will be happy to help you.
Getting started
Switching the sound bar on
Connect the sound bar to the supplied power adapter (B) and then connect the power adapter (B) to an easily accessible power socket. Toggle the power switch (17) located on the back panel of the unit to "ON". After a brief initialisation period (yellow and blue LEDs on simultaneously, then one LED briefly lights up green) only the blue LED flashes slowly and the device is in AP mode.
Establishing the Wi-Fi connection
There are 2 ways to connect the sound bar (A) to the existing network of your router via Wi-Fi: either by pressing the WPS / RESET button (14) or by downloading the SilverCrest Smart-Audio app for free from the Apple® App Store or from the Google® Play Store. In both cases, when
establishing the connection for the first time, make sure to place the sound bar (A) as close as possible to the router to achieve an optimum Wi-Fi signal transmission. Then install the sound bar (A) within the Wi-Fi signal range.
Please note that a maximum of 16 multi-room devices can be connected to a network. Furthermore the multi-room devices and your smartphone/tablet must be connected to the same network.
Establishing the Wi-Fi connection via WPS
If your router features a WPS button, the easiest way to connect the sound bar (A) to the network is using this button.
- Place the power switch (17) in "ON" position to go to connection mode. After a brief initialisation period (yellow and blue LEDs on simultaneously, then one LED briefly lights up green) only the blue LED flashes slowly. If the LED does not flash, the sound bar must be reset:
Press and hold the WPS / RESET button for approx. 15 seconds to restart the device. After a brief initialisation period (yellow and blue LEDs on simultaneously, then one LED lights green briefly) the blue LED flashes slowly and the device is in AP mode. - Next press the WPS button on your router and confirm the connection by briefly pressing the WPS / RESET button (14) on the sound bar (A) back panel.

See the operating instructions for your router.
The sound bar (A) establishes a network connection. The blue LED flashes 3 times fast, followed by a short pause.
• After the connection has been established, the blue LED goes on.
• Now the sound bar (A) can play audio signals from the network.
- The sound bar (A) will save the connection data, so the next time you switch it on you don't need to re-establish the connection again.
Establishing the WiFi connection via the SilverCrest Smart-Audio App
The following contains some important instructions for setting up your sound bar. A detailed, up-to-date description of the SilverCrest Smart-Audio App with plenty of screenshots can be found online. You can find the relevant internet links in the "QR codes" chapter on page 64.
Setting up a device
If you cannot establish a connection using WPS, you can use the SilverCrest Smart-Audio App to connect your sound bar to the network.
Power on the device and start AP mode. The AP mode lets you configure and connect your sound bar to the WiFi network.

When using it for the first time, the sound bar starts the AP mode automatically. Otherwise, hold the WPS / RESET button for approx. 15 seconds to restart the
device. After a brief initialisation period (yellow and blue LEDs on simultaneously, then one LED briefly lights up green) only the blue LED flashes slowly and the device is in AP mode.
Start the SilverCrest Smart-Audio App and select "Set up audio system". Follow the on-screen instructions to connect the device to your WiFi network.
After setup is finished, you can add more existing WiFi devices to the network in the same way, if you have any.
Setting up a group
In order to create a group, you need at least two multi-room devices in the same network.
From the overview, select the device you wish to act as the "Master" in the group and press the button next to the device.
In the window that opens, you are shown the multi-room devices you can add to the group. Select the devices you wish to add to the group. Confirm your selection by checking the boxes next to the names. You can also rename the group.
Then press "Done" or "OK". You have successfully created a group.
Please note that a group cannot contain more than 5 devices.
Source
You can use the "Source" menu option to select the available audio sources for the selected multi-room system:
- Internet radio
- Spotify
- Music streaming (more music services)
- Local music
- Music player
- Bluetooth
- AUX in
- Optical in (optical input)
Browse
Once you have selected a source, you are taken to the "Browse" menu option. Here, you can refine your search based on the audio source selected, e.g. by music genre, station or title.
Now playing
If you select a station or a title, the cover is displayed and you have various settings options based on the source selected, for example, Volume.
Spotify Connect
Spotify is a music streaming service that runs on many mobile devices like smartphones or tablet PCs. Together with one of these devices your sound bar SMRB 40 A1 can play this streamed music.
Requirements:
- You have to download the Spotify App to your smartphone (iOS, Android) and install it.
- A Spotify account subject to a purchased subscription (Premium account).

You can find further information at: www.spotify.com
Using Spotify with your SilverCrest SMRB 40 A1 sound bar
• Make sure that your sound bar and smartphone are connected to the same wireless LAN.
- Select the Spotify mode from the SilverCrest Smart-Audio app or by pressing the Mode / Spotify button (2) on the sound bar. To do this, hold the Mode / Spotify button (2) down for about 2 seconds.
- Launch the Spotify app and play the desired songs on the sound bar.

Please note that you must select the sound bar in the Spotify app first.
- Playback control and music title selection is done from the Spotify App. Alternatively, you can control some functions (Start / Stop / Pause / Next title / Previous title) from the SilverCrest Smart-Audio app. You can also set the playback volume on the sound bar.

The Spotify app is very intuitive, however please read the Spotify app documentation for information about using the app.

Using this device with Spotify Connect
A better way to listen at home
Spotify Connect allows you to play Spotify on your home speakers or TV. And you can also use the Spotify app as a remote control.
You'll need a Spotify Premium account to use Spotify Connect. If you don't have it, just go to http://www.spotify.com/freetrial for your free 30-day trial.
- Connect your sound bar to the same wifi network as your phone, tablet or PC running the Spotify app.
- Open the Spotify app, and play any song.
- Tap the song image in the bottom left of the screen.
- Tap the Connect icon
- Pick your sound bar from the list.
For more information on how to set up and use Spotify Connect please visit:
www.spotify.com/connect
Licenses
The Spotify Software is subject to third party licenses found here:
https://developer.spotify.com/esdk-third-party-licenses/
Idle mode
To set the sound bar (A) to idle mode, briefly press the On / Standby button (1). The orange LED (6) is on. While idle, the sound bar (A) keeps the network connection alive so the connection is available immediately after switching it back on.
If the sound bar (A) receives no signal, it goes idle automatically after a certain time.
Switching the sound bar off
Toggle the power switch (17) located on the back panel of the unit to "OFF" to switch the sound bar (A) off. Please remember that the power adapter consumes a small amount of electricity when it is connected to the mains. To fully separate it from the mains, unplug the power adapter from the mains socket.
Playing back music
The SMRB 40 A1 sound bar lets you play music from the following sources:
- Internet Radio
- Music services
• USB media and DLNA/UPNP playback / local files - External audio source via Bluetooth ^®
• External audio source via Cinch/RCA cable
• External audio source via SPDIF (optical input)
You can use the device buttons, the remote control or your smartphone/tablet PC for playback control.
Playback modes
You can also press the Mode / Spotify button (2) on the sound bar to toggle between the 8 playback modes:
- Internet radio
- Spotify
• Music streaming (more music services) - Local music
- Music player
- Bluetooth ®
- AUX IN
• Optical in (optical input)
Hold the Mode/Spotify button (2) down for about 2 seconds to select the Spotify mode directly.
Internet radio
The sound bar includes an Internet radio feature that you can control via the SilverCrest SmartAudio app.
Registering on the Internet radio portal
If you register on the Internet radio portal, you can create and manage favourite lists. You can also add radio stations manually. The same favourites are then available on all devices registered to an account. In order to register your multi-room devices on the Internet radio portal, you need to generate an access code. From the SilverCrest Smart-Audio app, select "Internet radio" mode. Next select "Browse/Help" in the sub-menu. Press "Get access code".
- Then register on the website www.wifiradio-frontier.com
- Follow the instructions on the website. The following information is required for registration: access code, e-mail address and password.
- Once registered, you can create and manage your favourite lists on the website www.wifiradiofrontier.com.
In order to register another device, select the "My preferences" option.
Spotify
Play music from the Spotify online service by installing the SPOTIFY app on your smartphone or tablet PC.
Music streaming (more music services)
This menu item contains more music services, such as Deezer.
Local music
To play music files that are saved locally on your smartphone or tablet PC.
Music player
This lets you play music files saved on a USB mass storage device. Connect the USB mass storage device to the USB port (10) on the back of the sound bar and use the SilverCrest Smart-Audio app for playback control.
Shared media (DLNA): Select this option to play music files from your local network. Please note that the music files have to be shared for streaming on your network first. Please read the documentation for the device (computer, router, etc.) you wish to use as playback source.
The description below gives you an insight into the subject:
DLNA (Digital Living Network Alliance) is a standard within a network which ensures that computers, media players/servers and smart devices understand one another and enables the shared use of network music files.
How to set up a DLNA media server depends on the hardware/software solution in use. To find out, read the documentation for your device or look it up on the internet.
Bluetooth®
You can also pair the sound bar with your smartphone or tablet PC via Bluetooth® and play locally saved music or music with an app.
- From the "SilverCrest Smart-Audio" open the "Source" menu of your sound bar and select "Bluetooth®". Alternatively, you can select the Bluetooth® mode with the Mode/Spotify (2) button and with the remote control.
- Close the "SilverCrest Smart-Audio" and enable Bluetooth® in the settings of your smartphone or tablet PC. You will find the sound bar SMRB 40 A1 in the list of available devices.
- Select SMRB 40 A1. You sound bar will pair with the smartphone or tablet PC.

Please also read the user manual of your smartphone or tablet PC.
- Next open the music player app of your smartphone or tablet PC or any other music app to play music with your sound bar without any Internet connection.
- You can control the volume on the sound bar, with the remote control or with the smartphone or tablet PC that you're using as playback device.

When a connected device is not in range of the sound bar, another device can connect to the sound bar.
AUX in
Use this operating mode to play music from an external audio source on your sound bar (A). Proceed as follows:
- Connect the supplied Cinch/RCA cable (H) to the audio out jack of your external audio source. - Then connect the Cinch/RCA cable (H) to the Audio IN jacks (12, 13) of your sound bar. Make sure to use the correct channel connections for the Cinch/RCA cable (H). The red colour is for the right channel, the white colour for the left channel - both on the sound bar and on the cable.
- Start playback on the external audio source.
- Select the AUX IN source from the SilverCrest Smart-Audio app, on the remote control or by pressing the Mode / Spotify button (2).
- If necessary, you can set the desired volume with the volume adjustment buttons (3, 4), via the SilverCrest Smart-Audio app, on the remote control or on your external audio source.

See the operating instructions for your external audio source.
Optical in
Use this operating mode to play music from the optical digital input SPDIF (for example from a TV) on your sound bar (A). The TV must have an optical digital output. You will need a Toslink cable (not supplied) for this connection. Proceed as follows:
- Connect a Toslink cable to the optical digital output of your TV.
- Then connect the Toslink cable to the optical digital input (15) of your sound bar.
- Start playing on the TV.
- Select the SPDIF (optical input) source from the SilverCrest Smart-Audio app, on the remote control or by pressing the Mode / Spotify button (2).
- If necessary, you can set the desired volume using the volume adjustment buttons (3, 4), via the SilverCrest Smart-Audio app, on the remote control or on your TV.

See the User Manual for your TV set.
Adjusting the volume
You can adjust the volume by using the SilverCrest Smart-Audio app or by pressing the + (4) or - (3) buttons on the sound bar.
For playback from an external audio source (AUX) you can also adjust the volume on the external audio source.
When using a Bluetooth ^® connection, the volume cannot be adjusted with the SilverCrest SmartAudio app.
USB port
On the one hand, the USB port (10) can be used to connect a USB storage device to play the saved music files in "Music player" mode. On the other hand, you can charge a device (smartphone or tablet PC) connected to this port. You can still charge devices connected to the USB port (10) when the sound bar is in standby mode. There is only no power to the USB port (10) when the sound bar is switched off using the main power switch (17).
SUB OUT - to connect an active subwoofer
You can use the SUB OUT jack and a suitable Cinch/RCA cable (not supplied) to connect an active subwoofer to the sound bar.

The volume and frequency settings for the subwoofer must be adjusted on the subwoofer itself. See the operating instructions for your subwoofer.
Factory default values
Proceed as follows to restore the factory default values:
Press and hold the WPS / RESET button for approx. 15 seconds. The sound bar will restart. After a brief initialisation period (yellow and blue LEDs on simultaneously, then one LED briefly lights up green) only the blue LED flashes slowly and the device is in AP mode.

Please note that all custom settings will be lost when restoring the factory default values.

Restore the factory default values before passing on the sound bar so that your data are not revealed to any third parties!
Multi-room functionality
A multi-room system is very versatile. If you have multiple Wi-Fi speakers, you can group them by using the SilverCrest Smart-Audio app. For example, you can install one speaker per room, group them and then use your smartphone or tablet PC for centralised control. For instance, if you select a radio station, it will be played on all grouped speakers.
Of course, you can ungroup the devices at any time and then control each speaker individually.
Or you can create multiple small groups for individual control.
For more information, see the chapter "Setting up a group" on page 55.
Cleaning
Switch the device off and unplug the power adapter from the mains. To clean it, use a soft, dry cloth. Never use any solvents or cleaners and never an abrasive sponge. Otherwise the sound bar housing can be damaged.
Storage when not in use

If the device is not to be used for an extended period, store it in a clean, dry and cool place. Also remove the batteries from the remote control to prevent any leaking.
Troubleshooting
The sound bar does not power on.
- Check that the power switch located on the back panel of the sound bar is switched to "ON".
- Check that the power adapter is correctly inserted into the power socket. Connect it properly if not.
- Check whether the used power socket is alive. Try a different power socket, if necessary.
No sound
- Please check if the correct playback mode has been selected. Select the proper playback mode first.
- Check the volume setting.
- For "AUX IN" mode: Make sure to connect the Cinch/RCA cable (H) to the AUDIO IN jacks (12, 13) of your sound bar and to the corresponding jacks of the external playback device. Please also check the volume setting of the external playback device connected via audio cable.
- For "Optical" mode: Make sure to connect the Toslink cable to the SPDIF digital input (15) of your sound bar and to the corresponding jack of the external playback device.
- There might be no signal reception. Double-check the network settings.
Router connection problems
- You have entered a wrong network encryption key. Double-check the encryption key and enter it again.
- If you are using a network cable to connect the sound bar to your router, make sure that the network cable is properly inserted into the LAN ports of the sound bar and the router.
Cannot control the sound bar with the app
- The sound bar and the smartphone or tablet PC are not connected to the same wireless network. If necessary, correct the network settings of the corresponding devices.
Cannot control the sound bar with the remote control
- The remote control batteries are low or empty. Replace them with new batteries of the same type.
- The distance between the sound bar and the remote control is too high, reduce it.
Playback via Bluetooth® does not work
- On your smartphone / tablet PC, check if there is a Bluetooth® connection established to the SMRB 40 A1 sound bar. If necessary, repeat the pairing.
QR codes
The following QR codes connect you to interesting Websites that contain more helpful information about your device.
Use your smartphone or tablet PC to scan the code to open the corresponding website. Alternatively, you can also enter the corresponding URL into your Internet browser address bar.
| Here you can download apps available for this device:URL: http://www.multiroom-sound.com/app-download |  |
| This website contains detailed information about setting up and installing the SilverCrest multi-room system:URL: http://www.multiroom-sound.com/about |  |
| Here you can find specific information for your sound bar.URL: http://www.silvercrest-multiroom.de/produkte/soundbar |  |
| This link forwards you to the SilverCrest Multi-room system homepage:URL: http://www.multiroom-sound.com |  |
What you need to know about setting up the network
Make sure that the smartphone and/or tablet with which you wish to register and operate your smart audio device in the network belongs to the relevant network.
To prevent unauthorised persons gaining access to the system, the WiFi network should be encrypted. There are numerous encryption algorithms, including WPS, WPA, WEP, etc. Make sure you use the same encryption algorithm for your multi-room product as for your wireless network. Otherwise, no connection can be established to the wireless network.
In large apartments or buildings with several storeys, a number of different wireless networks can be installed. Make sure that the network equipment (routers/repeaters) are connected to one another, otherwise your smart audio devices cannot communicate with one another and you will not be able to control them as expected.
Some smart audio devices also have a LAN connection socket which allows the device to be connected to the network via a network cable.
If you connect your sound bar to your network using a cable, make sure that the network cable for the relevant device is connected to the same network (WiFi) as your smartphone and/or tablet and any other smart audio devices.
In buildings with fixed network sockets in the walls, these sockets can often lead to different networks.
If this cannot be guaranteed, the devices cannot be controlled.
Other tips and instructions on setting up the network can be found on our website:
www.silvercrest-multiroom.com
WPS
Most wireless routers and access points have a WPS button. Press this button and then the WPS button on your multi-room device for the multi-room device to establish a connection with your wireless network. Make sure that the device you wish to use to control your multi-room products (e.g. smartphone or tablet) is also connected to the same wireless network (i.e. router or access point).
Dynamic/static IP addresses
By default, your multi-room device expects to be automatically assigned an IP address by your wireless router or access point when it connects to it (DHCP function activated). However, if you use static IP addresses for your network devices, this will not work. In this case, you need to manually assign your multi-room device an available IP address. See the operating instructions for your router.
Wireless range
Wireless routers normally work in the 2.4 GHz range, but this is also used by other RF devices (not only wireless networks). This can reduce speeds and ranges as the numerous wireless signals
interfere with each other. It is even possible that there is no reception any more just two rooms away. If necessary, install a repeater to extend the WiFi network range.
Combined wireless with 2.4 and 5 GHz
Older wireless devices are not able to work in the 2.4 and 5 GHz ranges at the same time. This applies not only to routers and access points, but also to PCs, laptops and other devices you may wish to use to control your multi-room system. If you cannot find or control your multi-room products or the connection is too slow, check that they really support both frequency ranges.
Router overnight standby function
If your router has an overnight standby function, it is possible that the sound bar will switch on automatically (but not automatically play music) when you switch the router back on again. In this case, the sound bar obviously consume electricity. If necessary, deactivate the overnight standby function.
Allow network discovery
Make sure that the wireless router or access point allows devices in the wireless network to be visible to one another and exchange data with one another. Otherwise, the sound bar is no longer visible after they have been set up.
Network glossary
Access Point Device which provides an access hub between a wireless (WiFi) network and a cabled one (LAN). It gives wireless-compatible devices (laptops, smartphones, loud-speakers, etc. with wireless functionality) access to the LAN and any other networks connected (e.g. the internet).
AP mode Operating mode in which a multi-room device can be connected and configured via the wireless network (WiFi) using the Smart-Audio App or another compatible app.
Bluetooth Industrial standard for wireless communication between devices. The range for this system is normally max. 10 m. After an initial synchronisation (pairing) between two devices, the wireless connection between them is automatically restored when the two devices are switched on and within range at a later date.
DHCP Abbreviation for "Dynamic Host Configuration Protocol". Computer networks can contain large numbers of computers. Each computer is given a unique IP address to ensure the data intended for it is only sent to it. There is the option either of assigning IP addresses yourself (these are then fixed) or leaving this to a device within the network (normally the router). And this is what the DHCP function does: after a computer is switched on, it is automatically assigned a free IP address which is valid until it is switched off again.
| DLNA | Abbreviation for "Digital Living Network Alliance". Guidelines which define the interaction between various multimedia devices when it comes to the transfer of digital content. They make it possible to transfer this content to fixed home devices, mobile devices and other products connected to various networks, including cable, satellite and mobile phone networks. These guidelines also include standards such as UPnP. |
| Ethernet | Ethernet is without a doubt the most popular standard for computer networks. The signals can be transferred via various types of cables and at differing speeds. A computer is connected to one end of the cable, while the other end is connected to a hub or switch which acts a distributor within the network. |
| Hub | Within the network, the hub is responsible for distributing data to the computers it is intended for. In larger networks, this can be connected to additional hubs or switches, themselves serving numerous computers. Many routers already incorporate a hub, allowing direct connection of multiple computers and quick setup of small home networks. |
| Internet radio | Internet radio is an audio service transmitted via the internet. Listeners are provided with a permanent audio stream which cannot normally be paused, time-shifted or repeated. This is a radio broadcast which is not transmitted via radio waves. |
| IP Address | In the same way as the postman needs a street and house number in order to deliver post, the target devices must be assigned addresses in data communication in order for the data to be delivered to the right device. On the internet and in conventional computer networks, this is the IP address. As a user, you do not normally need to think about IP addresses, as the applications and devices you use do this for themselves. |
| LAN | Abbreviation for "Local Area Network". The LAN is a traditional cabled network used in companies and now in the home. It consists of multiple computers and other devices which are connected with one another and can communicate and exchange data with one another. The LAN is often connected to the internet. |
| Multiroom | A function whereby multiple compatible devices can be grouped on the wireless network and centrally controlled (e.g. via a smartphone app). For example, you can install one speaker per room, group them and then use your smartphone or tablet to control them centrally. For instance, if you select a radio station, it will be played on all grouped speakers. |
| Network | A series of data processing devices which are connected together and can communicate with one another. This connection can be via cable (LAN) or via wireless (WiFi). |
| Pairing | One-off synchronisation between two Bluetooth devices to "get to know one another". After two devices have been successfully paired once, the wireless connection between them is automatically restored when the two devices are switched on and within range at a later date. |
| Podcast | Digital media file (audio or video) which is broadcast via the internet or another network on request. This is not a live stream. |
| Repeater | A repeater extends the range of a wireless network. This lets you include devices originally located outside the WiFi range into the wireless network via the repeater. |
| Router | The router is the link between a local network (LAN) or wireless network (WiFi) and the internet. Many routers incorporate a hub or switch to allow direct access to the internet from various computers to form a small home network. |
| Smart-Audio | An app based on the UNDOK standard which allows multi-room systems to be controlled by a smartphone or tablet. |
| Spotify | A commercial music streaming service which allows the music of your choice to be played on various devices and operating systems (computers, smartphones, tablets, smart TVs, etc.). |
| Switch | Many routers already incorporate a switch, allowing direct connection of multiple computers and quick setup of small home networks. |
| UNDOK | UNDOK has become established as the standard for Multi-room systems. It is an app which allows Multi-room devices to be grouped and controlled from a smartphone or tablet. |
| Update | An update refers to upgrading a software. An update may include enhancements or new features. |
| UPnP | Abbreviation for "Universal Plug and Play". A series of network protocols which allow devices in the network to find one another, communicate and share data easily without requiring specific intervention or knowledge. |
| Encryption | To prevent unauthorised persons gaining access to a wireless network, it should be encrypted. There are numerous encryption algorithms, including WPS, WPA, WEP, etc. |
| WiFi | Abbreviation for "Wireless Fidelity". A standard which enables computers, smartphones, digital cameras and other compatible devices to establish a connection with a wireless network (WLAN). The WiFi environment is normally provided by an access point connected to a cabled network (LAN) or the internet via a router. |
| WLAN | Abbreviation for "Wireless Local Area Network". The WLAN is the modern variant of a computer network which is used in small companies and households. It consists of multiple computers and other devices which are connected with one another and can communicate and exchange data with one another. However, unlike a LAN, the data is transferred wirelessly rather than by cable. To ensure the wireless signals are not intercepted by unauthorised parties, encryption of the signals is very important. The WLAN is often connected to the internet. |
| WPS | Abbreviation for "WiFi Protected Setup". For security reasons, wireless networks are encrypted and a password is required to establish a connection to them. On the one hand, this password can be defined manually. In this case, the user needs to enter the password to establish a connection. On the other hand, there is the option whereby a button is pressed on the access point or router providing the wireless network with a few moments to attempt synchronisation with the connecting device (e.g. smartphone). This is achieved |
using the WPS function. As with Bluetooth, this synchronisation is only required once. The access data for the WLAN is saved and the device (e.g. smartphone) restores the network connection as soon as it is in range and its wireless function is activated.
Environmental regulations and disposal information

Devices marked with this symbol are subject to the European Directive 2012/19/EU. All electrical and electronic devices must be disposed of separately from household waste at official disposal centres. Avoid damage to the environment and risks to your personal health by disposing of the device properly. For further information about proper disposal, contact your local council, recycling centre or the shop where you bought the device.
Disposal of packaging
Dispose of all packaging in an environmentally friendly manner. Cardboard packaging can be taken to paper recycling centres or public collection points for recycling. Any film or plastic contained in the packaging should be taken to your public collection points for disposal.
Disposal of batteries
Respect the environment. Old batteries must not be disposed of with domestic waste. They must be handed in at a collection point for waste batteries. Please note that batteries must be disposed of fully discharged at appropriate collection points for old batteries. To prevent any short circuits cover the battery poles of not fully
discharged batteries with insulating tape.
Conformity notes

This device complies with the basic and other relevant requirements of the EMC Directive 2014/30/EU, the Low-voltage Directive 2014/35/EU, the ErP Directive 2009/125/EC, the R&TTE Directive 1999/5/EC and the RoHS Directive 2011/65/EU.
The power minimisation for network devices required by (EC) Ordinance 1275/2008 cannot be met by the sound bar SMRB 40 A1 as it is controlled via software over the network and it therefore requires a permanent network connection.
In order to receive the complete EU declaration of conformity, please send an e-mail to the following e-mail address:
ce@targa.de
Warranty and servicing advice
Warranty of TARGA GmbH
Dear Customer,
This device is sold with three years warranty from the date of purchase. In the event of product defects, you have legal rights towards the seller. These statutory rights are not restricted by our warranty as described below.
Warranty conditions
The warranty period commences upon the date of purchase. Please keep the original receipt in a safe place as it is required as proof of purchase. If any material or manufacturing faults occur within three years of purchase of this product, we will repair or replace the product free of charge as we deem appropriate.
Warranty period and legal warranty rights
The warranty period is not extended in the event of a warranty claim. This also applies to replaced and repaired parts. Any damage or defects discovered upon purchase must be reported immediately when the product has been unpacked. Any repairs required after the warranty period will be subject to charge.
Scope of warranty
The device was carefully manufactured in compliance with stringent quality guidelines and subjected to thorough testing before it left the works. The warranty applies to material and manufacturing faults. This warranty does not cover product components which are subject to normal wear and which can therefore be regarded as wearing parts, or damage to fragile components such as switches, rechargeable batteries or components made of glass. This warranty is void if the product is damaged, incorrectly used or serviced. To ensure correct use of the product, always comply fully with all instructions contained in the user manual. The warnings and recommendations in the user manual regarding correct and incorrect use and handling of the product must always be observed and complied with. The product is solely designed for private use and is not suitable for commercial applications. The warranty is rendered void in the event of incorrect handling and misuse, if it is subjected to force, and also if any person other than our authorised service technicians interfere with the device. No new warranty period commences if the product is repaired or replaced.
Submitting warranty claims
To ensure speedy handling of your complaint, please note the following:
- Before using your product for the first time, please read the enclosed documentation carefully. Should any problems arise which cannot be solved in this way, please call our hotline.
- Always have your receipt, the product article number as well as the serial number (if available) to hand as proof of purchase.
- If it is not possible to solve the problem on the phone, our hotline support staff will initiate further servicing procedures depending on the fault.

Service

Phone: 020 - 70 49 04 03
E-Mail: service.GB@targa-online.com

Phone: 01-4370121
E-Mail: service.IE@targa-online.com

Phone: 027 78 11 03
E-Mail: service.MT@targa-online.com
Phone: 02 - 20 09 025
E-Mail: service.CY@targa-online.com
IAN: 279409

Manufacturer
Please note that the following address is not a service address. First contact the service point stated above.
TARGA
GmbH
Coesterweg 45
59494 SOEST
GERMANY
Table des matières
Marques commerciales 74
Spotify Connect....91
natural_image
Product display of a black rectangular device with labeled parts including a monitor, cable, and a book icon (no text or symbols on main objects)natural_image
Close-up of a mechanical component with two white arrows pointing to a hole and a small protrusion (no text or symbols visible)natural_image
Two identical white bottle silhouettes on black background, no text or symbols presentnatural_image
Mechanical device with a bottle inside a housing, connected to a wall-mounted bracket (no text or symbols visible)
natural_image
Mechanical component with a labeled arrow and part number 2, showing no readable text or symbols.Voyants lumineux
www.spotify.com/connect
Licences
Music streaming (Streaming musical) (autres services musicaux)
Local music (Musique locale)
natural_image
Symbol of a trash bin with crossed lines indicating no waste or discharge, and a solid black rectangle below (no text or labels)Cher client, chère cliente,
Cher client, chère cliente,
Spotify Connect....128
WAARSCHUWING! Kabels
natural_image
Close-up of a small electronic component with two white arrows pointing to its surface (no text or symbols visible)natural_image
Two identical white bottle silhouettes on black background, no text or symbols presentnatural_image
Mechanical device with a bottle inside a housing, connected to a wall-mounted bracket (no text or symbols visible)
natural_image
Mechanical component with a numbered label '2.' and a handle, no visible text or symbolsLeds
www.spotify.com/connect
Licenties
https://developer.spotify.com/esdk-third-party-licenses/
Inactieve modus
natural_image
Symbol of a trash bin crossed with a diagonal line and a horizontal bar below (no text or numbers present)natural_image
Product display of a silver screen with labeled accessories including a TV, cable, and remote control (no text or symbols on main objects)natural_image
Top-down view of a rectangular electronic device with two white arrows pointing to its interior (no text or symbols visible)natural_image
Two white bottle silhouettes against black background, no text or symbols presentnatural_image
Mechanical device with a bottle inside a housing and a valve inserted, no visible text or symbols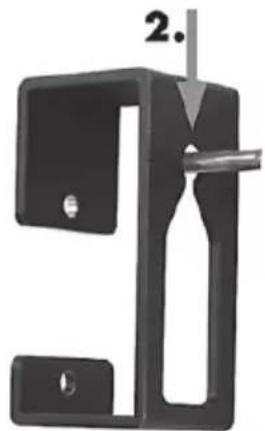
natural_image
Mechanical component with a handle and mounting bracket, labeled with number 2 (no text or symbols on the object itself)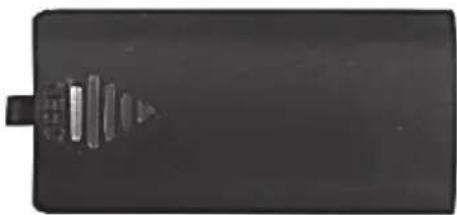
natural_image
Black rectangular object with a small protrusion and a small rectangular element on the left (no visible text or symbols)LED indikátory
www.spotify.com/connect
Licence
https://developer.spotify.com/esdk-third-party-licenses/
Klidový režim
natural_image
Symbol of a trash bin crossed out by two crossed lines, with no text or labels present.natural_image
Product display of a silver screen with labeled accessories including a TV, cable, and remote control (no text or symbols on main objects)natural_image
Close-up of a black rectangular electronic component with two white arrows pointing to its interior (no text or symbols visible)natural_image
Two identical white bottle silhouettes on black background, no text or symbols presentnatural_image
Mechanical device with a bottle inside a housing, showing a valve mechanism (no text or symbols)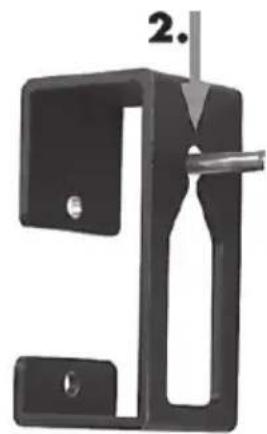
natural_image
Mechanical component diagram showing a piston-like structure with a labeled part (no text or symbols present)Indicadores LED
www.spotify.com/connect
Licencias
https://developer.spotify.com/esdk-third-party-licenses/
Modo Preparado
Local music (Música local)
AUX in (Entrada AUX in)
natural_image
Symbol of a trash bin with crossed lines indicating no waste or discharge, and a solid black rectangle below (no text or labels)natural_image
Close-up of a rectangular electronic component with two white arrows pointing to its interior (no text or symbols visible)natural_image
Two identical white bottle silhouettes on black background, no text or symbols presentnatural_image
Mechanical device with a bottle inside a frame and a valve inserted (no text or symbols visible)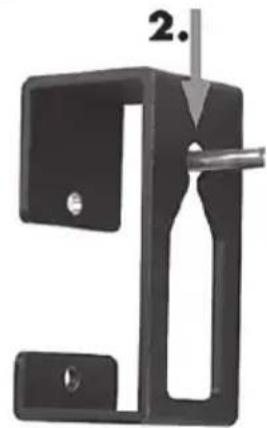
natural_image
Mechanical component with a labeled part (2) and a handle, no visible text or symbolsIndicadores LED
www.spotify.com/connect
Licenças
https://developer.spotify.com/esdk-third-party-licenses/