
SSVF 45 A1 - Fan SILVERCREST - Free user manual and instructions
Find the device manual for free SSVF 45 A1 SILVERCREST in PDF.


| Product Type | Pedestal Fan |
| Model | SSVF 45 A1 |
| Brand | SilverCrest |
| Blade Diameter | 45 cm |
| Height | 130 - 150 cm (adjustable) |
| Base Diameter | 35 cm |
| Weight | 5.2 kg |
| Power Supply | 220-240 V ~ 50/60 Hz |
| Power Consumption | 45 W |
| Speed Settings | 3 (low, medium, high) |
| Oscillation | Yes, 90° horizontal |
| Tilt Adjustment | Manual up/down tilt |
| Timer | Up to 7.5 hours |
| Remote Control | Included (battery CR2032) |
| Noise Level | approx. 35 - 55 dB (depending on speed) |
| Safety Features | Overheat protection, tip-over switch |
| Material | Plastic and metal base |
| Cleaning | Wipe with damp cloth; do not immerse in water |
| Spare Parts Availability | Blade, guard, motor assembly (contact customer service) |
Frequently Asked Questions - SSVF 45 A1 SILVERCREST
User questions about SSVF 45 A1 SILVERCREST
0 question about this device. Answer the ones you know or ask your own.
Ask a new question about this device
Download the instructions for your Fan in PDF format for free! Find your manual SSVF 45 A1 - SILVERCREST and take your electronic device back in hand. On this page are published all the documents necessary for the use of your device. SSVF 45 A1 by SILVERCREST.
USER MANUAL SSVF 45 A1 SILVERCREST
FLOOR FAN SSVF 45 A1
HOYER Handel GmbH
Tasköprüstraße 3
22761 Hamburg
GERMANY
Operating instructions
DE
PEDESTAL FAN
Operating instructions
IAN 353132_2007 IAN 353132_2007
ES PT
Spanish....2
Portuguese 18
English.... 34
German.... 50
Overview


Index
6. Preparations
6. Preparations
- Overview 35
- Intended purpose 36
- Safety information 36
- Items supplied 39
- Assembling the device 40
- Preparations 42
6.1 Setting up the device 42 6.2 Adjusting the height 42 6.3 Adjusting the tilt angle 42 6.4 Connecting the device 42
- Remote control 43
- Operation 43
- Cleaning 45
- Storage 46
- Troubleshooting 46
- Disposal 46
- Technical specifications 47
- Warranty of HOYER Handel GmbH 48
1. Overview
1 Front protective grid 2 Cap nut (for the rotor blade) 3 Rotor blade 4 Screw ring (for the rear protective grid) 5 Rear protective grid 6 Axle (for the rotor blade) 7 Fan motor 8 Control unit (with operating panel) 9 Power cable with mains plug 10 Locking screw 11 Inner pole 12 Circlip 13 Pedestal (height-adjustable) 14 Base 15 Base plate 16 L-shape screw 17 Nut 18 Connecting screw
Figure A: Operating panel
19 NOR/NAT/SLP Mode display (Normal/Natural/Sleep) 20 0.5/1/2/4 Timer function display (sum of LEDs: 0.5 - 7.5 hours) 21 LOW/MED/HIGH Fan speed display (low/medium/high) 22 TIMER Timer function button 23 MODE Mode selection button 24 +/- Button for adjusting fan speed (3 fan speeds) 25 On/off switch 26 OSC Button for switching swivel function on/off 27 OSC Swivel function display
Figure B: Remote control
28 POWER On/off switch 29 OSC Button for switching swivel function on/off 30 MODE Mode selection button 31 Remote control 32 TIMER Timer function button 33 SPEED Button for adjusting fan speed (3 fan speeds)
Thank you for your trust!
Congratulations on your new pedestal fan with remote control.
For safe handling of the device and in order to get to know the entire range of features:
- Read these user instructions thoroughly prior to initial use.
- Above all, observe the safety information!
- The device should only be used as described in this copy of the user instructions.
- Keep this copy of the user instructions for reference.
- If you pass the device on to someone else, please include this copy of the user instructions. The user instructions are a part of the product.
We hope you enjoy your new pedestal fan with remote control!
2. Intended purpose
The pedestal fan with remote control is suitable for circulating air in dry indoor areas. The device is designed for private, domestic use. The device must only be used indoors. This device must not be used for commercial purposes.
3. Safety information
Warnings
If necessary, the following warnings are used in this copy of the user instructions:

DANGER! High risk: failure to observe this warning may result in injury to life and limb.
WARNING! Moderate risk: failure to observe this warning may result in injury or serious material damage.
CAUTION: low risk: failure to observe this warning may result in minor injury or material damage.
NOTE: circumstances and specifics that must be observed when handling the device.
Instructions for safe operation
- This device can be used by children from the age of 8 and people with restricted physical, sensory or intellectual abilities or people without adequate experience and/or understanding, if they are supervised or instructed on how to use this device safely and if they are aware of the resulting dangers. Children must not play with the device. Cleaning and maintenance by the user must not be performed by children without supervision.
- Do not expose small children, persons with reduced physical, sensory or mental abilities and animals to direct air flow.
- If the mains power cable of this device should become damaged, it must be replaced by the manufacturer, the manufacturer's customer service department or a similarly qualified specialist, in order to avoid any hazards.
- This device is not intended to be operated using an external timer or a separate remote control system.
- Make sure that the fan is disconnected from the power supply before removing the protective device.
- The remote control requires a CR2025 (3 V) battery.
- Be sure to observe the correct polarity when inserting the battery.
- DANGER OF EXPLOSION Batteries must not be charged or reactivated by other means, nor must they be dismantled, thrown into a fire or short-circuited.
- The connection terminals of the remote control must not be short-circuited.
- Remove the batteries from the remote control if you do not intend to use the remote control for a prolonged period of time, or if the battery runs out of power. The battery might leak and damage the remote control.
- Do not subject batteries to extreme conditions, e.g. do not place the remote control on radiators or expose it to direct sunlight. Otherwise, there is an increased danger of batteries leaking.
- If battery acid has leaked, avoid contact with the skin, eyes and mucous membranes. In case of contact with the acid, rinse the affected area at once with plenty of clean water and seek medical assistance immediately.
- Batteries can be life-threatening if swallowed. Therefore you should store batteries out of the reach of young children. If a battery has been swallowed, medical assistance must be sought immediately.
- New and used batteries must be kept away from children.
- If you suspect that the batteries could have been swallowed or have gotten into any body cavities, immediately seek medical assistance.
- Batteries must be properly disposed of after use.

DANGER for children!
- Packing materials are not children's toys. Children should not be allowed to play with the plastic bags. There is a risk of suffocation.
- Keep the device out of the reach of children.

DANGER to and from pets and livestock!
Electrical devices can represent a danger to pets and livestock. In addition, animals can also cause damage to the device. For this reason you should keep animals away from electrical devices at all times.

DANGER! Risk of electric shock due to moisture!
- The device, the mains power cable and the mains plug must not be immersed in water or any other liquids.
- Protect the device from moisture, water drops and water splashes: failure to observe this instruction may result in an electrical shock hazard.
- If liquid gets into the device, disconnect the mains plug immediately. Have the device checked before reusing.
- Never touch the device with wet hands.

DANGER! Risk of electric shock!
- Do not use the device if the device or the mains power cable has any visible damage, or if the device has previously been dropped.
- Only connect the mains plug to a properly installed and easily accessible wall socket whose voltage corresponds to the specifications on the rating plate. The wall socket must still be easily accessible after the device is plugged in.
- Ensure that the mains power cable cannot be damaged by sharp edges or hot points.
- When using the device, ensure that the mains power cable cannot be trapped or crushed.
- The device is not fully disconnected from the power supply, even after it is switched off. In order to fully disconnect it, pull out the mains plug.
- When removing the mains plug from the wall socket, always pull on the plug and never the cable.
- Pull the mains plug out of the wall socket, ...
... before assembling/disassembling parts,
... if there is a fault,
... when you are not using the device,
... before you clean the device and
... during thunderstorms.
- In order to avoid any hazards, do not make modifications to the device.

DANGER from rotating parts!
- Only operate the fan when all accessories are fully assembled. The protective grids must be closed securely and undamaged.
- Do not insert objects through the protective grids while the fan is running. Keep long hair away from the rotating parts.
WARNING! Risk of material damage!
- Place the device on a stable, level surface so that it cannot tip over.
- Do not cover the device. Make sure there is enough free space (at least 50 cm) around the device.
- Never place the device on hot surfaces (e.g., hot plates) or near heat sources or open flames.
- Only use original accessories.
- Do not clean with sharp objects or abrasive cleaning agents.
4. Items supplied
1 control unit 8 with fan motor 7 and screw ring 4, 1 base 14, 1 pedestal 13 with base plate 15 and L-shaped screw 16, 1 rear protective grid 5, 1 front protective grid 1, 1 rotor blade 3, 1 cap nut 2, 1 connecting screw 18, 1 nut 17, 1 remote control 31 with battery inserted, 1 copy of the user instructions.
Unpacking
- Remove all parts from the packaging.
- If necessary, remove stickers and films from the device and accessories. However, do not remove the rating plate under any circumstances.
- Check that all accessories are present and undamaged.
5. Assembling the device
- The base plate 15 and the L-shaped screw 16 are already fitted to the lower end of the pedestal 13 on delivery. Loosen the L-shaped screw and remove both parts.
- Place the pedestal 13 on the base 14. From the underside of the base, place the base plate 15 and screw it to the pedestal with the L-shaped screw 16.

- Unscrew the circlip 12 a little (counterclockwise). Pull the inner pole 11 out of the pedestal 13 a little and screw the circlip 12 back in place (clockwise).
- Place the top part (control unit 8 and fan motor 7) on the inner pole 11. Tighten the locking screw 10.

- The screw ring 4 is mounted on the fan motor 7 on delivery. Loosen it.

- Place the rear protective grid 5 on the fan motor 7. Pay attention to the following:
- The small hole for the connecting screw 18 is at the bottom.
- The two smaller slots in the middle of the protective grid are placed on the ridges on the fan motor.

- Position the rear protective grid 5 exactly in the centre and screw it tight with the screw ring 4.

- Place the rotor blade 3 on the axle 6, making sure that the groove on the back of the rotor blade is positioned exactly on the small pin on the axle.
- Put on the cap nut 2 and screw it tight in the TIGHTEN direction (anticlockwise). Hold the rotor blade 3 with the other hand, if necessary.

- Test whether the rotor blade 3 can be turned freely by hand without touching other parts. If this is not the case, disassemble and reassemble the rear protective grid 5 and the rotor blade 3.
- Place the front protective grid 1 onto the rear protective grid 5. Pay attention to the following:
- The small hook on the edge of the front protective grid 1 is hung over the top of the edge of the rear protective grid 5.
- The two holes for the connecting screw 18 at the lower edge of the protective grids 1 and 5 must be exactly on top of each other.

- Push the connecting screw 18 through the two holes and screw on the nut 17 from the back. Make sure that the edges of the two protective grids 1 and 5 are exactly on top of each other.
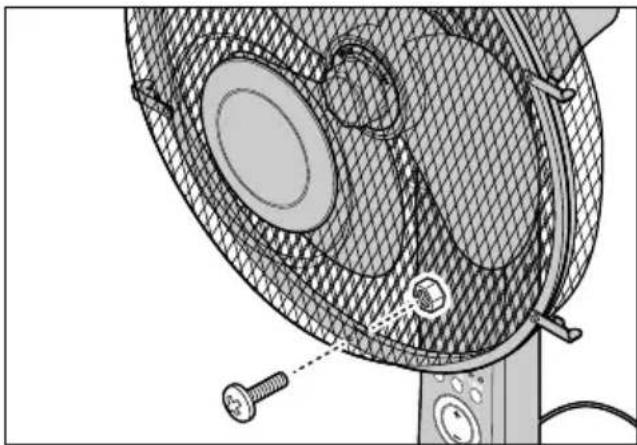
- Fold the hinged connections on the front protective grid 1 so that the two protective grids 1 and 5 are firmly connected to each other.

6. Preparations
6.1 Setting up the device
Place the device in a suitable location. This location must comply with the safety information (see "Safety information" on page 36). Ensure that it is stable.
6.2 Adjusting the height
- Unscrew the circlip 12 a little (anti-clockwise).
- Pull the inner pole 11 out of the pedestal 13 or push it in until the desired height is reached.
- Screw the circlip 12 back on (clockwise).
6.3 Adjusting the tilt angle
The tilt angle of the fan can be adjusted in steps. To do this, tilt the fan motor 7 to the desired angle.
6.4 Connecting the device
Insert the mains plug 9 into a wall socket corresponding to the technical data. A acoustic signal sounds.
7. Remote control
How to use
The remote control 31 is supplied with a CR2025 (3V) battery inserted. Before switching on, remove the plastic strip from the remote control.
Storage

DANGER for children!
- Keep the remote control and, if necessary, old and new batteries out of the reach of children.
Replacing the remote control battery

DANGER!
- There is a danger of explosion if the battery is not correctly replaced. Replace only with the same or an equivalent type.
NOTE: if possible, do not touch the top and bottom of the battery with your fingers to prevent dirt from getting on the battery contacts. Use a clean cloth instead, for example.
- Press the small lever on the side of the battery compartment gently in the direction of the middle (small arrow), and then pull the battery compartment out of the remote control (large arrow).

- Replace the old battery with a new one. The positive pole (+) of the battery must be pointing upwards.
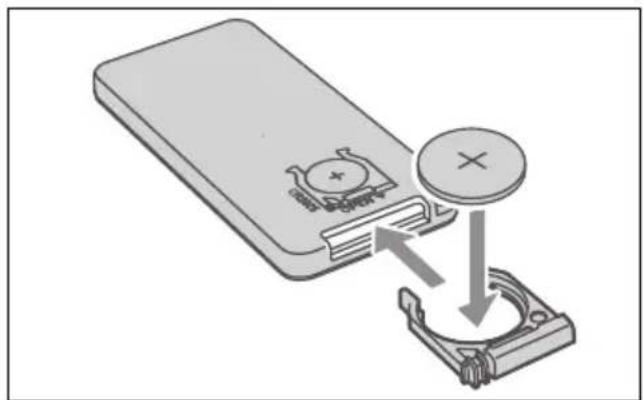
- Slide the battery compartment into the remote control 31.
8. Operation

DANGER from rotating parts!
- Only operate the fan when all accessories are fully assembled. The protective grids 1 and 5 must be closed securely and undamaged. - Do not insert objects through the protective grids 1 and 5 while the fan is running. Keep long hair away from the rotating parts.
The device can be operated using the buttons on the operating panel 8 or using the remote control 31. Unless otherwise described, an acoustic signal sounds each time a button is pressed.
Switching on and off
- Press the ⏻ 25/POWER 28 button to switch on the fan. Two acoustic signals will sound. The device starts ...
... with the fan speed that was set before it was switched off,
... with the mode that was selected before it was switched off,
... with the swivel function if it was switched on before the device was last switched off.
NOTE: if the mains plug 9 was disconnected, the device starts with the default settings: at the lowest fan speed, in normal mode and without the swivel function.
- Press the ⏻ 25/◎ POWER 28 button again to switch off the fan.
- Disconnect the mains plug 9 after use.
Setting blower level
The device has three blower levels. The fan speeds let you choose the power of the air flow.
- When the device is switched on, repeatedly press the SPEED 33 button on the remote control.
- Or select the fan speed with the +/-24 buttons on the device.
- The LEDs 21 indicate the selected fan speed:
- LOW: low speed
- MED: medium speed
- HIGH: highest speed
Swivel function (oscillation)
The device has a swivel function. It causes the device to swivel back and forth, thus distributing the flowing air more evenly in the room.
- Switch the swivel function on by pressing the OSC 26/® 29 button. The fan starts to swivel back and forth. The LED OSC 27 is lit.
- Switch the swivel function off by pressing the OSC 26/® 29 button again. The LED OSC 27 goes out.
Selecting a mode
- When the device is switched on, press the MODE 23/30 button repeatedly to switch between 3 different modes.
- The NOR/NAT/SLP 19 LED indicates the selected mode:
| LED is not lit Normal mode | |
| LED is lit green Natural mode:Rising and falling air flowsimulates natural wind. | |
| LED is lit red Sleep mode |
Selecting sleep mode
NOTE: in this mode, the device switches to the lowest blower level but not to standby mode. For switching off after a certain period, you can additionally use the timer.
Sleep mode reduces the air flow of the switched on device over time. This mode can also be set using the timer.
- Select the desired blower level.
- Press the MODE button 23/30 until the LED NOR/NAT/SLP 19 lights up red. If any blower level other than the lowest speed is set, it is reduced by one speed setting after approximately every half hour.
Timer function
With the timer function, you can set a time after which the fan automatically switches off. You can set a time between 0.5 and 7.5 hours in 0.5-hour steps.
- When the device is switched on, repeatedly press the TIMER 22/◎32 button. Each time you press it, half an hour is added. The lit LEDs 20 indicate the time that has been set. Add up the times of the lit LEDs to get the set time:
- 0.5: Half an hour
- 1: 1 hour
- 2: 2 hours
- 4: 4 hours
Example:
The following LEDs are lit:
0 . 5 + 1 + 4.
This means that the timer is set to:
0. 5 + 1 + 4 hour = 5. 5 hours.
- While the timer is running, the LEDs 20 show the remaining time.
- After the set time has elapsed, the device switches off.
- To switch off the timer function early, press the TIMER 22/32 button repeatedly until all LEDs 20 have gone out or switch off the device.
9. Cleaning
In order to enjoy your device for a long time, you should regularly clean it.

DANGER! Risk of electric shock!
Before cleaning, pull out the mains plug 9. - Never immerse the device in water. - Do not let water or cleaning agent run into the device.
WARNING! Risk of material damage!
- Do not clean using sharp objects or abrasive cleaning agents.
Protective grid/rotor blade
- Carefully remove coarse dust deposits with a vacuum cleaner, preferably with a small brush nozzle.
- If necessary, loosen the connecting screw 18, open the hinged connections and remove the front protective grid 1.
- Be careful not to bend the rotor blade 3.
- Replace the front protective grid 1 before reconnecting the device.
Remote control
- Clean the remote control 31 with a dry cloth.
Device
- Clean the outside of the other parts of the device with a damp cloth. You can also use a little detergent.
- Dry with a soft cloth.
- Do not use the device until it is completely dry again.
10. Storage

DANGER for children!
- Keep the device and remote control out of the reach of children.
- Pull out the mains plug 9 when you are not using the device.
- Remove the battery from the remote control if the device is not going to be used for an extended period of time 31.
11. Trouble-shooting
If your device fails to function as required, please try this checklist first. Perhaps there is only a minor problem, and you can solve it yourself.

DANGER! Risk of electric shock!
- Do not attempt to repair the device yourself under any circumstances.
| Problem | Possible causes/Troubleshooting |
| No function - Has the device been connected to the power supply?- Check the connection.- Has the timer function switched off the device? | |
12. Disposal
This product is subject to the provisions of European Directive 2012/19/EC. The symbol showing a wheelie bin crossed through indicates that the product requires separate refuse collection in the European Union. This applies to the product and all accessories marked with this symbol. Products identified with this symbol may not be discarded with normal household waste, but must be taken to a collection point for recycling electric and electronic appliances.

This recycling symbol marks e.g. an object or parts of the material as valuable for recycling. Recycling helps to reduce the consumption of raw materials and protect the environment.

Batteries must not be discarded with your household waste. Spent batteries must be disposed of properly. Special containers are available for this purpose in shops selling batteries and at municipal collection points.

(Rechargeable) batteries marked with the following letters contain harmful substances such as: Cd (cadmium), Hg (mercury), Pb (lead).
Packaging
When disposing of the packaging, make sure you comply with the environmental regulations applicable in your country.
13. Technical specifications
| Model: SSVF 45 A1 | |
| Mains voltage: 220 - 240 V ~ 50 Hz | |
| Protection class: II | ☐ |
| Battery for the remote control: CR2025 (3V) | |
| Power rating: 45 W | |
| Designation | Symbol | Value | Unit |
| Maximum volume flow | F 50,71 | m3/min | |
| Fan power consumption | P 39,5 W | ||
| Service value | SV 1,28 | (m3/min)/W | |
| Power consumption in standby mode | PSB | 0,43 W | |
| Fan sound power level | LWA | 57 dB(A) | |
| Maximum speed | c 2,57 m/s | ||
| Measurement standard for service value | IEC 60879:2019 | ||
Symbols used
 | Double insulation |
 | Geprüfte Sicherheit (certified safety). Devices must comply with the generally acknowledged rules of technology and the German Product Safety Act (Produkt-sicherheitsgesetz - ProdSG). |
 | With the CE marking, HOYER Handel GmbH declares the conformity with EU guidelines. |
 | This symbol reminds you to dispose of the packaging in an environmentally friendly manner. |
 PAP PAP | Recyclable materials: cardboard (except corrugated cardboard) |
| ~ | AC voltage |
Subject to technical modifications.
14. Warranty of the HOYER Handel GmbH
Dear Customer,
your device is provided with a 3 year warranty starting with the purchase date. In the event of product defects, you are entitled to statutory rights against the vendor. These statutory rights are not restricted by our warranty presented in the following.
Warranty conditions
The warranty period starts with the purchase date. Please keep the original purchase receipt in a safe place. This document is required to verify the purchase.
If within three years from the purchase date of this product a material or factory defect occurs, the product will be repaired or replaced by us – at our discretion – free of charge to you, or the purchase price will be refunded. This warranty implies that within the period of three years the defective device and the purchase receipt are presented, including a brief written description of the defect and the time it occurred.
If the defect is covered by our warranty, the repaired or a new product will be returned to you. No new warranty period starts with a repair or replacement of the product.
Warranty period and statutory claims for defects
The warranty period is not extended when the warranty has been claimed. This also applies to replaced and repaired parts. Any damages and defects already existing at the time of purchase must be reported immediately upon unpacking. Repairs arising after the expiration of the warranty period are subject to a charge.
Warranty coverage
The device was produced carefully according to strict quality guidelines and tested diligently prior to delivery. The warranty applies to material or factory defects.
Excluded from the warranty are wear parts subject to normal wear and damages to fragile parts, e.g. switches, batteries, lamps or other parts manufactured from glass.
This warranty expires if the product is damaged, not used as intended or not serviced. For the proper operation of the product, all instructions listed in the operating instructions must be observed carefully. Any form of use and handling that is advised against in the operating instructions or warned against must always be avoided.
The product is only intended for private and not for commercial use. In the case of incorrect and improper treatment, use of force and interventions not performed by our authorised Service Centre, the warranty shall cease.
Handling in case of a warranty claim
In order to ensure prompt processing of your matter, please observe the following notes:
- Please keep the article number
IAN: 353132_2007 and the purchase receipt as a purchase verification for all inquiries.
- The article number can be found on the rating plate, an engraving, the title page of your instructions (in the bottom left), or as a label on the rear or underside of the device.
- If faulty operation or other defects occur, first contact the Service Centre listed in the following by telephone or email.
- Then, you are able to send a product reported as defective free of charge to the service address specified to you, including the purchase receipt and the information on the defect and when it occurred.
At www.lidl-service.com you can download this and many other manuals, product videos and installation software.

This QR code takes you directly to the Lidl Service website (www.lidl-service.com), where you can enter the article number (IAN)
353132_2007 to open your user instructions.

Service Centre
GB Service Great Britain
Tel.: 0800 404 7657
E-Mail: hoyer@lidl.co.uk
IE Service Ireland
Tel.: 1890 930 034
(0.08 EUR/min, peak)
(0.06 EUR/min, off-peak)
E-Mail: hoyer@lidl.ie
MT Service Malta
Tel.: 80062230
E-Mail: hoyer@lidl.com.mt
CY Service Cyprus
Tel.: 8009 4409
E-Mail: hoyer@lidl.com.cy
IAN: 353132_2007

Supplier
Please note that the following address is no service address. First contact the aforementioned Service Centre.
HOYER Handel GmbH
Tasköprüstraße 3
22761 Hamburg
GERMANY
Inhalt
6. Vorbereitungen


- FLOOR FAN SSVF 45 A
- INDEX
- PREPARATIONS
- OVERVIEW
- FIGURE A: OPERATING PANEL
- FIGURE B: REMOTE CONTROL
- THANK YOU FOR YOUR TRUST
- INTENDED PURPOSE
- SAFETY INFORMATION
- WARNINGS
- INSTRUCTIONS FOR SAFE OPERATION
- DANGER FOR CHILDREN
- DANGER TO AND FROM PETS AND LIVESTOCK
- DANGER! RISK OF ELECTRIC SHOCK DUE TO MOISTURE
- DANGER! RISK OF ELECTRIC SHOCK
- DANGER FROM ROTATING PARTS
- WARNING! RISK OF MATERIAL DAMAGE
- ITEMS SUPPLIED
- UNPACKING
- ASSEMBLING THE DEVICE
- SETTING UP THE DEVICE
- ADJUSTING THE HEIGHT
- ADJUSTING THE TILT ANGLE
- CONNECTING THE DEVICE
- REMOTE CONTROL
- HOW TO USE
- STORAGE
- REPLACING THE REMOTE CONTROL BATTERY
- DANGER
- OPERATION
- SWITCHING ON AND OFF
- SETTING BLOWER LEVEL
- SWIVEL FUNCTION (OSCILLATION)
- SELECTING A MODE
- SELECTING SLEEP MODE
- TIMER FUNCTION
- CLEANING
- PROTECTIVE GRID/ROTOR BLADE
- DEVICE
- TROUBLE-SHOOTING
- DISPOSAL
- PACKAGING
- TECHNICAL SPECIFICATIONS
- WARRANTY OF THE HOYER HANDEL GMBH
- WARRANTY CONDITIONS
- WARRANTY PERIOD AND STATUTORY CLAIMS FOR DEFECTS
- WARRANTY COVERAGE
- EXCLUDED FROM THE WARRANTY ARE WEAR PARTS SUBJECT TO NORMAL WEAR AND DAMAGES TO FRAGILE PARTS, E.G. SWITCHES, BATTERIES, LAMPS OR OTHER PARTS MANUFACTURED FROM GLASS
- HANDLING IN CASE OF A WARRANTY CLAIM
- SERVICE CENTRE
- SUPPLIER
- INHALT
- VORBEREITUNGEN
Brand : SILVERCREST
Model : SSVF 45 A1
Category : Fan