
POWXG50551 - Drill PowerPlus - Free user manual and instructions
Find the device manual for free POWXG50551 PowerPlus in PDF.

| Brand | PowerPlus |
| Model | POWXG50551 |
| Product type | Gasoline auger |
| Intended use | Digging holes for planting shrubs, driving fence posts, gardening |
| Fuel | Unleaded gasoline (min. octane rating 91) mixed with two-stroke oil, ratio 1:40 |
| Engine type | Air-cooled two-stroke engine |
| Displacement | 52 cc |
| Rated speed | 7500 rpm |
| Idle speed | 3100 rpm |
| Clutch engagement speed | 4600 rpm |
| Fuel tank capacity | 1.20 L |
| Supplied auger diameters | Ø 10 cm, Ø 15 cm, Ø 20 cm |
| Reduction ratio | 40:1 |
| Sound pressure level LpA | Not stated (dB(A)) |
| Sound power level LwA | 112 dB(A) |
| Vibration (maximum value) | 19.9 m/s² |
| Weight | Not stated |
| Warranty period | 36 months from purchase date |
| Air filter maintenance | Cleaning every month, replacement at least once a year |
| Spark plug maintenance | Check every 20 hours, replace every 100 hours |
| Gearbox lubrication | Every 100 hours with lithium-based grease (5-10 g) |
| Safety instructions | Wear gloves, safety glasses, hearing protection, safety shoes; keep a distance of 3 m from people; do not use above waist level |
Frequently Asked Questions - POWXG50551 PowerPlus
User questions about POWXG50551 PowerPlus
0 question about this device. Answer the ones you know or ask your own.
Ask a new question about this device
Download the instructions for your Drill in PDF format for free! Find your manual POWXG50551 - PowerPlus and take your electronic device back in hand. On this page are published all the documents necessary for the use of your device. POWXG50551 by PowerPlus.
USER MANUAL POWXG50551 PowerPlus
BG 6bJIAPCKN IPEBOH HA OPINHAJHOTO PbKOBOCTBO
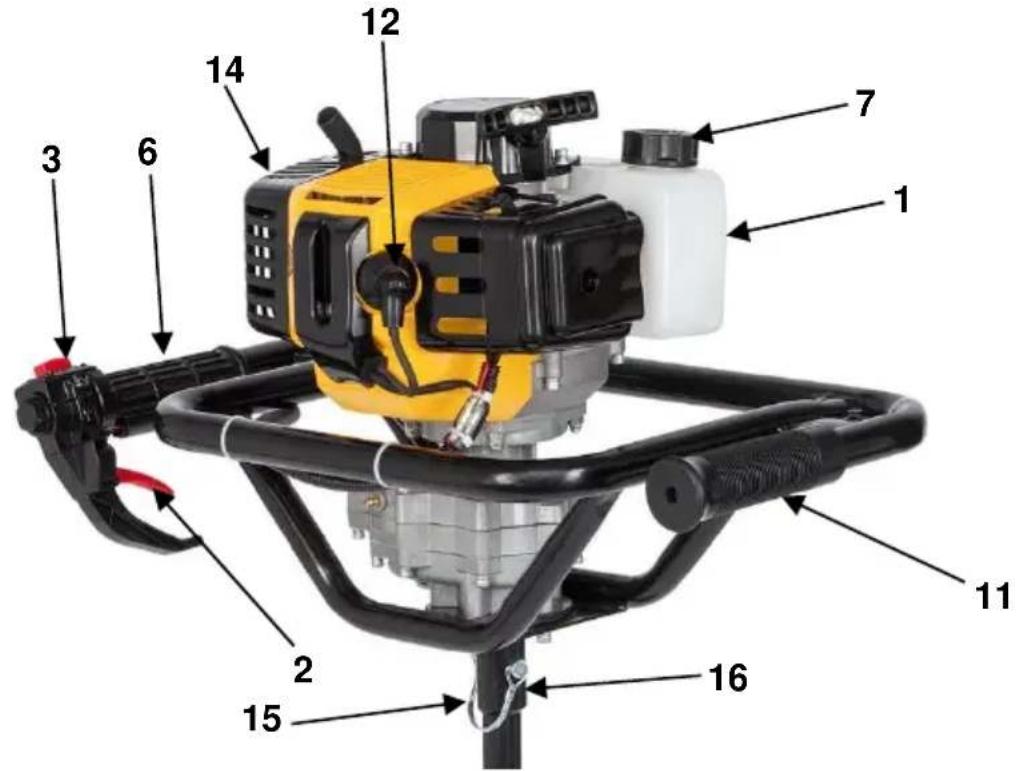
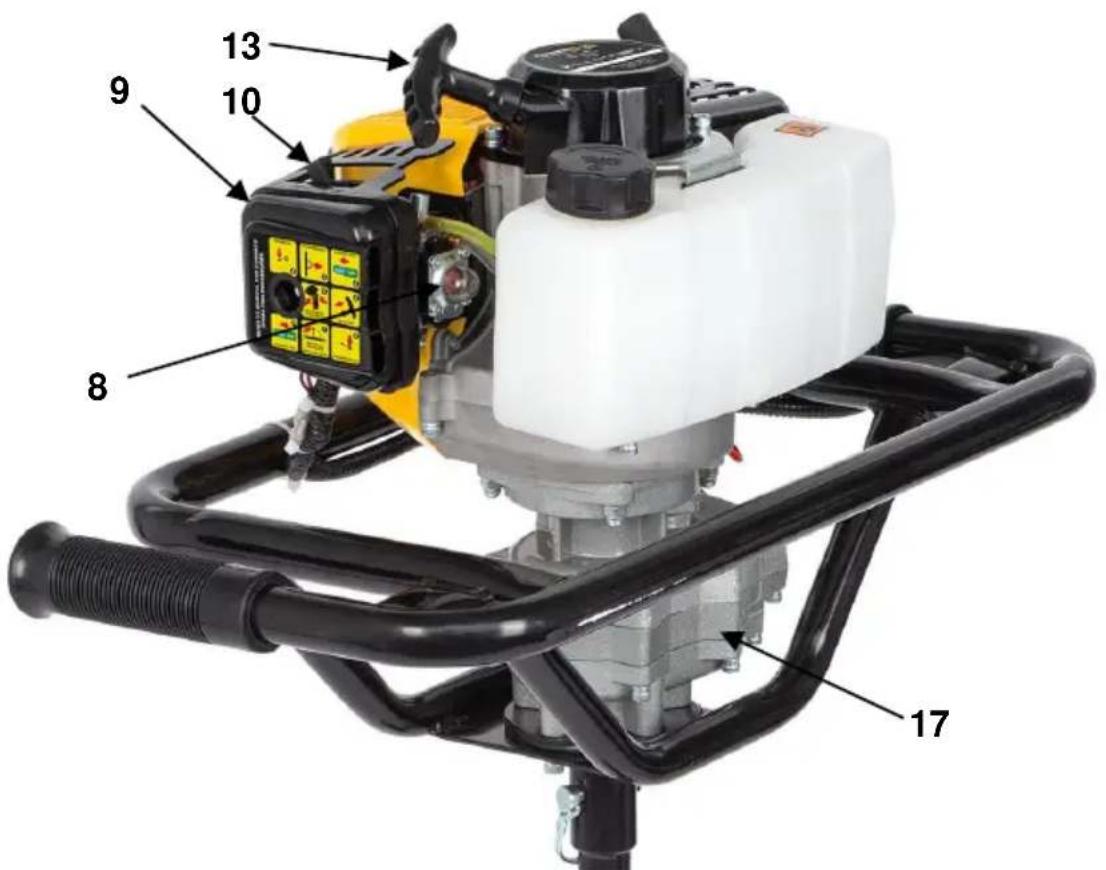
Fig. A
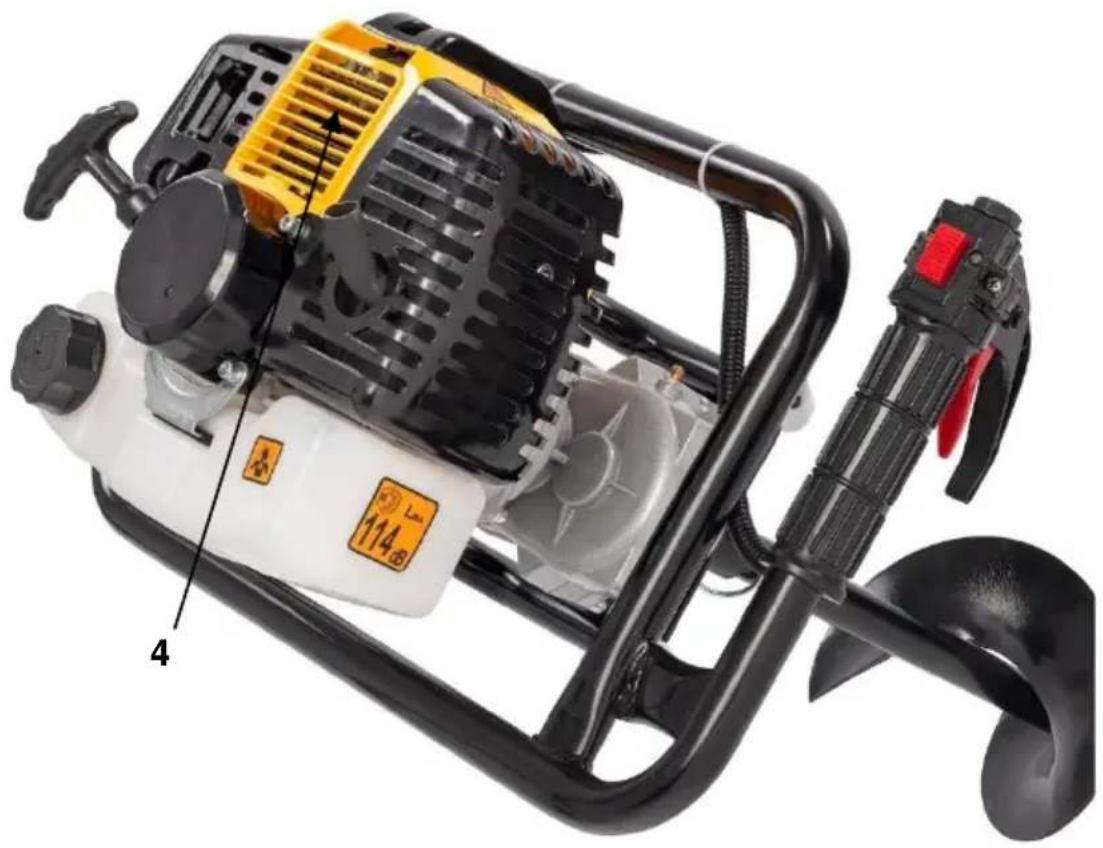
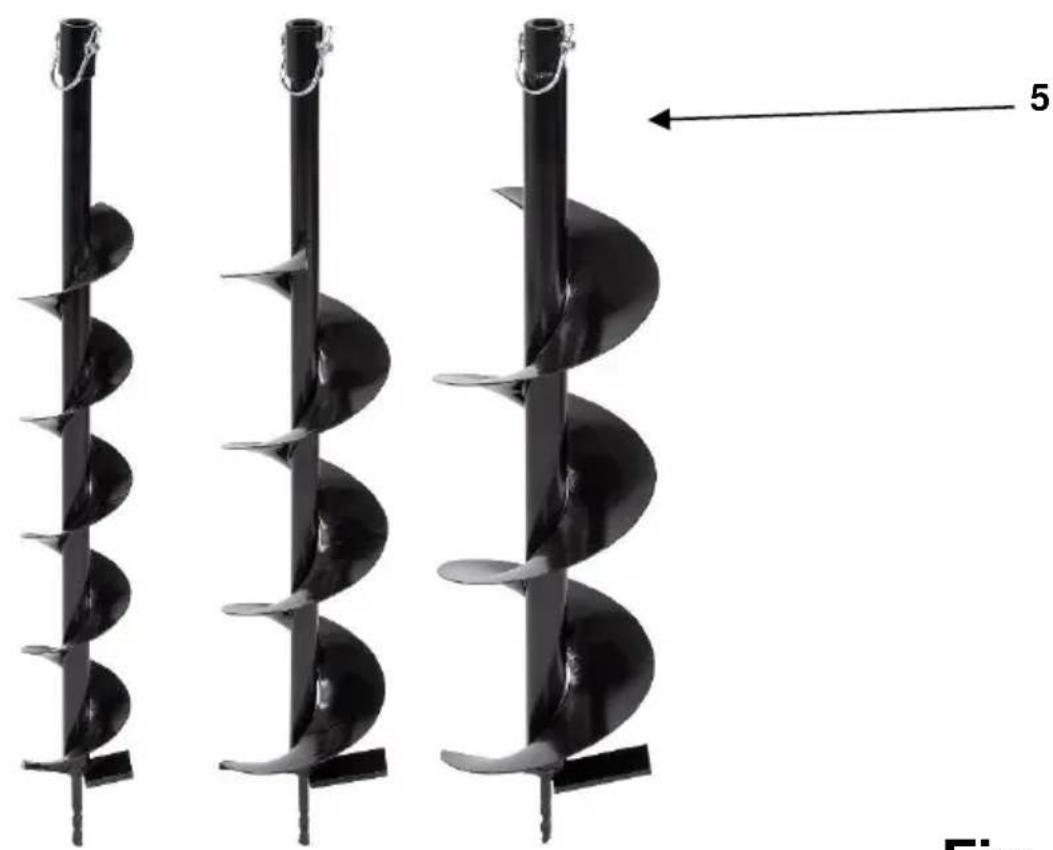
Fig. B
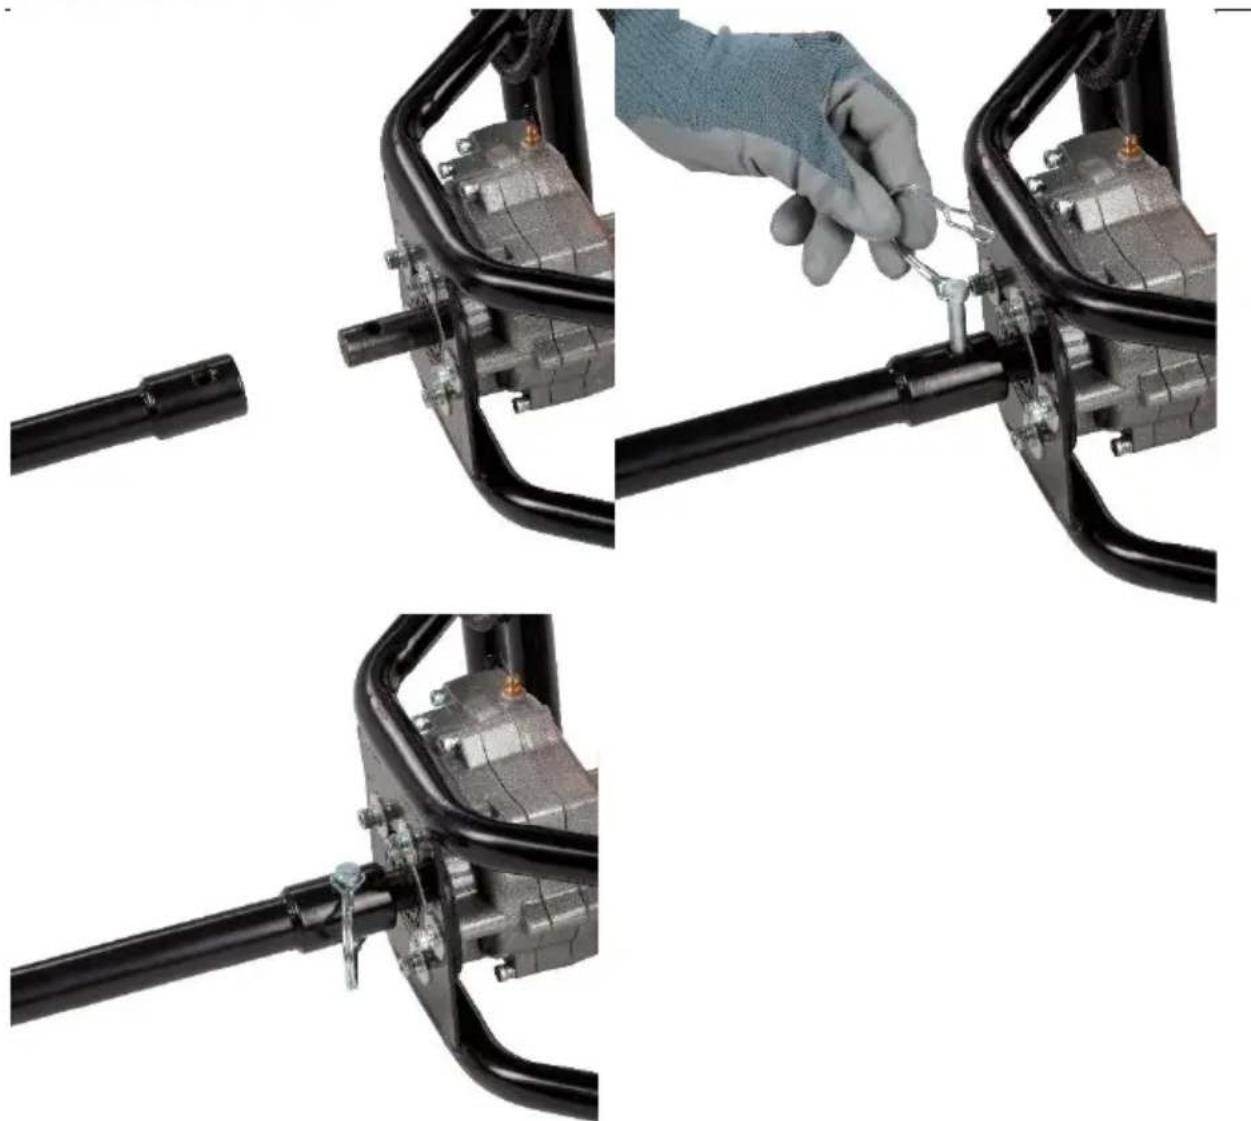
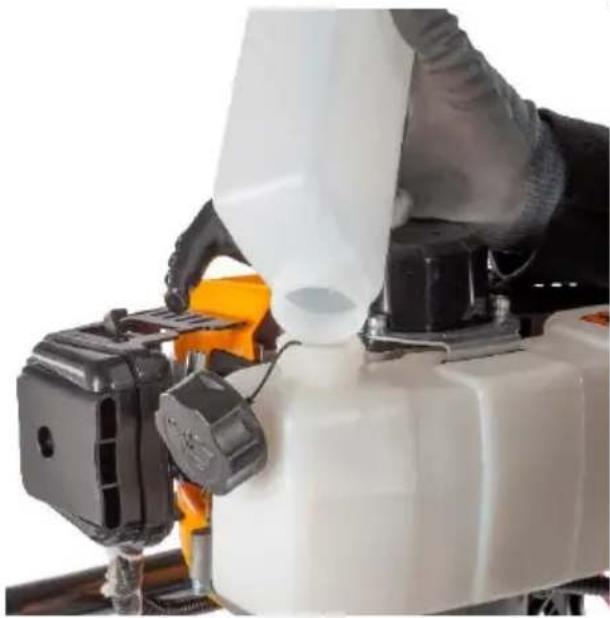
Fig. 1
Fig. 2
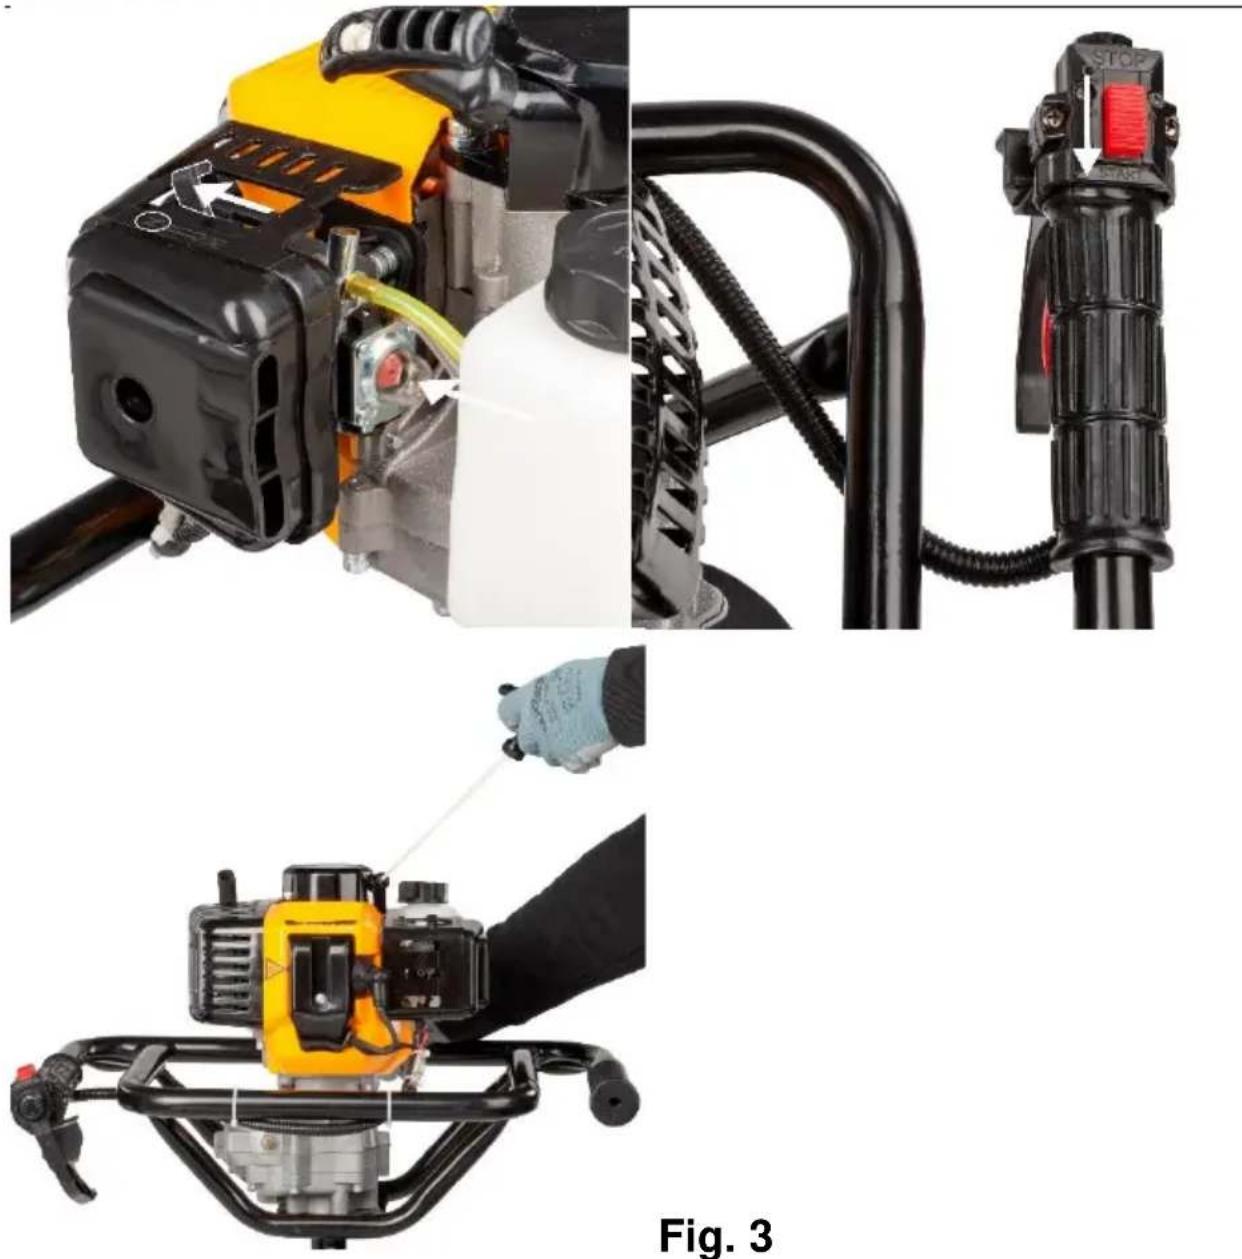

Fig. 4
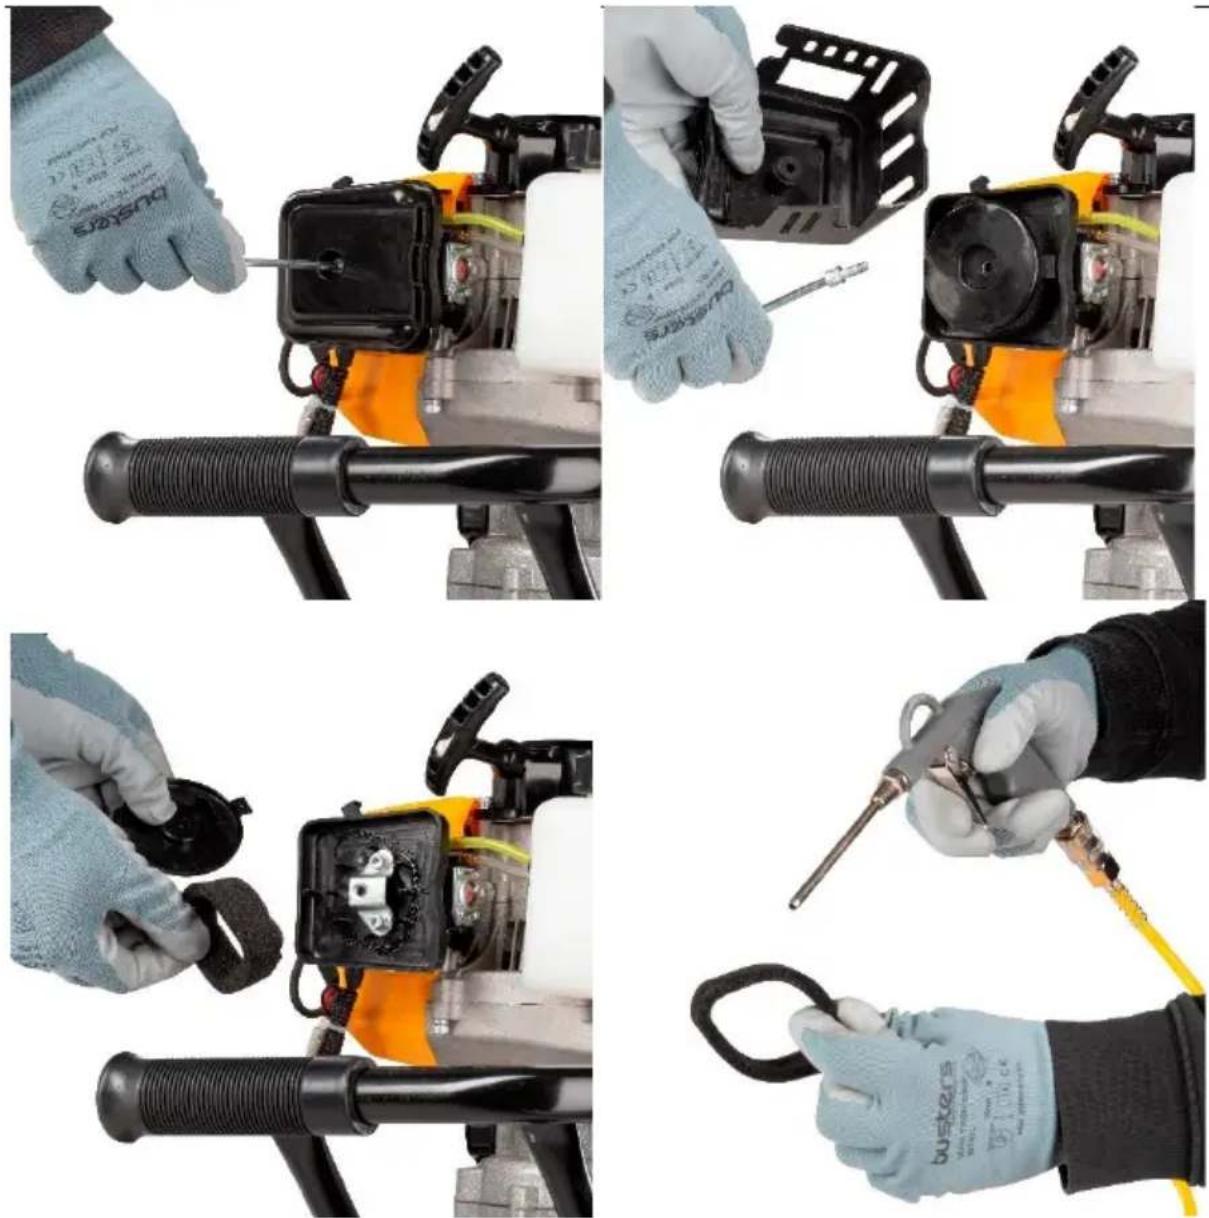
Fig. 5
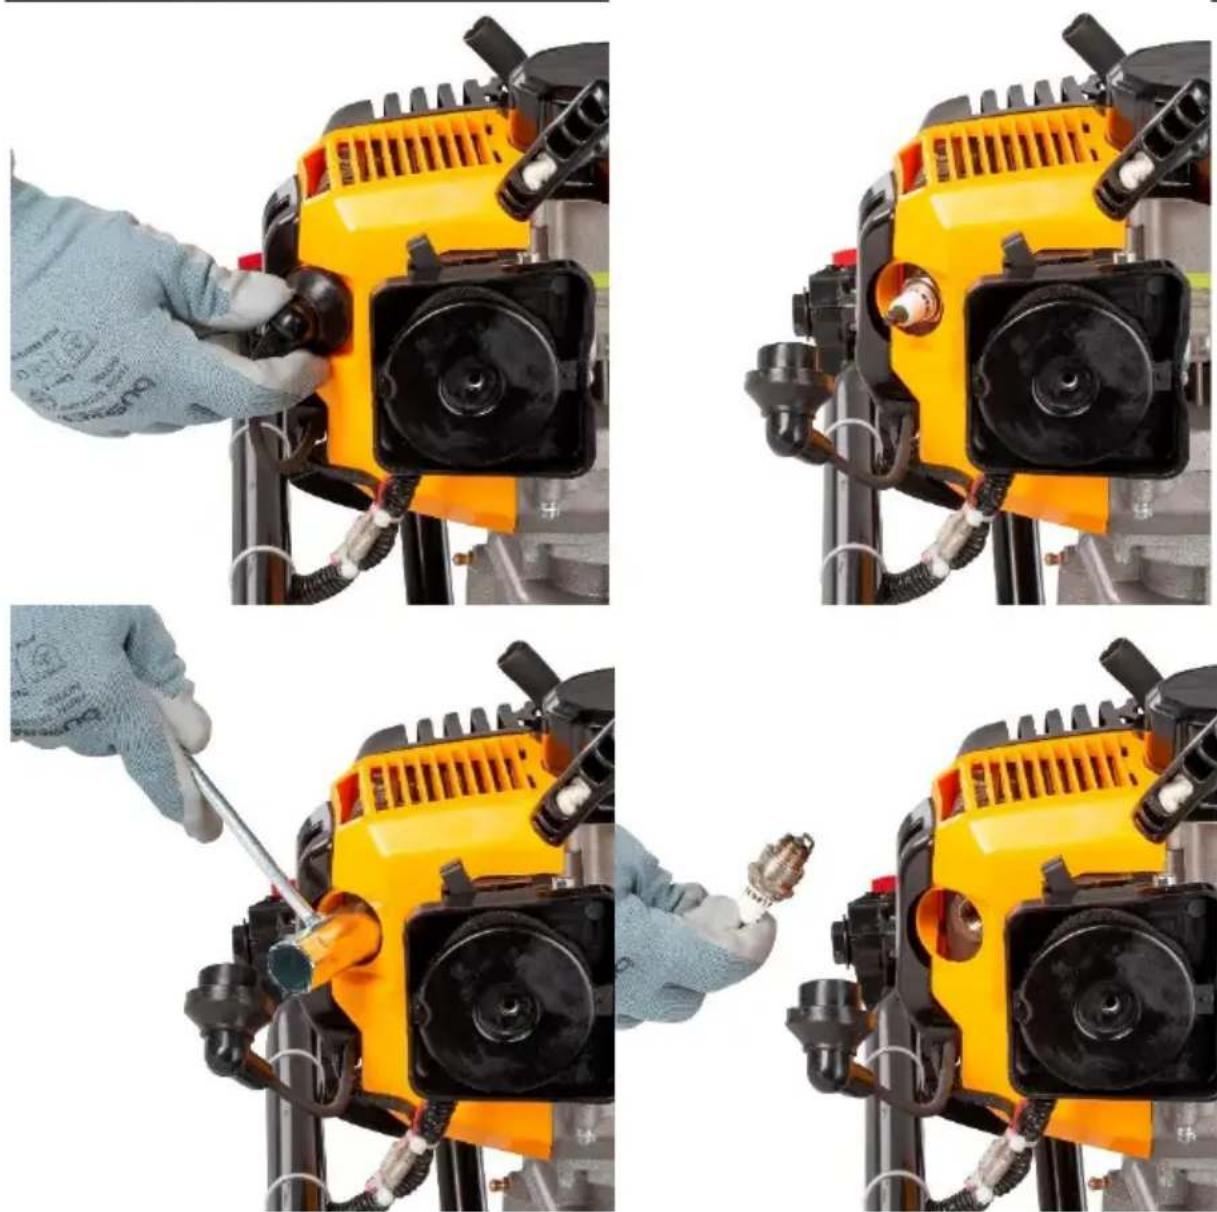
FiG. 6
1 BEOOGD GEBRUIK 3
1.1 Beoogd gebruik 3
1.2 Niet-beoogd gebruik 3
1.3 Nevenrisico's 3
2 BEsCHRIJVING (FIG.A) 3
3 INHOUD VAN DE VERPAKKING 3
4 TOELICHTING VAN DE SYMBOLEN 4
5 ALGEMENE VEILIGHEIDSVOORSCHRIFTEN 4
6 GEREEDSCHAPSPECIFIEKE VEILIGHEIDSVOORSCHRIFTEN 5
2 BEsCHRIJVING (FIG. A)
30/06/2022, Lier - Belgium
1 UTILISATION PREVUE 3
30/06/2022, Lier - Belgium
1 INTENDED USE 3
1.1 Intended use 3
1.2 Non intended use 3
1.3 Residual risks 3
2 DESCRIPTION (FIG A&B) 3
3 PACKAGE CONTENT LIST 3
4 SYMBOLS 4
5 GENERAL POWER TOOL SAFETY WARNINGS 4
6 MACHINE-SPECIFIC SAFETY WARNINGS 5
7 ASSEMBLY 6
7.1 Lubrificant for reduction gearbox 6
7.2 Fitting drill bits (Fig. 1) 6
7.3 Fueling (Fig. 2) 6
7.4 Fuel mixture 6
7.5 Working rules 7
8 OPERATION 7
8.1 Starting the motor (Fig. 3)
8.2 To stop the engine (Fig. 4)
8.3 Operating the earth auger 7
9 CLEANING AND MAINTENANCE 8
9.1 Engine 8
9.2 Reduction gearbox 8
9.3 Cleaning air filter (Fig 5) 8
9.4 Replace spark plug (Fig. 6)
10 STORAGE 9
10.1 When storing for 1 month or longer 9
11 TECHNICAL DETAILS 9
12 NOISE 10
13 WARRANTY 10
14 ENVIRONMENT 10
EARTH AUGER 52CC POWXG50551
1 INTENDED USE
1.1 Intended use
This earth auger is intended to work with soil, (digging holes for small trees, fence ground stakes and the like.), which is designed to be used with both hand for gardening purpose.
This machine is not designed for working with ice, excessively rocky ground and especially in an area which with underground electric, gas, water, or telephone lines.
This machine is not designed for use in any position other than the auger bit is in upright.
1.3 Residual risks
Even with the intended use of the appliance there is always a residual risk, which can not be prevented. According to the type and construction of the appliance the following potential hazards might apply:
- Access to the rotating auger bit (cutting hazards)
- Unforeseen, abrupt movement of the auger bit. (vibrating on hands)
Flung out of foreign materials from the working area. - Inhalation of work place particles, emissions from the gasoline engine
Skin contact with the fuel (gasoline / oil)
Loss of hearing, if no required ear protection used during work.

WARNING! Read this manual and general safety instructions carefully before using the appliance, for your own safety. Your power tool should only be passed on together with these instructions.
2 DESCRIPTION (FIG A&B)
- Fuel tank
- Throttle trigger
2a. Throttle trigger lock - Engine switch
- Engine
- Drills
- Right hand grip
- Fuel cap
- Primer bulb
-
Airbox cover
-
Choke lever
- Left hand grip
- Spark plug cap
- Starter grip
- Muffler
- Locking pin
- Drive shaft
- Gearbox
- Grease nipple
3 PACKAGE CONTENT LIST
- Remove all packaging materials.
- Remove remaining packing and package inserts (if included).
- Check that the package contents are complete.
- Check the appliance, the power cord, the power plug and all accessories for transportation damage.
- Keep the packing materials as far as possible till the end of the warranty period. Dispos it into your local waste disposal system afterwards.

WARNING: Packaging materials are not toys! Children must not play with plastic bags! Danger of suffocation!
POWXG50551 EN
1 x earth auger
1x0100mmdrill
1x0150mmdrill
1x0200mmdrill
1 x empty bottle to mix oil/fuel
3 x locking pins
1 x spark plug wrench
1 x manual

If any parts are missing or damaged, please contact your dealer.
4 SYMBOLS
In this manual and/or on the machine the following symbols are used:
| ! | Denotes risk of personal injury or damage to the tool. | Wear ear guards and goggles | |
| Read manual before use | Wear gloves | ||
| Wearing of protective shoes advised | Keep all bystanders at least 3m away | ||
| No smoking | |||
5 GENERAL POWER TOOL SAFETY WARNINGS
- For safe operation, read and understand all instructions before using the earth auger. Follow all safety instructions. Failure to follow all safely instructions listed below, can result in serious personal injury.
- Do not allow children or untrained individuals to use this unit.
- The power drill must only be used by adults in good physical condition with knowledge of the operating instructions.
- Never start or run the engine in a closed or poorly ventilated area; breathing exhaust fumes can kill.
- Clear the work area before each use. Remove all objects such as rocks, broken glass, nails, wire, or string which can be become entangled in the auger.
- Wear protective non-slip safety shoes, gloves, glasses and ear protection while operating this unit.
- Wear heavy long pants. Do not wear loose fitting clothing, short pants, loose jewellery of any kind, or use with bare feet.
- Secure long hair to prevent entanglement in any moving parts.
- Keep all bystanders, children, and pets at least 3m away.
- Do not operate this unit when you are tired, ill, or under the influence of alcohol, drugs, or medication.
- Do not operate in poor lighting.
- Keep firm footing and balance. Do not overreach. Overreaching can result in loss of balance or exposure to hot surfaces.
- Keep all parts of your body away from any moving part.
- Do not touch area around the muffler or cylinder of the earth auger, these parts get hot from operation.
POWXG50551 EN
- Always stop the engine and remove the spark plug wire before making any adjustments or repairs except for carburetor adjustments.
- Inspect the unit before each use for loose fasteners, damaged components, fuel leaks, etc. Replace any damaged parts before use.
- It has been reported that vibrations from hand-held tools may contribute to a condition called Raynaud's Syndrome in certain individuals. Symptoms may include tingling, numbness and blanching of the fingers, usually apparent upon exposure to cold. Hereditary factors, exposure to cold and dampness, diet, smoking and work practices are all thought to contribute to the development of these symptoms. It is presently unknown what, if any, vibrations or extent of exposure may contribute to the condition. There are measures that can be taken by the operator to possibly reduce the effects of vibration:
- Keep your body warm in cold weather. When operating the unit wear gloves to keep the hands and wrists warm. It is reported that cold weather is a major factor contributing to Raynaud's Syndrome.
After each period of operation, exercise to increase blood circulation. - Take frequent work breaks. Limit the amount of exposure per day.
If you experience any of the symptoms of this condition, immediately discontinue use and see your physician about these symptoms. - Keep the tool well maintained, fasteners tightened and worn parts replaced.
- Mix and store fuel in a container approved for fuel.
- Mix fuel outdoors where there are no sparks or flames. Wipe up any fuel spillage.
- Move 9m away from refuelling site before starting engine.
- Stop the engine and allow to cool before refuelling or storing the unit.
- Allow the engine to cod; empty the fuel tank and secure the unit from moving before transporting in a vehicle.
6 MACHINE-SPECIFIC SAFETY WARNINGS
- Replace augers if cracked, bent, or damaged in anyway. Be sure the auger and or extension shaft is properly installed and securely fastened. Failure to do so can cause serious injury.
- Make sure all guards, straps, deflectors and handles are properly and securely attached.
- Do not start working until you have a clear work area. Do not work near electric cables or underground utilities. It is highly recommended that you check with local authorities before starting to drill.
- If auger turns whilst the engine is idling, stop the engine and immediately adjust the idle settings following the instructions in this manual.
Use only the manufacturer's replacement augers on this unit. Do not use any other attachments. - Never operate unit without the safety clutch in working condition. The safety clutch will engage when the engine is at idle or if a hard object is struck.
- Replace the bit immediately if any cracks or other damage are present.
- Maintain a firm grip on both handles during operation.
- Never use the drill with the handles above waist level. Drilling with the units handles above waist level restricts control and can cause serious chest injuries if a hard object is struck.
- Never carry the power drill with the engine running.
- Carry the power drill with the engine stopped, and with the auger bit removed.
- Never drill in a horizontal angle. This drill should only be operated with the auger at a 90^ angle to the ground (see figure 7a).
Always keep the handles dry and clean. - Before starting to drill make sure the bit is not obstructed.
Always work in a firm-footed and safe position. - Never touch the auger bit or carry out maintenance with the engine running.
POWXG50551 EN
- Grip the earth auger firmly with both hands and keep all parts of the body away from the auger bit and muffler.
- Never attempt to carry out servicing or repairs that are not part of the routine maintenance. For other repairs, have the earth auger serviced by an authorized repairer.
- Store the power drill off the ground in a vertical position in a dry place and with fuel tank empty.
- If the auger bit jams, stop the engine immediately.
7 ASSEMBLY
7.1 Lubricant for reduction gearbox

Warning! The power drill is supplied with a universal gearbox grease in the reduction gearbox.
7.2 Fitting drill bits (Fig. 1)
- Place the motor casing on a work bench.
- Place the earth auger drill (5) on the drive shaft (16), ensuring that both holes are aligned.
- Insert the locking pin (A)
7.3 Fueling (Fig. 2)
- Open the fuel tank cap (7).
- Pour in the fuel mixture using a funnel.
- Do not fill the tank completely as fuel expands.
- Close the fuel tank cap (7) tightly and clean the area from possibly spilled fuel mixture.
7.4 Fuel mixture
The auger's motor is a two-stroke motor. It is driven by a 1:40 fuel mixture made up of two-stroke oil and fuel. The fuel requires unleaded ordinary petrol with a research octane count of at least 91. Lubrication of the motor takes place by adding premium two-stroke oil. Do not mix the fuel mixture in the fuel tank. Use the mixing container supplied or another appropriate container. Only pour the fuel mixture into the fuel tank after previously mixing and stirring it well.
- Use fresh, clean fuel. Water and contaminants in the petrol damage the fuel system.
- Refuel in a well-ventilated area with the motor not running. If the motor was in use directly prior to re-fuelling, leave it to cool down first. Never refuel the machine in a building where the petrol fumes can reach flames or sparks.
- Petrol is highly flammable and explosive. When handling fuel, you may suffer burns or other severe injuries.
- Turn off the motor and keep away from heat, sparks and flames. - Only ever refuel outside.
- Wipe up spilled petrol straight away.
| Gasoline liters | 1 | 2 | 3 | 4 | 5 |
| 2-cycle oil ml | 25 | 50 | 75 | 100 | 125 |
When preparing the mixture, only use oil for 2-stroke engines. Shake the fuel canister before filling. Refill when the engine is switched off and faraway from naked flames. Before unscrewing the fuel tank cap, position the power drill on a flat, solid surface.
7.5 Working rules

Warning! Always follow the safety rules. The power drill must only be used to drill ground. Do not lock the power drill onto fixed supports. It is forbidden to apply tools or applications other than the ones indicated by the manufacturer onto the p.t.o. of the power drill.
8 OPERATION
Before starting the motor, check the following:
- Fuel level - the fuel tank should be at least half full
Condition of the fuel lines - Outer screw couplings for tight fit
The earth auger has to be able to run freely
8.1 Starting the motor (Fig. 3)
If the motor is cold, turn the choke lever (10) to the position.
- Prime the primer bulb (8) by pressing it several times until you can see fuel in the pump.
Put the engine switch (3) in the "start" position.
- Lightly pull on the starter cord (13) until you can feel resistance, then pull on the cord strongly 2-3 times until the motor fires briefly.

CAUTION!: Do not pull out the starter cable more than approx. 50~cm , and lead it back by hand. For efficient starting, it is important to pull the starter cable quickly and powerfully.
- Turn the choke lever (10) to position.
- Pull the starter cord 2-3 times again until the motor fires and runs in idle mode.

Warning! The earth auger only begins to rotate when the throttle lever is used.
- If the motor is warm, turn the choke lever (10) to the position.
Pull the starter cord 2-3 times again until the motor fires and runs in idle mode.
8.2 To stop the engine (Fig. 4)
Press the engine switch to the stop "Stop" position. Wait until the engine stops. When restarting, first press the engine switch (3) back to the 'Start' position.
8.3 Operating the earth auger
Grip the power drill firmly with both hands and keep all parts of the body away from the auger bit and muffler.
- Hold the earth auger in front of you with the right hand firmly gripping on the throttle handle and your left hand firmly gripping the other.
- Always keep a firm grip with both hands while in operation.
- The earth auger should be held at a comfortable position with the handle height no higher than waist level.
- Set the auger down and actuate the throttle control lever (2).
- Adjust the power according to the ground conditions in order to be able to proceed ideally.
POWXG50551 EN
- If the ground condition is ideal, permitting a steady work speed, you can lock the throttle control lever (2) in the center position by pressing the lock-on button 2a while pressing the throttle control lever, in order to make your work easier (not recommended).
- Keep a comfortable distance between yourself and the drill without overreaching.
- Always pay full attention to your operation. Serious injuries may result if contact is made with the rotating auger.

WARNING! Never use the drill with the handles above waist level. Drilling with the units handles above waist level restricts control and can cause serious chest injuries if a hard object is struck.
9 CLEANING AND MAINTENANCE

Warning! For all work on the machine, the spark plug cap and tha spark plug have to be removed (high voltage).
- After 20 operating hours Clean air filter and check spark plug
After 100 operating hours Clean fuel tank and replace spark plug. Lubricate transmission.
After 300 operating hours Replace air filter - Do not submerge earth auger in any liquids.
- Do not use products that contain ammonia, chlorine, or abrasives.
- Do not use chlorinated cleaning solvents, carbon tetrachloride, kerosene, or gasoline.
- Keep earth auger body clean. Use a soft cloth dampened with a mild soap and water mixture and wipe the earth auger body to clean.
9.1 Engine
Clean the cylinder fins with compressed air or a brush periodically. Dangerous overheating of engine may occur due to impurities on the cylinder.
9.2 Reduction gearbox
Every 100 working hours change the grease in the reduction gearbox.
Lubricate with lithium-based grease. Add the amount of 5-10g grease by use of grease gun or remove the screw (18) and put in the grease, turning the shaft manually until grease emerges, then replace the screw. Attention! Fill only a small amount of grease. Do not overfill. (max. 5-10g)
9.3 Cleaning air filter (Fig 5)
A dirty air filter will cause starting difficulty, loss of performance, and shorten the life span of the engine. Check the air filter monthly. For best performance, replace the air filter at least once a year.
- Loosen the air filter cover by turning the fixing screw counter clockwise.
- Remove the airbox cover and the air filter.
- Clean the foam filter element with warm soapy water. Rinse and let dry.

NOTE If the foam filter element is damaged, It should be replaced.
- Apply a light coat of engine oil to the foam filter element, then squeeze it out.
-
Reinstall the air filter.
-
Reinstall the airbox cover and tighten fixing screw to secure.
9.4 Replace spark plug (Fig. 6)
- The exhaust/casing becomes very hot during operation. Wait for the motor to cool down.
NEVER touch the hot motor. - Remove the spark plug cap (8).
- Remove the spark plug (I) and check it.
- Check the insulator. In case of damage such as cracks or chips: Replace the spark plug (I).
- Clean the spark plug electrodes with a wire brush.
- Check the electrodes' gap and adjust it. Gap 0.75 ~mm .
- Return the spark plug (I) and tighten it with the spark plug spanner.
- Replace the spark plug cap (8) on the spark plug (I). Ensure that no dirt gets into the cylinder head during replacement. Check the position of the spark plug (I).
- A loose spark plug (l) can damage the motor by overheating.
- Tightening it too much can damage the thread in the cylinder head. The manufacturer is not liable for damage resulting from this, the risk lies exclusively with the user
10 STORAGE
In a high or locked place, out of children's reach;
- in a dry place.
10.1 When storing for 1 month or longer
Drain all fuel from tank into a container approved for petrol. Run engine until it stops.
11 TECHNICAL DETAILS
| DRILL | Model nr. | POWXG50551 |
| Reduction ratio | 40:1 | |
| Auger drill bits | φ10cm、φ15cm、φ20cm | |
| Reduction gearbox with grease | yes | |
| ENGINE | Type | Air-cooled Two cycle engine |
| Rated speed | 7500r/min | |
| Idle speed | 3100r/min | |
| Clutch speed | 4600r/min | |
| Total displacement | 52cc | |
| Tank capacity | 1.20L |
12 NOISE
Noise values measured according to relevant standard. (K = 3)
Acoustic pressure level LpA
/dB(A)
Acoustic power level LwA
112 dB(A)

ATTENTION! The sound power level may exceed 85 dB(A), in this case individual hearing protection shall be worn.
aw (Vibration)
Max 19.9m / s^2
K = 1,5 m/s²
13 WARRANTY
This product is warranted for a 36-month period effective from the date of purchase by the first user.
- This warranty covers all material or production flaws excluding : batteries, chargers, defective parts subject to normal wear & tear such as bearings, brushes, cables, and plugs, or accessories such as drills, drill bits, saw blades, etc. ; damage or defects resulting from maltreatment, accidents or alterations; nor the cost of transportation.
- Damage and/or defects resulting from inappropriate use also do not fall under the warranty provisions.
We also disclaim all liability for any bodily injury resulting from inappropriate use of the tool.
- Repairs may only be carried out by an authorised customer service centre for Powerplus tools.
- You can always obtain more information at the number 00 32 3 292 92 90.
- Any transportation costs shall always be borne by the customer, unless agreed otherwise in writing.
- At the same time, no claim can be made on the warranty if the damage of the device is the result of negligent maintenance or overload.
- Definitely excluded from the warranty is damage resulting from fluid permeation, excessive dust penetration, intentional damage (on purpose or by gross carelessness), inappropriate usage (use for purposes for which the device is not suitable), incompetent usage (e.g. not following the instructions given in the manual), inexpert assembly, lightning strike, erroneous net voltage. This list is not exhaustive.
- Acceptance of claims under warranty can never lead to the prolongation of the warranty period nor commencement of a new warranty period in case of a device replacement.
Devices or parts which are replaced under the warranty therefore remain the property of Varo NV.
- We reserve the right to reject a claim whenever the purchase cannot be verified or when it is clear that the product has not been properly maintained. (Clean ventilation slots, carbon brushes serviced regularly, etc.).
- Your purchase receipt must be kept as proof of date of purchase.
- Your appliance must be returned undismantled to your dealer in an acceptably clean state (in its original blow-moulded case if applicable to the unit), accompanied by proof of purchase.
14 ENVIRONMENT
Should your appliance need replacement after extended use, do not dispose of it with the household refuse, but in an environmentally safe way.
Please dispose of used motor oil in a manner that protects the environment. We suggest you take it in a sealed container to your local service station for recycling. Do not throw it into the refuse or pour it on the ground.
VARO N.V. - Vic. Van Rompuy N.V. Joseph Van Instraat 9 - BE2500 Lier - BELGIUM, declares that,
Product: Earth auger
Trade mark: POWERplus
Model:POWXG50551
is in conformity with the essential requirements and other relevant provisions of the applicable European Directives as they relate to European harmonized standards. Any unauthorized modification of the apparatus voids this declaration.
European Directives (including, if applicable, their amending directives):
2006/42/EC
2014/30/EU
2000/14/EC Annex V LwA
Measured 112dB(A)
Guaranteed 112dB(A)
European harmonized standards (including, if applicable, their amendments):
- PPP16014A : 2022 (TuV Sud - DE test standard)
EN ISO 14982:2009
The undersigned acts on behalf of the company management,

Philippe Vankerkhove
Certification Manager
30/06/2022, Lier - Belgium
30/06/2022, Lier - Belgium
1 USO PREVISTO 3
1.1 Uso pretendido 3
Responsible de certifications
30/06/2022, Lier - Belgium
1 USO PREVISTO 3
30/06/2022, Lier - Belgium
1 UTILIZACAO PREVISTA 3
30/06/2022, Lier - Belgium
1 TILTENKT BRUK 3
1.1 Tiltenkt bruk 3
1.2 Ikke tiltenkt bruk 3
1.3 Restfarer 3
2 BESKRIVELSE (FIG. A) 3
3 PAKKENS INNHOLD 3
4 SYMBOLFORKLARING 4
5 GENERELLE SIKKERHETSADVARSLER 4
6 MASKINAVHENGIG SIKKERHETSINFORMASJON 5
7 MONTERING 6
7.1 Smoremiddel for reduksjonsgirkassen 6
7.2 Montere borekroner 6
7.3 Fylle drivstoff (Fig. 1). 6
7.4 Drivstoffblanding 6
7.5 Regler for arbeid 7
8 BRUK. 7
8.1 Startemotoren (Fig. 3). 7
8.2 Stoppe motoren (Fig. 4) 7
8.3 Bruke jordboret.. 7
9 RENGJØRING OG VEDLIKEHOLD 8
9.1 Motor 8
9.2 Reduksjonsgirkasse 8
9.3 Rengjering av luftfilter (Fig. 5)
9.4 Utskiftning av tennpluggen (Fig. 6) 9
10 OPPBEVARING 9
10.1 Oppbevaring i 1 maned ellermer.. 9
11 TEKNISKE DATA 9
12 STOY 9
13 GARANTI 10
14 MILJ0 10
JORDBOR 52CC POWXG50551
1 TILTENKT BRUK
1.1 Tiltenkt bruk
9 RENGJØRING OG VEDLIKEHOLD

30/06/2022, Lier - Belgium
1 TILSIGTET BRUG 3
1.1 Bestemmelsesmaessig anvendelse 3
1.2 Ikke bestemmelsesmaessig brug 3
1.3 Restrisici 3
2 BESKRIVELSE (FIG. A) 3
3 MEDFØLGENDE INDHOLD 3
4 SYMBOLER 4
5 GENERELLE SIKKERHEDSFORSKRIFTER 4
6 VERKTØJSSPECIFIKKE SIKKERHEDSINSTRUKSER 5
7 MONTERING 6
7.1 Smoremiddel til reduktionsgearkasse 6
7.2 Montering af borehoveder (Fig.1) 6
7.1 Pafyldning af brændstof (Fig. 2)
7.2 Brændstofblanding 6
7.3 Arbejsforskrifter 7
8 BRUG 7
8.1 Start af motoren (Fig. 3)
8.2 Stop af motoren (Fig. 4). 7
8.3 Betjening af jordboret.. 7
9 RENGORING OG VEDLIGEHOLDELSE 8
9.1 Motor 8
9.2 Reduktionsgearkasse 8
9.3 Rengoring af luftfilteret (Fig. 5). 8
9.4 Udskift taendrøret (Fig. 6) 9
10 OPBEVARING 9
10.1 Ved opbevaring i 1 maned ell er Iangere.. 9
11 TEKNISKE DATA 9
12 STOJ 9
13 GARANTI 10
14 MILJ0 10
52CC JORDBOR POWXG50551
1 TILSIGTET BRUG
1.1 Bestemmelsesmaessig anvendelse
30/06/2022, Lier - Belgium
1 ZAMYSLENEPOUZITI 3
1.1 Zamyslenévyuzivani 3
1.2 Nesprávné vyuzivani 3
1.3 Zbytkové riziko 3
2 POPIS (OBR. A) 3
3 SEZNAM OBSAHU BALENI 3
4 SYMBOLY 4
5 OBEÇNÁ BEZPEČNOSTNI UPOZORNÉNÍ PRO ELEKTRICKÉ NASTROJE 4
6 PODLE TYPU STROJE SPECIFIKOVANÉ BEZPEČNOSTNI POKNY 5
7 MONTAZ. 6
7.1 Mazivo pro redukni prevodovku 6
7.2 Vhodné vrtaci bity (Obr.1) 6
7.3 Tankovani (obrazek 2) 6
7.4 Palivová směs 6
7.5 Pracovni pravidla 7
8 PROVOZ 7
8.1 Startovani motoru (obrazek 3) 7
8.2 Chcete-li zastavit motor (Obr. 4)
8.3 Provoz zemni vrtacky 7
9 CISTENIA UDRZBA 8
9.1 Motor 8
9.2 Redukcnf prevodovka 8
9.3 Cišěni vzduchového filtru (obr. 5) 9
9.4 Vymena svicky zapalovani (obrazek 6) 9
10 USKLADNENEI 9
10.1 Skladovani po dobu 1 mese nebo dele.. 9
11 TECHNICKE UDAJE 10
12 HLUK 10
13 ZARUKA 10
14 ZIVOTNI PROSTREDI 11
15 PROHLASENIO SHODE 11
ZEMNI VRTÁK 52CCPOWXG50551
1 ZAMYŠLENÉ POUžITÍ
1.1 Zamyslené vyuzivani
2006/42/EC - Annex I
EN ISO 14982:2009
Podepsányaddresses

Philippe Vankerkhove
30/06/2022, Lier - Belgium
1 UTILIZARE PREVAZUTA 3
1.1 Utilizare acceptata 3
1.2 Utilizare neacceptata 3
1.3 Riscuri reziduale 3
2 DESCRIERE (FIG A) 3
3 CONTINUTUL PACHETULUI 3
4 SIMBOLURI 4
5 AVERTISMENTE GENERALE DE SIGURANÀ PRIVIND
APARATUL 4
6 INSTRUÇIUNI PRIVIND SIGURANTA SPECIFICE MAŞINII ....5
7 MONTARE 6
7.1 Lubrifiantul pentru transmisia cu reductor 6
7.2 Montarea varfurilor de foraj (Fig.1) 6
7.3 Alimentarea (Fig. 2) 6
7.4 Amestecul carburantului 6
7.5 Reguli de lucru.. 7
8 FUNCTIONARE 7
8.1 Pornirea motorului (Fig. 3)
8.2 Pentru a opri motorul (fig. 4). 8
8.3 Utilizarea sfredelului de foraj.. 8
9 CURATAREA 日 INTREINEREA 8
9.1 Motorul 8
9.2 Transmisia cu reductor 9
9.3 Curataea filtrului de aer (fig. 5)
9.4 Montaftla loc bujia (Fig. 6) 9
10 DEPOZITAREA 9
10.1 La depositarea pe o perioada de 1 lună sau mai mult.. 9
11 DATE TEHNICE 10
12 ZGOMOT 10
13 GARANTIE 10
14 MEDIU 11
15 DECLARATIA DE CONFORMITATE 11
BURGHIU PENTRU SOL, DE 52CC POWXG50551
1 UTILIZARE PREVÁZUTA
1.1 Utilizare acceptata
30/06/2022, Lier - Belgium
1 IPEdHA3HauEHNHe HA YIOTPEbATA. 3
1.1 3
1.2 3
1.3 OcmambHu puckooe 3
2 OINCAHNE (ΦNΓ. A) 3
3 CnncbK HA CbIbPjXAHNETO HA ONAKOBKATA. 3
4 CnMBOJIH 4
5 OBUH NPEDUNPEXDEHNA B6E3ONACHOCT PNI 3NOJ3BAHE HA MEXAHN3INPAHINHCTPYMEHTN.4
6 YKA3AHN 3A 6E3O7ACHA PABOTA, CNEUΦNCHN 3A 3AKYENH 0T BAC EJEKTPOHCTPymeHT .6
7 MOHTNPAHE 6
11 TEXHnueCKn DAHHN 10
12 11
13 TAPAHUN 11
14 OKoJIHa CPeDA 12
15 DEKJIAPAUJRA 3A CbOTBETCTBNE 12
CBPENIO 3A NOUBA 52CCPOWXG50551
1 ПЕДHA3HAUECHNE HA YNOTPEBATA
1.1 3no36aHe no npedHa3haueHue
ToBa CBpeIIO 3a 3eMЯ e npedHa3HauEHO 3a pa6Ota c noUba, (npo6uBaHe Ha dynKn 3a MaIKn DbPBeTa, KOIOBE 3a orpaHa Na TepeHa n dp.), KOITo e npoeKtnpaH 3a n3noJ3BaHe n C DBeTe pIe 3a rpaINHapcKn ceII. HenoJxOJa3 a npocecNoHaJIHa ynoTpe6a.
1.2 N3noJ38aHe He no npedHa3HaueHue
Ta3n MaunHa He e npedha3naeHa 3a pa6oTa c nei, npekaJeHo cKaIncTa 3emn Oco6eHO B o6nactn C NOd3emHO eNeKtpnueCTBO, Ra3, BOda nn TeIefoHNn JINHH.
Ta3n MaunHa He e npedHa3NaueHa 3a N3noJ3BaHe BbB BcKa N03n3uO CBeH aKO CBpeJIoTO He e BepTnKaJIHo.
1.3 Ocmambyu pucko8e
Dopn npneBndeHaTa ynoTpe6a Ha ypeDa BnHaMa ocTaTbueH pNCK, KOTo He MoKe Da ce npedotBpaTu. B 3abncmocT ot BnDa N KOHCTpyKunra Ta Ha ypeDa, CneHNTe NOTeHuaHn OnaCHOCTu 6nx Ma MOrJn Da ce nOABRT:
- OoctbI IO BbptraUTo Ce CBpeIIO (onachOCT OT p3aHe)
- HenpeBnIeHO, p3Ko DnIXeHne Ha CBpeINoTO (Bn6paunn BpueTe)
- 3XbDnHe Ha YKm MaTePnaHn OT Pa60HaTa 3OHa
BdHbHe Ha yactuHOn OT da60thata 3OHa n EMcHn OT 6eH3NHOBn DBrAten
KoHTaKT Ha KoxaTa C TOpuBO (6eH3nH, MaCNo)
3ary6a Ha cnyuXa, aKO He ce n3noJ3BaT npedna3Hn cpeIcTBa 3a 3auNTa Ha yuHTe no Bpeme Ha pa6Ota

IpeynpexdeHne! Ipei Da n3no3BaTe HnctpyMeHTa, npoyeTeBHNMaTeJHO TOBa pkoBOcTBo N 06uNTe HnctpyKcNn 3a 6e3onacHocT,3apaN Baawata Co6CTBeHa cHrypHocT. Baunr eNeKTponHcTpyMeHT Tp6Ba Da ce IpeDaBa Ha dpyr cAmO 3aeDNo C hAcToaUnte HnctpyKcNn.
2 OПИСАНЕ (ФИГ. A)
- Pe3epBoap 3a rOpuBO
- Cnycbk 3a ra3Ta
2a. 3akIoyBaHe Ha cnYCbKa Ha ra3Ta - KIIOU Ha DIBURATeJIa
4.ДвигатEN - CBpeDenn
- PbkoXBaTka 3a JЯСHa PbKa
- Kanayka Ha rOpBOTO
8.Подkaчвашиnomma3a ropnboto -
Kanak Ha Bb3DyueH dNtbp
-
JIoCT HaДрocena
- PbkoXbaTka 3a JraBa pbka
- Kanayka Ha 3anaHteHaTa CBeU
- Pbkoxbatka Ha cTapTepa
- Zhymo3arJywnTeI
15.3aknoybaaunb - Bodeu Ban
- CKOPOCTHa KVTnA
- Tpecbopka
3 CnncbK HA CbIbPjKHNETO HA ONAKOBKATA
OTcTaHete BCnUKN ONaKOBbHyN MaTePnaJN.
OTcTaHeTe OCTaHaJIte ONaKOBbUHN I BpeMeHHN IOCTaBKN (aKO hMa TaKnBa).
PIOBepTe DaI NaKeTbT CbIbPka BCNUK KOMNoHEHTN.
- PpOBepTe daHn ypeDbT, 3axpaHbAunr Ka6en, uencenbT n akcecoapnte He ca 6nn noBpeDeHn np TpaHCnoptnpaHe.
- Na3ete onakOBbHnTe MaTePnAn NoTn Do KpaHa rapaHcNoHHn nepno. CneToba n3XBpIeTe B IVHKT 3a Cb6HpAHe Ha OTnabu.
1xnoybeHcpeJeI
1x0100MMcBpeJIo
1x0150MMcBpeJno
1x0200MMcBpeIIO
1x npa3Ha 6yTuJIka 3a cmeCbaHe Ha
Macon/rotuBO
3x3aKnIOUyBaunuHnTOBe
1xKIOU3a3anaNTENCBeUN
1xHapbvnHaIopTeBnTeJia

B clya, ye hakoun actn Jnncbat nJn ca nobpeHn, CbpxeTe ce C meCTHn npedctabNTeJ.
4 CMMBOJN
B HacToaHnHaBcHnK n/nn Bbpxy MaunHata ca n3NoJ3BaHn CJIeHNTE CNMBOJN:
CToHocTn Ha uymaa n3MepeHn cbrnaCHO cboTBETHnA CTaHdapT. (K=3)
HnBO Ha 3ByKOBoTo HnIraHe LpA /dB(A)
HnBO Ha 3BykoBaTa MouHocT LwA 112 dB(A)

BHIMAHHE! HnBOTO Ha 3ByKOBOTo HaJraHe MoKe Da npebuHs 85 dB(A), B TaKbB CnyaH Tp6Ba Da HocHTe INHnBnDyajHn PpeJa3Hn CpeCTBa 3a Cnyxa (aHTnΦoHn).
aw(Bn6paunn)
Max. 19.9m / s^2 K = 1,5m / s^2
13 TAPAHUN
To3n npOdyKT nMa rapaHcnoH en cpoK 36 Meceua, KOITo Bnna B Cnna O T daTata Ha NOKynka Ha nbpBnra Notpe6nten.
Ta3n rapaHnI NOKPbBA BCNUKn DepeKTn Ha MaTePnAIn n npOn3BOJCTBeHn DepeKTn, HO He BKNIOvBa: 6aTePN, 3apAnHn yCTpOncTBA, DepeKTn YactN BCJeDCTBne Ha HopMaJIHO H3HOCBaHe n H3TpNBaHe KaTo NaRePn, YeTK, Ka6eN n UcENCeN nnn AkceCoApn KaTO CBpeJNa, HkpaHnUz 3a npoNBn INHCTpyMeHTn, pexeN dNCKOBe n T.H., NOBpeN n DepeKTn PpON3TuHaun OT HenpaBnHa yNoTpe6a, 3noNOLyKn n nn HApPaBeHn IpnOMeHn, HnTO TpaHCnOpTHnTe pa3XoDn.
IobpeHn Hnn n deoektn npoun3TuauuOn OT He npabunHO ynoTpe6a He ce 0xbaaat OTe3n rapaanOHn ycNoBna.
OcBeH TOBa He HocIM HnKaKBA OTROBOpHOCT 3a TeNECHn HapaHbAHn npOn3TuAun OTHnpaBnHaTa yNoTpe6a Ha nHCTpyMeHTa.
Pemontn Morat da 6bdat N3BpWBAHc camo OT ynbHOMOeH nOTpe6ntckn cepBn3eH ceHTbp 3a eNEKTPoINHCTpyMeHTN.
Mokete da nojyute donbHnTeHa HOpMaun Ha Homep 00 32 3 292 92 90.
BcHKn TpaHCnOpTHn pa3XoDn Ue 6bDat noEtN OT nOte6nten, OCBEN Ako NmCMeHO He e DorOBopeHo dpyro.
BcbuTo BpeMe, He Morat Da ce PpeJraBaT PpeTeHcunn No rapaHcunrTa, aKO nobpeDaTa Ha ypeJa E BCJeIcTBHe OT PpeHe6perBaHe Ha TexHueckOTo 06CnyKBaHe nnn npetOBapBaHe.
- Ot rapaHnra Ta KaTeOpuHc Ce n3KnUoyBa NOBpeDa, KOrTO e B pe3yIITaT OT npOHKBaHe Ha TeuHOCT, MHOro npax, npedHaMepeHa NOBpeDa (ymnJneHa nnnpaDN TotAnHO 6e3prKHe), HeNoDxOJaIO n3NOJ3BaHe (n3NOJ3BaHe 3a ueN, 3a KOnTO ypeDbT He e NODXoJus), HEKOMNeTeHTHO n3NOJ3BaHe (HAp. Hecna3BaHe Ha IHCTpyKUnTE B pBkoBOdCTBOTO), HEKOMNeTeHTeMOHTax, rpbMOTeBuYeH yap, HeppaBnHb HO HanpeKeHne. To3n cnncbk He e n3YeepNaTeJIeH.
- IpnemHaTo Ha rapaHcnoHHn IpTeHcnn HNKora He MoKe Da DoBeDe Do yDbJkaBaHe Ha rapaHcnoHHn cPOK, HHTO Do 3anOuBaHe Ha HOB rapaHcnoHe CpOK B CnyaH Ha 3amHa Ha ycTpoIcTBo.
- UcTPOIcTBaTa NIN DeTaNInTe, KOnTO ca 3aMeHeH CbO6pa3HO rapaHcNIOHHnTe ycNoBnA, cJeIOBaTeJIHO OCTaBAt CO6CTBeHOCT Ha Varo NV.
Hne cn 3ana3BaMe npaBTo Da OTXBpJIM BCra Ka npeTeHcIg, B cIyauy e NOKyPkata He MoKe da 6bJe npOBepHa IIN, KOrato e ACHO, Ye npOdyKTbT He e NODpbXah npabUNHO. (NouchTaHe Ha BeHTnlaUOnHHte OTBOpN, peIOBHa NOdRpXka Ha KapboHOBe TKN,...)
CbxpaHbAaTe pakTypaTa 3a NOKynKaTa KaTO DOKa3aTeJCTBO 3a DaTata, Ha KOrTo e HappaBeHa T.
Tp86Ba Da BbPHeTe HeDcMoHTnpaHn HNCTpyMeHT Ha npOdaBaA B npHcMJIbO YnCTO CbCToHnE, BOpUHHaJIHOTo My JIATO Kyapue, aKO yCTpoINCTBOTo IMa TAKOBa, PnpdpyKaBaHO OT DOKa3aTeINCTBOTO 3a NOKyPkata.
14 OKOJIHACPEDA
Ako cnei npoibjxnteHa ynoTpe6a MaunHaTa Bn ce Hxkdae OT NOmHa, He n3xBpIyTe CTapata pni DomakHckte OTnaDbu, a y HnOxKeTe No Haun, 6e3OpaceH 3a OKolHaTa Cpea.
Molna ce ocbo6oHnTe OT n3noJ3BaHOTo MOTOPHO MacNo NO haunH, cbo6pa3eH C OKJHaTa cpea. Hne cbBeTBaMe da ro OTHecTe B 3aNeuTah KOnTeHep Do Baunr MeCTe H cepBn3 a peKNaMaunr. He ro n3XBpIyTe Ha 6oknyka n He ro n3CnBaNte Ha 3emra.
15 DEKJIAPAUJRA 3A CbOTBETCTBNE


VARO N.V. - Vic. Van Rompuy N.V. - Joseph Van Instraat 9 - BE2500 Lier - Beinna de KnapuraT, Ye
npoayt: CBPEJIO 3A IOnyBA
Mapka: POWERplus
moJeI:POWXG50551
cBOTBeTCTBa Ha OCHOBHnTe N3NCKBaHnry I DpyrN CbOTBETN YCNOBnHa npINIOXIMnTe Ebponeckn DnpeKTHn Ha 6a3ata Ha npINOxKeHnTo Ha xapMOHN3npAHnTe ebPoneckn CTaHApTn. Bcra Ka Heno3BOJHe Na POMHa Ha anapaTa npaBn Ta3n DeKnapauRn HnOxHa.
Ebponeckn DnpekTNBn (BKNIOHTeJHO nTexHTe npomeHn, aKO ca npNJIOXIMN):
2006/42/EC
2014/30/EU
2000/14/EC Annex V LwA
Measured 112dB(A)
Guaranteed 112dB(A)
Ebponeckn XapMOHn3npaHn CtaHdapTN (BkJIIOHTeJHO N TeXHNTe npOMEH, aKO ca npINOXMN):
- PPP16014A : 2022 (TuV Sud - DE test standard)
EN ISO 14982:2009
30/06/2022, Lier - Belgium

Vario
WWW.VARO.COM
DESIGNED AND MARKETED BY VARO
Copyright by varo
VARO - VIC. VAN ROMPUY nv
JOSEPH VAN INSTRAAT 9 - 2500 LIER - BELGIUM