
POWX1175 - Drill PowerPlus - Free user manual and instructions
Find the device manual for free POWX1175 PowerPlus in PDF.


| Product type | Drill |
| Brand | PowerPlus |
| Model | POWX1175 |
| Power supply | Mains 230 V ~ 50 Hz |
| Power consumption | 700 W |
| No-load speed | 0 – 2800 rpm |
| Drilling capacity (wood) | 25 mm |
| Drilling capacity (metal) | 10 mm |
| Drilling capacity (concrete) | 10 mm |
| Chuck | Keyless, 1 – 10 mm |
| Functions | Drilling, screwdriving, hammer |
| Variable speed | Yes, dial |
| Rotation direction | Left/Right |
| Dimensions (L x W x H) | 260 x 65 x 200 mm |
| Weight | 1.4 kg |
| Double insulation | Yes |
| Maintenance and cleaning | Unplug the device. Clean with a damp cloth. Do not use abrasive products. |
| Spare parts and repairability | Contact PowerPlus after-sales service. Motor brushes are replaceable. |
| Warranty | 2 years |
Frequently Asked Questions - POWX1175 PowerPlus
User questions about POWX1175 PowerPlus
0 question about this device. Answer the ones you know or ask your own.
Ask a new question about this device
Download the instructions for your Drill in PDF format for free! Find your manual POWX1175 - PowerPlus and take your electronic device back in hand. On this page are published all the documents necessary for the use of your device. POWX1175 by PowerPlus.
USER MANUAL POWX1175 PowerPlus
natural_image
Yellow PowerPlus power drill with black and silver casing (no visible text or symbols)
NL NEDERLANDS VERTAALDE VERSIE VAN DE ORIGINELE HANDLEIDING
FR FRANÇAIS TRADUCTION DU MODE D'EMPLOI D'ORIGINE
EN ENGLISH ORIGINAL INSTRUCTION MANUAL
natural_image
Two mechanical components: a drill bit and a drill cap, shown with arrows indicating direction (no text or symbols present)Fig 2

natural_image
Close-up of a power drill press tool with visible branding (no text or symbols on the device itself)Fig 3
natural_image
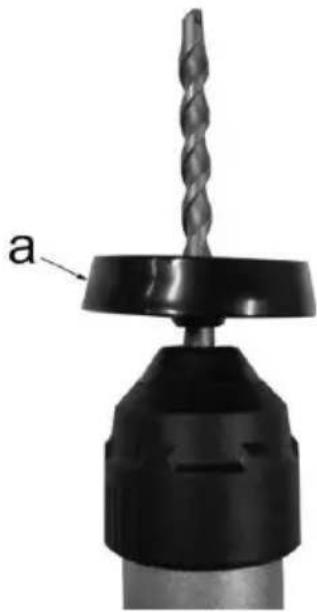
Close-up of a drill bit with a twist drill bit and labeled component 'a' (no text or symbols beyond label)Fig 4
1 BEOOGD GEBRUIK 2
2 BESCHRIJVING (FIG. 1) ...... 2
3 INHOUD VAN DE VERPAKKING 2
4 TOELICHTING VAN DE SYMBOLEN 3
5 ALGEMENE VEILIGHEIDSVOORSCHRIFTEN ....3
5.1 Werkplaats....3
5.2 Elektrische veiligheid ....3
5.3 Veiligheid van personen....4
5.4 Zorgvuldige omgang met en gebruik van elektrisch gereedschap....4
5.5 Service....5
6 AANVULLENDE VEILIGHEIDSVOORSCHRIFTEN ....5
7 VOOR DE INBEDRIJFSTELLING 6
7.1 Gereedschappen inplaatsen en wisselen (Fig. 2)....6
7.2 SDS-plus gereedschappen uitnemen....6
8 GEBRUIK 6
8.1 In-/uitschakelen....6
8.2 Hulphandgreep (Fig. 3)....6
8.3 Diepteaanslag....6
8.4 Stofopname-inrichting (Fig. 4)....6
8.5 Hameren/boren-schakelaar 6
9 REINIGING EN ONDERHOUD 7
9.1 Reiniging 7
10 TECHNISCHE GEGEVENS 8
11 GELUID 8
12 SERVICEDIENST 8
13 OPSLAG 8
14 GARANTIE 9
15 MILIEU....9
16 CONFORMITEITSVERKLARING .... 10
BOORHAMER 1600W
POWX1175
1 BEOOGD GEBRUIK
2 BESCHRIJVING (FIG. 1)
natural_image
Simple hand-drawn sketch of a rounded rectangular shape with no text or symbolsPhilippe Vankerkhove
Regelgevings- en compliancemanager
18/11/2022, Lier - Belgium
18/11/2022, Lier - Belgium
1 INTENDED USE 2
2 DESCRIPTION(FIG.1) 2
3 PACKAGE CONTENT LIST....2
4 SYMBOLS 3
5 GENERAL POWER TOOL SAFETY WARNINGS .... 3
5.1 Work area .... 3
5.2 Electrical safety....3
5.3 Personal safety .... 3
5.4 Power tool use and care....4
5.5 Service....4
6 ADDITIONAL SAFETY INSTRUCTIONS FOR HAMMER DRILLS 4
7 BEFORE USING THE TOOL FOR THE FIRST TIME ....5
7.1 Fitting and changing tools (Fig. 2)....5
7.2 Removing SDS-plus tool 5
8 OPERATION....5
8.1 Switching ON/OFF....5
8.2 Handle attachment (Fig. 3)....6
8.3 Depth stop....6
8.4 Dust collection device (Fig. 4)....6
8.5 Hammer / drill switch....6
9 CLEANING AND MAINTENANCE....7
9.1 Cleaning....7
10 TECHNICAL DATA 7
11 NOISE....7
12 SERVICE DEPARTMENT 8
13 STORAGE 8
14 WARRANTY....8
15 ENVIRONMENT 9
16 DECLARATION OF CONFORMITY 9
HAMMER DRILL 1600W
POWX1175
1 INTENDED USE
The machine is intended for hammer drilling in concrete, brick and stone, as well as for light chiseling work. It is also suitable for drilling without impact in wood, metal, ceramic and plastic. Not suitable for professional use.

WARNING! Read this manual and general safety instructions carefully before using the appliance, for your own safety. Your power tool should only be passed on together with these instructions.
2 DESCRIPTION(FIG.1)
-
Dust cap
-
Fastening sleeve
-
Auxiliary handle
-
Oil cover
-
Hammer stop
-
Drill stop
-
Double AVS system (Anti Vibration System)
-
On/off switch
-
Depth stop
-
Lock knob for depth stop
-
Handle
-
Safety lock knob
-
Power light
3 PACKAGE CONTENT LIST
■ Remove all packing materials
- Remove remaining packaging and transit supports (if existing)
- Check the completeness of the packing content
- Check the appliance, the power cord, the power plug and all accessories for transportation damages.
- Keep the packaging materials as far as possible till the end of the warranty period. Dispose it into your local waste disposal system afterwards.

WARNING Packing materials are no toys! Children must not play with plastic bags! Danger of suffocation!
■ Hammer drill 1600W
- Depth stop
■ Auxiliary handle
■ 13mm chuck and adapter
■ Dust cap
- Spanner
■ Grease cup
- 3 SDS drills ∅8-10 & 12 x 150mm
- SDS point chisel: 250mm
- SDS flat chisel: 21 x 250mm

When parts are missing or damaged, please contact your dealer.
4 SYMBOLS
In this manual and/or on the machine the following symbols are used:
 | Denotes risk of personal injury or damage to the tool. |  | Read manual before use. |
 | In accordance with essential safety standards of applicable European directives. |  | Class II - The machine is double insulated; Earthing wire is therefore not necessary. |
 | Mandatory use of eye protection. |  | Wear gloves. |
5 GENERAL POWER TOOL SAFETY WARNINGS
Read all safety warnings and all instructions. Failure to follow all warnings and instructions may result in electric shock, fire and/or serious injury. Save all warnings and instructions for future reference. The term "power tool" in the warnings refers to your mains operated (corded) power tool or battery operated (cordless) power tool.
5.1 Work area
- Keep work area clean and well lit. Cluttered and dark areas invite accidents.
- Do not operate power tools in explosive atmospheres, such as in the presence of flammable liquids, gases or dust. Power tools create sparks which may ignite the dust or fumes.
- Keep children and bystanders away while operating a power tool. Distractions can cause you to lose control.
5.2 Electrical safety

Always check that the power supply corresponds to the voltage on the rating plate.
- Power tool plugs must match the outlet. Never modify the plug in any way. Do not use any adapter plugs with earthed (grounded) power tools. Unmodified plugs and matching outlets will reduce risk of electric shock.
- Avoid body contact with earthed or grounded surfaces such as pipes, radiators, ranges and refrigerators. There is an increased risk of electric shock if your body is earthed or grounded.
- Do not expose power tools to rain or wet conditions. Water entering a power tool will increase the risk of electric shock.
- Do not abuse the cord. Never use the cord for carrying, pulling or unplugging the power tool. Keep cord away from heat, oil, sharp edges or moving parts. Damaged or entangled cords increase the risk of electric shock.
- When operating a power tool outdoors, use an extension cord suitable for outdoor use. Use of a cord suitable for outdoor use reduces the risk of electric shock.
- If operating a power tool in a damp location is unavoidable, use a residual current device (RCD) protected supply. Use of an RCD reduces the risk of electric shock.
5.3 Personal safety
- Stay alert, watch what you are doing and use common sense when operating a power tool. Do not use a power tool while you are tired or under the influence of drugs, alcohol or medication. A moment of inattention while operating power tools may result in serious personal injury.
- Use safety equipment. Always wear eye protection. Safety equipment such as dust mask, non-skid safety shoes, hard hat, or hearing protection used whenever conditions require will reduce personal injuries.
- Avoid accidental starting. Ensure the switch is in the off position before plugging in. Carrying power tools with your finger on the switch or plugging in power tools that have the switch on invites accidents.
- Remove any adjusting key or wrench before turning the power tool on. A wrench or a key left attached to a rotating part of the power tool may result in personal injury.
- Do not overreach. Keep proper footing and balance at all times. This enables better control of the power tool in unexpected situations.
- Dress properly. Do not wear loose clothing or jewellery. Keep your hair, clothing and gloves away from moving parts. Loose clothes, jewellery or long hair can be caught in moving parts.
- If devices are provided for the connection of dust extraction and collection facilities, ensure these are connected and properly used. Use of these devices can reduce dust related hazards.
5.4 Power tool use and care
- Do not force the power tool. Use the correct power tool for your application. The correct power tool will do the job better and safer at the rate for which it was designed.
- Do not use the power tool if the switch does not turn it on and off. Any power tool that cannot be controlled with the switch is dangerous and must be repaired.
- Disconnect the plug from the power source before making any adjustments, changing accessories, or storing power tools. Such preventive safety measures reduce the risk of starting the power tool accidentally.
- Store idle power tools out of the reach of children and do not allow persons unfamiliar with the power tool or these instructions to operate the power tool. Power tools are dangerous in the hands of untrained users.
- Maintain power tools. Check for misalignment or sticking of moving parts, breakage of parts and any other condition that may affect the power tool's operation. If damaged, have the power tool repaired before use. Many accidents are caused by poorly maintained power tools.
- Keep cutting tools sharp and clean. Properly maintained cutting tools with sharp cutting edges are less likely to stick and are easier to control.
- Use the power tool, accessories and tool bits etc., in accordance with these instructions and in the manner intended for the particular type of power tool, taking into account the working conditions and the work to be performed. Use of the power tool for operations different from intended could lead to a hazardous situation.
5.5 Service
- Have your power tool serviced by a qualified repair person using only identical replacement parts. This will ensure that the safety of the power tool is maintained.
6 ADDITIONAL SAFETY INSTRUCTIONS FOR HAMMER DRILLS
- Check the voltage (volt) marked on the rating plate.
- When using cable drums, run all the cable off the drum. Minimum conductor cross section: 1.0 mm ^2 .
- When using the electric hammer drill outdoors, connect to the power supply with a type H07RN-F 3G 1.5 mm ^2 extension cable and rain-water-protected plugs in proper working order.
■ Make sure of your footing on ladders and scaffolding when drilling free-handed. - Use a line detector to localize lines in walls with concealed electric, water or gas lines. Avoid touching live components or conductors.
-
Wear ear muffs to protect your hearing. Loss of hearing can be a gradual process!
-
Wear goggles and use a dust mask on jobs generating dust.
- Do not use in areas where there are vapours or flammable liquids.
- Always pull the plug out of the socket before cleaning or making changes to the machine.
- Protect the power cable from damage. Oil and acid can damage the cable.
■ Never overload the machine.
- Secure all workpieces sufficiently.
- Important! It is imperative to follow all national safety regulations concerning installation, operation and maintenance.
- Chisel bits and drill bits may be flung out of the machine accidentally and cause serious injury:
■ Before starting to work, always check that the chisel or drill bit is property locked in the chuck.
- Examine the chuck regularly for signs of wear or damage.
- Never start up a hammer tool until it pressed against a workpiece (wall, ceiling, etc.).
- When you are finished, unplug the hammer drill from the electric supply and remove the chisel or drill bit Irom the machine.
- Always disconnect the hammer drill from the electric supply before you change a chisel or drill bit.
- Protect your eyes and other workers from flying particles and splinters. Wear a helmet! Set up partition walls!
- Wear work gloves to protect fingers from bruising and grazing.
- Vibrations can injure the hand-arm system. Keep exposure to vibrations as short as possible.
■ Always lead the mains cable away backwards from the device.
- Store the device where it is inaccessible to children.
- When carrying out work, always hold the device with both hands and ensure that you have a stable standing position.
7 BEFORE USING THE TOOL FOR THE FIRST TIME
- Examine the place where the device is to be used for hidden electrical cables, gas and water pipes using a pipe finding device.
- Before connecting to the mains, ensure care that the mains voltage corresponds to the details on the rating plate.
7.1 Fitting and changing tools (Fig. 2)
The device is equipped with a SDS-plus attachment system.
- Clean tools and grease with a thin layer of machine grease before fitting.
■ Pull back fastening sleeve and hold.
- Push and rotate the dust-free tool into the tool holder as far as it will go. The tool will lock automatically.
- Check that it has locked by pulling the tool
7.2 Removing SDS-plus tool
Pull back fastening sleeve, hold and remove tool.

Accessories can be hot after use. Don't touch the tip of accessory by hand! Please always use protective floves to remove accessory.
8 OPERATION
8.1 Switching ON/OFF
- Switching on: Press the operating switch (8).
- Switching off: Release the operating switch(8)
8.2 Handle attachment (Fig. 3)
For reasons of safety, only use the hammer drill with handle attachment.
You will be able to obtain a safe body position when working by rotating the handle attachment. Loosen and turn the handle attachment in an ant-clockwise direction. Slip loop onto the neck of the housing tool and position the handle, then tighten the handle attachment.
8.3 Depth stop
Loosen the handle attachment and place the straight part of the depth stop in the hole. Adjust the depth stop and retighten the handle attachment.
8.4 Dust collection device (Fig. 4)
Before carrying out hammer-drilling work vertically overhead pull dust collecting device over the drill bit.
8.5 Hammer / drill switch
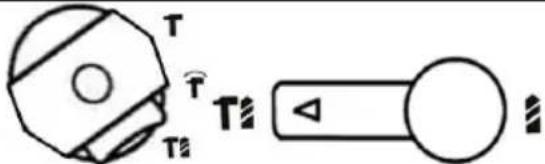
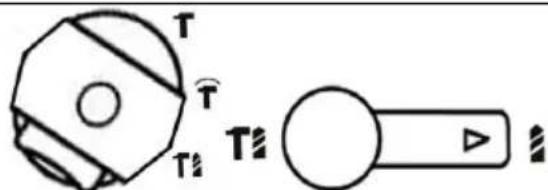
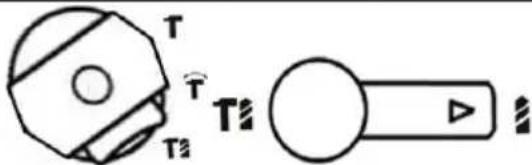
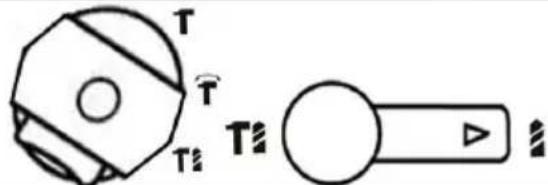
- The hammer/drill switch can switch the drill, hammer and hammer/ drill functions.
- There is a lock knob in front hammer/ drill switch, please depressed it first to preventing any unintentional adjusting.
- To set the function, please use below compounding of front and rear hammer/drill switch.


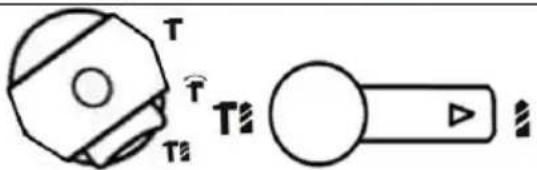
Hammer/ drill mode:
Drill in masonry, concrete and natural stone. Don't use the hammer drill function for ceramic tile or others material can not withstand impact energy.
Hammer mode:
Hammer in masonry, concrete and natural stone.
Drilling mode:
Drilling in wood, synthetic materials and metal.
Chisel Rotation:
Non-working position used only to rotate flat chisel into the desired position


Important! When hammer drilling you will require a low pressure. Too much pressure will place unnecessary load on the motor. Check the drill bits regularly. Re-sharpen or replace blunt drill bits.

Do not use the chuck with SDS connector in combination with the hammer/hammer drill function!
9 CLEANING AND MAINTENANCE

Attention !Before performing any work on the equipment, pull the power plug.
9.1 Cleaning
- Keep the ventilation slots of the machine clean to prevent overheating of the engine.
- Regularly clean the machine housing with a soft cloth, preferably after each use.
- Keep the ventilation slots free from dust and dirt.
- If the dirt does not come off use a soft cloth moistened with soapy water.

Never use solvents such as petrol, alcohol, ammonia water, etc. These solvents may damage the plastic parts.
10 TECHNICAL DATA
| Rated Voltage | 220-240 V |
| Rated Frequency | 50 Hz |
| Rated Power | 1600 W |
| Rotation speed | 800 min ^-1 |
| Protection class | II |
| Drill capacity concrete | 32 mm |
| Drill capacity steel | 13 mm |
| Drill capacity wood | 40 mm |
| Impact rate | 3900 min ^-1 |
| Cable length | 3 m + VDE plug |
| Chuck type | 13mm chuck and adapter |
11 NOISE
Noise emission values measured according to relevant standard. (K=3)
Acoustic pressure level LpA 97 dB(A)
Acoustic power level LwA 108 dB(A)

ATTENTION! Wear hearing protection when sound pressure is over 85 dB(A).
aw (Vibration)
14.6 m/s²
K = 1,5 ~m / s^2
12 SERVICE DEPARTMENT
- Damaged switches must be replaced by our after-sales service department.
- If the connecting cable (or mains plug) is damaged, it must be replaced by a particular connecting cable which is available from our service department. Replacement of the connecting cable must only be carried out by our service department (see last page) or by a qualified person (qualified electrician).
13 STORAGE
- Thoroughly clean the whole machine and its accessories.
- Store it out of the reach of children, in a stable and secure position, in a cool and dry place, avoid too high and too low temperatures.
- Protect it from exposure to direct sunlight. Keep it in the dark, if possible.
- Don't keep it in plastic bags to avoid humidity build-up.
14 WARRANTY
- This product is warranted for a 36-month period effective from the date of purchase by the first user.
- This warranty covers all material or production flaws excluding : batteries, chargers, defective parts subject to normal wear & tear such as bearings, brushes, cables, and plugs, or accessories such as drills, drill bits, saw blades, etc. ; damage or defects resulting from maltreatment, accidents or alterations; nor the cost of transportation.
- Damage and/or defects resulting from inappropriate use also do not fall under the warranty provisions.
- We also disclaim all liability for any bodily injury resulting from inappropriate use of the tool.
- Repairs may only be carried out by an authorised customer service centre for Powerplus tools.
- You can always obtain more information at the number 00 32 3 292 92 90.
- Any transportation costs shall always be borne by the customer, unless agreed otherwise in writing.
- At the same time, no claim can be made on the warranty if the damage of the device is the result of negligent maintenance or overload.
- Definitely excluded from the warranty is damage resulting from fluid permeation, excessive dust penetration, intentional damage (on purpose or by gross carelessness), inappropriate usage (use for purposes for which the device is not suitable), incompetent usage (e.g. not following the instructions given in the manual), inexpert assembly, lightning strike, erroneous net voltage. This list is not exhaustive.
- Acceptance of claims under warranty can never lead to the prolongation of the warranty period nor commencement of a new warranty period in case of a device replacement.
- Devices or parts which are replaced under the warranty therefore remain the property of Varo NV.
- We reserve the right to reject a claim whenever the purchase cannot be verified or when it is clear that the product has not been properly maintained. (Clean ventilation slots, carbon brushes serviced regularly, etc.).
- Your purchase receipt must be kept as proof of date of purchase.
- Your appliance must be returned undismantled to your dealer in an acceptably clean state, (in its original blow-moulded case if applicable to the unit), accompanied by proof of purchase.
15 ENVIRONMENT

Should your appliance need replacement after extended use, do not discard it with the household rubbish but dispose of it in an environmentally safe way. Waste produced by electrical machine items should not be handled like normal household rubbish. Please recycle where recycle facilities exist. Check with your Local Authority or retailer for recycling advice.
16 DECLARATION OF CONFORMITY


VARO N.V. - Vic. Van Rompuy N.V Joseph Van Instraat 9 - BE2500 Lier - BELGIUM, solely declares that
Product : Hammer Drill
is in conformity with the essential requirements and other relevant provisions of the applicable European Directives / Regulations, based on the application of European harmonized standards. Any unauthorized modification of the apparatus voids this declaration.
European Directives / Regulations (including, if applicable, their amendments up to the date of signature):
2011/65/EU
2006/42/EC
2014/30/EU
European harmonized standards (including, if applicable, their amendments up to the date of signature);
EN60745-1:2009
EN60745-2-6:2010
EN55014-1:2017
EN55014-2:2015
EN IEC 61000-3-2 : 2019
EN61000-3-3:2013
Keeper of the Technical Documentation : Philippe Vankerkhove, VARO – Vic. Van Rompuy N.V.
The undersigned acts on behalf of the company CEO,
Philippe Vankerkhove
Regulatory Affairs – Compliance Manager
18/11/2022, Lier - Belgium
18/11/2022, Lier - Belgium
Modo Martillo / Taladro:
18/11/2022, Lier - Belgium
18/11/2022, Lier - Belgium

Modo martelo/perfurador:
18/11/2022, Lier - Belgium
POWX1175 NO
1 TILTENKT BRUK 2
2 BESKRIVELSE (FIG. 1)....2
3 PAKKENS INNHOLD 2
4 SYMBOLFORKLARING ....3
5 GENERELLE SIKKERHETSADVARSLER 3
5.1 Arbeidsplassen 3
5.2 Elektrisk sikkerhet 3
5.3 Personsikkerhet....3
5.4 Vær nøyaktig og omhyggelig når du omgås elektroverktøy 4
5.5 Service....4
6 SPESIELLE SIKKERHETSADVARSLER 4
7 F∅R IGANGSETTING....5
7.1 Innsetting og utskifting av verktøy (Fig. 2)....5
7.2 Trekke ut SDS-verktøy....5
8 DRIFT 5
8.1 Start/stopp....5
8.2 Hjelpehåndtak (Fig. 3)....5
8.3 Dybdeanlegg 6
8.4 Støvavsug (fig. 4)....6
8.5 Slagboringsbryter 6
9 RENGJ∅RING OG VEDLIKEHOLD 7
9.1 Rengjøring....7
10 TEKNISKE DATA....7
11 ST∅Y 7
12 SERVICEAVDELING....7
13 OPPBEVARING 7
14 GARANTI....8
15 MILJ∅....8
16 SAMSVARSERKLÆRING....9
BORHAMMER 1600W
POWX1175
1 TILTENKT BRUK
8.5 Slagboringsbryter
18/11/2022, Lier - Belgium

3 FÖRPACKNINGSINNEHÅLL

14/06/2022, Lier - Belgium
natural_image
Simple line drawing of a rounded rectangular shape with a small circular mark on top (no text or symbols)Philippe Vankerkhove
18/11/2022, Lier - Belgium
natural_image
Simple hand-drawn sketch of a rounded rectangular shape with a curved line on the left (no text or symbols)Philippe Vankerkhove
18/11/2022, Lier - Belgium
1 NAMJENA 2
2 OPIS (SL. 1) 2
3 POPIS SADRŽAJA PAKETA 2
4 SIMBOLI 3
5 OPĆA UPOZORENJA O SIGURNOSTI RUKOVANJA
ELEKTRIČNIM ALATIMA....3
5.1 Radno mjesto....3
5.2 Električna sigurnost....3
5.3 Osobna sigurnost .... 4
5.4 Uporaba i održavanje električnog alata 4
5.5 Servis....4
6 POSEBNA SIGURNOSNA UPOZORENJA 5
7 PRIJE POČETKA RADA 5
7.1 Postavljanje i zamjena alata (sl. 2)....5
7.2 Vađenje SDS-plus alata 5
8 UPOTREBA....6
8.1 Uključivanje/Isključivanje....6
8.2 Nastavak za držanje (sl. 3)....6
8.3 Graničnik dubine....6
8.4 Uređaj za prikupljanje prašine (sl. 4) ......6
8.5 Sklopka vibracija / bušenje....6
9 ČIŠĆENJE I ODRŽAVANJE....7
9.1 Čišćenje....7
10 TEHNIČKI PODACI 7
11 BUKA....8
12 SERVIS....8
13 SKLADIŠTENJE......8
14 JAMSTVO....8
15 OKOLIŠ 9
16 IZJAVA O SUKLADNOSTI 9
UDARNA BUŠILICA 1600 W POWX1175
1 NAMJENA
Uređaj je predviđen za vibracijsko bušenje u betonu, cigli i kamenu, kao i za lagane poslove rezbarenja. Također je prikladan i za bušenje bez vibracija u drvetu, metalu, keramici i plastici. Nije prikladno za profesionalnu uporabu.

UPOZORENJE! Prije uporabe alata, a radi vaše vlastite sigurnosti pažljivo pročitajte ovaj priručnik i opće upute o sigurnosti. Ove upute čine sastavni dio opreme električnog alata, pa i u slučaju prodaje drugom vlasniku.
2 OPIS (SL. 1)
- Zaštita od prašine
- Prsten za pritezanje
- Pomoćna ručka
- Poklopac za ulje
- Isključivanje vibracija
- Isključivanje bušenja
-
Dvostruki AVS sustav (Anti Vibracijski Sustav)
-
Sklopka za uključivanje/isključivanje
- Graničnik dubine
- Gumb blokade graničnika dubine
- Ručka
- Sigurnosni gumb za blokadu
- Indikator napajanja
3 POPIS SADRŽAJA PAKETA
UPOZORENJE! Bez funkcije načina rada: Motor se okreće bez opterećenja, vratilo se neće okrenuti. Ne postavljajte sklopku u taj položaj. To može znatno oštetiti motor.

18/11/2022, Lier - Belgium
1 NAMENJENA UPOTREBA....2
2 OPIS (SL. 1) 2
3 SPISAK SADRŽAJA PAKOVANJA 2
4 SIMBOLI 3
5 OPŠTA BEZBEDNOSNA UPUTSTVA ZA ELEKTRIČNE ALATE .3
5.1 Radna oblast....3
5.2 Električna bezbednost ....3
5.3 Lična bezbednost....4
5.4 Korišćenje i održavanje električnog alata ....4
5.5 Servisiranje 4
6 DODATNE BEZBEDNOSNE INSTRUKCIJE ZA ČEKIĆ BUŠILICE
5
7 PRE POČETKA RADA 5
7.1 Nameštanje i zamena alata (slika 2)....5
7.2 Skidanje SDS-plus alata 6
8 RAD 6
8.1 Uključivanje/isključivanje....6
8.2 Montaža rukohvata (slika 3)....6
8.3 Regulator dubine bušenja 6
8.4 Uređaj za sakupljanje prašine (slika 4)....6
8.5 Prekidač za udarnu funkciju / funkciju bušenja....6
9 ČIŠĆENJE I ODRŽAVANJE....7
9.1 Čišćenje....7
10 TEHNIČKI PODACI 7
11 BUKA....8
12 SERVISNO ODELJENJE....8
13 ODLAGANJE 8
14 GARANCIJA....8
15 ŽIVOTNA SREDINA....9
16 IZJAVA O USKLAĐENOSTI....9
UDARNA BUŠILICA 1600W POWX1175
1 NAMENJENA UPOTREBA
Udarni režim / režim bušenja
Režim bušenja:
18/11/2022, Lier - Belgium
1 ZAMÝŠLENÉ POUŽITÍ ......3
2 POPIS (OBR. 1)....3
3 SEZNAM OBSAHU BALENÍ....3
4 SYMBOLY 4
5 OBECNÁ BEZPEČNOSTNÍ UPOZORNĚNÍ PRO ELEKTRICKÉ NÁSTROJE 4
18/11/2022, Lier - Belgium
1 ZAMÝŠL'ANÉ POUŽITIE....3
2 POPIS (OBR. 1)....3
3 OBSAH BALENIA....3
4 SYMBOLY 4
5 VŠEOBECNÉ BEZPEČNOSTNÉ VAROVANIA PRE ELEKTRICKÉ NÁRADIE....4
5.1 Pracovná plocha 4
5.2 Elektrická bezpečnost'......4
5.3 Osobná bezpečnost'......5
5.4 Používanie elektrického náradia a starostlivost' oň....5
5.5 Servis....6
6 DOPLNKOVÉ BEZPEČNOSTNÉ POKYNY PRE VŘTACIE KLADIVÁ 6
7 PRED ZAČATÍM PRÁCE 6
7.1 Uchytenie a výmena nástrojov (obr. 2)....6
7.2 Vybratie nástroja SDS-plus....7
8 PREVÁDZKA....7
8.1 Zapnutie / vypnutie ....7
8.2 Prídavná rukovát' (obr. 3)....7
8.3 Híbkový doraz. 7
8.4 Zariadenie na zber prachu (obr. 4)....7
8.5 Prepínač kladiva/ vřtačky 7
9 ČISTENIE A ÚDRŽBA 8
9.1 Čistenie....8
10 TECHNICKÉ ÚDAJE......8
11 HLUK....9
12 SERVISNÁ SLUŽBA....9
13 SKLADOVANIE....9
14 ZÁRUKA....9
15 ŽIVOTNÉ PROSTREDIE....10
VŘTACIE KLADIVO 1600W POWX1175
1 ZAMÝŠL'ANÉ POUŽITIE
18/11/2022, Lier - Belgium
1 PREDVIDENA UPORABA 2
2 OPIS (SLIKA A)....2
3 SEZNAM VSEBINE PAKETA 2
4 SIMBOLI 3
5 SPLOŠNA VARNOSTNA OPOZORILA ZA ELEKTRIČNO ORODJE 3
5.1 Delovno mesto 3
5.2 Električna varnost....3

natural_image
Simple line drawing of a rounded rectangular shape with a small circular mark on the top right corner (no text or symbols)Philippe Vankerkhove
Oddelek za zakonodajne zadeve – vodja za certificiranje
18/11/2022, Lier - Belgium
1 UTILIZARE PREVĂZUTĂ 3
2 DESCRIERE (FIG. 1)....3
3 CONTINUTUL PACHETULUI 3
4 SIMBOLURI 4
5 AVERTISMENTE GENERALE DE SIGURANTĂ PRIVIND APARATELE ELECTRICE ....4
5.1 Zona de lucru 4
natural_image
Simple line drawing of a rounded rectangular shape with a small protrusion (no text or symbols)Philippe Vankerkhove
Divizia de reglementare – Director de conformitate
18/11/2022, Lier - Belgium
12 SERWIS GWARANCYJNY
18/11/2022, Lier - Belgium
natural_image
Simple line drawing of a robot head with arrows and symbols, no text or labels present
natural_image
Simple line drawing of a right-hand rule with a handle and arrow (no text or symbols)
natural_image
Simple line drawing of a robot head with no text or symbols
natural_image
Simple line drawing of a right-handled lever with a circular head and arrow indicator (no text or symbols)

natural_image
Simple line drawing of a button with a play button and triangular pointer (no text or symbols)

natural_image
Simple line drawing of a button with a play button and arrow, no text or symbols presentnatural_image
Simple hand-drawn sketch of a rounded rectangular shape with no text or symbolsPhilippe Vankerkhove
18/11/2022, Lier - Belgium
1 KAVANDATAV KASUTUSALA....2
2 KIRJELDUS (JOONIS A) 2
3 PAKENDI SISU 2
4 SÜMBOLID....3
5 ÜLDISED HOIATUSED JA OHUTUSJUHISED 3
5 ÜLDISED HOIATUSED JA OHUTUSJUHISED


18/11/2022, Lier - Belgium


natural_image
Yellow and black power drill with visible branding (no text or symbols on the device body)varo
WWW.VARO.COM
DESIGNED AND MARKETED BY VARO
©copyright by varo
VARO - VIC. VAN ROMPUY nv
JOSEPH VAN INSTRAAT 9 - 2500 LIER - BELGIUM



- BOORHAMER 1600W
- POWX1175
- BEOOGD GEBRUIK
- BESCHRIJVING (FIG. 1)
- HAMMER DRILL 1600W
- INTENDED USE
- DESCRIPTION(FIG.1)
- PACKAGE CONTENT LIST
- SYMBOLS
- GENERAL POWER TOOL SAFETY WARNINGS
- Work area
- Electrical safety
- Personal safety
- Power tool use and care
- Service
- ADDITIONAL SAFETY INSTRUCTIONS FOR HAMMER DRILLS
- BEFORE USING THE TOOL FOR THE FIRST TIME
- Fitting and changing tools (Fig. 2)
- Removing SDS-plus tool
- OPERATION
- Switching ON/OFF
- Handle attachment (Fig. 3)
- Depth stop
- Dust collection device (Fig. 4)
- Hammer / drill switch
- Hammer/ drill mode:
- Hammer mode:
- Drilling mode:
- Chisel Rotation:
- CLEANING AND MAINTENANCE
- Cleaning
- NOISE
- SERVICE DEPARTMENT
- STORAGE
- WARRANTY
- ENVIRONMENT
- DECLARATION OF CONFORMITY
- Modo Martillo / Taladro:
- Modo martelo/perfurador:
- POWX1175 NO
- BORHAMMER 1600W
- TILTENKT BRUK
- Slagboringsbryter
- FÖRPACKNINGSINNEHÅLL
- UDARNA BUŠILICA 1600 W POWX1175
- NAMJENA
- OPIS (SL. 1)
- POPIS SADRŽAJA PAKETA
- UDARNA BUŠILICA 1600W POWX1175
- NAMENJENA UPOTREBA
- Udarni režim / režim bušenja
- Režim bušenja:
- VŘTACIE KLADIVO 1600W POWX1175
- ZAMÝŠL'ANÉ POUŽITIE
- SERWIS GWARANCYJNY
- ÜLDISED HOIATUSED JA OHUTUSJUHISED
Brand : PowerPlus
Model : POWX1175
Category : Drill