PCBSR 3108 - Robot vacuum ProfiCare - Free user manual and instructions
Find the device manual for free PCBSR 3108 ProfiCare in PDF.
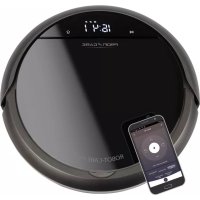
| Product type | Robot vacuum with mopping function |
| Brand | ProfiCare |
| Model | PCBSR 3108 (PC-BSR 3108) |
| Net weight | Approx. 2.8 kg |
| Protection class | III (device), II (power supply unit) |
| Power supply | 100–240 V AC, 50/60 Hz, 0.4 A |
| Power supply unit | Output 19 V DC, 600 mA (model SA12BH-190060V) |
| Battery type | Built-in rechargeable Li-ion, 14.4 V, 2600 mAh |
| Battery life | Approx. 2 hours |
| Charging time | Approx. 6 hours |
| Cleaning modes | Systematic (zigzag), Spot (circle), Edge (along walls) |
| Mopping function | Yes, with water tank and cleaning cloth |
| Control | Infrared remote control and Smart Life app (Android/iOS) |
| Connectivity | Wi-Fi 2.4 GHz (802.11b/g/n), WPA/WPA2 |
| Schedule programming | Yes, day/time setting and scheduled cleaning |
| Safety sensors | Stair detection (3 infrared sensors), collision detection |
| Brushes | Rotating floor brush + 2 side brushes (spares included) |
| Filtration | HEPA filter (washable, replace once a year) |
| Dust bin capacity | Not specified (approx. 300 ml estimated) |
| Water tank capacity | Not specified (approx. 200 ml estimated) |
| Charging base | Included, with charging contacts and indicator light |
| Package contents | Robot, charging base, power supply unit, remote control, water tank, cleaning cloth, spare HEPA filter, 2 spare side brushes, manual |
| Maintenance | Empty dust bin after each use, clean filters (do not wash), clean brushes and sensors |
| Storage temperature | 10 °C to 20 °C |
| Warranty | Refer to the provided warranty certificate |
Frequently Asked Questions - PCBSR 3108 ProfiCare
User questions about PCBSR 3108 ProfiCare
0 question about this device. Answer the ones you know or ask your own.
Ask a new question about this device
Download the instructions for your Robot vacuum in PDF format for free! Find your manual PCBSR 3108 - ProfiCare and take your electronic device back in hand. On this page are published all the documents necessary for the use of your device. PCBSR 3108 by ProfiCare.
USER MANUAL PCBSR 3108 ProfiCare
Clean Dust Container and Floor Brush (A-I) / Fill Water Tank (J-I)
Stofreservoirenvloerborstelreinigen (A-I)/Waterreservoirvullen (J-L)
A | B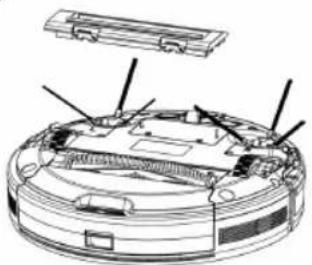 | C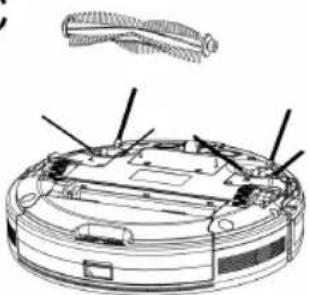 | |
D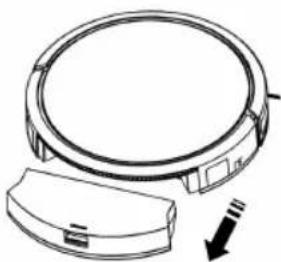 | E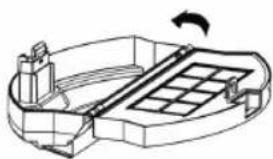 | F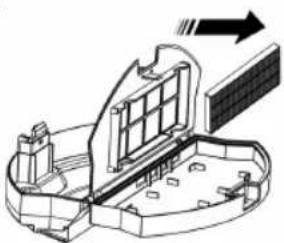 | |
G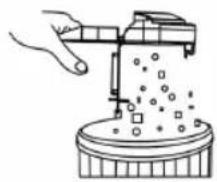 | H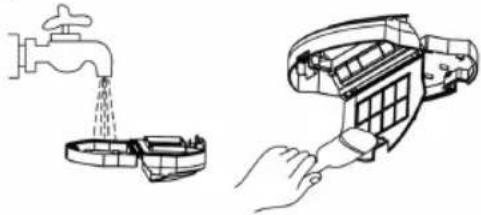 | I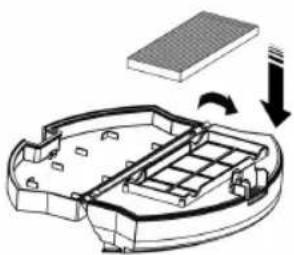 | |
J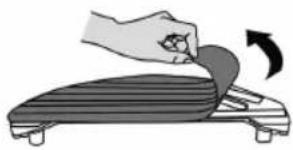 | K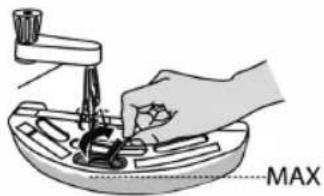 | L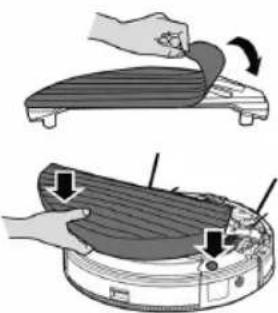 | |
WICHTIG:
www.pro care-germany.de / service
Aufbewahrung
www. proficare-germany.de / service
natural_image
Technical line drawing of a mechanical component with labeled parts (a), no readable text or symbols present.
text_image
bBe sure to read the separately enclosed safety instructions first.
Instruction Manual
Thank you for choosing our product. We hope you will enjoy using the appliance.
Read the instruction manual and the separately enclosed safety instructions very carefully before using this appliance. Keep these documents, including the warranty certificate, receipt and, if possible, the box with the inner packaging in a safe place. If you pass the appliance on to a third party, always include all the relevant documents.
Symbols in this Instruction Manual
Important information for your safety is specially marked. It is essential to comply with these instructions in order to avoid accidents and prevent damage to the appliance:

WARNING:
This warns you of dangers to your health and indicates possible injury risks.

CAUTION:
This refers to possible hazards to the appliance or other objects.
Content
Overview of the Components....3
Clean Dust Container and
Floor Brush / Fill Water Tank....4
Unpacking the Appliance....14
Overview of the Components / Scope of Delivery......14
Warnings for the Use of the Appliance ....15
Handling Batteries....15
Notes for Use....15
Before Using the Appliance 16
Putting Into Operation....16
Insert the Batteries in the Remote Control ....16
Setting the Weekday and the Time....16
Setting Up the Charging Station 16
Charging the Rechargeable Battery ....16
Information About the App
"Smart Life - Smart Living"......17
Information on Operating with the App ....17
System Requirements for Using the App ....17
Putting Into Operation with the App....17
Deactivate WLAN in the Appliance and
Disconnect WLAN Connection ....17
Operation....17
Switching the Appliance On/Off 17
Buttons on the Remote Control 17
Set Scheduled Cleaning .... 18
Buttons on the Appliance 18
Using the Appliance 18
Using the Appliance with the Wiping Function .....19
Ending Operation 19
Maintenance and Cleaning 19
Emptying the Dust Container and Cleaning the Filters .19
Cleaning / Changing the Side Brushes....20
Cleaning the Floor Brush 20
Cleaning the Cleaning Fleece....20
Replacement Parts 20
Storage....20
Troubleshooting....20
Technical Data....20
Product Specifications in Accordance with
Regulation (EU) 2019 / 1782 Power Supplies ......21
Notice of Directive Conformity....21
Disposal 21
Rechargeable Battery Disposal / Battery Disposal .....21
Meaning of the "Dustbin" Symbol ....21
Unpacking the Appliance
- Remove the appliance from its packaging.
- Remove all packaging material, such as foils, filling material, cable ties and cardboard packaging.
- Check the scope of delivery for completeness.
- If the contents of the packaging are incomplete or if damage can be detected, do not operate the appliance. Return it to the dealer immediately.
Overview of the Components / Scope of Delivery
Top Side (Illustration A)
1 Button ⏻
2 Button
3 Mechanical start-up sensor
4 Air outlet
5 Dust container compartment
6 Dust bin release
Charging Station (Illustration B)
7 Power supply unit
8 Mains indicator light
9 Charging contacts
Bottom Side (Illustration C)
10 Stair detection sensor
11 Side brush
12 Contact surface for charging via the charging station
13 Front wheel
14 Stair detection sensor
15 Contact surface for charging via the charging station
16 Side brush
17 Stair detection sensor
18 Battery compartment cover
19 Drive wheel
20 Air intake duct / rotating floor brush
21 Locks for the floor brush cover
22 Rubber lip
23 Drive wheel
Remote Control (Illustration D)
1 Display
2 Button
3 Button ▶II
4 Button
5 Button
6 Button
7 Direction buttons ▲,▶,▼◀
8 Button
Without Illustration
Filter insert with HEPA filter and socket
Water tank with cleaning fleece
Spare HEPA filter (1 ×)
Replacement side brush (2 ×)
Replacement cleaning fleece (1 ×)
Warnings for the Use of the Appliance

Read the instructions!

Only use with "SA12BH-190060V" power supply unit! For the purpose of recharging the battery, only use the detachable supply unit provided with this appliance.

Do not use power supply with damaged plug! If the pins of the plug part are damaged, the plug-in power supply shall be scrapped.

CAUTION:
- Do not charge the rechargeable battery unattended.
- Place the charging station so that the appliance is not exposed to direct sunlight or other sources of heat.
• Do not suck up moisture or liquids! - Do not use the wipe function if you want to operate the appliance by schedule. As soon as the water tank is installed, the water starts to drip out. This could cause damage to parquet and laminate flooring!
- In addition, always charge the rechargeable battery without the water tank to avoid the risk of electric shock.
- Lay the cable from the power supply unit so that no one can trip over it.
Handling Batteries

Do not charge batteries!

Do not disassemble batteries!

Do not short-circuit batteries!

Keep away from children!

Observe polarity (+ / -)!

Danger of explosion!
Do not expose batteries to intense heat, such as sunshine, fire or similar.
- Batteries can leak battery acid. If the remote control will not be used for a longer period of time, remove the batteries.
- If a battery leaks, do not rub the liquid into the eyes or mucous membranes. In case of contact, wash hands, rinse eyes with clean water. Seek medical attention if any discomfort persists.
- Different battery types and new and used batteries must not be used together.
- Batteries are not to be disposed of together with domestic wastes. Return used batteries to the responsible collection points or to the dealer.
Notes for Use
- The appliance is operated using the rechargeable battery. Charging is done via the supplied charging station with power supply unit.
- The appliance sucks up loose dirt through the nozzle. For more efficient cleaning, the appliance has a rotating brush and a rubber lip.
- Do not use the appliance to vacuum up construction debris.
- Dirty filters reduce the suction power of the appliance, so we recommend cleaning the dust container and filters after each use.
- If the appliance runs into a wall or other obstacles, it changes its driving direction.
- Do not change the conditions of the room while the appliance is working. For example, if you close a door through which the appliance was previously able to pass unhindered, the appliance will try to enter the other room until you open the door again.
- From a height of approx. 90 mm, the appliance also cleans underneath pieces of furniture. If the appliance gets stuck under a piece of furniture, the appliance stops operating after a short time. The control lamp in the button ⬇lashes red and a signal tone is heard approximately every 10 seconds.
- If the appliance is lifted during operation, two beeps are heard after a few seconds. The appliance then switches
to sleep mode. If you continue to hold the appliance in your hand, the appliance will beep again at regular intervals. When you place the appliance back on the floor, you will hear a beep.
- Due to the design, cleaning carpets and driving over edges is only possible to a limited extent. Short pile carpets with low edges can be driven over. For long-pile carpets, please use a conventional 230 V floor hoover.
- The sensors on the underside of the appliance detect steps or other depressions so that the appliance cannot fall down.

CAUTION:
Before each use, make sure that the sensors are clean, otherwise the appliance may fall.
Nevertheless, depending on the nature of the stair tread (colouring, construction, etc.), the sensors may not be able to detect the landing. Do not leave the appliance unattended, especially near the stairs.
Before Using the Appliance
- Clear the floor of any objects lying around that could obstruct the side brushes or get caught in the nozzle or stop the appliance from cleaning.
- Remove all objects that could be knocked over (e.g. vases, small lamps, decorative items, etc.).
- Make sure that no cables, cords or fringes, e. g. from curtains, tablecloths or carpets, are accessible to the appliance. If necessary, fold the edges of carpets with fringes under the carpet. The appliance could otherwise get caught in them.
Putting Into Operation
Insert the Batteries in the Remote Control
(Batteries are not included in the scope of delivery)
- Open the battery compartment cover on the back of the remote control.
- Insert 2 AAA / R03 1.5 V batteries. Make sure the polarity is correct (see battery compartment bottom)!
- Close the battery compartment cover.
- The display of the remote control shows the weekday (SUN), the time (0:00) and the symbol for the suction power (∞).
Setting the Weekday and the Time
To set the weekday and the time in the remote control, proceed as follows:
- Press the Ⓤ button. The clock symbol appears in the display and the weekday starts flashing.
- Select the current weekday with the ▶/ buttons.
$$ \mathrm{SUN} = \text { Sunday THU } = \text { Thursday } $$
$$ \text { MON } = \text { Monday FRI } = \text { Friday } $$
$$ T U E = T u e s d a y $$
$$ \mathrm{SAT} = \text { S a t u r d a y } $$
$$ W E D = W e d n e s d a y $$
- Confirm your selection with the ▶II button. The selection changes to the hour entry.
- Now set the hour with the ▲ buttons and then change to the minute input with the ▶ button.
- Also set the minutes with the ▲buttons.
- Confirm your entry with the button.
If you do not press any button within approx. 14 seconds, the setting will be discarded.
Setting Up the Charging Station
- Place the charging station on a wall. Make sure that there is a power socket nearby.
- Place the cable from the power supply unit so that the appliance cannot get caught in it.
- Make sure that there are no objects 2 m in front of and 1 m to the right and left of the charging station. These could obstruct the appliance when searching for the charging station.
- Plug the connector from the power supply unit into the socket on the charging station.
- Plug the power supply unit into a properly installed earthed socket. The control lamp of the charging station lights up.
Charging the Rechargeable Battery
Before you can use the appliance, you must first charge the built-in rechargeable battery. Always charge the appliance without the water tank installed.
1) Place the appliance with the charging surfaces on the charging contacts of the charging station. The control lamps in the buttons on the appliance pulsate.
or
2) Press the 📄 button on the remote control or 🌘 on the appliance. The appliance starts searching for the charging station. This may take a little longer the first time. Both control lamps on the appliance flash. As soon as the appliance has docked at the charging station, the control lamps in the buttons on the appliance pulse.
- When the rechargeable battery is fully charged, you will hear a beep and the control lamps in the buttons on the appliance will go out.
- Charge the appliance for at least 12 hours before using it for the first time.
- When the rechargeable battery is exhausted, the appliance automatically starts searching for the charging station. Both control lamps on the appliance flash. As soon as the appliance has docked at the charging station, the control lamps in the buttons on the appliance pulse.
- Even when the unit is switched off, the rechargeable battery is constantly discharging. If you do not use the appliance for a longer period of time, charge the rechargeable battery at least every 4 to 6 weeks.
Information About the App "Smart Life - Smart Living"
The Smart Life - Smart Living app is available for Android and for iOS. Scan the corresponding QR code to go directly to the download.
Depending on the provider, costs may be incurred when downloading the app.


Google Play App Store
Information on Operating with the App
This appliance allows you to operate the appliance via your home network. This requires a permanent WLAN connection with your router and the free "Smart Life - Smart Living" app.
You can conveniently access all the appliance's functions via the app. Since the app is constantly being improved, we cannot give a more detailed description here.
To prevent the appliance from being switched on unintentionally when you are away from home, we recommend switching the appliance off and unplugging the mains plug from the charging station!
System Requirements for Using the App
- Android 6.0 or higher
- iOS 11.0 or higher
Putting Into Operation with the App
- Install the "Smart Life - Smart Living" app. Create a user account.
- Activate the WLAN function in the settings of your appliance.
- Place the Robot Vacuum Cleaner within approx. 5 metres of your router.
- If the appliance is in sleep mode, switch on the appliance by briefly pressing and holding the ⏻ button on the appliance.
- Press and hold the 🎨 button on the Robot Vacuum Cleaner until you hear a beep. The control lamp in the button on the appliance flashes quickly.
- Open the app and select "+".
- Select the "Robot vacuum cleaner" menu and follow the instructions on the display.
- After the appliance has been successfully connected, you can operate it using the app.
Deactivate WLAN in the Appliance and Disconnect WLAN Connection
If you want to disconnect the existing WLAN connection, proceed as follows:
- If the appliance is in sleep mode, switch on the appliance by briefly pressing and holding the ⏻ button on the appliance.
- Press and hold the button on the Robot Vacuum Cleaner until you hear a signal tone. The control lamp in the button on the appliance flashes quickly. The appliance is now removed from the app and the WLAN has been deactivated in the appliance.
If you want to re-establish the WLAN connection, proceed as described in the section "Putting Into Operation with the App".
Operation
Switching the Appliance On/Off
- Switch on the appliance by briefly pressing the ⏻ button on the appliance. A beep is heard and the control lamps in the buttons light up briefly. The control lamp in the button ⬇ when flashes.
- Now press the button ⏻ briefly and the appliance starts to work.
- If you press the button again briefly, the appliance switches back to standby.
- The appliance automatically switches to sleep mode after 60 seconds if no cleaning mode was activated after switching on.
- While the appliance is in standby, press and hold the button ⏻ on the appliance for about 4 seconds to put the appliance into sleep mode. Two beeps are heard. The control lamps are off.
Buttons on the Remote Control
To operate the appliance with the remote control, the appliance must be in sight. Point the remote control at the front of the appliance to ensure optimal transmission of the remote control signals. There are two infrared receivers there. The display shows the selected setting. An acknowledgement tone from the appliance is heard.
• (2)
Press this button repeatedly to select between the following modes. The symbol for the selected mode appears in the display. Then start the selected cleaning mode with the ▶II button.
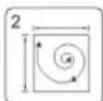
The appliance operates in "Systematic" mode. For optimal cleaning of the room, the appliance uses a gyroscope-controlled navigation system.
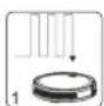
If the conditions of the room allows it, the appliance cleans the room in zigzag mode.
The appliance operates in "Spot" mode. Place the appliance in the area to be cleaned. It moves from the centre of the area in an ever-widening circle.
The appliance operates in "Corner" mode. Place the appliance against a wall. After you activate the appliance, the appliance moves along the walls.

- If, after selecting a cleaning mode, the appliance detects that another mode would achieve a better cleaning effect, the appliance automatically switches to it. - You can end the started cleaning mode at any time with the ▶II button.
• ▶||(3)
Start or stop the appliance from sleep mode. Confirm the entry when setting the time or creating the cleaning schedule.
• (4)
To set the time. See chapter "Putting Into Operation"→ "Setting the Weekday and the Time".
• (5)
When you press this button, the appliance stops operating and searches for the charging station. The two control lamps in the buttons on the appliance flash.
• (Scheduled Cleaning) (6)
CAUTION:
Do not use this function with the mopping function, as the escaping water could damage the floor covering!
With this button, you can set a schedule for the appli- ance. You can set the appliance to switch on at a certain time on selected days. To do this, proceed as follows:
Set Scheduled Cleaning
- Press the 📄 button. SUN or the first previously activated weekday starts flashing on the display.
- Press the ▼ button repeatedly until the weekday you want to set flashes. Confirm your selection with the ▲ button. The next weekday starts flashing.
- Select all the desired weekdays as just described. Then switch to entering the time by pressing the ▶II button. The hour entry starts flashing.
- Now set the hour with the ▲/buttons and then change to the minute input with the ▶ button.
- Also set the minutes with the ▲buttons.
- Confirm your entry with the ▶ button.
-
Now transmit the schedule to the appliance. To do this, the appliance must be in standby (control lamp in the button flashes). Point the remote control at the appliance and press the button. A beep from the appliance confirms the transmission.
-
In order for the appliance to execute the plan, it must be connected to the charging station at the time.
- If you do not press any button within approx. 14 seconds, the setting will be discarded.
- The symbol appears on the display to indicate that a schedule has been set.
- Delete schedule: To reset and delete the set schedule from the appliance, press and hold the button for about 3 seconds while pointing the remote control at the appliance. A beep is heard and the symbol disappears.
• ▲ / ▶ / ▼ (◀)
The appliance moves forward, to the right, backward, to the left.
• ③(8)
Here you can increase the suction power of the appliance. The selected suction power is displayed in the remote control display.
= normal suction power
= increased suction power
- Please note that the increased power results in a shorter battery life. To keep the increased battery consumption as low as possible, the power increase is only approx. 10–15%.
Buttons on the Appliance
• ⏻ (1)
With this button you switch the appliance on and off. See chapter "Operation" "Switching the Appliance On / Off".
The appliance automatically switches to sleep mode after 60 seconds if no cleaning mode has been activated after switching on.
• ♀ (2)
When you press this button, the appliance stops operating and searches for the charging station. The two control lamps in the buttons on the appliance flash.
Using the Appliance
WARNING:
- While the appliance is in operation, pay special attention to the safety of babies, small children and the elderly. Make sure that no one trips over the appliance.
- Do not touch the wheels or side brushes with your hands while the appliance is in operation.
CAUTION:
- Do not leave the appliance switched on unattended so that you can intervene if it is obstructed by furniture / objects.

CAUTION:
- If something gets stuck in the nozzle during operation and obstructs the appliance, switch off the appliance immediately and remove the obstruction.
- Before each use, make sure that the dust container and filters are inserted and empty or cleaned.
- Briefly press and hold the ⏻ button on the appliance to switch it on.
- Press the ▶ button. If the room conditions allows it, the appliance cleans the room in zigzag mode.
- If necessary, select another cleaning mode.
- The appliance cleans the floor until it has completely cleaned the room or the battery capacity has dropped to about 15 %. The appliance then automatically returns to the charging station.
- If you press the Ⓞ button, the appliance stops operating and searches for the charging station, even if there is still enough battery charge.
Using the Appliance with the Wiping Function
Before using the appliance as described previously, mount the water tank with the attached cleaning fleece. See also illustrations J to K on page 4.
- If necessary, remove the cleaning fleece to be able to open the water tank cap.
- Open the rubber cover of the water tank and fill the water tank. If necessary, add some cleaning agent to the water.
- Attach the cleaning fleece to the water tank and place the water tank on the underside of the appliance.
- Important! Start the operation of the appliance immediately to avoid damage to the floor covering by the dripping water!
The condition of the floor covering is decisive for the wiping result.
Ending Operation
- Stop the appliance by pressing the ▶II button.
- Switch off the appliance by pressing and holding the ⏻ button for approx. 4 seconds.
- Remove the water tank and pull off the cleaning fleece. Empty the dust container and clean the filters and sensors as well as the cleaning fleece as described under "Maintenance and Cleaning".
Maintenance and Cleaning

WARNING:
• Always switch off the appliance before maintenance or cleaning!
- Never immerse the appliance in water for cleaning. It could cause an electric shock or fire.

CAUTION:
- Do not use a wire brush or other abrasive objects.
- Do not use harsh or abrasive cleaners.
Do not attempt to lubricate the rollers with grease or oil. This would cause dust or dirt to stick to the rollers more.
- Clean the housing with a soft, dry cloth without any additives.
- Clean the sensors (10 / 14 / 17) carefully with a dry soft cloth.

CAUTION:
Check that the sensors are clean after and before each use. Otherwise the appliance could fall down a staircase.
• After and before each use, make sure the nozzle and air vents are clear.
- For a good performance of the appliance, empty the dust container and clean the filters after each use.
Emptying the Dust Container and Cleaning the Filters

CAUTION:
Never wash the filters.
Also refer to illustrations D to I on page 4.
- Remove the water tank, if still attached.
- Reach into the recess and press the lock. Now you can pull the dust container out of the appliance. (Illustration D)
- Fold the dust container apart and lift the cover for the HEPA filter. (Illustration E)
- Pull the HEPA filter out of the dust container. (Illustration F)
- Clean the HEPA filter and the socket by gently tapping them out.
We recommend replacing the HEPA filter once a year.

CAUTION:
Do not use a brush to clean the HEPA filter. Using a brush could damage the filter material.
- Empty the dust container over a dustbin. (Illustration G)
- You can clean the dust container under running water. Clean the frame with a soft brush. (Illustration H)

CAUTION:
- Allow the dust container to air dry. However, do not place it in the sunshine.
-
Only reinsert the filters in the dust container when they are completely dry!
-
Put the filters back into the dust container. Make sure that both the socket and the HEPA filter are inserted correctly. (Illustration I)
- Put the dust container back into the appliance. It should lock into place with a "click".
Cleaning / Changing the Side Brushes
If the side brushes are dirty, you can clean them with clear water. Do not use any additional cleaning agents.
If the side brushes are used up or defective, replace them with new ones.
- Turn the appliance around.
- You can simply pull the side brushes upwards.
- Clean any hair or other dirt from the side brush. When putting the side brushes on, pay attention to the markings (R) and (L). The side brushes must engage with a "click".
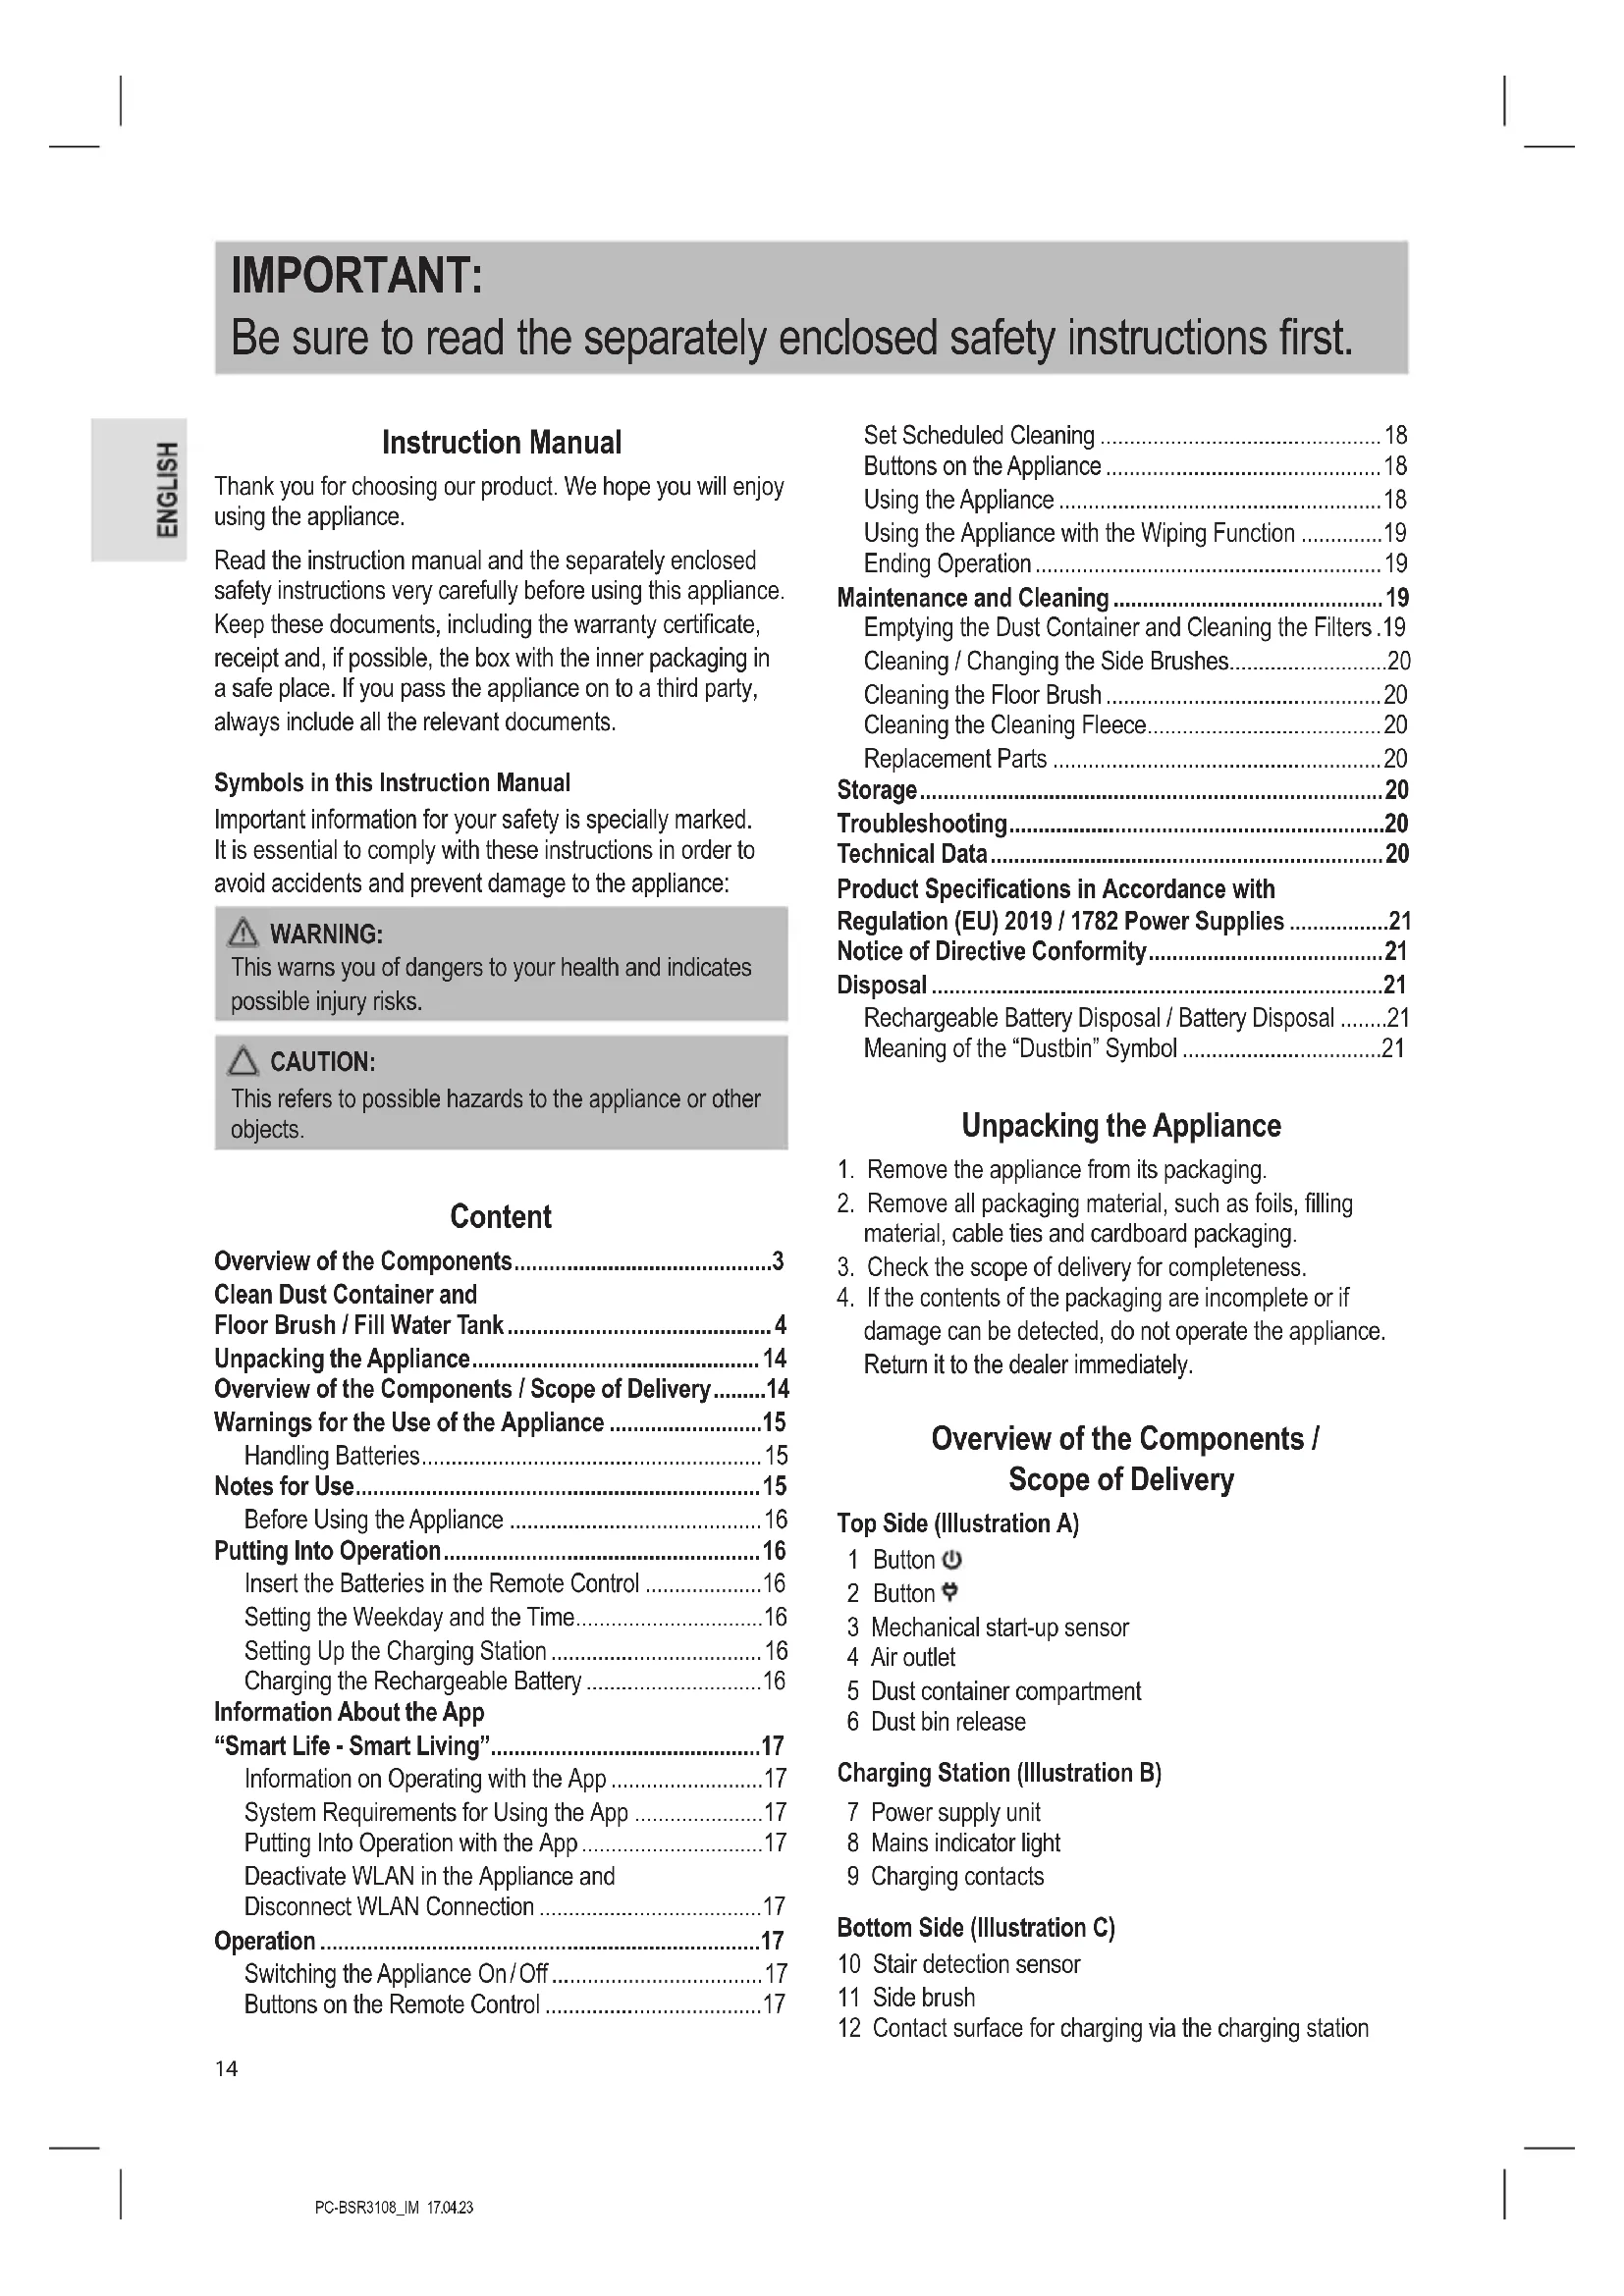
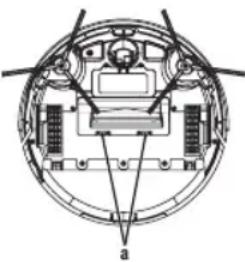
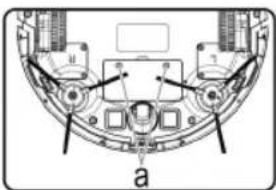
Cleaning the Floor Brush
The floor brush can be removed for easy cleaning.
- Remove the cover by pressing the latches (a) and pulling the cover upwards at the same time.
- Pull the floor brush, on the side with the rubber bearing, upwards out of the appliance.
- Make sure that the attached rubber bearing is not lost in the process.
natural_image
Technical diagram of a circular mechanical or electrical component with internal components and no visible text or symbols- Clean any hair or other dirt from the floor brush.
- Put the floor brush back into the appliance.
- Insert the side with the square nose first.
- Put the cover back on. It should click into place.
Cleaning the Cleaning Fleece
After you have removed the cleaning fleece from the water tank, you can wash it at 30 °C with a little detergent. Dry the cleaning fleece hanging on the clothesline. Do not bleach or iron!
30 Wash at or below 30 °C Do not iron
Hang to dry
Do not bleach
After the cleaning fleece has dried, you can attach it to the water tank again.
Replacement Parts
For replacement parts, please consult your dealer.
Storage
-
Clean the appliance as described and let it dry completely.
• We recommend that you store the appliance in its original packaging if you do not intend to use it for a long period of time.
• Always store the appliance out of the reach of children in a well-ventilated and dry place. -
The storage temperature should be between 10 °C and 20 °C.
- Rechargeable battery life: Even when switched off, the rechargeable battery is constantly discharging. If you do not use the appliance for a long time, recharge the rechargeable battery at least every 4 to 6 weeks.
Troubleshooting
| Problem Possible | Cause Remedy | |
| The appliance has no function. | The rechargeable battery is empty. | Recharge the rechargeable battery. |
| The rechargeable battery is defective. | Contact our service department or your dealer. | |
| Weak suction power. | The rechargeable battery is almost empty. | Recharge the rechargeable battery. |
| The dust container is full. | Empty the dust container. | |
| The filters are dirty. | Clean the filters. | |
| The nozzle is clogged. | Clean the nozzle. | |
| The rotating floor brush is blocked. | Clean the floor brush. | |
| The appliance stops operating. | The rechargeable battery is empty. | Charge the rechargeable battery. |
| The rechargeable battery does not hold a charge. | The rechargeable battery has reached the end of its life. | Contact our service department or your dealer. |
Technical Data
Model: PC-BSR 3108
Net weight: .... approx. 2.8 kg
Protection class:....III
Power Supply Unit
Protection class:......II
Input: AC 100–240V, 50/60Hz, 0.4A
Output: DC 19 V, 600 mA
Polarity:
Rechargeable battery: 14.4 V, 2600 mAh Li-Ion
Running time:....approx. 2 hours
Charging time:......approx. 6 hours
WLAN
Supported network: 802.11b/g/n
Maximum radio-frequency power transmitted: 100 mW
Frequency range: 2.4 GHz
Channels:....1-13
Supported Wi-Fi protected access: ....WPA/WPA2
The right to make technical and design modifications in the course of continuous product development remains reserved.
Product Specifications in Accordance with Regulation (EU) 2019 / 1782 Power Supplies
| Information about the Power Supply Used | Value Unit | |
| DistributorClatronic International GmbHCommercial register number HRB 9158Industriering Ost 40, 47906 KempenGermany | ||
| Model identifier | SA12BH-190060V | |
| Input voltage 100–240V~ | ||
| Input alternating current frequency 50/60 Hz | ||
| Output voltage AC/DC 19.0 V DC | ||
| Output current 0.6 A | ||
| Output power 11.4 W | ||
| Average efficiency in operation 83.95 % | ||
| Low load efficiency (10 %) | 70.99 % | |
| No-load power consumption 0.075 W | ||
The relevant load conditions are as follows: Percentage of nameplate output current
| Load condition 1 100% ± 2% | |
| Load condition 2 75% ± 2% | |
| Load condition 3 50% ± 2% | |
| Load condition 4 25% ± 2% | |
| Load condition 5 10% ± 1% | |
| Load condition 6 0% (no-load con- dition) |
Notice of Directive Conformity
Hereby, Clatronic International GmbH declares that the radio equipment type PC-BSR 3108 is in compliance with Directive 2014/53/EU.
Furthermore, the appliance is in compliance with the requirements of the RoHS directive 2011 / 65 / EC & (EU) 2015/863.
The full text of the EU declaration of conformity is available at the following internet address:
www.proficare-germany.de/service
In the "Download" area, please enter the model name PC-BSR 3108.
Tested for operation in Great Britain.
Disposal
Rechargeable Battery Disposal / Battery Disposal
The appliance contains a rechargeable battery. Used batteries / accumulators do not belong in household waste.
The rechargeable battery must be removed before disposing of the product:

CAUTION:
Batteries / rechargeable batteries must not be disposed of with household waste!
natural_image
Technical diagram of a mechanical assembly with labeled components (no readable text or symbols)
text_image
b- Remove the two screws on the battery cover (a).
- Remove the rechargeable battery pack and disconnect the connector (b).
- Remove the battery pack(s) from the remote control before disposing of the appliance.
Information on where to dispose of batteries / rechargeable batteries can be obtained from your local authorities or local councils.
Meaning of the "Dustbin" Symbol
Protect our environment: do not dispose of electrical equipment in the domestic waste.
Please return any electrical equipment that you will no longer use to the collection points provided for their disposal.
This helps avoid the potential effects of incorrect disposal on the environment and human health.
This will contribute to the recycling and other forms of re-utilisation of electrical and electronic equipment.
Information concerning where the equipment can be disposed of can be obtained from your local authority. Your dealer and contractual partner is also obliged to take back the old appliance free of charge.
BELANGRIJK:
Reserve HEPA-filter (1 ×)
$$ W E D = W o e n s d a g $$
natural_image
Technical diagram of a circular mechanical or electrical component with internal components and no visible text or symbolsnatural_image
Technical diagram of a mechanical component with labeled parts (a, b, c) and no readable text or symbols beyond labels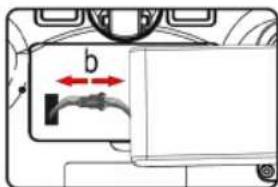
text_image
b$$ T U E = M a r d i S A T = S a m e d i $$
$$ W E D = \text { Mercredi } $$
natural_image
Technical diagram of a circular mechanical or electrical component with internal components and labeled point 'a' (no text or symbols beyond label)| Condition de charge 1 100% ± 2% | |
| Condition de charge 2 75% ± 2% | |
| Condition de charge 3 50% ± 2% | |
| Condition de charge 4 25% ± 2% | |
| Condition de charge 5 10% ± 1% | |
| Condition de charge 6 | 0% (condition sans charge) |
www. proficare-germany.de / service
natural_image
Technical diagram of a mechanical assembly with labeled components (no readable text or symbols)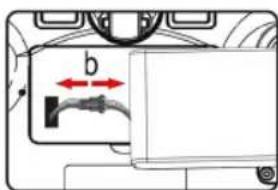
text_image
bnatural_image
Technical diagram of a circular mechanical or electrical component with internal components and no visible text or symbolswww. proficare-germany.de / service
natural_image
Technical diagram of a mechanical assembly with labeled components (no readable text or symbols)
text_image
bnatural_image
Technical diagram of a circular mechanical or electrical component with internal components and no visible text or symbolsSupporto Wi-Fi protected access: ....WPA/WPA2
www. proficare-germany.de / service
natural_image
Technical diagram of a mechanical or electronic component with labeled parts (a, b, c) and no readable text or symbols.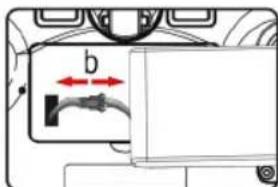
text_image
b$$ W E D = \text { Sroda } $$
natural_image
Technical diagram of a circular mechanical or architectural component with internal structural elements (no text or symbols)CTC Clatronic Sp. z o.o
Ul. Brzeska 1
45-960 Opole
Usuwanie
natural_image
Technical diagram of a mechanical or electrical component with labeled parts (a, b, c) and no readable text or symbols.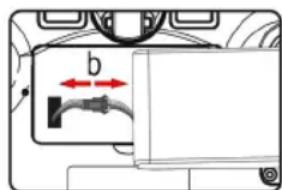
text_image
b$$ T U E = K e d d S A T = S z o m b a t $$
$$ W E D = S z e r d a $$
natural_image
Technical diagram of a circular mechanical or electrical component with internal components and labeled section 'a' (no text or symbols beyond label)natural_image
Technical diagram of a mechanical or electronic component with labeled parts (a), showing internal components and connections without any readable text or symbols.
text_image
bnatural_image
Technical diagram of a circular mechanical or electrical component with internal components and no visible text or symbolsnatural_image
Technical diagram of a mechanical assembly with labeled components (no readable text or symbols)