PCBSR 3043 - Robot vacuum ProfiCare - Free user manual and instructions
Find the device manual for free PCBSR 3043 ProfiCare in PDF.
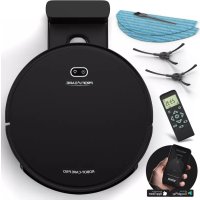
| Product type | Robot vacuum |
| Brand | ProfiCare |
| Model | PCBSR 3043 |
| Net weight | 2.24 kg |
| Power supply | AC adapter 100-240 V, 50/60 Hz, 0.5 A MAX, DC output 19 V, 600 mA |
| Battery | Li-ion 14.8 V, 2600 mAh |
| Runtime | Approx. 1.5 hours |
| Charging time | Approx. 4.5 hours |
| Cleaning modes | Auto, Spot, Corner, Full Go, Scheduler |
| Control | Remote control (AAA batteries not included), Smart Life app (Wi-Fi 2.4 GHz) |
| Navigation system | Gyroscopic, zigzag movement |
| Sensors | Stair detectors (3), bumper |
| Filtration | HEPA filter (dry washable) |
| Dust bin capacity | Not specified (estimated 300-500 ml) |
| Brushes | 2 side brushes, 1 rotating floor brush with rubber squeegee |
| Charging station | Included, with charging contacts |
| Automatic return to base | Yes, when battery low or via HOME button |
| Minimum clearance under furniture | 80 mm |
| Maintenance | Emptying the bin, cleaning filters (do not wash), cleaning brushes and sensors |
| Safety | Automatic shut-off in case of jamming, stair detection, impact protection |
| Included accessories | Charging station, adapter, remote control, spare HEPA filter, spare side brushes (2), cleaning tool |
Frequently Asked Questions - PCBSR 3043 ProfiCare
User questions about PCBSR 3043 ProfiCare
0 question about this device. Answer the ones you know or ask your own.
Ask a new question about this device
Download the instructions for your Robot vacuum in PDF format for free! Find your manual PCBSR 3043 - ProfiCare and take your electronic device back in hand. On this page are published all the documents necessary for the use of your device. PCBSR 3043 by ProfiCare.
USER MANUAL PCBSR 3043 ProfiCare
natural_image
Technical diagram of a circular mechanical or electrical component with internal components and labeled point 'a' (no text or symbols beyond label)
HINWEIS:
Reserve HEPA-filter (1 ×)
Reserve-zijborstel (2×)
Reinigingsinstrument
natural_image
Technical diagram of a circular mechanical or electrical component with internal components and labeled point 'a' (no text or symbols beyond label)
OPMERKING:
Batteries au lithium-ion rechargeables (Li-ion)....24
Configurer la station de charge....26
Batteries au lithium-ion rechargeables (Li-ion)
Station de charge (Figure B)
natural_image
Technical diagram of a circular mechanical or architectural component with internal structural elements (no text or symbols)
NOTE:
natural_image
Technical diagram of a circular mechanical or electrical component with internal components and labeled point 'a' (no text or symbols beyond label)
NOTA:
natural_image
Technical diagram of a circular mechanical or electrical component with internal components and labeled point 'a' (no text or symbols beyond label)Dati tecnici
Modello: PC-BSR 3043
Peso netto:......ca. 2,24 kg
Adattatore
Chiavi Wi-Fi supportate:......WPA/WPA2
Thank you for choosing our product. We hope you enjoy using the appliance.
Symbols in this Instruction Manual
Important information for your safety is specially marked. It is essential to comply with these instructions in order to avoid accidents and prevent damage to the appliance:

WARNING:
This warns you of dangers to your health and indicates possible injury risks.

CAUTION:
This refers to possible hazards to the appliance or other objects.

NOTE:
This highlights tips and information.
Contents
Overview of the Components....3
General Notes......50
Special Safety Instructions for this Appliance....50
Rechargeable Lithium-Ion Batteries (Li-Ion) ....51
Safe Handling of Rechargeable Lithium-Ion Batteries ... 51
Extending the Life of the Rechargeable Li-Ion Battery...51
Unpacking the Appliance....52
Overview of the Components/Scope of Delivery....52
Notes for Use....52
Before Using the Appliance 53
Putting into Service 53
Inserting Batteries into the Remote Control....53
Setting up the Charging Station....53
Charging the Battery 53
Information on the App "Smart Life - Smart Living" ....54
Information on How to Use the App....54
System Requirement for Use of the App ....54
Commissioning via the App 54
Operation 54
Switching the Appliance On/Off 54
Buttons on the Remote Control ....54
Buttons on the Appliance 55
Using the Appliance ....55
Stopping Operation 55
Maintenance and Cleaning 55
Emptying the Dust Container and Cleaning the Filter ...56
Cleaning/Replacing the Side Brushes....56
Cleaning the Floor Brush 56
Storage....57
Troubleshooting....57
Technical Data....57
Notice of Directive Conformity....57
Disposal 57
Accumulator/Battery Disposal....57
Meaning of the "Dustbin" Symbol ....58
General Notes
Read the operating instructions carefully before putting the appliance into operation and keep the instructions including the warranty, the receipt and, if possible, the box with the internal packing. If you give this appliance to other people, please also pass on the operating instructions.
- The appliance is designed exclusively for private use and for the envisaged purpose. This appliance is not fit for
commercial use. • The power adapter is only suitable for use in dry rooms.
- Check if the output current, voltage and the polarity of the power adapter match the information on the connected appliance!
- Do not touch the connected power adapter with wet hands!
- If necessary, disconnect the appliance from the power adapter.
- Ensure that the cable of the power adapter does not become kinked, jammed, driven over or come into contact with heat sources.
- Do not use a damaged power adapter.
- Do not repair the appliance yourself, but visit an authorized specialist.
- The appliance and the mains lead have to be checked regularly for signs of damage. If damage is found the appliance must not be used.
- Use only original spare parts.
- In order to ensure your children's safety, please keep all packaging (plastic bags, boxes, polystyrene etc.) out of their reach.

WARNING:
Do not allow small children to play with the foil. There is a danger of suffocation!
Special Safety Instructions for this Appliance
- This appliance can be used by children aged from 8 years and above and persons with reduced physical, sensory or mental capabilities or lack of experience and knowledge if they have been
given supervision or instruction concerning use of the appliance in a safe way and understand the hazards involved.
• Children shall not play with the appliance.
- Cleaning and user maintenance shall not be made by children without supervision.
- The appliance is intended for use with safety extra-low voltage. Connect only to a power supply according to the specifications on the rating label.
- If the connection cable of this appliance has been damaged, it must be replaced with a special connection cable available from the manufacturer or its customer service.
- Do not use any power adapter other than the one supplied.
- Do not suck up hot ashes or pointed or sharp objects!
- Do not suck up liquids!
- Do not use the appliance in damp rooms!
- Never vacuum-clean without the dust container and filter in place.
Rechargeable Lithium-Ion Batteries (Li-Ion)
The appliance is equipped with rechargeable Li-ion batteries. This results in numerous advantages compared to other batteries and accumulators:
• A high cell voltage (more volts)
- No memory effect
- A low self-discharge
Safe Handling of Rechargeable Lithium-Ion Batteries
In general, Li-ion batteries are considered safe. Nevertheless, hazards may result from mechanical damage, electrical faults and thermal effects.
Mechanical damage may result in the leakage of gaseous or liquid substances that can be highly irritating, flammable or even toxic.
An electrical fault, such as a short circuit, may lead to overheating and cause a fire.
Even the heating of the outer shell of a Li-ion battery, e. g. due to sunlight or a heating element, may lead to fire or an explosion.
However, Li-ion batteries are safe when handled properly. Only if used or stored improperly they may become dangerous. Therefore:
- Avoid temperatures above 40^ and below 0^ .
- Do not drop the appliance or the rechargeable battery.
- In case the Li-lon battery has been dropped and is now damaged, stop using it.
- When storing or disposing of the appliance, mask the terminals to prevent short circuits.
- Dispose of old accumulators properly in collecting containers at the trader or at municipal collection points.
Extending the Life of the Rechargeable Li-Ion Battery
For Li-ion batteries, even more than with other accumulators, their life can be extended by treating them properly. The following simple rules for charging and storing help you keeping the capacity of the battery:
- Temperature: The ideal temperature for these batteries ranges from 10 - 25 °C. Temperatures above may lead to premature aging.
- Charging and discharging: During charging cycles, both full charge and deep discharge should be avoided. When the charging process of the battery is completed, you should disconnect the charger immediately. A charge up to 90 % is considered best.
Conversely, it is also preserving the battery more when it is not discharged to 0 %. If the possibility arises, you
should already recharge the battery when it is reaching a charge state of 30 %.
- Storage: Always store batteries in a dry place and at moderate temperatures between 10 °C and 20 °C. Also consider the effect of self-discharge! When the accumulator is already empty, this effect may lead to a deep discharge resulting in damaging the battery. If you intend to store the battery for an extended period of time, you can counteract this effect. We then recommend charging the battery to approx. 40 % before storage. You should check the state of charge after not more than a month.
Unpacking the Appliance
- Remove the appliance from its packaging.
- Remove all packaging material such as plastic films, filler material, cable ties and cardboard packaging.
- Check the content for any missing parts.
- In the event that the packaging content should be incomplete or if damages are noticeable, do not operate the appliance. Return it to the dealer immediately.
Overview of the Components / Scope of Delivery
Top Side (Figure A)
1 ▷ button
2 Display
3 button
4 Shock absorber
5 Connection socket for power adapter
6 Main switch I/0(on/off)
7 Tab for opening the dust container compartment cover
8 Dust container compartment
Charging Station (Figure B)
9 Power adapter
10 Power indicator
11 Charging contacts
Bottom Side (Figure C)
12 Side brush
13 Contact area for charging via the charging station
14 Front wheel
15 Stairway detection sensor
16 Contact area for charging via the charging station
17 Side brush
18 Stairway detection sensor
19 Battery compartment cover
20 Drive wheel (left)
21 Air intake duct / rotating floor brush
22 Rubber lip
23 Drive wheel (right)
24 Stairway detection sensor
Remote Control (Figure D)
1 button
2 HOME button
3 OK button
4 Button
5 button
6 PLAN button
7 button
8 CLOCK button
9 button
10 Direction buttons ▲,▶, ▼ ◀
11 AUTO button
Not Illustrated
Filter insert with HEPA filter and fitting Spare HEPA filter (1 ×) Spare side brush (2 ×) Cleaning tool
Notes for Use
- The appliance is operated via charged battery. Charge the battery using the power adapter provided. Direct power supply via power adapter is not possible.
- The appliance sucks up loose dirt through the nozzle. For more efficient cleaning, the appliance is equipped with a rotating brush and a rubber lip.
- Do not use the appliance to vacuum building rubble.
- Dirty filters reduce the suction power of the appliance, hence we recommend cleaning the dust container and filters after each use.
- When the appliance hits a wall or other obstacles during operation, it will change its driving direction.
- Do not change the conditions of the room while the appliance is in operation. For example, if you close a door that previously allowed the appliance to move unhindered, it will keep trying to get into the other room until you open the door again.
- The appliance also cleans underneath furniture if they have a ground clearance of at least 80 mm. When the appliance gets stuck under a piece of furniture, a beep will sound, the display will show and the appliance switches itself off.
- When the appliance is lifted up during operation it will emit a sound after a few seconds. The display will then show and the appliance stops operating.
- Due to its design, the cleaning of carpets and the driving over edges is only possible to a limited extent. Short-pile carpets with low edges can be surmounted. For long-pile carpets, please use a conventional 230 V floor vacuum cleaner.
- The sensors at the bottom of the appliance detect steps and other dips, so that it can not drop down.
CAUTION:
Prior to each use, ensure the sensors are clean, or else the appliance may crash.
Depending on the condition of the step (colour scheme, design, etc.), it may happen that the sensors can still not detect the landing. Especially near a stairway, please do not leave the appliance unattended.
Before Using the Appliance
- Clear the floor of any objects lying around that could obstruct the side brushes, get caught in the nozzle or stop the appliance from cleaning.
- Remove any objects that could be knocked over (such as vases, small lamps, decorative items, etc.).
- Make sure that no cables, cords or fringes, e.g. of curtains, table cloths or carpets can be accessed. If necessary, fold the edges with its fringes under the carpet. The appliance may otherwise get entangled in it.
Putting into Service
Inserting Batteries into the Remote Control
(Batteries are not included in the scope of delivery)
- Open the battery compartment cover on the back of the remote control.
- Insert 2 batteries of type R03 "AAA" 1.5 V, observing the correct polarity (see markings on the bottom of the compartment)!
- Close the battery compartment cover.

WARNING:
Do not expose batteries to excessive heat such as sunlight, fire or similar. There is a risk of explosion!

CAUTION:
- Batteries may leak and lose battery acid. Remove the batteries if the remote control is not being used for an extended period of time.
- Different battery types or new and used batteries must not be used together.
- Do not dispose of batteries along with domestic waste. Return used batteries to the relevant collection facilities or your retailer.
Setting up the Charging Station
- Place the charging station close to a wall. Make sure there is a wall outlet nearby.

NOTE:
You may use the adhesive strips supplied to fix the charging station to the floor.
- Make sure there are no objects within 2 meters in front and 1 meter to the right and left of the charging station. These could interfere with the appliance while it is searching for the charging station.
-
Insert the connection of the power supply into the socket of the charging station.
-
Plug the power adapter into a properly installed shock-proof socket. The indicator light of the charging station will light up.
- Route the cable of the power adapter in such a way that the appliance can not get caught in it.
Charging the Battery
Before you can use the appliance, you must first charge the integrated rechargeable battery.
- Place the appliance with the charging surfaces onto the charging contacts of the charging station. The display will then show CHRG.
or - Set the main switch to the I button on the remote control or on the appliance. The appliance will start searching for the charging station. The first time, this may take a little longer. The display will show F. Once the appliance has docked on to the charging station, the message appears in the display.
The progress of the charging process can be identified by the flashing bars. When the rechargeable battery is fully charged, all charging bars in the display will light up. In addition, the message FULL appears in the display.
• After a maximum of 6 hours or as soon as the indicator light stays on permanently, the charging process needs to be stopped.

CAUTION:
- Route the cable of the power adapter in such a way that nobody can trip over it.
- Do not charge the rechargeable battery unsupervised.

NOTE:
- When the capacity of the rechargeable battery is getting low, the appliance will automatically start searching for the charging station. The display will then show the message Find and the last bar of the battery status indicator starts flashing.
- When the appliance does not find the charging station until the rechargeable battery is fully discharged, you will hear several beeps. The display briefly shows the message -LL- and the appliance will switch off by itself.
- Even when switched off, the rechargeable battery discharges continuously. If the appliance is out of use for a longer period of time, charge the rechargeable battery at least once every 4 to 6 weeks.
• Alternatively, you may also charge the appliance by connecting the plug of the power adapter directly to the socket (5).
Information on the App "Smart Life - Smart Living"
The Smart Life - Smart Living App is available for android and iOS. Scan the corresponding QR code to get directly to the download.

NOTE:
Depending on the provider, there may be costs involved in downloading the app.


Google Play App Store
Information on How to Use the App
This appliance allows you to operate the appliance via your home network. A prerequisite is a permanent Wi-Fi connection to your router and the free app "Smart Life - Smart Living".
You can easily access all functions of the appliance via the app. Since the app constantly improved, we can not provide a more detailed description here.
When you are not at home, we recommend to switch off the appliance via the main switch to prevent unintentional switching on!
System Requirement for Use of the App
- iOS 9.0 or higher
- Android 4.1 or higher
Commissioning via the App
- Install the "Smart Life - Smart Living" app. Create a user account.
- Activate the Wi-Fi function in the settings of your appliance.
- Place the robot vacuum cleaner within a radius of approx. 5 meters to your router.
- Press and hold the ▶ button on the robot vacuum cleaner until the symbol in the display starts flashing.
- Launch the app and select "+".
- Select the "Robot vacuum cleaner" menu and follow the instructions on the display.
- Once the appliance has been connected successfully, the symbol lights up in the display. Now you can operate the appliance using the app.
Operation
Switching the Appliance On/Off
- The appliance is switched on when the main switch I/O is set to position I.
- Switch off the appliance by setting the main switch to position Q
Buttons on the Remote Control
To operate the appliance with the remote control, it must be within sight. Point the remote control at the infrared receiver.
•
Switches the appliance into standby mode or into sleep mode.

NOTE:
The appliance will automatically switch into sleep mode when within 45 seconds after switching on no cleaning mode has been activated.
• AUTO
The appliance is operating in "Systematic" mode. For an optimal cleaning procedure of the room, the appliance uses a navigation system that is controlled via a gyroscope. If the room conditions allow for it, the appliance will clean the room in zigzag mode.
• HOME
When you press this button, the appliance will stop operating and start searching for the charging station. The display will show F ind.
• ▲


The appliance moves forward, to the right, backwards and to the left.
• OK
For example, when setting the time manually, you confirm the desired input.
.
The appliance is working in "Corner" mode. Place the appliance close to a wall and activate the mode with the corresponding button.
• D
Turns the "Full Go" mode on or off. When the mode is activated, FULL GO will appear at the top of the display. Once the rechargeable battery is fully charged the appliance starts cleaning automatically.

NOTE:
Make sure the main switch is set to the I position. Otherwise, the appliance will only drive down from the charging station and then switches itself off.
• +
The appliance is operating in "Spot" mode. Place the appliance in the area that is to be cleaned. It then drives from the centre of the area in an ever-growing circle.
- CLOCK
The time will be set automatically once the appliance has been connected to your router and the app. With this button, you will also be able to set the time manually. However, this is only possible if the time is shown in the display. Enter the time with the ▲ Buttons and confirm your entry with the OK button.
• PLAN (Timed Daily Cleaning)
Press the this button to set a timer for the appliance. However, this is only possible if the time is shown in the display. Use the ▲/▼ buttons to enter the time at which the appliance should switch on and confirm your choice by pressing OK.
The appliance will remember the entered timer even when switching off the appliance via the main switch.
.
Here you may increase the suction power of the appliance. This can only be noted by the beeps being emitted from the appliance.
Beeps once = normal suction power
Beeps twice = increased suction power

NOTE:
Please keep in mind that the increase in power results in a shorter running time of the rechargeable battery. In order to keep the increased consumption of the rechargeable battery as low as possible the increase in power will be only around 10 - 15 %.
Buttons on the Appliance
The buttons on the appliance are touch keys. Gently touch the buttons with a finger to execute the function. Whenever a button is pressed, it will be confirmed by a beep sound.

NOTE:
In sleep mode, the buttons appear approximately every 7 seconds next to the display.
To make the buttons being displayed, briefly touch the area where the specific button is located.
The appliance will automatically switch into sleep mode when within 45 seconds after switching on no cleaning mode has been activated.
Using the Appliance

WARNING:
- Pay particular attention to the safety of babies, young children and the elderly while the appliance is in operation. Make sure that no one stumbles over the appliance.
- Do not touch the wheels and side brushes with your hands during operation.

CAUTION:
- Do not leave the appliance switched on unattended, so that you are able to intervene if it is handicapped by furniture/objects.
-
If anything gets stuck in the nozzle and obstructs the appliance during operation, switch it off immediately and remove the obstacle.
-
Prior to each use, ensure that the dust container and filters are in place, empty and cleaned.
- Ensure the main switch is set to position
- Press the button to switch on the appliance.
- Press the AUTO button. If the room conditions allow for it, the appliance will clean the room in zigzag mode.
- If desired, select another cleaning mode.
- The appliance will then clean the floor until it has either completely cleaned the room or the capacity of the rechargeable battery has dropped to around 15 %. The appliance will then automatically return to the charging station.

NOTE:
When pressing the HOME button, even while the rechargeable battery is still sufficiently charged, it will stop operating and start making its way to the charging station.
Stopping Operation
- Stop the appliance by pressing the
button. - Bring the main switch into position appliance.
to switch off the - Empty the dust container and clean the filters and sensors as described under "Maintenance and Cleaning".
Maintenance and Cleaning

WARNING:
- Always switch off the appliance before servicing or cleaning and disconnect it from the power adapter!

WARNING:
- Under no circumstances should you immerse the appliance in water for cleaning purposes. Otherwise this might result in an electric shock or fire.

CAUTION:
- Do not use a wire brush or any abrasive items.
- Do not use any acidic or abrasive detergents.

NOTE:
Do not attempt to lubricate the rollers with lubricants or oil. Ignoring this would cause significantly more dust or dirt to adhere to the rollers.
- Clean the housing with a soft, dry cloth without additives.
- Use a soft cloth to gently clean the sensors (15/18/24).

CAUTION:
Prior to and after each use, check that the sensors are clean. Otherwise, the appliance may tumble down a staircase.
- Prior to and after each use, make sure that the nozzle and vents are clear.
- For optimum performance of the appliance, you should empty the dust container and clean the filters after each use.
Emptying the Dust Container and Cleaning the Filter

CAUTION:
Never wash the filters under any circumstances.
- Open the dust container compartment by using the tab to pull up the cover.
- Reach into the recesses and pull the dust container out of the appliance.
- Fold the cover of the dust container upwards.
- Empty the dust container while holding it over a garbage can.
- Pull the HEPA filter out of the dust container. There is still a fitting for the HEPA filter in the dust container. Gently push it towards the outside. Clean the HEPA filter and its fitting by carefully beating it.
We recommend replacing the HEPA filter once a year.
natural_image
Technical line drawing of a mechanical assembly with no visible text or symbols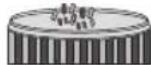

CAUTION:
Do not use a brush to clean the HEPA filter. Using a brush may damage the filter material.
- You can clean the dust container under running water. Use a soft brush to clean the fitting.

CAUTION:
- Allow the dust container to air dry. Do not, however, expose it to direct sunlight.
-
Only re-insert the filters into the dust container once it is completely dry!
-
Reinsert the filters into the dust container. Make sure that both the fitting and the HEPA filter are inserted correctly.
- Put the dust container back into the appliance. It must audibly engage.
Cleaning / Replacing the Side Brushes
If the side brushes are dirty, you may clean them with clean water. Do not use any additional cleaning agents.
If the side brushes are worn or defective, replace them with new ones.
- Turn the appliance upside down. Make sure that the cover of the dust container compartment does not open while performing this step.

NOTE:
The cover is kept closed only by its own weight.
- Use a suitable Phillips screwdriver to unscrew the screw anticlockwise and remove it.
- Pull the side brush upwards.
- Clean the side brush of hair or other debris. Put the side brush back on and use the screw to remount it. Use a screwdriver to tighten the screw by hand.
or
- Now, put the new side brush back on and use the screw to remount it. Use a screwdriver to tighten the screw by hand.
Cleaning the Floor Brush
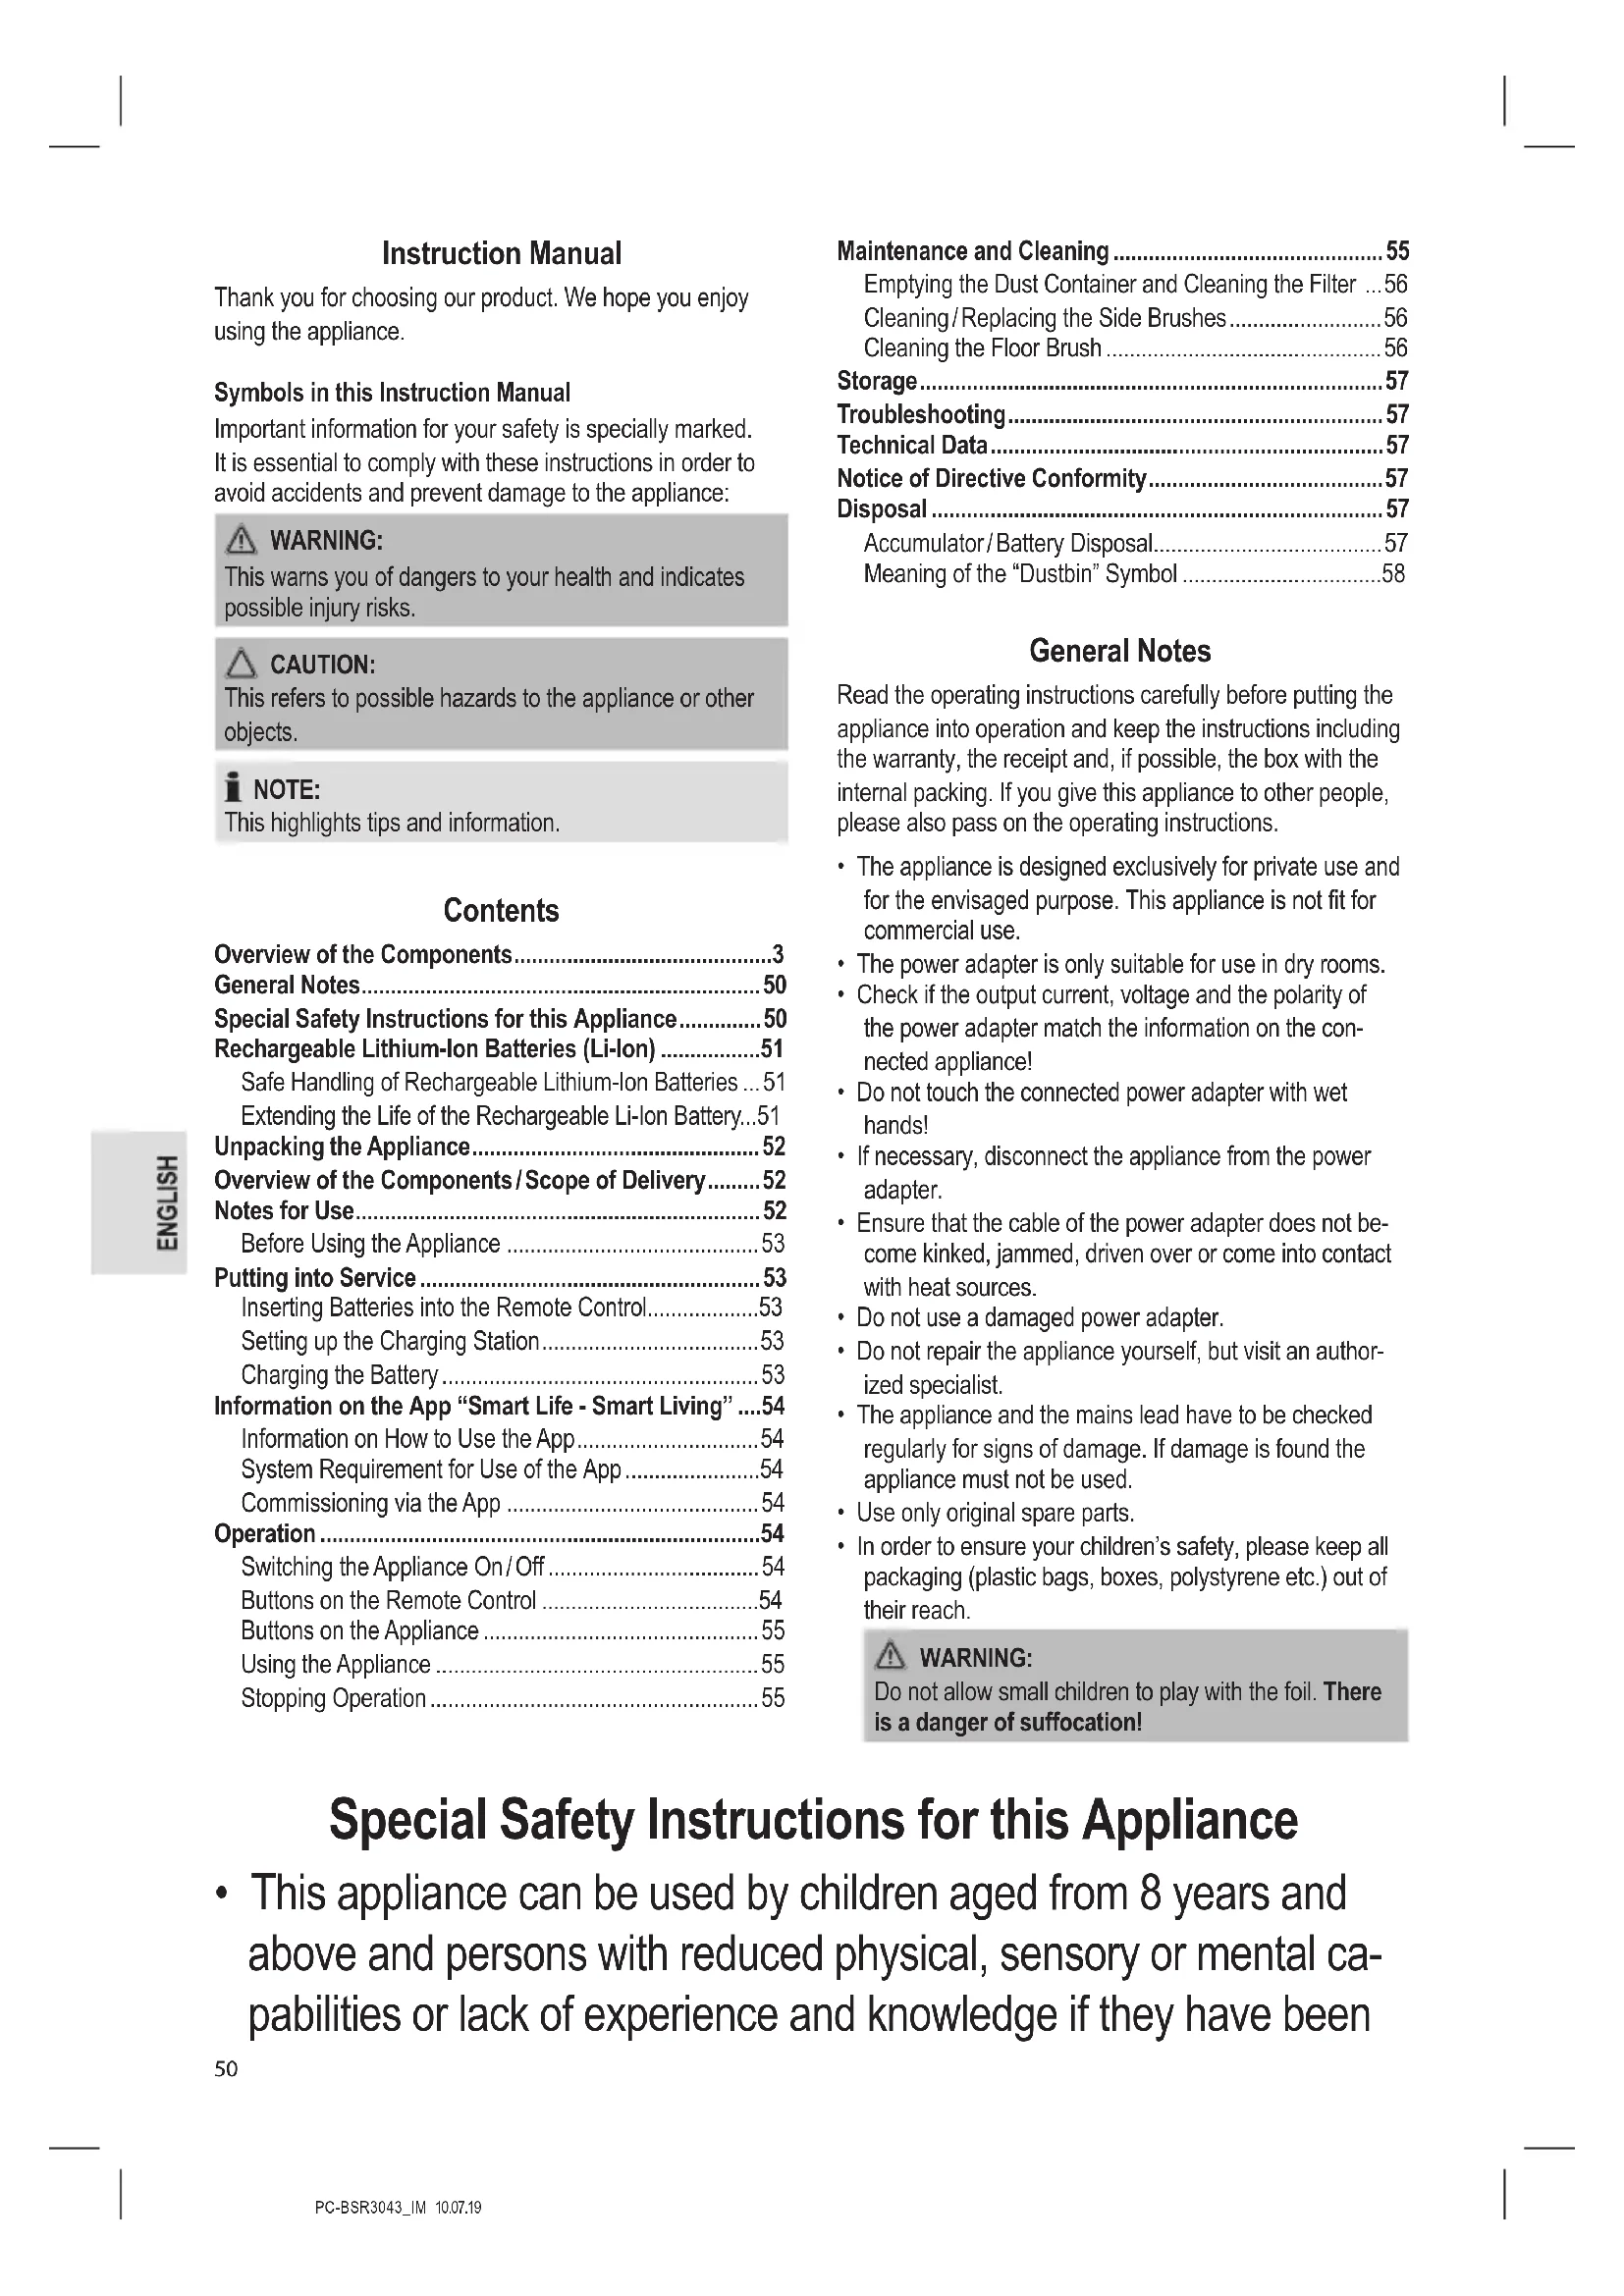
For easy cleaning, the floor brush can be removed.
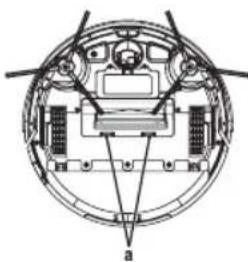
- Remove the cover by pressing the latches (a) and at the same time pulling the cover upwards.
- Pull the floor brush on the side with the rubber mount upwards and out of the appliance.
natural_image
Technical diagram of a circular mechanical or electrical component with internal components and no visible text or symbols
NOTE:
Make sure that the attached rubber mount is not getting lost.
-
Clean the floor brush of hair or other debris.
-
Reinstall the floor brush into the appliance.

NOTE:
The rounded side of the rubber mount must point downwards.
- Replace the cover. It must audibly engage.
Storage
- Clean the appliance as described and allow it to dry.
- We recommend that you keep the appliance in the original packaging if it will not be used for long periods.
• Always store the appliance out of the reach of children in a dry, well ventilated place. - The storage temperature should be between 0 and 40^ .
Troubleshooting
| Problem Possible cause Remedy | ||
| The appliance does not function. The rechargeable | battery is empty. | Charge the battery. |
| The rechargeable battery is defect. | Contact our service or your dealer. | |
| Weak suction power. The battery is nearly discharged. | Charge the battery. | |
| The dust container is full. Empty the dust container. | ||
| The filters are soiled. Clean the filters. | ||
| The nozzle is blocked. Clean the nozzle. | ||
| The appliance will stop operating and the display briefly shows the message -LL-. | The rechargeable battery is empty. | Recharge the battery. |
| The rechargeable battery does not keep the charge. | The rechargeable battery has reached the end of its life. | Contact our service or your dealer. |
| A beep will be emitted, the appliance will stop operating and the message ErO1 will appear in the display. | Dust container not inserted or not inserted correctly. | Insert the dust container or check if the dust container has been inserted correctly. |
Technical Data
Model: PC-BSR 3043
Net weight: .... approx. 2.24 kg
Power adapter
Protection class: II
Input: AC 100-240V, 50/60Hz, 0.5A MAX
Output: DC 19 V, 600 mA
Polarity:
Rechargeable battery: 14.8 V, 2600 mAh Li-Ion
Operating time:......approx. 1.5 hours
Charging time:......approx. 4.5 hours
WLAN
Supported network: 802.11b/g/n
Maximum radio-frequency power transmitted: ....100 mW
Frequency range: 2.4 GHz
Channels: 1 - 13
Supported Wi-Fi keys:......WPA/WPA2
The right to make technical and design modifications in the course of continuous product development remains reserved.
Notice of Directive Conformity
Hereby, Clatronic International GmbH declares that the radio equipment type PC-BSR 3043 is in compliance with Directive 2014/53/EU.
Furthermore, the appliance is in compliance with the requirements of the RoHS directive 2011/65/EC & (EU) 2015/863.
The full text of the EU declaration of conformity is available at the following internet address: www.sli24.de
In the "Download" area, please enter the model name PC-BSR 3043.
Tested for operation in Great Britain.
Disposal
Accumulator/Battery Disposal
The appliance contains a rechargeable battery. Used batteries/accumulators (rechargeable batteries) do not belong in household waste.
The battery must be removed before the product is recycled:
- Ensure the appliance has been switched off via the main switch (O).
- Remove the two screws on the battery compartment cover.
- Remove the rechargeable battery pack and disconnect the plug connection.
Information, where batteries / accumulators are to be disposed of can be obtained from your local or municipal authorities.
Meaning of the "Dustbin" Symbol
Protect our environment: do not dispose of electrical equipment in the domestic waste.
Please return any electrical equipment that you will no longer use to the collection points provided for their disposal.
This helps avoid the potential effects of incorrect disposal on the environment and human health.
This will contribute to the recycling and other forms of re-utilisation of electrical and electronic equipment.
Information concerning where the equipment can be disposed of can be obtained from your local authority.
Instrukcja obsługi
Akumulatory litowo-jonowe (Li-Ion)....60
natural_image
Technical diagram of a circular mechanical or electrical component with internal components and no visible text or symbols
WSKAZÓWKA:
CTC Clatronic Sp. z o.o
Ul. Brzeska 1
45-960 Opole
Usuwanie
natural_image
Technical diagram of a circular mechanical or electrical component with internal components and labeled point 'a' (no text or symbols beyond label)