KÜCHENminis Vitalis E - Other kitchen appliances WMF - Free user manual and instructions
Find the device manual for free KÜCHENminis Vitalis E WMF in PDF.
| Product type | Compact steam cooker |
| Brand | WMF |
| Model | KÜCHENminis Vitalis E |
| Power | 900 W |
| Rated voltage | 220-240 V, 50-60 Hz |
| Protection class | I |
| Main material | Cromargan® (stainless steel) |
| Number of cooking compartments | 2 (stackable) |
| Water tank capacity | Approximately 1.2 L (estimate) |
| Functions | Steaming, Easy Steam, keep warm, automatic shut-off, programmable timer |
| Cooking programs | Leafy vegetables/fruits, root vegetables, rice/pasta, free programs |
| Display | Digital screen with countdown |
| Water level indicator | Yes, with alarm in case of water shortage |
| Safety | Automatic shut-off, overheating protection, hot surface indicator |
| Maintenance and cleaning | Bowls, collectors, steam hose and lid are dishwasher-safe; housing wipe with a damp cloth |
| Descaling | Recommended regularly; use of Cromargol® descaler advised |
| Included accessories | Lid, cooking bowl, 2 cooking blocks, 2 collector containers, steam hose, separating grid |
| Repairability | Repair by manufacturer or after-sales service; no spare parts listed |
| Use | Domestic and similar applications (offices, hotels, etc.) |
| Standards | Complies with EU directives 2014/35, 2014/30, 2009/125 |
Frequently Asked Questions - KÜCHENminis Vitalis E WMF
User questions about KÜCHENminis Vitalis E WMF
0 question about this device. Answer the ones you know or ask your own.
Ask a new question about this device
Download the instructions for your Other kitchen appliances in PDF format for free! Find your manual KÜCHENminis Vitalis E - WMF and take your electronic device back in hand. On this page are published all the documents necessary for the use of your device. KÜCHENminis Vitalis E by WMF.
USER MANUAL KÜCHENminis Vitalis E WMF
Steam cooker construction
1 Lid
2 Cromargar® cooking bowl
3 Upper cooking component
4 Upper collection tray
5 Steam pipe
6 Divider (removable)
7 Lower cooking component
8 Lower collection tray
9 Steam lock
10 Water tank
11 Water level indicator
12 Control panel
a) On/Off button
b) Selection button
Important safety information
- This appliance can be used by children aged from 8 years and above if they are supervised or have been instructed on how to use the appliance in a safe way and if they understand the hazards involved.
- Cleaning and user maintenance shall not be carried out by children unless they are older than 8 and supervised.
- Children must not play with the appliance.
- Keep the appliance and its cord out of reach of children aged less than 8 years.
- Appliances can be used by persons with reduced physical, sensory or mental capabilities or lack of experience and knowledge if they are supervised or have been instructed on how to use the appliance in a safe way and understand the hazards involved.
- Do not immerse the appliance in water.
- If the supply cord is damaged, it must be replaced by the manufacturer, its service agent or a similarly qualified person in order to avoid hazards.
-
This appliance is designed for use in households and similar environments such as:
-
staff kitchen areas in shops, offices and other working environments;
- farm houses;
- by clients in hotels, motels and other residential facilities;
- bed-and-breakfast establishments.
The appliance is not intended for purely commercial use.
- Caution! Risk of burns! The temperature of accessible surfaces can become very hot. The heating surfaces remain hot for some time after the appliance has been switched off.
Before use
The appliance may only be used for the intended purpose according to these operating instructions. For this reason, please read the instruction manual carefully before use as it provides instructions for using, cleaning and caring for the appliance. We accept no liability for any damages caused if this manual is not observed. Keep the operating manual in a safe place and pass it on to any subsequent user together with the appliance.
Observe the safety information when using the appliance.
Technical data
Rated voltage: 220 - 240V 50 - 60Hz
Power consumption: 900 W
Protection class: I
Additional safety information
-
Only connect the appliance to earthed wall sockets that have been installed pursuant to regulations. The supply cable and plug must be dry.
-
Do not pull or clamp the connecting cable over sharp edges. Do not leave it dangling and protect it from heat and oil.
-
Only use an extension cable that is in perfect condition.
-
Never pull the mains plug out of the socket by the cable or with wet hands.
-
Do not carry the appliance by the cable.
-
Do not place the appliance on hot surfaces, such as hot plates or similar, or near open flames, as the casing could melt.
-
Do not place the appliance on water-sensitive surfaces. Water spray can damage such surfaces.
-
Caution: steam escapes from the appliance! Do not operate the appliance underneath sensitive furniture (e.g. wall cupboards).
-
Caution: the appliance gets hot! Risk of scalding from escaping steam. Do not move the appliance during operation and do not pull on the mains cable.
-
Fill the water tank with cold water no higher than the max marker.
If the appliance is not being used, pull out the mains plug.
-
Stop using the appliance and/or pull out the mains plug immediately if:
-
the appliance or power cord is damaged.
-
you suspect that there is a defect after the appliance has fallen or suffered a similar incident. In such cases, arrange for the appliance to be repaired.
The appliance must be supervised when in use.
-
Descale the appliance regularly.
-
We accept no liability for damages caused as a result of misuse, incorrect operation, improper repairs or non-observation of the descaling instructions. Claims under warranty are likewise excluded in such cases.
Use
The WMF KUCHENminis® steamer is a space-saving and energy-efficient kitchen appliance.
You can use it to gently cook foods such as vegetables, meat, fish and rice.
With its Easy Steam function, you can cook foods with different cooking times at the touch of a button and have them all ready at the same time.
Control panel
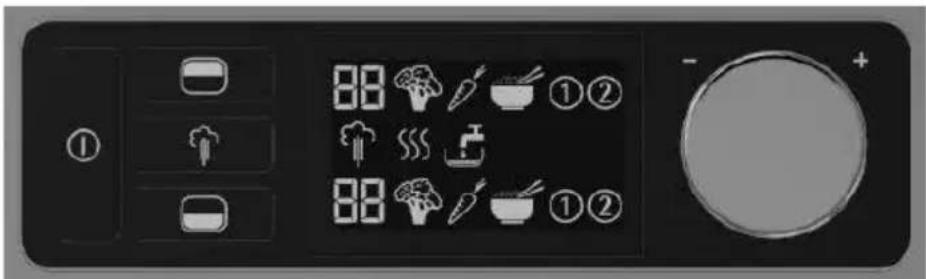
| Symbol因地制宜 | |
| 0 | On/off button |
| ↑ | Start button |
| Select lower cooking area | |
| Select upper cooking area | |
| 88 | Remaining time |
| Leafy and fruit vegetables program | |
| Root vegetables | |
| Rice/pasta program | |
| 0 2 | Individually adjustable program |
| Keep warm function | |
| F | Insufficient water |
Note: The symbols in the body text are shown in inverted colour due to typographical reasons.
Before using for the first time
Cleaning
Clean the device before use as described in the chapter on "Cleaning and Care".
Starting up the appliance
- Fill the water tank with cold tap water. Fill the tank at least half full with water, but no higher than the max marker.
We recommend always filling to the maxmarker.
The markers are located on the back panel of the water tank.
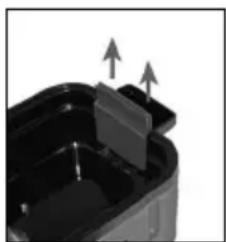
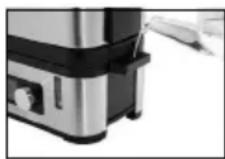
Note: You must insert the steam locks into the handles on the base of the appliance to prevent the handles from becoming too hot.
Remove this from the water tank at the end, so that the remaining water can be emptied using the handles.
- Place the lower collection tray with the steam pipe and the lower cooking area on top of the water tank. You can now place the upper collection tray, upper cooking area and lip on top.
Note: the guided staking system is designed so the individual components can be correctly placed on each other. All the steam outlets for the cooking areas are located on the back of the device.
There should be no gaps between the individual bowls, cooking areas. Check that the components have been put together in the correct order.
- If using just one cooking area, only use the lower collection tray, the lower cooking area without steam pipe, and the lid.
Select only one program for the lower cooking area
- Put the ingredients in the cooking area.
Make sure you put the ingredients with similar cooking times in the same cooking area.
Note: if you are using two different ingredients in one cooking area, you can separate the area with the divider. You can divide the cooking area in half, or 2/3 and 1/3.
Note: use the Cromargan® cooking bowl to prepare rice, noodles or marinated/seasoned foods.
-
Plug the device into the mains. You will hear an acoustic signal.
-
Select the appropriate program/cooking time for the upper ( ) or lower cooking area
After pressing the button or you will see the currently selected program with the preset cooking time on the control panel.
- Select the programs (v, , or 1 by rotating the selection button.
Confirm the program you want by pressing the selection button.
- The preset cooking time (for the specific program) will flash. Manually change this by rotating the selection button and confirming by pressing the selection button.
Note: the device has two individually programmable programs (1) and (2).
Use can use them to set your preferred cooking time yourself. The last setting used is saved.
- Begin cooking by pressing the start button . will appear in the display.
Note: the device has a keep warm function to keep food warm after cooking is completed. After pressing the start button, will flash in the display.
Press the start button within 3 seconds to activate the keep warm function. The symbol will show. If not, the device will automatically switch off after cooking is complete.
- You can see the remaining cooking time on the display (countdown function). The area with the shorter cooking time only switches on when the area with the longer cooking time reaches that of the shorter one.
Please note: if there is not enough water in the water tank, you will hear an acoustic signal during the cooking process and will appear on the display. Confirm the signal by pressing the start button. Fill the tank at least half full with water. You can fill in fresh water with a beaker using the handles of the lower collection tray. Continue the cooking process by pressing the start button.
- The device will automatically switch off after cooking is complete/the keep warm function is activated. You will hear an acoustic signal.
Note: you can interrupt the cooking process at any time by pressing the on/off button ①. The device will switch off.
Danger: risk of scalding! Hot steam is released when you remove the lid, the steaming inserts and collection trays. You should therefore always use pan holders.
Cooking times
The cooking times are approximate and will vary according to size, consistency and quantities of the ingredients. The serving sizes per person are only approximations.
| Leafy and fruit vegetables 1 | serving 2 servings | |||
| Cauliflower florets 30 min. 100g 30 min. 200 g | ||||
| Broccoli 20 min. 60 g 20 min. 120 g | ||||
| Green beans 15 min. 50 g 15 min. 100 g | ||||
| Peas (fresh or frozen) 10 min. 60 g 10 min. 120 g | ||||
| Green beans 20 min. 50 g 20 min. 100 g | ||||
| Leek 15 min. 70 g 15 min. 140 g | ||||
| Pepper 15 min. 80 g 15 min. 160 g | ||||
| Mushrooms 13 min. 50 g 13 min. 100 g | ||||
| Bean sprouts | 20 min. 100 g 20 min. 200 g | |||
| Asparagus (white) | 20-25 min. | 350 g | 20-25 min. | 700 g |
| Asparagus (green) | 15-20 min. | 350 g | 15-20 min. | 700 g |
| Spinach | 15 min. 60 g 15 min. 120 g | |||
| Sweet corn (tin) | 12 min. 80 g 15 min. 160 g | |||
| Sweet corn (frozen) | 15 min. 80 g 15 min. 160 g | |||
| Tomatoes | 10 min. 120 g | 13 min. | 240 g | |
| White cabbage | 15 min. 50 g 15 min. 100 g | |||
| Courgette | 15 min. 60 g 15 min. 120 g | |||
| Mangetout | 13 min. 50 g 13 min. 100 g | |||
| Root vegetables / | 1 serving 2 servings | |||
| Pumpkin | 15 min. 100 g 15 min. 200 g | |||
| Carrots | 30 min. 100 g 30 min. 200 g | |||
| Kohlrabi | 30 min. 100 g 35 min. 200 g | |||
| Celery | 20 min. 100 g 20 min. 200 g | |||
| Potatoes (new) | 23 min. 180 g | 25 min. | 350 g | |
| Potatoes (old) | 30 min. 180 g | 30 min. | 350 g | |
| Sweet corn (on the cob) | 30 min. 1 piece 250 g | |||
| Onions | 20 min. 2 pcs. | 20 min. | 4 pcs. | |
| Rice and pasta | 1 serving 2 servings | |||
| Parboiled rice 30 min. 75 g | + 150 ml water | 30 min. 150 g | + 300 ml water | |
| White long grain rice 30 min. 75 g | + 150 ml water | 30 min. 150 g | + 300 ml water | |
| White basmati rice 30 min. 75 g | + 150 ml water | 30 min. 150 g | + 300 ml water | |
| Bulgur wheat 20 min. 75 g | + 150 ml water | 27 min. 150 g | + 300 ml water | |
| Couscous 15 min. 75 g | + 150 ml water | 17 min. 150 g | + 300 ml water | |
| Pasta 25 min. 75 g | + water (must cover pasta) | 30 min. 150 g | + water (must cover pasta) | |
| Meat, poultry and fish 1 serving 2 servings | ||||
| Chicken breast (filleted) | 18 min. 150 g 20 | min. 300 g | ||
| Duck breast (filleted) | 18 min. 150 g 20 | min. 300 g | ||
| Turkey breast 11 min. 100 g 15 | min. 200 g | |||
| Pork fillet 20 min. 80 g | 20 min. 160 g | |||
| Sausages | 10 min. | 170 g 10 min. | 340 g | |
| Filleted fish pieces (thick) | 15 min. 125 g 15 | min. 250 g | ||
| Filleted fish pieces (thin) | 13 min. 100 g 13 | min. 200 g | ||
| Fruits and eggs | 1 serving 2 servings | |||
| Apples | 13 min. 1 pcs. 15 | min. 2 pcs. | ||
| pears 20 min. 1 pcs. 25 min. 2 pcs. | ||||
| Eggs (soft boiled) | 9 min. | 1 pcs. 10 min. 2 | pcs. | |
| Eggs (hard boiled) | 18 min. 1 pcs. 20 | min. 2 pcs. | ||
Cleaning and maintenance
Cleaning
Unplug the mains plug and allow the appliance to cool down.
Do not immerse the appliance in water, but instead just use a damp cloth and a little washing-up liquid to clean its exterior.
Do not use harsh or abrasive cleaning agents.
The collection trays, steamer baskets, steam pipe, cooking bowl and lids can be easily washed in the dishwasher.
Dscaling
Limescale deposits lead to energy losses and impair the service life of the appliance. The appliance switches off prematurely if the layer of limescale is too thick. The limescale is then very difficult to remove. Therefore descale the appliance regularly.
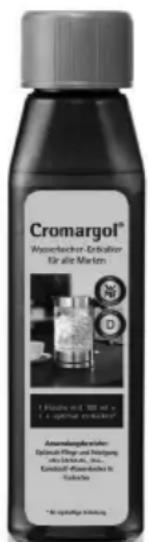
We recommend using Cromargol® kettle descaler. This product has been designed specifically for descending kettles and is extremely effective, food safe and has a neutral smell and taste. Thanks to the special care formula with two double additives, the Cromargol® kettle descaler does not damage the materials. You can usually purchase Cromargol® from the store where you have purchased your appliance or from your chosen dealer. The Cromargol® / Cromargol® water kettle decalcifier is only available in Germany and Austria.
Prior to descending, unplug the appliance from the mains and allow it to cool down.
- Shake the bottle of Cromargol® before using it. Fill the water tank with one portion (100 ml) of Cromargol® kettle descaler and leave for approximately five minutes to take effect. Then fill the appliance with cold tap water to cover the limescale ring on the wall and leave to stand for 30 minutes.
- Then pour out the water and thoroughly rinse with cold tap water.
- Measure out and use other descending agents according to the manufacturer's instructions.
Do not heat the solution during descaling.
Caution: the warranty does not cover damage caused by failure to observe the descending instructions.
For UK use only
- This product is supplied with a 13 A plug conforming to BS 1363 fitted to the mains lead. If the plug is unsuitable for your socket outlets or needs to be replaced, please note the following. If the plug is a non-rewireable one, cut it from the mains lead and immediately dispose of it. Never insert it into a socket outlet as there is a very great risk of an electric shock.
- The replacement of the plug at the mains lead has to be done according to the following instructions:
Warning - This appliance must be earthed
Important: The wires in this mains lead are coloured in accordance with the following code:
green/yellow Earth
blue Neutral
brown Live
As the colours of the wires in the mains lead of this appliance may not correspond with the coloured markings identifying the terminals in your plug, proceed as follows:
- the wire which is coloured green and yellow must be connected to the terminal which is marked with the letter E or by the earth symbol 12 , or coloured green or green and yellow,
- the wire which is coloured blue must be connected to the terminal which is marked the letter N or coloured black,
- the wire which is coloured brown must be connected to the terminal which is marked with the letter L or coloured red.
- If a 13 A (BS 1363) plug is used it must be fitted with a 13 A fuse conforming to BS 1362 and be ASTA approved. If any other type of plug is used, the appliance must be protected by a 10 A fuse either in the plug or adapter or at the distribution board.
If in doubt - consult a qualified electrician. - Never use the plug without closing the fuse cover.

The appliance complies with European directives 2014/35/EC, 2014/30/EC and 2009/125/EC.
At the end of its life, this product must not be disposed of in normal household waste but must instead be delivered to a collection point for recycling electric and electronic appliances.
The materials are recyclable in accordance with their labelling. The reuse, recycling and other ways of using old appliances make an important contribution to protecting our environment.
Please ask your local administration for details of the appropriate disposal point.
Subject to alterations