
Lono 415430011 - Griddle WMF - Free user manual and instructions
Find the device manual for free Lono 415430011 WMF in PDF.


| Product type | Electric plancha |
| Brand | WMF |
| Model | Lono 415430011 |
| Dimensions (L x W x H) | Approx. 65 x 45 x 15 cm |
| Weight | Approx. 8 kg |
| Power supply | 220-240 V ~ 50/60 Hz |
| Power | 2000 W |
| Plate material | Robust chrome-plated steel |
| Non-stick coating | Yes, high-quality non-stick |
| Adjustable thermostat | Yes, from 80°C to 230°C |
| Heating indicator | Yes |
| Drip tray | Yes, removable |
| Cleaning | Removable plate for easy cleaning |
| Safety | Automatic shut-off and overheating protection |
| Non-slip feet | Yes |
| Removable power cord | Yes |
| Spare parts available | Cooking plate, drip tray, thermostat |
| Repairability | Repairability index: 8/10 |
Frequently Asked Questions - Lono 415430011 WMF
User questions about Lono 415430011 WMF
0 question about this device. Answer the ones you know or ask your own.
Ask a new question about this device
Download the instructions for your Griddle in PDF format for free! Find your manual Lono 415430011 - WMF and take your electronic device back in hand. On this page are published all the documents necessary for the use of your device. Lono 415430011 by WMF.
USER MANUAL Lono 415430011 WMF
EN Operating Manual 10 Table grill ribbed with glass lid


Lieferumfang
- Grillbasis
- Temperaturregler (Thermostat)
- Glasdeckel
- Grillplatte gerippt
- Auffangschale
- n-a / n + a Temperatureinstellung
- Aufheizsymbol
- Heizstufen
Delivery scope
- Grill base
- Temperature controller (thermostat)
- Glass lid
- Ribbed grill plate
- Drip tray
- n-a / n+ Temperature setting
-
Heat-up symbol
-
Heat level
Contenu
Table grill ribbed with glass lid
Important safety information
- This appliance can be used by children aged from 8 years and above and persons with reduced physical, sensory or mental capabilities or lack of experience and knowledge if they have been given supervision or instruction concerning use of the appliance in a safe way and understand the hazards involved.
- Children shall not play with the appliance.
- Cleaning and user maintenance shall not be made by children unless they are older than 8 and supervised.
- Keep the appliance and its cord out of reach of children less than 8 years.
- If the supply cord is damaged, it must be replaced by the manufacturer, its service agent or similarly qualified persons in order to avoid a hazard.
- Only operate the appliance using the temperature controller (thermostat) supplied.
- The device must not be operated via an external timer or remote control.
- Clean all parts immediately after use and remove any food residue straight away.
Follow the instructions in the "Cleaning and Care" section.
- You must remove the temperature controller (thermostat) before cleaning the grill plate in water. Make sure the thermostat connection on the grill plate is dry before you use it again.
- The appliance is designed for indoor household use only.
-
This device is intended to be used in household and similar applications, such as:
-
staff kitchen areas in shops, offices and other working environments;
- farm houses;
- by clients in hotels, motels and other residential type environments;
- bed and breakfast type environments.
The device is not intended for purely commercial use.

- WARNING: Charcoal or similar combustible fuels must not be used with this appliance.
WARNING: risk of burns!! When the appliance is switched on, its contact surfaces, including the glass lid, can get hot and they also remain hot for a while even after the appliance has been switched off!
Before use
Read the instruction manual carefully. It contains important information about the use, safety and care of the appliance. It should be kept in a safe place and passed on to subsequent users if necessary. The appliance may only be used for the intended purpose according to these operating instructions. Observe the safety information when using the appliance.
Technical data
Mains voltage: 220-240 V\~ 50-60 Hz
Power consumption: 1850 - 2200 Watt
Protection class: 1
Additional safety information
- The appliance should be connected only to earthed wall sockets that have been installed in accordance with the regulations. The power cable and plug must be dry.
- Place the appliance on a level and firm surface and ensure there is sufficient space around the appliance.
- Make sure that the drip tray (5) is always fully inserted during grilling. The grill can only be operated when the drip tray (5) is fully inserted.
- The grill plate (4) must be correctly positioned on the appliance and connected to the temperature controller (2) otherwise the grill will not turn on.
■ Always pre-heat the grill plate (4) before you place food on it. - Fat can spray out randomly when grilling. For this reason, do not place the appliance directly on any sensitive surfaces, e.g. polished tabletops.
- Caution! When the glass lid (3) is locked in the open position, the lid must never be pushed forwards or backwards with force. To close the lid, pull it upwards slightly and close.
- Always switch the appliance off after use, pull the mains plug out of the socket and allow the appliance to cool down completely before removing and cleaning the grill plate (4) and drip tray (5).
- Make sure that the grill plate (4) is always repositioned correctly after it has been removed.
- Never store the appliance outdoors or in a damp room.
- No liability shall be accepted for any damage resulting from misuse, incorrect operation or improper repairs. Warranty claims shall likewise be excluded in such cases.
Use
You can cook lots of delicious food on the table-top grill. The table-top grill is suitable for grilling foods such as meat, vegetables or fish. The closed glass lid reduces grease spatter and the heat is retained in the appliance while the food is being prepared.
Setting up and connecting
- Remove all packaging from the appliance.
- Clean the appliance (see chapter „Cleaning and care“).
- Set up the appliance on a stable and level surface near a plug socket.
Initial operation
- Insert the drip tray (5) into the grill base (1). Fat and meat juice collect in the drip tray. Make sure that the drip tray is always fully inserted during grilling. Note: The grill can only be operated when the drip tray is fully inserted.
- The grill plate (4) must first be inserted into the grill base with the left side at a slight angle from above until it locks into place in the grill base. The right side of the grill plate must then be positioned on the grill base. Make sure that both sides of the grill plate are correctly inserted into the grill base. This is necessary before the temperature controller (2) can be inserted into the grill base.
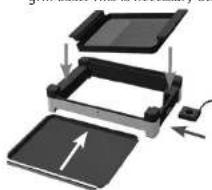
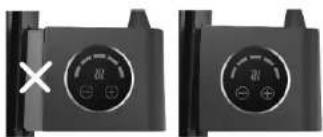
- Insert the temperature controller into the grill base as far as it will go. The knob of the temperature controller must point upwards.
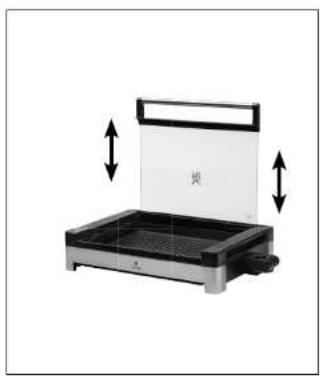
- Insert the glass lid (3) into the two notches in the rear part of the base of the grill at an angle of 45° (Fig. 2). Open the lid further until it slides back slightly into the notches and remains open at an angle of approx. 90° .
- Close the glass lid by lifting it slightly and closing it at the same time. Make sure that the glass lid does not slide out of the notches.
- Now insert the mains plug into the socket. The „+” key and the left segment of the heat levels light up white, the heat-up symbol lights up red. Press the „+” key until all segments of the heating stages light up. As soon as the heating phase has finished and the required temperature has been reached, the heat-up symbol lights up white. Then select a lower setting with the “-” key depending on the food to be grilled (see chapter „Grill times“). Note: Only place the food on the grill plate after preheating.
- WARNING: risk of burns!! When the appliance is switched on, its contact surfaces, including the glass lid, can get hot and they also remain hot for a while even after the appliance has been switched off!
Non-stick coating
Never touch the scratch-sensitive coating of the grill plate (4) with sharp or pointed objects. When using your new appliance for the first time, there may be a little smoke or odour. This is for technical reasons and nothing to be concerned about.
Grilling times
Cut up the food you wish to grill into portions or slices that are not too large. The glass lid should still close easily without touching the grilled food. Season meat before grilling, but only add salt afterwards so it loses less juice. Small sausages, tender steaks, minced steaks, meat loaf and fi sh are ideal. Sliced tomato, aubergine and pineapple are ideal for cooking on the table-top grill and are very tasty. Depending on the size, corn on the cob can be grilled whole or in slices. Pierce thick sausages before you grill them to prevent fat splashes. The cooking time depends on the lype and thickness of the food. Never cut meal or other foods on the grill plate.
Grilling times and temperature settings depend on the food being grilled and your own particular taste, therefore the following values are only approximate.
Note: The specified times relate to the pure grilling/cooking times and do not include the time for pre-heating the grill plates when the lid is closed. After grilling, reduce the temperature. The meal or vegetables can then continue to cook perfectly with the lid closed.
| Grilling time (minutes) Grilling level | |
| Beef steak 8-10 4-5 | |
| Pork escalope 6-8 4-5 | |
| Hamburger steak 6-8 4-5 | |
| Pork chop 8-10 4-5 | |
| Lamb chop 8-10 4-5 | |
| Chicken escalope 4-6 4-5 | |
| Fish fillet 4-6 4-5 | |
| Vegetables 4-5 5 | |
| Keeping warm |
Cleaning and care
- Pull out the mains plug and allow the appliance to cool down.
- Once the grill plate is warm to the touch, use a paper towel to remove as much fat and other residue from it as possible.
- Remove the grill plate by opening the glass lid or removing it at an opening angle of 45° (Fig. 1) and detach the temperature controller from the grill. Lift the grill plate on the right side until the left side is also released from the grill base. The grill plate can now be removed from the grill base by lifting it up. (Fig. 1).

- Clean the grill plate in lukewarm water using washing-up liquid and a washing-up brush. Note: Do not use abrasives, metal scourers or oven cleaner.
- Pull the drip tray out of the grill base (Fig. 1).
- Clean the drip tray in lukewarm water using washing-up liquid and a washing-up brush. Note: Do not use abrasives, metal scourers or oven cleaner.
- You can also wash the grill plate in the dishwasher to make cleaning easier.
- Clean the grill base in lukewarm water using washing-up liquid.
- Reassemble the appliance for storage. Store the appliance on a level and dry surface.
- Clean the temperature controller using only a slightly damp cloth.
WARNING: Never immerse the temperature controller in water.
Note: The temperature controller and the contacts on the grill plate must be completely dry before using the appliance again.
 dishwasher-safe dishwasher-safe |  can be rinsed under running water can be rinsed under running water |  wipe clean with a damp cloth wipe clean with a damp cloth | |
| Grill base (1) | — | √ | √ |
| Glass lid (3) | √ | √ | √ |
| Ribbed grill plate (4) | √ | √ | √ |
| Drip tray (5) | — | — | √ |
For UK use only
- This product is supplied with a 13 A plug conforming to BS 1363 fi tted to the mains lead. If the plug is unsuitable for your socket outlets or needs to be replaced, please note the following. If the plug is non-rewireable one, cut it from the mains lead and immediately dispose of it. Never insert it into a socket outlet as there is a very great risk of an electric shock.
- The replacement of the plug at the mains lead has to be done according to the following instructions:
Warning - This appliance must be carthed
Important: The wires in this mains lead are coloured in accordance with the following code: green/yellow Earth
blue Neutral
brown Live
As the colours of the wires in the mains lead of this appliance may not correspond with the
coloured markings identifying the terminals in your plug, proceed as follows:
- the wire which is coloured green and yellow must be connected to the terminal which is
marked with the letter E or by the earth symbol (±), or coloured green or green and yellow, -
the wire which is coloured blue must be connected to the terminal which is marked the letter N or coloured black,
-
the wire which is coloured brown must be connected to the terminal which is marked with the letter L or coloured red.
- If a 13 A (BS 1363) plug is used it must be fitted with a 13 A fuse conforming to BS 1362 and be ASTA approved. If any other type of plug is used, the appliance must be protected by a 10 A fuse either in the plug or adapter or at the distribution board.
If in doubt - consult a qualified electrician.
- Never use the plug without closing the fuse cover.

The appliance complices with European directives 2014/35/EU, 2014/30/EU and 2009/125/EU.
At the end of its life, this product may not be disposed of in normal household waste, but must instead be taken to a collection point for recycling electrical and electronic appliances.
The materials are recyclable in accordance with their labelling. Reuse, recycling and other ways of reutilising old appliances make an important contribution to protecting our environment.
Please ask your local authorities for information about the appropriate disposal point.
End users are personally responsible for deleting any personal data that may be stored on appliances they are disposing of.
Subject to change.
Mode d'emploi


Brand : WMF
Model : Lono 415430011
Category : Griddle