
AD 7861 - Dehumidifier ADLER - Free user manual and instructions
Find the device manual for free AD 7861 ADLER in PDF.
| Product type | Dehumidifier |
| Brand | Adler |
| Model | AD 7861 |
| Dehumidification capacity | 10 L/24h (at 30°C, 80% RH) |
| Water tank | 2.0 litres |
| Noise level | ≤ 42 dB(A) |
| Airflow rate | 150 m³/h |
| Refrigerant | R290 (45 g) |
| Power supply | 220-240 V ~50 Hz |
| Rated power | 280 W |
| Adjustable humidity range | 30% to 90% RH (5% steps) |
| Timer | 0-24 hours (delayed start/stop) |
| Continuous drainage | Yes, via included drain hose |
| Auto-defrost | Automatic |
| Full tank indicator | Light indicator and audible alarm |
| Minimum operating area | 4 m² |
| Operating temperature | 5°C to 35°C |
| Air filter | Washable mesh filter |
| Filter maintenance | Every 2 weeks (vacuum or lukewarm water) |
| Available spare parts | Air filter, drain hose, water tank |
| Repairability | Repairs exclusively by an authorized service center |
| Safety | Do not puncture/burn refrigerant; use on a flat surface; do not block air inlets/outlets; do not use below 0°C |
| Intended use | Household |
| Included accessories | Drain hose, water tank |
| Weight | Approximately 10 kg (estimate) |
Frequently Asked Questions - AD 7861 ADLER
User questions about AD 7861 ADLER
0 question about this device. Answer the ones you know or ask your own.
Ask a new question about this device
Download the instructions for your Dehumidifier in PDF format for free! Find your manual AD 7861 - ADLER and take your electronic device back in hand. On this page are published all the documents necessary for the use of your device. AD 7861 by ADLER.
USER MANUAL AD 7861 ADLER
natural_image
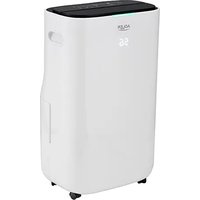
White ADLER portable water purifier device with a single lid and ventilation slots (no visible text or symbols on body)AD 7861
natural_image
Line drawing of a portable air conditioner unit with a curved tube attached, labeled '10' (no text or symbols on the device itself)PICTURE 3

PICTURE 4
PICTURE 5
PICTURE 6

| GB | DO NOT COVER« INSCRIPTION IMPORTANCE The inscription on the device means that the device is not to be covered with clothing, blankets and other textile products which could cause ignition. |
| DE | NICHT ABDECKEN" - BESCHRIFTUNG WICHTIGKEIT Die Beschriftung auf dem Gerät bedeutet, dass das Gerät nicht mit Kleidungsstücken, Decken und anderen Textilien bedeckt werden darf, die eine Entzündung verursachen können. |
| FR | NE PAS COUVRIR" - IMPORTANCE DE L'INSCRIPTION L'inscription sur l'appareil signifie que l'appareil ne doit pas être recouvert de vêtements, couvertures ou autres produits textiles pouvant provoquer une inflammation. |
| ES | "NO CUBRIR": IMPORTANCIA DE LA INSCRIPCIÓN La inscripción en el dispositivo significa que el dispositivo no debe cubrirse con ropa, mantas y otros productos textiles que podrían causar una ignición. |
| PT | "NÃO COBRE" - IMPORTÂNCIA DA INSCRIÇÃO A inscrição no dispositivo significa que o dispositivo não deve ser coberto com roupas, cobertores e outros produtos têxteis que possam causar ignição. |
| LT | "NEGALIMA" - JRAŠYMAS SVARBU Jrašas ant prietaiso reiškia, kad prietaisas neturi būti padengtas drabužiais, antklodémis ir kitais tekstilês gaminiais, kurie gal su kelti uždegimą. |
| LV | "NEIZMANTOJIET" - UZRAUDZÍBAS SVARÍBA leraksts uz ierīces nozīmē, ka ierīce nav pārklāta ar apgērbu, segām un citiem tekstilizstrādājumiem, kas var izraisīt aizdegšanos. |
| EST | "ÄRGE KASUTADA" - SISSEJUHATUS TÄHELEPANU Seadmel olev pealkiri tähendab, et seadet ei tohi kanda riideid, tekke ega muid tekstilltooteid, mis võivad põhjustada süttimist. |
| HU | "NE HASZNÁLJON" - FELHASZNÁLÁSI FONTOSSÁG A készülék felirata azt jelenti, hogy a készüléket nem borítja ruházat, takaró és egyéb textiltermékek, amelyek gyulladást okozhatnak. |
| BS | "NEMOJTE POKLOPITI" - NAPOMENA ZNAČAJ Natpis na uređaju znači da se uređaj ne smije prekriti odjećom, dekama i drugim tekstilnim proizvodima koji bi mogli izazvati paljenje. |
| RO | "NU ÎNTREȚI" - IMPORTANTĂ INSCRIPTIE Inscripția pe dispozitiv înseamnă că dispozitivul nu trebuie acoperit cu îmbrăcăminte, pături și alte produse textile care ar putea provoca aprinderea. |
| CZ | NEKLIDUJTE" - DŮLEŽITÉ NÁPRAVY Nápis na zařízení znamená, že zařízení nesmí být pokryté oděvy, přikrývkami a jinými t extilními výrobky, které by mohly způsobit vznícení. |
| RU | «НЕ ПОКРЫВАЙТЕ» - ВНИМАНИЕ НАДПИСЬ Надпись на устройстве oзначает, что устройство не должно быть покрыто одеждой, одеялами и другими текстильными изделиями, которые могут вызвать возгорание. |
| GR | "MHN KAUYTEPATE" - ЕГГРАФН Σημασία Η επιγραφή στη συσκευή σημαίνει ότι η συσκευή δεν πρέπει να καλύπτεται με ρούχα, κουβέρτες και άλλα κλωστοϋφαντουργικά προϊόντα που θα μπορούσαν να προκαλέσουν ανάφλεξη. |
| MK | "НЕ ПОВРЗАНИ" - BAJHOCT ЗА НАПРЕДУВАНЬЕ Написот на уредот значи дека уредот не треба да се покрива со облека, ѵебиња и други текстилни производи што може да предизвикаат палење. |
| NL | "DO NOT covers" - opschrift BELANG De inscriptie op het apparaat betekent dat het apparaat niet te worden bedekt met kleding, dekens en andere textielproducten die ontbranding kan veroorzaken. |
| SL | Ne pokrivajte - NAPISNI POMEMBNI napis Napis na napravi pomeni, da naprave ne prekrivajte z oblačili, odejami in drugimi tekstilnimi izdelki, ki bi lahko povzročili vžig. |
| FI | "ÄLÄ KÄÄNTÄ" - KUVAUS TÄRKEÄÄ Laitteen merkintä tarkoittaa, että laitetta ei saa peittää vaatteilla, peitteillä ja muilla tekstilituotteilla, jotka voivat aiheuttaa syttymistä. |
| PL | OSTRZEŽENIE: W celu uniknięcia przegrzania – nie przykrywać ogrzewacza Napis na urządzeniu oznacza, že urządzenia nie należy przykrywać odzieżą, kocami i innymi wyrobami tekstylnymi, które mogą spowodować zapłon. |
| IT | "Non coprire" - ISCRIZIONE IMPORTANZA L'iscrizione sul dispositivo significa che il dispositivo non deve essere coperta con vestiti, coperte e altri prodotti tessili che potrebbero causare l'accensione. |
| HR | "NEMOJTE POKLOPITI" - NAPISI VAŽNOST Natpis na uređaju znači da uređaj ne smije biti prekriven odjećom, pokrivačima i drugim tekstilnim proizvodima koji bi mogli izavati paljenje. |
| SV | "INTE SKYDD" - INSCRIPTION IMPORTANCE Inskriften på enheten innebär att enheten inte ska täckas med kläder, filtar och andra textilprodukter som kan orsaka tändning. |
| DK | "DÆKK IKKE" - INSCRIPTION IMPORTANCE Indskriften på enheden betyder, at enheden ikke skal være dækket af tøj, tæpper og andre tekstilvarer, der kan forårsage tænding. |
| UA | "НЕ ПОКРИТТА" - BAJЛИВІСТЬ ВІДЗНАЧЕННЯ Напис на пристрої означає, що пристрій не повинен бути покритий одягом, ковдрами та іншими текстильними виробами, які можуть викликати займання. |
| SR | "HEMAOJTE ПОКЛОПИТИ" - НАПОМЕНА ЗНАЧАЈ Натпис на уређају значи да уређај не треба да буде прекривен одећом, ћебадима и другим текстилним производима који могу изазвати пальење. |
| SK | "NEZAPŘÍAJTE" - DÔLEŽITÉ UPOZORNENIE Nápis na prístroji znamená, že zariadenie by nemalo byť pokryté oblečením, prikrývkami a inými textilými výrobkami, ktoré by mohli spôsobit' zapálenie. |
| AR | يطُعَلّلّا "بَجْمُّاً" نبُسِت قَعَيلًا كُرْخُلُّاً ات اجَوْنِفِي ات اجَنْجُوْتَعَلَّنْ طَلْبَاو سَبْ لَهْبِل زَهْرَجًا قَيُطُعَّب بِي لِلْهُنا أَزْهُ لِجَاتِيع دوج وَفِي شَرْقِسَاتِينِي عَتَشَالا. |
| BG | НЕ ПОКРИВАЙТЕ «ВАЖНОСТ НА НАДПИСА Надписът на устройството означава, че устройството не трябва да бъде покрито с дрехи, одеяла и други текстилни продукти, които могат да причинят запалване. |
| AZ | ÖPÜLMƏYİN« YAZIĞININ ƏNƏMİYYƏTİ Cihazın üzərindəki yazı cihazın alışmağa săbəb óla biləcak paltar, ədyal və digər tekstil məhsulları îla өrtülməməsi deməkdir. |
| ALB | MOS MBUSH « RËNDÊSIA E MBISHKRIMIT Mbishkrimi në pajisje do të thotë që pajisja nuk duhet të mbulohet me veshje, batanije dhe produkte të tjera tekstili që mund të shkaktojnë ndezje. |
ENGLISH
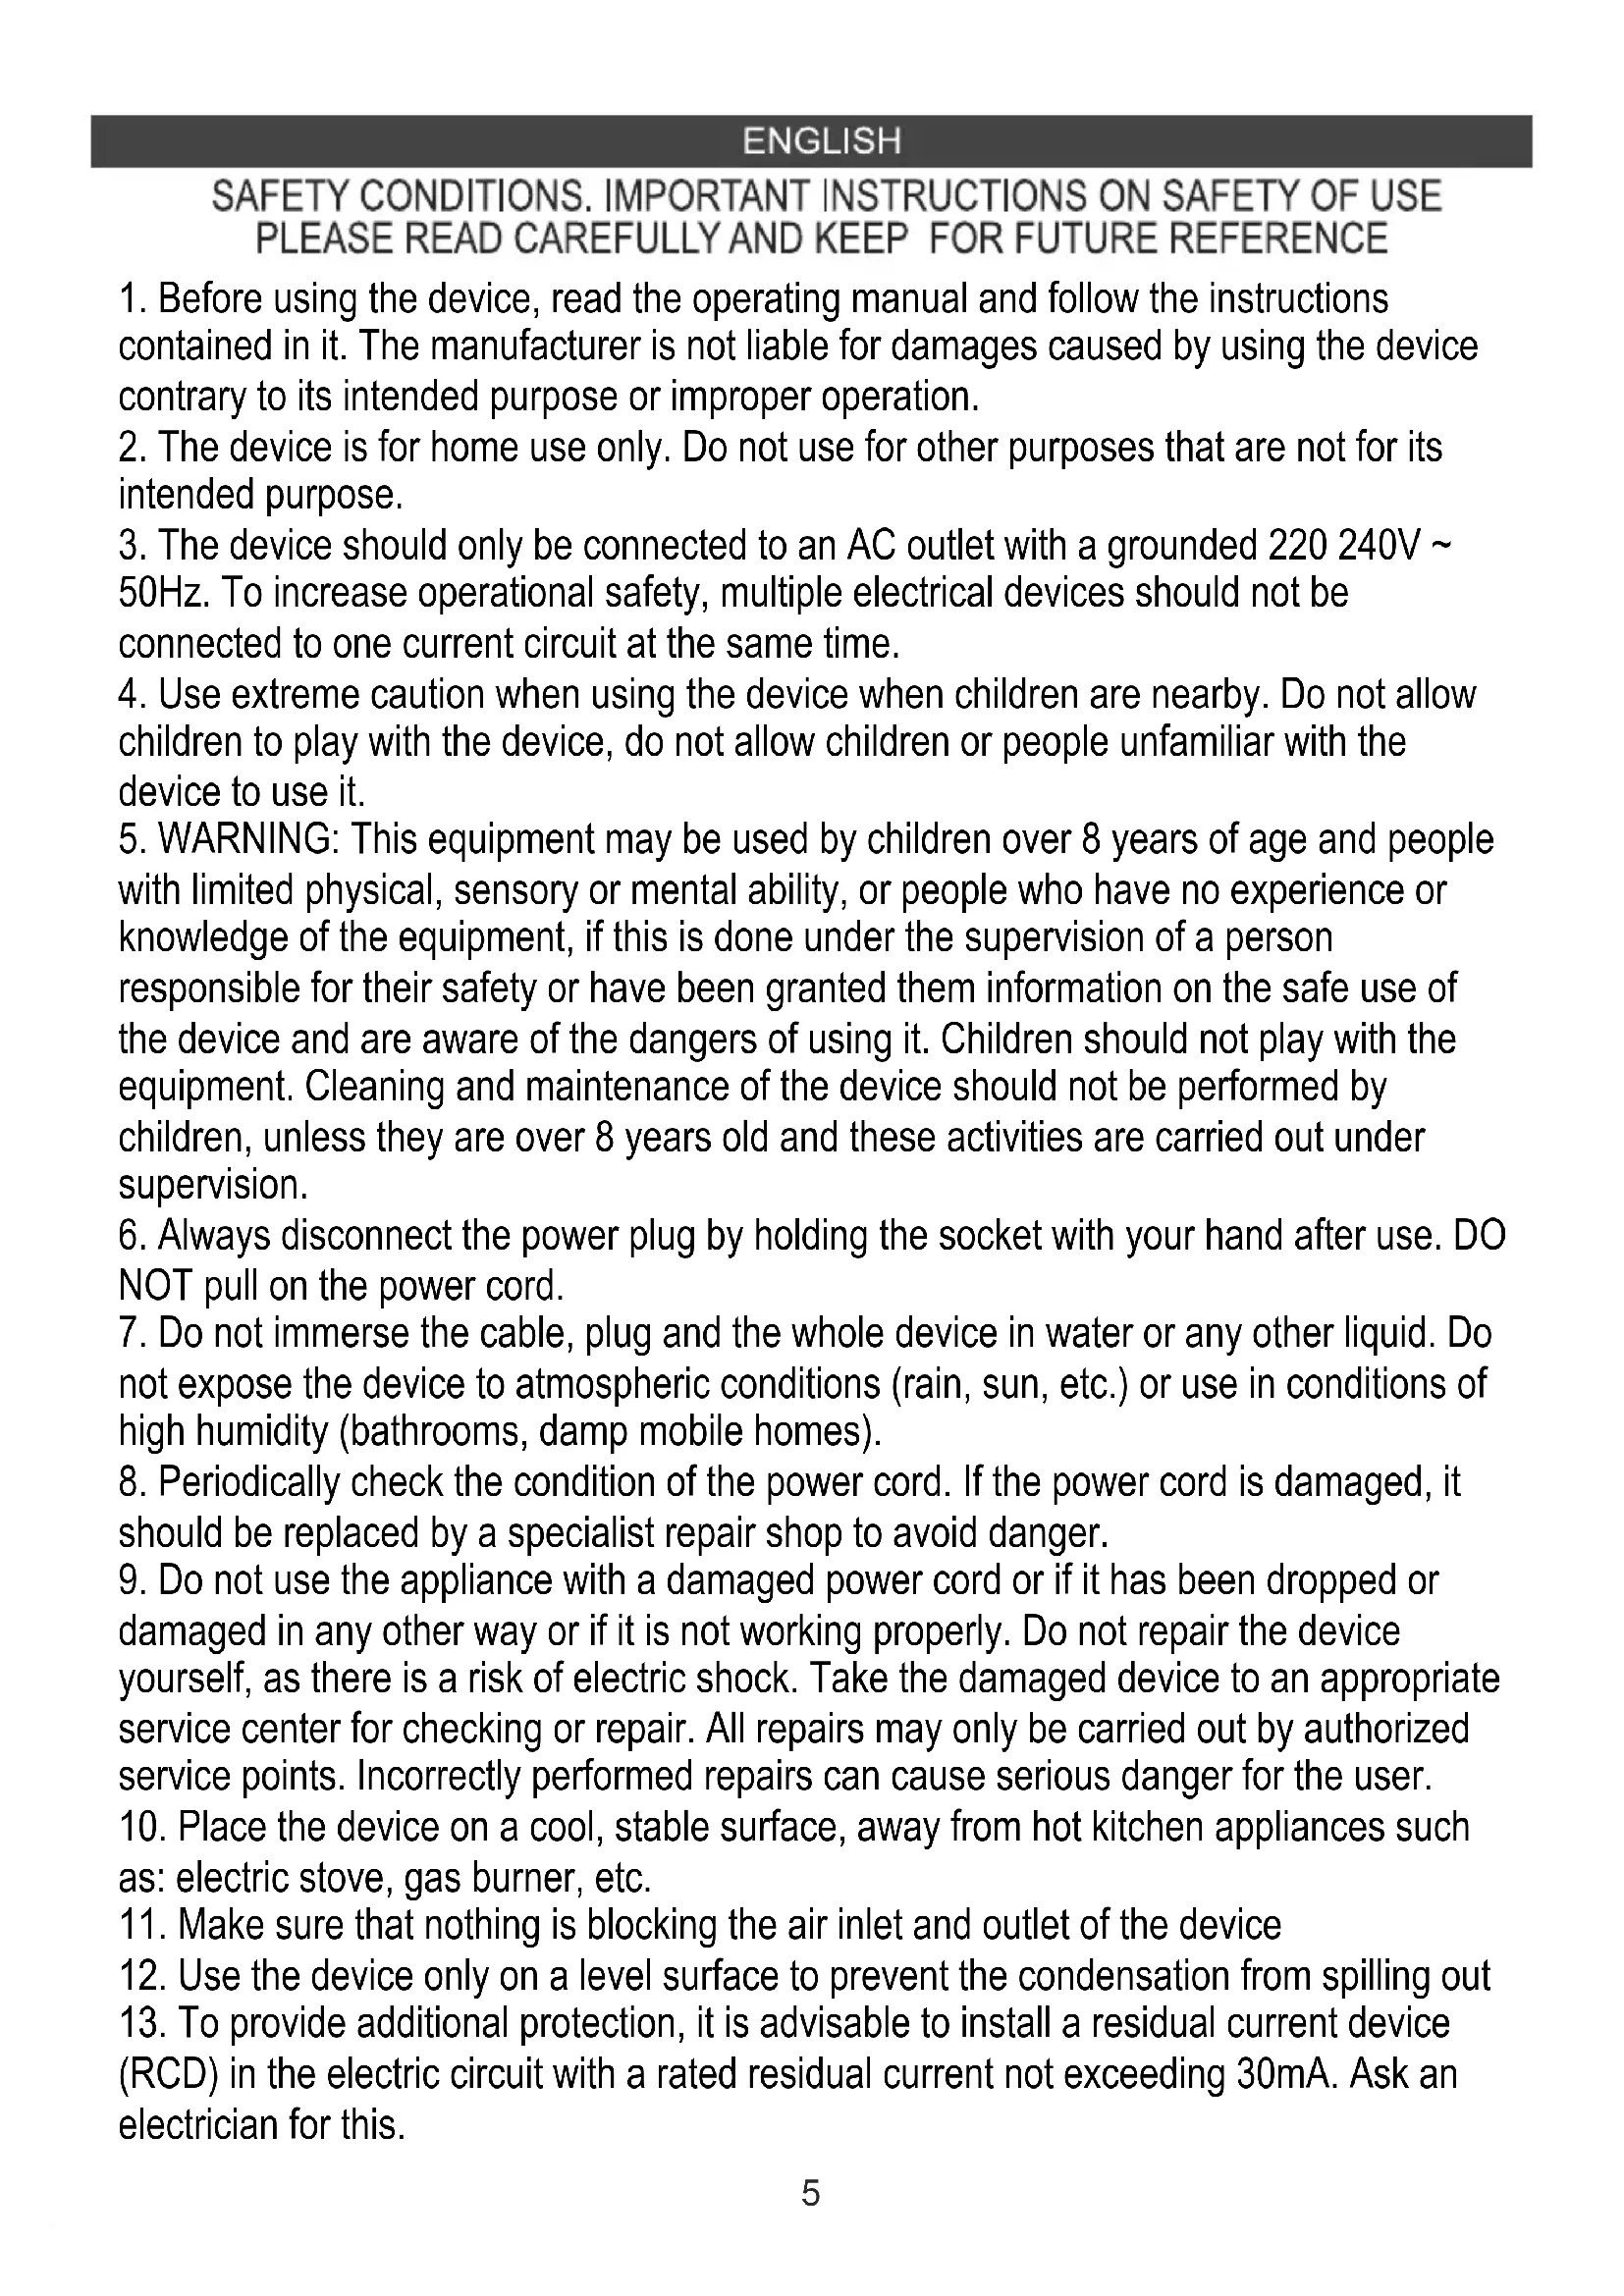
SAFETY CONDITIONS. IMPORTANT INSTRUCTIONS ON SAFETY OF USE PLEASE READ CAREFULLY AND KEEP FOR FUTURE REFERENCE
- Before using the device, read the operating manual and follow the instructions contained in it. The manufacturer is not liable for damages caused by using the device contrary to its intended purpose or improper operation.
- The device is for home use only. Do not use for other purposes that are not for its intended purpose.
- The device should only be connected to an AC outlet with a grounded 220 240V \~ 50Hz. To increase operational safety, multiple electrical devices should not be connected to one current circuit at the same time.
- Use extreme caution when using the device when children are nearby. Do not allow children to play with the device, do not allow children or people unfamiliar with the device to use it.
- WARNING: This equipment may be used by children over 8 years of age and people with limited physical, sensory or mental ability, or people who have no experience or knowledge of the equipment, if this is done under the supervision of a person responsible for their safety or have been granted them information on the safe use of the device and are aware of the dangers of using it. Children should not play with the equipment. Cleaning and maintenance of the device should not be performed by children, unless they are over 8 years old and these activities are carried out under supervision.
- Always disconnect the power plug by holding the socket with your hand after use. DO NOT pull on the power cord.
- Do not immerse the cable, plug and the whole device in water or any other liquid. Do not expose the device to atmospheric conditions (rain, sun, etc.) or use in conditions of high humidity (bathrooms, damp mobile homes).
- Periodically check the condition of the power cord. If the power cord is damaged, it should be replaced by a specialist repair shop to avoid danger.
- Do not use the appliance with a damaged power cord or if it has been dropped or damaged in any other way or if it is not working properly. Do not repair the device yourself, as there is a risk of electric shock. Take the damaged device to an appropriate service center for checking or repair. All repairs may only be carried out by authorized service points. Incorrectly performed repairs can cause serious danger for the user.
- Place the device on a cool, stable surface, away from hot kitchen appliances such as: electric stove, gas burner, etc.
- Make sure that nothing is blocking the air inlet and outlet of the device
- Use the device only on a level surface to prevent the condensation from spilling out
-
To provide additional protection, it is advisable to install a residual current device (RCD) in the electric circuit with a rated residual current not exceeding 30mA. Ask an electrician for this.
-
Clean the air filter regularly. The frequency of cleaning depends on the cleanliness of the air.
- After turning off the machine, wait at least 5 minutes before turning it back on.
- For effective dehumidification, a gap of at least 20 cm should be used between the side walls of the devices and the compressed furniture or curtains.
- To avoid the risk of fire or explosion, do not spray the dryer
- To use the housing parts, do not place the dehumidifier near heating devices.
- Remove the water collected in the tank. Accidentally drinking water or using it with other people may cause illness.
- Does not support devices with the back cover removed due to moving and hot parts.
- Do not use any means to carry out the thawing or operating process other than those recommended by the manufacturer.
- The device should be available as part of a permanent list of ignition sources, i.e. without open flame, without a working gas device or without a working device heater.
- Do not pierce or smoke.
- Please note that refrigeration manufacturers may not contain fragrance.
Before first use:
- The dehumidifier must be used on a level and stable surface, keep distances between unit and other objects according to picture 1 to ensure suitable efficiency. Close all windows and doors of room you want to dehumidify the air.
- To prevent the water from freezing, do not use the dehumidifier and the drain hose at ambient temperature below 0^ C
- Do not use the dehumidifier outside. Exposure to direct sunlight or rain may result in overheating, electric shock and fire.
- Do not put water tank on the dehumidifier to avoid any spill of water into the unit inside and deteriorates the insulation.
- Never attempt to use the dehumidifier for special uses, such as food dehumidification or preservation of art objects, or the like.
- Do not use the dehumidifier where any leakage of oil or flammable gas may take place. Do not use the unit in places subject to chemicals.
- For continuous draining, make sure that the drain hose is set properly with slope.
- Be careful that a heating appliance is not exposed to the wind from the dehumidifier.
- Do not use the dehumidifier as a chair or a footstool.
- Do not remove the float lever from the water tank.
- Do not block up the air intakes and the air outlets.
- Do not cover the unit with washed clothes.
- Prior to continuous operation for a long duration, periodical checking is required especially for the air clean filter, the drain hose, or the like.
- The device shall be installed, operated and stored in a room with a floor area larger than 4 square meters and in a room with a well-ventilated area.
- Never put your fingers, rods, into the air outlet and inlet.
Product description: AD7861 Air dehumidifier (picture 2)
- Handle for easy carry 2. Air outlet 3. Back housing
- Control panel 5. Air inlet 6. Front housing
- Water tank 2.0L 8. Power cord 9. Foot
- Drain hose 11. Float laver 12. Net air filter
- Filter grid 14. Continuous water drainage port
control panel
A. Power button B. Desired humidity decrease button
C. Desired humidity increase button D. Timer 0-24 hours button
E. Timer indicator F. self-defrost indicator
G. Compressor activity indicator H. Full water tank indicator
J. Digital "88" indicator
The digital "88" indicator (J) will show:
- selected desired humidity level in range: 30-90 percent of relative humidity (RH)
- hours in range: 1-24, when you program delayed start or delayed stop
- "LO" – means low, when the environment humidity is lower than 35%
- "HI" - means high, when the environment humidity is higher than 95%,
USAGE
-
Plug in the device.
-
Press the power button (A) to start operation, the digital "88" indicator (J) will be lighted on. Press the power button (A) again to stop operation.
-
Press the bottom (C) or (D) to set the desired humidity level in the room, which can be set from 30% to 90% at 5% intervals or "CO". After a period of working:
-
when environment humidity is lower than the selected humidity by 2%, compressor will stop,
- when environment humidity is equal to or higher than the selected humidity by 3%, the compressor will restart once 3-minute compressor protection time over.
4. TIMER FUNCTION
Press the timer button (D) is the program the time:
- when the device is turned on to set up the delayed stop function:
Repeatedly pressing of the timer button (D) adjust desired time, it will be circulate from 0-1-2.....23-24. The time indicator (E) will be lighted on. The device will stop operation when desired time passed. - when the device is turned off to set up the delayed start function:
Repeatedly pressing of the timer button (D) adjust desired time, it will be circulate from 0-1-2.....23-24. The time indicator (E) will be lighted on. The device will start operation when desired time passed.
To cancel the timer programming, press the timer button (D) to zero.
The programmed time remains unchanged if the machine stops to work due to full water tank or during self-defrosting.
5. WATER TANK DRAINAGE
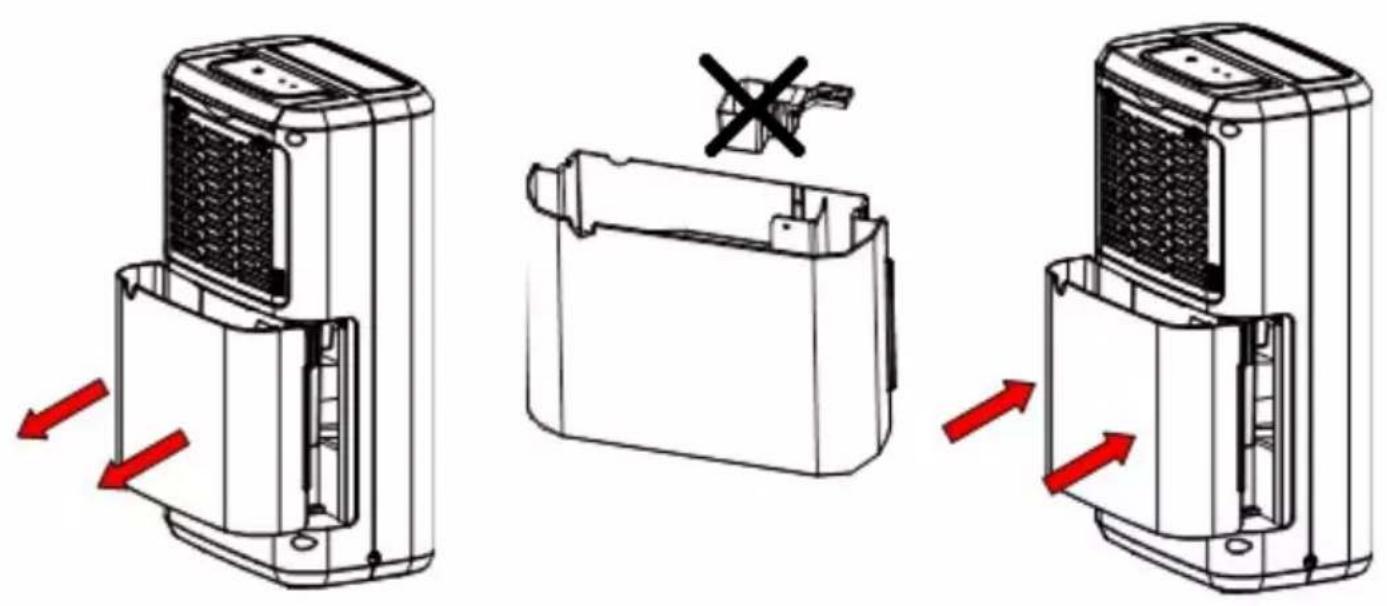
When the water tank (7) is full, the indicator (H) light up, the operation will stop automatically and the buzzer will beep 15 times to alert the user, that the water need to be emptied from the water tank (7). Look at pictures 4 and 5. The water drainage procedure is:
- Lightly press on the sides of the tank (7) with both hands and pull the tank out gently.
- Pour out the collected water. If the water tank (7) is dirty, wash it with cold or lukewarm water.
REMARK: Do not remove the float laver (11) from the water tank (7). The built-in full water sensor will no longer be able to detect the water level correctly without the float laver (11) and the device will stop operation.
- When putting back the water tank (7), press the tank firmly into place with both hands. If the tank is not positioned properly, the built-in full water sensor will be not activated, so the dehumidifier will not operate.
6. CONTINUOUS WATER DRAINAGE FUNCTION
When setting the humidity level to "CO" on digital display (J), the compressor will run continuously. The user can:
6.a. connect the drain hose (10)
If the user connects the drain hose (10), the water will drain out continuously to sink / bathtub or other outside container you will set up. The device features a continuous water drainage port (14) - look at picture 3. It is need to take out the water tank (7) to assemble the drain hose (10) to the continuous water drainage port (14). The drain hose (10) (with an inner diameter of 10mm) should be put on the port (14) drain hole shown at picture 3. The water can be continuously drained out from the port (14).
6.b. do not connect the drain hose (10).
If the user doesn't connect the drain hose (10), the water will drain to the water tank (7). When the water tank (7) be full, the device will stop operation automatically.
7. AUTO DEFROST FUNCTION
When frost builds up on the built-in evaporator coil, the compressor will cycle off and the device will go in to self-defrost mode automatically. Following completion of the defrost mode, the device will return to the previously operating settings. When the device is running in a room with a temperature between 5 degree of Celsius and 12 degree of Celsius, it will enter self-defrost mode roughly every 30 minutes. When the device is running in a room with a temperature between 12 degree of Celsius and 20 degree of Celsius, it will enter the self-defrost mode roughly every 45 minutes.
Cleaning and Maintenance
- Turn off the unit and disconnect the power plug before starting any cleaning or other routine maintenance.
- To avoid the risk of electric shock, never sprinkle or spill water on the dehumidifier when cleaning.
- Turn off the device and empty the water out of the water tank before moving the device. Be sure to hold by the handle while moving.
- Wipe up the housing of the device with wet cloth.
- Don't dismantle the floater (11) from the water tank (7). To clean the water tank (7) do not use detergent, scouring pads, chemically treated dust cloths, gasoline, benzene, thinner, or other solvents, as these can scratch and damage the tank and cause water leakage.
- Prior to planned continuous operation for a long duration, periodical checking is required especially for the net air filter (12) and the drain hose (10).
-
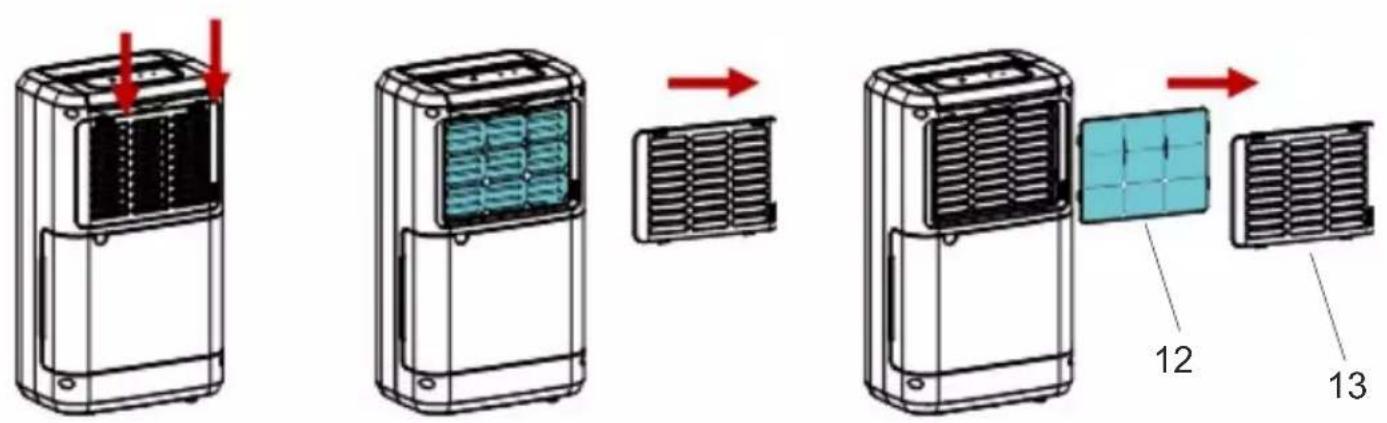
To clean or replace the filters should be:
-
disconnect the plug and take out the water tank (7),
- remove the grid (13) as shown at picture 6,
- remove the net air filter (12) gently from the filter grid (13),
- clean filter every two weeks with a vacuum cleaner. Run a vacuum cleaner lightly over the surface of the air filter (12) to remove dirt. If the air filter (12) is exceptionally dirty, wash it with warm water and a mild cleanser and dry thoroughly. Dehumidification performance may decrease when the filter is clogged with debris.
- put the filter inside the filter grid and assemble them back into the device housing.
- Don't clean the device with gasoline, thinner or liquid detergent.
- Storage: when the device is not being used for a long period of time and you want to store it note the following steps:
- Empty any water left in the water tank.
- Fold up the power supply cord (8) and put it inside the water tank (7) inside.
- Clean the net air filter (12).
- Storage in a cool and dry place.
TROUBLE SHOOTING
If a condition listed below occurs, please check the following items before calling customer service.
Problem 1: The device does not operate.
Possible reason 1: Has the power cord been disconnected?
Solution of problem: Plug the power cord into the outlet.
Possible reason 2: Is the full water tank indicator (H) blinking?
Solution of problem: The tank is full or in a wrong position. Empty the water tank (7) and then re-position the tank.
Possible reason 3: Is the temperature of the room above 35 degree of Celsius or below 5 degree of Celsius?
Solution of problem: Built-in protection device is activated and the dehumidifier cannot be started in the temperature of the room above 35 degree of Celsius or below 5 degree of Celsius.
Problem 2: The dehumidifying function does not work
Possible reason 1: Is the net air filter (12) clogged?
Solution problem 1: Clean the air filter as instructed under "Cleaning and Maintenance" – point 7.
Possible reason 2: Is the air inlet (5) or the air outlet (2) obstructed?
Solution of problem: Remove the obstruction.
Problem 3: No air is discharged.
Possible reason 1: Is the net air filter (12) clogged?
Solution of problem: Clean the air filter as instructed under "Cleaning and Maintenance" - point 7.
Problem 4: Operation is noisy
Possible reason 1: Is the device tilted or unsteady positioned?
Solution of problem: Move the device to a stable, even, sturdy surface.
Possible reason 2: Is the net air filter (12) clogged?
Solution of problem: Clean the air filter as instructed under "Cleaning and Maintenance" - point 7.
Problem 5: E1 Code shown on the digital indicator (J)
Possible reason 1: Coil sensor short circuit or open circuit
Solution of problem: Contact the seller who issued you purchase bill.
TECHNICAL DATE:
Dehumidify capacity at 30°C / 80% RH): 10 liters / 24 hours
Noise level: <= 42dB(A)
Water tank capacity: 2.0 liters
Airflow: 150m3/hour
R290 coolant weight: 45 grams
Rated Input Power: 280W
Power supply: 220-240V \~50Hz

Caution, risk of fire.
Do NOT pierce or burn.
Be aware that the refrigerant may not contain an odor.
Device shall be installed, operated and stored in a room with a floor area larger than 4 m. ^2
The maximum refrigerant charge amount: 45g.
Please transfer cardboard packaging to waste paper. Pour the polyethylene bags (PE) into the plastic container Worn device should be returned to the appropriate point storage because it is dangerous in the device ingredients may pose a threat to the environment. The electrical device should be handed over to limit its reuse and use. If in the device there are batteries you have to take out and give to the point stored separately.
DEUTSCH


Oprez, opasnost od požara.


Oprez, opasnost od požara.

Pozor, nevarnost požara.

5. AFLEDNING AF VANDTANK
Forsigtig, risiko for brand.

6. CONTINUE WATERAFVOERFUNCTIE


Kujdes, rrezik zjarri.
MOS shponi ose digjni.
natural_image
Exterior view of a modern stainless steel toaster with a digital display (no visible text or symbols)TOASTER 2 SLICE AD 3214

HAND BLENDER
Ad4625

natural_image
Close-up of a stainless steel kitchen appliance with a digital scale and control knob (no visible text or symbols)MIXER WITH BOWL AD 4222

natural_image
Exterior view of a black and white electric oven with digital display (no visible text or symbols)AIR FRYER OVEN AD 6309

natural_image
Front view of a white microwave oven with control knobs and a black screen (no visible text or symbols)MICROWAVE OVEN AD 6205
natural_image
Black rectangular electronic device with ports and lid (no visible text or symbols)WAFFLE MAKER AD 3049
natural_image
White digital kitchen scale with LCD display and control buttons (no visible text or symbols)KITCHEN SCALE AD 3170
natural_image
Glass water heater with blue liquid splashing, no visible text or symbolsELECTRIC KETTLE AD 1286

natural_image
Black rectangular device with a handle and label 'SAR' on top (no readable text or symbols beyond branding)SANDWICH MAKER
AD 3043

natural_image
Exterior view of a modern office building (no signage)PORTABLE FRIDGE AD 8077
natural_image
Black four-tier toaster oven with two top ovens and front wheels (no visible text or labels)Electric Oven With HOB AD 6020

natural_image
White ADLER electric heater with visible grille and control knobs (no text or symbols)FAN HEATER AD 7728

natural_image
Black rectangular device with blue mesh pattern and a small cable attached (no visible text or symbols)MOSQUITO LAMP AD 7938

natural_image
Black mesh cushion with a white USB cable attached, no visible text or symbolsHEATED PAD AD 7433
ORAL IRRIGATOR
AD 2176
ADLER
EUROPE

natural_image
White portable air conditioner unit with ventilation grilles and wheels (no visible text or symbols)AIR COOLER AD 7913

natural_image
Close-up of a white spherical device with blue internal components and a central control knob (no visible text or symbols)FOOT SPA AD 2177

HAIR CLIPPER
AD 2831

natural_image
Green handheld hair dryer with black handle and logo (no visible text or symbols on body)HAIR DRYER AD 2265

natural_image
Close-up of a white remote control device placed on a gray cushion with a fluffy white blanket (no text or symbols visible)HEATED PAD AD 7412

CERAMIC FAN HEATER
AD 7731
natural_image
White AOLER oil resistance heater with cooling fan and wheels (no visible text or symbols)OIL-FILLER RADIATOR AD 7811

KITCHEN SCALE AD 3171

natural_image
White industrial blender with black filter and control knob (no visible text or symbols)CHOCOLATE FOUNTAIN AD 4487

HAND BLENDER
AD 4617

natural_image
White handheld electric shaver with mesh grille and handle (no visible text or symbols)LINT REMOVER AD 9616
natural_image
Close-up of a handheld vacuum cleaner with black and pink body (no visible text or symbols)VACUUM CLEANER AD 7044

natural_image
Black and white photo of a kitchen feeder (no visible text or labels)MEAT MINCER AD 4811

Blender AD 4078

natural_image
Exterior view of a modern kitchen grater with food and a glass lid (no text or symbols visible)ELECTRIC GRILL AD 6610
natural_image
Glass kettle with water splash inside, placed on a square base (no text or symbols visible)ELECTRIC KETTLE AD 1293
| AFTER SALE SERVICE NOTICE | |
| GB | If you want to buy spare parts or make any complaints, please contact the celler who issued the receipt directly. |
| DE | Wenn Sie Ersatzteile kaufen oder reklamieren möchten, wenden Sie sich bitte direkt an den Verkäufer, der die Quittung ausgestellt hat. |
| FR | Si vous souhaitez acheter des pièces de rechange ou faire des réclamations, veuillez contacter directement le vendeur qui a émis le reçu. |
| ES | Si dosca comprar repuestos o presentar alguna queja, comuniquese directamente con el vendedor que emitió el recibo. |
| PT | Se você quiser comprar peças de reposição ou fazer alguma reclamação, entre em contato diretamente com o vendedor que emitiú o recibo. |
| LT | Jei nonite jsigyti atsarginiú daliú ar pateikti nusiskundimu, susisiekite tiesiogiai su kvitą išdavusiu pardavēju. |
| LV | Ja vēlaties legādāties rezerves daļas vai izteikt pretenzijas, lūdzu, sazinieties tieši ar pārdevēju, kurš izsniedza ǒeku. |
| EST | Kui soovite osta varuosi või esitada pretensioone, võtke otse uhendust kvīttungi valjastanud muujaga. |
| HU | Ha pótaikatrészeket szeretne vásárolni, vagy panaszt szeretne tenni, forduljon közvetlenül a bizonylatot kiāllitó eladóhoz. |
| BS | Ako želite kupiti rezervne dijelove ili napraviti reklamaciju, obratite se direktno prodavaču koji je izdao račun. |
| RO | Если вы хотите купить запчасти или предъявить какие-либо претензии, покалуйста, свяжитесь напрямую с продавцом, выдавшим чек. |
| CZ | Chcete-li zakoupit náhradní díly nebo uplatnit jakoukoli reklamaci, kontaktujte přímo prodejce, který účtenku vystavil. |
| RU | Dacă doriti să cumpārați piese de schimb sau să faceți vreo reclamatie, vǎ rugăm să contactați direct vânzătorul care a emis chitanța. |
| GR | Eáv θέλετε να αγοράσετε ανταλλακτικά τή να κάνετε οποιαδήποτε παράπονα, επικοινωνήστε απευθείας με τον πτωλητή που εξί δωσε την απόδειξη. |
| MK | Ако сакате да купите резервни делови или да поднесете какви било поплаки, контактирајте директно со продавачот кој ja издал сметката. |
| NL | Als u reserveonderdelen wilt kopen of een klacht wilt indienen, neem dan rechtstreeks contact op met de verkoper die de bon heeft afgegeven. |
| SL | Če želite kupiti nadomectne dele ali vložiti reklamacije, ce obmite nepocredno na prodajalca, ki je izdal račun. |
| FI | Jos haluat octaa varaocia tai tehdä valitukcia, ota yhteyttä cuoraan kuitin antaneeceen myyjään. |
| PL | W przypadku chęci zakupu części zamiennych lub zgłoszenia ewentualnych reklamacji należy kontaktować się bezpośrednio ze sprzedawca, który wystawił paragon. |
| IT | Se desideri acquistare pezzi di ricambio o presentare reclami, contatta direttamente il venditore che ha emesso la ricevuta. |
| HR | Se desideri acquistare pezzi di ricambio o presentare reclami, contatta direttamente il venditore che ha emesso la ricevuta. |
| SV | Om du vill köpa reservdelar eller göra några reklamationer, vänligen kontakta säljaren som utfārdat kvittot direkt. |
| DK | Hvis du ønsker at köbe reservedele eller reklamere, bedes du kontakte sælgeren, som har udstedt kvitteringen, direkte. |
| UA | Якщо ви хочете придбати запчастини або подати будь-які претензії, зверніться безпосередньо до продавца, який видав чек. |
| SR | Ако желите да купите резервна делове или да уложите рекламацију, обратите се директно продавцу који је издаю рачун. |
| SK | Ak si chcete küpit náhradné diely alebo uplatnit' akúkofvek reklamáciu, kontaktujte priamo predajcu, ktorý účtenku vystavil. |
| AR | إِذا کنعت تRGB في شراء قطع عيار أو نتقبим أي знакوی، فیرجی الاتصال بالبiałع الذي أصدر الإ Itsул. «باشرة». |
| BG | Ако искате да закупите резервни части или да направите оплаивания, моля, свържете се директно с продавача, който е издал касовата бележха. |
| AZ | Ehtiyat hissəlari almaq va ya hər hansı şikayat etmak istayirsinizsə, qabzi veran satıcı ila birbaşa əlaqa saxlayin. |
| ALB | Nëse dëshironi të blinî pjesë këmbimi ose të bëni ndonjë ankesë, ju lutemi kontaktoni drejtpërdrejt shitësin që ka lëshuar faturën. |

- AD 7861
- ENGLISH
- SAFETY CONDITIONS. IMPORTANT INSTRUCTIONS ON SAFETY OF USE PLEASE READ CAREFULLY AND KEEP FOR FUTURE REFERENCE
- Before first use:
- Product description: AD7861 Air dehumidifier (picture 2)
- control panel
- USAGE
- TIMER FUNCTION
- WATER TANK DRAINAGE
- CONTINUOUS WATER DRAINAGE FUNCTION
- AUTO DEFROST FUNCTION
- Cleaning and Maintenance
- TROUBLE SHOOTING
- TECHNICAL DATE:
- DEUTSCH
- AFLEDNING AF VANDTANK
- CONTINUE WATERAFVOERFUNCTIE
- ADLER
- EUROPE
Brand : ADLER
Model : AD 7861
Category : Dehumidifier