AD 7863 - Dehumidifier ADLER - Free user manual and instructions
Find the device manual for free AD 7863 ADLER in PDF.

User questions about AD 7863 ADLER
0 question about this device. Answer the ones you know or ask your own.
Ask a new question about this device
Download the instructions for your Dehumidifier in PDF format for free! Find your manual AD 7863 - ADLER and take your electronic device back in hand. On this page are published all the documents necessary for the use of your device. AD 7863 by ADLER.
USER MANUAL AD 7863 ADLER
natural_image
Line drawing of a portable electronic device labeled 'ADLER 50' with wheels and handle (no additional text or symbols)AD 7863
(GB) user manual 4 (BIH) upute za rad 55
(KA) 0656799999999999999999999999999999999999999999999999999999999999999999999999999999999999999999999
PICTURE 1
PICTURE 2
PICTURE 3
natural_image
Technical line drawing of a mechanical component with no visible text or symbolsPICTURE 4
PICTURE 5
natural_image
Technical line drawing of a mechanical component with internal cavities and mounting brackets (no text or symbols)PICTURE 6
natural_image
Technical line drawing of a mechanical bracket assembly with two views (no text or symbols)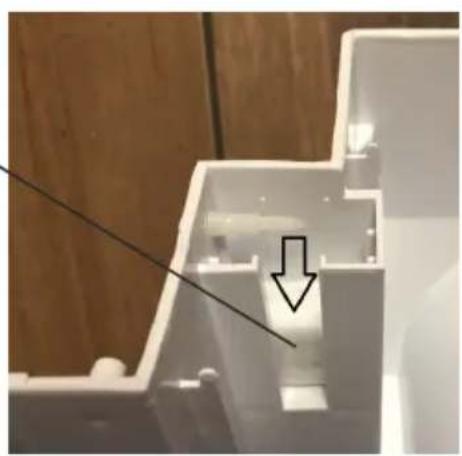
natural_image
Close-up of a white plastic enclosure with a black arrow pointing to a component, no visible text or symbols.ENGLISH
SAFETY CONDITIONS. IMPORTANT INSTRUCTIONS ON SAFETY OF USE PLEASE READ CAREFULLY AND KEEP FOR FUTURE REFERENCE
- Before using the device, read the operating manual and follow the instructions contained in it. The manufacturer is not liable for damages caused by using the device contrary to its intended purpose or improper operation.
- The device is for home use only. Do not use for other purposes that are not for its intended purpose.
- The device should only be connected to an AC outlet with a grounded 220 240V \~ 50Hz. To increase operational safety, multiple electrical devices should not be connected to one current circuit at the same time.
- Use extreme caution when using the device when children are nearby. Do not allow children to play with the device, do not allow children or people unfamiliar with the device to use it.
- WARNING: This equipment may be used by children over 8 years of age and people with limited physical, sensory or mental ability, or people who have no experience or knowledge of the equipment, if this is done under the supervision of a person responsible for their safety or have been granted them information on the safe use of the device and are aware of the dangers of using it. Children should not play with the equipment. Cleaning and maintenance of the device should not be performed by children, unless they are over 8 years old and these activities are carried out under supervision.
- Always disconnect the power plug by holding the socket with your hand after use. DO NOT pull on the power cord.
- Do not immerse the cable, plug and the whole device in water or any other liquid. Do not expose the device to atmospheric conditions (rain, sun, etc.) or use in conditions of high humidity (bathrooms, damp mobile homes).
- Periodically check the condition of the power cord. If the power cord is damaged, it should be replaced by a specialist repair shop to avoid danger.
- Do not use the appliance with a damaged power cord or if it has been dropped or damaged in any other way or if it is not working properly. Do not repair the device yourself, as there is a risk of electric shock. Take the damaged device to an appropriate service center for checking or repair. All repairs may only be carried out by authorized service points. Incorrectly performed repairs can cause serious danger for the user.
- Place the device on a cool, stable surface, away from hot kitchen appliances such as: electric stove, gas burner, etc.
- Make sure that nothing is blocking the air inlet and outlet of the device
- Use the device only on a level surface to prevent the condensation from spilling out
- To provide additional protection, it is advisable to install a residual current device
(RCD) in the electric circuit with a rated residual current not exceeding 30mA. Ask an electrician for this.
- Clean the air filter regularly. The frequency of cleaning depends on the cleanliness of the air.
- After turning off the machine, wait at least 5 minutes before turning it back on.
- For effective dehumidification, a gap of at least 20 cm should be used between the side walls of the devices and the compressed furniture or curtains.
- To avoid the risk of fire or explosion, do not spray the dryer
- To use the housing parts, do not place the dehumidifier near heating devices.
- Remove the water collected in the tank. Accidentally drinking water or using it with other people may cause illness.
- Does not support devices with the back cover removed due to moving and hot parts.
- Do not use any means to carry out the thawing or operating process other than those recommended by the manufacturer.
- The device should be available as part of a permanent list of ignition sources, i.e. without open flame, without a working gas device or without a working device heater.
- Do not pierce or smoke.
- Please note that refrigeration manufacturers may not contain fragrance.
Before first use:
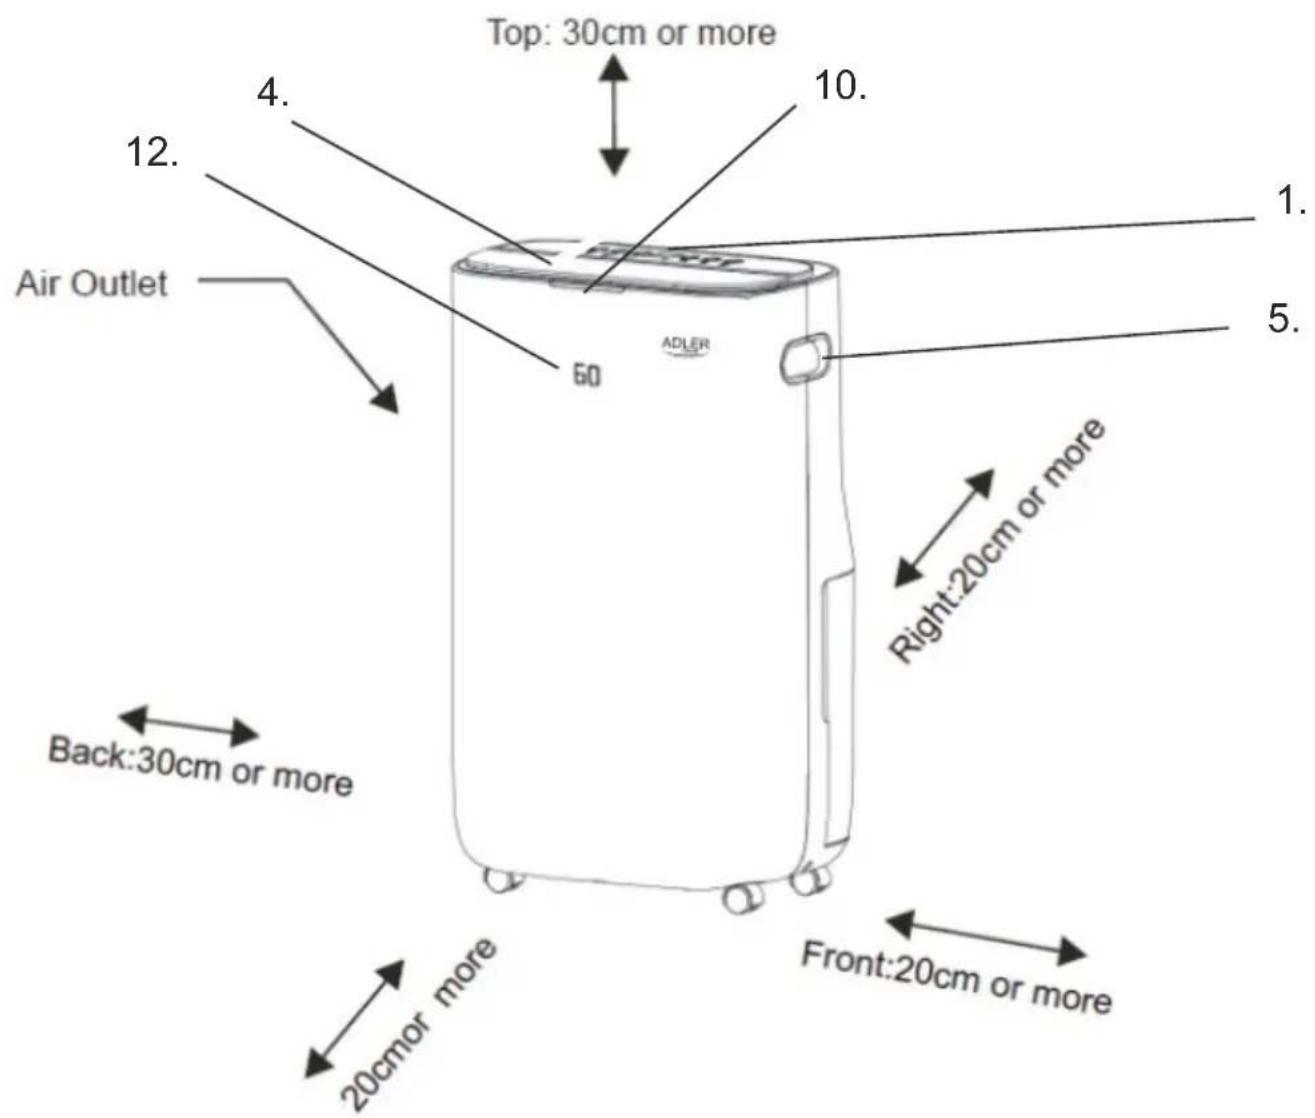
- The dehumidifier must be used on a level and stable surface, keep distances between unit and other objects according to picture 1 to ensure suitable efficiency. Close all windows and doors of room you want to dehumidify the air.
- To prevent the water from freezing, do not use the dehumidifier and the drain hose at ambient temperature below 0^ C
- Do not use the dehumidifier outside. Exposure to direct sunlight or rain may result in overheating, electric shock and fire.
- Do not put water tank on the dehumidifier to avoid any spill of water into the unit inside and deteriorates the insulation.
- Never attempt to use the dehumidifier for special uses, such as food dehumidification or preservation of art objects, or the like.
- Do not use the dehumidifier where any leakage of oil or flammable gas may take place. Do not use the unit in places subject to chemicals.
- For continuous draining, make sure that the drain hose is set properly with slope.
- Be careful that a heating appliance is not exposed to the wind from the dehumidifier.
- Do not use the dehumidifier as a chair or a footstool.
- Do not remove the float lever from the water tank.
- Do not block up the air intakes and the air outlets.
- Do not cover the unit with washed clothes.
Product description: AD7863 2in1 Air dehumidifier & Air purifier
-
Control panel
-
Air inlet
-
Water tank 6,5L
-
Air outlet
-
Handle
-
Floater
-
HEPA air fliter
-
Washable mesh air pre-filter
-
Filter's housing
-
Humidity indicator light
-
Activated carbon filter
-
Front digital display
-
Hole for pipe to continuous water drain
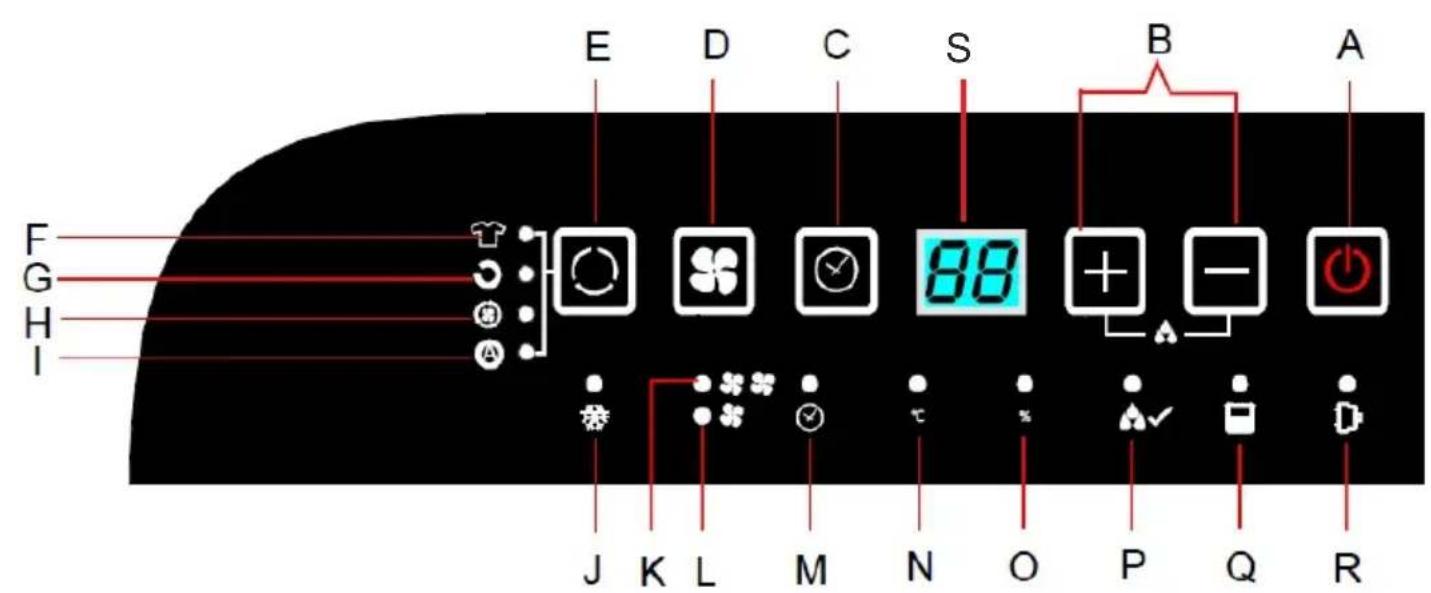
Control panel (1):
A. Power switch
B. Plus and minus buttons
C. Timer 0-24 hours button
D. Fan speed button
E. Mode button
F. Dry clothes mode indicator
G. Normal operation mode indicator
H. Air circulation mode indicator
I. Automatic mode indicator
J. Device self-defrost indication
K. Fan high speed indicator
L. Fan low speed indicator
M. Timer indicator
N. Temperature indicator
O. Humidity indicator
P. Target humidity indicator
Q. Full water tank indicator
R. Power indicator
S. LED digital display of humidity and timer and room temperature
CONDITIONS OF USE
This dehumidifier is not suitable for keeping the humidity very low approximately 50% or less.
This dehumidifier is designed to remove uncomfortable humidity in daily life and to use for auxiliary drying of washed clothes indoors. This is not suitable for keeping the humidity very low.
It is normal the device produces heat during the operation and room temperature rises by 1C to 4C, because this device does not have cooling function. The temperature gets higher while it is operated in a closet or the like. Furthermore, room temperature rises because doors and windows are closed and heat is produced from other appliances in the room and the sun radiation. This dehumidifier can't be applicable to keep extreme low temperature. The function of this dehumidifier is to pump off the unpleasant, high humidity.
DEVICE SELF-DEFROSTING FUNCTION
When the frost builds up on the evaporator coils inside the device, the automatic defrost function will be started. The compressor will turn off and the fan will continue to run until the frost is removed. When the device is running in a room temperature between 5 degree of Celsius and 12 degree of Celsius, it will stop to defrost for about 3 minutes every 8 minutes. When the device is running in a room temperature between 12 degree of Celsius and 18 degree of Celsius, it will stop to defrost for about 5 minutes every 25 minutes. When the device is running in a room temperature between 18 degree of Celsius and 23 degree of Celsius it will stop to defrost for about 5 minutes every 120 minutes. Wait 3 minutes before resuming operation. After the compressor has stopped, it cannot restart operation until 3 minutes has passed. The indicator (J) on the control panel (1) is lighted up all the time the self-defrosting is active.
IMPORTANT!
Both the dehumidifying function and the air cleaning function stop during the defrosting operation.
Do not disconnect the plug of the device or turn off the device during the defrosting.
Dehumidifying capacity
- The daily dehumidifying capacity of the dehumidifier depends on room temperature and relative humidity. At different temperatures and relative humidity, it may have different dehumidifying capacity.
- In the same room temperature, the dehumidifying capacity is higher in higher relative humidity and the dehumidifying capacity is lower in lower relative humidity. In the same relative humidity, the dehumidifying capacity is higher in higher temperature and the dehumidifying capacity is lower in lower temperature.
- If the dehumidifier is placed in the cabinet, its dehumidifying capacity may highly reduce in a short period after operating due to the humidity in the cabinet has been highly reduced.
- For 30^ C / 27^ C of room temperature and 80% / 60% of relative humidity the dehumidifying capacity is respectively around 25/13 liters of water when the air outlet is fully open.
Air purification system - 3-stages filtration
System is designed to remove pollutant particles and an odors in the air. The device includes following filters:
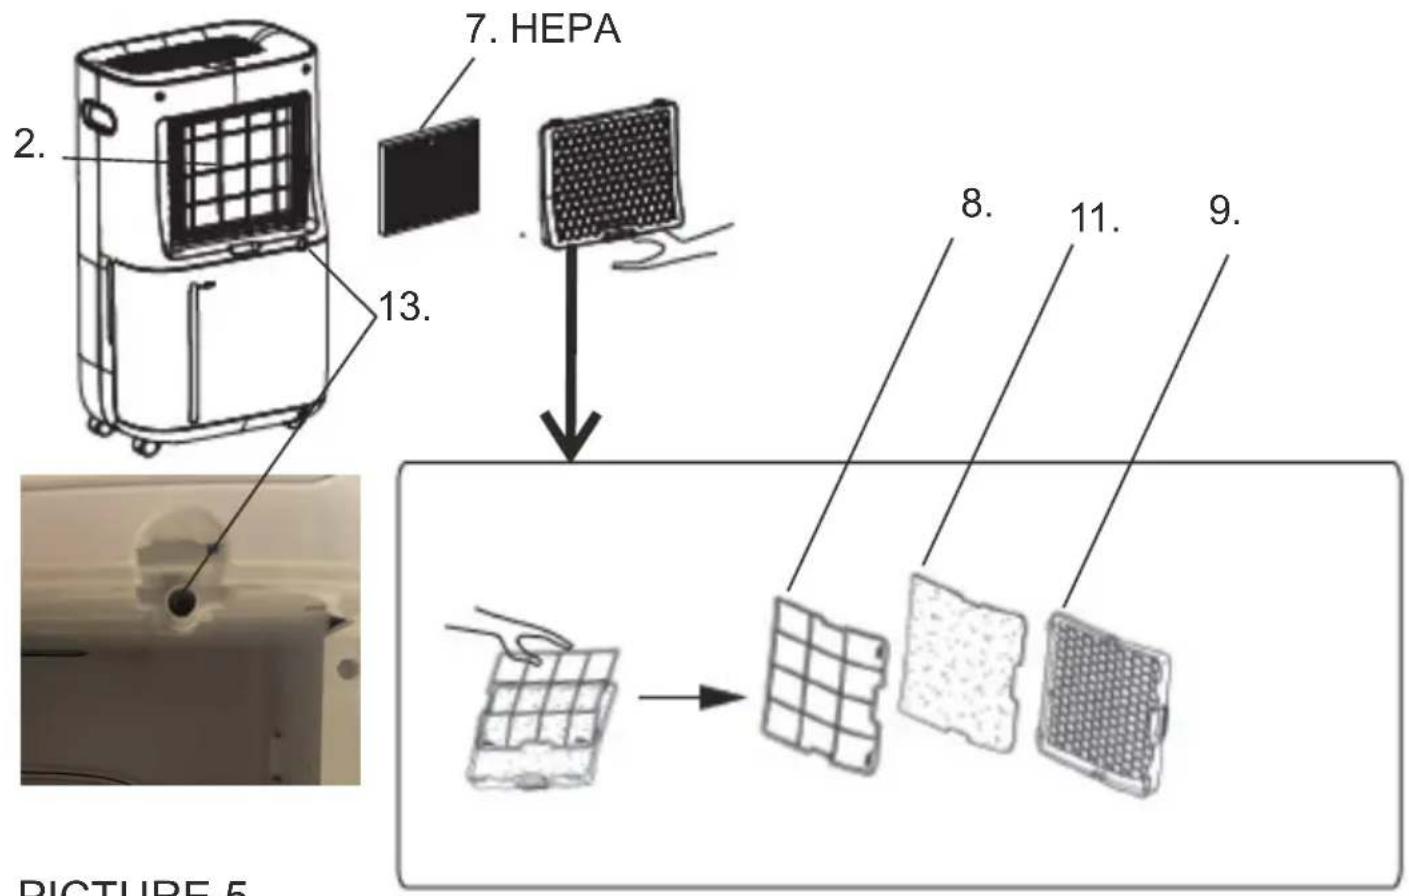
- Washable mesh air pre-filter (8): use to filtrate dust and hair in the air.
- Activated carbon filter: remove an odor caused by e.g. cigarette, pet, etc..
- HEPA filter H13: It filtrates dust, pollutant particles and refreshing an air. The HEPA H13 filter effectively retains 99.95% of pollutant particles of size up to 0.3 microns in the flowing air. HEPA H13 filter is suitable for air purification for allergy sufferers.
Operation
- Please place the device upright to avoid miss operation and unusual sound. Keep distances between other objects like shown at picture 1.
- HEPA filter (7) is packed in polybags, please do remove the polybag before using.
- Open the black lid on the top of device to let the air come out easy.
- Plug in the device, the power switch (A) is blinking on the control panel (1), press it to turn on the device. The digital display (S) will show present humidity level in room. At the same time the humidity indicator light (10) will lighted up on the front-top edge of the device.
During operation, the humidity indication light shows current humidity level in room:
- Blue color means low humidity below 50% relative humidity
- Green color means medium humidity in range 51% - 69% relative humidity
- Red color means high humidity over 70% relative humidity
Please note, the relative humidity value has got 3% tolerance when illuminates up the corresponding indication light.
- Press mode button (E) in cycle to choose desired operation mode between:
- Dry clothes mode – press the mode button (E) once, the indicator (F) will be lighted up. To get fast function fulfilling, the co is working continuous without stop, except the case the water tank (3) is full. The fan keeps in high speed all the time.
- Normal operation mode – press the mode button (E) again, the indicator (G) will be lighted up. Under normal operation, cor work. User can set target humidity level by pressing plus and minus buttons (3). Set humidity range is: 30%-80% with 5% step target humidity reaches, the compressor stop working. The fan can be set on both: high and low speed according to your need. choice the fan speed between low and high, press the button (D), corresponding indicator (K) for high speed and (L) for low sp will be lighted up.
- Air circulation mode – press the mode button (E) again, the indicator (H) will be lighted up. In this mode the compressor is working, there is fan operation only. You can adjust the speed of fan between: low and high speed to your needs.
- Automatic mode — press the mode button (E) again, the indicator (I) will be lighted up. Under this mode, the default target h is 55%. When room humidity reaches 55%, the compressor stop working, fan keeps working only. When the room humidity is than 55%, the compressor start to work again.
In the case of the electricity cut the device has memory function and it can remember the last set up.
Continuous drainage function
-
If you need to dehumidify the air for a long time, you can use the continuous drainage function.
-
Prior to continuous operation for a long duration, periodical checking is required especially for the air clean filter, the drain P the like.
-
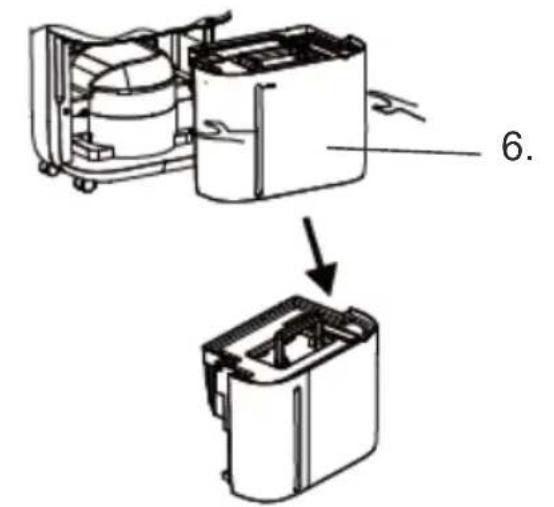
Take away the water tank (3) from original position, insert the attached the pipe on the hole for continuous water drain (13) shown on picture 5.
-
When you set target humidity under normal dehumidification mode, you can set: 30-35-40-45-50-55-60-65-70-75-80%-CO- and so on. "CO" means continuous dehumidifying mode. In this mode the fan speed can be chose between low speed or high s
-
After ending the continuous dehumidifying, disassemble the pipe, position the water tank (3) in its original place and switch device.
Drain hose: length: 30 cm, internal diameter: 17 mm, external diameter: 19 mm.
Timer operation - Delay Stop function
To setting the Timer OFF function - DELAY STOP use the timer button (C).
The timer off function can be set when the device operates. Press the Timer button (C), the timer indication (M) will lighted up LED digital display (S) lights up and "00" appears, you should press the plus or minus buttons (B) to select the desired time for device to switch off. After the timer is set, the time will be displayed for 5 seconds and remember. Once timer is set, to check time press the timer button (C). The device will switch off automatically after set up time pass. To reset the timer function is not continuous pressing the timer button (C) while time value is flashing, the time value will be changed to zero. The timer range 1 to 24 hours with a 1-hour interval.
Room temperature checking
In order to check with present room temperature, press the Plus button for few seconds, when the value will be displayed on L digital display (S), at same time the temperature indicator (N) will be displayed.
Room humidity checking
In order to check with present room humidity, look at value shown by LED digital display (S) or look at value shown by the first display (12), at same time the humidity indicator (O) will be lighted up on the control panel (1). When the present room humid reached the set relative humidity the target humidity indicator (P) will be lighted up.
Press the power switch (A) again to turn off the device, the device stops running, just the power indicator (R) will flashing to i the device is under standby status. When the device is turned on. The power indicator (R) glows.
Emptying the water tank
-
If the water tank (3) is full or the water tank (3) isn't installed in correct position, the full water tank indication (Q) lights up panel (1), the buzzer sounds. The device will stop operation automatically.
-
When the full water tank indicator light (Q) is flashing, the device stops operation until the water tank is empty or set in the position.
-
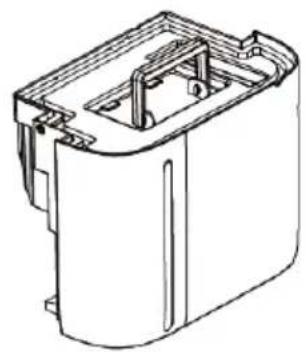
To remove the water tank (3) please do draw the water tank gently toward you by holding the concave parts of the water tan Look at picture 3.
-
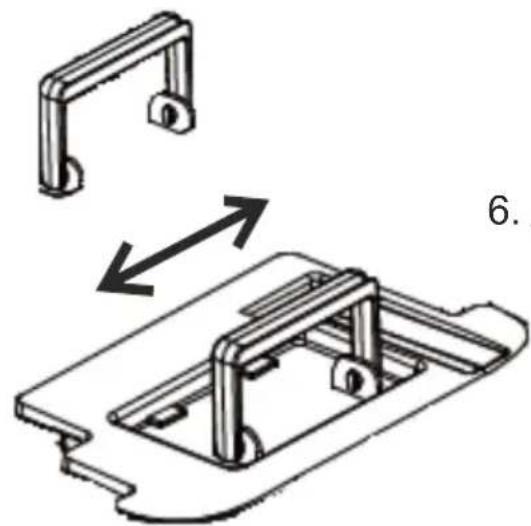
To empty the water tank (3), use a handle to carry it, then tilt it as shown at picture 4 and drain the water slowly. Then, you
lay the handle flat before gently pushing the tank (3) back to its previous position inside the housing.
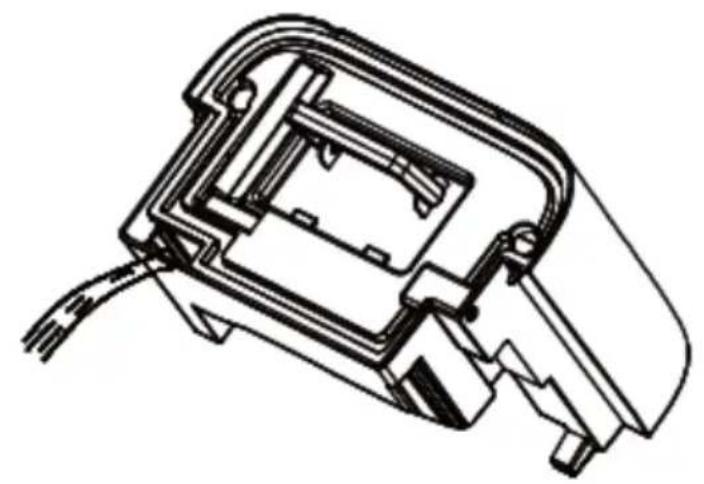
- From time to time the water tank (6) needs to clean it inside. To open the water tank (3), adjust the position of water tank's handle to shape of holes in two plastic parts the handle is assembled to and expand both edges of the handle gently to disassemble the handle completely away. Now you can open the water tank's lid and clean the water tank by water with dish soap and soft cloth. Do not dismantle or lift the floater (6) from the water tank (3). Look at picture
Buzzer
It sounds for 20 seconds when the water tank (3) is taken out during operation.
Cleaning and Maintenance
- Turn off the device and disconnect the power plug before starting any cleaning or other routine maintenance.
- To avoid the risk of electric shock, never sprinkle or spill water on the dehumidifier when cleaning.
- Turn off the device and empty the water out of the water tank before moving the device. Be sure to hold the handle while moving.
- Wipe up the housing of device with wet and soft cloth.
- Don't dismantle the floater (6) from the water tank (3).
- Prior to planned continuous operation for a long duration, periodical checking is required especially for the mesh air filter (8), activated carbon filter (11) and the drain pipe (13), or the like.
- To clean or replace the filters:
- disconnect the plug and take out the water tank (3)
- remove the filter housing (9) as shown in figure 5
- remove the mesh air filter (8) from the housing and gently remove the activated carbon filter (11)
- pull out HEPA filter (7) from device
- every two weeks, clean all three filters with a vacuum cleaner or lightly pat them to shake them out. Dehumidification performance may decrease if the filters are clogged with dirt
- put the filters back and assemble the filter housing (9) again.
If filters are fouled seriously, wash in water including neutral detergent, rinse well with water and leave until dry. - Don't clean the device with gasoline, thinner or liquid detergent.
- Before longer storage: bundle the power cord, empty water tank and wipe it by soft cloth, clean and dry all filters. Stand the device upright position to avoid malfunction or abnormal sound in future, avoid the exposure to the direct sunlight.
Trouble – shooting : check with below list before contact the seller:
- Problem: no operation
Checking point 1: see if the power plug is disconnected.
Solution 1: insert the plug into an electric outlet fully and securely
Checking point 2: see if the water tank is full of water
Solution 2: Empty the water out of the tank.
Checking point 3: see if the water tank is not set properly in position.
Solution 3: Set the tank to the device properly in position
Checking point 4: see if the top lid made from black plastic of air outlet is closed
Solution 4: open top lid
- Problem: dehumidifier capacity is small
Checking point 1: see if the filters are dirty
Solution 1: Clean the filters as specified in chapter Cleaning and Maintenance in point 7
Checking point 2: see if the air openings are blocked up
Solution 2: remove obstacles from the air openings
Checking point 3: see if the dehumidifier is in air circulation mode
Solution 3: Change the operation mode to the dehumidifying mode
- Problem: loud sound while operating
Checking point 1: check if the device is installed correctly
Solution 1: Install the device on a level and stable floor
- Problem: washed cloths are not dried
Checking point 1: see if washed clothes are not exposed to the air from the device
Solution 1: Try to expose the washed clothes to the air flow
Checking point 2: see if the room temperature is too low
Solution 2: Washed clothes are hard to be dried under low temperature conditions
The device works properly when the following phenomenon occurs:
- Phenomenon description: Operation stops occasionally
Reason of phenomenon: The device is defrosting
- Phenomenon description: Dehumidified volume is small
Reason of phenomenon: Dehumidifier volume less when the room temperature is low.
- Phenomenon description: The humidity in a room is still high
Reason of phenomenon: The room size may be too large. The doors or the windows of the room may be opened and /or closed frequently. The dehumidifier is used close to a kerosene heater which emits vapor.
- Phenomenon description: Bad smell during operation
Reason of phenomenon: Smell is emitted from the walls, furniture or other objects.
- Phenomenon description: Sound is produced within the device
Reason of phenomenon: Circulation of the refrigerant may cause sound until it is stable.
- Phenomenon description: Water is left in the water tank
Reason of phenomenon: The water is left because the device is subjected to dehumidifying test in the factory
- Phenomenon description: The buzzer sounds
Reason of phenomenon: The buzzer sounds when the water tank is full of water.
CAUTION: Refrigerant agent can be filled by factory only.
TECHNICAL DATA:
Dehumidify capacity at 30^ C / 80% RH): 25 liters / 24 hours
Dehumidify capacity at 27°C / 60% RH): 13 liters / 24 hours
Noise level: <= 48dB (A)
Water tank capacity: 6,5 liters
Air flow: 195 m3 / hour
R290 coolant weight: max. 65 grams
Ratted Input Power: 320W
Max. Ratted Input Power: 420W


Caution, risk of fire.
Do NOT pierce or burn.
Be aware that the refrigerant may not contain an odour.
The maximum refrigerant charge amount: 65g.
Please transfer cardboard packaging to waste paper. Pour the polyethylene bags (PE) into the plastic container
Worn device should be returned to the appropriate point storage because it is dangerous in the device
ingredients may pose a threat to the environment. The electrical device should be handed over to limit
its reuse and use. If in the device there are batteries you have to take out and give to the point stored separately.
DEUTSCH

Atentie, risc de incendiu.
Oprez, opasnost od požara
NE bušite i ne palite.
Imajte na umu da rashladno sredstvo ne sadrži miris.
Maksimalna količina punjenja rashladnog sredstva: 65g.
Brinući za okoliš. Molimo Vas da kartonska pakovanja odnesete u otkup otpadnog papira. Polietilenske džakove (PE) bacajte u kontejner za plastiku. Iskorišćen uređaj treba odneti na odgovarajuću deponiju, jer opasni sastojci koji se u njemu nalaze, mogu biti opasni za okoliš. Električni uređaj treba odneti na način, koji ograničava njegovu ponovnu upotrebu i korištenje. Ako se u uređaju nalaze baterije, treba ih izvaditi i odvojeno predati na deponiju. Uređaj se ne smije bacati u kontejner za komunalni otpad!!
MAGYAR
ÁLTALÁNOS BIZTONSÁGI FELTÉTELEK
FONTOS BIZTONSÁGI UTASÍTÁSOK FIGYELMESEN OLVASSA EL ÉS TÖRVÉNYE JÖVŐBEN

Varo, tulipalon vaara.


Oprez, opasnost od požara

Forsigtig, risiko for brand.


Kujdes, rrezik zjarri.
MOS shponi ose digjni.
modification of the first 10 items of the first 10 items of the first 10 items of the first 10 items of the first 10 items of the first 10 items of the first 10 items of the first 10 items of the first 10 items of the first 10 items of the first 10 items of the first 10 items of the first 10 items of the first 10 items of the first 10 items of
اللهutzung desamortales
Toru Ognunghmugon Ughmuguymsq Qusdunbdyghduyms, Ughmugon Ubnbnd hyssmugn bgnghmuguyms Ughmugon Ushyghmugon, Ughmugon Ushdunbdyghduyms, Ughmugon Ushyghmugon Ushsghmugon.
- 36m07m9ds: d78dsm0n5 q6m1b4s4smsmn bds

Kujdes, rrezik zjarri.
MOS shponi ose digjni.
natural_image
Exterior view of a modern silver kettle with blue liquid, no visible text or symbolsElectric Kettle AD 1282

natural_image
Close-up of a black and white coffee maker with powder spilling out (no visible text or symbols)Burr Coffee Grinder
Milk Frother
AD 4491
natural_image
Black rectangular electronic device with a silver tab and handle (no visible text or symbols)Sandwich Maker AD 3055
natural_image
Exterior view of a modern silver toaster with two handles and a side panel (no visible text or symbols)TOASTER 2 SLICE

natural_image
Exterior view of a modern stainless steel grater with black and silver casing (no visible text or symbols)ELECTRIC GRILL

natural_image
Exterior view of a modern glass juice organizer with orange juice and a white squeegee (no text or symbols visible)CITRUS JUICER

natural_image
Product photo of a modern blender with clear glass, black lid, and orange slices (no text or symbols visible)PERSONAL BLENDER

natural_image
Assorted kitchen utensils including a blender, spatula, and cleaning tools (no text or labels visible)FOOD PROCESSOR AD 4224
natural_image
Electric hand mixer with a black handle and metallic handle, accompanied by decorative wavy lines (no text or symbols visible)MIXER AD 4225
natural_image
Black air fryer with control knob and side handle (no visible text or symbols)AIR FRYER AD 6310
natural_image
Exterior view of a modern stainless steel coffee maker with black lid and control panel (no visible text or symbols)PASTEURIZATION POT
natural_image
White portable air conditioner unit with visible branding and ventilation grille (no text or symbols on body)AIR CONDITIONER AD 7916
natural_image
Black and white cylindrical device with a lid and 'SH' branding (no visible text or symbols on body)AIR HUMIDIFIER AD 7966
natural_image
White portable heater with heat sink and ventilation grille (no visible text or symbols)FAN HEATER AD 7725

natural_image
Top-down view of a stainless steel kitchen scale with digital display (no text or symbols visible)KITCHEN SCALE AD 3166

AFTER SALE SERVICE NOTICE
| GB | If you want to buy spare parts or make any complaints, please contact the seller who issued the receipt directly. |
| DE | Wenn Sie Ersatzteile kaufen oder reklamieren möchten, wenden Sie sich bitte direkt an den Verkäufer, der die Quittung ausgestellt hat. |
| FR | Si vous souhaitez acheter des pièces de rechange ou faire des réclamations, veuillez contacter directement le vendeur qui a émis le reçu. |
| ES | Si desea comprar repuestos o presentar alguna queja, comuníquese directamente con el vendedor que emitió el recibo. |
| PT | Se você quiser comprar peças de reposição ou fazer alguma reclamação, entre em contato diretamente com o vendedor que emitiu o recibo. |
| LT | Jei norite jsigyti atsarginių dalių ar pateikti nusiskundimų, susisiekite tiesiogiai su kvitą išdavusiu pardavėju. |
| LV | Ja vēlaties iegādāties rezerves daļas vai izteikt pretenzijas, lūdzu, sazinieties tieši ar pārdevēju, kurš izsniedza čeku. |
| EST | Kui soovite osta varuosi või esitada pretensioone, võtke otse ühendust kviitungi väljastanud müūjaga. |
| HU | Ha pótalkatrészeket szeretne vásárolni, vagy panaszt szeretne tenni, forduljon közvetlenül a bizonylatot kiállító eladóhoz. |
| BS | Ako želite kupiti rezervne dijelove ili napraviti reklamaciju, obratite se direktno prodavaču koji je izdao račun. |
| RO | Если вы хотите купить запчасти или предъявить какие-либо претензии, пожалуйста, свяжитесь напрямую с продавцом, выдавшим чек. |
| CZ | Chcete-li zakoupit náhradní díly nebo uplatnit jakoukoli reklamaci, kontaktujte přímo prodejce, který účtenku vystavil. |
| RU | Dacă doriți să cumpārați piese de schimb sau să faceți vreo reclamație, vă rugăm să contactați direct vânzătorul care a emis chitanța. |
| GR | Eáv θέλετε να αγοράσετε ανταλλακτικά ή να κάνετε οποιαδήποτε παράπονα, επικοινωνήστε απευθείας με τον πωλητή που εξέδωσε την απόδειξη. |
| MK | Ako сакате да купите резервни делови или да поднесете какви било поплаки, контактрајте директно со продавачот koj ja издал сметката. |
| NL | Als u reserveonderdelen wilt kopen of een klacht wilt indienen, neem dan rechtstreeks contact op met de verkoper die de bon heeft afgegeven. |
| SL | Če želite kupiti nadomestne dele ali vložiti reklamacije, se obrnite neposredno na prodajalca, ki je izdal račun. |
| FI | Jos haluat ostaa varaosia tai tehdä valituksia, ota yhteyttä suoraan kuitin antaneeseen myyjään. |
| PL | W przypadku chęci zakupu części zamiennych lub zgłoszenia ewentualnych reklamacji należy kontaktować się bezpośrednio ze sprzedawcą, który wystawił paragon. |
| IT | Se desideri acquistare pezzi di ricambio o presentare reclami, contatta direttamente il venditore che ha emesso la ricevuta. |
| HR | Se desideri acquistare pezzi di ricambio o presentare reclami, contatta direttamente il venditore che ha emesso la ricevuta. |
| SV | Om du vill köpa reservdelar eller göra några reklamationer, vänligen kontakta säljaren som utfärdat kvittot direkt. |
| DK | Hvis du ønsker at købe reservedele eller reklamere, bedes du kontakte sælgeren, som har udstedt kvitteringen, direkte. |
| UA | Якщо ви хочете придбати запчастини або подати будь-які претензії, зверніться безпосередньо до продавця, який видав чек. |
| SR | Ako желите да купите резервне делове или да уложите рекламацију, обратите се директно продавцу који је издаю рачун. |
| SK | Ak si chcete küpit'náhradné diely alebo uplatnit' akúkol'vek reklamáciu, kontaktujte priamo predajcu, ktorý účtenku vystavil. |
| AR | إذا��ت ترゴب في شراء قطع غيار أو تقدم ihي شكوی، فيرجي الاتصال بالبانع الذي أصدرا الإ似的ال مباشرة. |
| BG | Ako искате да закупите резервни части или да направите оплаквания, моля, свържете се директно с продавача, който е издал касовата бележка. |
| AZ | Ehtiyat hissələri almaq və ya her hansı şikayət etmək istəyirsinizsə, qəbzi verən satıcı ile birbaşa əlaqe saxlayın. |
| ALB | Nëse dëshironi të blini pjesë këmbimi ose të bëni ndonjë ankesë, ju lutemi kontaktoni drejtpërdrejt shitësin që ka lëshuar faturën. |
| KA | στη βυγφιση λσσσσεσθομ δβζησσθονι δθρδις δ6 σπσθο 3σθζθβθης, σσθμσο σσγγμσθοθησθοσο δσθυσσθονι, σπθσθοθοθο σσθυσθο θσσσσθο θσσσσθο θσσσσθο θσσσσθο θσσσσθο θσσσσθο θσσσσθο θσσσσθο θσσσσθο θσσσσθο θσσσσθο θσσσσθο θσσσσθο |