
CDM1147P - Drill Ferm - Free user manual and instructions
Find the device manual for free CDM1147P Ferm in PDF.
| Product type | Cordless hammer drill/driver |
| Brand | Ferm |
| Model | CDM1147P |
| Nominal voltage | 20 V |
| Chuck capacity | 1.5 - 13 mm |
| No-load speed (position 1) | 0 - 450 min⁻¹ |
| No-load speed (position 2) | 0 - 1700 min⁻¹ |
| No-load impact rate (position 1) | 0 - 7200 min⁻¹ |
| No-load impact rate (position 2) | 0 - 27200 min⁻¹ |
| Max torque | 50 N·m |
| Torque settings | 21 + drilling mode |
| Weight (without battery) | 1.26 kg |
| Battery type | Lithium-Ion 20 V (models CDA1132P / CDA1133P) |
| Recommended charger | CDA1131P (input 100-240 V AC, output 20 V 2 A) |
| Battery charge time 2 Ah | 60 min |
| Battery charge time 4 Ah | 120 min |
| Sound pressure level | 92 dB(A) (K=3 dB(A)) |
| Sound power level | 103 dB(A) (K=3 dB(A)) |
| Vibrations (hammer drilling concrete) | 3.60 m/s² (K=1.5 m/s²) |
| Vibrations (drilling metal) | <2.93 m/s² (K=1.5 m/s²) |
| Double insulation (class II) | Yes |
| Functions | Screwing, drilling, hammer drilling |
| Lighting | Integrated LED work light |
| Included accessories | Belt hook, charger, battery (depending on version) |
| Maintenance | Clean with a soft, slightly damp cloth (without solvents) |
| Intended use | Wood, metal, ceramic, plastic, brick, stone, masonry |
Frequently Asked Questions - CDM1147P Ferm
User questions about CDM1147P Ferm
0 question about this device. Answer the ones you know or ask your own.
Ask a new question about this device
Download the instructions for your Drill in PDF format for free! Find your manual CDM1147P - Ferm and take your electronic device back in hand. On this page are published all the documents necessary for the use of your device. CDM1147P by Ferm.
USER MANUAL CDM1147P Ferm
Cordless Li-Ion Combi Drill 20V CDM1147P
Thank you for buying this Ferm product. By doing so you now have an excellent product, delivered by one of Europe's leading suppliers. All products delivered to you by Ferm are manufactured according to the highest standards of performance and safety. As part of our philosophy we also provide an excellent customer service, backed by our comprehensive warranty. We hope you will enjoy using this product for many years to come.
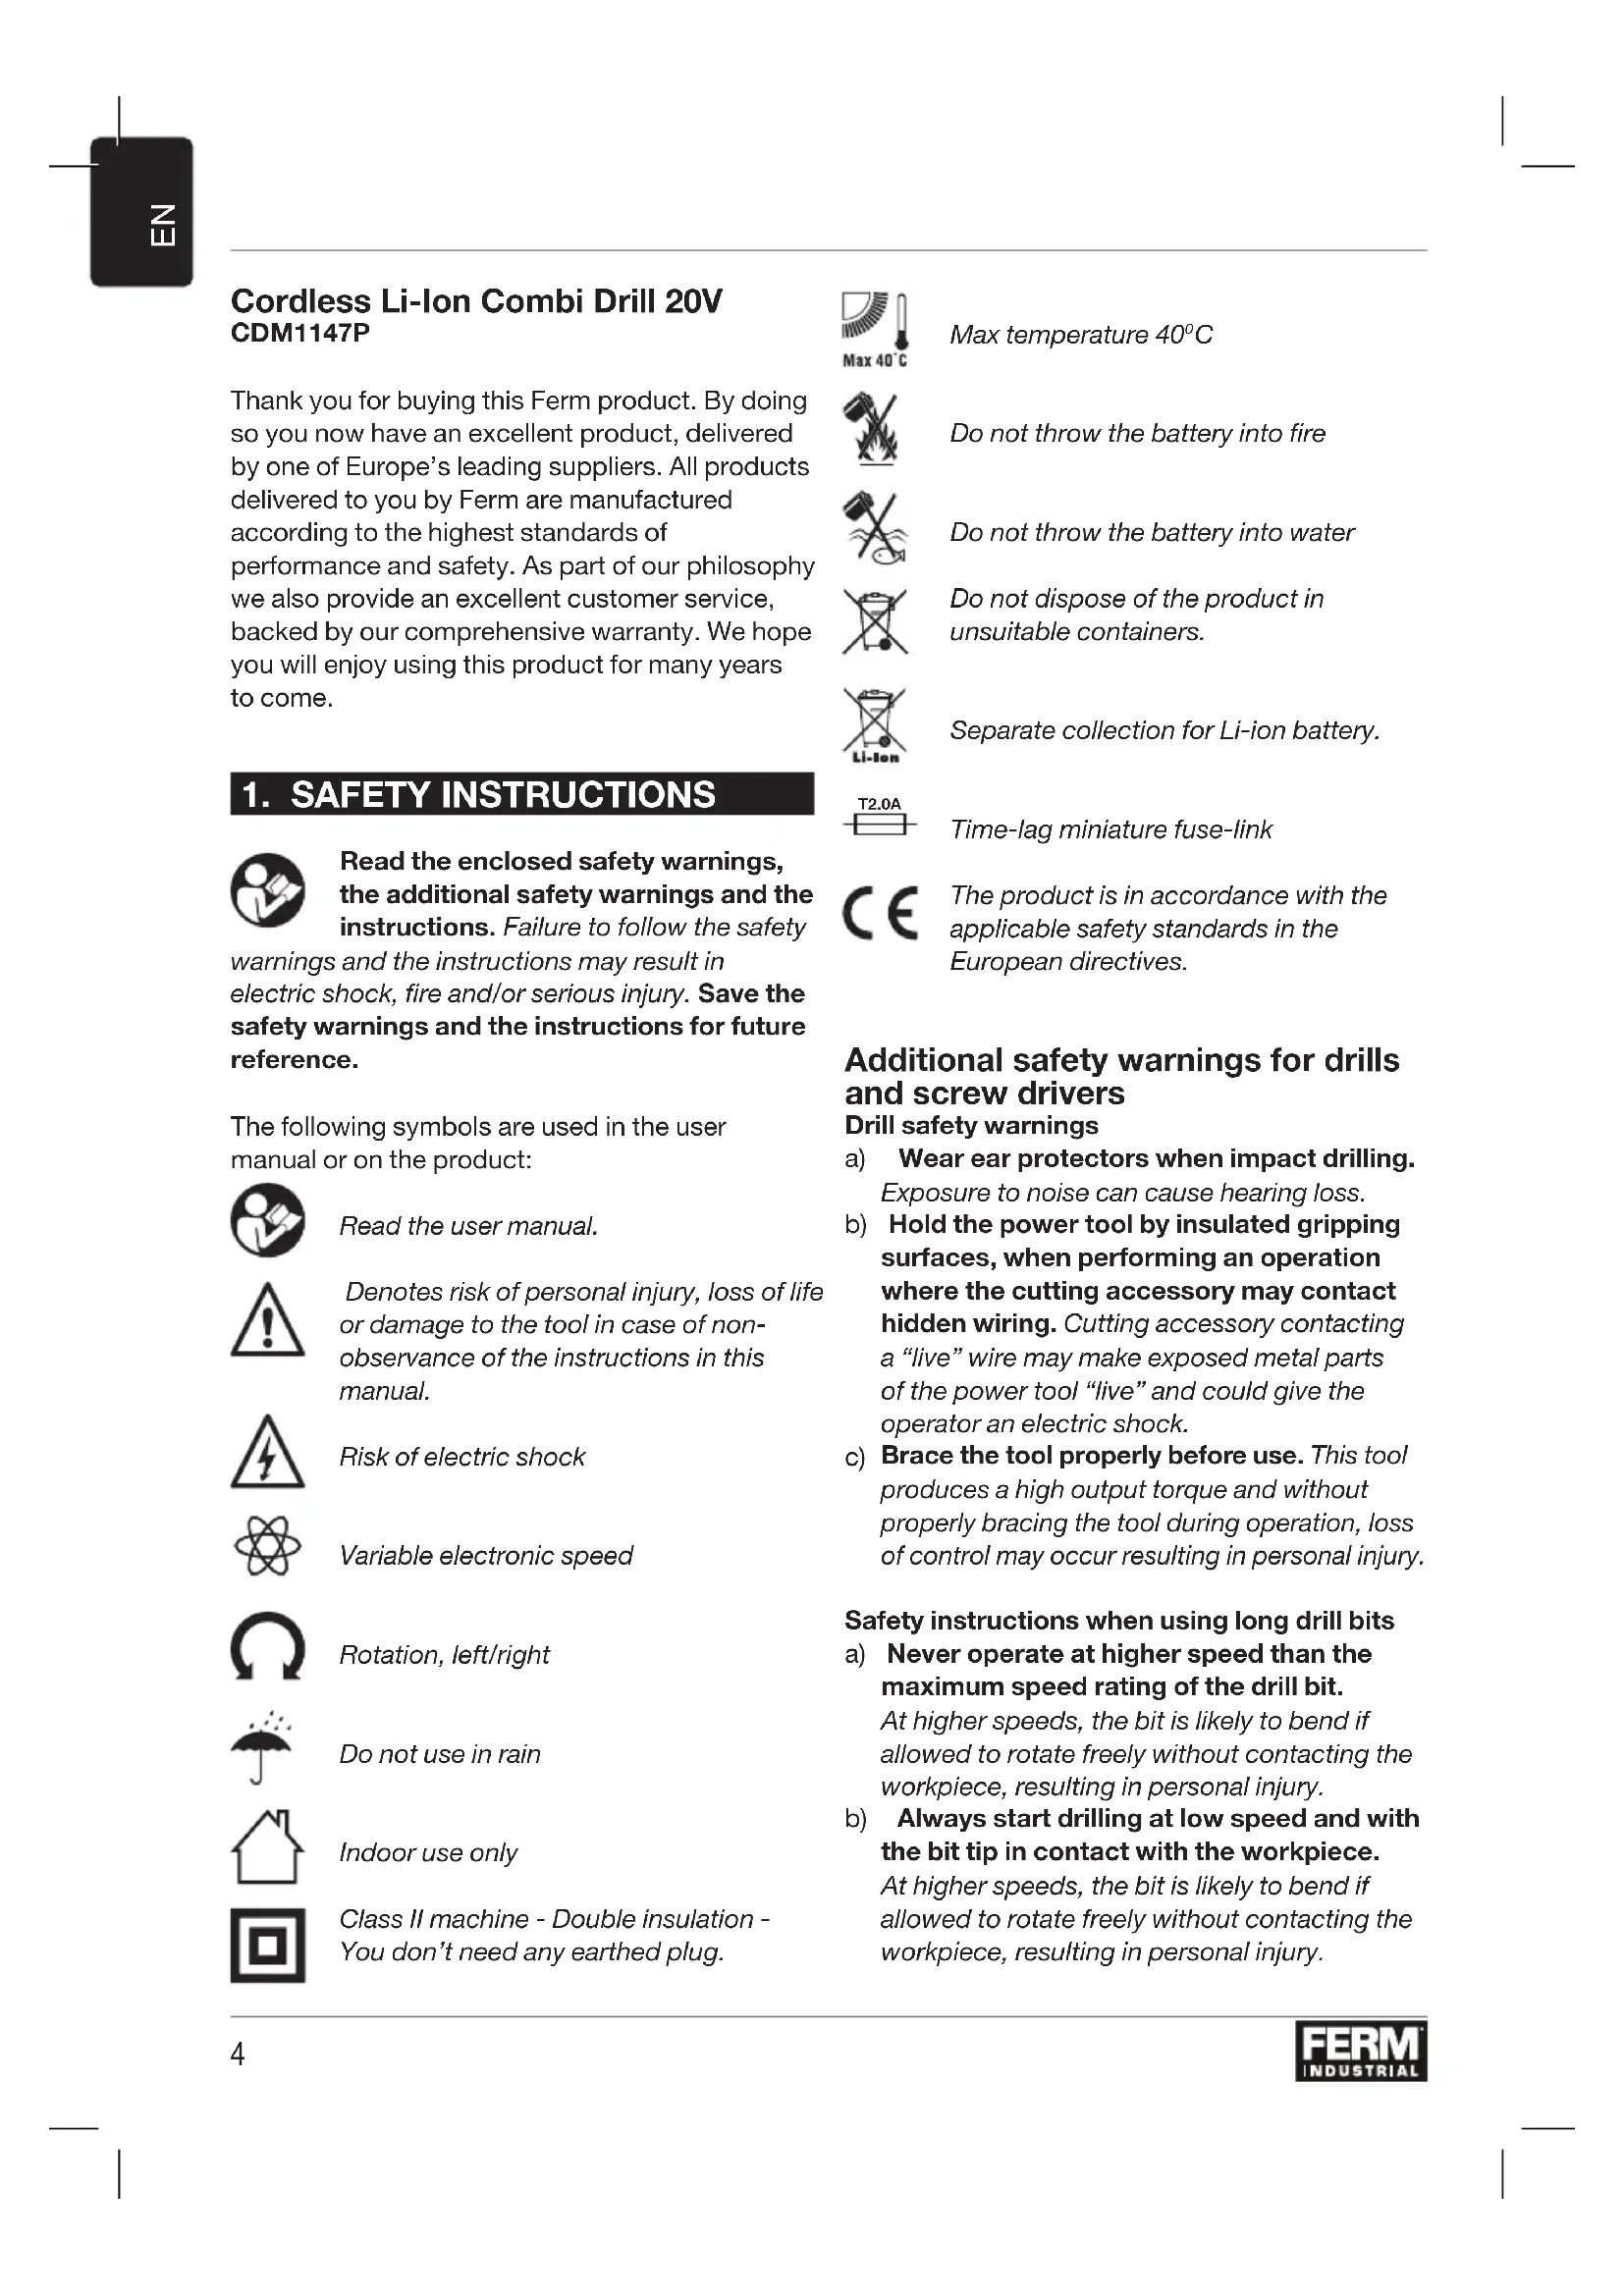
1. SAFETY INSTRUCTIONS

Read the enclosed safety warnings, the additional safety warnings and the instructions. Failure to follow the safety
warnings and the instructions may result in electric shock, fire and/or serious injury. Save the safety warnings and the instructions for future reference.
The following symbols are used in the user manual or on the product:

Read the user manual.

Denotes risk of personal injury, loss of life or damage to the tool in case of non-observation of the instructions in this manual.

Risk of electric shock

Variable electronic speed

Rotation, left/right

Do not use in rain

Indoor use only

Class II machine - Double insulation - You don't need any earthed plug.

Max temperature 40^

Do not throw the battery into fire.

Do not throw the battery into water

Do not dispose of the product in unsuitable containers.

Separate collection for Li-ion battery.

Time-lag miniature fuse-link

The product is in accordance with the applicable safety standards in the European directives.
Additional safety warnings for drills and screw drivers Drill safety warnings
a) Wear ear protectors when impact drilling. Exposure to noise can cause hearing loss.
b) Hold the power tool by insulated gripping surfaces, when performing an operation where the cutting accessory may contact hidden wiring. Cutting accessory contacting a "live" wire may make exposed metal parts of the power tool "live" and could give the operator an electric shock.
c) Brace the tool properly before use. This tool produces a high output torque and without properly bracing the tool during operation, loss of control may occur resulting in personal injury.
Safety instructions when using long drill bits
a) Never operate at higher speed than the maximum speed rating of the drill bit. At higher speeds, the bit is likely to bend if allowed to rotate freely without contacting the workpiece, resulting in personal injury.
b) Always start drilling at low speed and with the bit tip in contact with the workpiece. At higher speeds, the bit is likely to bend if allowed to rotate freely without contacting the workpiece, resulting in personal injury.
c) Apply pressure only in direct line with the bit and do not apply excessive pressure. Bits can bend causing breakage or loss of control, resulting in personal injury.
Safety warnings for battery
a) Do not open the battery. Danger of shortcircuting.
b) Protect the battery against heat, e. g., against continuous intense sunlight, fire, water, and moisture. Danger of explosion.
c) In case of damage and improper use of the battery, vapours may be emitted. Ventilate the area and seek medical help in case of complaints. The vapours can irritate the respiratory system.
d) Use the battery only in conjunction with your Ferm Industrial product. This measure alone protects the battery against dangerous overload.
e) The battery can be damaged by pointed objects such as nails or screwdrivers or by force applied externally. An internal short circuit can occur and the battery can burn, smoke, explode or overheat.
Safety warnings for charger Intended use
Charge only CDA1132P and CDA1133P type rechargeable Battery packs with the charger.
Only use the following batteries of the Ferm Industrial FI20V battery platform. Using any other batteries could cause serious injury or damage the tool.
CDA1132P 20V, 2Ah Lithium-lon
CDA1133P 20V,4Ah Lithium-Ion
The following charger of the can be used to charge these batteries.
CDA1131P Quick charger
The batteries of the Ferm Industrial FI20V battery platform are interchangeable with all the Ferm Industrial FI20V battery platform tools.
Residual risks
Even when the power tool is used as prescribed it is not possible to eliminate all residual risk factors. The following hazards may arise in connection with the power tool's construction and design:
a) Health defects resulting from vibration emission if the power tool is being used over longer period of time or not adequately managed and properly maintained.
b) Injuries and damage to property to due to broken accessories that are suddenly dashed.

Warning! This power tool produces an electromagnetic field during operation. This field may under some circumstances interfere with active or passive medical implants. To reduce the risk of serious or fatal injury, we recommend persons with medical implants to consult their physician and the medical implant manufacturer before operating this power tool.
Power cord replacement
If the supply cord is damaged, it must be replaced by the manufacturer, its service agent or similarly qualified persons in order to avoid a hazard.
2. MACHINE INFORMATION
Intended use
The machine is intended for driving in and loosening screws as well as for drilling in wood, metal, ceramic and plastic and for impact drilling in brick, brickwork and masonry.
Technical specifications
| Machine CDM1147P | |
| Voltage 20V | |
| Chuck capacity 1.5-13mm | |
| No load speed | |
| Position 1: | 0-450/min |
| Position 2: | 0-1700/min |
| No load impact rate | |
| Position 1: | 0-7200/min |
| Position 2: | 0-27200/min |
| Max torque | 50 Nm |
| Torque settings 21 + drill mode | |
| Weight (without battery pack) | 1.26 kg |
| Sound pressure level | LpA 92 dB(A), K=3dB(A) |
| Sound power level | LwA 103 dB(A), K=3dB(A) |
| Hand-arm vibration ah (Impact drilling in concrete) | 3.6 m/s2K=1.5 m/s2 |
Hand-arm vibration ah,D < 2.93m / s^2K = 1.5m / s^2 (Drilling into metal)
Charger CDA1131P
Charger input 100-240VAC 50-60Hz, 50W
Charger output 20V 2A
Charging time 2Ah battery 60 minutes
Charging time 4Ah battery 120 minutes
Recommended batteries CDA1132P, CDA1133P
Weight 0.36 kg
Battery CDA1132P
Battery Type Lithium-Ion
Voltage 20V
Capacity 2.0 Ah
Recommended charger CDA1131P
Weight 0.38kg
Vibration level
The vibration emission level stated in this instruction manual has been measured in accordance with a standardized test given in EN 62841; it may be used to compare one tool with another and as a preliminary assessment of exposure to vibration when using the tool for the applications mentioned.
- Using the tool for different applications, or with different or poorly maintained accessories, may significantly increase the exposure level.
- The times when the tool is switched off or when it is running but not actually doing the job, may significantly reduce the exposure level.
Protect yourself against the effects of vibration by maintaining the tool and its accessories, keeping your hands warm, and organizing your work patterns.
Description
The numbers in the text refer to the diagrams on pages 2-3
Fig. A
- Machine
- Battery
- Battery unlock button
- Battery charge indication
- Charger
-
Charger LED indicators
-
Chuck
- Gear selection switch
- Direction switch
- On / off switch
- Torque adjustment ring
- Operation mode ring
- Belt hook
- Work light
3. OPERATING

The battery must be charged before first use.
Removing the battery from the machine Fig.B
Hold the machine (1) firmly with one hand
- Push down the battery unlock button (3) located on the rear side of the battery (2) with the other hand.
- Keep pushing this button (3) down and slide the battery backwards out of the machine, like shown in Fig. B.
Inserting the battery into the machine Fig.B

Ensure that the exterior of the battery is clean and dry before connecting to the charger or machine.
- Hold the machine (1) firmly with one hand
- Insert the battery (2) into the base of the machine as shown in Fig. B.
- Push the battery further forward until it clicks into place.
Checking the battery charging status Fig.C

The included battery is delivered in partly charged condition.
- To check the battery charge status, push the button (4) on battery shortly.
The battery has 3 lights indicating the charge level, the more lights that burn, the more charge the battery has left.
Charging the battery (with the charger) Fig. C
Take the battery (2) from the machine
- Turn the battery (2) to upside down position and slide it onto the charger (5) as shown in Fig. C.
- Push the battery until it is fully pushed into the slot.
Plug the charger plug into an electrical outlet and wait for a while. The LED indicators on the charger (6) will lighten up and show the charger status.
LED indicators (6)
Fig.C
The charger has 2 LED indicators (6) which indicate the status of the charging process:
| Red LED status: | Green LED status: | Charger status |
| Off Off No power | ||
| On Off | Standby mode:-No battery is inserted or,-Battery inserted but charging has finished more then 2 hours ago | |
| Blinking Blinking Defective battery | ||
| On Blinking | Battery charging in progress | |
| On On | Battery charging finished, battery fully charged | |
| Blinking Off | Battery is too hot, charging progress is on hold. Charging will start automatically after the battery has cooled down. | |
- Fully charging the battery may take up to 60 minutes.
After the battery is fully charged remove the charger plug from the outlet and remove the battery from the charger. - The battery can be stored or directly installed on the machine.

Lithium-iron cells can be stored for a long period without losing much of their charge. When the machine is not being used over a longer period of time it is best to store the battery in charged condition.
Fitting and removing drills or screwdriver bits Fig.A

Always remove the battery before mounting an accessory.
The drill chuck (7) is suitable for drills and screwdriver bits with round shaft as well as hexagonal shaft.
Hold the machine firmly with one hand
- Open the drill chuck (7) by rotating the chuck sleeve with your other hand in clockwise direction until it is opened far enough for the bit to slide in.
- Insert the shaft of the drill or screwdriver bit
- Tighten the drill chuck again by firmly rotating the chuck sleeve counterclockwise.
- Check if the bit is centered well by shortly activating the machine's on/off switch.
Adjusting the gears
Fig. A

Never switch gears when the motor is running, this will damage your machine.

Never put switch in the middle between both positions, this will damage your machine.
The machine has 2 drill speeds, which can be adjusted by sliding the gear switch (9) forward or backwards. The number on the gear switch (9) shows which position is chosen.
- Position 1: For slow drilling, large drilling diameter or screw driving. The machine has high power at a low speed.
- Position 2: For fast drilling or small drilling diameter.
Adjusting the direction of rotation Fig.A
- Set the direction switch (10) to position “←” in order to drive screws or to use it for drilling.
- Set the direction switch (10) to position “→” in order to remove screws
Switching the machine on and off Fig.A
The on/off switch (11) is used for activating the machine and adjusting rotation speed.
- Pressing the on/off switch (11) will activate the machine, the further the switch is being pushed, the faster the drill will turn.
Releasing the on/off switch (11) will stop the machine.
- Move the direction reversing switch (10) to the middle position to lock the movement of the on/off switch. It cannot be activated in this position.

Only lay down the machine when it has stopped running completely. Do not place it on a dusty surface as particles of dust could get into the mechanism.
Setting the operating mode
Fig.A
Screwdriving
- Set the operation mode ring (13) to the "screwdriving" symbol and set the torque adjustment ring (12) to the required torque.
- By rotating the torque adjustment ring (12), screws can be driven to a predetermined depth, which is ideal for repetitive work. The higher the number, the more torque will be transmitted.
- Select a low setting for small screws or soft work material.
- Select a high setting for large screws, hard work materials and when removing screws.
- You should preferably choose a setting as low as possible when driving screws. Select a higher setting if the motor slips before the screw is fully tightened.
Drilling:
- Set the operation mode ring (13) to the "drilling" symbol.
Impact drilling:
- Set the operation mode ring (13) to the "impact drilling" symbol.

Ensure that the direction switch (10) is always set to during drilling.

The machine is equipped with electronic overload protection function. When the machine gets overloaded it will shut down automatically. When this happens, please wait for at least 5 seconds to let the overload protection reset itself.
Work light (15)
Fig. A
The machine is equipped with a work light to illuminate the work location.
It automatically switches on when the on/off switch is being pressed.
It automatically switches off when the on/off switch is released again.
Belt hook (14)
Fig. A
The machine is equipped with a belt hook for hanging the machine to your belt during use.

Always switch the direction switch (10) to middle position to avoid accidental startup of the machine.
- When delivered, the belt hook (14) is assembled to the left side of the machine.
It can easily be removed by removing the screw on the hook and taking it off.
It can be assembled on the right side of the machine when this is preferred.
User tips
When driving screws into wood, metal and other materials:
- Before using the appliance check if the drill or screw bit is properly fitted and centered inside the drill chuck.
- Screw bits are available in several shapes and dimensions. When unsure, always try if the bit fits on the screw head without any free play before using the machine.
- Make sure the machine is not running when it contacts the screw. A rotating bit may slip. This could result in damage to the work piece.
When drilling into wood, metal and other materials:
- With small diameter drills use a high drill speed. For large diameter drills use a low drill speed.
- For hard materials, select a low drill speed, for soft materials select a high drill speed.
Fix the work piece properly, preferably by using a clamp or vice.
During drilling draw back the drill out of the hole frequently so swarf or drill dust will be removed.
When drilling in metal:
Use a metal drill (HSS). For the best results you should cool the bit with oil.
Metal (HSS) drills can also be used drilling into plastic.
When drilling in stone or masonry:
Always use drills for concrete or masonry drilling
- Apply force to the machine to let the hammer action work at its best, but always make sure the machine maintains its rotation speed. Machine will wear out faster, and drilling will take more time.
- When drilling pull back the drill every few seconds. Drill dust is being removed out of the hole and drilling is done faster.
4. MAINTENANCE

Before cleaning and maintenance, always switch off the machine and remove the battery pack from the
machine.
Clean the machine casings regularly with a soft cloth, preferably after each use. Make sure that the ventilation openings are free of dust and dirt. Remove very persistent dirt using a soft cloth moistened with soapsuds. Do not use any solvents such as gasoline, alcohol, ammonia, etc. Chemicals such as these will damage the synthetic components.
ENVIRONMENT

Faulty and/or discarded electrical or electronic apparatus have to be collected at the appropriate recycling
locations.
Only for EC countries
Do not dispose of power tools into domestic waste. According to the European Guideline 2012/19/EU for Waste Electrical and Electronic Equipment and its implementation into national right, power tools that are no longer usable must be collected separately and disposed of in an environmentally friendly way.
WARRANTY
The warranty conditions can be found on the separately enclosed warranty card.
The product and the user manual are subject to change. Specifications can be changed without further notice.
CDA1133P 20V,4Ah Lithium-ion
CDA1133P 20V,4Ah Lithium-Ion
Specifications techniques
Rotation,vanster/hoger

Använd inte i regn

CDA1133P 20V,4Ah Lithium-jon
CDA1133P 20V,4Ah Lithium-Ion
CDA1131P Rychla nabiječka
2. INFORMACE O NARADI
Určené použití
CDA1133P 20V,4Ah Litiu-Ion
(Gaurire cu percutie in ciment)
Vibratie mana-brat ah,D < 2,93m / s^2K = 1,5m / s^2 (Gaurire in metal)
Incarcator CDA1131P
Intrare incarcator 100-240VAC 50-60Hz, 50W
Tip accumulator Lithiu-lon
Tensiune 20V
Capacitate 2.0Ah
Incarcator recomandat CDA1131P
Masã 0,38 kg
Atunci cand gauriti in metal:
PomeHHuaeNekmpoHnCKopocM

3aebpmaHe,HaJIaBO/HaIaCHO

Ha He ce u3non38a npu 0bk

Camo Ha 3akpumo

MaunHa KnaIc II - DeouHa u3Olaaun - Hmame Hyka om 3a3eMeH uekep.

Max 40^
Makcumanha memnepamypa 40^

He u3xebpnaume bamepuma 02bH

He xebpnaume 6amepuyma b8e oda

He u3xebpyme npodykma e HenoDxoOaU KoHmueHepu.

Omdenho c6bupane Ha numuee0-ooHa 6amepu.

Bpeme-3aKbChHeue MUHuaMIOphu npedna3umenu

Ipoodykmbme e cbomeemcmeue c npunoxumme cmahdapmu 3a 6e3onacnoem e eeponeueckume dupekmu.
DOnbHnTeHNn npEynpeXeHna 3a 6e3oNaChocT 3a 6opMaunHn n OTBeptKn
PpeynpeKdHn 3a 6e3onacHocT Ha 6opMaunHaTa
a) Hocete npedna3n CpecTba 3a cnyxa npu yapno npo6nBaHe. N3na2aHemo Ha wym Moke da doeede do 3a2yba Ha cnyxa.
6)ДрькTe eNeKtpOnHcTppyMeHTa 3a n3OInpaHnTe 3axBauau NOBbpxHOCTn npn n3BbPwBaHe Ha onepaunrTa, npn KOraTo akceCoapbT 3a pR3aHe MoKe da ce dOnnpa Do ckpntn Ka6eN. Docea Ha peXeU akceCoap c "Kue" npoBODHuk MoKe da 3apeDu c eJeKmpuuecmBo u3noKeHume MemanHu YacMu Ha eNeKmpouHcmpyMeHa umaka Da npuUnu mokOB ydAp Ha onepamopa.
B) Iopnpete HnctpymeHT npabunno npednyoTe6a.To3u uHcmpymemnpou3eeekda
BUCOK bpmu, MoneHm u 6e3 npaBUNHO 3amrahe Ha uHcmpymHa nO epeme Ha paBoma moKe da ce noyu 3a2yba Ha KOHpOn, Koemo da doede do HapaHnaeHe.
HCTpykun 3a6e3onacnoct npn n3non3BaHe Ha dbnn CBpeJa
a) HnKora He pa6oTe Ha no-BnCoka ckOPOCT OT MaKcHMaJIHaTc CKOPOCT Ha CBpeDnOTO. Ipu no-bucoku ckopocmu cepednomo uma eepomHocm da ce o2bHe, ako ce ocmaBu da ce bpmu c6o6oHo, 6e3 da doKocba demauna, Koemo da doBeede do hapaHraBaHe.
6) BnHaH 3aNoCbAte npo6uBaHeTo Ha Hncka ckopocT n C bBpXa Ha CBpeDnOTo B KOHTaKT C detaHa. Ppu no-Bucoku ckopocMu cpeDnomo Uma bepoamHocm da ce o2bHe, ako ce ocmaBu da ce bpmu ceobodHo, be3 da doKocea demauna, Koemo da doBeede do HapaHraBaHe.
B) PpIJIaraiTe HATNCK cAmO B npaBa JINHnC bCbpeDnTo n He npIJIaraiTe npeKoMepeH HATnCK. CapeDnama Mozam da ce OzbHam, Koemo da doeede do cyuVeHae unu 3a2y6a Ha KOHmPon, Koemo Eodu do HapaHreaHe.
IpeDynpexKeHn 3a 6e3oNaChocT 3a 6aTepeNra
a) He O'TbapnTe 6aTepeHra. OnacHocm om Kbco cbeuHHeue.
6) Na3eTe 6aTePnTa OT TOnnHa, Hanp. Cpeu npOdbJnxTEnHa nHTeH3NBHa CbHueBa CBeTnHa, OrbH, Boda n BnaRa. OnacHocm om ekCnNo3u.
B) B cnyaHa noBpeHa HneppaBnHNO3noJ3BaHe Ha 6aTepeTAta MoKe Da HMaOTdJeHa nap. IpoBeTpTe MrcToTO NOTbpcTe MeuHcNcA NOMoU B cNyauHa ONJaKbAHn. NnapeHuMa MozAm daNoopa3Hm duXamennama cucmema.
r) 3nON3BaIte 6aTePnraTa cMo BbB Bpb3Ka c Baun npOdykT ha Ferm Industrial. Camo ma3u Mnpka npedna3ea 6amepuma om onacHO npemoeapaeane.
I) BaTePnra MoKe Da 6bDe nobpeDeHa OT OcTpN npeMeTn, KaTo HApnPmep NnPoHn IIn OTBePTKn, INn OT Cnla, PnpIoKeHa OTBbH. MoKe Da eb3HuKHe ebMpewHo KbCo cBeDuHeue u bamepuMa MoKe da U32Opu, da Nywu, da ekCnIodupa unu da npeepee.
IpeDynpexdHn 3a 6e3oNaChocT 3a 3apJHOTo Ha 6aTePnTa
PpeHa3NaueHne
3apejdaTe cmo akymylaTopn 6aTePn Tn CDA1132P n CDA1133P BaTePnHn naKeTn cbc 3apJHO yCTpOINCTBO.
I3noJ3BaIte cAmO cIeHnTe 6aTePmN OT IJIaTfOpMaTa 3a 6aTePmHa Ferm Industrial FI20V. I3noJ3BaHeTo Ha dpyrN 6aTePmMoKe da npuHHn cepNo3Ho HapaHЯBaHe nII NOBpeDa Ha IHCTpyMeHTa.
CDA1132P 20V,2Ah JNTHeBO-NoHHa
CDA1133P 20V,4Ah JNTHeBO-NOHHa
3a 3apeKdaHe Ha Te3n 6aTeepuMoKe Da Ce n3no3Ba CneHOTo 3apAnHO yCTPOIcTBO.CDA1131P Bbp30 3apAnHO yCTPOIcTBO
BaTePnTe Ha 6aTePnHaTa nnatfOpMa Ferm Industrial FI20V ca B3aMOn3aMeHReEMN C BCnKn HnCTpyMeHTn Ha nPaTfOpMaTa 3a 6aTePnFerm Industrial FI20V.
OcTaTbUHn pNCKOBe
Dopn KOrato eNeKtpoHnCTpyMeHTbT ce H3NoJ3Ba nO npednncAHnHaunH, He e Bb3MOxHO da CE npemaxHaT BCnCKn OCTaTBuHn pUckOBn PAKTOPn. CneHnTe ONaCHOCTN MORa Da Bb3HNKHAT BB Bp3Ka c KOHCTpyKcIyTa n Dn3aHa Ha eNeKtpoHnCTpyMeHTa:
a) DepeKTH B 3dpaBeTo, npOn3TuHaun OT n3IbYBaHeTo Ha Bn6paun, aKO eJeKTPoHnCtpyMeHTbT Ce n3NoJ3Ba 3a no- dIbIbIr nepIOd OT BpeMe IIN He e aDeKBaTHO ynpabJIraBaH n npaBnIHo NODbPkaH.
b) HapaHЯBaHЯ n ΜεTn Ha nMyuSeCTBO,Дьлжаи ce Ha cUypeHn akcecoapn, KOnTO BHe3aHNo ca nychaTn.

BHumaue!Toea enekmpouhcmpyMeH npou36eJda enekmpoMa2HumHO none no epeme Ha paoboma. Toea none moKe npu onpepeIenu obcmoIemcmea da 8b3npenmcmba akmuHume uIu nacueHume Meduuncku umnlaHmaHmu.3a da hamaIumepucka om cepuo3HO UNU CMBpmoHocHO HapaHraBe, npenopbyeAme Ha xopama c Meduuncku umnlaHmaHmu da ce KOHCyImupam c mexnua lekap u npou36oDumela Ha meduunckua umnlaHmaHm, npedu da u3non3a me mo3u enekmpouhcmpyMeHm.
3amha Ha 3axpaHbauaKa6eJ
Ako 3axpaHbauT Ka6eI e NOBpeH,Toi Tp8Ba Da 6bJe 3aMeHcOT IpOn3BOUnteJI, HEROBn cepBn3eH aReHT NIn Nua C NoD6Ha KBaINΦkaCn, 3a Da ce N36erHe ONaCHOCT.
2. INHΦOPMAUЯ 3A MAUINH
PpeHa3NaeHne
MaunHaTa e npedHa3NaYeHa 3a 3aBnHTBaHe npa3Xna6BaHe Ha BnHTObe, KaKTo n 3a npo6uBaHe BDbpBO, MetaI, Kepamika n PJIacTmaca n 3a ydapHO npo6uBaHe B TyxNa, TyxNn 3nDapn.
Texnueckcn cneuΦnkaun
| Машина | CDM1147P |
| Нарlexенue 20V | |
| КалачтET на патоннika 1.5-13 mm | |
| Бeз скорост на натоварвае | |
| ПозиURA 1: | 0-450 /min |
| ПозиURA 2: | 0-1700 /min |
| Чecстота на удAPIte на пазен | |
| хoД | 0-7200/min |
| ПозиURA 1: | 0-27200/min |
| ПозиURA 2 | |
| Мakсимален Вьртыц мімент 50 Nm | |
| Насторій на Вьртыцья | 21 + Ржим на |
| МOMЕТ | бормашиna |
| Тergл (Бeз бateрини пakет) 1,26 kg | |
| НИВО на 3ВУКOBOTO налягане L | pA 92 dB(A), K=3dB(A) |
| НИВО на 3ВУКOBATA мошноct L | wA 103 dB(A), K=3dB(A) |
Bknuehama 6amepu ce docmae 8 yacmuHno 3apeDeHo cbcmOraHue.
3a da npOBepnTe cbCToHneTo Ha 3apeXdaHe Ha 6aTePnTa, HATNCheTe 6yToHa (4) Ha 6aTePnTa ckopo.
BaTePnIa HMa 3 CBETHNNH INHdNkTOpN, POKa3BaUH NHBOTHa 3apeKdaHe, TOnKOBa NOBuecCBETLHN, KOnTO rOpT, TOKOBa NOBuec 3apeKdaHe e ocTaHana BaTePnIa.
3apeKdahe Ha 6aTepeHra (cbc 3apAHOTo yctpoCTBO)ΦnC
- I3BaIeTe 6aTeepnTa (2) ot yctpoiCTBOTo
3abptete 6aTepeyta (2) B noIoxeHne Harope n IINb3HeTe Bbpxy 3apAnHO yctpoiCTBO (5), KaKTo e noka3aHo Ha fNrgpa C. - NocTabete 6atepnaT,doKaTo THe 6bJe HAnbJHo HAtncHaB He3dOTo.
BkIIOUeTe ⅢeKepa Ha 3apAHOTo yCTpoiCTBO BeJIeKTPnueckn KOHTaKT N 3uKaaiTe N3BeCTHO BpeMe. LED INDikatOpnte Ha 3apAHOTo yCTpoiCTBO (6) Ⅲe CBETHaT N Ⅲe NOKaKaT CbCTOAHNETo Ha 3apAHOTo yCTpoiCTBO.
LED nHdkaTopn (6) ΦnC
3apndhoto yctpoicBo mAm2 LED nHdkaTopa (6),KoITo poka3BaT cbctOHeTo Ha npOeCa Ha 3apeJdaHe:
| Червен СBEТОДИОД | Зелен СBEТОДИОД | Стаус на зарядною усточьо |
| OT OT Ная мазханован | ||
| 3a OT | Реким Ha rotoBnoct: - He e постavenа батерия пли, - Батерияа e постavenа, Ho заразжданeto e prinkлочило прази постениоот 2 ча | |
| Могаши Могаши Depeктна ватерия | ||
| 3a могаши | Зaperжданeto Ha sbatерияа e в Хов | |
| 3a 3a | Зaperжданeto Ha sbatерияа пр riskлочи, sbatерияа e напълно заразendeha | |
| Могаши OT | Батерияа e рекаленo ropeца, поесыт ha зaperжданe e зальpvжан. 3aperжданeto лe заочné авTomатино, сед като батерияа ce oxлади. |
Suvouaogevo dpattavo mttapiac Iovtwv Aioiou 20 V CDM1147P
Euxapiotoupe Toun ayopaoate auto to Tpoiov Ferm. Etoa atoktnoate eva eiaipetiko Tpoiov, Toun npapodietai anto evav anto touc kopuaiouc Tpountheutc otyn Eupwn. Ola ta Tpoiovta Toun oac npapodovtai aTn Ferm eivai kataoakeuaoueva ouwva e ta auotnpotepa TporuTTa atdoonc kai aoopaiaic. Oc peoc tnC pfiooqiac pa, Tapexoue etionc eiaipetikn Eutnpetnon TEaTuV, n toia uTOOtnpiZetai aTTOV EKTEvN auc yyunon. Eaizoue va aTIOAuaoe auto to Tpoiov yia TOnA xpovia cTo eAiov.
CDA1133P 20 V,4AhovwVlBiou
Tia tn φoptiən autw twv mtaapiw uTopei va xpnaioutointheta i o npakatw φoptiotns. CDA1131P Taxuφoptiotns
Oi atapiies nC TnAatopopac atapiwFerm Industrial FI20V mToppov va ouvoeovta e ola ta epyaia TnAatopopac atapiwFerm Industrial FI20V.
Ytloaetioevoikivduvoi
Akoua kai av to epyaaleio xpnoiotoiietai
oTWC TPOBLeTTeai,Dev Eivai epiKTH n Eaeaiy
olawv twv utoaleiIOeewv npayovtwv
kivduov. O akouooi kivduovoi mTopei va
tpokuouv oeuovdOg me Tnv kataoKeun kai
to oxebiaoou tou nAekptikoepyaaleiou:
a aalll lalll alll aaii aai iia
Ferm asa aallll l a baiy jilpia ( 2
ii jil Jai jbi
i 1
jaiia jia jia jia jia jia jia jia jia jia jia jia jia jia jia jia jia jia jia jia jia jia jia jia jia jia jia jia jia jia jia jia jia jia jia jia jia jia jia jia jia jia jia jia
a
Jalil
CDA1132P g jnnn nn nnnnnnnnnnnnnnnnnnnnnnnnnnnnnnnnnnnnnnnnnnnnnnnnnnnnnnnnnnnnnnnnnnnnnnnnnnnnnnnnnnnnnnnnnnnnnnnnn
CDA1133P g
Ferm Industrial
yF120V
a
2 20 CDA1132P
4 20 CDA1133P
y
CDA1131P Quick
FI20V Ferm Industrial
Ferm Industrial
.F120V
aeea 1
a
jblallll iia. jaiial lalge gie slalil
iayaaiaiyyssll 01s1 Jya aiaaiaa
1 1
Jgjglz g jgj 0j j 1
J 1
ylllssalllllllllllllllll
aill 12345678901011
Clej jll 400000000000000000000000000000
yaiil yaiy jia jaoall ayll aiail aiill
aall jll gj yaiy j
Jia aalall cale jll aaiail all 4s jll, uall s jullu
a 1012100
aalblll j
aaiaaai 5 aaii jao allai iiaai
jlll lllllll 100000000000000000000000000
a_i = c_ia_i
1
g ailllll lalil ylll lal lall
aillw jll g jlll
4.111 1
| CDM1147P | |
| الإستعمال | |
| ملا 13-1.5 50-0 | |
| الإستعمال | |
| الإستعمال | 450-0 |
| الإستعمال | 1700-0 |
| 7200-0 | |
| الإستعمال | 27200-0 |
| الإستعمال | 50-0 |
| الإستعمال | 21-0 |
| الإستعمال | 1.26 (الإستعمال) بupon بupon بupon |
| K=3 (I) | DSSS LPA92(I) |
| (II) | DSSS LWA103(I) |
| (III) | DSSS K=3 |
| \( L_{\text{WA}} \)/\( L_{\text{WA}} \)/\( P \)=3 | ah, D (الإستعمال / بupon بupon) (الإستعمال) |
| \( P \)=1.5=K\( L_{\text{WA}} \)/\( P \)<2,93 | ah,D (ال,en bloc) (ال,en bloc) |
| \( L_{\text{WA}} \)/\( P \)<2,93 | ah,D (ال,en bloc) (ال,en bloc) |
| CDA1131P | ال,en bloc |
| \( D \) | DSSS 240-100 |
| \( D \) | \( 50 \),\( 60-50 \) |
| \( D \) | 2\( D \)/\( 20 \) |
| \( D \) | 60\( D \)/\( 2 \) |
| \( D \) | 120\( D \)/\( 4 \) |
| \( CDA1133P \) | \( D \) |
| \( CDA1132P \) | \( D \) |
| \( CDA1132P \) | \( D \) |
| \( D \) | \( D \) |
| \( D \) | \( 20 \) |
| \( D \) | 2.0 |
| CDA1131P | \( D \) |
| \( D \) | 0.38 |
jijai jiu
a 62841 5 5 5 5 5 5 5 5 5 5 5 5
.8jssall 1
aaiia aiaia aiaia aiaia aiaia aiaia aiaia aiaia aiaia aiaia aiaia aiaia aiaia aiaia aiaia aiaia aiaia aiaia aiaia aiaia aiaia aiaia aiaia aiaia aiaia aiaia aiaia aiaia aiaia aiaia aiaia aiaia aiaia aiaia aiaie
blalglgntalagollya Jn jjnl jnl nclipal
#
3-2
iS
1,2,3 )
ai a ai 分母最小值为 k .
Ai Aj
yjlll jn
LED
S BCD = S COD + S BDO - S BOC
w gill 1200 ciao .9
ool
Jy
jssal jce bua aia 1
1
Jaeel 1400.01
pJall 1
J
a

2111 2111
(1)
(3)jlll j 1
(2)
(3)j11a
J 1
1
a 1

(20 1
(2)
aaba 1
a

i j 1
gall (4) jll le bial a lal lal 102
(cal)
C
(2) 与 g
(5)JLJI (2)
C. ( x - 2) ^2 ≤ 3 或 y > 0
aall Jals kaii
a
(6)jolldgallLED
(6)LED
C
(6)LED
alall aol gl alal 2gac jai
A
aclll 1jie oai jie
J111 1
0
#
- S.S.S_1
128 130 131 132

a 1

zla 12345678901123456789011234567890112345678901123456789011234567890112345678901123456789011234567890112345678901
1 1
aiaiaiaaiie aaii iiaiaiaiaiaiaiaiaiaiaiaiaiaiaiaiaiaiaiaiaiaiaiaiaiaiaiaiaiaiaiaiaiaiaiaiaiaiaiaiaiaiaiaiaiaiaiaiaiaiaiaiaiaiaiaiaiaiaiaiaiaiaiaiaiaiaiaiaiaiaiaiaiaiaia
100
- S 三点共线
j 10 (10)
10 1
Lg
- S 、点
11 11
111 111 111 111 111 111 111 111
(11)j/(10)
211 111 111 111 111 111 111 111 111
JaaJIe IaI 21 Jai Jai Jai Jai Jai Jai Jai Jai Jai Jai Jai Jai Jai Jai Jai Jai Jai Jai Jai Jai Jai Jai

1 Jstll jxtll gag kua
1
()
jlll joll (11) jall bala bala, a
(1)jgl
Jaaill aill yol 128 g hnnn nnae gac g
j j j j j j j j j j j j j j j j j j j j j j j j j j j j j j j j j j j j j j j
Aiiill Jauo 0j yaiuall jll iia 12
iic g aill Jaaal alg 10g 18
( x - 1) ( y - 2) = 0
ie elaiuall jia laeisio 1i aei gai jia juiy
Jll Jall jaiy jiyjai Jai Jai jay Jai Jai Jai Jai Jai Jai Jai Jai Jai Jai Jai Jai Jai Jai Jai Jai Jai Jai Jai Jai Jai Jai Jai Jai Jai Jai Jai
(13)
1
Jaiia 1y Jie Cuaa yao ay
(14)
- S . 2. S .
p1i 101111111111111111111
aaiial 10) 11 (10)

14 11 11 11 11 11 11 11 11 11 11 11 11 11 11 11 11 11 11 11 11 11 11 11 1
juailll
Aa a a a a a a a a a a a a a a a a a a a a a a a a a a a a a a a a a a a a a a a a a a a a a a a a a a a a a a a a aaa
A
s/2 1 2 3 4 5 6 7 8 9 10

aill l aallll 12/19/EU 2012/19
#
Jaiia
aalalalalalalalalalalalalalalalalalal
Spare parts list
CDM1147P
| No Description Position |
| CDA1131P Quick charger 20V |
| CDA1132P Battery 20V - 2.0Ah Li-Ion |
| 481160 13MM Keyless chuck 2 |
| 481626 Gear box assembled 3...48|51 |
| 481162 Mabuchi motor complete 52|53 |
| 481163 Belt hook + screw 46|47 |
| 481164 Switch 60 |
| 481165 Terminal + PCB assembly 61 |
Exploded view
CE
DECLARATION OF CONFORMITY CDM1147P - CORDLESS LI-ION COMBI DRILL
(EN) We declare under our sole responsibility that this product is in conformity with directive 2011/65/EU of the European parliament and of the council of 8 June on the restriction of the use of certain hazardous substances in electrical and electronic equipment is in conformity and accordance with the following standards and regulations:
(DE) Der Hersteller erklart eigenverantwortlich, dass这点 Produkt der Direktive 2011/65/EU des Europäischen Parlaments und des Rats vom 8. Juni 2011 über die Einschränkung der Anwendung von bestimmten gefährlichen Stoffen in elektrischen und elektronischen Geräten entspricht. den folgenden Standards und Vorschriften entspricht:
(NL) Wij verwlaren onder once volledige verantwoorderdelijkheid dat dit product voldoet aan de conform Richtlijn 2011/65/EU van het Europees Parlement en de Raad van 8 Juni 2011 betreffende beperking van het gebruik van bepaalde gevaarlijke stoffen in elektrische en elektronische apparatusu er in overeenstem ming is met de volgende standaarden en reguleringen:
(FR) Nous déclarons sous notre seule responsabilité que ce produit est conforme aux standards et directives suivants: est conforme à la Directive 2011/65/EU du Parlement Européen et du Conseil du 8 juin 2011 concernant la limitation d'usage de certaines substances dangereuses dans l'équipment électrique et électronique.
(ES) Declaramos bajo esta exclusiva responsabilidad que este producto cumple con las siguientes nomas y estandares de funciona: se enquirytra conforme con la Directiva 2011/65/UE del Parliamento Europeo y del Consejo de 8 de junio de 2011 sobre la restricción del uso de determinadas sustancias peligrosas en los equipos electricos y electrónicos.
(PT) Declaramos por esta total responsabilià-de que este produits esté en conformidade e cumpe as normas e regulamentacoes que se seguem: está em conformidade com a Directa 2011/65/EU do Parliamento Europeu e com o Conselho de 8 de Junho de 2011 no que respeita a restricao de享用a de determinadas substancias perigosas existentes em equipamento eletrico e electrónico.
(II) Dichiariamo, sulla notre responsabilità, che questo prodotto è conforme alle normativè e ai regolamenti segunti: è conforme alla Direttiva 2011/65/UE del Parliamento Europeo e del Consiglio dell'8 giugno 2011 sulla limitazione dell'uso di determinate sostancze pericolose nelle apparecchature elettriche ed elettroniche.
(SV) Vi garanterar peget ansvar att denna produkt uppyller och foljer foljande standarder och bestammelser: uppyller direktiv 2011/65/EU fran Europeiska parliamentet et ech EG-radet den 8 Juni 2011 om begransningen av anvandning av fariga substanzer i elektrisk och elektronikn utrustning.
(FI) Vakuutamme yksinomaan omalla vastuullamme, etta tama tuote tayttaa seuaavat standardit ja saadokset: tayttaa Europon parlementin ja neuvoston 8. Kesakuta 2011 paivatyn direktivin 2011/65/EU vaatimukset koskien vaarallisten aineiden kayton rajolusta sahko- ja elektronisissa laiteitta.
(NO) Vi erklaer er under vart eget ansvar at dette produktet er samsvar med folgende standarder og regler: er i samsvar med EU-directivet 2011/65/EU fra Europa-parlamentet og Europa-radet, pr. 8 Juni 2011, om begrensning i bruken av visse farlige stoffer i elektrisk og elektronisk utstyr.
(DA) Vi erklaer under eget ansvar, at delle produit er i overensstammelse med flogende standarder og bestemmelser: er i overensstammelse med direktiv 2011/65/EU fra Europa-Parliamentet og Rådet af 8. Juni 2011 om begraensingf anvendelsen af visse farlige stoffer ie elektrisk og elektronisk udystr.
(HU) Felelossegung teljes tudataban kijelentjuk, hogy ez a termek teljes mertekben megfelel az alabbi szabvanyoknak es eliorasoknak: je v souladu se smernici 2011/65/EU Evropskho parlamentu a Rady EU ze dne 8. cerva 2011, ktera se tyká orameni pouziti urciti nebepeznch latek v elektrickych a elektronickych zaizenich.
(CS) Na naši vlastni zodpovednost prohrašujeme, ze je tento vyrobek v souladu s následujicimi standardy a normami: Je v sūlade s normou 2011/65/EU Europskeho parlementu a Rady z 8. juna 2011 týkajúcej sa obmedzenia použivania určitych nebezečnéch látok v elektrikcowe a elektronikowem vybaveni.
(SK) Vyhlasujeme na nasu vyhradnú zodpovednost, Že tento vyrobok je v zhode a sulade s nasledujúčími normami a predpisim; Je v sūlade s normou 2011/65/EU Europskeho parlementu a Rady z 8. juna 2011 týkajúcej sa obmedzenia použivania určitych nebezepečnéchá látek v elektrikkom e elektrikoncky vybaveni.
(SL) S polno odgovomostjo izjavlamo, da je ta izdelek v skladu in da odgovarja nasledn-jim standardom terpredispom; je v skladu z direktvo 2011/65/EU Evropsega parla-menta in Sveta z dne 8. junii 2011 o omejevanju uporabe dolocenih nevamih snovi v elektricni in elektronik opremi.
(PL) Deklarujemy na wlasna odpwiedzialnosc, ze ten produkt spelnila wymogizawarte w nastepujacych nomach i przypesachat: jest zgodny z Dyrektywa 2011/65/UE Parfa- mentu Europejskiego i Rady z dnia 8 czerwca 2011 r. w sprawie ograniczenia stosowania niedtorych niebepezcznych sublancji w spreziele elektrycznym i elektroniczynm.
(LT) Prisirndami visa atsakomybe deklaruojame, kad sis gaminys attinka zemiau paminétus standutus arba nuostatus: atitinka 2011 m. birzeli 8 d. Europos Parliamento ir Tarybos direktyva 2011/65/EB del tam tikru pavojingu medziagu naudojimo elektros ir elektroninejre jangoje apribojo.
(LV) Ir atbstoSA Etropas Parliamenta un Padomes 2011, gada 8. junja Direktivai 2011/65/ES par dazu bftamu vielu izmantoanas ierobezsoanu elektriskas unelektroniskas ekartas.
(ET) Agpalvojam ar visu atibildifu, ka sis produits ir saskaan un atbilst sekojsiem standartiem un nohlukemi: ir atbilstosa Eriopas Parliamenta un Padomes 2011. gada 8. junja Direktiv 2011/65/ES par da zu bistamu vii izmantoisanias ierobezo sanu elektriskas un elektroniskas iekarlas.
(RO) Declaram prin aceasta cui raspunderea deplina ca produsul acesta este in conformitate cu urmatoarele standarde sau directive: este in conformitate cu Direcva 2011/65/UE a Parliamentului Europeani si a Consiliulii din 8 iunie 2011 cu privire la interzicerca utilizari anumitor substante periculoase la echipamente tele electrice si electronice.
(HR) Izjavljemo pod vlasitom odgovornoLsu da je strojem ukladan sa slijedesim standardima ill standardizariran Dokumentima i u skladu sa odredbama: uskladeno s Direktivom 2011/65/EU europskog parliamenta i vije za dianom 8. lipna 2011. oografienju koristjenu odredenih opasnih tvari u elektrichnoj i elektronickoj opremi.
(SRL) Pod punom odgovorosncu izjavljemoda je usaglasen sa sledecim standardima li normama: usaglasen sa direktivom 2011/65/EU Evropskog parlamenta i Saveta od 8.juna.2011. godine za restrkciju upotrebe odredenih opasnih materija u elektricnoj i elektronskoj opremi.
(RU) IIOI CBOIO OTBETCTBENHOCTb 3aABNREM, YTO DaHHOE H3DNE COOTBTCTBYe CnDEYOUIMM CTANAPTAM N HOPMAM: COOTBTCTBYET Tp6OBAHIM DnpeKTNbI 2011/65/EU EBponeickoro napnAmehTa n coBETA oT 8 INOHJ 2011 r. no ORpanHHNcIO NcIOBTOBHAOM ONPeDeNHBx OAnchbX BaeJeCTB a3IEKTPmVeeKOM mNIEKTPHOHOM O6OpDyOBAHIM
(UK)Ha cboa bnchy BInDooiabnHCTb aaeBnEMO, 0u dahe 6nbDAHNH BINIOBIAc HACTYHM CTahdaptam I HOPMATBAM: 3aDOOBTHRE BMMOT DInepkTMBH 2011/65/ CC BAponeBcKOI PAnpMeHTy Ta PaIDI B8 NEPBCH 2010 pOKy HAo6MekHHA bIKOPMCNTAHN DEeMX He6beNeHHX peoBOH IN ENEKTPNHOMY Ta eNEKTPOHOMY o6NJADHNNH.
EL Anuoue uttubua at to pioov autu uupueve kai tneitouc taepakow Kavoviaouic kai npotura: ouaopagvatae t my Oyndya 2011/65/EE tou Eupwtaikou KvoBouluoi kai Touuoulou n 8n louviou vioi 2011 va Tropokipno xpns opiaevtu etkivouov ouuvos o aeKepikko kai naKepkovko eoTAmq.
(AR) euee eae eae eae eae eae eae eae eae
(TR) Tek sorumlusu bize olarak bu irunun agidaki standart ve yonergelere uygun oldugu n beyan edizeri.
EN 55014-1, EN 55014-2, EN 61000-3-2, EN 61000-3-3, EN 62233 EN 62841-1,EN 62841-2-1, EN 60335-1, EN 60335-2-29, 2006/42/EC, 2011/65/EU, 2012/19/EU, 2014/35/EU, 2014/30/EU
Zwolle, 01-10-2020

FERM - Lingenstraat 6 - 8028 PM - Zwolle - The Netherlands


- Cordless Li-Ion Combi Drill 20V CDM1147P
- SAFETY INSTRUCTIONS
- Additional safety warnings for drills and screw drivers Drill safety warnings
- Safety instructions when using long drill bits
- Safety warnings for battery
- Safety warnings for charger Intended use
- Residual risks
- Power cord replacement
- MACHINE INFORMATION
- Intended use
- Charger CDA1131P
- Battery CDA1132P
- Vibration level
- Description
- Fig. A
- OPERATING
- Removing the battery from the machine Fig.B
- Inserting the battery into the machine Fig.B
- Checking the battery charging status Fig.C
- Charging the battery (with the charger) Fig. C
- LED indicators (6)
- Fig.C
- Fitting and removing drills or screwdriver bits Fig.A
- Adjusting the gears
- Adjusting the direction of rotation Fig.A
- Switching the machine on and off Fig.A
- Setting the operating mode
- Fig.A
- Work light (15)
- Belt hook (14)
- User tips
- MAINTENANCE
- ENVIRONMENT
- Only for EC countries
- WARRANTY
- Specifications techniques
- INFORMACE O NARADI
- Určené použití
- Incarcator CDA1131P
- DOnbHnTeHNn npEynpeXeHna 3a 6e3oNaChocT 3a 6opMaunHn n OTBeptKn
- HCTpykun 3a6e3onacnoct npn n3non3BaHe Ha dbnn CBpeJa
- IpeDynpexKeHn 3a 6e3oNaChocT 3a 6aTepeNra
- IpeDynpexdHn 3a 6e3oNaChocT 3a 3apJHOTo Ha 6aTePnTa
- PpeHa3NaueHne
- OcTaTbUHn pNCKOBe
- 3amha Ha 3axpaHbauaKa6eJ
- INHΦOPMAUЯ 3A MAUINH
- PpeHa3NaeHne
- 3apeKdahe Ha 6aTepeHra (cbc 3apAHOTo yctpoCTBO)ΦnC
- LED nHdkaTopn (6) ΦnC
- Suvouaogevo dpattavo mttapiac Iovtwv Aioiou 20 V CDM1147P
- Ytloaetioevoikivduvoi
- Jalil
- aeea 1
- a_i = c_ia_i
- #
- J
- 100
- Lg
- Jstll jxtll gag kua
- (13)
- (14)
- juailll
- A
- Spare parts list
- Exploded view
- CE
- DECLARATION OF CONFORMITY CDM1147P - CORDLESS LI-ION COMBI DRILL
Brand : Ferm
Model : CDM1147P
Category : Drill