HUB 2 - Tent DOMETIC - Free user manual and instructions
Find the device manual for free HUB 2 DOMETIC in PDF.
| Brand | Dometic |
| Model | HUB 2 |
| Product type | Inflatable tent |
| Capacity | 2 persons |
| Main material | Polyester with polyurethane coating |
| Mounting type | Inflation with supplied manual pump |
| Recommended inflation pressure | 9 psi (0.62 bar) |
| Included accessories | Shelter, ground sheet, 4 quick-release straps, manual pump, peg bag, carry bag |
| Recommended use | Excursions, autonomous camping, SUVs and vans |
| Not suitable for | Very strong winds, snowfall, seasonal or commercial use |
| Safety | Never use fuel-burning devices inside; keep ventilation openings clear |
| Maintenance | Clean with clean water and a soft brush; apply waterproof and UV treatment before each trip |
| Storage | Dry completely before storing in a dry, ventilated place |
| Repair | Recommended repair kit: repair tape, repair solution, silicone spray for zippers |
| Europe warranty | Legal warranty; contact the retailer or Dometic subsidiary |
| Australia/New Zealand warranty | 3 years; conditions in accordance with the Consumer Guarantees Act |
Frequently Asked Questions - HUB 2 DOMETIC
User questions about HUB 2 DOMETIC
0 question about this device. Answer the ones you know or ask your own.
Ask a new question about this device
Download the instructions for your Tent in PDF format for free! Find your manual HUB 2 - DOMETIC and take your electronic device back in hand. On this page are published all the documents necessary for the use of your device. HUB 2 by DOMETIC.
USER MANUAL HUB 2 DOMETIC
natural_image
Two identical 3D architectural diagrams of a modular cabin or tent structure, shown from different angles and orientations (no text or symbols)HUB, HUB 2
EN Inflatable tent Operating manual....11
© 2022 Dometic Group. The visual appearance of the contents of this manual is protected by copyright and design law. The underlying technical design and the products contained herein may be protected by design, patent or be patent pending. The trademarks mentioned in this manual belong to Dometic Sweden AB. All rights are reserved.
1
HUB
- Width: 230 cm
- Depth: 230 cm
- Height: 230 cm
- Weight: 13.8 kg
- Min weight: 12.3 kg

text_image
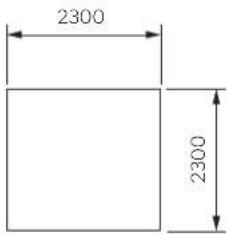
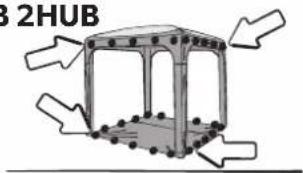
2300 2300HUB 2
- Width: 230 cm
- Depth: 230 cm
- Height: 230 cm
- Weight: 8.94 kg
- Min weight: 8.5 kg
text_image
2300 23002
natural_image
Diagram of a 3D object with a labeled top view and projection lines, no text or symbols present.
natural_image
Illustration of a folded fabric or textile with a curved arrow indicating rotation (no text or symbols)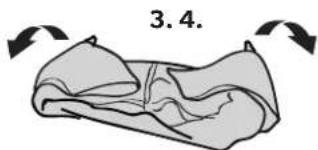
natural_image
Diagram of a folded fabric or material with directional arrows indicating movement (no text or symbols)
natural_image
Illustration of a person folding a folded garment with an arrow indicating upward motion (no text or symbols)3
text_image
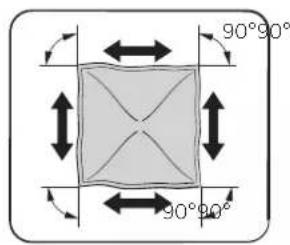
90°90° 90°90°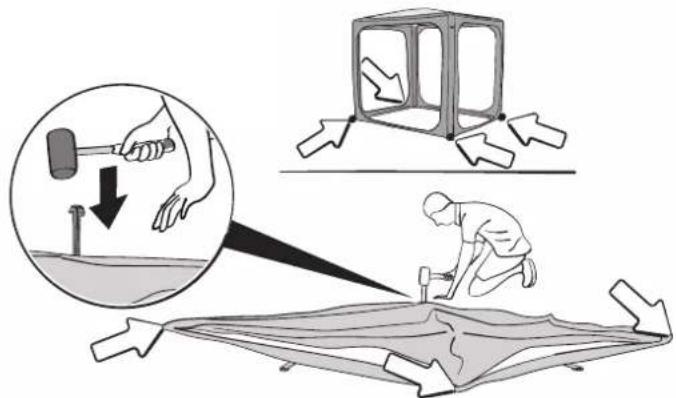
text_image
Diagram illustrating a hand using a hammer to measure a floor, with an inset showing the hand holding a nail and a magnified view of the hand using a tool.4

text_image
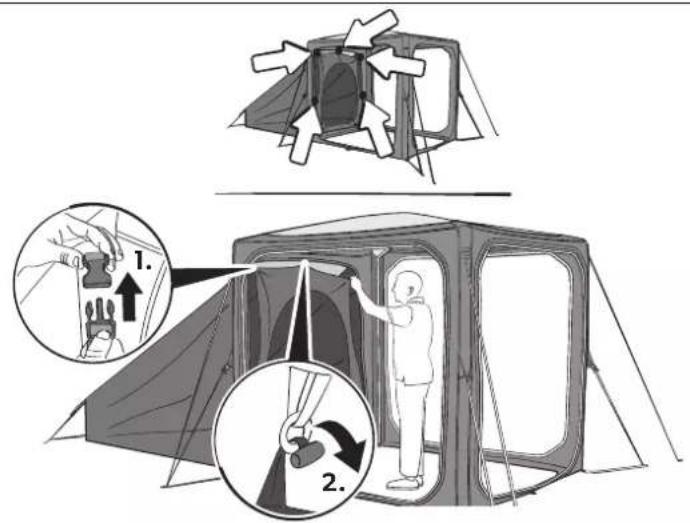
Medical procedure diagram showing a person using a catheter to compress an injured patient, with labeled steps 1 and 2.HUB 2HUB
text_image
Illustration showing a person using a medical or rehabilitation device to adjust equipment, with labeled steps 1 and 2.5
text_image
Diagram illustrating a mechanical assembly process with numbered steps and a magnified view of the component being adjusted.HUB 2HUB
text_image
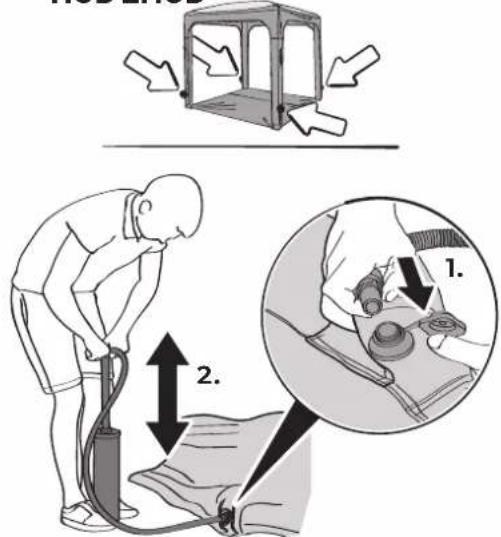
1. 2.6
text_image
Illustration showing a hand using a hammer to measure a foot with a gavel, accompanied by instructional diagrams and labeled steps.7
text_image
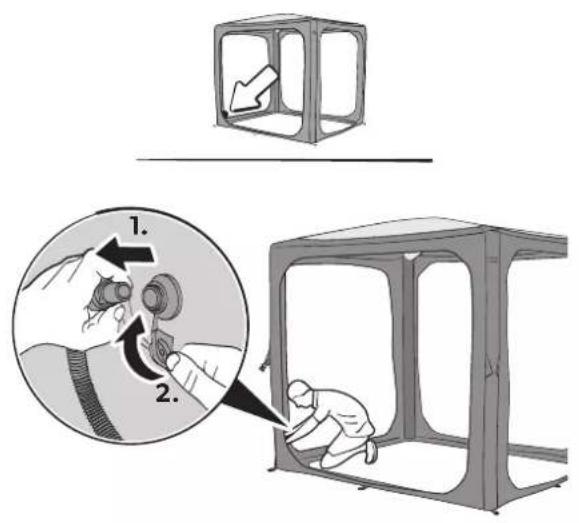
Diagram illustrating two steps to install a mechanical device, showing step 1 with hand placement and step 2 with tool insertion.8
text_image
Technical diagram illustrating a mechanical assembly process with labeled steps and directional arrows indicating inspection or disassembly.9
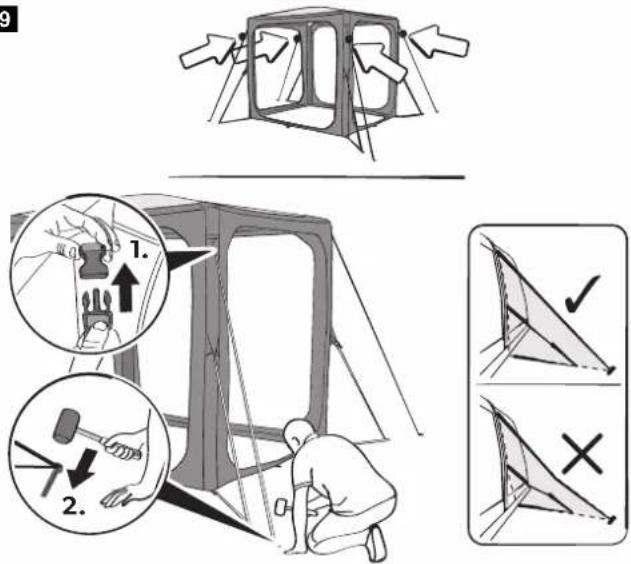
text_image
Diagram illustrating how to adjust a folding structure, showing step-by-step instructions for tool positioning and folding.10
11
text_image
Diagram illustrating three-step folding or lifting process of a cabin frame, labeled with steps 1, 2, and 3.HUB 2HUB
text_image
3 2HUB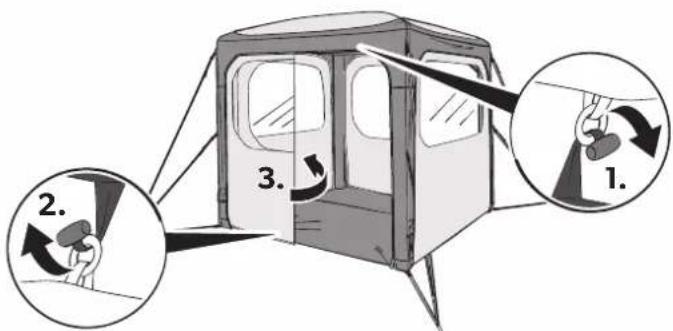
text_image
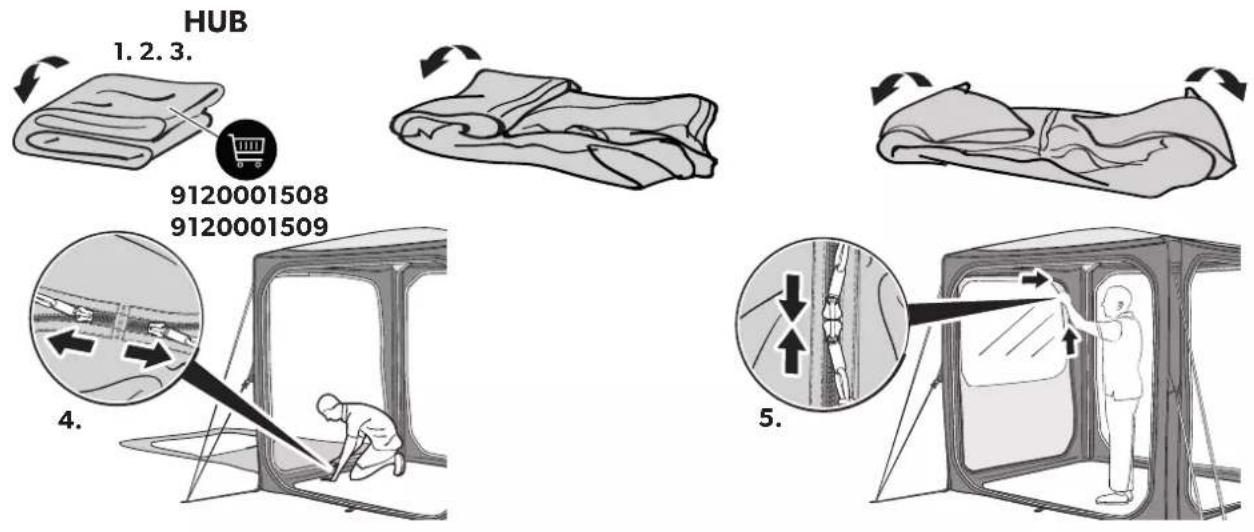
1. 2. 3.12
text_image
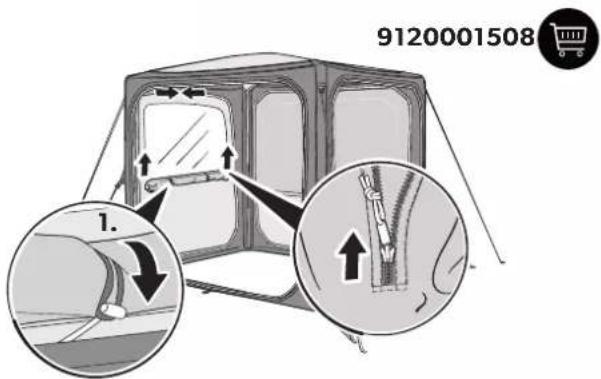
9120001508 1.13
text_image
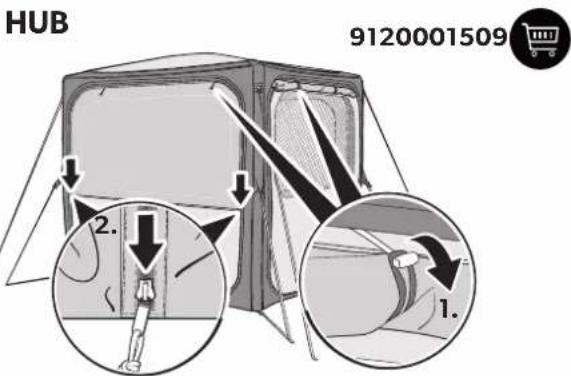
HUB 9120001509 1. 2. 1.14
HUB
text_image
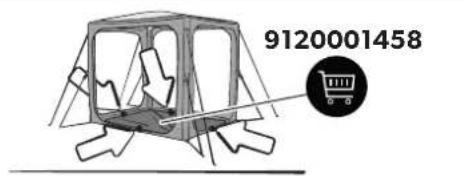
9120001458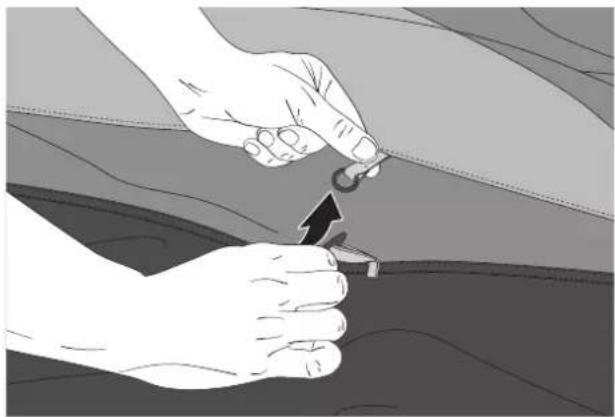
natural_image
Illustration of a hand holding a key inserted into a car compartment, with an arrow indicating the insertion direction (no text or symbols present)15

16
text_image
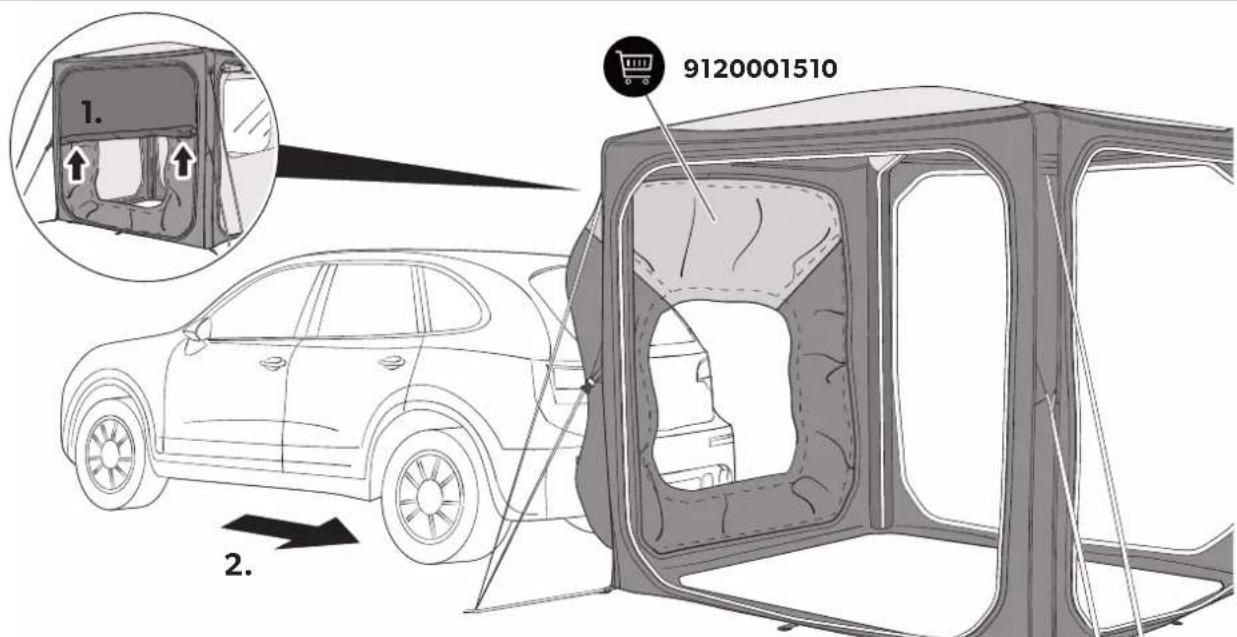
9120001510 1. 2.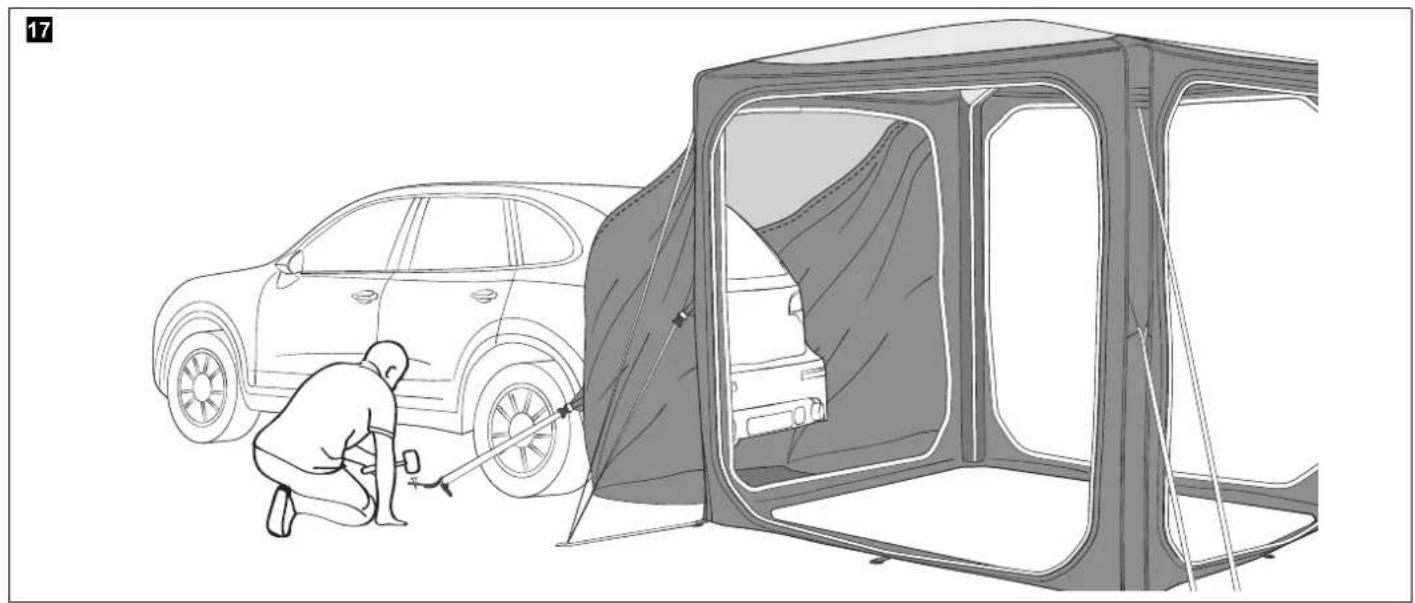
natural_image
Line drawing of a person cleaning a car via a ramp onto a tent (no text or symbols)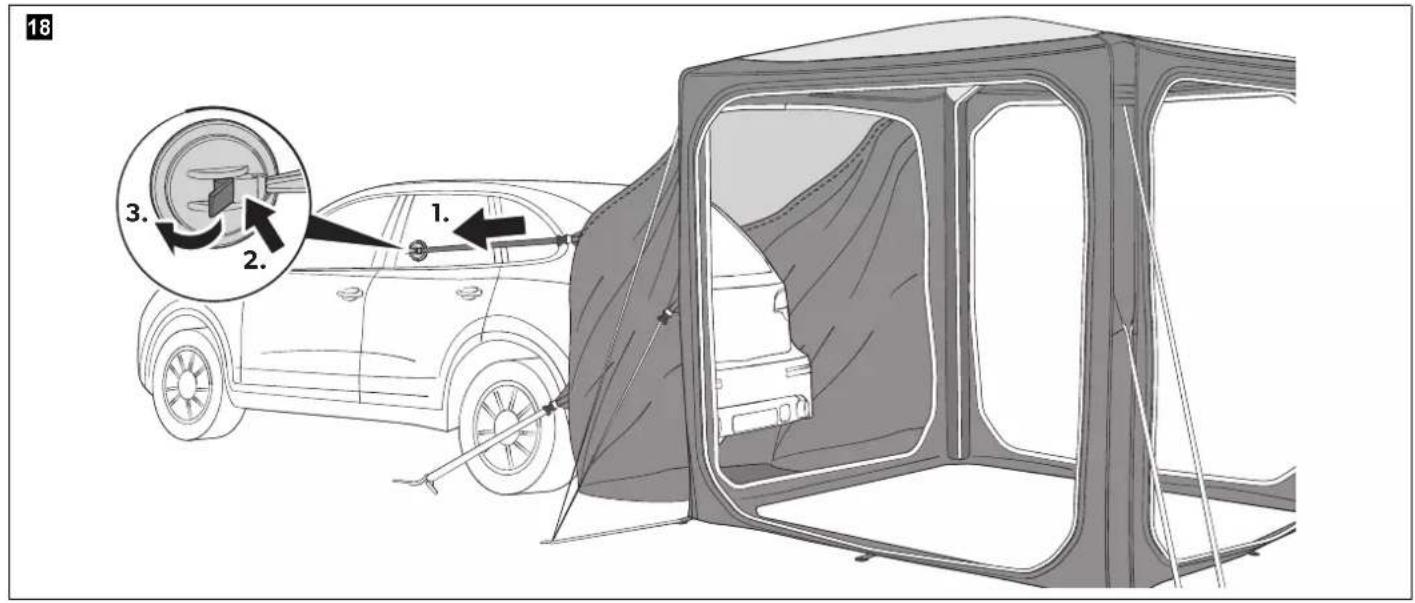
text_image
18 3. 2.19
HUB
text_image
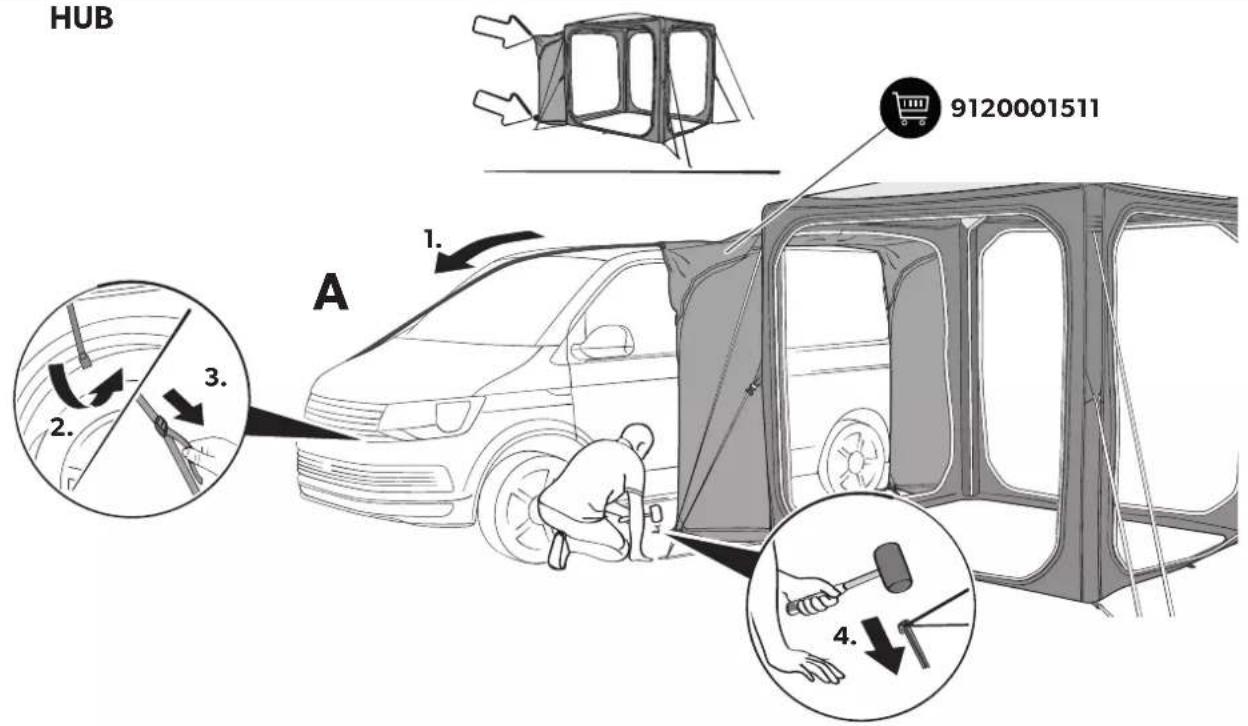
HUB 9120001511 A 1. 2. 3. 4.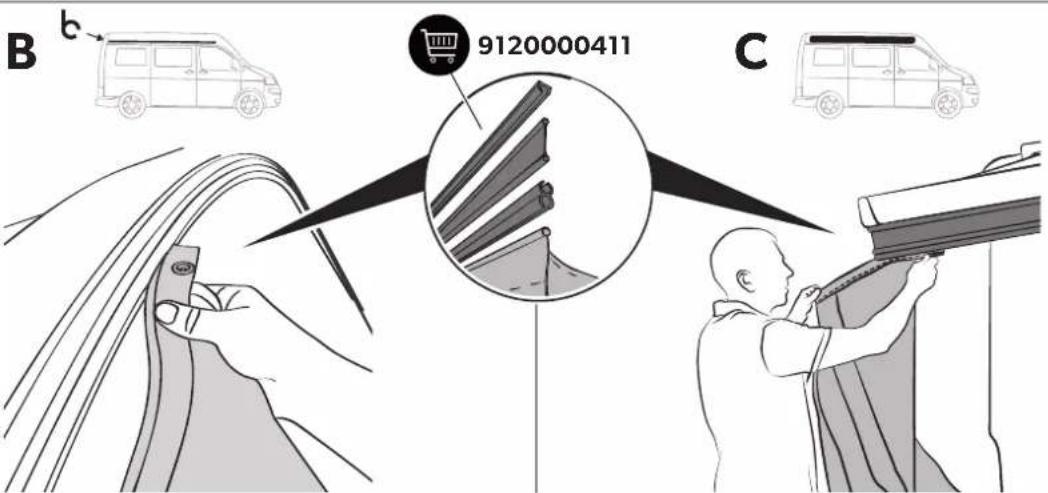
text_image
B 9120000411 C20
text_image
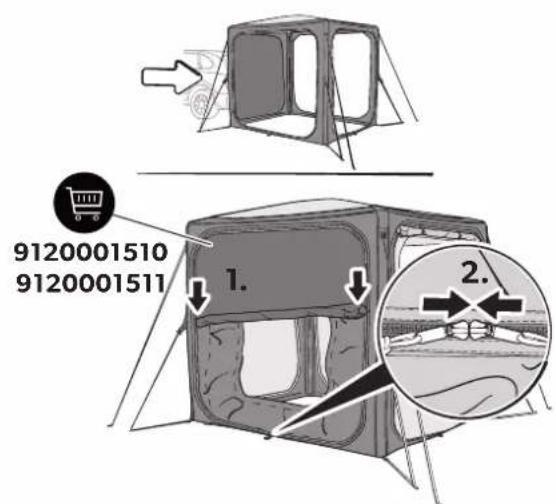
9120001510 9120001511 1. 2.21
text_image
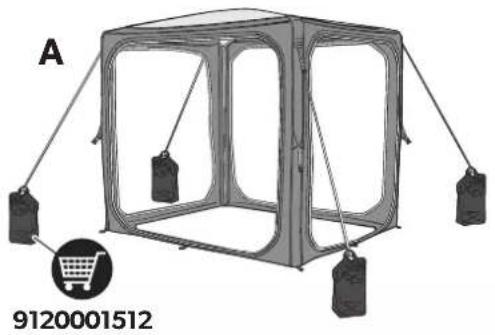
A 9120001512B
natural_image
Diagram of a mechanical device with a magnified inset showing a hand holding a tool, no text or symbols present.22
HUB
text_image
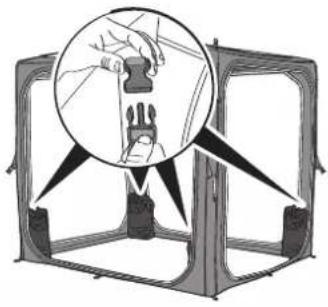
1.2.3. 9120001507 4. 5.23
text_image
Diagram illustrating a mechanical repair or disassembly process with labeled steps 1 and 2, showing hand positioning and tool path.24
text_image
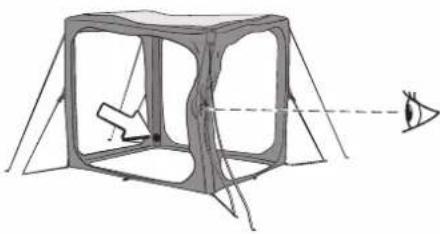
Diagram illustrating a climbing setup with labeled correct and incorrect check indicators for folding or lifting a tent.25
text_image
Diagram illustrating two-step folding or lifting process of a tent, showing hand positioning and tool path changes.26
HUB
text_image
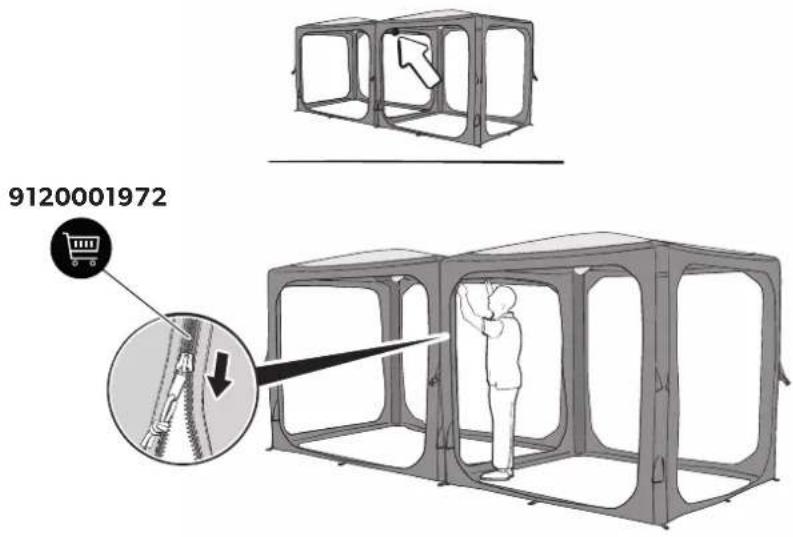
912000197227
natural_image
Diagram of a tent structure with an arrow indicating direction, no text or symbols present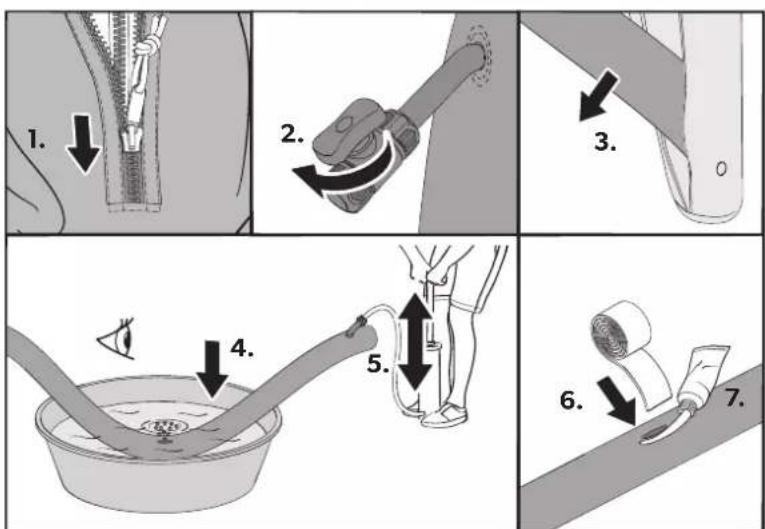
text_image
1. 2. 3. 4. 5. 6. 7.Please read these instructions carefully and follow all instructions, guidelines, and warnings included in this product manual in order to ensure that you install, use, and maintain the product properly at all times. These instructions MUST stay with this product.
By using the product, you hereby confirm that you have read all instructions, guidelines, and warnings carefully and that you understand and agree to abide by the terms and conditions as set forth herein. You agree to use this product only for the intended purpose and application and in accordance with the instructions, guidelines, and warnings as set forth in this product manual as well as in accordance with all applicable laws and regulations. A failure to read and follow the instructions and warnings set forth herein may result in an injury to yourself and others, damage to your product or damage to other property in the vicinity. This product manual, including the instructions, guidelines, and warnings, and related documentation, may be subject to changes and updates. For up-to-date product information, please visit "documents.dometic.com, dometic.com".
Explanation of symbols

DANGER!
Safety instruction: Indicates a hazardous situation that, if not avoided, will result in death or serious injury.

WARNING!
Safety instruction: Indicates a hazardous situation that, if not avoided, could result in death or serious injury.

CAUTION!
Safety instruction: Indicates a hazardous situation that, if not avoided, could result in minor or moderate injury.

NOTICE!
Indicates a situation that, if not avoided, can result in property damage.

NOTE
Supplementary information for operating the product.
General safety instructions

DANGER! Failure to obey this instruction will cause death or serious injury. Hazard of carbon monoxide poisoning
- Never use a fuel-burning appliance such as barbecues or gas heaters inside the tent. The burning process produces carbon monoxide which accumulates inside the tent as there is no flue.

WARNING! Failure to obey these warnings could result in death or serious injury. Fire hazard
- Ensure you know the fire precaution arrangements on the site.
- Do not cook inside the tent or use open flames.
- Leave the tent immediately in case of fire.
Beware of suffocation
- Ensure ventilation openings are open and clear all the time to avoid suffocation.

CAUTION! Failure to obey these cautions could result in minor or moderate injury. Risk of injury
- This device is not intended for use by persons (including children) with reduced physical, sensory or mental capabilities, or lack of experience and knowledge, unless they have been given supervision or instruction concerning use of the device by a person responsible for their safety.
- Do not allow children to play around the tent and ensure that suitable protective footwear is worn. Guy lines are a trip hazard and pegs can be sharp.
- Cleaning and user maintenance may not be carried out by unsupervised children.
- Keep passage ways clear.
Scope of delivery
HUB
| Component Quantity |
| Inflatable tent 1 |
| QuickPitch straps 4 |
| Storm straps 4 |
| Hand pump 1 |
| Peg bag 1 |
| Carry bag 1 |
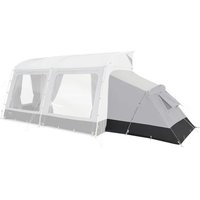
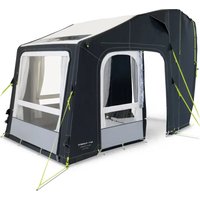
HUB 2
| Component Quantity |
| Shelter 1 |
| Groundsheet 1 |
| QuickPitch straps 4 |
| Hand pump 1 |
| Peg bag 1 |
| Carry bag 1 |
Accessories
| Accessory | Ref. no. | |
| Hub | Hub 2 | |
| HUB Sleeping Annexe | 9120001507 | - |
| HUB PVC Window / Door Panel | 9120001508 | - |
| HUB Mesh Window / Door Panel | 9120001509 | 9120001971 |
| HUB SUV Connect Tunnel | 9120001510 | - |
| HUB Campervan Connect Tunnel | 9120001511 | - |
| HUB Weight Bag | 9120001512 | |
| Footprint | 9120001458 | - |
| Connection strip | 9120001972 | - |
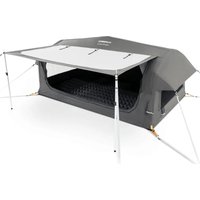
| Inner tent | - | 9120001983 |
Intended use
This inflatable tent is suitable for:
- Stand-alone use
- SUVs and campervans
• Light to moderate weather - Touring
This inflatable tent is not suitable for:
• Very strong winds or snowfall
• Seasonal pitch or commercial use
This product is only suitable for the intended purpose and application in accordance with these instructions.
This manual provides information that is necessary for proper installation and/or operation of the product. Poor installation and/or improper operating or maintenance will result in unsatisfactory performance and a possible failure.
The manufacturer accepts no liability for any injury or damage to the product resulting from:
- Incorrect assembly or connection, including excess voltage
- Incorrect maintenance or use of spare parts other than original spare parts provided by the manufacturer
• Alterations to the product without express permission from the manufacturer - Use for purposes other than those described in this manual
Dometic reserves the right to change product appearance and product specifications.
Using the tent

CAUTION! Risk of injury
Never open the zipper on the protective sleeve while an air pole is inflatable. This will result in the air pole bursting.
Before first use
Familiarize yourself with the product by carrying out a test set up before the product is used for the first time. Check if the scope of delivery is complete.
Choosing a site
Choose a flat site that is protected from wind:
- If necessary, use a windbreak.
- Choose a shaded site to avoid UV degradation of the fabric.
- Avoid pitching under trees as falling branches, resin, etc. can damage the product.
- Clear the site of sharp stones and debris to avoid damaging the groundsheet.
- Set up the product with the doors facing away from the wind.
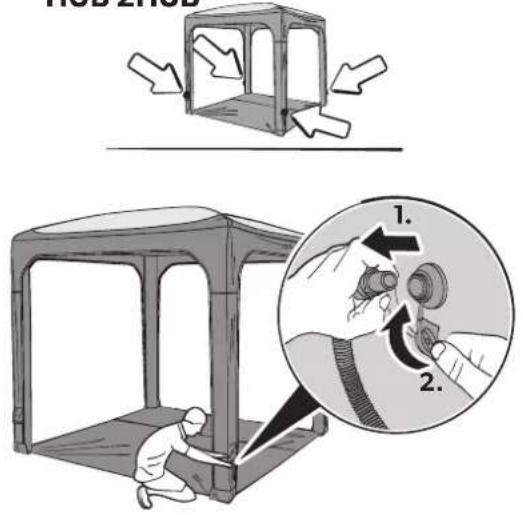
Setting up the tent

CAUTION! Risk of injury and material damage
- Do not use any type of compressor designed to inflate car tires.
- Only inflate the air poles into the green zone of the pressure gauge of the supplied hand pump (9 psi/0.62 bar).

NOTICE! Material damage
- Do not open or close the zippers by force.
- If a cassette awning is used to attach the tent, support the cassette awning while working to avoid putting too much stress on it. After attaching the tent, rewind the cassette awning fully back into its housing.

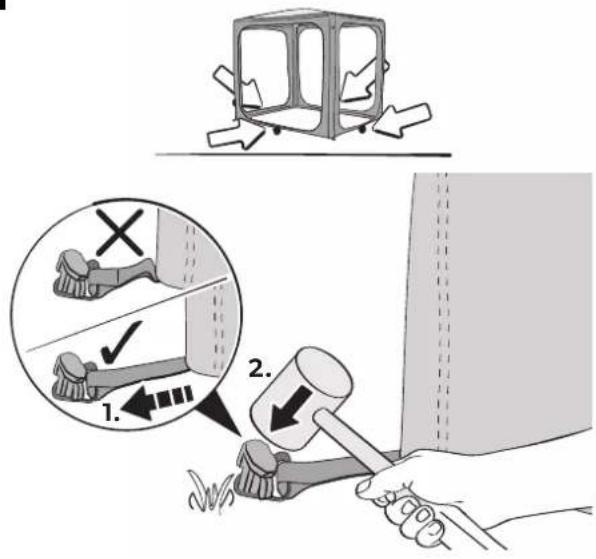
NOTE
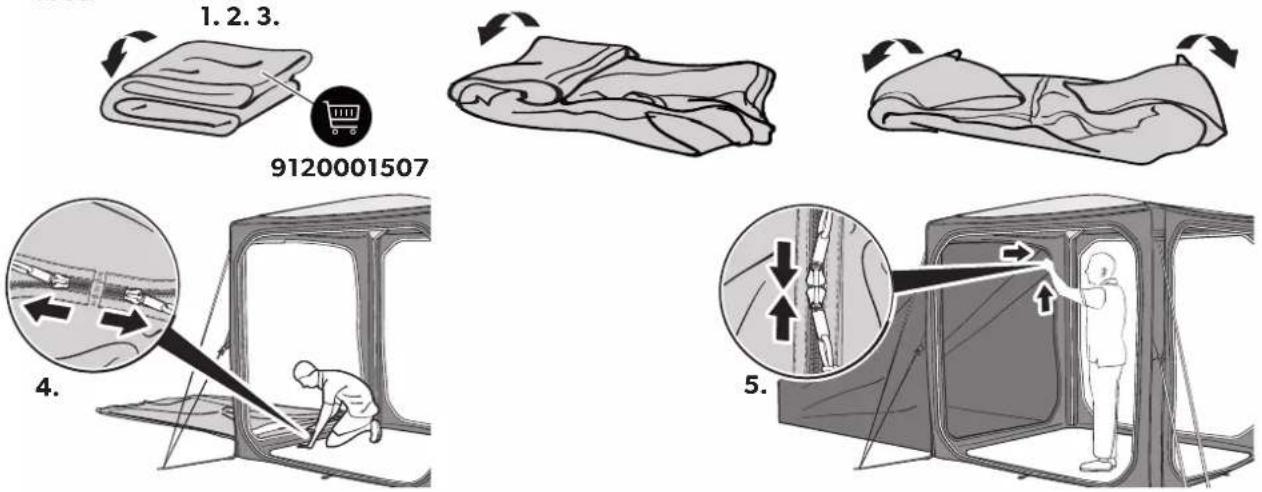
- The tent comes with heavy duty pegs. These will be suitable for many sites but for some types of ground special pegs will be needed. Ask your dealer.
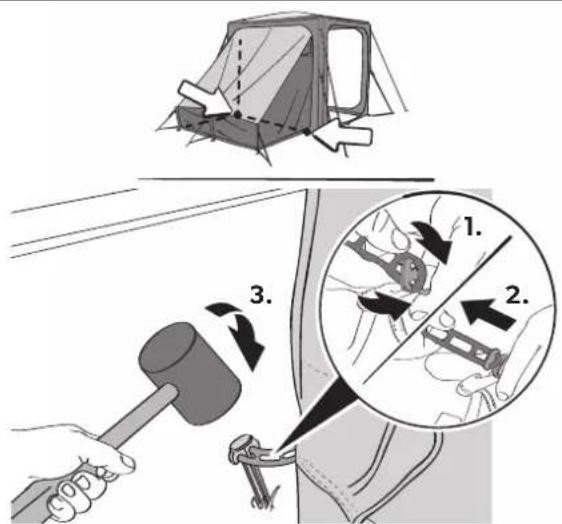
- Drive the pegs at a 45^ angle away from the tent into the ground.
- Peg each guy line in-line with the seam it starts from.
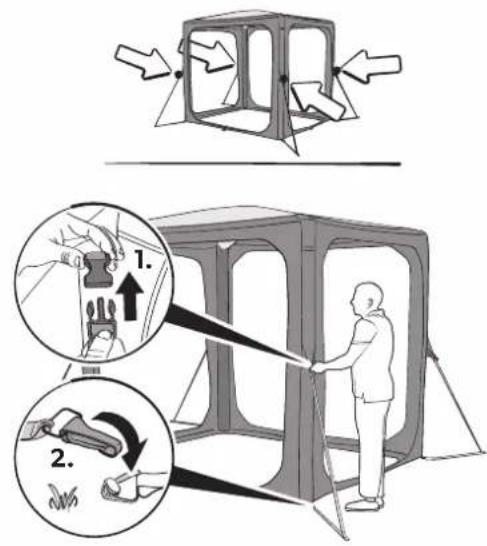
Keep the following tips in mind while setting up the tent:
- The figures provide a general overview of the set-up. The actual set-up will vary slightly based on the model of tent.
- Get help. The set-up is easier with more people.
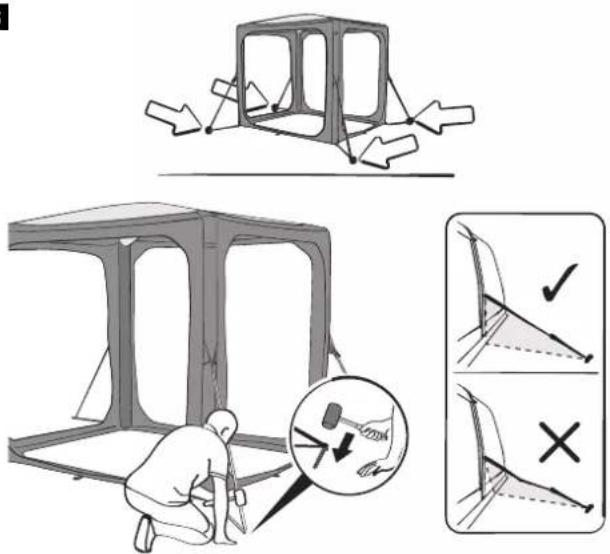
- After standing the tent upright, check the corner pegs and re-peg if necessary. The groundsheet on the inside should be taut and in a rectangular shape.
- Peg the guy lines so that the tent is under tension without distorting the shape.
- If available, attach the storm straps.
- Check the guy lines from time to time to ensure adequate tension, if necessary use the runners to adjust.
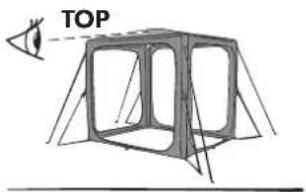
Set up the tent as follows:
- To protect the tent from dirt and damage, lay down a groundsheet or footprint before unpacking.
- Unpack the tent.
- Separate and identify the different components.
- Proceed as shown to set up the tent (fig. 2, page 3 to fig. 9, page 4).
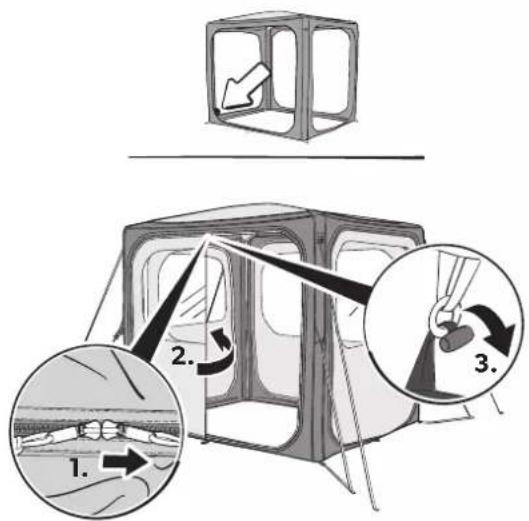
Set up the accessories as follows:
- To protect the accessories from dirt and damage, lay down a ground-sheet or footprint before unpacking.
- Unpack the accessories.
- Separate and identify the different components.
- Proceed as shown to set up the accessories (fig. 10, page 5 to fig. 26, page 10).
Dismantling the tent

NOTICE! Damage hazard
Do not use force when dismantling the tent. Otherwise you might damage any material.
- Remove any dirt on the outside.
- Close all window blinds.
- Close all doors.
- Remove all accessories.
- Remove all lines and straps.
- Remove all pegs between the corner pegs.
- Open the outlet valves.
- Wait until most of the air has been expelled.
- Remove the four corner pegs.
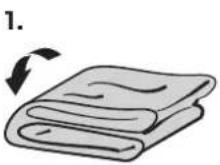
- Fold/roll the tent towards the valves to expel more air.
- When deflated, roll the tent to fit into the carry bag.
- Ensure that all parts are clean before packing them into the carry bag.
- If the tent is wet or damp, dry fully as soon as possible.
Cleaning and maintenance

NOTICE! Damage hazard
- Do not use sharp or hard objects or cleaning agents for cleaning.
- Do not use alcohol based materials, chemicals, soap and detergents for cleaning.
-
Remove bird droppings and tree resin as soon as possible to avoid permanent damage to the material.
-
If necessary, clean the product with clean water and a soft brush.
- Apply impregnation against water and UV radiation before each trip.
Storing the tent

NOTE
• Fully set up the tent for cleaning.
- Choose a sunny day for cleaning to ensure the material will dry thoroughly.
- Clean the tent.
- Air fully and ensure the tent is totally dry before packing away.
- Store in a well ventilated dry place.
Troubleshooting

NOTE
- During first exposure to water there may be some moisture at the seams. Through this moisture the threads will swell and fill the holes that are created in the sewing process.
- A fully equipped spare parts kit should include:
- Waterproof
– Repair tape and repair solution
– Silicone spray for the zippers - Spare pegs
Problem Solution
| Tent only inflates with difficulties | ▶ Check that the valve is fully screwed into the air pole. ▶ Check if the inflation tube is twisted at the valve. This may be indicated by noise. Untwist the inflation tube. ▶ Check that the hand pump is working. |
| Part of the tent does not inflate | ▶ Check that all isolation valves that connect the air poles are open. |
| Part of the tent does not deflate | ▶ Check that all isolation valves that connect the air poles are open. |
| Air poles are kinked | ▶ Add more air (9 psi/0.62 bar). |
| Air leak | ▶ Check that the valve is fully screwed into the air pole and the ring seal is in place. ▶ Check that the cap of the valve is done up tightly. ▶ Check for punctures, see chapter “Condensation” on page 13. |
| Water leak | ▶ Check for leaky seams, damaged tapings and moist areas. ▶ If you cannot find any leaks, see chapter “Condensation” on page 13. ▶ If you find any leaks, apply seam sealant. |
| Rip in the fabric | ▶ Use repair tape to seal the fabric. ▶ Have repairs carried out by an authorized specialist. |
Condensation
All tents suffer from internal condensation if one or more of the following conditions apply:
• High air humidity
• High ground moisture
- A drop in temperature
Severe condensation can run down the inside of the roof and drip off ties, tapes and other internal fittings and can be mistaken for leaking.
▶ Increase ventilation by opening doors and/or windows.
▶ Install a waterproof groundsheet.
Repairing a puncture in the air pole
If the air pole loses air, proceed as follows:
- Unzip the outer sleeve holding the air pole.
- If installed, close isolation valves.
- Remove the air pole.
- Deflate the air pole.
- Unzip the protective sleeve to expose the inflatable tube.
- Blow some air into the inflatable tube.
- Submerge the tube in water.
- Locate the puncture.
-
Use repair tape and repair solution to seal the hole.
-
Zip the inflatable tube back into the protective sleeve.
- Zip the air pole back into the outer sleeve.
Disposal

Place the packaging material in the appropriate recycling waste bins wherever possible.
Consult a local recycling center or specialist dealer for details about how to dispose of the product in accordance with the applicable disposal regulations.
Warranty
Europe
The statutory warranty period applies. If the product is defective, please contact your retailer or the manufacturer's branch in your country (see dometic.com/dealer).
For repair and warranty processing, please include the following documents when you send in the product:
• A copy of the receipt with purchasing date
- A reason for the claim or description of the fault
Note that self-repair or non-professional repair can have safety consequences and might void the warranty.
Australia and New Zealand
If the product does not work as it should, please contact your retailer or the manufacturer's branch in your country (see dometic.com/dealer). The warranty applicable to your product is 3 year(s).
For repair and warranty processing, please include the following documents when you send in the device:
• A copy of the receipt with purchasing date
- A reason for the claim or description of the fault
Australia only
Our goods come with guarantees that cannot be excluded under the Australian Consumer Law. You are entitled to a replacement or refund for a major failure and for compensation for any other reasonably foreseeable loss or damage. You are also entitled to have the goods repaired or replaced if the goods fail to be of acceptable quality and the failure does not amount to a major failure.
New Zealand only
This warranty policy is subject to the conditions and guarantees which are mandatory as implied by the Consumer Guarantees Act 1993(NZ).
Local support
Please find local support at: dometic.com/dealer
The warranty covers manufacturing defects, materials and parts. The warranty does not cover fading of the cover and wear and tear due to UV radiation, misuse, accidental damage, storm damage, or permanent, semi-permanent or commercial use. It does not cover any resulting damage. Please contact your dealer for claims. This does not affect your statutory rights.
dometic.com/sales-offices