
32HBL7310 - TV HITACHI - Free user manual and instructions
Find the device manual for free 32HBL7310 HITACHI in PDF.
| Product type | Television |
| Brand | Hitachi |
| Model | 32HBL7310 |
| Category | Television |
| Screen diagonal | 32 inches |
| Resolution | Ultra HD (4K) - 3840 x 2160 |
| Image technologies | Ultra HD, HDR, HLG, Dolby Vision |
| Tuner | DVB-T2/C/S2 |
| Connectivity | HDMI (x2), USB, Ethernet LAN, Wi-Fi 802.11 a/b/g/n, Bluetooth, SPDIF optical output, YPbPr input, VGA, CI+ |
| Smart functions | Internet browser, HbbTV, Smart Center (mobile app), Alexa Ready, FollowMe TV |
| USB recording | Yes (direct and time-shifted recording, time shift) |
| Supported USB formats | FAT32, NTFS (read); FAT32 (recording) |
| Multimedia file formats | Video: MPEG, AVI, MKV, etc. (see manual); Audio: MP3, AAC, etc.; Image: JPEG, BMP, PNG |
| Power supply | 220-240 V AC, 50 Hz |
| Standby consumption | Reduced with Wake On option disabled |
| Included accessories | Remote control, AAA batteries x2, side AV cable, YPbPr cable, quick start guide, instruction manual |
| Dimensions (with stand) | Approximately 73 x 20 x 45 cm (estimate) |
| Weight (approx.) | 5.5 kg (estimate) |
| Safety | Instructions: do not expose to water, do not block ventilation, use on a stable surface, precautions for button batteries |
| Maintenance | Clean the screen with a soft, dry cloth; do not use chemical products |
| Repairability | Internal maintenance should be entrusted to qualified personnel |
Frequently Asked Questions - 32HBL7310 HITACHI
User questions about 32HBL7310 HITACHI
0 question about this device. Answer the ones you know or ask your own.
Ask a new question about this device
Download the instructions for your TV in PDF format for free! Find your manual 32HBL7310 - HITACHI and take your electronic device back in hand. On this page are published all the documents necessary for the use of your device. 32HBL7310 by HITACHI.
USER MANUAL 32HBL7310 HITACHI
Some features or functions mentioned in this user manual may vary or may not be available depending on the model you purchased.
| Contents |
| Safety Information 2 |
| Markings on the Product 2 |
| Environmental Information 3 |
| Features 4 |
| Ultra HD (UHD) 4 |
| Dolby Vision 4 |
| Accessories Included 4 |
| Standby Notifications 4 |
| TV Control & Operation 5 |
| TV Control Switch & Operation 5 |
| TV Control Button & Operation 6 |
| Using Main TV Menu 7 |
| Inserting the Batteries into the Remote 8 |
| Power Connection 8 |
| Antenna Connection 8 |
| Antenna Connection 8 |
| License Notification 8 |
| Disposal Information 9 |
| Remote Control 10 |
| Remote Control 11 |
| Connections 12 |
| Switching On/Off 13 |
| Switching On/Off 13 |
| Switching On/Off 13 |
| First Time Installation 13 |
| Using Satellite Channel Table Feature 15 |
| Media Playback via USB Input 15 |
| USB Recording 15 |
| Media Browser 17 |
| FollowMe TV 17 |
| CEC 17 |
| Settings Menu Content 19 |
| General TV Operation 23 |
| Using the Channel List 23 |
| Configuring Parental Settings 23 |
| Electronic Programme Guide 23 |
| Electronic Programme Guide 24 |
| Teletext Services 25 |
| Software Upgrade 25 |
| Troubleshooting & Tips 25 |
| PC Input Typical Display Modes 26 |
| AV and HDMI Signal Compatibility 27 |
| Supported File Formats for USB Mode 28 |
| Video File Formats 28 |
| Picture File Formats 28 |
Audio File Formats 28
Subtitle File Formats 28
Supported DVI Resolutions 30
Connectivity 31
Wired Connectivity. 31
Wireless Connectivity 31
Wake ON 32
Wireless Display 32
Connecting Bluetooth Devices 33
Connectivity Troubleshooting 33
Using Audio Video Sharing Network Service.34
34
Freeview Play Platform 34
Internet Browser 35
HBBTV System 35
Smart Center 36
Alexa Ready Feature 37
DVB functionality information 38
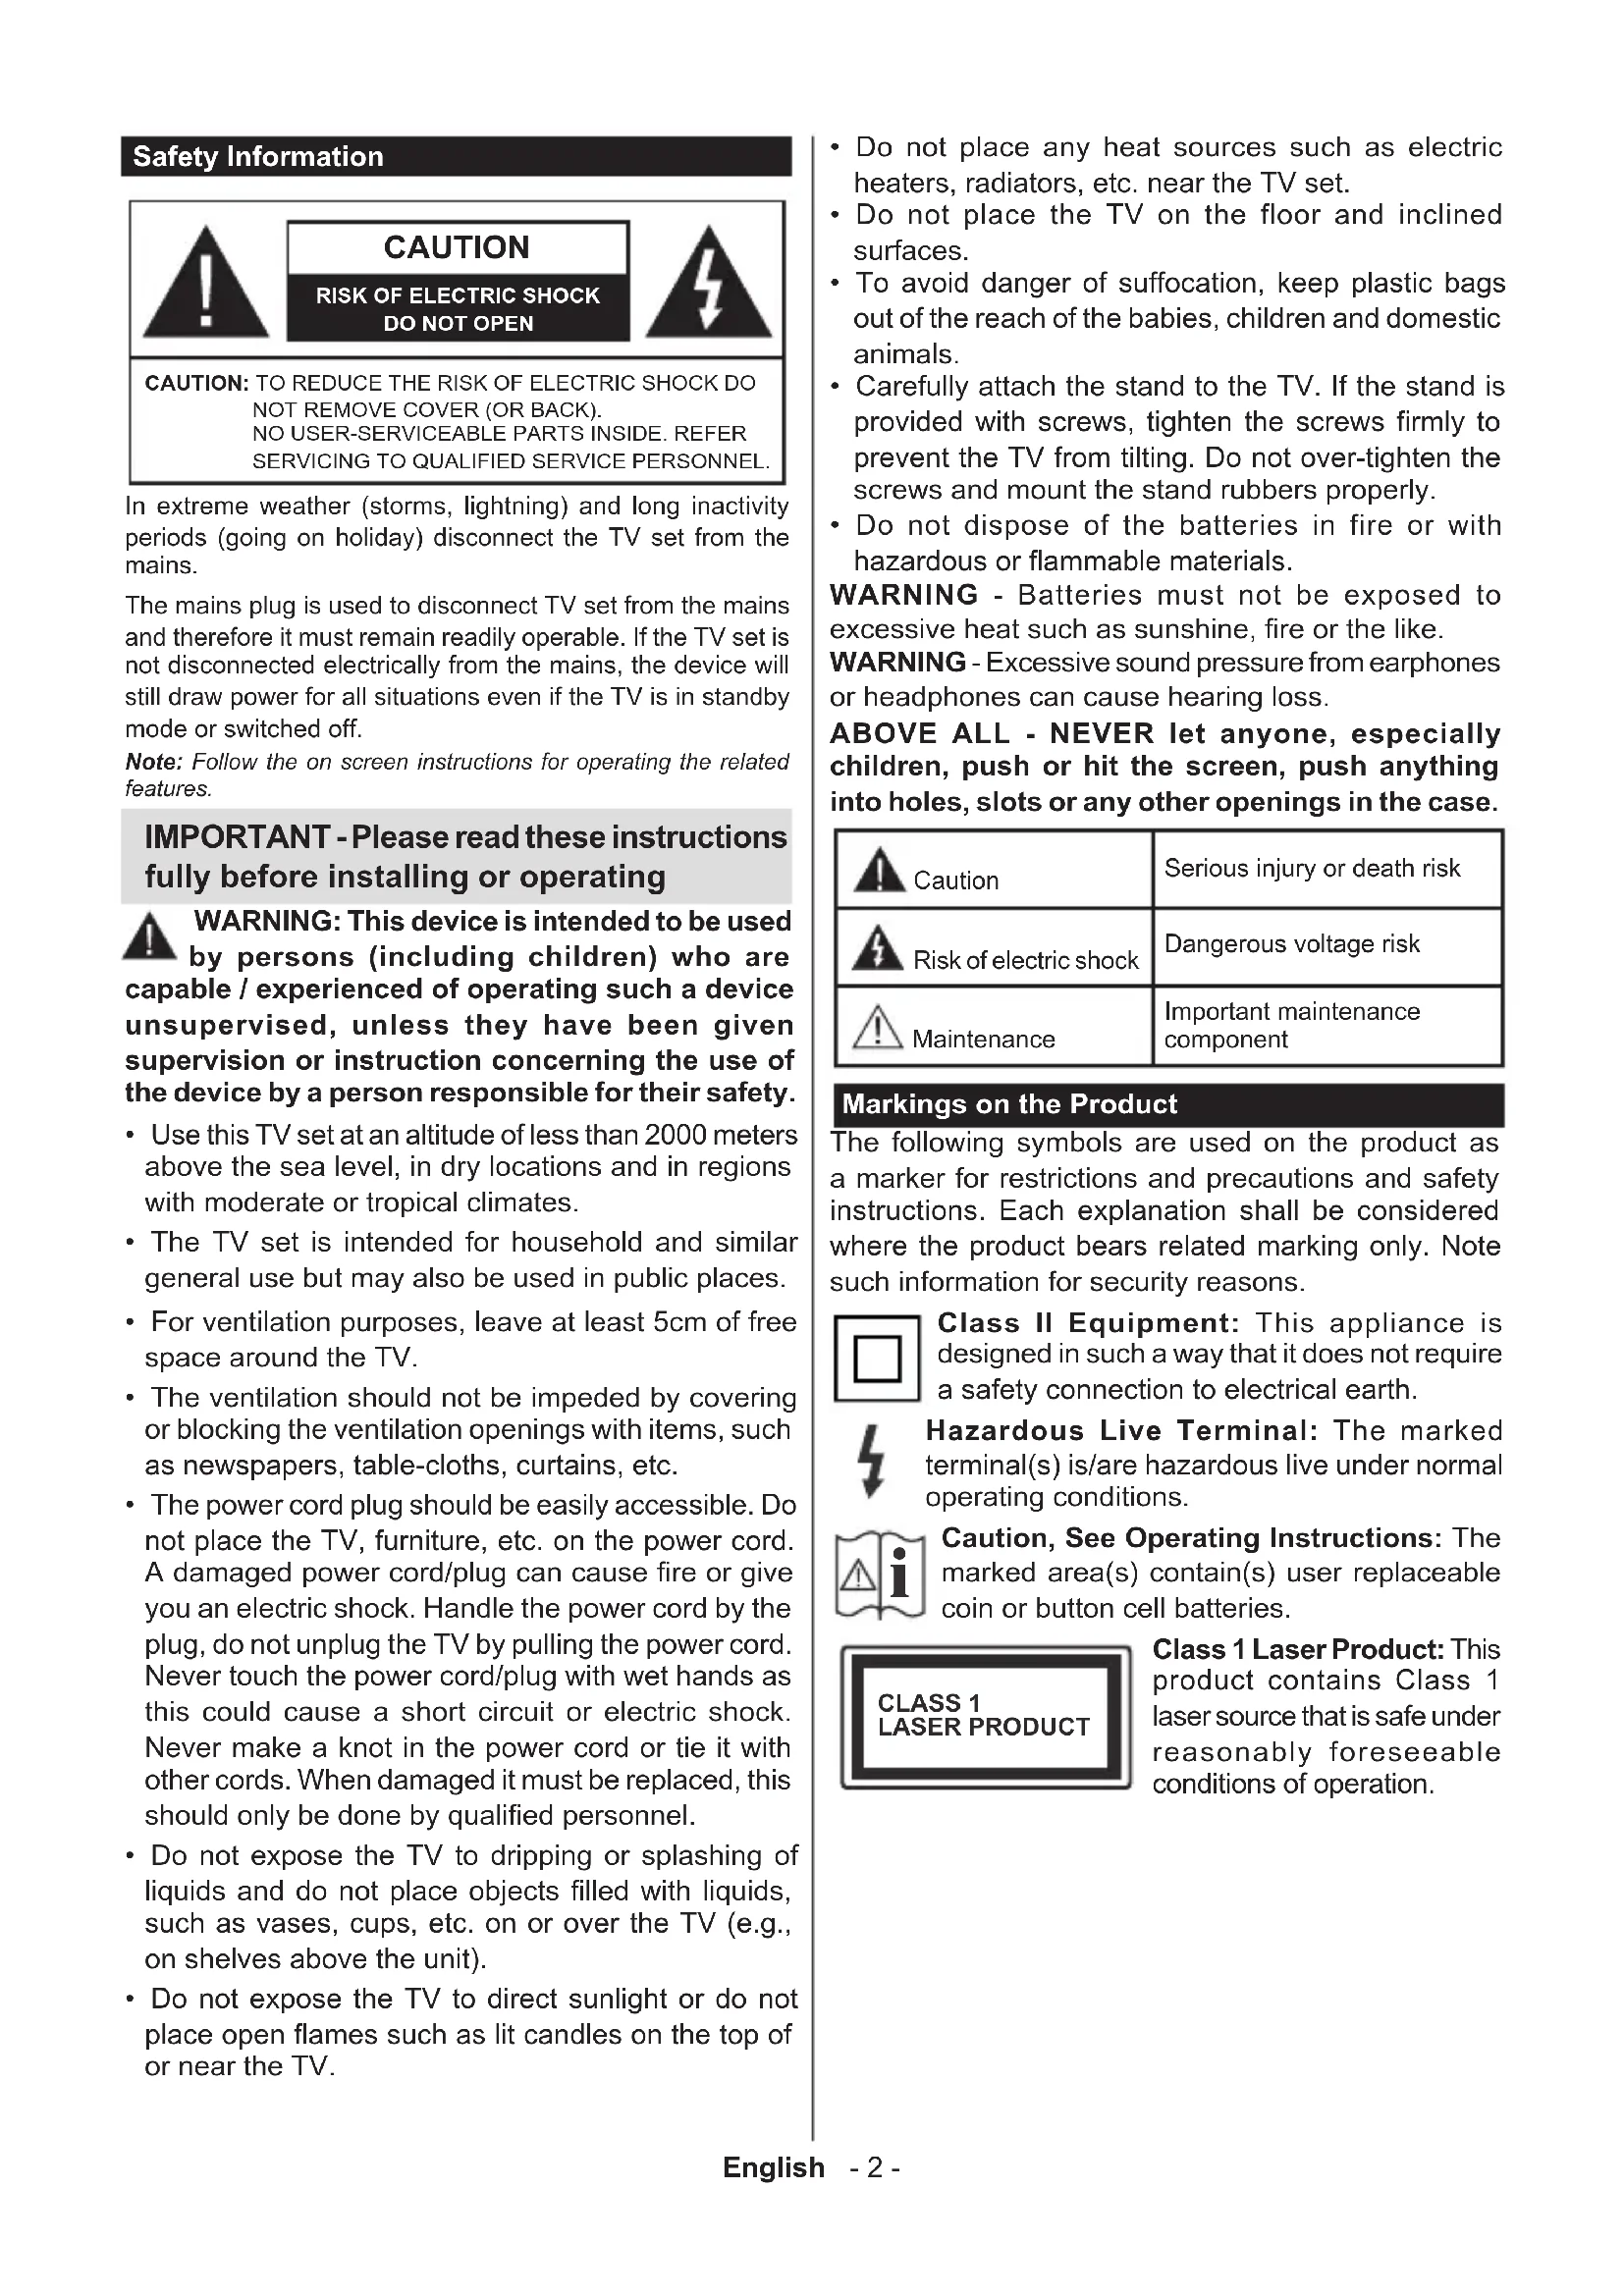
Safety Information

CAUTION
RISK OF ELECTRIC SHOCK DO NOT OPEN

CAUTION: TO REDUCE THE RISK OF ELECTRIC SHOCK DO NOT REMOVE COVER (OR BACK).
NO USER-SERVICEABLE PARTS INSIDE. REFER SERVICING TO QUALIFIED SERVICE PERSONNEL
In extreme weather (storms, lightning) and long inactivity periods (going on holiday) disconnect the TV set from the mains.
The mains plug is used to disconnect TV set from the mains and therefore it must remain readily operable. If the TV set is not disconnected electrically from the mains, the device will still draw power for all situations even if the TV is in standby mode or switched off.
Note: Follow the on screen instructions for operating the related features.
IMPORTANT - Please read these instructions fully before installing or operating
WARNING: This device is intended to be used by persons (including children) who are capable / experienced of operating such a device unsupervised, unless they have been given supervision or instruction concerning the use of the device by a person responsible for their safety.
- Use this TV set at an altitude of less than 2000 meters above the sea level, in dry locations and in regions with moderate or tropical climates.
- The TV set is intended for household and similar general use but may also be used in public places.
- For ventilation purposes, leave at least 5cm of free space around the TV.
- The ventilation should not be impeded by covering or blocking the ventilation openings with items, such as newspapers, table-cloths, curtains, etc.
- The power cord plug should be easily accessible. Do not place the TV, furniture, etc. on the power cord. A damaged power cord/plug can cause fire or give you an electric shock. Handle the power cord by the plug, do not unplug the TV by pulling the power cord. Never touch the power cord/plug with wet hands as this could cause a short circuit or electric shock. Never make a knot in the power cord or tie it with other cords. When damaged it must be replaced, this should only be done by qualified personnel.
- Do not expose the TV to dripping or splashing of liquids and do not place objects filled with liquids, such as vases, cups, etc. on or over the TV (e.g., on shelves above the unit).
-
Do not expose the TV to direct sunlight or do not place open flames such as lit candles on the top of or near the TV.
-
Do not place any heat sources such as electric heaters, radiators, etc. near the TV set.
- Do not place the TV on the floor and inclined surfaces.
- To avoid danger of suffocation, keep plastic bags out of the reach of the babies, children and domestic animals.
- Carefully attach the stand to the TV. If the stand is provided with screws, tighten the screws firmly to prevent the TV from tilting. Do not over-tighten the screws and mount the stand rubbers properly.
- Do not dispose of the batteries in fire or with hazardous or flammable materials.
WARNING - Batteries must not be exposed to excessive heat such as sunshine, fire or the like.
WARNING - Excessive sound pressure from earphones or headphones can cause hearing loss.
ABOVE ALL - NEVER let anyone, especially children, push or hit the screen, push anything into holes, slots or any other openings in the case.
| Caution | Serious injury or death risk |
| Risk of electric shock | Dangerous voltage risk |
| Maintenance | Important maintenance component |
Markings on the Product
The following symbols are used on the product as a marker for restrictions and precautions and safety instructions. Each explanation shall be considered where the product bears related marking only. Note such information for security reasons.

Class II Equipment: This appliance is designed in such a way that it does not require a safety connection to electrical earth.

Hazardous Live Terminal: The marked terminal(s) is/are hazardous live under normal operating conditions.

Caution, See Operating Instructions: The marked area(s) contain(s) user replaceable coin or button cell batteries.

Class 1 Laser Product: This product contains Class 1 laser source that is safe under reasonably foreseeable conditions of operation.
WARNING
Do not ingest the battery, Chemical Burn Hazard This product or the accessories supplied with the product may contain a coin button cell battery. If the coin button cell battery is swallowed, it can cause severe internal burns in just 2 hours and can lead to death.
Keep new and used batteries away from children. If the battery compartment does not close securely, stop using the product and keep it away from children.
If you think batteries might have been swallowed or placed inside any part of the body, seek immediate medical attention.
Never place a television set in unstable or inclined locations. A television set may fall, causing serious personal injury or death. Many injuries, particularly to children, can be avoided by taking simple precautions such as;
- Using cabinets or stands recommended by the manufacturer of the television set.
- Only using furniture that can safely support the television set.
- Ensuring the television set is not overhanging the edge of the supporting furniture.
- Not placing the television set on tall furniture (for example, cupboards or bookcases) without anchoring both the furniture and the television set to a suitable support.
- Not standing the television set on cloth or other materials placed between the television and supporting furniture.
- Educating children about the dangers of climbing on furniture to reach the television set or its controls. If your existing television set is being retained and relocated, the same considerations as above should be applied.
Apparatus connected to the protective earthing of the building installation through the MAINS connection or through other apparatus with a connection to protective earthing – and to a television distribution system using coaxial cable, may in some circumstances create a fire hazard. Connection to a television distribution system has therefore to be provided through a device providing electrical isolation below a certain frequency range (galvanic isolator)
WALL MOUNTING WARNINGS
- Read the instructions before mounting your TV on the wall.
- The wall mount kit is optional. You can obtain from your local dealer, if not supplied with your TV.
- Do not install the TV on a ceiling or on an inclined wall.
- Use the specified wall mounting screws and other accessories.
- Tighten the wall mounting screws firmly to prevent the TV from fall. Do not over-tighten the screws.
Figures and illustrations in this user manual are provided for reference only and may differ from the actual product appearance. Product design and specifications may be changed without notice.
Environmental Information
This television is designed to be environment friendly. To reduce energy consumption, you can follow these steps:
If you set the Energy Saving to Minimum, Medium, Maximum or Auto the TV will reduce the energy consumption accordingly. Set as Off to turn this setting off. If you like to set the Backlight to a fixed value set as Custom and adjust the Backlight (will be located under the Energy Saving setting) manually using Left or Right buttons on the remote.
Note: Available Energy Saving options may differ depending on the selected Mode in the Settings>Picture menu.
The Energy Saving settings can be found in the Settings>Picture menu. Note that some picture settings will be unavailable to be changed.
You can also turn the screen off using the Screen Off option, if you want to hear the sound only and don't need to watch. If pressed Right button or Left button consecutively Screen Off option will be selected and "Screen will be off in 15 seconds." message will be displayed on the screen. Select Proceed and press OK to turn the screen off immediately. If you don't press any button, the screen will be off in 15 seconds. Press any button on the remote or on the TV to turn the screen on again.
Note: Screen Off option is not available if the Mode is set to Game.
When the TV is not in use, please switch off or disconnect the TV from the mains plug. This will also reduce or stop the energy consumption.
Features
- Remote controlled colour TV
- Fully integrated digital terrestrial/cable/satellite TV (DVB-T-T2/C/S-S2)
- Fransat Installation Option
- HDMI inputs to connect other devices with HDMI sockets
- USB input
- OSD menu system
- Stereo sound system
- Teletext
- Headphone connection
Automatic programming system - Manual tuning
Automatic power down after up to eight hours. - Sleep timer
Child lock
Automatic sound mute when no transmission. - NTSC playback
AVL (Automatic Volume Limiting) - PLL (Frequency Search)
PC input
Game Mode (Optional) - Picture off function
Programme recording
Programme timeshifting - Pixelence
- Ethernet (LAN) for Internet connectivity and service
802.11 a/b/g/n built in WLAN Support
Audio Video Sharing
HbbTV
Ultra HD (UHD)
TV supports Ultra HD (Ultra High Definition - also known as 4K) which provides resolution of 3840 × 2160 (4K:2K). It equals 4 times the resolution of Full HD TV by doubling the pixel count of the Full HD TV both horizontally and vertically. Ultra HD contents are supported from HDMI, USB inputs and over DVB-T2 and DVB-S2 broadcasts.
High Dynamic Range (HDR) / Hybrid Log-Gamma (HLG)
Using this feature the TV can reproduce greater dynamic range of luminosity by capturing and then combining several different exposures. HDR/HLG promises better picture quality thanks to brighter, more realistic highlights, more realistic colour and other improvements. It delivers the look that filmmakers
intended to achieve, showing the hidden areas of dark shadows and sunlight with full clarity, colour and detail. HDR/HLG contents are supported via native and market applications, HDMI, USB inputs and over DVB-S broadcasts. Set the related HDMI source input as Enhanced from the Sources option in the Settings>System menu in order to watch HDR/HLG content, if the HDR/HLG content is received through an HDMI input. The source device should also be at least HDMI 2.0a compatible in this case.
Dolby Vision
Dolby Vision™ delivers a dramatic visual experience, astonishing brightness, exceptional contrast, and vivid colour, that brings entertainment to life. It achieves this stunning image quality by combining HDR and wide colour gamut imaging technologies. By increasing the brightness of the original signal and using a higher dynamic colour and contrast range, Dolby Vision presents amazing true-to-life images with stunning detail that other post-processing technologies in the TV aren't able to produce. Dolby Vision is supported via native and market applications, HDMI and USB inputs. Set the related HDMI source input as Enhanced from the Sources option in the Settings>System menu in order to watch Dolby Vision content, if the Dolby Vision content is received through an HDMI input. The source device should also be at least HDMI 2.0a compatible in this case. In the Settings>Picture>Mode menu two predefined picture modes will be available if Dolby Vision content is detected: Dolby Vision Bright and Dolby Vision Dark. Both allow the user to experience the content in the way the creator originally intended with different ambient lighting conditions.
Accessories Included
Remote Control
- Batteries: 2 x AAA
- Instruction Book
Quick Start Guide
- Side AV Connection Cable
- YPbPr Connection Cable
Standby Notifications
If the TV does not receive any input signal (e.g. from an aerial or HDMI source) for 3 minutes, it will go into standby. When you next switch-on, the following message will be displayed: "TV switched to stand-by mode automatically because there was no signal for a long time."
The Auto Power Down option (in the Settings>System >More menu) could have been set to a value between 1 and 8 hours by default. If this setting is not set as Off and the TV has been left on and not been operated during the set time, it will switch into standby mode after the set time has expired. When you next switch-on the TV, the following message will be displayed. "TV
switched to stand-by mode automatically because no operation was made for a long time." Before the TV switches into standby mode a dialogue window will be displayed. If you do not press any button the TV will switch into the standby mode after a waiting period of about 5 minutes. You can highlight Yes and press OK to switch the TV into standby mode immediately. If you highlight No and press OK, the TV will remain on. You can also choose to cancel the Auto Power Down function from this dialogue. Highlight Disable and press OK, the TV will remain on and the function will be cancelled. You can enable this function again by changing the setting of the Auto Power Down option from the Settings>System>More menu.
TV Control & Operation
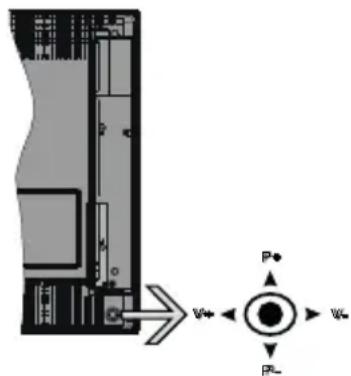
This TV has a joystick as shown in the above drawing. It allows you to control the Volume / Programme / Source and Standby-On functions of the TV.
Note: The position of the joystick may differ depending on the model.

I, switch is used for turning the TV on or off.
Note: The position of the power switch may differ depending on the model.
To change volume: Increase the volume by pushing the joystick right. Decrease the volume by pushing the joystick left.
To change channel: Scroll through the stored channels by pushing the joystick up or down.
To change source: Press the centre of the joystick in, the sources list will appear on the screen. Scroll
through the available sources by pushing the joystick up or down.
To turn the TV off: Press the centre of the joystick in and hold it down for a few seconds, the TV will turn into standby mode.
To turn on the TV: Press the centre of the joystick in, the TV will turn on.
Note: Main menu OSD cannot be displayed via control button.
Operation with the Remote Control
Press the Menu button on your remote control to display main menu. Use the directional buttons and OK button to navigate and set. Press Return/Back or Menu button to quit a menu screen.
Input Selection
Once you have connected external systems to your TV, you can switch to different input sources. Press the Source button on your remote control consecutively to select the different sources.
Changing Channels and Volume
You can change the channel and adjust the volume by using the Programme +/- and Volume +/- buttons on the remote.
TV Control Switch & Operation
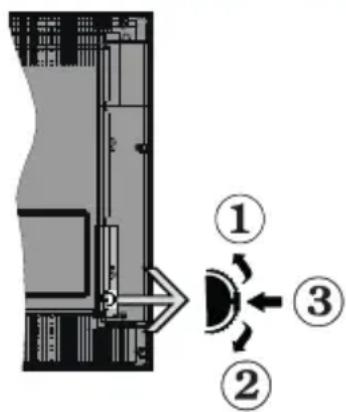
1.Up direction
2. Down direction
3. Volume / Info / Sources List selection and Standby-On switch
The Control button allows you to control the Volume / Programme / Source and Standby-On functions of the TV.
To change volume: Increase the volume by pushing the button up. Decrease the volume by pushing the button down.
To change channel: Press the middle of the button in, the information banner will appear on the screen. Scroll through the stored channels by pushing the button up or down.
To change source: Press the middle of the button in twice(for the second time in total), the source list will
appear on the screen. Scroll through the available sources by pushing the button up or down.
To turn the TV off: Press the middle of the button in and hold it down for a few seconds, the TV will turn into standby mode.
To turn on the TV: Press the middle of the button in, the TV will turn on.
Notes:
If you turn the TV off, this cycle starts again beginning with the volume setting.
Main menu OSD cannot be displayed via control button.
Operation with the Remote Control
Press the Menu button on your remote control to display main menu. Use the directional buttons and OK button to navigate and set. Press Return/Back or Menu button to quit a menu screen.
Input Selection
Once you have connected external systems to your TV, you can switch to different input sources. Press the Source button on your remote control consecutively to select the different sources.
Changing Channels and Volume
You can change the channel and adjust the volume by using the Programme + / - and Volume + / - buttons on the remote.
TV Control Button & Operation

Note: The position of the control button may differ depending on the model.
Your TV has a single control button. This button allows you to control the Standby-On / Source / Programme and Volume functions of the TV.
Operating with the Control Button
- Press the control button to display the function options menu.
- Then press the button consecutively to move the focus to the desired option if needed.
- Press and hold the button for about 2 seconds to activate the selected option. The icon colour of the option changes when activated.
-
Press the button once again to use the function or enter the sub menu.
-
To select another function option, you will need to deactivate the last activated option first. Press and hold the button to deactivate it. The icon colour of the option changes when deactivated.
- To close the function options menu do not press the button for a period of about 5 seconds. The function options menu will disappear.
To turn the TV off: Press the control button to display the function options menu, the focus will be on the Standby option. Press and hold the button for about 2 seconds to activate this option. The icon colour of the option changes when activated. Then press the button once again to turn the TV off.
To turn on the TV: Press the control button, the TV will turn on.
To change volume: Press the control button to display the function options menu and then press the button consecutively to move the focus to Volume + or Volume - option. Press and hold the button for about 2 seconds to activate the selected option. The icon colour of the option changes when activated. Then press the button to increase or decrease the volume.
To change channel: Press the control button to display the function options menu and then press the button consecutively to move the focus to Programme + or Programme - option. Press and hold the button for about 2 seconds to activate the selected option. The icon colour of the option changes when activated. Then press the button to switch to the next or previous channel in the channel list.
To change source: Press the control button to display the function options menu and then press the button consecutively to move the focus to Source option. Press and hold the button for about 2 seconds to activate this option. The icon colour of the option changes when activated. Then press the button once again to display the sources list. Scroll through the available sources by pressing the button. TV will automatically switch to the highlighted source.
Note: Main menu OSD cannot be displayed via the control button.
Operation with the Remote Control
Press the Menu button on your remote control to display main menu. Use the directional buttons and OK button to navigate and set. Press Return/Back or Menu button to quit a menu screen.
Input Selection
Once you have connected external systems to your TV, you can switch to different input sources. Press the Source button on your remote control consecutively to select the different sources.
Changing Channels and Volume
You can change the channel and adjust the volume by using the Programme + / - and Volume + / - buttons on the remote.
Using Main TV Menu
When the Menu button is pressed, the main TV menu will appear on the screen. You can navigate through the menu items using the directional buttons on the remote. To select an item or see the sub-menu options of the highlighted menu press OK button. When you highlight a menu option some of the sub-menu items of this menu may appear on the upper side of the menu bar for quick access. To use a quick access item highlight it, press OK and set as desired using the Left/Right directional buttons. When finished press OK or Back/Return button to exit.
Press Exit button to close the main menu.
1. Home
When main menu is opened Home menu bar will be highlighted. The content of the Home menu can be customised by adding options from other menus. Just highlight an option and press the Down direction button on the remote. If you see Add to Home option you can add it to the Home menu. Same way you can delete or change the position of any item in the Home menu. Press the Down direction button and select Delete or Move option and press OK. In order to move a menu item use the Right and Left direction buttons to select the position that you want the item to move to and press OK.
2. TV
2.1. Search
You can search for channels, programmes, services or settings using this option. Press OK and enter a key word using the virtual keyboard. Then highlight OK and press OK to start the search. Results will be displayed on the screen. Highlight the desired result using the directional buttons and press OK to open.
2.2. Guide
You can access the electronic programme guide menu using this option. Refer to Electronic Programme Guide section for more information.
2.3. Channels
You can access the Channels menu using this option. Refer to Using the Channel List section for more information.
2.4. Timers
You can set timers for future events using the options of this menu. You can also review the previously created timers under this menu.
To add a new timer select the Add Timer tab using the Left/Right buttons and press OK. Set the sub-menu
options as desired and when finished press OK. A new timer will be created.
To edit a previously created timer, highlight that timer, select the Edit Selected Timer tab and press OK. Change the sub-menu options as desired and press OK to save your settings.
To cancel an already set timer, highlight that timer, select Delete Selected Timer tab and press OK. A confirmation message will be displayed. Highlight Yes and press OK to proceed. The timer will be cancelled. It is not possible to set timers for two or more events that will broadcast in different channels at the same time interval. In this case you will be asked to choose one of these timers and cancel others. Highlight the timer you want to cancel and press OK, Options menu will be displayed. Then highlight Set/Cancel and press OK to cancel that timer. You will have to save changes after that. In order to do that press OK, highlight Save Changes and press OK again.
2.5. Recordings
You can manage your recordings using the options of this menu. You can playback, edit, delete or sort previously recorded events. Highlight a tab by using the Left or Right direction button and press OK to see available options. Refer to the USB Recording section for more information.
3. Settings
You can manage the settings of your TV using the options of this menu. Refer to Settings Menu Content section for more information.
4. Apps
When your TV is connected to the Internet related contents will also be available, including Apps related contents. Using the Apps menu you can access and manage your applications. You can add new apps from the market or delete the existing ones. Refer to Apps section for more information.
5. Sources
You can manage your input source references using the options of this menu. To change the current source highlight one of the options and press OK.
5.1. Source Settings
Edit the names, enable or disable selected source options. There are also Regular and Enhanced options available for HDMI sources. Regular and Enhanced options are affecting the colour settings of the selected HDMI source.
You can reset your customisations on the Home and Apps menus to defaults using the Reset Menu option in the Settings menu (availability depends on TV model and its features). Highlight this option and press OK. A confirmation message will be displayed. Highlight Yes and press OK to proceed. Note that you
will not be able to perform this operation again within the next 2 minutes.
Inserting the Batteries into the Remote
Remove the back cover to reveal the battery compartment. Insert two size AAA batteries. Make sure the (+) and (-) signs match (observe correct polarity). Do not mix old and new batteries. Replace only with same or equivalent type. Place the cover back on.
A message will be displayed on the screen when the batteries are low and must be replaced. Note that when the batteries are low, the performance of the remote control may be impaired.
Batteries should not be exposed to excessive heat such as sunshine, fire or the like.
Power Connection
IMPORTANT: The TV set is designed to operate on a 220-240V AC, 50Hz supply. After unpacking, allow the TV set to reach the ambient room temperature before you connect the set to the mains. Plug the power cable to the mains socket outlet.
Antenna Connection
Connect the aerial or cable TV plug to the AERIAL INPUT (ANT-TV) socket located on the rear side of the TV.
Rear side of the TV


If you want to connect a device to the TV, make sure that both the TV and the device are turned off before making any connection. After the connection is done, you can turn on the units and use them.
Antenna Connection
Connect the aerial or cable TV plug to the AERIAL INPUT (ANT-TV) socket or satellite plug to the SATELLITE INPUT (ANT SAT) socket located on the rear side of the TV.
Rear side of the TV
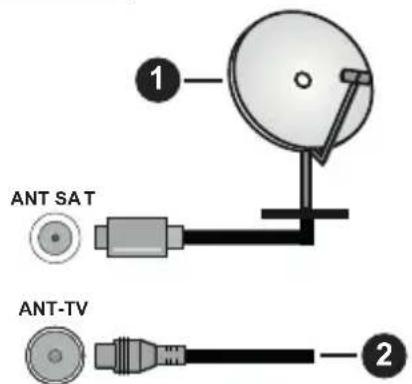
- Satellite
- Aerial or cable

If you want to connect a device to the TV, make sure that both the TV and the device are turned off before making any connection. After the connection is done, you can turn on the units and use them.
License Notification
The terms HDMI and HDMI High-Definition Multimedia Interface, and the HDMI Logo are trademarks or registered trademarks of HDMI Licensing Administrator, Inc. in the United States and other countries.

H
Manufactured under license from Dolby Laboratories. Dolby, Dolby Audio, Dolby Vision, and the double-D symbol are trademarks of Dolby Laboratories. Confidential unpublished works. Copyright ©1992-2019 Dolby Laboratories. All rights reserved.
YouTube and the YouTube logo are trademarks of Google Inc.
For DTS patents, see http://patents.dts.com. Manufactured under license from DTS Licensing Limited. DTS, the Symbol, & DTS and the Symbol together are registered trademarks, and DTS TruSurround is a trademark of DTS, Inc. DTS, Inc. All Rights Reserved.

TruSurround
For DTS patents, see http://patents.dts.com. Manufactured under license from DTS Licensing Limited. DTS, DTS-HD, the Symbol, & DTS or DTS-HD and the Symbol together are registered trademarks of DTS, Inc. DTS, Inc. All Rights Reserved.

dtss-HD
The Bluetooth® word mark and logos are registered trademarks owned by the Bluetooth SIG, Inc. and any use of such marks by Vestel Elektronik Sanayi ve Ticaret A.S. is under license. Other trademarks and trade names are those of their respective owners.
This product contains technology subject to certain intellectual property rights of Microsoft. Use or distribution of this technology outside of this product is prohibited without the appropriate license(s) from Microsoft.
Content owners use Microsoft PlayReady™ content access technology to protect their intellectual property, including copyrighted content. This device uses PlayReady technology to access PlayReady-protected content and/or WMDRM-protected content. If the device fails to properly enforce restrictions on content usage, content owners may require Microsoft to revoke
the device's ability to consume PlayReady-protected content. Revocation should not affect unprotected content or content protected by other content access technologies. Content owners may require you to upgrade PlayReady to access their content. If you decline an upgrade, you will not be able to access content that requires the upgrade.
The "CI Plus" Logo is a trademark of CI Plus LLP.
This product is protected by certain intellectual property rights of Microsoft Corporation. Use or distribution of such technology outside of this product is prohibited without a license from Microsoft or an authorized Microsoft subsidiary.
Disposal Information
[European Union]
These symbols indicate that the electrical and electronic equipment and the battery with this symbol should not be disposed of as general household waste at its end-of-life. Instead, the products should be handed over to the applicable collection points for the recycling of electrical and electronic equipment as well as batteries for proper treatment, recovery and recycling in accordance with your national legislation and the Directive 2012/19/EU and 2013/56/EU.
By disposing of these products correctly, you will help to conserve natural resources and will help to prevent potential negative effects on the environment and human health which could otherwise be caused by inappropriate waste handling of these products.
For more information about collection points and recycling of these products, please contact your local municipal office, your household waste disposal service or the shop where you purchased the product. Penalties may be applicable for incorrect disposal of this waste, in accordance with national legislation.
[Business users]
If you wish to dispose of this product, please contact your supplier and check the terms and conditions of the purchase contract.
[Other Countries outside the European Union]
These symbols are only valid in the European Union.
Contact your local authority to learn about disposal and recycling.
The product and packaging should be taken to your local collection point for recycling.
Some collection points accept products free of charge.
Note: The sign Pb below the symbol for batteries indicates that this battery contains lead.
![HITACHI 32HBL7310 - [Other Countries outside the European Union] - 1](/content/2026/04/616944/images/08112b532eeb42689b5793a039ac1d657fd21ad8b7c4f727ec5a0654a9f21cce.jpg)
- Products
- Battery
Wireless LAN Transmitter Specifications
| Frequency Ranges Max Output Power | |
| 2400 - 2483,5 MHz (CH1-CH13) < 100 mW | |
| 5150 - 5250 MHz (CH36 - CH48) < 200 mW | |
| 5250 - 5350 MHz (CH52 - CH64) < 200 mW | |
| 5470 - 5725 MHz (CH100 - CH140) | < 200 mW |
Country Restrictions
This device is intended for home and office use in all EU countries (and other countries following the relevant EU directive) without any limitation except for the countries mentioned below.
| Country Restriction | |
| Bulgaria | General authorization required for outdoor use and public service |
| France In-door use only for 2454-2483.5 MHz | |
| Italy | If used outside of own premises, general authorization is required |
| Greece | In-door use only for 5470 MHz to 5725 MHz band |
| Luxembourg | General authorization required for network and service supply(not for spectrum) |
| Norway | Radio transmission is prohibited for the geographical area within a radius of 20 km from the centre of Ny-Alesund |
| Russian Federation | In-door use only |
The requirements for any country may change at any time. It's recommended that user checks with local authorities for the current status of their national regulations for both 2.4 GHz and 5 GHz wireless LAN's.

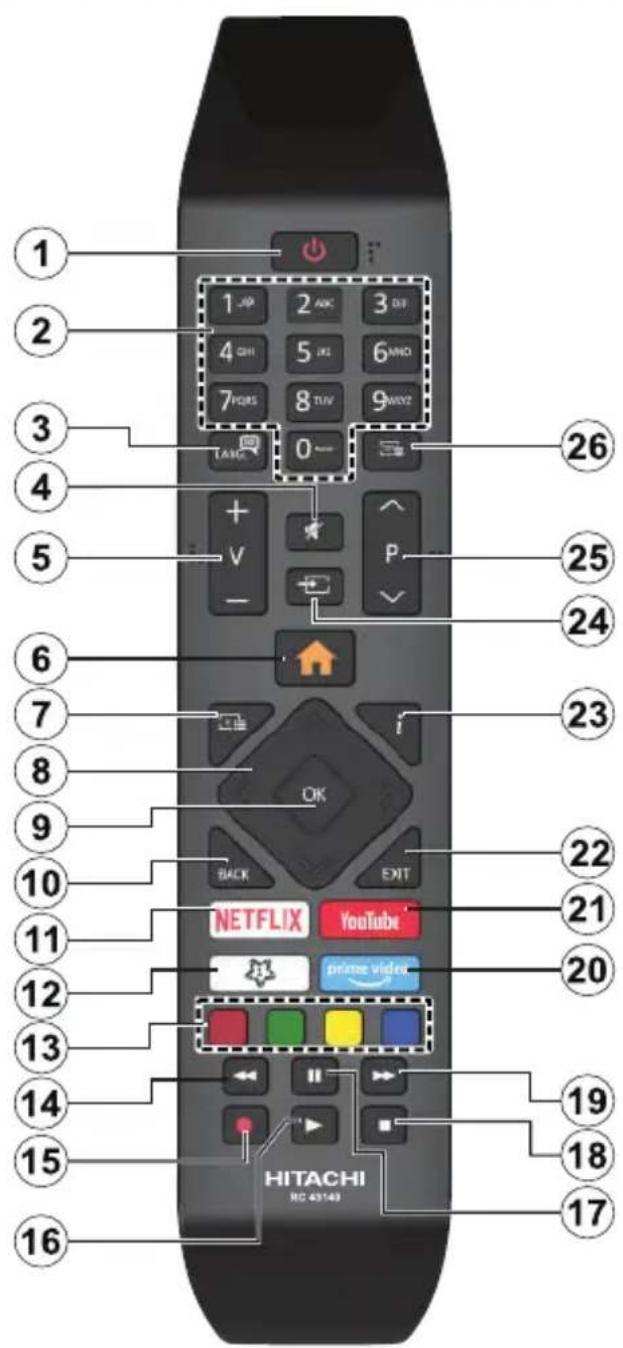
(*) MY BUTTON 1 & MY BUTTON 2:
These buttons may have default functions depending on the model. However you can set a special function to these buttons by pressing on them for five seconds when on a desired source or channel. A confirmation message will be displayed on the screen. Now the selected My Button is associated with the selected function.
Note that if you perform First Time Installation, My Button 1&2 will return to their default function.
- Standby: Switches On / Off the TV
- Numeric buttons: Switches the channel, enters a number or a letter in the text box on the screen.
- Language: Switches among sound modes (analogue TV), displays and changes audio/subtitle language and turns subtitles on or off (digital TV, where available)
- Mute: Completely turns off the volume of the TV
- Volume +/-
- Menu: Displays TV menu
- Guide: Displays the electronic programme guide
- Directional buttons: Helps navigate menus, content etc. and displays the subpages in TXT mode when pressed Right or Left
- OK: Confirms user selections, holds the page (in TXT mode), views Channels menu (DTV mode)
- Back/Return: Returns to previous screen, previous menu, opens index page (in TXT mode). Quickly cycles between previous and current channels or sources
- Netflix: Launches the Netflix application
- My Button 1 (*)
- Coloured Buttons: Follow the on-screen instructions for coloured button functions
- Rewind: Moves frames backwards in media such as movies
- Record: Records programmes
- Play: Starts to play selected media
- Pause: Pauses the media being played, starts timeshift recording
- Stop: Stops the media being played
- Fast Forward: Moves frames forward in media such as movies
- My Button 2 (*)
- YouTube: Launches the YouTube application
- Exit: Closes and exits from displayed menus or returns to previous screen
- Info: Displays information about on-screen content, shows hidden information (reveal - in TXT mode)
- Source: Shows available broadcast and content sources
- Programme +/-
- Text: Displays teletext (where available), press again to superimpose the teletext over a normal broadcast picture (mix)
Remote Control
(*) MY BUTTON 1:
This button may have default function depending on the model. However you can set a special function to this button by pressing on it for five seconds when on a desired source or channel. A confirmation message will be displayed on the screen. Now the My Button 1 is associated with the selected function.
Note that if you perform First Time Installation, My Button 1 will return to its default function.
- Standby: Switches On / Off the TV
- Numeric buttons: Switches the channel, enters a number or a letter in the text box on the screen
- Language: Switches among sound modes (analogue TV), displays and changes audio/subtitle language and turns subtitles on or off (digital TV, where available)
- Mute: Completely turns off the volume of the TV
- Volume +/-
- Menu: Displays TV menu
- Guide: Displays the electronic programme guide
- Directional buttons: Helps navigate menus, content etc. and displays the subpages in TXT mode when pressed Right or Left
- OK: Confirms user selections, holds the page (in TXT mode), views Channels menu (DTV mode)
- Back/Return: Returns to previous screen, previous menu, opens index page (in TXT mode). Quickly cycles between previous and current channels or sources
- Netflix: Launches the Netflix application
- My Button 1 (*)
- Coloured Buttons: Follow the on-screen instructions for coloured button functions
- Rewind: Moves frames backwards in media such as movies
- Record: Records programmes
- Play: Starts to play selected media
- Pause: Pauses the media being played, starts timeshift recording
- Stop: Stops the media being played
- Fast Forward: Moves frames forward in media such as movies
- Prime Video: Launches the Amazon Prime Video application
- YouTube: Launches the YouTube application
- Exit: Closes and exits from displayed menus or returns to previous screen
- Info: Displays information about on-screen content, shows hidden information (reveal - in TXT mode)
- Source: Shows available broadcast and content sources
- Programme +/-
- Text: Displays teletext (where available), press again to superimpose the teletext over a normal broadcast picture (mix)
Connections
| Connector Type | Cables Device | |
| VGA Connection (back) | ||
| AUDIO IN | PC/YPbPr Audio Connection (back) | YPbPr/PC Audio Cable |
| HDMI Connection (side&back) | ||
| SPDIF | SPDIF (Optical Out) Connection (back) | |
| BACK AV | Back AV (Audio/Video) Connection (back) | Audio Video Cable |
| HEADPHONE | Headphone Connection (side) | |
| YPBPR | YPbPr Video Connection (back) | PC to YPbPr Connection Cable |
| USB Connection (side) | ||
| CI Connection (side) | ||
| LAN | Ethernet Connection (back) | LAN / Ethernet Cable |
See the illustrations on the left side. You can use YPbPr to VGA cable to enable YPbPr signal via VGA input. You cannot use VGA and YPbPr at the same time. To enable PC/YPbPr audio, you will need to use the back audio inputs with a YPbPr/PC audio cable for audio connection. When using the wall mounting kit (available from a third party in the market, if not supplied), we recommend that you plug all your cables into the back of the TV before mounting on the wall. Insert or remove the CI module only when the TV is SWITCHED OFF. You should refer to the module instruction manual for details of the settings. The/ Each USB input of your TV supports devices up to 500mA. Connecting devices that have current value above 500mA may damage your TV. When connecting equipment using a HDMI cable to your TV, to guarantee sufficient immunity against parasitic frequency radiation and trouble-free transmission of high definition signals, such as 4K content, you have to use a high speed shielded (high grade) HDMI cable with ferrites.

If you want to connect a device to the TV, make sure that both the TV and the device are turned off before making any connection. After the connection is done, you can turn on the units and use them.
Switching On/Off
To Switch the TV On
Connect the power cord to a power source such as a wall socket (220-240V AC, 50 Hz).
To switch on the TV from standby mode either:
- Press the Standby button, Programme +/- or a numeric button on the remote control.
- Press the centre of the joystick on the TV in or push it up/down.
To Switch the TV Off
Press the Standby button on the remote control or press the centre of the joystick on the TV in and hold it down for a few seconds, the TV will switch into standby mode.
To power down the TV completely, unplug the power cord from the mains socket.
Note: When the TV is switched into standby mode, the standby LED can blink to indicate that features such as Standby Search, Over Air Download or Timer is active. The LED can also blink when you switch on the TV from standby mode.
Switching On/Off
To Switch the TV On
Connect the power cord to a power source such as a wall socket (220-240V AC, 50 Hz).
To switch on the TV from standby mode either:
- Press the Standby button, Programme +/- or a numeric button on the remote control.
- Press the middle of the side function switch on the TV in.
To Switch the TV Off
Press the Standby button on the remote control or press the middle of the side function switch on the TV in and hold it down for a few seconds, the TV will switch into standby mode.
To power down the TV completely, unplug the power cord from the mains socket.
Note: When the TV is switched into standby mode, the standby LED can blink to indicate that features such as Standby Search, Over Air Download or Timer is active. The LED can also blink when you switch on the TV from standby mode.
Switching On/Off
To Switch the TV On
Connect the power cord to a power source such as a wall socket (220-240V AC, 50 Hz).
To switch on the TV from standby mode either:
- Press the Standby button, Programme +/- or a numeric button on the remote control.
- Press the control button on the TV.
To Switch the TV Off
-
Press the Standby button on the remote control.
-
Press the control button on the TV, the function options menu will be displayed. The focus will be on the Standby option. Press and hold the button for about 2 seconds to activate this option. The icon colour of the option will change. Then press the button once again, the TV will switch into standby mode.
To power down the TV completely, unplug the power cord from the mains socket.
Note: When the TV is switched into standby mode, the standby LED can blink to indicate that features such as Standby Search, Over Air Download or Timer is active. The LED can also blink when you switch on the TV from standby mode.
First Time Installation
Note: If you are going to perform FRANSAT installation, insert the FRANSAT card (optional) into the Conditional Access terminal of your TV before switching on your TV.
When turned on for the first time, the language selection screen is displayed. Select the desired language and press OK. In the following steps of the installation guide, set your preferences using the directional buttons and OK button.
On the second screen set your country preference. Depending on the Country selection you may be asked to set and confirm a PIN at this point. The selected PIN cannot be 0000. You have to enter it if you are asked to enter a PIN for any menu operation later.
Note: M7(*) operator type will be defined according to the Language and Country selections that you made in the First Time Installation.
(*) M7 is a digital satellite service provider.
You can activate Store Mode option in the next step. This option will configure your TV's settings for store environment and depending on the TV model being used, the supported features of it may be displayed on the side of the screen as an info banner. This option is intended only for store use. It is recommended to select Home Mode for home use. This option will be available in Settings>System>More menu and can be turned off/on later. Make your selection and press OK to continue.
Depending on the model of your TV and the country selection Privacy Settings menu may appear at this point. Using this menu you can set your privacy privileges. Highlight a feature and use Left and Right directional buttons to enable or disable. Read the related explanations displayed on the screen for each highlighted feature before making any changes. You can use Programme +/- buttons to scroll up and down to read the entire text. You will be able to change your preferences at any time later from the Settings>System>Privacy Settings menu. If the Internet Connection option is disabled Network/Internet Settings screen will be skipped and not displayed. If you have any questions, complaints or comments regarding this privacy
policy or its enforcement, please contact by email at smarttvsecurity@vosshub.com.
Highlight Next and press OK button on the remote control to continue and the Network/Internet Settings menu will be displayed. Please refer to Connectivity section to configure a wired or a wireless connection. If you want your TV to consume less power in standby mode, you can disable the Wake On option by setting it as Off. After the settings are completed highlight Next and press OK button to continue.
On next screen you can set broadcast types to be searched, set your encrypted channel searching and time zone (depending on the country selection) preferences. Additionally you can set a broadcast type as your favourite one. Priority will be given to the selected broadcast type during the search process and the channels of it will be listed on the top of the channel list. When finished, highlight Next and press OK to continue.
About Selecting Broadcast Type
To turn a search option for a broadcast type highlight it and press OK. The checkbox next to the selected option will be checked. To turn the search option off clear the checkbox by pressing OK after moving the focus on the desired broadcast type option.
Digital Aerial: If D. Aerial broadcast search option is turned on, the TV will search for digital terrestrial broadcasts after other initial settings are completed.
Digital Cable: If D. Cable broadcast search option is turned on, the TV will search for digital cable broadcasts after other initial settings are completed. A message will be displayed before starting to search asking if you want to perform cable network search. If you select Yes and press OK you can select Network or set values such as Frequency, Network ID and Search Step on the next screen. If you select No and press OK you can set Start Frequency, Stop Frequency and Search Step on the next screen. When finished, highlight Next and press OK button to continue.
Note: Searching duration will change depending on the selected Search Step.
Satellite: If Satellite broadcast search option is turned on, the TV will search for digital satellite broadcasts after other initial settings are completed. Before satellite search is performed some settings should be made. A menu will be displayed where you can select to start M7 or Fransat operator installation or a standard installation.
To start an M7 operator installation set the Install Type as Operator and the Satellite Operator as the related M7 operator. Then highlight Preferred Scan option and set as Automatic channel scan and press OK to start the automatic search. These options can be preselected depending on the Language and Country selections that you made in the earlier steps of the first
time installation process. You may be asked to select HD/SD or country specific channel list according to your M7 operator type. Select one and press OK to proceed.
Wait till the scan is finished. Now the list has been installed.
While performing an M7 operator installation, if you want to use the satellite installation parameters that differ from the default settings select the Preferred Scan option as Manual channel scan and press the OK button to proceed. Antenna Type menu will be displayed next. After selecting the antenna type and the desired satellite in the following steps press OK in order to change the satellite installation parameters in the sub-menu.
To start a Fransat installation set the Install Type as Operator and then set the Satellite Operator as the related Fransat operator. Then press the OK button to start Fransat installation. You can select to start an automatic or manual installation.
Press OK to proceed. Fransat Installation will be performed and broadcasts will be stored (if available).
If you set the Install Type as Standard, you can continue with regular satellite installation and watch satellite channels.
You can start a Fransat installation at any time later from the Settings>Installation>Automatic channel scan> Satellite menu.
In order to search for satellite channels other than M7 or Fransat channels you should start a standard installation. Select the Install Type as Standard and press the OK button to proceed. Antenna Type menu will be displayed next.
There are three options for antenna selection. You can select Antenna Type as Direct, Single Satellite Cable or DiSEqC switch by using Left or Right buttons. After selecting your antenna type press OK to see the options to proceed. Continue, Transponder list and Configure LNB options will be available. You can change the transponder and LNB settings using the related menu options.
- Direct: If you have a single receiver and a direct satellite dish, select this antenna type. Press OK to continue. Select an available satellite on the next screen and press OK to scan for services.
- Single Satellite Cable: If you have multiple receivers and a single satellite cable system, select this antenna type. Press OK to continue. Configure settings by following instructions on the next screen. Press OK to scan for services.
- DiSEqC switch: If you have multiple satellite dishes and a DiSEqC switch, select this antenna type. Then set the DiSEqC version and press OK to continue. You can set up to four satellites (if available) for version v1.0 and sixteen satellites for version v1.1
on the next screen. Press OK button to scan the first satellite in the list.
Analogue: If Analogue broadcast search option is turned on, the TV will search for analogue broadcasts after other initial settings are completed.
A dialogue screen asking to activate parental control will be displayed. If you select Yes, parental restriction options will be displayed. Configure as desired and press OK when finished. Select No and press OK to advance, if you don't want to activate parental restrictions.
After the initial settings are completed TV will start to search for available broadcasts of the selected broadcast types.
While the search continues current scan results will be displayed at the bottom of the screen. After all the available stations are stored, Channels menu will be displayed. You can edit the channel list according to your preferences using the Edit tab options or press the Menu button to quit and watch TV.
While the search continues a message may appear, asking whether you want to sort channels according to the LCN^* . Select Yes and press OK to confirm.
(*) LCN is the Logical Channel Number system that organizes available broadcasts in accordance with a recognizable channel number sequence (if available).
Notes:
To search for M7 channels after the First Time Installation, you should perform the first time installation again. Or press the Menu button and enter the Settings>Installation>Automatic channel scan>Satellite menu. Then follow the same steps mentioned above in the satellite section.
Do not turn off the TV while initializing first time installation. Note that, some options may not be available depending on the country selection.
Using Satellite Channel Table Feature
You can perform these operations using the Settings>Installation>Satellite Settings>Satellite Channel Table menu. There are two options regarding to this feature.
You can download or upload satellite channel table data. In order to perform these functions a USB device must be connected to the TV.
You can upload current services and related satellites & transponders in TV, to a USB device.
Additionally you can download one of the satellite channel table files stored in USB device, to the TV.
When you select one of these files, all services and related satellites and transponders in the selected file will be stored in the TV. If there are any installed terrestrial, cable and/or analogue services, they will be kept and only satellite services will be removed.
Afterwards, check your antenna settings and make changes if necessary. An error message stating "No
Signal" may be displayed if the antenna settings are not configured properly.
Media Playback via USB Input
You can connect 2.5" and 3.5" inch (HDD with external power supply) external hard disk drives or USB memory stick to your TV by using the USB inputs of the TV.
IMPORTANT! Back up the files on your storage devices before connecting them to the TV. Manufacturer will not be responsible for any file damage or data loss. Certain types of USB devices (e.g. MP3 Players) or USB hard disk drives/memory sticks may not be compatible with this TV. The TV supports FAT32 and NTFS disk formatting but recording will not be available with NTFS formatted disks.
While formatting USB hard drives which have more than 1TB (Tera Byte) storage space you may experience some problems in the formatting process.
Wait a little while before each plugging and unplugging as the player may still be reading files. Failure to do so may cause physical damage to the USB player and the USB device itself. Do not pull out your drive while playing a file.
You can use USB hubs with your TV's USB inputs. External power supplied USB hubs are recommended in such a case.
It is recommended to use the TV's USB input(s) directly, if you are going to connect a USB hard disk.
Note: When viewing media files the Media Browser menu can only display a maximum of 1000 media files per folder.
USB Recording
Recording a Programme
IMPORTANT: When using a new USB hard disk drive, it is recommended that you first format the disk using your TV's Format Disk option in the TV>Recordings>Settings menu.
To record a programme, you should first connect a USB disk to your TV while the TV is switched off. You should then switch on the TV to enable the recording feature. To use recording your USB drive should have 2 GB free space and be USB 2.0 compatible. If the USB drive is not compatible an error message will be displayed. To record long duration programmes such as movies, it is recommended to use USB Hard disk drives (HDD's). Recorded programmes are saved into the connected USB disk. If desired, you can store/copy recordings onto a computer; however, these files will not be available to be played on a computer. You can play the recordings only via your TV.
Lip Sync delay may occur during the timeshifting. Radio record is supported. The TV can record programmes up to ten hours.
Recorded programmes are split into 4GB partitions. If the writing speed of the connected USB disk is not sufficient, the recording may fail and the timeshifting feature may not be available.
It is recommended to use USB hard disk drives for recording HD programmes.
Do not pull out the USB/HDD during a recording. This may harm the connected USB/HDD.
If the AC cord is unplugged while there is an active USB-recording timer setting, it will be cancelled.
Multiparition support is available. A maximum of two different partitions are supported. The first partition of the USB disk is used for USB Recording ready features. It also must be formatted as the primary partition to be used for the USB Recording ready features.
Some stream packets may not be recorded because of signal problems, as a result sometimes videos may freeze during playback.
While recording a programme in the background you can use menu options, switch to another source or use Media Browser functions, such as viewing pictures, playing video and music files, and even play back the ongoing recording.
Timeshift Recording
Press Pause button while watching a broadcast to activate timeshifting mode. In timeshifting mode, the programme is paused and simultaneously recorded to the connected USB disk.
Press Play button again to resume the paused programme from where you stopped. Press the Stop button to stop timeshift recording and return to the live broadcast.
Timeshift cannot be used while in radio mode.
You can use the timeshift rewind feature after resuming normal playback or fast forward option.
Instant Recording
Press Record button to start recording an event instantly while watching a programme. Press Stop button to cancel instant recording.
You can not switch broadcasts during the recording mode. While recording a programme or during the timeshifting, a warning message appears on the screen if your USB device speed is not sufficient.
Watching Recorded Programmes
Select Recordings from the TV menu. Select a recorded item from the list (if previously recorded). Press the OK button to view the Options menu. Select an option then press OK button.
Note: Viewing main menu and menu items will not be available during the playback.
Press the Stop button to stop a playback and return to the Recordings.
Slow Forward
If you press Pause button while watching recorded programmes, the slow forward feature will be available. You can use Fast Forward button to slow forward.
Pressing Fast Forward button consecutively will change slow forwarding speed.
Recording Settings
You can configure your recording preferences using the Settings tab in the TV>Recordings menu. Highlight Settings tab by using Left or Right button and press OK. Then select the desired item in the sub-menu and set by using Left or Right button.
Start early: You can set recording timer's starting time to start earlier by using this setting.
End late: You can set recording timer's end time to end later by using this setting.
Max Timeshift: This setting allows you to set the maximum duration for the timeshift recording. Available options are approximate and the actual recording time may change in practice depending on the broadcast. The reserved and free storage space values will change according to this setting. Make sure that you have enough free space otherwise instant recording may not be possible.
Auto discard: You can set the Discard type as None, Oldest, Longest or Shortest. If it is not set to None, you can set the Unplayed option as Included or Excluded. These options determine the preferences for deleting the recordings in order to obtain more storage space for ongoing records.
Hard disk information: You can view detailed information about the USB storage device connected to your TV. Highlight and press OK to see and press Back/Return to close.
Format Disk: If you want to delete all files on the connected USB storage device and convert the disk format to FAT32, you can use this option. Press OK button while the Format Disk option is highlighted. A menu will appear on the screen, requiring you to enter the PIN*. After you enter the PIN, a confirmation message will be displayed. Select Yes and press OK to start formatting the USB storage device. Select No and press OK to cancel.
(*) Default PIN could have been set to 0000 or 1234. If you have defined the PIN(is requested depending on the country selection) during the First Time Installation use the PIN that you have defined.
IMPORTANT: Formatting your USB drive will erase ALL the data on it and it's file system will be converted to FAT32. In most cases operation errors will be fixed after a format but you will lose ALL your data.
If "USB disk writing speed too slow to record" message is displayed on the screen while starting a recording, try restarting the recording. If you still get the same error, it is possible that your USB disk does not meet the speed requirements. Try connecting another USB disk.
Media Browser
You can play back music and movie files and display photo files stored on a USB storage device by connecting it to your TV. Connect a USB storage device to one of the USB inputs located on the side of the TV.
After connecting a USB storage device to your TV Media Browser menu will be displayed on the screen. You can access the content of the connected USB device any time later from the Sources menu. Select the related USB input option from this menu and press OK. You can also press the Source button on the remote and then select your USB storage device from the list of sources. Then select the file of your choice and press OK to display or play it back.
You can set your Media Browser preferences by using the Settings menu. Settings menu can be accessed via the information bar which is displayed on the bottom of the screen while playing back a video or an audio file or displaying a picture file. Press the Info button if the information bar has disappeared, highlight the gear wheel symbol positioned on the right side of the information bar and press OK. Picture Settings, Sound Settings, Media Browser Settings and Options menus will be available. The contents of these menus may change according to the type of the currently open media file. Only Sound Settings menu will be available while playing back audio files.
| Loop/Shuffle Mode Operation | |
| Start playback and activate | All files in the list will be continuously played in original order |
| Start playback and activate | The same file will be played continuously (repeat) |
| Start playback and activate | All files in the list will be played once in random order |
| Start playback and activate | All files in the list will be continuously played in the same random order |
To use the functions on the information bar highlight the symbol of the function and press OK. To change the status of a function highlight the symbol of the function and press OK as much as needed. If the symbol is marked with a red cross, that means it is deactivated.
Custom Boot Up Logo
You can personalize your TV and see your favourite image or photo on the screen each time your TV boots up. To do this, copy your favourite image files into a USB disk and open them in the Media Browser. Select USB input from the Sources menu and press OK. You can also press the Source button on the remote and then select your USB storage device from the list of sources. When you have chosen the desired image, highlight it and press OK to view it in full screen. Press the Info button, highlight the gear wheel symbol on
the information bar and press OK. Select Options and press OK to enter. Set Boot Logo option will be available. Highlight it and press OK again to choose the image as custom boot logo. A confirmation message will be displayed. Select Yes and press OK again. If the image is suitable(*) you will see it on the screen during the TV's next boot up.
Note: If you perform a First Time Installation the TV will return to using the default logo, if any.
(*) Images must have an aspect ratio between 4:3 to 16:9 and they must be in .jpeg, .jpg or .jpe file formats. The image cannot be set as boot logo, which's resolution doesn't appear on the info banner.
FollowMe TV
With your mobile device you can stream the current broadcast from your smart TV using the FollowMe TV feature. Install the appropriate Smart Center application to your mobile device. Start the application.
For further information on using this feature refer to the instructions of the application you use.
Note: Depending on model, your TV may not support this function. The application may not be compatible with all mobile devices. Both of the devices must be connected to the same network.
CEC
This function allows to control the CEC-enabled devices, that are connected through HDMI ports by using the remote control of the TV.
The CEC option in the Settings>System>Device Settings menu should be set as Enabled at first. Press the Source button and select the HDMI input of the connected CEC device from the Sources List menu. When new CEC source device is connected, it will be listed in source menu with its own name instead of the connected HDMI ports name(such as DVD Player, Recorder 1 etc.).
The TV remote is automatically able to perform the main functions after the connected HDMI source has been selected. To terminate this operation and control the TV via the remote again, press and hold the "0-Zero" button on the remote control for 3 seconds.
You can disable the CEC functionality by setting the related option under the Settings>System>Device Settings menu accordingly.
The TV supports ARC (Audio Return Channel). This feature is an audio link meant to replace other cables between the TV and an audio system (A/V receiver or speaker system).
When ARC is active, the TV does not mute its other audio outputs automatically. You will need to decrease TV volume to zero manually if you wish to hear the ARC audio only (same as optical or co-axial digital audio outputs). If you want to change connected device's volume level, you should select that device
from the source list. In that case volume control keys are directed to connected audio device.
Note: ARC is supported only via the HDMI2 input.
System Audio Control
Allows an Audio Amplifier/Receiver to be used with the TV. The volume can be controlled using the remote control of the TV. To activate this feature set the Sound Output option in the Settings>Sound menu as HDMI ARC. When HDMI ARC option is selected, CEC option will be set as Enabled automatically, if it is not already set. The TV speakers will be muted and the sound of the watched source will be provided from the connected sound system.
Note: The audio device should support System Audio Control feature.
Settings Menu Content
| Picture Menu Content | ||
| Mode | You can change the picture mode to suit your preference or requirements. Picture mode can be set to one of these options: Cinema, Game(optional), Sports, Dynamic and Natural.Dolby Vision Modes: If Dolby Vision content is detected Dolby Vision Dark and Dolby Vision Bright picture mode options will be available instead of Cinema and Natural modes. | |
| Contrast | Adjusts the light and dark values on the screen. | |
| Brightness | Adjusts the brightness values on the screen. | |
| Sharpness | Sets the sharpness value for the objects displayed on the screen. | |
| Colour | Sets the colour value, adjusting the colours. | |
| Energy Saving | For setting the Energy Saving to Custom, Minimum, Medium, Maximum, Auto, Screen Off or Off.Note: Available options may differ depending on the selected Mode. | |
| Backlight | This setting controls the backlight level. This option will be available if the Energy Saving is set to Custom. Highlight and use Left/Right directional buttons to set. | |
| Picture Zoom | Sets the desired image size format. | |
| Picture Shift | This option may be available depending on the Picture Zoom setting. Highlight and press OK, then use directional buttons to shift the picture upwards or downwards. | |
| Virtual HDR | Virtual HDR function that manipulates colour, saturation and dynamic contrast, basically converts Standard Dynamic Range picture to High Dynamic Range picture. Set as On to enable. | |
| Advanced Settings | ||
| Dynamic Contrast | You can change the dynamic contrast ratio to desired value. | |
| Colour Temp | Sets the desired colour temperature value. Cool, Normal, Warm and Custom options are available. | |
| White Point | If the Colour Temp option is set as Custom, this setting will be available. Increase the 'warmth' or 'coolness' of the picture by pressing Left or Right buttons. | |
| Blue Stretch | White colour enhancement function that makes white colour more cooler in order to make more bright picture. Set as On to enable. | |
| Micro Dimming | Low, Medium, High and Off options are available. While Micro Dimming is active, it will enhance contrast locally for each defined zone. | |
| Noise Reduction | If the signal is weak and the picture is noisy, use the Noise Reduction setting to reduce the amount of noise. | |
| De-contour | Low, Medium, High and Off options are available. While De-contour is active, it will decrease the contour effects in low resolution contents and auto streaming services. | |
| MEMC | Press left/right buttons to set MEMC to Low, Medium, High or Off. While MEMC is active, it will optimize the TV's video settings for motional images to acquire a better quality and readability. | |
| MEMC Demo | When MEMC option is set to Low, Medium or High, this option will be available. Press OK button to activate the demo mode. While demo mode is active, the screen will be divided into two sections, one displaying the movie sense activity, the other displaying the normal settings for TV screen. Press OK button again to cancel. | |
| Film Mode | Films are recorded at a different number of frames per second to normal television programmes. Turn this feature on when you are watching films to see the fast motion scenes clearly. | |
| Skin Tone | Skin tone can be changed between -5 and 5. | |
| Colour Shift | Adjust the desired colour tone. | |
| Gamut Mapping | You can use this option to set the range of colours displayed on your TV screen. When set as On, colours are set according to the source signal. When set as Off, the TV's maximum colour capacity is used by default (recommended option). Note: This option may not be available depending on the TV model and its features. | |
| Dolby Vision Notification | Sets the notification appearance preference for Dolby Vision contents. When set as On, Dolby Vision logo will be displayed on the lower right side of the screen when Dolby Vision content is detected. | |
| HDMI Full Range | While watching from a HDMI source, this feature will be visible. You can use this feature to enhance blackness in the picture. | |
| Reset | Reset the picture settings to factory default settings (except Game mode). | |
| PC Position | Appears only when the input source is set to VGA/PC. | |
| Autoposition | If the image is not centered in VGA mode use this option to automatically adjust the position of the image. Press OK to start the auto adjustment. | |
| H Position | This item shifts the image horizontally to the right hand side or left hand side of the screen. | |
| V Position | This item shifts the image vertically towards the top or bottom of the screen. | |
| Dot Clock | Dot Clock adjustments correct the interference that appear as vertical banding in dot intensive presentations like spreadsheets or paragraphs or text in smaller fonts. | |
| Phase | Depending on the input source(computer etc.) you may see a hazy or noisy picture on the screen. You can use phase to get a clearer picture by trial and error. | |
| While in VGA (PC) mode, some items in Picture menu will be unavailable. Instead, VGA mode settings will be added to the Picture menu while in PC mode. | ||
| Sound Menu Content | |
| Dolby Audio | Smart, Movie, Music, News and Off options will be available. Set as Off to disable. Note: Some items in Sound menu will be grayed out and unavailable if set to an option other than Off. |
| DTS TruSurround HD | Enables or disables the DTS TruSurround HD. |
| Bluetooth | Press OK to open the Bluetooth menu screen. Using this screen you can discover and connect the Bluetooth wireless technology enabled sound devices to your TV. |
| Sound Output | Sets the sound output preference. TV, S/PDIF and HDMI ARC options will be available. There will be no sound output except through the selected option. If HDMI ARC option is selected, CEC feature will be enabled. Note: Depending on the selected option some items in Sound menu will appear as grayed out and will be unavailable. |
| AVL (Automatic Volume Limiting) | Sets the sound to obtain fixed output level between programmes. If the Dolby Audio menu item is set to an option other than Off the AVL setting options will change. Auto, Night, Normal and Off options will be available. In Auto mode the TV will switch to Normal or Night mode automatically according to the current time information. If no time information is available this option will always function as Normal. When the TV switches to Night mode for the first time after setting this option as Auto, an information bar will pop up on the screen. Please note that compared to Normal mode Night mode provides more aggressive dynamic compression control which is suitable for silent environments. |
| Advanced Settings | |
| Equalizer | Selects the equalizer mode. Custom settings can be made only when in User mode. |
| Bass Gain | Controls the bass gain level. Use Left or Right button to set. |
| DTS DRC | Dynamic Range Control provides gain adjustment of the source to maintain suitable audible range at both low and high playback levels. It will function only if the source audio format is DTS. Enable or disable the DTS DRC by setting as On or Off. |
| Sound Mode | You can select a sound mode (If the viewed channel supports). |
| Digital Out | Sets digital out audio type. This option will not be available if the Sound Output option is not set as S/PDIF. |
| Headphone/Lineout | When you connect an external amplifier to your TV using the headphone jack, you can select this option as Lineout. If you have connected headphones to the TV, set this option as Headphone.Pleasesure ensure before using headphones that this menu item is set to Headphone. If it is set to Headphone, the output from the headphone socket will be set to maximum which could damage your hearing. |
| Headphone | Sets headphone volume. This option will not be available if the Headphone/Lineout option is not set as Headphone.Pleasesure ensure before using headphones that the headphone volume is set to a low level, to prevent damage to your hearing. |
| Reset | Resetset some of the sound settings to factory defaults. |
| Network Menu Content | |
| Network Type | Disable the network connection or change the connection type. |
| Scan Wireless Networks | Start a search for wireless networks. This option will be available if the Network Type is set as Wireless Device. |
| Press WPS on your wifi router | If your modem/rodert device has WPS, you can directly connect to it using this option. Highlight this option and press OK. Go to your modem/rodert device and press the WPS button on it to make the connection. This option will be available if the Network Type is set as Wireless Device. |
| Internet Speed Test | Start a speed test to check your connection bandwidth. The result will be displayed on the screen when finished. |
| Advanced Settings | Change the IP and DNS configurations of your TV. |
| Wake On | Enable or disable this feature by setting it as On or Off. |
| Note: For detailed information on the options of this menu refer to the Connectivity section. | |
| Installation Menu Content | ||
| Automatic channel scan (Retune) | Displays automatic tuning options. D. Aerial: Searches and stores aerial DVB stations. D. Cable: Searches and stores cable DVB stations. Analogue: Searches and stores analogue stations. Satellite: Searches and stores satellite stations. | |
| Manual channel scan | This feature can be used for direct broadcast entry. | |
| Network channel scan | Searches for the linked channels in the broadcast system. D. Aerial: Searches for aerial network channels. D. Cable: Searches for cable network channels. Satellite: Searches for satellite network channels. | |
| Analogue fine tune | You can use this setting for fine tuning analogue channels. This feature is not available if no analogue channels are stored and if currently watched channel is not an analogue channel. | |
| Satellite Settings | Displays satellite settings. Satellite list: Displays available satellites. You can Add, Delete satellites or Edit satellite settings on the list. Antenna installation: You can change satellite antenna settings and/or start a satellite scan. Satellite Channel Table: You can upload or download satellite channel table data using the related options. | |
| Installation Settings (optional) | Displays installation settings menu. Standby Search (*): Your TV will search for new or missing channels while in standby. Any new found broadcasts will be shown. Dynamic Channel Update(*): If this option is set as Enabled, the changes on the broadcasts such as frequency, channel name, subtitle language etc., will be applied automatically while watching. (*) Availability depends on model. | |
| Setup Home Transponder (*) | Using this menu, you can edit the main and backup home transponder parameters, including the Pid of the related M7 operator, which are used to download the channel list. Set your preferences and press the Green button to save the settings. Then start an M7 operator installation using the Automatic channel scan>Satellite menu. (*) This menu option will only be available if an M7 operator installation is performed. | |
| Clear Service List | Use this setting to clear channels stored. This setting is visible only when the Country option is set to Denmark, Sweden, Norway or Finland. | |
| Select Active Network | This setting allows you to select only the broadcasts within the selected network to be listed in the channel list. This feature is available only for the country option of Norway. | |
| Signal Information | You can use this menu item to monitor signal related information such as signal level/ quality, network name etc for available frequencies. | |
| First time installation | Deletes all stored channels and settings, resets TV to factory settings. | |
| Fransat Options | Displays Fransat options. | |
| Parental Control | Displays parental control options. Enter the PIN number you have defined in the initial installation to view current settings. | |
| System Information | Displays system information. | |
| Reception Information | Displays current satellite reception information. | |
| CAS-Module | Displays current CAS module information. | |
| Upgrade | Displays software upgrade options. | |
General TV Operation
Using the Channel List
The TV sorts all stored stations in the channel list. You can edit this channel list, set favourites or set active stations to be listed by using the Channels menu options. Press the OK button to open the channel list. You can filter the listed channels or make advanced changes in the current list using the Filter and Edit tab options. Highlight the tab you want and press OK to see available options.
In order to add the channel you are currently watching to the Home menu, highlight the Add to Home option in the Edit tab in the Channels menu and press OK.
Note: The commands Move to position, Delete and Edit name in the TV>Channels>Edit menu are not available for channels that are being broadcasted from an M7 operator.
Managing the Favourite Lists
You can create four different lists of your favourite channels. Enter the TV>Channels menu or press the OK button in order to open the Channels menu. Highlight the Edit tab and press OK to see the editing options and select the Tag/Untag channel option. Select the desired channel on the list by pressing the OK button while the channel is highlighted. You can make multiple choices. You can also use the Tag/ Untag all option to select all channels on the list. Then press Back/Return button to return to the Edit menu options. Select Add/Remove Favourites option and press the OK button again. Favourite channel list options will be displayed. Set the desired list option to On. The selected channel/s will be added to the list. In order to remove a channel or channels from a favourite list follow the same steps and set the desired list option to Off.
You can use the filtering function in the Channels menu to filter the channels in the channel list permanently according to your preferences. For instance, using the options of the Filter tab, you can set one of your four favourite lists to be displayed every time the channel list is opened.
Configuring Parental Settings
The Parental menu options can be used to prohibit users from viewing of certain programmes, channels and using of menus. These settings are located in the Settings> System>Parental menu.
To display parental lock menu options, a PIN should be entered. After coding the correct PIN, Parental menu will be displayed.
Menu Lock: This setting enables or disables access to all menus or installation menus of the TV.
Maturity Lock: If this option is set, TV gets the maturity information from the broadcast and if this maturity level is disabled, prohibits access to the broadcast.
Note: If the country option in the First Time Installation is set as France, Italy or Austria, Maturity Lock's value will be set to 18 as default.
Child Lock: If this option is set to On, the TV can only be controlled by the remote control. In this case the control buttons on the TV will not work.
Internet Lock: If this option is set to ON, the internet using applications will be disabled. Set to OFF to release these applications again.
Set PIN: Defines a new PIN number.
Default CICAM PIN: This option will appear as greyed out if no CI module is inserted into the CI slot of the TV. You can change the default PIN of the CI CAM using this option.
TV PIN (^*) : By enabling or disabling this option you can allow or restrict some M7 operator channels to send PIN queries. These PIN queries provide an access control mechanism for related channels. If this option is set as On, the channels which send PIN queries cannot be accessed without entering the right PIN first.
(*) This menu option will only be available if an M7 operator installation is performed.
Note: Default PIN could have been set to 0000 or 1234. If you have defined the PIN(is requested depending on the country selection) during the First Time Installation use the PIN that you have defined.
Some options may not be available depending on the model and/or on the country selection in the First Time Installation.
Electronic Programme Guide
By means of electronic programme guide function of your TV you can browse the event schedule of the currently installed channels on your channel list. It depends on the related broadcast whether this feature is supported or not.
To access the programme guide, press the Guide button on your remote. You can also use the Guide option under TV menu.
There are 2 different types of schedule layouts available, Timeline Schedule and Now/Next. To switch between these layouts highlight the tab with the name of the alternative layout on the upper side of the screen and press OK.
Use the directional buttons to navigate through the programme guide. Use the Back/Return button to use the tab options on the upper side of the screen.
Timeline Schedule
In this layout option, all events of the listed channels will be displayed by timeline. You can use the directional buttons to scroll through the list of the events. Highlight an event and press OK to display event options menu.
Press Back/Return button to use available tab options. Highlight Filter tab and press OK to see the filtering options. To change the layout highlight Now/Next and press OK. You can use the Previous Day and Next
Day options to display the events of the previous and next day.
Highlight Extras tab and press OK to access below options.
Highlight Genre: Displays Highlight Genre menu. Select a genre and press OK. The events in the programme guide matching the selected genre will be highlighted.
Guide Search: Displays searching options. Using these options, you can search the programme guide database in accordance with the selected criteria. Matching results will be listed.
Now: Displays current event of the highlighted channel.
Zoom: Highlight and press OK to see events in a wider time interval.
Now/Next Schedule
In this layout option, only the current and next events of the listed channels will be displayed. You can use the directional buttons to scroll through the list of the events.
Press Back/Return button to use available tab options. Highlight Filter tab and press OK to see the filtering options. To change the layout highlight Timeline Schedule and press OK.
Event Options
Use the directional buttons to highlight an event and press OK button to display Options menu. The following options are available.
Select Channel: Using this option, you can switch to the selected channel in order to watch it. The programme guide will be closed.
More Info: Display detailed information on the selected event. Use up and down directional buttons to scroll through the text.
Set Timer on Event / Delete Timer on Event: Select Set Timer on Event option and press OK. You can set timers for future events. To cancel an already set timer, highlight that event and press the OK button. Then select Delete Timer on Event option. The timer will be cancelled.
Record / Delete Rec. Timer: Select the Record option and press the OK button. If the event is going to be broadcasted at a future time, it will be added to Timers list to be recorded. If the selected event is being broadcasted at the moment, recording will start immediately.
To cancel an already set record timer, highlight that event and press the OK button and select the option Delete Rec. Timer. The record timer will be cancelled. IMPORTANT: Connect a USB disk to your TV while the TV is switched off. You should then switch on the TV to enable the recording feature.
Notes: You cannot switch to any other channel while there is an active recording or timer on the current channel.
It is not possible to set timer or record timer for two or more individual events at the same time interval.
Integrated Catch-Up Services
You can enjoy Freeview Play catch-up TV services that work directly through the electronic programme guide. Whilst you are on a channel use the directional buttons to scroll back in time through the timeline-based guide. You will see contents from last few days. Available catch-up contents may change according to broadcasters and will be marked with a play icon. Highlight the content you want to play back and press the OK button.
Make sure that your TV is connected to your home network in order to use the catch-up services. For further information regarding this matter and other requirements for Freeview Play services refer to the Connectivity and Freeview Play Platform sections.
Electronic Programme Guide
By means of electronic programme guide function of your TV you can browse the event schedule of the currently installed channels on your channel list. It depends on the related broadcast whether this feature is supported or not.
To access the programme guide, press the Guide button on your remote. You can also use the Guide option under TV menu.
There are 2 different types of schedule layouts available, Timeline Schedule and Now/Next. To switch between these layouts highlight the tab with the name of the alternative layout on the upper side of the screen and press OK.
Use the directional buttons to navigate through the programme guide. Use the Back/Return button to use the tab options on the upper side of the screen.
Timeline Schedule
In this layout option, all events of the listed channels will be displayed by timeline. You can use the directional buttons to scroll through the list of the events. Highlight an event and press OK to display event options menu.
Press Back/Return button to use available tab options. Highlight Filter tab and press OK to see the filtering options. To change the layout highlight Now/Next and press OK. You can use the Previous Day and Next Day options to display the events of the previous and next day.
Highlight Extras tab and press OK to access below options.
Highlight Genre: Displays Highlight Genre menu. Select a genre and press OK. The events in the programme guide matching the selected genre will be highlighted.
Guide Search: Displays searching options. Using these options, you can search the programme guide database in accordance with the selected criteria. Matching results will be listed.
Now: Displays current event of the highlighted channel.
Zoom: Highlight and press OK to see events in a wider time interval.
Now/Next Schedule
In this layout option, only the current and next events of the listed channels will be displayed. You can use the directional buttons to scroll through the list of the events.
Press Back/Return button to use available tab options. Highlight Filter tab and press OK to see the filtering options. To change the layout highlight Timeline Schedule and press OK.
Event Options
Use the directional buttons to highlight an event and press OK button to display Options menu. The following options are available.
Select Channel: Using this option, you can switch to the selected channel in order to watch it. The programme guide will be closed.
More Info: Display detailed information on the selected event. Use up and down directional buttons to scroll through the text.
Set Timer on Event / Delete Timer on Event: Select Set Timer on Event option and press OK. You can set timers for future events. To cancel an already set timer, highlight that event and press the OK button. Then select Delete Timer on Event option. The timer will be cancelled.
Record / Delete Rec. Timer: Select the Record option and press the OK button. If the event is going to be broadcasted at a future time, it will be added to Timers list to be recorded. If the selected event is being broadcasted at the moment, recording will start immediately.
To cancel an already set record timer, highlight that event and press the OK button and select the option Delete Rec. Timer. The record timer will be cancelled. IMPORTANT: Connect a USB disk to your TV while the TV is switched off. You should then switch on the TV to enable the recording feature.
Notes: You cannot switch to any other channel while there is an active recording or timer on the current channel.
It is not possible to set timer or record timer for two or more individual events at the same time interval.
Teletext Services
Press the Text button to enter. Press again to activate mix mode, which allows you to see the teletext page and the TV broadcast at the same time. Press once more to exit. If available, sections in the teletext pages will become colour-coded and can be selected by pressing the coloured buttons. Follow the instructions displayed on the screen.
Digital Teletext
Press the Text button to view digital teletext information. Operate it with the coloured buttons, cursor buttons and the OK button. The operation method may differ depending on the contents of the digital teletext. Follow
the instructions displayed on the digital teletext screen. When the Text button is pressed again, the TV returns to television broadcast.
Software Upgrade
Your TV is capable of finding and updating the firmware automatically via the broadcast signal or via Internet.
Software upgrade search via user interface
On the main menu select Settings>System and then More. Navigate to Software upgrade and press the OK button. Then select Scan for upgrade and press OK button to check for a new software upgrade.
If a new upgrade is found, it starts to download the upgrade. After the download is completed, a warning will be displayed, press OK button to complete software upgrade process and restart TV.
3 AM search and upgrade mode
Your TV will search for new upgrades at 3:00 o'clock if Automatic scanning option is set to Enabled and if the TV is connected to an aerial signal or to Internet. If a new software is found and downloaded successfully, it will be installed at the next power on.
Note: Do not unplug the power cord while led is blinking during the reboot process. If the TV fails to come on after the upgrade, unplug, wait for two minutes then plug it back in.
All updates are automatically controlled. If a manual search is carried out and no software is found then this is the current version.
Troubleshooting & Tips
TV will not turn on
Make sure the power cord is plugged in securely to a wall outlet. Press the Power button on the TV.
Poor picture
- Check if you have correctly tuned the TV.
- Low signal level can cause picture distortion. Please check antenna connections.
- Check if you have entered the correct channel frequency if you have performed manual tuning.
No picture
- TV is not receiving any signal. Make sure the correct source has been selected.
- Is the antenna connected properly?
- Is the antenna cable damaged?
- Are suitable plugs used to connect the antenna?
If you are in doubt, consult your dealer.
No sound
- Check if the TV sound is muted. Press the Mute button or increase the volume to check.
Sound may be coming from only one speaker. Check the balance settings from Sound menu.
Remote control - no operation
- The batteries may be exhausted. Replace the batteries.
- The batteries maybe inserted incorrectly. Refer to the section "Inserting the Batteries into the Remote".
No signal on an input source
- It is possible that no device is connected.
- Check the AV cables and connections from your device.
- Check the device is switched on.
The Image is not centered in VGA source
To have your TV automatically center the image, enter the PC Position menu in Picture menu, highlight Autoposition and press OK. Wait for it to finish. In order to set the position of the image manually you can use H Position and V Position options. Select the desired option and use Left and Right directional buttons on the remote to set.
Recording unavailable
To record a programme, you should first correctly connect a USB storage device to your TV, while the TV is switched off. You should then switch on the TV to enable recording feature. If you cannot record, check the storage device is correctly formatted and there is sufficient space.
USB is too slow
If a "USB disk writing speed too slow to record" message is displayed on the screen while starting a recording, try restarting the recording. If you still get the same error, it is possible that your USB storage device does not meet the speed requirements. Try using a different USB storage device.
PC Input Typical Display Modes
The following table is an illustration of some of the typical video display modes. Your TV may not support all resolutions.
| Index | Resolution | Frequenc |
| 1 | x350 85Hz | |
| 2 | x480 60Hz | |
| 3 | x480 72Hz | |
| 4 | x480 75Hz | |
| 5 | 00x600 56Hz | |
| 6 | x600 60Hz | |
| 7 | x600 72Hz | |
| 8 | x600 75Hz | |
| 9 | 4x768 60Hz | |
| 10 | 24x768 70Hz | |
| 11 | 24x768 75Hz | |
| 12 | 24x768 85Hz | |
| 13 | 52x864 75Hz | |
| 14 | 80x768 60Hz | |
| 15 | 280x768 75Hz | |
| 16 | 80x960 60Hz | |
| 17 | 80x960 75Hz | |
| 18 | 80x1024 60Hz | |
| 19 | 80x1024 75Hz | |
| 20 | 60x768 60Hz | |
| 21 | 66x768 60Hz | |
| 22 | 00x1050 59Hz | |
| 23 | 00x1050 60Hz | |
| 24 | 00x1050 75Hz | |
| 25 | 440x900 60Hz | |
| 26 | 40x900 75Hz | |
| 27 | 00x1200 60Hz | |
| 28 | 80x1050 59Hz | |
| 29 | 80x1050 60Hz | |
| 30 | 20x1080 60Hz |
AV and HDMI Signal Compatibility
| Source Sup | ported Signals Available | ||
| Back AV | PAL O | ||
| SECAM O | |||
| NTSC4.43 O | |||
| NTSC3.58 O | |||
| YPbPr | 480i, 480p 60Hz O | ||
| 576i, 576p 50Hz O | |||
| 720p 50Hz,60Hz O | |||
| 1080i 50Hz,60Hz O | |||
| HDMI | 480i 60Hz O | ||
| 480p 60Hz O | |||
| 576i, 576p 50Hz O | |||
| 720p 50Hz,60Hz O | |||
| 1080i 50Hz,60Hz O | |||
| 1080p | 24Hz,25Hz,30Hz,50Hz,60Hz | O | |
| 3840x2160p | 24Hz,25Hz,30Hz,50Hz,60Hz | O | |
| 4096x2160p | 24Hz,25Hz,30Hz,50Hz,60Hz | O | |
(X: Not Available, O: Available)
In some cases a signal on the TV may not be displayed properly. The problem may be an inconsistency with standards from the source equipment (DVD, Set-top box, etc.). If you do experience such a problem please contact your dealer and also the manufacturer of the source equipment.
Supported File Formats for USB Mode
Video File Formats
| File Extension | Format | |
| Video Codec Audio | ||
| .mpg/.mpeg/.dat/.vob | MPEG1/2, H.264, VC1 | MPEG Layer 1/2/3, AC3 |
| /ts/.trp/.m2ts/.mts | MPEG Layer 1/2/3, AC3, E-AC3 | |
| .avi | MPEG1/2, MPEG4, H.264, MJPEG | MPEG Layer 1/2/3, AC3, AAC, WMA |
| .mp4/.m4a/.m4v/.mov/.qt/.3gp/.3g2/.3gpp | MPEG1/2, H.263, MPEG4, H.264 | MPEG Layer 1/2/3, AAC LC, AC3 |
| .mkv | MPEG 1/2, MPEG4, H.264 | MPEG Layer 1/2/3, AAC, AC3 |
| .flv | Sorenson Spark, MPEG4, H.264 | MPEG Layer 3, ADPCM, AAC LC |
| .ogm/.ogg MPEG1/2 | , MPEG4 MP3, Vorbis | |
| .asf/.wmv MPEG4, | WMV3, VC1 WMA, AMR-NB | |
| .rm/.rmvb RV30, RV | 40 COOK, AAC LC / HE-AA | |
| .webm VP9, VP8 O | PUS, Vorbis | |
Picture File Formats
| File Extension | Format |
| .jpeg/.jpeg JPEG, PJPEG | |
| .bmp BMP | |
| .gif GIF | |
| .png PNG | |
| .tiff/.tif TIFF | |
| .webp Webp | |
Audio File Formats
| File Extension | Format | |
| Video Codec Audio | ||
| .mp3 mp3 | ||
| .ac3 ac3 | ||
| .aac AAC | ||
| .wma WMA | ||
| .wav | MPEG Layer 1/2/3, AAC, PCM | |
| .flac | FLAC | |
| .ogg OGG | Vorbis | |
| .m4a M4A | AAC | |
| External Subtitles | |
| Extension Specification | |
| .ssa SubStation Alpha | |
| .ass Advanced Sub Station Alpha | |
| .srt Subripper | |
| .sub Micro DVD / SubViewer | |
| .sub + .idx VOUBSub | |
| .txt Micro DVD / TM Player / MPL2 | |
| .mpl MPL2 | |
| .smi Sami | |
| .jss JACOSUB | |
| .ttml TTML | |
| .txt / .sub DVDSUBTITLE | |
| .lrc - | |
| Internal Subtitles | |
| Extension Specifi-cation | |
| .mkv VOUBSub | |
| .mkv ASS / SSA / T | TEXT |
| .dat, .mpg, .mpeg, .vob | DVD Subtitle |
| .mp4 DVD Subtitle, | TEXT |
Supported DVI Resolutions
When connecting devices to your TV's connectors by using DVI converter cable(DVI to HDMI cable - not supplied), you can refer to the following resolution information.
| 56Hz 60Hz | 66Hz 70Hz | 72Hz 75Hz | ||||
| 640x480 | X | X | ||||
| 800x600 | XXXX | |||||
| 1024x768 | XXXX | |||||
| 1280x768 | X | X | ||||
| 1280x960 | X | |||||
| 1360x768 | X | |||||
| 1366x768 | X | |||||
| 1280x1024 | XXXX | |||||
| 1400x1050 | X | |||||
| 1600x900 | X | |||||
| 1920x1080 | X |
Connectivity
Wired Connectivity
To Connect to a Wired Network
- You must have a modem/rodter connected to an active broadband connection.
- Connect your TV to your modem/rodter via an Ethernet cable. There is a LAN port at the rear (back) of your TV.

- Broadband ISP connection
- LAN (Ethernet) cable
- LAN input on the rear side of the TV
To configure wired settings refer to the Network section in the Settings menu.
- You might be able to connect your TV to your LAN depending on your network's configuration. In such a case, use an Ethernet cable to connect your TV directly to the network wall outlet.

- Network wall socket
- LAN input on the rear side of the TV
Configuring Wired Device Settings
Network Type
The Network Type can be selected as Wired Device, Wireless Device or Disabled, in accordance with the active connection to the TV set. Select this as Wired Device if you are connecting via an Ethernet cable.
Internet Speed Test
Highlight Internet Speed Test and press the OK button. TV will check the internet connection bandwidth and display the result when complete.
Advanced Settings
Highlight Advanced Settings and press the OK button. On the next screen you can change the IP and DNS settings of the TV. Highlight the desired one and press Left or Right button to change the setting from Automatic to Manual. Now you can enter the Manual IP and / or Manual DNS values. Select the related item in the drop down menu and enter the new values using the numeric buttons of the remote. Highlight Save and press the OK button to save settings when complete.
Wireless Connectivity
To Connect to a Wireless Network
The TV cannot connect to the networks with a hidden SSID. To make your modem's SSID visible, you should change your SSID settings via the modem's software.
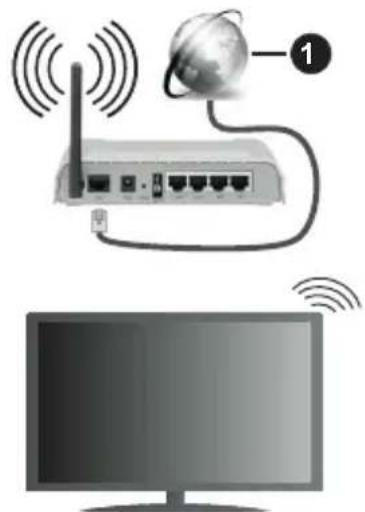
1. Broadband ISP connection
A Wireless-N router (IEEE 802.11a/b/g/n) with simultaneous 2.4 and 5 GHz bands is designed to increase bandwidth. These are optimized for smoother and faster HD video streaming, file transfers and wireless gaming.
The frequency and channel differ depending on the area.
- The transmission speed differs depending on the distance and number of obstructions between the transmission products, the configuration of these products, the radio wave conditions, the line traffic and the products that you use. The transmission may also be cut off or may get disconnected depending on the radio wave conditions, DECT phones or any other WLAN 11b appliances. The standard values of the transmission speed are the theoretical maximum values for the wireless standards. They are not the actual speeds of data transmission.
- The location where the transmission is most effective differs depending on the usage environment.
- The Wireless feature of the TV supports 802.11 a,b,g & n type modems. It is highly recommended that you should use the IEEE 802.11n communication protocol in order to avoid any possible problems while watching videos.
- You must change your modem's SSID when there are any other modems around with the same SSID. You can encounter connection problems otherwise. Use a wired connection if you experience problems with a wireless connection.
Configuring Wireless Device Settings
Open the Network menu and select Network Type as Wireless Device to start connection process.
Highlight Scan Wireless Networks option and press OK to start a search for available wireless networks. All found networks will be listed. Highlight your desired network from the list and press OK to connect.
Note: If the modem supports N mode, you should set N mode settings.
If the selected network is password-protected, enter the correct key by using the virtual keyboard. You can use this keyboard via the directional buttons and the OK button on the remote control.
Wait until the IP address is shown on the screen.
This means that the connection is now established. To disconnect from a wireless network, highlight Network Type and press Left or Right buttons to set as Disabled.
If your router has WPS, you can directly connect to the modem/rodter without entering a password or adding the network first. Highlight Press WPS on your wifi router option and press OK. Go to your modem/rodter device and press the WPS button on it to make the connection. You will see a connection confirmation on your TV once the devices have paired. Select OK to proceed. No further configuration is required.
Highlight Internet Speed Test and press the OK button to check your internet connection speed. Highlight Advanced Settings and press the OK button to open the advanced setting menu. Use directional and numeric buttons to set. Highlight Save and press the OK button to save settings when complete.
Other Information
The status of the connection will be displayed as Connected or Not Connected and the current IP address, if a connection is established.
Connecting to your mobile device via WLAN
- If your mobile device has WLAN feature, you can connect it to your TV via a router, in order to access the content in your device. For this, your mobile device must have an appropriate sharing software.
Connect your TV to your router following the steps mentioned in the sections above.
Afterwards, connect your mobile device to the router and then activate the sharing software on your mobile device. Then, select files that you want to share with your TV.
If the connection is established correctly, you will be able to access the shared files installed on your mobile device via the Audio Video Sharing (AVS) feature of your TV.
Highlight the AVS option in the Sources menu and press OK, available media server devices in the network will be displayed. Select your mobile device and press the OK button to continue.
- If available, you can download a virtual remote controller application from the server of your mobile device application provider.
Note: This feature may not be supported on all mobile devices.
Wake ON
Wake-on-LAN (WoL) and Wake-on-Wireless LAN (WoWLAN) are standards that allow a device to be turned on or woken up by a network message. The message is sent to the device by a program executed on a remote device connected to the same local area network, such as a smartphone.
Your TV is Wol and WoWLAN compatible. This feature might be disabled during the First Time Installation process. To enable this feature set the Wake On option in the Network menu as On. It is necessary that both the device, from which the network message will be sent to the TV, and the TV are connected to the same network. Wake On feature is only supported for Android OS devices and can only be used via YouTube and Netflix applications.
In order to use this feature the TV and the remote device should be connected at least once while the TV is on. If the TV is powered off, the connection should be re-established, the next time it is switched on. Otherwise this feature will be unavailable. This does not apply, when the TV is switched into the standby mode.
If you want your TV to consume less power in standby mode, you can disable this feature by setting the Wake On option as Off.
Wireless Display
Wireless Display is a standard for streaming video and sound content. This feature provides the ability to use your TV as wireless display device.
Using with mobile devices
There are different standards which enable sharing of screens including graphical, video and audio content between your mobile device and TV.
Plug the wireless USB dongle to TV first, if the TV doesn't have internal WLAN feature.
Then press the Source button on the remote and switch to Wireless Display source.
A screen appears stating that the TV is ready for connection.
Open the sharing application on your mobile device. These applications are named differently for each brand, refer to the instruction manual of your mobile device for detailed information.
Scan for devices. After you select your TV and connect, the screen of your device will be displayed on your TV.
Note: This feature can be used only if the mobile device supports this feature. If you experience problems with the connection check if the operating system version you use supports this feature. There may be incompatibility problems with the operating system versions which are released after the production of this TV. Scanning and connecting processes differ according to the programme you use.
Connecting Bluetooth Devices
Your TV supports Bluetooth wireless connection technology too. A pairing is required before using Bluetooth devices with the TV set. You should do the following to pair your device with the TV:
- Set the device to pairing mode
- Start device discovery on the TV
Note: Refer to the user manual of the Bluetooth device to learn how to set the device to pairing mode.
You can connect audio devices or remote controllers to your TV using the Bluetooth wireless technology. Unplug or switch off any other connected audio device in order for wireless connection feature to work correctly. For audio devices you should use the Bluetooth option in the Settings>Sound menu, for remote controllers the Smart Remote option in the Settings>System>More menu. Select the menu option and press the OK button to open the related menu. Using this menu you can discover and connect the devices that use the Bluetooth wireless technology and start to use them. Follow the on-screen instructions. Start the device discovery. A list of available Bluetooth devices will be displayed. Select the device you want to connect from the list and press the OK button to connect. If "Device connected" message is displayed, the connection is successfully established. If the connection fails try it again.
Image transfer and audio streaming
You can also use Bluetooth connection to transfer images or stream audio from your mobile device to your TV.
Pair the mobile device and the TV as described before. Start a device search in your hand-held device. Select your TV from listed devices. Confirm the request for connection on your TV screen and do the same on your hand held device screen. If no pairing is done,
image transfer or audio streaming to the TV will not be possible.
The images sent by mobile device will be displayed on the TV without confirmation request, if the image file is suitable. You can also save the image file to a connected USB memory drive or set as boot logo, if this feature is supported and the file is suitable. Press the Exit button to terminate displaying the image.
The audio will be routed through the speakers of the TV, after confirmation is given. To start audio streaming unpair the device from your TV if it is paired with your TV previously. After pairing is completed, a confirmation message will be displayed asking whether you want to start audio streaming from your mobile device. Select Yes and press the OK button on the remote of the TV. If the connection is succeeded, all audio will be routed through the speakers of the TV. A symbol will appear on the upper side of the TV screen as long as the audio streaming connection is active. To terminate the audio streaming, you should turn off the Bluetooth connection of your mobile device.
Close all running applications and all the menus on the TV for a trouble-free transfer. Only image files with sizes smaller than 5 MB and in the following file formats are suitable; .jpg, .jpeg, .png, .bmp. If a file sent by the mobile device does not suit these requirements, it will not be displayed on the TV.
If the AVS option in the Settings>System>More menu is disabled, the TV will ignore pairing requests and no information message will be displayed on the screen. If a device is already paired prior to disabling the AVS option, it will be able to continue sharing audio/video with the TV even if the AVS option is disabled.
Note: Wireless devices may operate within the same radio frequency range and may interfere with one another. To improve the performance of your wireless device place it at least 1 meter away from any other wireless devices.
Connectivity Troubleshooting
Wireless Network Not Available
- Ensure that any firewalls of your network allow the TV wireless connection.
- Try searching for wireless networks again, using the Network menu screen.
If the wireless network does not function properly, try using the wired network in your home. Refer to the Wired Connectivity section for more information on the process.
If the TV does not function using the wired connection, check the modem (router). If the router does not have a problem, check the internet connection of your modem.
Connection is Slow
See the instruction book of your wireless modem to get information on the internal service area, connection
speed, signal quality and other settings. You need to have a high speed connection for your modem.
Disruption during playback or slow reactions
You could try the following in such a case:
Keep at least three meters distance from microwave ovens, mobile telephones, Bluetooth devices or any other WLAN compatible devices. Try changing the active channel on the WLAN router.
Internet Connection Not Available / Audio Video Sharing Not Working
If the MAC address (a unique identifier number) of your PC or modem has been permanently registered, it is possible that your TV might not connect to the internet. In such a case, the MAC address is authenticated each time when you connect to the internet. This is a precaution against unauthorized access. Since your TV has its own MAC address, your internet service provider cannot validate the MAC address of your TV. For this reason, your TV cannot connect to the internet. Contact your internet service provider and request information on how to connect a different device, such as your TV, to the internet.
It is also possible that the connection may not be available due to a firewall problem. If you think this causes your problem, contact your internet service provider. A firewall might be the reason of a connectivity and discovery problem while using the TV in Audio Video Sharing mode or while browsing via Audio Video Sharing feature.
Invalid Domain
Ensure that you have already logged on to your PC with an authorized username/password and also ensure that your domain is active, prior to sharing any files in your media server program on your PC. If the domain is invalid, this might cause problems while browsing files in Audio Video Sharing mode.
Using Audio Video Sharing Network Service
Audio Video Sharing feature uses a standard that eases the viewing process of digital electronics and makes them more convenient to use on a home network.
This standard allows you to view and play photos, music and videos stored in the media server connected to your home network.
1. Server Software Installation
The Audio Video Sharing feature cannot be used if the server programme is not installed onto your PC or if the required media server software is not installed onto the companion device. Prepare your PC with a proper server programme.
2. Connect to a Wired or Wireless Network
See the Wired/Wireless Connectivity chapters for detailed configuration information.
3. Enable Audio Video Sharing
Enter the Settings>System>More menu and enable the Audio Video Sharing option.
4. Play Shared Files via Media Browser
Highlight the AVS option in the Sources menu by using the directional buttons and press OK. Available media server devices in the network will be listed. Select one and press OK to continue. The media browser will then be displayed.
Refer to the Media Browser menu section for further information on file playback.
If a problem occurs with the network, switch your television off at the wall socket and back on again. Trick mode and jump are not supported with the Audio Video Sharing feature.
PC/HDD/Media Player or any other devices that are compatible should be used with a wired connection for higher playback quality.
Use a LAN connection for quicker file sharing between other devices like computers.
Note: There may be some PC's which may not be able to utilize the Audio Video Sharing feature due to administrator and security settings (such as business PC's).
Apps
You can access the applications installed on your TV from Apps menu. Highlight an app and press OK to launch.
In order to manage the apps installed on your TV, add new apps from the market or to see all available apps in full screen mode highlight the Add More option and press OK. Using this menu option you can add an installed app to Home menu, launch or remove it. Removed apps will no longer be accessible from Apps menu. You can also add new apps from the market. In order to enter the market highlight the shopping basket logo located on the upper left side of the screen and press OK. Available apps in the market will be displayed. Use directional buttons to highlight an app and press OK. Highlight Add to Apps option and press OK again to add the selected app to Apps menu.
For quick access to Add More menu you can press the Internet button on the remote, if this button is available.
Notes:
Possible application dependent problems may be caused by the content service provider.
Third party internet services may change, be discontinued or restricted at any time.
Freeview Play Platform
Freeview Play platform provides catch-up TV and On Demand services. Simply press the Freeview Play button on your remote control to connect to the Freeview Play platform.
The Freeview Play platform can also be accessed from the Home and Apps menus. Press Menu button and select Home or Apps. Then highlight Freeview Play and press the OK button.
You will have to agree to the terms and conditions for Freeview Play services first if you did not agree them during the First Time Installation. Highlight Yes and press OK on the remote to confirm and proceed.
Integrated TV Player applications will be displayed. Select one and press the OK button. Then select a content that you want to play back and press the OK button to watch.
Catch-up contents can also be accessed and played back directly from the TV Guide. Refer to the section Electronic Programme Guide for more information.
Requirements
The Freeview Play services may only be used if the following requirements are fulfilled:
- Connecting the TV to the internet. A minimum broadband speed of 2Mbps is required for proper operation of catch up and on demand services.
- Agreeing to the terms and conditions of Freeview Play
Note: Freeview Play platform usage will count towards any monthly broadband data allowance. Only selected channels provide 7-day catch up.
Internet Browser
To use the internet browser, enter the Apps menu first. Then launch the internet browser application which has an orange coloured logo with earth symbol on it.
In the initial screen of the browser, the thumbnails of the predefined (if any) links to web sites available will be displayed as Speed Dial options along with the Edit Speed Dial and the Add to Speed Dial options.
To navigate the web browser, use the directional buttons on the remote or a connected mouse. To see the browser options bar, move the cursor to the top of the page or press the Back/Return button. History, Tabs and Bookmarks options and the browser bar which contains previous/next buttons, the refresh button, the address/search bar, the Speed Dial and the Vewd buttons are available.
To add a desired website to the Speed Dial list for quick access, move the cursor to the top of the page or press the Back/Return button. The browser bar will appear. Highlight the Speed Dial - button and press the OK button. Then select Add to Speed Dial option and press the OK button. Fill in the blanks for Name and Address, highlight OK and press the OK button to add. Whilst you are on the site you wish to add to the Speed Dial list, highlight the Vewd button and press the OK button. Then highlight Add to Speed Dial option in the submenu and press the OK button again. Name and Address will be filled automatically
according to the site you are visiting. Highlight OK and press the OK button to add.
You can also use the Vewd menu options to manage the browser. Highlight the Vewd button and press the OK button to see available page specific and general options.
There are various ways to search or visit websites using the web browser.
Enter the address of a website(URL) into the search/ address bar and highlight the Submit button on the virtual keyboard and press the OK button to visit the site.
Enter keyword/s into the search/address bar and highlight the Submit button on the virtual keyboard and press the OK button to start a search for the related websites.
Highlight a Speed Dial thumbnail and press the OK button to visit the related website.
Your TV is compatible with USB mice. Plug your mouse or wireless mouse adaptor into the USB input of your TV for easier and quicker navigation.
Some web pages include flash content. These are not supported by the browser.
Your TV does not support any download processes from the internet via the browser.
All sites on the internet might not be supported. According to the site; content problems may occur. In some circumstances video contents might not be able to be played.
HBBTV System
HbbTV (Hybrid Broadcast Broadband TV) is a new industry standard that seamlessly combines TV services delivered via broadcast with services delivered via broadband and also enables access to Internet only services for consumers using connected TVs and settop boxes. Services delivered through HbbTV include traditional broadcast TV channels, catch-up services, video-on-demand, electronic programme guide, interactive advertising, personalisation, voting, games, social networking and other multimedia applications.
HbbTV applications are available on channels where they are signalled by the broadcaster. The broadcaster marks one application as "autostart" and this one is started by the platform automatically. The autostart applications are generally launched with a small red button icon to notify the user that there is an HbbTV application on that channel. Press the red button to open the application page. After the page is displayed you can go back to the initial red button icon state by pressing the red button again. You can toggle between the red button icon mode and full UI mode of the application via pressing red button. It should be noted that the red button switching capability is provided by the application and some application may
behave differently (other colour buttons such as green, yellow, blue, may be defined for some other functions, e.g. shortcuts).
If you switch to another channel while an HbbTV application is active (either in red button icon mode or full UI mode), the following scenarios can occur.
The application can continue running.
- The application can be terminated.
- The application can be terminated and another autostart red button application can be launched.
HbbTV allows the applications to be retrieved both from broadband or broadcast. The broadcaster may enable both ways or one of them. If the platform does not have an operational broadband connection, the platform can still launch applications transmitted on broadcast.
The autopost red button applications generally provide links to other applications. An example of this is shown below. The user then can switch to other applications by using the links provided. The applications should provide a way to terminate themselves, usually Exit button is used for this.
HbbTV applications use keys on the remote control to interact with the user. When an HbbTV application is launched, the control of some keys are owned by the application. For example, numeric channel selection may not work on a teletext application where the numbers indicate teletext pages.
HbbTV requires AV streaming capability for the platform. There are numerous applications providing VOD (video on demand) and catch-up TV services. The user can use play, pause, stop, forward, and rewind keys on the remote control to interact with the AV content.
Note: You can enable or disable this feature from the More menu in Settings>System menu. Depending on the model of your TV and the selected country option in the First Time Installation this feature might be available in the Settings>System>Privacy Settings menu instead of the Settings>System>More menu.
Smart Center
Smart Center is a mobile application running on iOS and Android platforms. With your tablet or phone, you can easily stream your favourite live shows and programmes from your smart TV. Also; you can launch your applications, use your tablet as a remote control for your TV and share media files.
Note: Being able to use all functions of this application depends on the features of your TV.
Getting Started
To be able to use internet based features, your modem/ router must be connected to the internet.
IMPORTANT: Make sure the TV and mobile device are connected to the same network.
For media sharing feature Audio Video Sharing option should be enabled(if available). Press the Menu button on the remote, select Settings>System>More menu and press OK. Highlight Audio Video Sharing and change as Enabled. Your TV is ready to connect to your mobile device now.
Install the Smart Center application onto your mobile device.
Start the smart center application. If all connections are configured properly, you will see your TV's name on your mobile device. If your TV's name doesn't appear on the list, wait a while and tap on the Refresh widget. Select your TV from the list.
Mobile Device screen
On the main screen you can find tabs to access various features.
The application retrieves actual channel list from TV first when it starts.
MY CHANNELS: The programmes of first four channels from the channel list retrieved from the TV are shown. You can change the listed channels. Press on the channel thumbnail and hold. A list of channels will be displayed and you can choose your desired channel to be replaced.
TV: You can watch content through the TV tab. In this mode you can navigate through the channel list retrieved from your TV and click on thumbnails to view the detail pages.
RECORDINGS: You can view your active recordings(if available) and reminders through this tab. To delete any item, simply press on the delete icon found on each row.
- EPG(Electronic programme guide): You can view the broadcast schedules of selected channel lists through this tab. You can also navigate through channels by pressing on the selected channel on the EPG grid. Please note that updating / refreshing the EPG information may take a while depending on your network and web service quality.
Note: Internet connection is required for WEB based EPG informations.
SETTINS: Configure the application to your liking. You can change;
Auto-lock (Only in IOS): The screen of the device automatically turns off after a certain amount of time. Default is off, which means the screen will always stay on.
Auto-enable FollowMeTV: FollowMeTV function (if available) will start automatically when this setting is enabled. Default is disabled.
Auto-connection to TV: When enabled, your mobile device will automatically connect to last connected TV and skips the TV search screen.
Change TV (Only in IOS): Shows the currently connected TV. You can press on this setting to go to the "TV search" screen and change to a different TV.
Edit custom channel list: You can edit your custom channel list using this setting.
Choose channel list source: You can choose the channel list source to be used in the application. The options are "TV List" and "Custom List". Additionally you can activate "Remember my choice" option to set the selected channel list source as a constant choice. In this case if the selected source is available it will be used in the application.
Version No: Displays the current version of the application.
Detail Page
To open detail page tap on a programme. On the detail page screen you can get detailed information of the programmes you select. There are "Details", "Cast&Crew" and "Videos" tabs to find on this page.
DETAILS: This tab provides summary and information about the selected programme. Also there are links to facebook and twitter pages of the programme selected.
CAST&CREW: Shows all the people contributed to the current programme.
VIDEOS: Provides videos on Youtube related to the selected programme.
Note: For some functions an internet connection may be required.
FollowMe TV Feature (if available)
Tap on the FOLLOW ME TV widget located at the bottom left of the screen of your mobile device to change the layout for FollowMe TV feature.
Tap the play icon to start streaming of the content from the TV to your mobile device. Available if your device is in your routers operation range.
Mirror Mode
This mode of FollowMe TV feature is enabled by default and allows streaming the content from any other selected TV sources and Media Browser.
Notes:
Note that only digital(DVB-T/C/S) SD and HD channels are supported.
Multilanguage audio support and subtitle on/off features are not functional.
The streaming performance may change depending on the quality of your connection.
Media Share Page
To access the Media Share widget tap on the Uparrow on the bottom left side of the screen.
If the Media Share widget is pressed, a screen is displayed where you can select the media file type to share with your TV.
Note: Not all image file formats are supported. This function will not work if Audio Video Sharing feature is not supported.
Smart Remote Feature
You can use your mobile device as a remote control for your TV once it has connected to the TV. To use smart remote's full features tap on the Up-arrow on the bottom left side of the screen.
Voice Recognition
You can tap on the Microphone( ) widget and manage your application, giving voice commands such as "Volume Up/Down!", "Programme Up/Down!".
Note: This feature is only for android based devices available.
Keyboard Page
The keyboard page can be opened in two ways; by pressing the Keyboard( B) widget on the application screen or automatically by receiving a command from the TV.
Requirements
- Smart TV
- Network connection
- Mobile Device based on Android or iOS platform (Android OS 4.0 or higher; IOS 6 or higher version)
- Smart Center app.(to be found on online application stores based on Android and iOS platforms)
- Routermodem
- USB storage device in FAT32 format (required for USB Recording feature, if available)
Notes:
For Android devices, Normal(mdpi), Large(hdpi) and Extra Large(xhdpi) screen sizes are supported. Devices with 3^ or smaller screen sizes are not supported.
For iOS devices, all screen sizes are supported.
User interface of the Smart Center application is subject to change according to version installed on your device.
Alexa Ready Feature
Alexa is Amazon's cloud-based voice service available on many voice controlled assistant devices. Your TV is compatible with and ready to be utilized with Alexa devices. With this feature you can use your voice to control functions on your TV, such as turning on or off, changing channel or input source, controlling volume, and more.
Requirements
The following requirements should be fulfilled:
Alexa Ready Smart TV
- Amazon Alexa device
- A mobile device, such as your phone or tablet, with Smart Center and Amazon Alexa apps installed on it
Home network with WLAN capabilities
- Amazon account
How to control your TV with an Amazon Alexa Device
- Connect your TV and mobile device to the same network with internet access as your Alexa device.
- Pair the Smart Center app with your TV. Then tap on the Amazon logo on the main screen of the Smart Center app. You will be directed to a registration page. Follow the on-screen instructions to complete your TV's registration and linking process.
- You will be asked to determine a name for your TV, called 'Friendly Name'(FN). A 'Friendly Name' is a name that reminds you of your TV, such as 'Living Room TV', 'Kitchen TV', 'Dining Room TV', etc. Choose an easy-to-say name. You will say this name to tell Alexa which TV to control.
- Pair the Alexa app on your mobile device with the Alexa device, search for the skill of your TV by the brand name and enable it in the Alexa app. For more information, you can refer to the user manual of the Alexa device.
- Ask Alexa to discover your devices. Say, "discover my devices," or select Discover Devices in the related section of the Alexa app.
Once the discovery process is complete, you will be able to control your TV by voice.
Note:
Make sure that the devices are connected to the same network. But once these pairing and linking processes are completed the Alexa device and your TV will no longer have to be on the same network.
After you have performed First Time Installation on your TV, launch the Smart Center application and pair it with your TV again. Then tap on the Amazon logo on the main screen and check if you are logged in to your Amazon account, if not you might need to re-login and determine a Friendly Name again for your TV in order to be able to continue to control your TV with Alexa device.
Example Commands
Here are some of the commands that you'll be able give to your Alexa-enabled TV:
| Command Function | |
| Alexa, turn on 'FN' Powers on the TV | |
| Alexa, turn off 'FN' Powers off the TV | |
| Alexa, play 'FN' Starts media playback | |
| Alexa, pause 'FN' Pauses media playback | |
| Alexa, resume 'FN' Resumes media playback | |
| Alexa, stop 'FN' Stops media playback | |
| Alexa, fast forward on 'FN' | Advances media in fast forward mode |
| Alexa, rewind on 'FN' Rewinds media | |
| Command Function | |
| Alexa, set the volume of 'FN' to 50 | Sets the volume to the specified level |
| Alexa, turn the volume up on 'FN' | Increases volume by 10 units |
| Alexa, turn the volume down on 'FN' | Decreases volume by 10 units |
| Alexa, mute 'FN' Mutes sound | |
| Alexa, unmute 'FN' Unmutes | sound |
| Alexa, change the input to "input_name" on 'FN' | The TV switches to the input source with the spec-ified name (e.g., HDMI 1) |
| Alexa, change channel to "channel_number" on 'FN' | The TV switches to the channel with the specified number (e.g., channel 200) |
| Alexa, change channel to "channel_name" on 'FN' | The TV switches to the channel with the specified name |
| Alexa, channel up on 'FN' | The TV switches to the next higher channel, if any available |
| Alexa, channel down on 'FN' | The TV switches to the next lower channel, if any available |
| Alexa, next channel on 'FN' | The TV switches to the next channel on the channel list |
FN is the abbreviation for 'Friendly Name'.
DVB functionality information
This DVB receiver is only suitable for use in the country which it was designed to be used in.
Although this DVB receiver conforms to the latest DVB specifications at the time of manufacture, we cannot guarantee compatibility with future DVB transmissions due to changes that may be implemented in broadcast signals and technologies.
Some digital television functions may not be available in all countries.
We continually strive to improve our products; therefore, specifications may change without prior notice.
For advice on where to purchase accessories, please contact the store where you purchased your equipment.
Smart Remote-Function
Notification de licence. 9
Informations de la disposition 10
Télécommande 11
Télécommande 12
Connexions 13
Marche/Arrét. 14
Marche/Arrét. 14
Marche/Arrét. 14
Premiere installation 14
Servicios television al día integrados
ONACHOCT OT TOKOB YDAP HEOTBAPY

BHIMAHNE:3AДA HAMAJITE ONACHOCTTA OT TOKOB YIAP HE CBALJTE KANAKA (NIN IbP6A).
BbTPE HrMA YACTN, KONTO NOTPBENTJEIT DA CEPBN3INA. PNEIOCTABETE PEMOHTNPAHETO HA KBALINФUIUPAHNCEPBUN3EH INPCOHAI.
Pn loo BpeMe (6pyr, rpbMOTeBnC) nIbIgneepnoi 6e3 ION3BaHe (3AMnHaBaHe B NOyBka), N3KIOUcTe TeneBn3Opa OT 3axpaHbaHeTo.
UencenbT ha Ka6eNa ce N3noJ3Ba 3a N3KnOuBaHe Ha TeJeBn3Opa OT eNeKtpnueckata MpeXa H 3aTOBa ToI Tp8Ba Da e BnHarn rOden 3a yNoTppe6a. Ako TeJeBn3OpbT He e N3KlIOUeH OT eNeKtpnueckata MpeXa, ToB BCE OSe Ue KOHCymipa eNeKtpoEheprn BbB BCNUKN CNTyaUN, DOpN TeJeBn3OpbT Da e B peXm Ha rTOBHOCT NIN Da e N3KlIOUeH.
3a6eEka: Cnebaune uHcmpkyuume Ha ekpaHa, 3a da 3adeucmeame cbomeemhume yHKuu.
BAxHO - MoI npOyeTe BHNMaTeIHo Te3n HNCTpyKcII npeI Da IHCTaJInpaTe IIN N3NoJ3BaTe ypeIa
I PEPyPEXKDEHNE : ToBa e npEHa3HaueHo 3a ynotpe6a ot nua (BKnIOHTeJIHO deca), KOnTO ca cnocO6HN/IMat ONNTa da N3NOJ3BaT TaKbA yCTPOINCTBa 6e3 HaID3Op, OCBEN aKO He ca 6nN Ha6NIoDABAHN INN HcTpyKTnpAHN OTHOCHO yNOTpe6aTa Ha yCTPOINCTBOTo OT nue, OTROBOPHO 3a TAnHATA 6e3ONacHOCT.
- I3noJ3BaIte To3n TeJIeBUN3Op Ha BUCOUnHa HauMaJIko ot 2000 MeTpA NaH aMOPCKOTO paBHNue, Ha cyxN MeCTa n paioHc Cymepen HIN TpONuYeCKN KInMaT.
TepeH3OpbTe npedHa3HaueH 3a DOMAKINCKN noo6Ha o6ua ynotpe6a, Ho MOKe da ce n3noJ3Ba n Ha o6eCTBeHN MecTa.
3a Do6pa BeHTnlaucn, octaBeTe noHe 5 cm Cbo6oJHO npocTpaHCTBO OKOJO TeJeBn3opa. - BeHTnlaunra He 6nBa Da ce npeKbcBa qpe3 NoCTaBHe Ha npEdMeTn KaTo BeCTHnCn, NOKpNBKn, Jeka Me6eJ, nepTeA, KINIMN IN pOChE Bbpxy INI6bnokupaHe Ha BeHTnlaunOHnTe OTBOpN.
- Μεπεζβτ Ha 3axpaHbaζη Ka6eŋ Tpr6Ba da e nechodoctbneH. He noctabaŋte TeleBn3opa, Me6eŋ nn Dpyro Bbpxy 3axpaHbaζη Ka6eŋ. Nobpehen 3axpaHbaζ Ka6eŋ/μencel Moxe da npedn3Bnka noxap nn Da BN ydpn TOKOB ynap. Xbaaŋte 3axpaHbaζna Ka6eŋ 3a Μεncela, He n3KNUcbaŋte TeleBn3opa KaTO nbpnaTe 3axpaHbaζ Na6eŋ. Hnkora He DokocbaTc 3axpaHbaζ Na6eŋ/μencela C MOKpn Pbue, TbN KATO TOBA MOKe Da npeDn3BnKa Kbco CbeDnHeHne Hnn TokOB yap. Hnkora He npaBeTe Bb3eŋ Ha 3axpaHbaζ Na6eŋ H BePb3BaIte C Hero dpyr
Ka6eHn. Ako ca noBpeDeHn, CMeHeTe rH He3a6abHo, KoETo Tp8Ba Da ce N3BbPwN OT KBaIuΦnUpaH nepcoHaJ.
He n3naraTe TeNeBn3Opa Ha KaNk N npbckn OTeuHocTn He NoctabraTe PpeDMeTu, PbLnH CTeuHocTn, KATO HApnpimep Ba3N, YaSh, N T.H. Bbpxuynnn HAd TeNeBn3Opa (Ha npimep Ha paPTOBe HAd TeNeBn3Opa).
He n3naraTe TeneBn3Opa Ha npraKa CbHueBa CBETInHa Hn He NoCTaBnTe OTKpNTn PnAmbuc, KATO HanpImep 3anaJIeHN CBeU, Bbpxu rOpHata Yact Ha nn6n3o Do TeneBn3Opa.
He noctabrayte n3toyHnHa hToPnHa, KaTo HapnpMep eIeKtpnueckn neuKn, paAnatopn np. 6n3o do TeNeBn3opa.
He noctabray Te TeJeBn3opa Ha nOda nn BbpxHaKJIOHEH NOBbpXHOCTN.
3a Da H36eHete onachocTta OT 3adyuBaHe, DpbjTe HaJIOHOBNTe Top6nKn Ha MeCTa, TpydNOOCTbNn 3a 6e6eta, Deca N Domaunn KINBOTNI.
BHHMaTeJHnO npKpeNeTe cToKaTa KbM TeJeBu3Opa. Ako cToiKaTc Ce DoCTabr C 6oNTObe, 3aTeHHeTe 6oIIOBeTe 3dpaBO, 3a Da npEJaNa3nte TeJeBu3Opa OT naDaHe. He npE3aTgAraTe 6oJIIOBeTe MoHTnpaTe npaBnHOr rymEnTe nOJNOxKn.
He n3XbIpyTe 6aTeepnTe BOrbH nn 3aeDHO C onaChn H 3anaJIMM MaTepnAJI.
IPEyPExEHE - BaTeepnte He Tp6Ba Da ce n3laT Ha IpeKomepHa TOIIHa, KaTO CJIbHueBa CBETIIHa, OYH N DpyrN POno6Hn.
PPEyPExKDEHNE - PpeKomepHOTo 3ByKOBO HnIraHe OT Cnyuankte MOKe Da npuHn 3aIy6a Ha cnyxa.
ПРЕДИ BCNUCHО - HNKORA He NO3BOJRAJIte НаΗΝΚΟΡ, OCOБЕНО На Deца, ДаΗТИСКАТ ИΝΥДРТ ekран, Да NOCTABRT ПpeДмETи BДуNWITE, СЛOTOBETe ИΝ OTBOPHTe Ha KUTЯ.
| Вииманио н н н н н н н н н н н н н н н н н н н н н н н н н н н н н н н н н н н н н н н н н н н н н н н н н н н н н н н н н н н н н н н н н н н н н н н н н н н н н н н н н н н н н н н н н н н н н н н н н н н н\/ ОпасноCT OT TOKOB уэр . . \ . . . . . . . . . . . . . . . . . . . . . . . . . . . . . . . . . . . . . . . . . . . . . . . . . . . . . . . . . . . . . . . . . . . . . . . . . . . . . . . . . . . . . . . . . . . . . . . . . . . . ; . . . . . . . . . . . . . . . . . . . . . . . . . . . . . . . . . . . . . . . . . . . . . . . . . . . . . . . . . . . . . . . . . . . > . . . . . . . . . . . . . . . . . . . . . . . . . . . . . . . . . . . . . . . . . . . . . . . . . . . . . . . . . . . . . . . . . . . . . . . . . . . . . . . . . . . . . . . . . . . . . . . . . . . - . . . . . . . . . . . . . . . . . . . . . . . . . . . . . . . . . ... . . . . . . . . . . . . . . . . . . . . . . . . . . . . . . . . . . . . . . . . . . . . . . . . . . . . . . . . . . . . . . . . . . \/ |
MapknpoBKn Bbpxy npoodykTa
CJIeHNITc CIMBOJN CE I3NOJ3BaT Bbpxy npOdykTa KaTo MapKeP 3a ORpaHnueHn INpeDnA3Hn MepKn n Yka3aHn 3a 6e3oNaChocr. BcKO oBcHHeNe TpRbBa Da ce B3eMe INpeDnD cAmo TaM, KbDeTo Bbpxy npOdykTa NMa CbOTBeTHaT a MapKnipOBka. B3eMeTe Ta3N INΦopMaucn INpeDbN, OTCbO6paXeHn 3a CNpyhOCT.

06opydBaHe Knac II: To3n ypeI e npoeKtpaH NO TaKbB Haun, Ye da He n3NCKBa npedna3Ha
Bpb3Ka KbM 3a 6e30nacHOCT KbM eJNEKtpnueCKOTO 3a3EMBaHe.

Onachn n3BOOn 3a pa3ata: MapKnpaHnT(Te) n3BOd(n) e/ca onaceH(n) pa3a(n) npn HopMaHn ycNoBna Ha ekCnNoaTaun.

BHHMaHHe, BHXTe HnCTpyKunTe 3a ynoTpe6a: MapKnpaHata(nte) 30Ha(n) cbDbpxa(T) 6atepn C opmata Ha KOnue/
KneTka, KOnTO nOteBnteJIr MOKe Ia 3aMeHra.

Ja3epen npoodykT KnaC 1: To3n npoodykT cbDbpxka Ja3epen n3TouHnK Knac 1, KOHTO e 6e30anaceH npn HopmaJHH ycNoBnHa
ynoptpe6a.
PPEyPExEHHNE:
He rltaite 6aTeepnra, cBueCTbByBa onaCHOCT OT XmMuecko n3rapAne
To3n npoodykT, nIIN BKNIOyeHnte B O6ema Ha DoctabKaTa My akcecoapn, Morat Da cbdbpKaat 6aTepeHn Tn Ta6netka/6yToH. Ako 6aTepeHnTa 6bnde NorbLnHata, TOBa MoKe Da npedu3BnKa TeKKN BbTpewHn N3rapHnB pAMKnte Ha 2 Yaca N MoKe Da IOBeDe Do CmbpT.
Ia3eTe HOBNTe n ynoTpe6BaHnTe 6aTePn daJeue ot deua.
Ako otdeleHneTo 3a 6atepyTa He ce 3aTbapr do6pe, cnpeTe da n3non3BaTe npOdykTa I ro dpbKTe daJeue OT deua.
Ako MucnTe, Ye cTe nOBnHaJIb6aTePnnte nJIn CTe rN NOCTABUNI, KbDeTo I Da 6HIOB TAnOTo CN, NOTbpcTe He3a6abHbMO MeduunHcKa NOMOU.
Hnkora He noctabray Te TeJeBn3opa Ha HecTa6nHa Ochoba. TeJeBn3OpbT MoKe Da NaIHe N da npuHH cepno3HN HapaHraBaHna nn CmbpT. MHoro HapaHbAHNA,OC6eHO npN decaT, Morat Da 6bDat N36erHaTHC B3ImaHe Ha IpocTN ppeDnA3HN MePKN, KaTO Hanp.;
-ИзнолзванetoHaшkaфовилстоки e npenopbvyteJHOOTpon3BODNTeЯHa TeJeBu3opa.
- ⅠЗПОЛЗВаΙТе са мо MeбELN, KОТо 6e3ОпаСн Oмога
Да NOДьрЖаТ TeJEBиЗopa.
- YBepete ce, Ye TeNebu3OpbT He ce HaDbecBa HaD p6a Ha NOBbpxHOCTTa, Ha KOrTo e NoCTaBeH.
He nocTabraIte TeIeBn3Opa Bbpxy BnCOKn Me6JI (Ha np. 1kafoBe IINN 6n6nOTeKn), 6e3 da cTe 3axBaHJI IN HeIOdBnXHO camnte Me6JI IN CToiKaTa Ha TeIeBn3Opa.
He noctabrayte TeJeBn3opa Bbpxy IaT nnI pym MaTeepnaH, NoCTaBeHN MExdy TeJeBn3opa n Me6eJIte, KOINTO cnykaT 3a HerOba onopa.
Ja ce 6pa3OBaT Deuata 3a OnachocHTne OT KATEpeHe NO Me6eHnTE B ONIT Da DOCTNRHaT Do TeJIeBn3Opa NIN KOHTPOJHNTe My 6yToHn. Ako Cte
3ana3nIIN PneMeCTnI IN CTapNc TTeJIeBn3Op, HAcToRaIHTe HaNbTCTBnB BaxaT N 3a Hero.
Upei, KoITo e Cbbp3aH CbC 3aunTHOto 3a3emBaHe Ha crpaHaTa Hnctalaucn Ype3 Ka6eJHa Bpb3Ka IINI ppe3 dpyr Upei, MMaU 3aunTHO 3a3emBaHe , KaKTo N KbM TeJeBn3NoHn pa3npdeJna CnCTema, N3PON3BaAa KaOKcnaJeH Ka6eJ, MoKe B HnKoN cnyan Da cb3daDe onachocT OT noXkap. Cbbp3BaHeTO KbM CNCTema 3a TeJeBn3n CnEDOBaTeHNO Tp8Ba Da ce Ocnrgyn Upe3 yCTpoiCTBO, KOeTO OcnrgyraeNeKtpnuecka n3OJaun NoD onpeJenH YecToTeH Dnana3OH (ranBaHnueh n3OnaTop)
ИНСТРУКЦИ 3A MOHTИРАЕ HA CTEHA
- PpoyeTe HNCTpyKcHnTe, npeNi da MOHTnpaTe TeJIeBn3opa Ha cTeHaT.
KOMnneKbT 3a MoHTax Ha cTeHa He e 3aIbJXknteJeH. MoKeTe Da ro 3aKyunite OT MeCTHnA DnIbP, Tb' KaTo He e BkInOueH B O6ema Ha DoCTaBka Ha TeJIeBuN3opa.
He MoHTnpaIte TeJIeBn3Opa Ha TaBaHa IIN Ha HAKNoHHeHa CTeHa. - N3noJ3BaIte CneuaHnIte 6OJItoBe 3a MOHTaK Ha CTeHaTа, KaKTo I pyrInTe akcecoapn.
3aterheTe 3paBO 6oTobete 3a MOHTax Ha cTeHaTa, 3a Da npedna3nte TeJeBn3opa OT naDaHe. He npe3aTgAte 6oTobete.
CmHa Ha KaHaJIte N npOMHa Ha cnJaTa Ha 3Byka
MoxTe Da npomEnIte KaHaja N da HacTpOnTe CnIaTa Ha 3Byka KaTO n3NoJI3BaTe 6yToHITe Progarmpe +/- n Volume +/-Ha nCTaHcIOHHTO ynpabJeHHe.
Бутони за управлени на телевизopa & pa6ota

- Nocoka Harope
- Nocoka haJony
- Ⅲ6op Ha Cnna Ha 3Byka/UHΦOpMaζη/CnncbK C n3TOUHnζι έ npεBkIHOuBaTeI Pexm rOToBHOCT/ Bkn.
IpeBkIIOUbaTeJIaT 3a ynpabJIeHne Bn no3BOJRA ba ca ynpabJIaBaTe ΦyHKcIuTe Cnna Ha 3ByKa/Iporpama/ N3TOUHnK I BkIIOuBaHe Ha pexm Ha rOTOBHOCT/ BkIIoUBaHe Ha TeJIeBu3opa.
3a npomHa Ha cnIata Ha 3Byka: YBeJIuYeTe cnIata Ha 3Byka Upe3 HATnCKaHe Ha 6yToHa. HamaJeTe cnIata Ha 3Byka Upe3 HATnCKaHe Ha 6yToHa.
3a CmHa Ha KaHaHa: HATNCHe TcpeDaTa Ha 6yToHa, Ha ekpaHa ige Ce IIOBn INOpMaunOHHaTa JeHTa. IpeBbPTe 3anaMeTeHHe Upe3 HaTnCKaHe Ha 6yToHa Harope Nn HaOny.
3a da cmeHnTe n3TOHnka:HaTncHeTe cpeData Ha 6yToHa DBA NbTN (B pAMKInTe Ha eHa ceKyHda), CnncBkBT C n3TOUHNHTe Ie Ce IoRbN Ha ekpaHa.
IpeBbptete np3 HaJIuHnTe n3ToUHnCn Ype3 HATnCKaHe Ha 6yToHa Harope nn HaDoNy.
3a Da n3KIOUHTe TeneBn3Opa: HatncheTe CpeDaTa Ha 6yToHa n 3aIpbXTe 3a HAKoNk CeKHyDn, TeneBn3OpbT Ue npemHHe B pexmHa rTOBHOCT.
3a Da BKNIOHTe TENEBU3Opa:HaTnCHTe CpeDATA Ha 6yToHa, TeNEBUN3OpBT uce Ce BKNIOH.
3a6eJekku:
Ako u3KnIOUme meIeBuzOpa, mo3u uKbI ue 3anOHe omHoeo c Hacmpoukama 3a cunama Ha 38yka.
TnabHOMo MeHIO He MoKe da ce nokaKe Ha ekpaHa ype3 ynpaBnaBaua 6ymo.
Pa6ota c nctaHnOHnTo ynpabHeHne
HaTnCHete 6yToHa Menu ot DnCTaHcNoHHOTO ynpabJIeHne, 3a Da BnIte TnABHOTo MeHIO. N3noN3BaIte 6yToHTe 3a Nocoka n 6yToHa OK, 3a Da HABnIpaTe n Hactponte. HaTnCHete 6yToHnte BpbUaHe/Ha3aD nn MeHIO, 3a Da n3Je3eTe OT ekpaHa Ha MeHIO
N36op Ha BxOa
Cne KaTo BeHbX CTe CBbp3aJIN BbHnH CnCTeM KbM Baunr TeJeBn3Op, MoKeTe Da IpeBKnOuHTe KbMa pa3NUnHn BXoHN n3TOHNu. HATNCHeTe 6yToHa N3TOUHK Ha BaWeTo DnCTaHcNoHHO ynpabNeHne NocJeDoBaTeJHo 3a Da n36epete pa3NJuHnTe N3TOUHnU.
CmHa Ha KaHaI NTe I npOMHa Ha CnJaTa Ha 3Byka
Mokete da npomeHte kaHaJa n Da hAcTpoTe cInaTa Ha 3Byka KaTo N3NoJ3BaTe 6yToHtE Programme + / - n Volume + / - Ha DCtAHCIOHOHTO ynpabJeHne.
ByToH 3a ynpabIeHne Ha TeIeBu3opa & pa6oTa
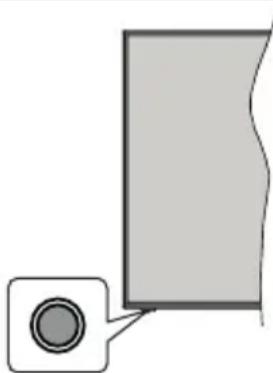
3a6eIekka: Io3uqma Ha 6ymohme Ha ducmaHooHmo ynpa6IeHue moke da ce pa3JIu4a8a e 3a6ucumocm om modena.
Baunr TeIeBn3Op mHa eHnueh KOHTpOen 6yToH. ByOnbT Bn no3BOJRA ba ca ynpabJIaBAte yHKUNITE BkIIOVAHe Ha pexm Ha rTOBHOCT/ N3TOUHNK / Pporpama n Cnna Ha 3Byka Ha TeIeBn3opa.
Pa60Ta c KOHTpOHHte 6yToHN
- Hatnche 6yToHa 3a ynpabIeHne, 3a da ce nokaxe MeHIOTO C ONUIN 3a cyHKUIN.
CneTOBaHaTnCHTe NocJeIOBaTeHNO 6yToHa,3a Da npemecntte fokyca Ha XeJHaHaTa OIcN, aKo e Heo6xoDIMO.
- HatncheTe n 3aDpbjXte 6yToHa 3a OKoJIO 2 cekyHn, 3a da aKTHBnpuATE n3bpaHata onu. LBeTbT Ha IKOHATA Ha ONUraTa ce npomeH, KORAto e aKTHBnpuHa.
- Hatnchete 6yToHa OSe BeDhBx, 3a Da n3NoJ3BaTe cyHKUraTa nn BJe3Te B NOdMeHIOTO.
3a da n36peTe dpyra onu 3a cyHKnna, npbBo Tp8Ba da deakTNBupate NocJeHaTa AKTUBpana onu. HATncHeTe n 3aDpbXkTe 6yToHa, 3a da ro deakTNBupate. LBeTbT Ha IKoHaTa Ha onu Ta ce npomeH, KOraTo e deakTNBupan 6yToHbT.
3a da 3aTBOPnTe MeHIOTo C cyHKUHOHaHN OuNN, He HATnCKaTe 6yTOHa 3a OKoJIo 5 cekHyDN. MeHIOTo C cyHKUHOHaHN OuNN Ie N3Ye3He.
3a Da n3KJIOUHTe TeJeBn3Opa:HaTNCHeTe KOHTPOHn86yToH,3a Da ce NOKaKe MeHIOTo C ONuHN 3a FyHKuHN, FOKycbT 9ue 6bDe B PExm Ha RotOBHOCT. HATNCHEt n 3aDpbXkTe 6yTOHa 3a OKoNo 2 cekyni, 3a Da aKTUBnPate Ta3n OOnuN. UBeTbT Ha NKOHATA Ha ONuYTA ce npOMeH, KOrato e aKTHBnPaHa.CneI TOBa HA TNCHEt 6yTOHa OSe BeDHbK, 3a Da n3KJIIOHTe TeNEBn3Opa.
3a Da BkIouHte TeIeBuN3opa:HaTnchTe KOHTpOJIHHa ByTOH,TeJIeBuN3OpbT Iue Ce BkIIOUH.
3a npomraHa cnilata Ha 3Byka: Hatnchete KOHTPOHnHa 6yToH, 3a Da ce nokaxe MeHIOTo C cyHKUHOHaHN OnuN, N CneI TOBa HATnCHete 6yTOHa NOcJeOBAteJHo, 3a Da Ipemecnte fOKyca Ha ONu HA 3Byka + nnCnHa 3Byka -. HATnCHete N 3adpbxTe 6yToHa 3a OKoNo 2 cekyni, 3a da AKTNBnPaTe n3bpaHata OOnu. LBeTbHa NKoHata Ha ONuRA Ta Ce npOMeH, KOraTo e aKTNBnPaHa. CneI TOBa HATnCHete 6yToHa, 3a Da yBeJInuHte NN HAmAJNTe Cnilata Ha 3Byka.
3a cMaHa Ha KaHana: HatncheTe KOHTPOJHn86yToH, 3a da ce nokaxe MeHOTc ONuIN 3a cyHKun IN CneI TOBa HATNCHETe 6yToHa NocJeIOBaTeJIHO, 3a da npemecnte fokyca B OOnyraT Ta Iporpama + INI Iporpama-. HatncheTe n 3aApbXte 6yToHa 3a OKoJIO 2 cekyn, 3a da AKTNBpuate N36paHaTa ONU. UBeTbT Ha IKOHATA Ha ONuYta Ce npomeH, KOrato e aKTHBpuHa. CneI TOBa HATNCHETe 6yToHa, 3a da npEBKnIOChTE KbM CNeDBAuINr INI npEduHnRA KaHaJI B CNICbKa C KaHaJI.
3a da cmeHnte n3ToCHnka:HaTnCHTe 6yToHa 3a ynpabHeHne, 3a da ce NOKaKe MeHIO TO COnuN 3a FOHKU, CNEI KOEtO HaTnCHTe NocJeDObaTeJHO 6yToHa, 3a da npemecHTe FOKyCa KbM OOnuTa N3ToOHK. HATnCHTe N 3aDpbXkTe 6yToHa 3a OKoNo 2 cekHydn, 3a da aKTbBnPaTe Ta3n OOnu. LBeTbT Ha IKoHaTa Ha ONuTa ce npomeH, KOrato e aKtNBupHa. CNeI ToBa HATnCHTe 6yToHa oSe
BEdhbx,3a Da n3BeTe CnncbKa C n3TOUHnCn.
PpeBbptete npe3 HaNCHnTe n3TOUHnCn ype3
HaTnCKaHe Ha 6yToHa.TeneBn3OpbT ABTomAtuHNo Ie
PpeBKnOuHn Ha MapKnpaHn n3TOUHk.
3a6eIeKka: IaHOMo MeHIO OSD He MoKe da ce nokaKe Ha ekpaHa Ype3 KOHmpOnnua 6ymoH.
Pa6oTa c nctaHnOHnTo ynpabnHeH
HaTnCHete 6yToHa Menu ot DnCTaHcNoHHTO ynpabIeHne, 3a Da BnIte rNaBHOTo MeHIO. N3noJ3BaIte 6yToHtE 3a Nocoka n 6yToHa OK, 3a da HABnIpaTe n HacTponte. HaTnCHete 6yToHtE BpbUaHe/Ha3aNm MeHIO, 3a Da n3JIe3eTe OT ekpaHa Ha MeHOTO
U36op Ha BxoI
CJIeI KaTO BeHbX CTe Cbbp3aJIN BbHnH CNCTEmN KbM Baunr TeJeBn3Op, MoKeTe Da npEeKlIOuHTe KbM pa3NIuHN BXoHN N3ToOHn. HATNCHeTe 6yToHa N3ToUHK Ha BaWeTo DnCTaHcUNHO ynpAbeHne NocJeDoBaTeHNO 3a Da N36epTe pa3NIuHnTe N3ToOHn.
CmHa Ha KaHaNITe N npOMHa Ha cnJaTa Ha 3Byka
Moxete da npomeHnte kaHajn Da hactponte cnnaTa Ha 3Byka KaTO n3noN3BaTe 6yToHnte nporpama +/- n Cnna Ha 3Byka +/- Ha nCTaHcNOHOTO ynpabJIeHne.
I3NoJ3BaHe Ha rJaBHOTo MeHIO Ha TeJIeBn3opa
Ako 6yToHbT MeHoe haTnCHaT, TnaBHOTo MeHIO Ha TeIeBn3Opa ige ce nOBn B ha ekpaHa. MoKeTe Da HABnHPaTe npE3 eIeMeHTnte Ha MeHIOTo, KaTO n3NoJ3BaTe 6yToHtte 3a HAcOuBaHe Ha yCTpoNCTBOTo 3a DnCTaHcUHO ynpabJeHne. 3a Da n36epete N03uYn 3a Da BVnTe ONuNTe Ha NOdMeHIO To HA MapKnPaHOTo MeHIO HATNCHEte 6yToHa OK. Korato MapKnPate ONuYra 3a MeHIO, HAKON OT eIeMeHTnte Ha NoDMeHIO TO TOBa MeHIO MOKe Da ce NOKa3BaT B rOpHaTa Yact Ha JeHTaTc MHeHOTA 3a 6bp3 DoCTbn. 3a Da n3NoJ3BaTe N03uYra 3a 6bp3 DoCTbn, Map KnpaIte Y, HATNCHEte OK n HAcTPONe Cnopei PpeDnOHTAHnRA Ta Bn c 6yToHtte HaJIBO/HaJaCHO. Cnei KaTo npNKluOHTe, HATNCHeTe OK nnn Ha3a/ BpbuaHe, 3a Da n3Je3eTe.
HaTnCHHeTe 6yToHa N3xOa, 3a Da 3aTBOpnte n 13ne3eTe.
1. Home (Hauano)
Korato rnaBHOTo MeHIO e OTBopeHO,JeHTaTaHa MeHIO Hauano,ue ce MapKnpa.CbIbpXaHneTo Ha MeHIO Hauano MoKe Da ce nepcoHaun3npa Ype3 do6abAne Ha onuN ot npytn MeHOTa. IpocTo MapKnpaTe Ouunn HaTNCHe Te 6yTOHa 3a NocOka HADOny Ha yCTPOINCTBOTo 3a DnCTaHcNOHNO ynpaBJIeHne.AKO BnNTe ONUraT A Do6ABnHe KbM HauAnoto,MOxETe Da JDo6aBnte B MeHIO Home. IOp CbUnr T NaH MoxTe Da n3TpNBate NN CMeHrTe No3uNtA a BCRA K03uN B MeHIO Home.HatNCHeTe 6yToHa
HaOny u n36peTe onuTa H3tpnBaHe uN Dpyu N HaTusheTe OK. 3a da npemecntte enemeHOT MeHTo, u3noJ3BaIte 6byToHtE HaJrCHO uN HaJraBO, 3a da u36peTe no3uYra, KbM KOrTO uCKaTe enemeHTbT da ce npuDvXu, u HaTusheTe OK.
2. IV
2.1. Tbpcene
MoKeTe Da Tbpcnte KaHaJI, nporpaMn, ycIyIu IIN HaCTpOienK, kaTo n3NoJ3BaTe Ta3n OIcIIa. HATncHete OK n BbBeDeTe KIOUOBA dyma Upe3 BnPTyaJHata KnaBnAtypa.CneToba MapknpaTe OK n HAtncHete OK, 3a da 3anoHeTe TbpceHeTo. Ha ekpaHa ige ce NOKaxat "Pe3yIITaT". N36epTe JxenaHnpe3yIITat c NOMoUta Ha 6byToHnTe Cbc CTpeJKN HaTncHete OK, 3a da ce OTbOpN.
2.2.PbKOBOCTBO
C nOmoUta Ha Ta3n OOnu MoKeTe Da nOlyuHTe DOCTbI Do MEHIOTo 3a eJNeKTPoHHN CnpaBOuHN Ka nporpaMITE. 3a DonbJIHNTeHHa HOpMaun BuxTe pa3dEn EJeKTPoHEn nporpaMeH cnpaBOuHk (ENC).
2.3. KaHaJIu
C nomouTa Ha Ta3n OOnu NMaTe DoCTbN Do MeHOp KaHa. 3a DOnbLnHtEnHa HhOpMaua BnKTe pa3dEi N3non3BaHe Ha CnncbKa C KaHa.
2.4. Taɪmepn
Moxete da 3adaTe TaMepn 3a 6bdeu Cb6ntna KaTO n3NOJ3BaTe OIcHnte B TOBa MeHIO. Moxete cBIO Taka Da IpeJIeDaTe Cb3daJeHnte IO-paHO TaIMepn B TOBa MeHIO.
3a da do6abnte HOB TaMep, n36epete pa3den Do6abAHe Ha TaMep c NOMOuTa Ha 6yToHa HAJIABo/HaIACHO HATNCHE Te 6yTOHa OK. HAcTpoTe XeJAHnTE OT Bac ONUIne Ha IOmEHOTOn CNeD TOBa HATNCHE To OK. Uc ce cb3daJe HOB TaMep.
3a da pepaTnape TpeuHcB3daen TaMep, MapkpauTe ro, n36epTe pa3deN PeaKTPaHe Ha n36paan TaMep u HATNCHEt OK. PpomeheTo ONUInTE Ha NODMeHOTOCnopeD npednoHTaHnraTa Bn HATNCHEt OK, 3a da 3anametnte BaunTe HacTPOkN.
3a da OTMeHnTe Beue 3aJaDeH TaIMep, MapKnpaITe ro, n36peTe pa3deNa N3TpNBaHe Ha n36paH TaIMep HnHaTnCHete OK. Ie ce nOraBn ekpan ce nOraBBA cbo6uEHe 3a notBbpxJdEHe. MapKnpaTe DA n HaTnCHete OK, 3a da npoDbJxNte. TaIMepbT ue ce OTMeHn.
He e Bb3MOxHO da 3aJaTe TaMepn 3a DBe nIIN NOBuee Cb6uTna, KOInTo Ie ce N3JIbUbaT no pa3NUnH KAnH IN CbIu INHTepBaN OT BpeMe. B TO3N cnyaJ ue 6bDeTe NOMoJeHn Da N36epeTe eINH OT Te3N TaIMepn IN Da OTMeHnte Dpyrnte. MapKnpaTe TaMepa, KOInTO NCKaTe Da OTMeHnte IN HAtNCheTe OK, MeHIO OnuN Ie ce NOBu. CneT ToBA MAPKpaTe 3aDaBaHe/OTMaHaN HATNCHETe OK, 3a Da OTMeHnte
TO3n TaHMeP. CneT OBa ige Tp86Ba Da 3ana3nte npomeHnte. 3a da HappaBnTe TOBa, HaTnCHete OK, MapKnpaIte 3anameTBAHe Ha npomeHnte n HAtncHEte OTHOBO OK.
2.5.3annctte
Moxete Da ynpablaBaTe 3aNcHte, KaTo n3No3BaTe OuNTe B TOBa MeHIO. MoXete Da Bb3npon3BExJdATE, peDaKTnPate, N3TpNBate NN copTnPate BeYe 3aNcaHn Cb6ntHa. MapKpaTe pa3deHa, KaTo n3No3BaTe 6yToHa HAnBo/HaJaCHo N HaTncHe OK, 3a Da BVnITE HaJIuHnTE OOniN. 3a DoIbJIHnTeJIHa INΦopMaζη BnKTe pa3deJL USB 3aNc.
3. Hactpoyn
Mokete Da ynpablaBaTe HAcTpoKnte Ha Baunr TeNeBn3Op, KaTo N3NoJ3BaTe ONuNTe B TOBa MeHIO. 3a DonbJnHTeJHa INΦopMaucn BnKTe pa3dEe Cb - DbpxaHHe Ha MeHOTo 3a HAcTpoKn.
4. Пиюженья
Korato Baunr Te neBn3Op e CbP3aH c nHTepHeT, CbP3aHOTc Hero CbDbPkaHne CbUo ige 6bDe HaNHyO, BKNIOHTeJHO CbDbPkaHneTO, CbBp3aHO C PnpNoXeHnTa. N3NOJ3BaIK MeHIO PnpNoXeHnBAe IMate DoCTbn DO n MOKeTe Da ynpaxHraBATE BaunTe npNoXeHnA. MoKeTe Da do6abNTe HOBn npNoXeHnOT Mara3nHa IIN Da rN n3TpneTe. 3a DOnbJIHNTeJHa INΦopMaucn BNXTe pa3dJI PnpNoXeHnA.
5.ИЗTOUHNU
Moxete Da ynpabnBaTe npednoHTaHraTa Ha BXoHNTE n3TOUHNu, KaTo n3NoJ3BaTe ONuNTe B TOBA MeHIO. 3a Da cMeHnte TEkyuNn H3TOUHNK, MapKnpaTe HkOa OT ONuNTe N HAtncHeTc OK.
5.1.HaTpoKnHa n3ToUHnKa
PepaHpe nmeHata, aKTHBpaTe nIeakTbpaTe n36paHnte onu 3a n3TOHnKa. CbueCTbByBat n onu PeoBeH, YcJIeH nn DeakTbpaH 3a HDMl n3TOHnCtte. Ounnte PeoBEN uCIne BnnaT Ha hAcToPiKaTa Ha cBeta Ha n36paHnHDMl n3TOHnK.
MokTe Da HynpaTe WaunTe nepcoHaun3npaHn HacTpoKn B MeHTo Home n Apps, 3a Da n3noJ3BaTe HacTpoKnTe no NoDpa36npaHe, n3noJ3BaKn OUnraTa Reset Menu B MeHTo Settings (HaNHyocCTTa 3aBncn OT MOneJa Ha TeJeBn3Opa n HeROBnTe fYHKuH).MapKpaTe Ta3n OnuH n HatNCheTe OK. Ue ce noRbEkpan Ce noRbBA cbo6ueHne 3a NotBbPckDeHne. MapKpaTe DA n HaTncHeTe OK, 3a Da npoJbnKeTe.ObbPheTe BHImaHne, Ye hMa Da MoXeTe Da N3BbPunTe Ta3n ONepaunr OTHOB B paMKte Ha CneDbAunTe 2 MNHyTu.
NoctabYHe Ha 6aTePmB DnCTaHcNHOHHoTo ynpaBLeHne
CbaIe 3aHnKa nak, 3a Da IMaTe DoCTb n OToDeHeHneTo 3a 6aTePnnte. NocTabeTe DBe 6aTe pnn c pa3Mep AAA.YBepTe ce, ye 3HaunTe (+) n (-) CbBnaat (cna3e TnpBnHnno JopnTet). He H3No3BaIte eHOBpeMeHHO CTapn HOBn 6aTePNN. 3aMeHnIte camo Cbc CbUIN nn EKBnBaJIeHTeH TnI. NocTabeTe o6paTHo Kanaka.
Ha ekpaHa ige ce nOBn Cbo6eHne, KOrato 6aTeepnnte ca n3ToUeHN u Tp8Ba da 6bDaT cMeHeH. IMaIte npedBnD, ye KOrato 6aTeepnnte ca n3ToUeHN, pa6oTata Ha dNCTaHcNOHHTO ynpabJeHne MoKe da ce HapuH.
BaTePnIe He Tp6Ba Da ce n3JaRaT Ha npeKoMePHa ToJIInHa, KaTo CJIbHueBa CBetJIInHa, OrBn I npyRn POnO6Hn.
Cbbp3BaHe KbMe eJKeTpNueckaTa MpeXa
BAXHO TeNeBn3OpbTe npoeKtnpaH da pa60Tu npu HnpeKeHne 220-240V AC c yecToTa, 50 Hz. Cnej KaTO n3BaJnte TeNeBn3Opa OT onakOBkata, octaBeTe ro Da DocTnHe CTaHa TempePaTypa, npeni Da ro BKIOHTe KbM eNEKtpueeCKaTa MPexa. BKnIOUeTe UenCeNa Ha 3axpaHbAunKa6eB KONTAKTa.
AHTeHeH BXoJ
BknIoueTe KynnyHra "aHTeHa" nIi "Ka6eJHa TeNeBn3nA B KOHTaKTA AHTEHEH BXOD (ANT), pa3noJoxHe Ha TbP6a Ha TeNeBn3opa.
Tpb6HaTeeneBn3opa


AkoXeNaete Da CbBpKTe YeCTPOINCTBO KbM TeNeBu3Opa, YBepeTe Ce, Ye N To N TeNeBu3Opa Ca N3KnIOUeHN PpeN Da OcbIeCTBnTE KaKBaTO N da BnIO Bp3Ka. CneI npNKIOuHbHe Ha CbBp3BaHTo, Da BKNIOUte YeCTPOINCTBaTa N da rN 3NO3BaTe.
AHTeHeH BXoD
CbbpxTe KynnyHra Ha aHaIorOBaTa aHTeHa nn KynnyHra Ha Ka6eJHaTa TeJeBn3nKbM AHTEHHN BXOD (ANT) nn catenTHn KynnyHr KbM CATEINTHN BXOD (ANT SAT) Ha rbp6a Ha TeneBn3opa.
Pb6HaTeNeBn3opa

- CateJnt
- AHTeHa nn Ka6en

AkoXeNaTe Da CbBpKTe YeCTPOINCTBO KbM TeNebu3Opa, YBepeTe Ce, Ye NTo N TeNebu3Opa Ca H3KNIOUeHN IpEa Da OcBJeCTBnTE KaKBaTO N Da BnIO Bpb3Ka. CNeI npNKJIOUHbHe Ha CbBp3BaHETo, E Da BKIOUHTe YECTPOINCTBaTa N Da IN 13NOIN3BaTe.
Iицeh3Ho cnopa3ymeHne
TepMNHTe ,HDMI" u INTEppeic 3a MyJTImeDnA c Bucoka pa3deneHtHa cnoc6hocT ,HDMI" (HDMI - High-Definition Multimedia Interface), kaKTo n Noroto HDMI ca 3ana3eHn MapKn Ha HDMI Licensing Administrator, "Inc." B CbeDuHeHtE 7atn i dpyrN nbpXabN.

Ipon3BeDen no InueH3 Ha Dolby Laboratories. Dolby, Dolby AydnO, Dolby Vision n DboHnT cIMBOJ D ca 3ana3eHa TbproBcKa Mapka Ha Dolby Laboratories. NobepTeHNn Heny6nkyBaHn npo3BeDenra. Copyright ©1992-2019 Dolby Laboratories. BcnKn npaba 3ana3eHn.
YouTubeил罗ToHa the YouTube ca 3ana3eHa Mapka Ha Google Inc.
3a DTS nateHTuTe BnKTe http://patents.dts.com. Ipon3BeDen noJIueH3a Ha DTS Licensing Limited. DTS, CmBOnbT, & DTS u CmBoNbT 3aeDNo ca perncTpnpaHn TbproBckn MapKn, a DTS TruSurrounde TbproBcKa Mapka Ha DTS, Inc. 念 DTS, Inc. BcnKn npaba 3ana3eHn.

dts TruSurround
3a DTS nateHTte BuxTe http://patents.dts.com. Ipon3BeDen noi neH3a Ha DTS Licensing Limited. DTS, DTS-HD, cmbolbT, & DTS nn DTS-HD, 3aeDn CbC cmbolbT, ca 3ana3eHa TbpROBcKa Mapka Ha DTS, Inc. DTS, Inc. BcnKn npaba 3ana3eHn.

dtshD
Думanta, Маркata и noroto Bluetooth® capernstpupaHи Tbprobckn Марkn, пntexabAHn ot Bluetooth SIG, Inc. И BCЯka Taxha ynotpe6a noIeKn Ha IuIeH3npaHne ot Vestel Elektronik Sanayi ve Ticaret A.S. Дpyги Tbprobckn Марkn I Tbprobckn HAnMeHOBaHnca Te3n Ha CbOTBeHTHe mco6CTBeHnci.
To3n npoDyKT cbDbpJka TexHOnIOrJna, 06eKT Ha onpeDeJIeHN npaba Ha nHTeJIeKTuAnHaTc co6CTBeHocT ha Microsoft. N3noJ3BaHeTO nn pa3npocTpahEnHeTo Ha ta3N TexHOJOrJn 3BbH To3n npOdyKT e 3a6paHeHa 6e3 cBoTBetTHra(Te) nIueH3(n) ot Microsoft.
CobCTBENIHTe Ha cBDbpXaHne n3noJ3BaT Microsoft PlayReadyTM TexHOJrTa 3a DoCTbN DO cbDbPxAHne, 3a Da 3aunTt HInTeNeKTyAINHaTa CN Co6CTBeHocCT BKNUChTeJHO CbDbPxAHne 3a ABTOPCKOTo npABO. Toba ycToiCTBO n3noJ3Ba PlayReady texHOJorN3a DoCTbN Do PlayReady-3aUnTeHO cbDbPxAHne u/nn WMDRM-3aUnTeHO cbDbPxAHne. Ako ycToiCTBOTO He ycnee Da npnIOxN npabUNHO orpaHnueHnra Ta Bbpyu n3noJ3BaHeTo Ha cbDbPxAHne, Co6CTBENIHTe Ha cbDbPxAHne To Morat Da n3nckat OT Microsoft Da npemaxHe Bb3MOxHOCCTTa Ha ycToiCTBOTO Da n3noJ3Ba PlayReady-3aUnTeHO cbDbPxAHne. OTMnHata He Tp6Ba Da 3acra He3aUnTeHO cbDbPxAHne Nn CBDbPxAHne, 3aUnTeHO ot Dpyrtn TexHOJrMn 3a DoCTbN Do cbDbPxAHne. Co6CTBENIHTe Ha cbDbPxAHne Morat Da n3nCKBat OT Bac Da aKTyaJIIN3npate PlayReady 3a DoCTbN Do T8XHOTo cbDbPxAHne. Ako OTkajete Da HnPaBnTE aKTyaJIIN3aUINrTa, HmMa Da nOnyUte DoCTbN Do cbDbPxAHne, KOEtO n3nCKBa aKTyaJIIN3aujraTa.
Joroto "CI Plus" e TbproBcka Mapka Ha CI Plus LLP.
To3n npOdyKT e 3aunTeH OT onpeJeHn npaba Ha nHTeJIekTyajHa co6CTBeHocT Ha Microsoft Corporation. N3non3BaHeTo nn pa3npocTpaheneHneTo Ha TaKInBa TexHOJIoRmN IN3BbH TO3N npOdyKT e 3a6paHEno 6e3 IuIeH3 OT Microsoft nn Otopn3napH ot Microsoft DbIeepHo dpyKeCTBO.
HOpMaun3aN3XBpJnHe
[Ebponeeckncbio3]
Te3n CmB0nn yKa3BaT, Ye eNeKtpnueckoto n eNeKtpoHHOT O6OpyDbaHe, KaKTo N 6aTePnra, He Tp86Ba Da Ce n3XbBpNt C 6nTOBnTe OTnAbuCneI npNKIOUcbAHe Ha EKCnNoaTaunOHnMn XHBOT. PpOdyKTnte Tp86Ba Da ce n3XbBpNt B CneuNaIN3npaHnTe Cb6nPaTeJHn NyHKTOBe 3a peuKnnpaHe Ha eNeKtpnuecko N eNeKtpoHHO 6OpyDbaHe, N 6aTePnN CbInaCHO MeCTHO 3aKoHOdaTeJIcTBO n DInpeKTHBn 2012/19/EC n 2013/56/EC.
Kato n3xBpIte npabnHTo Te3n npodykTn, Bue ige nomorHeTe 3a 3ana3BaHe Ha npipodaTa n ige npedOTbpaTne Bb3MOxHN OTPuataLEHn Bnna Hn Bbpxy OKoHaTa CpeDa N OOBeWKOTO 3dpaBe, KOnTO 6nxA Bb3NkHaPi np He npabnHTo n3XBpIraHe Ha Te3n npodykTn.
3a noBuepe noDpo6Ha HOpMaun OTHOCHO NyHKTOBeTe 3a Cb6npaHe n peuKnnpaHe Ha Te3n npOyKTn, MoJra CBpKeTe Ce C MeCTHnOΦnc BvB BaunrpaD, cnXk6nte 3a NxVBpPnaHe Ha 6OKnyK, nn Mara3nHa, OTkDeTo Toe 3akynen.
Morat Da Bu 6bDat HanoXeHrno6n 3a He npabuHIO u3XBpPnHE B 3aBNCMOCT OT MecTHOTO 3aKHOdaTeJIcTBO.
[Bn3Hec noTppe6nteI]
Ako nckate da n3xBbPJIte To3n npOdyKT, MoJ, CBbpxTe ce c Baunr DOCTaBvNK n npOBepTe o6uNTe ycNoBna Ha dorOBopa 3a NOKyNko-npOdaX6a.
[Дугн Дьржави n3BbH Ebponeecknca bIO3]
Te3n CmB0JInca BaJIiDHNcMo 3a Ebponeeckna CbIO3.
CbpxTe ce c MeCTHnTe Bnactn, 3a da HayuTe NOBuee 3a HaunHnte Ha n3XbPJIHe n peunKInpaHe.
IpoodykTbT n ONaKOBkata Tp8Ba Da ce 3aHecat B MeCTHnA ZeHTbp 3a Cb6nPaHe Ha OTnaDbu 3a peunKnipaHe.
HЯковункове пиемат подунтente 6e3пано.
3a6eIekka: 3HaKbM Pb noD cumoJana 3a bamepuume noka38a, ye ma3u 6amepura cbbpka onofo.
![HITACHI 32HBL7310 - [Дугн Дьржави n3BbH Ebponeecknca bIO3] - 1](/content/2026/04/616944/images/dc343ce1fda55c1ef490632deb2fd325ff892796445f11f30e3cc3a18b75313c.jpg)
- PpoDyKTN
4.Батугия
Cneunkaun Ha 6e3knHn LAN TpaHmTep
| Чебтнс сөktыр | Мак.изховая мошноct |
| 2400 - 2483,5 MHz (CH1-CH13) < | 100 mW |
| 5150 - 5250 MHz (CH36 - CH48) < | 200 mW |
| 5250 - 5350 MHz (CH52 - CH64) < | 200 mW |
| 5470 - 5725 MHz (CH100 - CH140) | < 200 mW |
IbpxKaBn orpaHnueHna
ToBa yCtpoiCTBO e npEHa3HaueHo 3a DoMaUHa n OΦnC yNOrpe6a BbB BCnKu DbpxkABn OT EC (uBdpyn DpbxkABn B pe3yIITaH cBoTBHeTata DnpeKTnBa Ha EC) 6e3 HnKaBO orpaHnueHne, C N3KJIoueHne Ha DbpxkABnte, NocOeHn No-DoNy.
3aHc c H3MeCTBaHe Ha BpeMeTo
HaTnchete 6yToHa "Nay3a", DOKaTo rNeJaTe npedabaHe, 3a Da aKTHBnpaTe pexIM "I3MeCTBaHe Ha BpeMeTo". B pexIM Ha I3MeCTBaHe Ha BpeMeTo
nporpamatae cnpraHa, KaTo eHOBpeMeHHo C TOBa ce 3aINcBa Ha cBbP3aHnA USB nck.
HaTnCHete OTHOBO 6yToHa "Bb3npOn3BexJaHe", 3a Da cTapTnpaTe CnpraHata nporpama OTam, OTKbDeTo e 6nla CnpraHa. HATnCHete 6yToHa "Cton", 3a Da CnpTe 3aIInca C n3MeCTBaHe Ha BpeMeTo n da Ce BbPHeTe KbM PpeDaBaHeTO Ha XINBO.
I3MeCTBaHe Ha BpeMeTo He MoKe Da ce I3NoJ3Ba, DOKaTO CTe B peKIM "PaJIO".
Moxete da n3noJ3Bate yHKnIyta "BbP3o H3MeCTBaHe Ha BpeMeTo" CJIeD Bb3CTaHOBraHa Ha onuTAt "HopMaJHOb Bb3npOu3BExJaHe nn Bb3npOu3BExJaHe 6bp30 Hanpei".
Tekyu3annc
HaTnCHete 6yToHa 3aAnnc 3a da cTapTnpate 3aAnncBaHeto Ha cb6ntne BeDHar,doKaTo rIeJaTe nporpama.HaTnCHete 6yToHa"Stop",3a Da OTMeHnTe 3aAnca.
No BpeMe Ha pexim 3aHc He MoKeTe da npBkIIOuBaTe nporpaMITE. No BpeMe Ha 3aHc Ha nporpama nn npn n3MeCTBaHe Ha BpeMeTo Ha ekpaHa ue ce noBn npdUnpeDInTEHNO cbo6ueHne, aKO ckopocTtHa USB yctpoiCTBOTo e He3aDoBOJNTeHnA.
Bb3npoH3BexJaHe Ha 3aHcAnn nporpaMn
I36epete 3aunnc OT MeHIO ToTeeBn3Op. I36epete 3aunc OT cncbka (ako npedn TOBa e 3ancaH). HATNCHEte 6yToHa OK, 3a da Bnnte MeHIO OnuN. I36epete OUnn i CneT TOBa HATNCHEte 6yToHa OK.
3a6eIeKka:No 6peMe Ha 8b3npou3BExdHema He MoKe da bukdaame 2naBHomO MeHIO u no3uUume om MeHOMO.
HaTnchete 6yToHa Cton 3a da cnpete BbnpoN3BExKaHeto N da Ce BbpHeTe B3annC.
BabHo Hanpei
Ako HATINCHTe 6yToHa "Paly3a",doKaTO rIePaTe 3aIIncAna nporpama,dyHKUraTa "BaBHO HAnpeD"Ze e AKTINBHa.MoKeTe Da n3NoJI3BaTe 6yToHa BbP30 HApPe3a 6abHn IpEeBbPtaHe HAnpeD. IocneIbAUto HATINCKaHe Ha 6yToHa BbP3O HAnpeD Ze IpOMEHN CKOpocTTa Ha 6abHTo IpEeBbPtaHe HAnpeD.
Hactpoyn Ha 3annca
Moxete da konfumypipaTe n BaunTe npednoHTaHn 3a 3annc, n3noJ3BaNk pa3deHacptoKn B MeHIOTo TeneBn3Op>3annc. MapkpaiTe pa3deHacptoKn, n3noJ3BaNk 6yTOH HAnBo nnn HAdrcho n HATNCheTc OK. CneT TOBa n36epete XeJaHaTa n03uINB NODMeHtO u HAcPToTe c NOMOHTa Ha 6yToHa HAnBO nnn HAdrCho.
Paheh cTapt: H3noJ3BaMKn Ta3n HAcTpoKa MoKeTe Da HAcTpOnte HaayalHOTo BpeMe Ha TaMepa 3a 3anC.
Kbcen Kpa: N3noJ3BaIKu Ta3n HAcTpoIka MoKeTe Da HAcTpOnte KpaHOTo BpeMe Ha TaIMepa 3a 3anC.
MaKc. npemeCTBaHe Ha BpeMeTo: Ta3n HacTpoiKa Bn no3B0JIyBa Da 3aJaTe MaKcImaHnHa TnpoDbIJXHTeJIHOCT 3a 3aINC n3MeCTBaHe Ha BpeMeTo. Ha
JIuHHTe OIcHn Ca npi6JIN3NTeHN I DeiCTBUNTeHOTOBpeMe 3a 3aNc MoKe Da Ce IpomEn Ha IpaKTnKa B3aBNCMOCT OT n3JIbYBaHETO. CToHOCHTe Ha 3ana3EHOTO IN CBO6OHDHO TPOCTpAHCTBO 3a CBxpaHeHneUe Ce IpomEHN B 3aBNCMOCT OT Ta3H HAcTpoHka.YBepeTe ce, Ye IMATE IOCTaTBuHO CBO6oDHO IpocTpaHCTBO, B IPOTNBEH CnyaM MoKe Da He e Bb3MOXHO He3a6abHO 3aNNCBAHe.
A B T H O C k p a a b a h e: M o x e t e d a H a c t p o n t e T i n a H a o x b b p l a h e K a T O B e 3, H a n c t a p, H a - d b j b r n i n H a n - k b c. A k o h e e h a c t p o e h o H a B e 3, M o x e t e d a H a c t p o n t e O n c u r t a K a T O B k l i o y e h a n i N 3 k l i o y e h a. Te 3 n o n c u n on p e d e n t P p e d n o u t a h n i r a t 3 a n 3 t p n b a h e H a 3 a n c i n t e, 3a da ce n o n y u n n o b e u e m a c t o 3 a c b x p a h e h e H a T e k y u n t e 3a n i n c i n.
HnΦopMaun3aXapD DnCKa:MoKeTe Da BnDnTe
NoDpo6Ha HnΦopMaun3a USB 3anameTBAuOTo
yCTpOInCTBO,KoETo e Cbbp3aHO KbMaBauNra TeJeBn3Op.
MapKupaIte N HaTnCHeTe OK,3a Da BnDnTe N
HaTnCHeTe Ha3aBvPbUaHe,3a Da 3aTBOpNTe.
Форматуране HaДиСК: Ако кениerte Да ИЗТрпente BCИЧКи Файное OT CBьрзанOTO USB 3aAnamETЯВAsO yCTpoIcTBОи Да KOHBePTnape ΦормATA Na YcTpoIcTBOTO КБМ FAT32, можete Да ИЗПОЛЗВATE Ta3N onця. HatUCheTe 6byToHa OK,doKATO onцяТаФорматуранe HaДиСka e МарКИрANA. She ce NOBIMEHIO HA ekpaHA, KoETO N3NCKBA BbBeJDAHeTO Ha ПИН KOD*). CneД katO bBBeJTe ПИN KODa, She ce NOBIN cBo6шЕнe 3a NOTBbPXDHeHne. N3BepeTeДa IHaTNCHTe OK, 3a Да CTapTnate ΦорматуранeTo Ha USBДиСka. N3BepeTe He n HATUCheTe OK, 3a DA OTMeHInTe.
(*) ΠИH KODb m no nodpa3bupahe e Hacmpoeh Ha 0000 unu 1234. Ako cme hacmpouu IINK od (u3uckea ce 8 3abucumocm om u36paHama dbpxa) no epeme Ha TbpBOHaayanHOTOnHCTaHnpaHe, u3nON3Baume BbBedeHuom bac IINK od.
BAXHOΦopMaTnpaHTo Ha USB dNcKa ige n3Tpne BCNUKn daHHn Ha Hero n faiNoBaTa My cncTeMa ige 6bIe npomeHa KbM FAT32. B nobueTe cnuyan rpeWKte npi pa6oTa ige 6bDat KopuRpaHn cnei φopMaTnpaHTo, Ho ige 3ary6nte BCNUKNTE cn daHHn.
AkoHaekpaha Ce noBn CbO6eHne "CkopoCTTHa 3aHc Ha USB dNcKa e TBbpde Hncka 3a 3annc" npu 3anoBaHe Ha 3aHNC, pecTaptnpaTe 3aHnca. Ako Bce Oue ce nOBra CbUaTa rpeWka, Bb3MOxHo e USB dNcKa Da He OTROBapr Ha CbOTBeTHnte N3nCKBaHn. CBpbKte dpyr USB dNck.
MeiHOBb3POn3BexDaHe
MokTe Da Bb3npOn3BExJaTe PaJIOBe C My3Nka,ФИIMN I CHIMKn, 3aIncAHn Ha USBДиCK, KaTO rO CBpXeTe KbM BaIIra TeJIeBn3Op. CBpXeTe USBДИСКа KbM HЯКОt USB BXODObTe, pa3NoIoxKeH NOTCTpaHn Ha TeJIeBn3Opa.
Cne CBp3BaHe Ha USB dNcKa KbM Baunr TeJeBn3Op Ha ekpaHa ige ce nOBm MeHIO MeHEn 6pay3bp. MoXe Ta NOnyUHTe DocTbN Do Cbbp3aHOTo USB yCTpoiCTBO NO BcRAKO BpeMe No-KbCHO OT MeHIO N3ToCHNu. N36epTe CbotBETHaTa ONuHa 3a USB BXoD OT TOBA MeHIO HATNCHETe OK. MoXe TcIoo Da HATNCHETe 6byTOHa N3ToUHK Ha DnCTaHcUNHOHOTO UnpabJIeHne I CneT ToBa Da N36epTe USB yCTpoiCTBOTO 3a cbxpanHeNe ot cncbKa C N3ToCHNu. CneT ToBa N36epTe paII n HATNCHETe OK, 3a da ro NOKaeTe nn BB3PON3BeDeTe.
Mokete da npomeHnte BaunTe HacTPOkN 3a MeHN 6pay3bp c nOmoUta Ha MeHIO HAcTPOkN. Do MeHIO HAcTPOkN MoKe Da ce CTnIe Npe3 INΦOpMaUNOHATA JeHTA, KOrTO Ce NOKa3Ba B DOJHATA Yact Ha ekpaH, KOrato No BpeMe Ha Bb3npOn3BExKdAHe Ha BnDeo IIN ayDNo paJn IINCe NOKa3Ba paJn C n3O6paxeHne. HatNCheTe 6yToHa INΦOpMaUzra, aKO INΦOpMaUNOHATA JeHTA e N3Ye3HaJa, MapKnpaIte CNMBOJa Ha 3b6HOTO KOJIeNO, pa3NoJoxEHO OT JxCHaTa CTrpHa Ha INΦOpMaUNOHATA JeHTA u HAtnCHe OK. MeHOTa HAcTPOkN Ha n3O6paxeHneTO, HAcTPOkN Ha 3Byka, HAcTPOkN Ha MeDNHNA 6pay3bp n OnuCa Ha pa3NoJoxEHe. CbDbpxKaHNeTO Ha Te3N MeHOTa MOKe Da ce npOMEHN B 3aBNCMOCT OT BnDa Ha OTBOpeHna MeDIn Phai. Camo MeHIO HAcTPOkN Ha 3Byka Ue e HanuHo NO BpeMe Ha Bb3PON3BExJaHe Ha ayDINO paJNIOBeTe.
| цклучен/Ра36ьрkan ржum наEbзпрουзбжданe | |
| Стартуарей Вьзпpon3Вжданeto и akтуарей | Всчки Фальове от симьka щe бдат Вьзпpon3Вждану постедовatenho воригиналния рeding |
| Стартуарей Вьзпpon3Вжданeto и akтуарей | Сышит Фаль��е 6ыдe Вьзпpon3Вждану овтою (nobtopende) |
| Стартуарей Вьзпpon3Вжданeto и akтуарей | Всчки Фальове от симьka щe bдат Вьзпpon3Вждану постедовatenho в сухаен рeding |
| Стартуарей Вьзпpon3Вжданeto и akтуарей | Всчки Фальове от симьka щe bдат Вьзпpon3Вждану постедовatenho овтою в сухаен рeding |
3a da n3no3BaTe fynKuInTe B HnΦopMaunOHnata
IeHTa,MapKnpaTte CmBOJa Ha fynKcNraTa n
HaTNCHEt OK. 3a da npomeHInTe cBCToHNeTO Ha
fynKcNra,MapKnpaTte CmBOJa Ha fynKcNraTa n
HaTNCHEt OK TOJKOBA NbTN, KOJIKOTO e Heo6xOJMo.
Ako CmBOblT e O3HaueH C cepBeH KpbCT, TOBa
O3HaUba,Ye Toi e DeaKTNBupaH.
Notpe6ntcko Ioro npn BknoBaHe
Mokete da nepcohaun3npaTe Baunr TeNeBn3Op n da BnKdTe BaWata JIO6mHa Chmka nn N3O6paKeHne Ha ekpaHa Ha BCEkN nT, KOrato TeNeBn3OpbT ce BKnUoyBa.. 3a Da HAnpabnte ToBa, KonnpaTe paIa CIO6mata CN CHmka Ha USB dNCK n ro OTbopeTe OT MeHIO "MeHN 6pay3bp". N36peTe USB BXoD OT MeHIO N3ToCHuNn HATNCHE TE OK. Mokete cbso Da HATNCHE 6yTOHa N3ToHnk Ha dNCTaHcNOHHOT OynpaBHeHne n cNei TOBa Da N36peTe USB yCTPOJcTBOTO 3a cbXpaHHeHne ot cnccbKa C N3ToHnCn. Cnei KaTO N36peTe KeJahata Chmka, MapkpaiTe r HATNCHE OK, 3a Da r BVndte Ha qanekpan. HATNCHE 6yTOHa NΦopMaun, MapkpaiTe CNMBOna Ha 3b6HOTOKoJIeNo Ha INΦopMaUNOHHa TJeHTa n HATNCHE OK. N36peTe OnuHn HATNCHE OK, 3a Da OTMeHNTe. ONuaTa 3adabahe Ha hauaHNO noro ue e Ha pa3noLoXeHne. MapkpaiTe n HATNCHE OK, 3a Da N36peTe N3O6paKeHneTo KaTO hauaHNO Ioro. Ue ce noRbN ekpan Ce nOraBA cbO6ueHne 3a NotBbpxDeHne. N36peTe DA n HATNCHE OK oTHBO.Ako N3O6paKeHneTo e nOxDxOJa( 串 ),Ie To BVndte Ha ekpaHa No BpeMe Ha cNeDbauOTo BKIOUvaHe Ha TEJEBu30pa.
3a6eJekka: Ppu u3nbHnBaHe Ha nbpeoHaanHa uHcmaauu meueu3Opbm ue ce ebphe KbM n3o6paKeHneTo no npda3bupaHe, ako uma makoba.
(*)Изобрахенуmampra6ea da umam cbomhoweHueMexky 4:3do16:9u mpr6ea da ca ebe faunoe φopmam.jpeg.jpg unu. jpe.Изобрахенуемо He moxe da ce 3adade kamo n020 npu bknlohyaHe yuraMo pe3oJIOUcua He ce nOraBba Ha uhφopMaouOHnHaJeHma.
FollowMe TV
C MO6HHTO Cn yCTPOICTBO MOKTe Da n3JIbYBaTe TEkyUTo IpeDaBAHe OT BaUNa CMapT TeJIeBUN3Op, n3NoI3BaIKn FyHKUraTa FollowMe TV. INcTAJIpaIte NOxODJIoTO pnpJXeHne Smart Center Ha BAWeTo MO6HIO YCTPOICTBO.CTapTnpaIte npINoJXeHneTo.
3a NOBuee INHΦopMaζη 3a ΙN3NoJ3BaHeTO Ha Ta3N ΦyHKζη BNXTe NHCTpyKζI NTe 3a ΙN3NoJ3BaHOTO OT Bac pπIoXKeHne.
3a6eIekka: B 3abucumocm om modema meenebu m Bu moKe da he noodbpxma3u yHKua. Ppuoxehueme He e cBMEcmu C BCUku MObUNH ycmpoucmea. deeme ycmpoucmea mpr6ea da ca cBp3au H KbM edHa u cbuaMpexka.
CEC
Ta3nФyHKnBn NO3BOJRABa Da ynpaBnBaTe CEC-BKJIIOUeHn ycTpoNCTBa,Cbbp3aHn Ype3 HDMI nopTOBeTe, n3NoI3BaIKn DnCTaHcNOHHOTo ynpaBHeHn Ha TeJIeBN3Opa.
OnuTa CEC B MeHIO HAcTPOKn>CnCTema> HatponHa ycTPOcTBOTp6Ba da ce HacTpon Ha AkTNbnpaHa. HatncHete 6yToHa Source n 36epTe HDMI BXOda KbM cBbp3aHOTo CEC yCTPOcTB0 OT MeHtO CnncbK Ha n3TOUHNcHTe. Korato 6bDe cBbp3aHO HOBO CEC ycTPOcTB0, To ue 6bJe n36poEHO B MeHtO 3a n3TOUHNcHTe cbc CBOeTO nme, BmecTo nMeTo Ha HDMI BXOda, KbM KOTo e cbbp3aHO (Hanp. DVD nneBp, Pekopdep 1 n T.H.).
HactpoibaHe Ha INH: DeΦnHpa HOB INH KOД.
CICAM INH KOD no noDpa3bnpahe: Ta3n onuia ce noBn noCmbena, ako CI moyntb 6bde nbxnat B CI cnoTa ha TeNeBn3opa. MoKeTe da npomeHnte INH Koda no noDpa3bnpahe Ha Cl CAM c nomoxta Ha Ta3n onuia.
TV PIN*): C BKNIOUBAHETO NIN N3KNOUBAHETO Ha Ta3N ONuRA MoXeTe Da pa3peWHTe NIN OpAHHte HAKON KaHAn Ha M7 onepaTopa Da n3npaat PIN 3aBKn. Te3n PIN 3aBKn npEOCTabRT MexAHn3bM 3a KOHTPOI Ha DOCTbNa 3a CbOTBeTHNTe KaHAn. AKO Ta3n ONuRA e HAcTpoEHa KATO BKn., Do KaHAnTE, KOtO N3npaat PIN 3aBKn, He MOxE Da IMATE DocTbn 6e3 nbpBO da BBBeDeTe npABNJHn4 PIN.
(*) Ta3u onuua Ha MeHIO mO ue 6bde Ha pa3nOJOKeHue, ako e u3nHeHa unCmanaua Ha M7 onepamop.
3a6eJekKa: INH kOdbm no nOdpa3bupane e hacmpoeh Ha 0000 unu 1234. Ako cme hacmpounu INH kOd (u3uckea ce e 3aeucumocm om u36paHama dbpxaBa) no epeme Ha NbpBOHaayanHaTa HcTajau, u3non3aume ebeedeHua om bac INH kOd.
Hrkou onu u MoKe Da He ca Ha pa3noJoxe Hne 3aBucumocm om Modena u/Unu u3bopa Ha dbpxaba npu npbp6oHaaynHa umcmanau.
EneKtpoHEn cnpaBOuHnK Ha nporpaMnte
Upe3ФyHKZIaTa 3a eJIeKTPoHNO IporpamHo HacoUbaHe Ha TeNeBn3Opa MoKeTe Da nperePaTe rpaФnKa Ha Cb6nTnaHa NHCTaJInpaHnTe NOHaCToRsqEm KaHAn B CNscbKa cN c KaHAn. 3aBnCn OT TOBa, daHn Ta3ФyHKzIa Ce NODbPxa NN He.
3a Da Bne3eTe B pkoBOOCTBOTO 3a npoPamn, HATNCHeTe 6yToHa Guide Ha BaWeTo DnCTaHcNoHHO ynpabNeHne. OcbEN TOBa MoKeTe Da N3NON3BaTe ONUraT PkoBOOCTBO B MeHo TeneBn3Op.
IMa 2 Dbpa3JNUHn Bua rpaФuHn oΦopMHeHn, XpoHOnOrNuHa rpaФnka n Cera/CneDbaa. 3a da npEeKJIIOvBaTe MEXdy Te3N OΦopMJIeHn, MapKnpaIte pa3DeIa C HMeTO Ha aNTepHaTINBHOTo OΦopMJIeHne B rohpTa YacT Ha ekpaHa n HaTNCHEt OK.
I3noJ3BaIte 6yToHITe 3a Nocoka, 3a da npemHeTe npE3 pbKOBoCTBOTO 3a nporpaMn. I3noJ3BaIte 6yToHa Ha3a/BpBuaHe, 3a da n3noJ3BaTe onuHITe Ha pa3deJa B rophata qact Ha ekpaHa.
Pporpama no BpeMe
B Ta3n onu 3a oopmneHne BCnKc cb6ntna O n36poehnte kaHaJI N ce noka3BaT NO BpeMeBa IHHra. MoKeTe Da n3non3BaTe 6yToHnte 3a NoCoka, 3a da npemHeTe pRe3 cnncbKa cbc cb6ntnTa. MapkpaIte cb6ntne HnatNCheTe OK, 3a da ce nOKae MeHIO TO C onuN 3a cb6ntna.
Ha3aBpBuahe, 3a da n3no3BaTe HaHnHnTe onuB pa3deNa. MapKpaIte pa3deNa HnTbp n HATnCHETe OK, 3a da BnNTe ONuNTe 3a nnTpnpaHe. 3a da npomeHnte oOpMneHneTo MapKpaIte Cera/cneDbau n HATnCHETe OK. Moxete Da n3no3BaTe onuHTe PpeDnWeH den i CneDbau dEN, 3a da ce nokaxat cb6ntyra 3a npednHn Inn CneDbau n DeH.
MapknpaTe pa3deJa Ekctpn HHaTncHeTe OK, 3a da nonyHTe DoCTbN DO ONCHTe NO-DOny.
MapKnpaH xaHp: Ioka3Ba MeHIOTo MapKnpaH xaHp.
I36epete xaHpa H aTnCHte 6byToHa OK. Cb6ntnraTa
B pkbOBOCTBOTO Ha npOrpaMaTA, CbOTBETCTBaun Ha
I36paHna XaHp, ige 6bDat MapKnpaHn.
PbKOBOCTBO 3a TbpceHe: Poka3Ba onuHnte 3a TbpceHe. KaTo n3no3BaTe Te3n onuH, MoKeTe da npereIate 6a3aTa DaHHc n pporpaMHnte yka3aHnB CbOTBeTcTBne C n36paHnte KpHTepnn. CbBnaDaunTe pe3yINaNu 6bDat n36poeHn.
Cera: Noka3Ba TekyuTo Cb6nTne Ha MapKupaHna KaHaJ.
Maça6bpahe: MapkpuTe n HataChTe OK, 3a da BnuDInTe c6bntnTa B wIpOK BpeMeBn INTepBaI.
Tekuza/CneDbaa nporpama
B Ta3n Oonzra 3a OopmneHne ige ce Noka3BaTcMoTeKyuIte n CneBaIte Cb6ntna OT N3bpoEHnTe KaHaII. MoKeTe da N3noN3BaTe 6yToHnTe 3a nocKa, 3a da npemHHe Te Ppe 3cnCbka Cbc Cb6ntnTa.
Ha3aBpBae HaHnHTe 6yToHa Ha3aBpBae, 3a Da H3noN3BaTe HaHnHTe OOnu B pa3deJa. MapKnpaTe pa3deJa ΦnTbp N HaTnCHete OK, 3a Da BnDInTe onCnInTe 3a
Филtpиран.3aДа npOMEHnte OΦOpMJIeHneTo МарКИрайТБрЕмБи спськ ИНСЧЕТО OK.
OnuHa c6ntnTa
I3noJ3BaIte 6yToHTe 3a nocoknte 3a da MapKnpaTe c6bntne HATNCHETe 6yToHa OK 3a da nokKeTe MeHIO OnuN 3a cb6HTNeTo. Ha pa3noJoxeHne ca CJIeHNTE ONUIN.
N36op Ha KaHaJ: N3noJ3BaIKN Ta3n 4yHKUa BHe MoKeTe Da npeBKnIOuHTe Ha n36paH OT Bac KaHaJ, 3a Da ro rIeJaTe. PbKOoDcTBOTo 3a nporpaMnte Ue 6bJe 3aTBopeHo.
DOnbHnTeJHa HhOpMaun: Noka3BaHe Ha IopobHa HhOpMaun 3a n36paHOTc b6HTne. I3noJ3BaIte 6yToHtE 3a nocoka Harope n HADony, 3a da npebbptnte TeKCTa.
HacpoBaHe Ha TaMep 3a Cb6ntne / N3tpnBaHe Ha TaMep 3a Cb6ntne: N36epete Onueta HacpoKa Ha TaMepa 3a Cb6ntne n HATNChe OK. Moxete Da 3aAdTe TaMepn 3a 6bDeuN Cb6Tna. 3a Da OTMeHInTe Beue HacTpoEH TaMep, MapKnpaTe TOBa Cb6ntne n HATNCheTe 6yToHa OK. CneiTOBa N36epTe N3tpnBaHe Ha TaMep ot ONueta Cb6ntne . TaMepbT ue ce OTMeHN.
3aHc / N3tpnBaHe Ha 3an. TaHmep: N36peTe onueta 3aHc n HATnCHete 6yToHa OK. Ako nporpaMaTa ige ce n3JIbYBa B 6bDeIeTo, Tg Ie 6bde do6abEha KbM CnncbKa TaHmepn, 3a Da 6bde 3aHcAna. Ako N36paHOTc b6HTne Ce N3JIbYBa B MOMeHTa, 3aHcBAHeTo ige 3anoHHe He3a6abHO.
3a da n3tpneTe TaMep 3a 3aNTBaHe, MapKnpaTe CbOTBeTHOTO Cb6ntue HHaTnCHete 6yToHa OK, cNei KoETO n36epete OIcNraTa N3tpnBaHe Ha 3an. TaMep.
TaimepbT 3a 3anC 1e ce oTMehN.
BAXHO: Cebp3eaume unu pa3kaeuaime Bauur USB duck, dokamo meeneu3opbme u3knouhen. Cned moa mpr6ba da eknoyume meeneu3opa, 3a da akmubupame fynkuja ma 3a 3anuc6ahe.
3a6eJeku: He moXeme da npEeKnHoyeame KbM KoUmo u da e dpya KaHa, dokamo uma akmueHo 3anucBaHe unu maUme3a mekyuur KaHa.
He e 3b3moxho da hacmpoume maMep unu maMep 3a 3anuc 3a dee unu noee omdeHn c6umur e edun u cbu, uhmepean om speme.
Brpaedn ycnyr
Moxete da ce hacnaJdaBate Ha Freeview Play TeJIeBn3IOHHnte ycIyI, KOnTO pa6OTdIpeKTHO npE3 eIeKTPoHHn IporpAmEH cnpaBOUHnK. DOKato cTe Ha KaHana, n3NoJ3BaIte 6byToHntecTpeJKN, 3a Da CKpoJnpaTe Ha3aD BbB BpeMeTo npE3 6a3npaHn Ha BpeMeBaTa IINHn CnpaBOUHnK. Ue BnIte CbIbPkaHn O T NocJeHNTE HrKOJKn. HAnuHnTe CbIbPkaHn Moat Da 6bDat npomeHn B 3aBncIMOCt OT npedAbaHnTa n Ie 6bDat MapKnpaHn C IKOHa 3a Bb3IpON3BeJdaHe. MapKnpaTc CbIbPkaHneto, KoETO nCKaTe da Bb3IpON3BeDeTe n HatNCheTe 6byToHa OK.
YBepete ce, Ye TeJeBu3OpbTe cBbp3aH KbM DomaunHaTa Bn MpeXa, 3a Da N3NoJ3BaTe ycnyrnte. 3a DonbInHeTna HOpMaunra 3a TOBa N npyru n3ncBaHna 3a Freeview Play ycnyrnte BxKTe pa3denn Cbbp3aHOCT Freeview Play nnatopma.
EnektpoHeH cnpaBOyHnK Ha nporpaMnte
Upe3 yHKuIyTa 3a eNeKtpoHNO nporpaMHO HAcOvBaHe Ha TeJIeBn3Opa MoXeTe Da IperIeJaTe rpaФИKa Ha Cb6NtIyTa Ha INCTaJInpaHnte NOHaCTOJcEM KaHAn B CnCbKa CN C KaHAn. 3aBucN OT TOBa, daJIu Ta3N yHKcYCe NODIbPka IJIH He.
3a Da Bne3eTe B pkoBOOCTBOTO 3a npoPamn, HATNCHEte 6yToHa Guide Ha BaWeTO DCtAnHcNoHHOynpaBHeHne.OCBeH TOBa MoKeTe Da n3NON3BaTe ONIraTApkoBOOCTBO B MeHIO TeneBn3Op.
Ima 2 da pa3nHn Bnda rpaunHn oopmneHna, XpoHOnrnuHa rpaNka n Cera/CneBauch. 3a da npBknUcbate MeKdy Te3n OoOpMneHna, MapKnpaTe pa3deJa C HMeTo Ha aNTepHaTNBHO To OoOpMneHne B rohpata cact Ha ekpaha N haTNCheTe OK.
I3noJ3BaIte 6yToHITe 3a Nocoka, 3a Da npemHHeTe npe3 pbKOBOcTBOTO 3a nporpaMn. I3noJ3BaIte 6yToHa Ha3aBpBuahe, 3a Da I3noJ3BaTe Ouncnte Ha pa3deJa B rophata Yact Ha ekpaHa.
Pporpama no Bpeme
B Ta3n OOnu 3a OopOpMJIeHne BCNUKc Cb6HTNOr OT n36poEHnte KaHaNl Ue Ce NOKa3BaT NO BpeMeBa nnHra. MoKeTe Da n3NoI3BaTe 6yToHtE 3a NoCoka, 3a Da npemHeTe ppe CnncbKa Cbc Cb6HTNrTa. MapKnpaIte Cb6HTNe H HatNCheTe OK, 3a da ce NOKaKe MeHOTo C ONUIN 3a Cb6HTNr.
HaTnCHTe 6byToHa3aBpBuahe,3a Da H3noI3BaTe HaHnUHnTe onuB pa3deNa. MapKnpaIte pa3deNaΦnTbp n HAtnCHTe OK, 3a Da BnIte OOnuTE 3aΦnTpnpaHe. 3a Da npomeHtne oOpMneHneToMapKnpaIte Cera/cneDbauu HaTnCHTe OK.MoKeTe Da n3noI3BaTe onuNITE PpeNWeH DeH N CneDbauchEN, 3a Da ce NOKaxat CbBHTyTA 3a npeDnHnY INCneDBAuN DEH.
MapkupaTe pa3dena Ekctpn HaTncHeTe OK, 3a da nolyuHTe DoCTbN DO ONuNTe No-dOly.
MapknapaJkaHp: Noka3Ba MeHIOTo MapknapaJkaHp. ɪn3bepete JkaHpaɪ NaHATNCHEtE 6yToHa OK.
Cb6ntnraTBA pkoBODCTBOTO Ha nporpaMaTa, cbOTBeTCTBaun Ha n36paHnaKp, ue 6bdat MapknapuH.
PbkoBoCTBO 3a TbpceHe: Poka3Ba onuHnte 3a TbpceHe. KaTo n3noJ3BaTe Te3n OnuH, MoKeTe Da npereJeate 6a3ata DaHHN C nporpaHnTe yKa3aHnB CbOTBeTcTBne C n36paHnTe Kpntepn. CbNaadaunte pe3yIaTaNtUe 6bDat n36poEHn.
Cera: Noka3Ba TekyuTo Cb6nTne Ha MapKnpaHna KaHaJ.
Ma7a6npahe: MapKpaIte n HaTnchTe OK, 3a Da Bnnte Cb6ntyTa B uPOK BpemEbn HHTepBaJ.
Tekyua/CneiBaua nporpama
B Ta3n OOnzra 3a oOopMneHne ige ce NOKa3BaT caMo TeKyuIte n CNeDbaInte Cb6ntnO T n36poeHnTe KaHaII. MoKeTe Da n3NoN3BaTe 6yToHnTe 3a Nocoka, 3a da npemHeTe npe3 cnncbKa cbc cb6ntnTa.
HaTnCHeTe 6yToHa Ha3aI/BpBuaHe, 3a Da n3noN3BaTe HaHnUHnTe Ouun B pa3deJa. MapKnpaIte pa3deJaΦnTbpN HAtncHETe OK, 3a Da BnDnTE OOnnITE 3aΦnTpnpaHe. 3a Da npomeHnTe oOoPmJeHneTo MapKnpaTe BpeMeBu cnncbK n HATnCHeTe OK.
OnuHa cBbntnTa
I3noJ3BaIte 6yTOHTe 3a nocOKnTe 3a da MapKnpaTe cb6HTne H aTNCHeTe 6yToHa OK 3a da NOKaKeTe MeHIO OnuN 3a cb6HTneTo. Ha pa3noJoxKeHne ca CNeDnHTe ONUIN.
N36Op Ha KaHaJ: N3noJ3BaIKn Ta3n 0yHKUa BHe MoKeTe Da npeBKnIOuHTe Ha N36paH OT Bac KaHaJ, 3a Da ro rIeDate. PbKOBoIDCTBOTO 3a nporpaMnte Ue 6bJe 3aTBOpeHo.
IOnbHnTeJHa HhOpMaun: Noka3BaHe Ha IooPobHa HhOpMaun 3a n36paHOTo Cb6ntne. I3noJ3BaIte 6yToHnTe 3a nocoka Harope n HadoJy, 3a da npebpTnTe TkCTa.
HactpoBaHe Ha TaMep 3a Cb6ntne / N3tpnBaHe Ha TaMep 3a Cb6ntne: N36epete OnuTHa HactpoKa Ha TaMepa 3a Cb6ntne n HaTnChete OK. MoKTe Da 3aJaTe TaMepn 3a 6bDeuN Cb6ntna. 3a Da OTMeHnte BeYe HAcTpoEH TaMep, MapKnpaIte TOBa Cb6ntne n HATnCHete 6yToHa OK. CpeT ToBa N36epTe N3tpnBaHe Ha TaMep ot OnuTAta Cb6ntne . TaMepbT ue ce OTMeHn.
3anc / N3tpnBaHe Ha 3an. TaMep: N36epete onueta 3anns HATNCHETe 6byToHa OK. Ako nporpamata uce ce n3IbYBa B 6bdeueto, Tz uze 6bde do6aBeHa KbM CnncbKa TaMepn, 3a da 6bde 3ancaHa. Ako n36paHOTc b6ntne ce n3lbYBa B MOMeHTa, 3anCBAHETO uze 3anoHr He3a6abHO.
3a da n3tpneTe TaMep 3a 3anNTBaHe, MapKnpaTecB0TBeTHOTo Cb6nTne HnatncheTe 6yToHa OK, cneKoETO n36epTe onueta N3tpnBaHe Ha 3an. TaMep. TaMepbT 3a 3annc ue ce otmeHn.
BAXHO: Cebp3aume unu pa3kaueaume Bauur USB duck, dokamo meeneb3opbme u3kIouen. Cned moa mpr6ba da ekIouume meeneb3opa, 3a da akmueupame yHKquma 3a 3anuc8ahe.
3a6eIekku: He moKeme da npeKIOUOBE ame KbM KOUMo u da e dpykaH,doKAMo UMa akmueHO 3anuceaHe unu maumep 3a mekyuua KaHa.
He e 3MOxHO da hacmpoume maMep unu maMep 3a 3anuc 3a dee unu noeue omdenhu c6umur e eduH u cbu, uhmepean om speme.
TeneTeKCTycnyr
HaTnchete 6yToHa TeKCT,3a Da BJIe3eTe.HaTnCHTe OTHOBO,3a Da aKTINBnPate CMEceHnpeXIM, KOITo BN N03BOJRABa Da rIeDaTe eHNOBpeMeHHo TEJETeKCT CTpaHnUcATA N TEJEBN3NOHHTO npeJaBaHe. Hatnche TIOBTOpHO,3a Da n3Je3eTe.AKO e Ha pa3NoJOnKeHne,OTdEHNc KeCUN OT TeJETeKCT CTpaHnUcTe Ue ca cBeTHO KoDnpAHN Ue MoT A da ce n3bnpat C HAtNUCKAHe Ha OuBeTeHnTe 6yTOHn. CneDbaiTe HNCTpyKcNITE, NOKa3AHn Ha ekpaHa.
UΦpOB TeNeTeKCT
HaTnCHTe 6yToHa TeKCT, 3a Da BnDInTe HOpMaun 3a uopBnra TeTeKCT. Pa6oTe c CBeTHnTe 6yToH, KycOpHNte 6yToH n 6yToHa OK. MeToBt 3a HABnraMQe Da ce pa3nUaBa B 3abNCmOcT OT cbDbPxAHHeTO Ha uOpBnra TeTeKCT. CneBaIte HNCTpyKUnITE, Noka3aHn Ha ekpaHa Ha uOpBnra TeTeKCT. Korato 6yToHbT TeKCT 6bJe HA tncat OTHBO, TeJIeBn3OpbT Ce Bpbua KbM Bb3npOn3BExJaHe Ha TeJIeBn3NOHOT npedabaHe.
AktyaIIIN3IpaHe Ha coΦTyepa
BauT TeIeBn3Op MoKe Da Tbpcu N O6HOBA aBTOMaTuHcOoTyeepa Cn Ppe3 CnHaJa Ha cTaHcTtA nn Ppe3 nHTepHeT.
Tbpcene Ha akTuJn3auny Upe3 nOtpe6ntckn INTepeic
OT rnaBHOTo MeHIO n36epeTe HAcTPOkN> CnCTema n cnei TOBa DOnbIhnteHN. PnpDnBxKeTe ce do CoΦTyepHa akTyaHn3aun HaTNCHeTe 6yToHa OK. Cnei TOBa n36epeTe CkaHnpaHe 3a akTyaHn3aun HHaTNCHeTe 6yToHa OK, 3a da npOBepnTe 3a HOBn akTyaHn3aun Ha coΦTyepa.
Ako ce OTKPne HOBa aKtyaJIIN3aun, cBuaTa 3anoYBa da ce CBAJn. CneI npNKJIIOUbaHe Ha cBaJnHeTo, Ha ekpaHa Ie Ce NOBn PpeDynpedntEnHO CbO6UeHne, HATNCHE Te 6yToHa OK, 3a Da npNKJIIOUHTe C aKtyaIN3aunrTa Ha coOpTyepa n da pectapTnpaTe TeNeBu3opa.
3 AM TbpcHe n peKm Ha akTyaHn3aun
Baunr TeBn3op 3a HObN aKtuaaH B 3:00 yaca, ako onueta ABTomTuHO cKaHpaHe e B No3nPa Pa3peWeno n aKO TeBn3OpT e CbP3aH KbM Ha3eMeH ePhipeH CnHaJI Nn KbM INTEpHeT. Ako 6bJe HamepeH HOB coOHTyep n Toi 6bJe CBAJEn ycneHOb, TOn 8e 6bJe IHCTaHnpA npCneDbaTO BEKnUcbHe Ha TeBn3Opa.
3a6eJexKa: He uKIOueBaUme 3axpaHeauu Ka6en, Dokamo ceemoduoobm Muza no epeme Ha npoueca Ha pecmapupahe. Ako meeeu3Opb m He ycnee da ce BkIOUcneakmyanu3upahe, uKIOUeMe 3axpaHeaHemo, U3aKaUme dBe Muhymu u omHOo EKIOUeMe 3axpaHaHemo.
Bcuku akmyanu3auuu ce konhmponupam aemomamuyho. Ako ce u3ebpu puhyo mpche u He ce hamepu codmyep, moea e mekyama cepura.
OTcTpaHЯBaHe Ha Hen3npaBHOCTN & cBBeTN
TeIeBn3OpbT HMa da Ce BkIIOUH
YBepete ce, ye 3axpaHbau nka6e e BkIIOueH npabnlo B KOHTa. HATNCheTe 6yToHa 3a BKIOUbaHe/INKIIIOUBAHe (Power 6yToHa) B rOpHaTa qact Ha TeNEBu3Opa.
Iоша KaptnHa
- YBepete ce, Ye npabunno cTe Hactpounn TeJeBu3opa.
HnCKOTO HnBO Ha CNrHaJa MoXe Da npuHHn CMyueHn B KapTHaTa. MoJ npOBepTe aHTeHHnte Bpb3Kn. - PpOBepTe dAnI cTe BbBEn IpaBUNHaTa YecToTa Ha KaHana, aKO cTe N3BbPWBaIn pBuHa HAcTpoKa.
HЯma n3o6paxeHne
TeNeBn3OpbT He NoIyUaBA CnHaJI.N. YBepeTe, ye cTe n36paJI npabNJHnT BXoD Ha n3TOuHNka.
-Дали aHTeHata e npabuJIno cBbP3aHa?
-Даи e noBpeH Ka6eJbT Ha aHTehata?
-Даиca n3noJ3BaHn noxOJaU nIeKepeN 3a CBbp3BaHe Ha aHTehata?
Ako mate cBmHeHn, CbpxKeTe ce c Baunr TbproBeu.
HЯma 3Byk
- PpOBepeTe DaJIH 3ByKbT Ha TeJIeBn3Opa He e n3KJIIOueH. HatNCHeTe 6yToHa Mute IJIN yBeJIuHte CUNaTa Ha 3ByKa, 3a Da npOBepuTe.
3BykCT ce cyBa cAmO OT eINHnB BnCOKOrOBOpnteI. PpOBepTe HactpoNKeTe Ha 6aHaHca OT MeHIO "3Byk".
OTCTpaHЯBaHe Ha HeN3npaBHOCTn, CBbP3aHN CbC CBbp3BaHeTo
Be3KnUHaTa MpeXa He e HAnuHa
- YBepete ce, Ye 3aunTHnte cTeHn Ha BaWata MpeKa, NO3BOJRAbT 6e3KuHa BpB3Ka KbM TeJeBu3Opa.
- Oпитай Te OTHOBО Tьрсе He Na 6e3ЖИЧМpeжи, ИЗПОЛЗВай КЕраHa MeHOTO Мpeжа.
Ako 6e3xuHaTa MpeKa He cyHKcHnHa pa npaBnHIO, ONtaiTe da n3no3BaTe Ka6enHaTa MpeKa B doma BN. Bxte pa3dena XmHcO CBbP3BaHe 3a noBue HOpMaun OTHOCHO npoeca.
Ako TeIeBn3OpbT He cyHKcNoHnpa c Ka6enHaTa Bpb3ka, npOBepTe Moema (pytepa). Ako MapwpyTu3aTopbT He e npo6nem, npOBepTe INHTepHET Bpb3kata Ha BaunrMoDem.
Cbbp3BaHeTo e 6aBHO
BnKTe HNCTpyKUInTE 3a KNHrata Ha Baunie 6e3KuyeH MOdEm, 3a Da NOLyHTe INOpMaunr 3a BbTpeHOTO nPoCTpaHCTBO, CKOPoCTTa Ha Bpb3KaTa, KaueCTBOTO Ha CnHaJa I dpyrH NaHAcTPOkN. Tp6Ba Da NMaTe BnCOKaCKOPOCT Ha Bpb3KaTa 3a BaUnr MoDEM.
HapyeHne no BpeMe Ha Bb3npOn3BexJaHe nJI 6aBn peakun
MoKe Da onnTaTe cneHToT, B TaKbB cnyuA:
CbxpaHbAte Ha-MAJko Tpr MeTpa pa3CTOHNoe OT MKNPOBbNHO BneKn, Mo6uHn TeNefoHn, Bluetooth yctpoiCTBa Hn Dpyr WLAN cbbMeCTUMyctpoiCTBa. OntaTe Da npomeHnte aKTUBHna KaHaJI Ha WLAN pytep.
He e HauHnHa nHTepHET Bpb3Ka / CnoJeIHe Ha ayDnO BVdeo faiNoBe He yHKuOHnpa
Ako MAC aDpeca (yHnKaJIeH nIeHTnФKaTOp, HOMep) Ha Baunr KOMNtbp NIN MoEm e NOCToHHa pernCTpaunr, To e Bb3MOxHO, Ye Baunr TteBn3Op He moKe Da Ce CbByPke C INTEpHET. B TaKB Cnyau, MAC aDpece ce 3aBepRaB Tat BCEKn PbT, KOrato Ce CBByPkeTe KbM INTEpHET. TOBa e npedna3Ha MApka cpeuhy HeOTOpn3npaH DoCTbN. Tb' KaTO Baunr TteBn3Op NMa CBOr Co6CTBeH MAC aDpec, Baunr INTEpHET DoCTabYnK He MoKe Da npOBepn MAC aDpeca Ha Baunr TeBn3Op. Iopadn Ta3n npuHa, Baunr TteBn3Op He MoKe Da Ce CbByPke C INTEpHET. CbByPkeTe C Baunr DoCTabYnK Ha INTEpHET ycLytn N da NOncKa IHΦOpMaunr 3a TOBa Ka Da Ce CbByPke C dpyro yCTpoiCTBO, KaTo HapnPmep Baunr TeBn3Op, INTEpHET.
Bb3MOxHo e cblso, ye Bpb3KaTa He Moxe da 6bJe Ha pa3noJoxKeHne npaDn npo6nemn 3aunTHa cTeHa. Ako cmTate, ye TOBa npuHnBa npo6nema cn, CBpXeTe ce C Ba7na DOCTaBvNK Ha nHTepHeYcnyra. FauByoNt MOxe Da e npuHnHaTa 3a npo6nemn cbc CBp3aHOCTTa N OTKPNBAHeTO Ha dpyIn ycTPOINCTBa, DOKATO n3No3BaTe TeNeBn3opa B pexm CnoJeHne Ha aydno N BnDeo faiNoBe nn KOrato pa3rIeXdaTe faiNoBeTe ype3 Ta3n fynkCnur.
HenpaBnEn domeH
YBepTe ce, Ye Buee Cte BnE3JN B CnCTemata Ha Baunr KOMNIObTp c OTOpuHpaHO NOTpe6nteNcKO nme / npona, a cbto Taka ce yBepTe, Ye BaunrT DomeH e AKTNBEH, ppei Da CnoJeNTe foaiNoBe Ype3 BaWATA nporpama 3a MeDHe CbPbHp Ha Baunr KOMNIObTp. Ako DomeHbTe HeBaJIndeH, TOBa MoKe
da npedn3Bnka npo6lemn,doKaTo pa3rJExkDaTe 0aaiNoBe B pexm Ha cnOeIeHa ayDIO BnDeO.
I3noJ3BaHe HaMpexkoBata ycnyra 3a cnOdeJHHe Ha ayDnO BnDeo paJNoBe
ФункцятacnoeJHHeHaaydnoBndeofoaJIOBEe cTaHdapT,koITo yIeChraNpoUcEHa pa3rJExKaHbBcIpOBAtaeKTPoHnKaI npaBNyCTpOncTBaT INo-JeCHN3aYIOTpe6aBDOMaShHaTAmpeka.
To3n cTahdapt Bn no3BolraBa da npereJexdaTe n Bb3npo3BexkDaTe CnIMKn, My3nKa n BnDeO3aNcN, CbXpaHbAHn Ha MeiHnra CbPbP, CBbp3aH KbM BaWata DomaunHa mpeka.
1.ИнсталпанеHa coqФуераHa cbрБьpa
ФункцяТа Aудно/Bиdeo cnoDeЯHe He Moxe Da ce n3noI3Ba, ako cbpBbPHaTApnporpaMa He e HnctaIInpaHa Ha Baunia KOMNtbp NIn aKO Heo6xOIMnna CoΦTyep Ha MedinHnra CbPbP He e HnctaIInpaHa Ha npndpykaBaIoTO yCTpoiCTBO. PoirotBeTe Baunia KOMNtbp cNoDxOJa cBpBbPHa nporpama.
2. Cbbp3BaHe KbM Ka6eHa HnN 6e3XnUHa Mpeka
BnKTe rnaBa XnUHa/6e3XnUHa BpB3ka 3a noDpo6Ha nHopMaun 3a KOHnpyaunra.
3. AkTbBnpaHe Ha cNoeJHeto Ha aydno N Bndeo paIIOBe
BJIe3Te B MeHIOTo HAcTpoiKn> CnCTema> OuIe n aKTHBpuaTe onueta AVS.
4. Bb3npo3Bexdahe Ha cnopeHn paJIOBe npe3 MeuHn6pay3bp
MapknpaTe OOnuTa AVS B MeHIO N3ToHnU, n3NoI3BaTe 6yToHnte 3a NocOka N HaTnCHete OK. Ue 6bDat N36poEHn HAnuHnTe MeiNHN CbPbPnYcTPOINCTBa B MpeXata. N36epTe eDInN HHaTnCHete OK, 3a Da npoDbJnxTe. Ue ce NoaBn MeiNHNrT 6pay3bp.
BnK pa3dena 3a MeHIO MeHEn 6pay3bp 3a OONbHnTeHa HOpMaunr OTHOCHO Bb3npoN3BExKaHe Ha qaiJa.
Ako ce noBn npo6nem C mpeXaTa, n3KIOUOte TeIeBn3opa O KOHTaTn ITO BKIOUOte o6paTHo. Pekm Ha npeBbPtaHe n ppeckaHa He Ce nOdIbPkaT ot fynkunra T CnoJeHne Ha ayDn BO VInDeo fainoBe . PC / HDD / MeiNeH nnEbnp nn Dpyr uCTpoNCTBa, KOnTo ca cBbMeCTnM, TprBa Da ce n3NoJ3BaT c Ka6enHa Bpb3Ka 3a No-BuCOKo KaueCTBO Ha Bb3npoN3BeKJaHe.
I3noJI3BaIe LAN Bpb3ka 3a no-6bp3o cnoJeIHe Ha
paJIOBE MEXy dpyr yCTPOIcTBA KaTO KOMHOTpn.
3a6eJexKa: MoKe da uma KomHjompu, Koumo He Mozam da u3non3am fynKcUma CnodeJeHa ayduo eudeo faunoe e pezymam Ha hacmpouku Ha admuHucmpamopa u Hacmpoukume 3a cu2yphocm (Hanpumep 6u3hec KomHjompu).
PpHIOXeHHa
Moxete da nojyute doctbno npinoxeHnra, nHcTanpaHn Ha Baunr TeJeBn3Op OT MeHIO npinoxeHn. MapKupaTe npinoxeHne n HATNCHEt OK, 3a da cTaptnate.
3a da ynpabnbaTe npINOxehnra, nHCTanpaHn Ha TeIeBn3opa, da do6abnte HOBn npINOxehnro Ta3apa nn Da BVNDTE BCNUKn HauNCHn npINOxehn B peXmHa cayekpaH, Mapknapte onueta Do6abhe Ha OSe n HATNCHEt OK. C NOMOHTa Ha Ta3n ONUry OT MeHOTo MoKeTe Da DO6abNTe HHCTaJIpaHO npINOxehne KbM MeHIO Hauano, da To CTAPtnpate nn Da rno pEmaxHeTe. PemaxBaHeto Ha npINOxehnra T HA m Da e NOBue YoCTbNHO OT MeHIO npINOxehn. MoKeTe cbso Da do6abTc HOBn npINOxehn OTo Ma3nHa. 3a Da BNe3eTe Ha na3apa, MapkpaTe NorOTO Ha KOHNcaTa 3a Na3apyBaHe, pa3NOxeha B RopHata JRA YaCt Ha ekpaha, n HATNCHEt OK. HauNCHte npINOxehn B Mara3nHa ige 6bDat noka3AH. N3noJ3BaYte 6yTOHnte 3a nocoka, 3a da MapkpuATE npINOxehne, n HATNCHEt OK. MapkpuTe onuTAt Do6abHHe Ha npINOxehn n HATNCHEt OTHOBO OK, 3a Da do6abnte n36paHOTo npINOxehne OT MeHIO npINOxehn.
3a 6bp3 DoCTbI DO MeHIO To Do6aBHe Ha dpyrnpocTo HATNCHeTe 6yToHa Internet Ha DCtAHUHOHTOynpaBHeHne (ako e HAnuHo).
3a6eJeku:
EbeHmyaHomo npunaahe 3aeucu npo6nemu Mozam da 6bdam npuunehu om docmaubuka Ha cbopbkaHue, ycnyau. Hmephem ycnyaume Ha mpemu cmpaHu Mozam da ce npomeh,m, da ce npekpamm unu ospanuam no ecko 6peMe.
Freeview Play natafopMa
Freeview Play nlaTΦopMaTa npedJaRa BrpaDeHn TeJeBn3NoHH yCnyr N ycnyr npn nonckBaHe. PpocTo HaTncHeTe 6yToHa Freeview Play Ha BaWeTo DnCTaHnOHO npabJeHne, 3a Da ce CbbpXeTe KbM Freeview Play nlaTΦopMaTa.
Docbno Freeview Play nlaTΦopMaTa mMaTe npe3 MeHIOta Hauano n PpINOxKeHn. HatNCHEte 6yToHa MeHIO uN36peTe Hauano nn PpINOxKeHn. CneI TOBa MapKpaaiTe Freeview Play n HaTNCHEte 6yToHa OK.
Tp6Ba Da npHemTe o6uHTe ycNoBna Ha Freeview Play ycnyrTe, aKo He cTe rN npHEni no BpeMe Ha IbPBOHaaHaTa HnctaJaun. MapknpaIte Da n HatNCHeTc OK OT DnCTaHcUHOHOTo ynpaBJIeHne, 3a Da NOTBbPdnte N pOdBJXKeTe.
Ie ce nokaxat BrpaedHnte npnnoxehna HA TV Player. 36epTe HATNCHEte 6yToHa OK.CneT0Ba n36epTe CbDpbXaHHeTO, KOeTo NCKate Da Bb3npo3BeDeTe H CNeD TOBa HATNCHEte 6yToHa OK, 3a da rIeDaTe.
CbDpbxahnraTa MoKe Da ca DoCTbHn N da ce Bb3Pon3BexKaT dIupeKTHO OT TeJIeBN3NoHHN cnpaBOuHnK. 3a DOnbJIHHTeHa INΦopMaζra BxKTe pa3dE JEnktpoHeh nporpameh cnpaBOuHnK.
N3nCKBaHn
Freeview Play ycnynte moraT da ce n3non3BaT caMo ako ca n3nbJHHeH cNeIHNTE n3NCKBaHHa:
CbpxTe Baunr TeJeBn3Op Kb m nHTepHeT. HeoXoIMa e MInHmAnHa cKOpoc T ha uPOKoNEhToBdoCTbN ot 2Mbps 3a npabuHNo yHKcnoHnpaHnBaPaeHnTe ycnyn n ycnynte npn NOnCKBaHe.
CbIacBaHe c ycNoBnTa Ha Freeview Play
3a6eIeKka: 3nnon3eaHem oHa nIamfopmama Freeview Play ue ce omyuma 3a 8cra MaceuHa doBaKa 3a wupokoneHmoBu daHnu. Camo u3bpaHume KaHau npednaazam fynKUma 3a 7-dHeBHO cneDeHe.
INHTepHeT 6pay3bp
3a da n3no13BaTe INTEpHET 6pay3bpa, nbpBO BJIe3Te B MeHIO PnIOXeHna. CneT TOBa CTapTnpaTe PnIOXeHnETo Ha INTEpHET 6pay3bpa, KOEt OMa OPAHKeBO JIoro CbC CNMBOJ Ha 3emrTa.
Ha nbpBOHaaynHa ekpaH Ha 6pay3bpa, CHIMKNTe Ha npedBapntEnHO 3aJaDeHInTe (ako HMa TaKINBa) IHHKOBe KbM HAnuHnYe6caNt, Ze ce NOKaKaT KaTO OIcH N Bp3o Ha6npaHe, 3aeDNo C ONUnTe PedaKtnpaHe Ha 6bp3OTo Ha6npaHe N Do6abRHe KbM 6bp3O Ha6npaHe.
3a da ynpabnbaTe ye6 6pay3bpa, n3noJ3BaIte 6byOnHTE cbc CTpeJIKN OT dNCTaHcUHOHOTO ynpabLeHne nn Cbbp3aHaT a MmJka. 3a da BVdInTe c OnuHTE Ha 6pay3bpa, IpemecTe TE KypCopa KbM rOpHaTa qact Ha cTpaHnucata nn HATNCHEte 6yToHa Back/Return. OnuHTE NcTopra, PAnKn OTMetkn IeHTata Ha 6pay3bpa, KOrTO cbDbpxa 6yToHtE previous/next, 6yTohBT refresh, aDpeChata neHTa/ JeHTata 3a TbpcHe, 6yToHtE Speed Dial n Vewd ca HaJIuHN.
3a da 6obabte Jekanatha ctpaanca KbM cnncbka Bbp3o Ha6npahe 3a 6bp3 doctbn, npemecTeKypcopa B rohpata qact Ha ctpaanata nn HATNCHe6byToHa Back/Return. Ue ce noBn JeHTata Ha 6pay3pa. MapkpaiTe 6yToHa Bbp3o n36npahe
HnHaTNCHe OK.Cnei TOBa n36peTe ONUYTA 106abAHe KbM 6bp3o HaBpuHe HnHaTNCHe 6yToHa OK. POnbLnHeTe npa3HNte MeCTa 3a NMe n AApec,
MapKnpaIte OK n HaTnCHete 6yToHa OK, 3a da do6abITE. DOKATO CTe HA cTpaHnUata N NCKaTe Da do6abITE KbM CNCSbKa Bbp3O Ha6nPaHe, MapKnpaIte 6yToHa Vewd n HATnCHete OK. CJeT TOBa MAPKnpaIte Ounra Tdo6abRHe KbM 6bp3O Ha6nPaHe n HATnCHete 6yToHa OK. POnetata NMe n AApEc ue ce nonbJIHrA bTOMaTHUHO Cnopei caTa, KOITTO NoceuBaTe.
Ekpan Ha Mo6nHTo yCtpoNCTBO
Ha ochoBnna ekpaH moKeTe da Hamepnte pa3dJIneT, 3a da ocBueCTBnTe DoctbN do pa3nnuHN fynKun.
PpInoKeHneTo n3BnUa aKtTuAINHn CnncbK cKaHaJI N OT TeNEBn3Opa, KOraTO ToI Ce BKNIOHN.
MONTE KAHAJI: Iporpamnte Ha nbpbnte yeTnpi KaHaJa ot cncsbKa C KaHaJI, Bb3ctaHOBeHn OT TeJeBn3opa, ca noka3aHn. Moxe Ta cMeHnTe n36poEHnTE kaHaJI. Hatnche TBpxy MmHaTHopata Ha KaHaJa n 3aDpBXkTe. Ue ce nokaxe cncsbK C KaHaJI mOxete Da n36epete JekAHn O T Bac KaHaJ, KOITo da 6bDe 3ameHeH.
TV: Moxete Da rneatae cBbpxkhaue ot nanka TB. B To3n peXIM MOxete Da ce DnKITE Ha cnncbka C KaHaJI, Bb3CTaHOBeH OT BaUNr TeJeBN3Op, N KInKHeTe Bbpy MmHaTOpN, 3a Da BNInTe CTpaHnIte C NoDpo6HoCTn.
3aIncnte: MoKeTe Da BnInTe BaUInTe aKTbHn 3aIncn (aKo IMa TaKbB) n HAnOMHnHa Ype3 To3n pa3dJe. 3a Da n3TpneTe HrKO eIemEHT, npocTo HaTnchTe Bbpxy IKOHATA 3a N3TpNBaHe BbpxY BCEKN peI.
ECI (eNEKKTPOHeH cnpaBOuHNK 3a nporpaMnTe): Moxete Da Bnnte rpaΦnUte 3a n3NbYBaHe Ha n36paHn CnncBcun KaHAn C To3n pa3dEi. Moxete cbTaka Da npemHaBaTe ppe3 KaHAnTe, KaTO HATnCHETe Bbpxy n36paHn KaHAn Ha CTapTOBaTa peWetka Ha EπC. MoJr, mMaIte npedBnD, ye AKTyAIN3nPaHe / onpeChraBe Ha INΦOpMaζnTa Ha EπC MoXe Da OTHeme n3BecTHO Bpeme B 3aBnCmOCT OT BaWaTa KaueCTBOTO Ha MpeXata n Ye6 ycLyrN.
3a6eJekka: HmepHem epb3ka ce u3uckea 3a WEB 6a3upaHu uHOpmauuu 3a ENC.
HACTPOIKN: KoHnHypnpaHe Ha npInIOKeHneTo no BaWe JeNaHne. MoKeTe Da npOMeHnte;
A B T O M A T N U H O 3aKJIIOUcBaH e (c a m o B I O S): E K p a H b T Ha y C T P O R I C T B O T O c e n3KJIIOUcBa aB T O M A T N U H O C l e d O npeIeIeN nepiOd ot Bpeme. Io nOpa3bnpaHe e n3KJIIOUcHa, KoETo O3HaUaBa, Ye ekpaH bT BnHa rI Μe OCTaH e BKJIIOUcH.
A B T O M A T N U H O a K T N B U P A H e H a F o l l o W M e T V: Φ y h k u n r a T a F o l l o W M e T V (a k o e h a n i n u h a) ige c e c t a p t n p a a b T O M a T N U H O, K O r a T O T a 3 n H a c t p o i k a e a k T N B U P A H a. I I no n d p a 3 b u p a H e n 3 K n i u o h e.
ABTOMATNUHO CBbp3BaHe KbM TeJEBN3Op: Korato e aKTHBnpuHo, BaSeTo MObNJHO yCTpoiCTBO aBTOMATNUHO ige ce CBbpXe C NocJeHNO CBbp3aHn TELEBN3Op n ige ppeckOuHa ekpaHa 3a TbpceHe Ha TEJEBN3opa.
CmHa Ha TeJebn3opa (cAmo B IOS): Poka3Ba CBbp3aHnB MOMeHTa TeJebn3Op. MoKTe Da HATINCHETe Bbpxy Ta3n HAcTPOJa, 3a Da OTnDETe Ha ekpaHa "TbpcHe Ha TeJebn3Op" n Da CMeHInTe BnDa Ha TeJebn3Opa.
PedaKtupaHa notpe6nteLckn CnncbK c KaHAn: MoKeTe Da peAaKtupate CBOJ nepcoHaJIu3npaH CnncbK C KaHaJI N C NOMOHTa Ha Ta3N HAcTpoKa.
N36npaHn3TOUHnKaHa CnncbKa C KaHaHn: Moxete Da n36epTe n3TOUHnKa Ha CnncbKa C KaHaHn, KOHTo Da Ce n3NOJ3Ba e npINIOKeHneTo. OOnuIne ca "CnncbK c TeJeBn3Opn" N "Iotpe6nteJcKn CnncbK". OCBEN TOBa moXeTe Da aKTUBnPATE ONuYTa "3aONMn MOr n36Op", 3a Da 3aJaTe TE N36paHn HA CnncbKa C KaHaHn KATO KOHCTaHTe H36Op. B To3n Cnya, aKO n36paHnT n3TOUHnK e HaJINuHe, Ize Ce n3NOJ3Ba B npINOKeHneTo.
Homep Ha Bercnra: Poka3Ba Tekyuata Ba Bercnna Ha npiloxeHneTo.
CtpaHua c noDpo6HoCTn
3a da OTBOpHTe cTpaHncaTa c NoDpo6HoCTnte, HaTncHeTe Bbpxy nporpaMaTa. Ha ekpaHa Ha cTpaHncaTa c NODpo6HoCTnte MOKeTe Da NOJyHtete NODpo6Ha INΦopMaζη 3a N36paHtete OT Bac nporpAm. Ha Ta3n cTpaHnca MoKeTe Da OTKpneTe pa3dJI "NODpo6HoCTn", "UyactHnCt&eknAax" n "BnDea".
IOPPOBHOCTN:To3n pa3dennpeoctabra
ob6ueneHn HOpMaun 3a n3bpaHaTa nporpama.
CbtoTaka mma JInKOBe KbM Peic6yK n TynTbp
cTpaHnO t N3bpaHaTa nporpama.
UYACTHnI&EKnIAX: Poka3Ba BCnIcxopa, DOpnpHeCn 3a TeKyuata nporpama.
BnDEA: OcnrgyprBa KInnoBe Ha Youtube, Cbbp3aHn c n36paHaTa nporpama.
3a6eJekka: 3a Hkou yHKuuu MoKe da ce u3uck8a UHmephem ep3ka.
FollowMe TV (ako e hannueh)
HaTnchete Bbpxu IKoHaTa FOLLOW ME TV, HAMnpaCa Ce B DoJHn JIb bIbJI Ha ekpaHa Ha BaWeto Mo6nH0 yCTpOietBO, 3a Da CMeHnte oOpMJIeHnTo Ha cyHKnraTa FollowMe TV.
HaTncheTe Bbpxu IKoHaTa 3a Bb3npOn3BexJaHe, 3a Da cTApTnpaTe CtpnIMnHr Ha cbDbpXaHHeTo OT TeJIeBn3Opa KbM Mo6nHTo yCTpoiCTBO. Ha pa3noJoxHe, aKO BaUeTO yCTPOICTBO e B pa60THna 0xbat Ha pyTepa.
PekmOrpeaio
To3n pexkIm Ha cyHKunraTa FollowMe TV e aKTHBupan
IIO nOpa36bpanHe I IO3BOJRA Ba cTprMnHr Ha
CbDbpxKaHne OT dpyr N36paH TeNeBn3NOHeH N3TOuHnK
m MeDneH 6pay3bp.
3a6eJeku:
Imaime npedeud, ye ce noodbpxam cmo uuppoeu (DVB-T/C/S) SD u HD kahanu.
He yHKquuHupam yHKquume 3a BKn./u3Kn. Ha noodpbkka ha ayduomo u cymbumpume Ha HraKoNko e3uka.
Pou3oDumHeHocmHa cmuMunHa MoKe da ce npomEn e 3aBucumocm KauecmeOHa eauama epb3ka.
CtpaHua 3a MeiHcno cnoJeIHe
3a da noJyUHTe doCTbI Do MednHo Bb3npOu3BExJaHe, HATUCHEte cTpeJIkaTa Harope BdoHnra JAB bTbN Ha ekpaHa.
Ako nkoHata "MeiHb3npo3BexdaHe" e HATnchata, ce NOKa3Ba ekpaH, KbTeO MoKeTe Da n36peTe Tnpa Ha MeiHna faiI, KOTo da NoJeTc BaaNra TeJIeBu3Op.
3a6eIekka: He ce nodobpkm am ecuku foopmam Ha faunoe c u3o6paXeHnur. Ta3u fynKUra Hma da paBomu, ako fynKUma "Ayduo eudeo cnodeJe" He ce nodbpxka.
ФункцmaCMapTДиCTaHcNoHHO
Moxete da n3noJ3BaTe mo6nHOTo cn yctpoiCTBO KaTO dNCTaHcUOnHO ynpabJeHne 3a Baunr TeNeBn3Op, CneI KaTo r CBpKTe KbM TeNEBn3Opa.3a da n3noJ3BaTe cyHKnraTa smr remote, HATncHeTe cTpePkata Harope B DoHNH JAB bBn Ha ekpaHa.
Tnacobopa3no3HaBaHe
Mokete Da HaTnCHete NkOHaTa MnkpooH ( ) n da ynpabnaBate npINOxKeHneTo cN C rIacOBn KOMaHn, kaTo Hanp. "Portal!" ("NopTan!"), "Volume Up/Down!" ("YBeIIuH/nAmann cnJata Ha 3Byka!"), "Programme Up/Down!" (CneBa7a/npeDnHa nporpaMa"!).
3a6eNkka: Ta3u 4yHKUe e camo 3a ycmpoUcmea, 6a3upaHn Ha pa3noJIOKeHue Ha Android.
CtpaHnca c KnaBnataTypa
CtpaHnucata c KnaBnatypata MoKe da 6bnde OTbOpeHa nDba HaunHa; Upe3 HATNCKaHe Ha IKoHaTa
KnaBnAtypa Ha ekpaHa Ha npINOxKeHneTo IIN ABTomATnHO Upe3 NOnyUbaHe Ha KOMaHa OT TeIeBu3opa.
N3nCKBaHn
- Smart TV
- Мөхова Бөвэка
- Mo6nH0 yCTpoiCTBO, 6a3npaHo Ha Android nIi iOS nIaTΦopMa (Android OS 4.0 nIi no-BvcoKa; IOS 6 nIi no-BvcoKa Bepcna)
- Smart Center npnloxehne (MOKe Da ce Hamepn B OHnaH Maa3Ha 3a npnloxehn Ha 6a3aTa Ha Android n iOS nlaTfopMn)
- PyTepeH moDEM
- USB 3a n a m e T r a B a u o y c t p o i c T B O B b B F A T 32 φopmat (H e o 6 x o d m 3 a φy h k u r t a 3 a n i c, a k o e H a n i u h a)
3a6eJeku:
3a Android ycmpoicmea, noodbpxam ce hopmanen (mdpi), 2014 (hdp) u MHOO 2014 (xhdpi) pa3mep Ha ekpana. Ycmpoicmea c 3" unu no-Manbk pa3mep Ha ekpana He ce noodbpxam.
3a iOS ycmpoucmea, noobpbxam ce ecuku pa3mepu ekpaHu. Nompebumenckum unmepceuc Ha Smart Center npunoxehuemo nooneku Ha npomraHa 3abucumocm om eepcuma, uhcmanupaHa ha eawemo ycmpoucmeo.
XapakTepcntka Ha Alexa Ready
Alexa e rnaocobata ycnyra Ha Amazon, 6a3npaHa Ha obnaute, Ha pa3noJoxeHne Ha MHoro anapatn c rnaocBO ynpabJeHne. Baunr TeIeBn3Op e CbBMecTUM C n e rTOB 3a H3NoJ3BaHe C yCTPOJCTBaTa Alexa.C Ta3n fynKcJMy MoKeTe da H3NoJ3BaTe rnaCa cn, 3a Da KOHTPOJnPaTe fynKcJNITE Ha TeJIeBn3Opa cn, KaTO BKNIOUChBaHe IJIn N3KJIOUChBaHe, IpomHa Ha KaHaJI INI BxOJeH N3TOUHnK, KOHTPOJnPaHe Ha CINaTa Ha 3ByKa n dp.
N3nCKBaHna
Tp6Ba da 6bDat n3nJIHeHn CneHNTE n3NCKBaHHa:
Alexa Ready Smart TV
- Amazon Alexa yctpoiCTBO
- MoBnHNo yCTpOiCtBO, KaTo TeneΦoHa nn Ta6NeTa Bn, C npINOKeHnra Ha Smart Center n Amazon Alexa nHCTaJInpaHn Ha Hero
-Домашна Мрека ch WLAN b3MOxHOCTH
- Amazon akayHT
Kak da koHTpOIpaTe TeIeBn3opa cn c Amazon Alexa yctpoiCTBOTO
CbpxTe TeIeBn3opa N MObHOTo CN yCTpoNCTBO Cbc CbUata MpeKa C DocTbn Do nHTepHeT KaTo BaWeto Alexa ycTPONCTBO.
CdboeTe npnloxehneTo Smart Center c TeJeBn3opacn.CneTobA DOKOChTe IORoTo Ha Amazon Ha rnaBHnE ekpan Ha npnloxehneTo Smart Center. 6bDeTe HacoeyH KbM cTpaHnua 3a peNCTpaunia. CneDbaiTe INcTpyKcUnnte Ha ekpaHa, 3a da 3abbpWnte IpOceca Ha peNCTpaunia n CBp3BaHe Ha TeJeBn3opa.
- Μe 6bndeTe NOMOJIEN Da onpeDeJIte IMe 3a BaIINr TeJEBN3Op, HapeHcO "PpIraTeNcKO IMe"(ΠN). "PpIraTeJIcKO IMe" e IMe, KoETo BN HaONMn 3a TeJEBN3Op BA, KATO "TeJIeBNI3Op B DHeBHa CTAJ", "KxHr C TeJIeBNI3Op", "TeJIeBNI3Op B TpaIe3apNrTa" nT.H. IV3bnpaIte JecHOIOCTbIIHO IMe. Ie KaXeTe TOBa IMe, 3a Da KaXeTe Ha Alexa KoI TeJIeBNI3Op Da KOHTPOIIPA.
CdBoeTe npnloXeHneTo Alexa Ha Mo6nHoto cn yctpoiCTBO C yctpoiCTBOTO Alexa, Tbpceteymehnra Ta Ha TeNeBn3opa cn C Mapkata n roaktnBupaIte B npnloXeHneTo Alexa. 3a nobeeHΦopMaun, MoKeTe da ce o6bpHeTe KbMpboKoBOIDCTBOTO 3a NOTpe6nteHa yctpoiCTBOTO Alexa.
-ПомолеAlexaда OTКрпЕ Baшinte yctpoиCTBa. Kaжete "OTКрп MOnTe yctpoиCTBa" nIN n36peTe OTKрИВанe Ha yctpoиCTBa B CbOTBETHnЯ pa3deJI B yctpoиCTBOTO Alexa.
Cne KaTo npOceBt Ha OTKpNBaHe pnpKNIOUH, Ie MoKeTe Da KOHTpONuPaTe TeJIeBN3Opa Cn rNaCoBO.
3a6eJexka:
Ybepeme ce, ye ycmpoucmbama ca c6bp3aHu KbM cbuamaMpexa. Ho cned npuknoyehmo ha mezu npouecu Ha c6bp3aHe u c6bp3aHe ycmpoucmeomo Alexa u eawum meeneu3op eeue Hma da mpr6ba da ca e edHa u cbuaMpexa.
Cne kamo u3ebpwume nbpoehaunHa unhcmanaua Ha Bawu meeeu3op, cmapupaume npunoxeHuemo Smart Center u zo cdoeme omhooe C Bawu meeeu3op. Cne moea dokocheme lozomo Ha Amazon Ha 2naehnue ekpan u npoeepeme danu cme eane3nu 8 akayHma cu E Amazon, ako Hee Heobomo da eene3eme omho6 npocuna cu u da
onpedenume Friendly Name omnoo 3a eauu meeubzop, 3a da moxeme da npodbnxkume da konmpolupame Teneubzop c ycmpoicmeo Alexa.
PnmepnKoMaHn
ETo HRAKON OT KOMAHINTE, KOINTO Ie MOKeTe Da daJeTe Ha TeNEBUN3Opa BN c aKTNBUPaHa ot Alexa:
| Команда Функция | |
| Alexa, вklючи 'ПИ' Вklючы | телевизора |
| Alexa,在其klючи 'ПИ'在其klючы | ва телевизора |
| Alexa, вklрочи веди 'ПИ' | старта медино вklз-прочьдане |
| Alexa, сложи на пayза 'ПИ' | спра мединоTOВвklз-прочьдане |
| Alexa, вklstанови 'ПИ' | Вklstанову мединоTOВвklрочьдане |
| Alexa, спра 'ПИ' | Спра мединоTOВвklз-прочьдане |
| Alexa,在其klрочи палегд Кьм 'ПИ' | Вklрочь мединоВ pe- жим на为其klро палег рто- не палег |
| Alexa,在其klрочи палад 'ПИ' | Вklрочь мединоНу Медята палад |
| Alexa,在其klрочи с铝合金 Звка на为其klру 3ыka на为其klр'ha 50 | Задава с铝合金 на 3ыka на съотberгто НИВО |
| Alexa,在其klрочи с铝合金 Звка на为其klр'ha 'ПИ' | Увеничаб с铝合金 на Звka c 10 edини |
| Alexa,在其klрочи с铝合金 Звка на为其klр'ha 'ПИ' | Hamалява с铝合金 на Звka c 10 edини |
| Alexa,在其klрochа на为其klр'ha 'ПИ' | Зклочь Ту? Ту? Ту? Ту? Ту? Ту? Ту? Ту? Ту? Ту? Ту? Ту? Ту? Ту? Ту? Ту? Ту? Ту? Ту? Ту? Ту? Ту? Ту? Ту? Ту? Ту? Ту? Ту? Ту? Ту? Ту? Ту? Ту? Ту? Tу? Tу? Tу? Tу? Tу? Tу? Tу? Tу? Tу? Tу? Tу? Tу? Tу? Tу? Tу? Tу? Tу? Tу? Tу? Tу? Tу? Tу? Tу? Tу? Tу? Tу? Tу? Tу? Tу? Tу? Tу? Tу? Tу? Tи? Tи? Tи? Tи? Tи? Tи? Tи? Tи? Tи? Tи? Tи? Tи? Tи? Tи? Tи? Tи? Tи? Tи? Tи? Tи? Tи? Tи? Tи? Tи? Tи? Tи? Tи? Tи? Tи? Tи? Tи? Tи? Tи? Tи; Tи? Tи? Tи? Tи? Tи? Tи? Tи? Tи? Tи? Tи? Tи? Tи? Tи? Tи? Tи? Tи? Tи? Tи? Tи? Tи? Tи? Tи? Tи? Tи? Tи? Tи? Tи? Tи? Tи? Tи? Tи? Tи? Tи? Ти? Tи? Tи? Tи? Tи? Tи? Tи? Tи? Tи? Tи? Tи? Tи? Tи? Tи? Tи? Tи? Tи? Tи? Tи? Tи? Tи? Tи? Tи? Tи? Tи? Tи? Tи? Tи? Tи? Tи? Tи? Tи? Tи? T. T. T. T. T. T. T. T. T. T. T. T. T. T. T. T. T. T. T. T. T. T. T. T. T. T. T. T. T. T. T. T. T. T. T. T. T. T. T. T. T. T. T. T. T. T. T. T. T. T. T T. T T T T T T T T T T T T T T T T T T T T T T T T T T T T T T T T T T T T T T T T T T T T T T T T T T T |
| Alexa,在其klрочи с铝合金 Звка на为其klр'ha 'ПИ' | Задава с铝合金 на 3ыka на съотberгто НИВО |
| Alexa,在其klрочи с铝合金 Звка на为其klр'ha 'ПИ' | Увеничаб с铝合金 на Звka c 10 edини |
| Alexa,在其klрочи с铝合金 Звка на为其klр'ha 'ПИ' 362 | Здамява с铝合金 на Звka c 10 edини |
| Alexa,在其klрочи с铝合金 Звка на为其klр'ha 'ПИ' 362 | Здамява с铝合金 на Звka c 10 edини |
| Alexa,在其klрочи с铝合金 Звка на为其klр'ha 'ПИ' 362 | Здамяibratorс铝合金 на съотberгто НИВО |
| Alexa,在其klрочи с铝合金 Звка на为其klр'ha 'ПИ' 362 | Здамяibratorс铝合金 на съотberгто НИВО |
| Alexa,在其klрочи с铝合金 Звка на为其klр'ha 'ПИ' 362 | Здамяibratorс铝合金 на съотberгто |
| Alexa,在其klрочи с铝合金 Звка на为其klр'ha 'ПИ' 362 | Здамяibratorс铝合金 на съотberгто |
| Alexa,在其klрочи с铝合金 Звка на为其klр'ha 'ПИ' 362 | Здамяibratorс铝合金 на съотbergто |
| Alexa,在其klрочи с铝合金 Звка на为其klр'ha 'ПИ' 362 | Здамяibratorс铝合金 на съотbergто |
| Alexa,在其klрочи с铝合金 Звка на为其klр'ha 'ПИ' 362 | Здамяibratorс铝合金 на съотbergто |
| Alexа,在其klрочи с铝合金 Звка на为其klр'ha 'ПИ' | Здамяibratorс铝合金 на съотbergто |
N e ckbpaueHuemo Ha 'PpuameIcko Ume'.
HOpMaun 3a DVB yHKnOHaHnocTa
To3n DVB npneMnke eoXoJaEeHCTBeHo 3a H3noJ3BaHe BDbpJxBaTa, 3a KOrTO e npedHa3NaueH.
Bbnpekn ye To3n DVB npneMHNK OTROBapra Ha Han-HOBNTe DVB cneuФkaun, He moKem da rapaHTnpame cbbmecTUMocT c 6bdeun DVB npedabAHn, nopadn npomeHnte, Konto Morat Da HactbnT B n3IbYBaHnTe paDnOcNrHaJI N TexHoNoRn.
HЯкофункин Haцфрobata TeJIeBn3moKe Da He caHa pa3NoIoxKeHne BbB BCNcKn IbpxkAbN.
IocTOnHNo ce cTpeMm Da nOo6pmm npOdyKTnTe cn; npaAn Ta3n npuHa CneunKauNTe Morat Da ce npomHrT 6e3 npedBapntelno npedn3BecTne.
3a cbbetn OTkbde da 3akynnte akcecoapn, MoJra CBbpxkete ce c mara3nHa,OT KOHTO CTe 3akynnnnOBopyDbaheto.
Sada/slijedeci raspored
U ovoj opciji okvira ce biti prikazani samo trenutni i buduci dogaadi navenenih kanala. Mozete koristiti navigaciske tipke za kretanje kroz listu dogaada.
Koristite taster Nazad/Povratak da biste koristili dostupne opcije kartice. Oznacite prozor Filter i pritisnite OK da biste vidjeli opcije filtriranja. Za promjenu okvira oznacite Raspored vremenske linije i pritisnite OK.
Opcije dogadaja
Koristite navigacijski tipkeda oznacite dogadaj i pritisnite taster OK za prikaz menija OpciJE. Dostupne su sljedece opcije.
Odabir kanala: Koristeci ovu opciju, mozete prebaciti na označeni kanal da biste ga gledali. Programski vodičce se zatvoriti.
Vise informacija: Prikaz detaljnih informacija o izabranom dogaaju. Koristite navigacijski tipke za nagore i nadole za kretanje kroz tekst.
Podesi tajmer za dogadaj / Izbrişi tajmer za dogadaj: Izaberite opciju Podesi tajmer za dogadaj i pritisnite OK. Možete podesiti tajmere za buduce dogadaje. Za otkazivanje vec postavljenog tajmera, označite taj dogadaj i pritisnite OK. Nakon toga izaberite opciju Izbrişi tajmer za dogadaj. Tajmer ce biti otkazan.
Snimaj/lzbrisi snim. Tajmer: Izaberite opciju Snimanje i pritisnite dugme OK. Ako ce se dogadaj prenositi u budućnosti, bit ce dodad na listu tajmera
koji ce se snimiti. Ako se izabrani dogadaj emituje u tom trenutku, snimanje ce odomah početi.
Da biste otkazali postavljeno snimanje, oznacite taj dogadaj i pritisnite taster OK i odaberite opciju Izbrisi smimak. Tajmer. Tajmer snimanja ce biti otkazan.
VAZNO! Povezati USB disk na TV jakino kada je TV isključan. Zatim trebali bi uključiti TV da biste omogucili odliku smimanja.
Napomene: Ne mozete prebaciti na bilo koji drugi kanal ili izvor dok je u toku aktivno snimanje ili tajmer na tekucem kanalu.
Nije moguce postaviti tajmer ili tajmer snimanja za dva ili vishe pojedinačnih dogadaja u istom vremenskom intervalu.
Integrirane usluge „pogledaj propusteno" (Catch-Up)
Možete uživati u Freeview Play uslugama „pogledaj propusteno" (catch up TV) koje rade direktno preko elektronskog vodica kroz programe. Dok se nalazite u kanalu, koristite tastere za usmjeravanje za kretanje unazad kroz vremenski raspored. Vidjet Čete sadržaj od posljednjih nekoliko dana. Dostupni sadržaji za uslugu „pregledaj propusteno mogu se promijeniti u skladu s emiterima i biće ozačeni ikonom reprodukcjie. Oznacite sadržaj kojiŽelite da reprodukujete i pritisnite tipku OK.
Proverite da li je vaš televizor povezan na kućnu mrežu kako bi mogli koristiti usluge „pogledaj propusteno" (catch up). Za vishe informacija o tome i drugim zahtjevima za Freeview Play servise, pogledajte odjeljke Povezivanje i Freeview Play platforma.
Elektronski vodič kroz programe
Pomocu funkcije elektronskog vodiča kroz programe vašeg televizora možete pretražiti raspored emitovanja trenutno instaliranih kanala sa vase liste kanala. Od povezanog emitovanja zavisi da li je ova mogucnost podržana ili ne.
Za pristup vodiču kroz programe, pritisnite taster Vodič na daljinskom upravljacu. Takode možete koristiti opciju Vodič iz menija televizora.
Sada/slijedeci raspored
U ovoj opciji okvira ce biti prikazaniismo trenutni i buduci dogaadi j navedenih kanala. Mozete koristiti navigacijske tipke za kretanje kroz listu dogaadaja.
Koristite taster Nazad/Povratak da biste koristili dostupne opcije kartice. Oznacite prozor Filter i pritisnite OK da biste vidjeli opcije filtriranja. Za promjenu okvira oznacite Raspored vremenske linije i pritisnite OK.
OpciJE dogadaja
Koristite navigacijski tipkeda označite dogadaj i pritisnite taster OK za prikaz menija OpciJE. Dostupne su sljedeće opcije.
Odabir kanala: Koristeči ovu opciju, možete prebaciti na označeni kanal da biste ga gledali. Programski vodičce se zatvoriti.
Vise informacija: Prikaz detaljnih informacija o izabranom dogadaju. Koristite navigacjske tipke za nagore i nadole za kretanje kroz tekst.
Podesi tajmer za dogadaj / Izbrisi tajmer za dogadaj: Izaberite opciju Podesi tajmer za dogadaj i pritisnite OK. Możete podesiti tajmere za buduce dogadaje. Za otkazivanje vec postavljenog tajmera, označite taj dogadaj i pritisnite OK. Nakon toga izaberite opciju Izbrisi tajmer za dogadaj. Tajmer ce biti otkazan.
Snimaj/lzbrisi snim. Tajmer: Izaberite opciju Snimanje i pritisnite dugme OK. Ako ce se dogadaj prenositi u budućnosti, bit ce dodad na listu tajmera koji ce se snimiti. Ako se izabrani dogadaj emituje u tom trenutku, snimanje ce odmah početi.
Da biste otkazali postavljeno snimanje, oznacite taj dogadaj i pritisnite taster OK i odaberite opciju Izbrisi smimak. Tajmer. Tajmer snimanja ce biti otkazan.
VAZNO! Povezati USB disk na TV jakino kada je TV iskljucan. Zatim trebali bi uključiti TV da biste omogucili odliku smimanja.
Freeview Play platform
Freeview Play platforma obezbeudje „pogledaj propusteno" (catch up TV) i usluge na zahtjev. Jednosavno pritisnite tipku Freeview Play na daljinskom upravljaču za povezivanje na Freeview Play platformu.
Freeview Play platformi se takode moze pristupiti iz Pocetnog menija ili menija Aplikacije. Pritisnite taster Meni i izaberite Pocetni meni ili Aplikacije. Oznacite Freeview Play i pritisnite dugme OK.
Prvo cete morati da se slozite sa uvjetima i odredbama za Freeview Play usluge ako se sa njima niste slozili tokom Prve instalacije. Oznacite Da i pritisnite OK na daljinskom upravlaacute za potvrdu i nastavak.
Prikazaće se aplikacije integriranog TV plejera. Izaberite jegnu i pritisnite tipku OK. Zatim odaberite sadrzaj kojiŽelite da reprodukujete i pritisnite tipku OK za gledanje.
Sadržaju „pogledaj propusteno" (catch up) se takode moze pristupiti i on se moze reprodukovati direktno iz TV vodica. Za vishe informacija pogledajte odjeljak Elektronski vodič kroz programe.
Zahtjevi
Freeview Play usluge se mogu koristitiismo akosu ispunjeni sljedeci uslovi:
- Povezivanje televizora na internet. Minimalna brzina širokopojasnog pristupa od 2 Mbps je potrebna za pravilno funkcionisanje „pogledaj propusteno" (catch up) i usluge na zahtjev.
- Slaganje sa uslovima Freeview Play-a.
Napomena: Upotreba platforme Freeview Play ce se računati prema bilo kojoj mjesećoj naknadi za širokopojasni pristup internetu. Samo izabrani kanali pruzaju 7-dnevni „pogledaj propusteno" (catch up).
Internet prelistac
Da biste koristili internet pretraživač, prvo udite u meni Aplikacije. ZatimPokrenite aplikaciju internet pretraživača sa narandžastim logotipom sa simbolom Zemplje.
Na početnom ekranu pretraživača, slicice unapred definiranih (ako postoje) veza do dostupnih web lokacija ce se prikazati kao opcije Brzog biranja zajedno sa opcjama Uredi brzo biranje i Dodaj na brzo biranje.
Da biste upravljavali web pretraživačem, možete koristiti navigacijski tipke na daljinskom upravljacu ili povezanom mišu. Da biste videli traku pretraživača sa opcjija, kursor pomerite na vrh stranice ili pritisnite tipku Back/Return. OpciJE Istorija, Kartice i Obeleživači i traka pretraživača koja sadrži tastere prethodno/sljedeće, taster za osvježavanje, traku za adresu/pretragu, Brzo biranje i Vewd tastere su dostupne.
Da biste dodali zeIjeni web sajt na listu Brzo biranje radi brzeg pristupa, pomaknite kursor na vrh stranice ili pritisnite tipku Nazad/Povratak. Pojavice se traka preglednika. Oznacite tipku Brzo biranje - i pritisnite tipku OK. Potom odaberite opciju Dodaj u brzo biranje i pritisnite tipku OK. Popunite prazna polja za Ime i Adresu, oznacite OK i pritisnite tipku OK da biste dodali. Dok ste na sajtu koji zeIte dodati na listu Brzo biranje, oznacite tipku Opera- i pritisnite tipku OK. Potom oznacite opciju Dodaj u brzo biranje i ponovno pritisnite tipku OK. Ime i Adresa ce se automatski popuniti u skladu sa sajtom koji ste posjetili. Oznacite OK i pritisnite tipku OK.
Takoder mozete koristiti opcije menija Vewd da upravljate pregledacem. Oznacite tipku Vewd i pritisnite tipku OK da biste vidjeli dostupne specificne i opce opcije za stranicu.
Postoje razliciti načini da pretražujete ili posjetite web stranice koristeči web pretraživač.
Unesite adresu web stranice (URL) u polje za pretragu/adresu i oznacite tipku Pošalji na virtualnoj tipkovnici i pritisnite tipku OK da posjetite stranicu.
Unesite kljucne rijeci u polje za pretragu/adresu i oznacite tipku Pošalji na virtualnej tipkovnici i pritisnite tipku OK da započnete pretragu povezanih web stranica.
Oznacite ikonicu za Brzo biranje i pritisnite tipku OK da posjetite povezane web stranice.
Vas TV je kompatibilan sa USB misem. Ukljucite mis ili bezični adapter za misu USB ulaz televizora radi lakse i brze navigacije.
Neke internet stranice imaju fleš sadržaj. One nisu podržane sa strane prelistáča.
Platform Freeview Play
Ugradena tzv. catch-up usluga
Možete uživati u tzv. catch up televizijskim uslugama za gledanje propustenog programa Freeview Play platforme izravno putem elektronickog programskog vodica. Dok gledate odrešeni kanal koristite gumbe sa strelicama za vremensko pomicanje unatrag putem vremenske crte vodica. Vidjet cete sadrzaj prethodnih nekoliko dana. Dostupan tzv. catch-up sadrzaj televizija skuca moze promijeniti i bit ce označen s ikonom reprodukcije. Oznacite sadrzaj kojiŽelite reproducirati i pritisnite gumb OK.
Za korištenje tzv. catch-up usluga televizor treba biti priključen na kućnu mrežu. Za više informacija o usluzi i ostalim zahtjevima za uslugu Freeview Play pogledajte dio Povezivanje dio „Povezivost i Freeview Play Platform".
Elektronicki programski vodič
Pomocu funkcjie elektronickog programskog vodiča televizora možete pretraživati raspored dogadanja na trenutno instaliranim kanalima popisa kanala. O televizijskog kuci ovisi hoce li ova funkcjja biti podrzana ili ne.
Za pristup programskom vodiču pritisnite gumb vodič na daljinskom. Takošer, možete koristiti opciju vodič na izborniku televizor.
Dostupna su 2 razlicita tipa prikaza rasporeda, vremenski raspored i trenutni/sljedeci. Za prebacivanje izmedu ovih prikaza oznacite karticus nazivom odgovarajuceg prikaza na gornoj stranizaslona i pritisnite OK.
Koristite se gumbima sa strelicama za navigaciju popisom programa. Pomocu gumba Natrag/Povratak koristite se opcjija kartice na gornjoj stranizaslona.
Vremenski raspored
U ovoj opciji prikaza sva dogadanja navedenih kanala prikazani su u vremenskom slijedu. Pomocu gumba sa strelicama mozte se kretati popisom dogadanja. Oznacite dogadanje i pritisnite OK za prikaz opcija izbornika dogadanja.
Pritisnite gumb Natrag/povratak za upotrebudostupnih opcija kartice. Za prikaz filtriranih opcijaoznačite karticu Filtar i pritisnite OK.Za promjenu
prikaza oznacite trenutno/sljedecé i pritisnite OK. Možete koristiti opcije prthodni dan i iduci dan za prikaz dogadanaj prethodnog i iduceg dana.
Oznacite carticu Dodatno i pritisnite OK za pristup donjim opcjama.
Oznacavanje zań: Prikazivanje izbornika oznaci zań. Odaberite zań i pritisnite gumb OK. Dogažanja koja u programskom vodiču odgovaraju odabranom zańu biti ce oznacena.
Pretraživanje vodica: Prikaz opcija pretraživanja.
Pomocu ovih opcija mozete pretraživati bazu podataka programskog vodica u skladu s odabranim kriterijima. Podudarni rezultati navest ce se na popisu.
Trenutno: Prikazuje trenutni dogadaj na označenom kanalu.
Zumiranje: Oznacite i pritisnite OK tza prikaz dogadaja u vecem vremenskom intervalu.
Sada/sljedece na rasporedu
(*) Kod ove opcjie popisu ce se prikazati samo trenutna i sljedeca doga'anja kanala navedenih na popisu. Pomocu gumba sa strelicama mozete se kretati popisom doga'anja.
Pritisnite gumb Natrag/povratak za upotrebu dostupnih opcija kartice. Za prikaz filtriranih opcija označite karticu Filtar i pritisnite OK. Za promjenu prikaza označite vremenski rasporedi pritisnite OK.
Opcije dogadaja
Gumbe sa strelicama koristite za označavanje dogadaja te pritisnite gumb OK za prikaz izbornika OpciJE. Dostupne su sljedeće opciJE.
Odabir kanala: Pomocu ove opcije mozete prebaciti na odabrani kanal kako biste ga gledali. Programski vodičce se zatvoriti.
Vise informacija: Prikaz detaljnih informacija o odabranim dogadajima. Pomocu gumba sa strelicama gore i dolje krećite se kroz tekst.
Tajmer za dogadaj / Brisanje tajmera za dogadaj: Odaberite opciju Podesi tajmer dogadaja i pritisnite OK. Mozete podesiti tajmer za buduce dogadaje. Za ponistenje vec podesenog tajmera, oznacite dogadaj i pritisnite gumb OK. Zatim odaberite opciju Brisanje tajmera za dogadaj. Tajmer ce se otkazati.
Snimanje / Brisanje snimlj. Tajmer: Odaberite opciju Snimanje i pritisnite gumb OK. Ako ce se dogadaj emitirati u buducnosti on ce se dodati na popis Tajmera kao program koji se treba snimiti. Ako se odabrani dogadaj emitira u tom trenutku snimanje ce odmah pocteti.
Za ponistavanje već podešenog tajmera smimanja, označite dogadaj i pritisnite OKpa odaberite opciju Obrisi smimanje. Tajmer. Tajmer smimanja ce se ponisti.
VAZNO: Kad je televizor isključen na njega prikljucite USB disk. Potom, trebate uključiti televizor kako bi aktivirali funkcjiju snimanja.
Napomene: Ne mozte se prebaciti na drugi kanal kada je aktivirano snimanje ili tajmer na trenutnom kanalu.
Nije moguce podesiti tajmer ili snimanje za dva ili vishe pojedinačna dogadaja u istom vremenskom intervalu.
Teletekst usluge
Za ulaz pritisnite gumb Tekst. Ponovno pritisnite i aktivirajte mik's mod, koji vam omogucije istovremeni prikaz teletekst stranice i emitirani televizijski program. Za izlaz pritisnite još Jednom. Ako je dostupno dijelovi stranice teleteksta označeni su bojama što znaci da se mogu odabrati tipkama u boji. Pratite upute prikazane nazaslonu.
Digitalni teletekst
Za prikaz digitalnih teletekst informacija pritisnite gumb Tekst. Koristite gumbe u boji, gumbePokazivača tegumb OK.Nacin rada razlikuje se ovisno o sadrzaju digitalnog teleteksta.Pratite upute prikazane nazaslonu digitalnog teleteksta.Kada se ponovo pritisne gumb Tekst televizor se vraća na normalan način emitiranja.
Nadogradnja softvera
Vas televizor ima mogucnost automatiski pronaci i azurirati firmware putem emitiranog signala ili interneta.
Freeview Play platform
Freeview Play platforma omogucava ugradene tzv. catch-up televizije suge i usluge na zahtjev. Jednostavno pritisnite gumb Freeview Play na daljinskom upravljaču i spojite se na Freeview Play platformu.
Platformi Freeview Play możete pristupiti iz glavnog izbornika ili izbornika aplikacije. Pritisnite gumb Izbornik i odaberite poćetni ili aplikacije. Zatim oznacite Freeview Play i pritsnite gumb OK.
Freeview Play Platform
"Alexa Ready Feature" 40
DVB funkcine informacija 41
Saugos informacija

DÉMESIO
ELEKTROS SMUGIO PAVOJUS NENUIMTI

PERSPEJIMAS SIEKIENT SUMAZINTI ELEKTROS SMUGIO PAVOJU, NENUIMKITE GAUBTO (ARBA GALINES PLOKSTES). VIDUJE NERA DALIU, KURIAS GALETU APTARNAUTI NAUDOTOJAS. PRIREIKUS TECHNINES PrieziuROS KREIPKITES I KVALIFIKUOTA SPECIALISTA.
(X: Nav pieejams, O: pieejams)
Dažos gadijumos signals televizora var netikt attelots pareizi. Problema var but neatbilstiba avota aprikojuma standartiem (DVD, iestatisanas kaste, utt..). Ja jus saskarieties ar šadu problemu, ludzu, szinieties ar savu tirdzniecibas pärstavi un attiecigā avota ierices ražotaju.
Atbalstitie failu formati USB režimā
Video failu formati
| Failapapašinâjums | Formãts | |
| Video kodeks Audio | ||
| .mpg/.mpeg/.dat/.vob | MPEG1/2, H.264, VC1 | MPEG Layer 1/2/3, AC3 |
| /ts/.trp/.m2ts/.mts | MPEG Layer 1/2/3, AC3, E-AC3 | |
| .avi | MPEG1/2, MPEG4, H.264, MJPEG | MPEG Layer 1/2/3, AC3, AAC, WMA |
| .mp4/.m4a/.m4v/.mov/.qt/.3gp/.3g2/.3gpp | MPEG1/2, H.263, MPEG4, H.264 | MPEG Layer 1/2/3, AAC LC, AC3 |
| .mkv | MPEG 1/2, MPEG4, H.264 | MPEG Layer 1/2/3, AAC, AC3 |
| .flv | Sorenson Spark, MPEG4, H.264 | MPEG Layer 3, ADPCM, AAC LC |
| .ogm/.ogg MPEG1/2 | , MPEG4 MP3, Vorbis | |
| .asf/.wmv MPEG4, | WMV3, VC1 WMA, AMR-NB | |
| .rm/.rmvb RV30, RV | Y40 COOK, AAC LC / HE-AA | |
| .webm VP9, VP8 O | PUS, Vorbis | |
Attelu failu formati
| Faila paplašinâjums | Formãts |
| .jpg/.jpeg JPEG, PJPEG | |
| .bmp BMP | |
| .gif GIF | |
| .png PNG | |
| .tiff/.tif TIFF | |
| .webp Webp |
Audio failu formati
| Failapapašinājums | Formāts | |
| Video kodeks Audio | ||
| .mp3 mp3 | ||
| .ac3 ac3 | ||
| .aac AAC | ||
| .wma WMA | ||
| .wav | MPEG Layer 1/2/3, AAC,PCM | |
| .flac | FLAC | |
| .ogg OGG | Vorbis | |
| .m4a M4A | AAC | |
Subtitru failu formati
| Ärejie subtitri | |
| Paplašinājums Specifikācija | |
| .ssa SubStation Alpha | |
| .ass Uzlabots SubStation Alpha | |
| .srt Subtitru ripošana | |
| .sub Mikro DVD / abakškatītājs | |
| .sub + .idx VOBSub | |
| .txt Micro DVD / TM Player / MPL2 | |
| .mpl MPL2 | |
| .smi Sami | |
| .jss JACOSUB | |
| .ttml TTML | |
| .txt / .sub DVD SUBTITRI | |
| .lrc - | |
| lekšëjie subtitri | |
| Paplašinājums Specifikácija | |
| .mkv VOBSub | |
| .mkv ASS / SSA / T | TEXT |
| .dat, .mpg, .mpeg, .vob | DVD subtitri |
| .mp4 DVD subtitri, | TEXT |
Freeview Play platform
MeHyBaHBe KaHaJIIn jaUHa Ha 3ByK
MoKeTe da ro cMeHnte KaHaIOT n da ro npJnaRoIte 3ByKOT co KOnuHbata JaunHa Ha 3Byk+/-n Pporpama +/- Ha daJeHHckNt ynpaByBa.
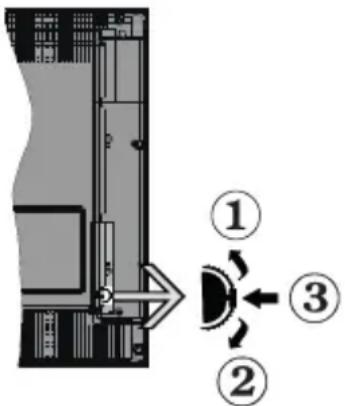
KoHTpOJIHn KOnUHbHa Ha TB n HNBn onepaun
- Hacoka harope
- Hacoka haJony
3.П配电инвачJaunHa Ha 3ByK/n36Op Ha n3BOp/ npinnpabHocT-BknyeHo
KoHTpOHNOT npeKNHyBaU OBO3MOxyBa Da ce KOHTpOInpa jaUnHaT Ha 3ByKOT/nporpaMaTa/u3BOpOt nФyHKuNTe 3a MnpyBaHe n 3a BKnyyBaHe Ha TB-ypeDoT.
3a da ja cmeHnte jaunHaTa Ha 3ByKOT: PnTnCHete ro KonyeTo "Harope" 3a da ja 3roJeMnte jaunHata Ha 3ByKOT. PnTnCHete ro KonyeTo ,HaOny" 3a da ja 3roJeMnte jaunHata Ha 3ByKOT.
3a da ro cmeHnte kaHAnOT: PnTncHete ro konyeTo BO CpeDnHa, Ha ekpaHOT Ke ce nojabn 6aHepot co HΦopMaun. PnTnCKajKn rKoNnBaTa ,Harope" IIN "HaOny", DnXKeTe Ce Hn3 3aUyBaHIne KaHAn
3a da ro cmeHnte n3BOPOT: Dbaata npTnCHte ja cpeDinHata Ha konHTO (3a BTOP nat BKynHO), Ha ekpaHot ke ce nojabu nIcTaTa co n3BOpN. PpTnckajKn
IINKOnHbata,Harope"NIN ,HaOJy",DVBKeTe Ce Hn3 DoCTaHHte N3BOpN
NcknyyBaHe Ha TB-ypeoT: PnTnchete ja cpeHnHaTa OJ KOChTe N dpXeTe HeKOnKy ceKHyDn, TB-ypeoT Ke Bne3e BO peKIM Ha MnpyBaHe.
3a da ro BknyuTe TB-ypeoT; PnHTncHe rKOMaHnte BO cpeDnHa, Ke ce Bknyu TB-ypeoT.
3a6eneuku:
Iokony 20 ucknyume meeneu3opom, uuknycom nohyba odH0o co nocmaekume Ha 3eykom.
OCHa aJaaHomo MeHu He MoKe da ce npukaxe co KOHmpoHume konyuHa.
PakyBaHe co daneyHcknoT ynpaByBa
ПиТиСнeTe Ha KOnчeTo MEnU Ha ДалЕЧИНСКИOT ynpaВуВaч 3a Да ce ппkaже ekpaHOT Ha ГлaBHTO MeHn. KopIcTeTe rKoPunbTa 3a HAcOKn I KOnJIeTO OK 3a HabuRupaHe n 3a NOCTaByBaHe. ПиTиСнeTe Ha KOnчeTo Return/Back ИИ N MENU 3a Дa ИЗЛe3eTe OД ekpaH co MeHn.
U36op Ha BJe3
IITOMKe NOBp3eTe HADBOpeuHn CnCTeMn Ha TBypeoT,MOxE Da ce IpeoPpLyBaTe Ha pa3NnUHn 3BOpn Ha Bne3OBn. PnTnCKajTe ro KOnHeTo SOURCE Ha daJeHHcknOT ynpaByBauchocNeIOBaTeJHo 3a da n36epeTa3NUnn H3BOpn.
MeHyBaHBe KaHaJIIn jaUHa Ha 3ByK
Moxete da ro cmeHnte KaHaIOT n da ro npuIarOndTe 3ByKOT co KOnuHbataProgramme+/-nVolume +/Ha daJeunHcknOT ynpaBvBaq.
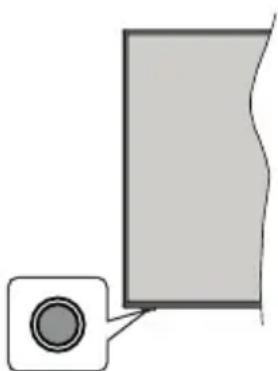
KoHTpOJIHn KOnUHbHa Ha TB n HNBn onepaun
3a6eneuka: No3ujuama Ha KOMaHdHume KOuHa MoKe da e pa3nu4ha 80 3aeuchocm od Modenom.
Baunot TB-ypei HMa eHNO KOMaHdHO KOJy. Oba KOMaHdHO KOJyoe OBO3MOxkyBa da ce KOHTpOJInpaat CneHNBe fynKuHn Ha TB-ypeoT: MpyBaIbe/INBOp/ Pporpama n JaunHa Ha 3Byk.
PaKyBaHbe CO KOMaHdHTo KOnue
-
PnTnCHeTe ro KOMaHdHOTo KOnYe 3a Da ce npKaeMeHnTO co OOnuHa yHKuIN.
-
Notoa, ako tpe6a, npntnckajte ro konyeTo KOHcekyTubHO 3a fokycOT da ro nomeCTnte Ha cakaHaTa onuJa.
- PnTnCHete n dpxKeTe ro konyeTo OKony 2 cekyHn3a da ja aktubnPate n36paHata onuJa Bojata Ha IKoHaTa Ha cyHKunjaTa ce MeHyBa Kora eaktubPapaHa.
- PnntncheTe ro konyeTo ywTe eHaaw 3a da ja Kaopnstte cyHKunjata nn Bne3eTe BO NpdmHnTo.
3a da n36epete npya onuja ha yHKunja, npbo Ke Tpeba da ja deakTNBnape TocneHaTa AKTINBnpaHa yHKunja. PnTnchete N dpxkeTe ro KoncheTo 3a da ro deakTNBnape. Bojata Ha IKOHATA Ha yHKunjata ce MeHyBa Kora e DeakTNBnpaHa.
3a da ro 3aTbOpHTe MeHnTO co ONuHa yHKuN, He npntnckajTe ro KOnyeTo BO nepnoD od OKony 5 cekyHn.Ke nCHe MeHnTO co ONuHa yHKuN.
NcknyuBaBe Ha TB-ypeDot: PnTnCHTe ro KOMaHdHTo KOnYe 3a da ce npKae MeHNOt co OOnuHa FyHKu, FOKycOT Ke 6nde Ha onuJaTa MpyBaBe. PnTnCHTe n dPKeTe ro KonHeTo OKOy 2 cekyn3a da ja aKTbBnpate OBaa onuJa Bojata Ha NkOHATA Ha cyHKunjata ce MeHyBa Kora e AKTNBpuHa. Notoa npTnCHeTo NOBTOpHO KOnYeTo 3a da ro NCKnyuHTe TB-ypeDot.
3a da ro Bknynte TB-ypeoT;PnTncheTe ro KOMaHdHTo KOuHe,Ke ce Bknyu TB-ypeoT.
3a da ja cmeHnte jaunHaTa Ha 3ByKOT: PnTnCHete ro KOMaHdHTo KOJue 3a da ce npKaeMeHtO co OIe H a FyHKcH N ITOa npNTnCKajTe Ro KOnyeTo NOctoJaHO 3a da Ro npHeceTe fokycot Ha onuJaTa JaunHa Ha 3Byk + nn JaunHa Ha 3Byk - PnTnCHete n DpxKeTe ro KonyeTo OKony 2 cekyn3a da ja aKTNBnPaTe n36paHata onuja Bojata Ha IKoHata Ha FyHKcHJaTa ce MeHyBa Kora e AKTNBnPaHa. NoToa npTnCHete ro KonyeTo 3a da ja 3roJeMnte nn HAmAJIne jaunHa Ta Ha 3ByKOT.
3a da ro cmeHnte kaHAnot: PnTnCHTe ro KOMaHdHTo KOJIe 3a da ce npKae MeHtO co OIuHN Ha cyHKcN I NOToa npTnCKajTe ro KOnYeTO nocToJHo 3a da ro npHece Te fokycot Ha onUjata Pporpama + Nn Pporpama - PnTnCHTe n dXeTe ro KOnYeTO OKoY 2 cekyHdn 3a da ja aKTbupate N3bpaHata onuja Bojata Ha IKoHata Ha cyHKunjata ce MeHyBa Kora e aKTbupHa. IpToa npTnCHete ro KOnHeTo 3a da ce npEppnTe Ha cnCOKOT KaHIn Ha CneDHnOT Nn pTeXODHnOT KaHn.
3a da ro cmeHnte H3Bopot: PnTnche To KOMaHdHTo KOJue 3a Da ce npKae MeHtO Co OOnuHa FyHKUIn NnTOa npNTckajTe Ro KOnyeTo NoCToJaHO 3a Da ro npHeceTe fokycot Ha onuJaTa H3BOp. PnTnche To dPkeTe Ro KOnyeTo OkJy 2 CeKyHn 3a Da ja akTbupate OBaa OnuJa Bojata Ha IKOHATA Ha FyHKUJaTa CE MeHyBa kora e akTbupaHa. Notoa npTnche To NOBTOPOKHeTo 3a Da ce
PnKae Cnncokot n3BOpn..Jn3rajTe Hn3 doctanHnTe n3BOpn co npntuckaHe Ha konyeTo. TB-ypeDot ABTOPMaTcKn Ke ce nppepnn Ha oBeJxKaHnOT n3BOp.
3a6eNeuKa: OSD Ha 2naHomo MeHu He MoKe da ce npukaxe co KOMaHOHOMO KOUe.
PakyBaHbe co daJeHHcknOT ynpaByBaY
Причсichte Ha Konчeto MENU Ha Далесинсnotупавьача за се пікaxes ekpaHOT Ha ГлвотоMeи.Корстete ГКончыata 3a Hacokn KOnJIteOOK 3a HabuHpaHbe n 3a NOCTaByBaHbe.ПричсichteHa Konчeto Return/Back ИИ MEnU 3a Да ИЗпeЗeTeOD ekpan co Meи.
N36op Ha BJIe3
IITOMKe NOBp3eTe HADBOpeuHn CnCTemn Ha TBypeoT, Moke da ce npeopnyBaTe Ha pa3nunHn 13BOpnHa Bne3OBn. PnTtckajTe ro KOnyeTo SOURCE Ha daJeunHCKNOT ynpaByBauchocNeobaTeJHo 3a da 136epTe pa3nUnHn 13BOpn.
MeHyBaHBe KaHaJIIn jaUHaHa Ha 3ByK
Mokete da ro cmeHnte kaHaIOT n da ro npnlaroDnte 3ByKOT CO KOnuHbata JaunHa Ha 3Byk +/- n Porpama +/- Ha daJeunHcKnOT ynpaByBa.
KopncTeHe Ha rnaBHOTo TB-men
Kora Ke ce npntuche konyeTo MeHn, ce nojabyBa TlabHoto TB-Mehn Ha dHoto Ha ekpanot. MoKe Da Habunrnapate Hn3 elememHTte BO MeHnTO CO KOnuNbata 3a Hacoka Ha daJeunHcknOT ynpaByBauch. 3a Da n36epTe elemeHT nn Da rBn BucnTE onuNTe Ha NODMeHnTO Ha O3HaueHOTo MeHn, npntuche To KoneTu OK. Kora Ke o3HaunTe onuJa Ha MeHnTo, HEKOn OD elemeHTte Ha NODMeHnTO Ha OBA MeHn MOKe Da ce nojabat Ha roHaTa cTpaHa Ha JeHTata Ha MeHnTO 3a 6p3 npuctan. 3a Da KOpNCtute elemeHT CO 6p3 npuctan, o3HaueTe ro, npntuche To OK u36epTe NOCTABKn CO KOnuNbata 3a Hacoka JleBO/Decho. Kora Ke 3aBPUnTe, npntuche To KonyeTo OK nn KOnyeto Ha3aD/Bpatn ce 3a Da n3Jne3eTe.
3a da ro 3aTbOpnte TJIaBHOTo MeHn, npNTuCHeTe ro KONoUeTo N3Je3n.
1.Дома
Kora ke ce OTBOPn rnaBHOTo MeH, Ke 6nide O3haeHa JeHTata 3a MeH NOpetHa cTpaHua. CoDpXnHaTa Ha MeHTo Doma MoKe Da ce npncnocOBn co DoDaBaHe Ha onuNte ODpyr MeHJa. Camo O3HaYeTe onuJa n npTnCHeTe ro KonyeTo 3a Hacoka HADOny Ha daJeunHcknOT ynpaByauch. AKO BnIte OnuJa Doaj Ha NoetHaTa cTpaHua, MoKe Ja DoJaTe Ha MeHTo NOpetHo. Ha nCT NaHH MoKe Da ja n36pnWeTe nn CMeHtE POnzjuata Ha Koj 6nNo enemET Bo MeHtO Doma. PnTnCHeTe Ro KonyeTo 3a Hacoka HAdony n n36epete ja OnuJaTa N36pnUnn Nn NomecTu n npTnCHeTe OK. 3a Da nomeCTnte eJemeHT oM MeHtO, KopcTeTe Tn KOnhBaTa 3a HacOKa Decho n JLeBO n n36peTe
ja no3njujata Ha koja cakate da ro nomectute enemHTOT n npTNCHeTe OK.
2. IV
2.1.Ппебаье
Mоже да пeбарувate kaHaJI, npoRpaMn, yCnyr nIи noCTaBKN KOpncTejkn ja Obaa onuJa. ПрптиссгЕ OK n BHeCETe KlyueH 36op co BnptyeJHaT a TactaTypa. IToTa, obelexkete OK n прпснсгет Ok 3a da noUHe ppebapyBaHbeTo. Pe3yntaToT Ke ce ke ce npikakxe Ha ekpanhot.ИЗбepete ro cakAHOT pe3yNTaT co KOnuNbBa 3a Hacoka n прпснсгет OK 3a da OTbopete.
2.2.BoAnu
Co obaa onuja moke da npuctannte do MeHTo Ha eNeKtpoHcKnOT nporpamckn BODnu. BndTe ro DeIot EneKtpoHcKn nporpamckn BODnu 3a nobeKe HOpMaun.
2.3. KaHaJIu
Co obaa onuja moxe da npuctannte do MeHnTo KaHann. Bndete ro deJOT KopncTeHe Ha cnncokot KaHann 3a NOBeKe INΦopMaun.
2.4. Tajmepu
Mоже да поставиTe Tajмери 3a Идни Habstahn co onцижаТа на OBA мeн. Може дa Гп ревид nanopateи npetxODH KpeupaHte Tajmepи NOД OBA мeн.
3a da doandaTe HOB Tajmep, n36peTe ro tabyIaTopoT
Doaj Tajmep co konuheBaTa JleBO/DecHO n
nptncHe OK. NocTabNTe rOnOpunTe Ha noDMHnTO
kako wTo cakate n Kora Ke 3abPUnTe, pntncHe OK.
Ke ce HanpabN HOB Tajmep.
3a da ypeiTe npetxOJHo KpeupaH TajMep, 03haueTe ro TajMepOT, n36ePeTe YpeiTo n36paHnOT TajMep IV pINTCHETe OK. CmeHete rN OIcHtE Ha NODMeHnTO KAKO ITO cakate IN PINTCHETe OK 3a da rN 3aUyBaTe NOCTABKITE.
3a da ypeiTe npetXoHNO KpeuPAH TajMep, 03haeTe ro TajMepOT, N36bepTe N36pniwn ro N36paHnOt TajMep IN pNTncHEt OK.Ke ce npKaeKe OTBpHa npoka N36bepTe DA IN pNTncHeT OK 3a da npOdoJNKe. TajMepOT Bpeme Ke ce OTKaKe.
He moke da ce noctabat Tajmepn 3a Dba nnn NOBEKe POeHHeuHn HacTaHn 7TO Ke CE emNTyBaAT Ha pa3NCHn KaHaNN BO nCT BpeMeHcN INTEpBaN. Bo oBoj cnyaj, Ke BN bIe nObapao Da n36pepe Te eDeH oD OBne Tajmepn N da rN OTkaxete dpyrnte. O3haute ro Tajmepot 7to cakate da ro OTkaxete n npTNCHEt OK, Ke CE npKae MeHnTo Onn. IToa O3hauTe NoCTABN/OTkaxn N npTNCHEt OK 3a da rO OTkaxete Tajmepot. Ke Mopa da r3ayBaTe n3MeHnTe nocJe Toa. 3a da rO HanpaBnTe Toa, npTNCHEt OK, O3hauTe 3auyBaj npomEni npTNCHEt NOBTOPOK.
2.5.ChmKn
Mоже ду ypeДyBaTe ChIMKInTe co onциTe Ha Oba MeHn.Можete dpa penpoDyUnpate,уpeДyBaTe,
6pnnte nn coptnate npetxodno chnmeHn HacTAn. O3haute Ta6ynatop co konueTo 3a Hacoka JeBO nn DEcho n npntnche TE OK 3a da rN BnNTe DocTAnHte onu. BndTe ro denot YCb-chnMahe 3a NOBeKe INΦOpMaun.
3. NocTabKn
Mоже дуpeдувate noctabknTe Ha Baunot TByped co onuNTe Ha Oba MeHn. Bndete ro DeJntCopaHa ha MeHTo NocTabKn 3a nObekeHdopMaun.
4. Anlukauu
Kora Baunot TeNeBn3Op e NOBp3aH Ha INHTepHeT, cOaNcOdpXHH NcTo TaKa Ke 6NdaT DoCTaHn, BKnyBajKn cOaNcOdpXHH 3a AnnkaunTe. Co MeHnTO Annkaun MoKe Da npNCtAnnte Do n da ynpabByate co CbOnTe annkaun. MoKe da OdoBaTe HOBn annkaun OD na3apOT nn da 6pnuHTe NoctojHn. Bndete ro DeJOT Annkaun 3a noBeke HOpmaun.
5. N3BOpN
Mоже дуВate Bne3HnTe pepepeHnHa n3BopOT co onuHnTe Ha Oba MeH. 3a da ro cMeHnTe TEKOBHnOT n3Bop, O3HaYeTe eHa od OIuHnTe n npITnCHeTc OK.
5.1. NocTabKn 3a n3BOPOT
YpeTe rH mNbata, aKTHBnpaJTe nIeakTNBnpaJTe rH36paHnTe onu 3a n3Bop IMa HopmaHn HAnpeHN Onu 3a n3BOpHTe HDMl. HopmaHnTe N NO6peHnTe onu BnJaAT BP3 NoCTaBkata Ha 6oN 3a n36paHnOT n3Bop HDMl.
Moxe da nIOCTaBnTe NOBTOPO npncnoc6yBaHbeto No Mepka Ha MeHjata NooetHO AnNkauuHa CTaHapHTe NOCTABKc CO ONUjATA NOBTOPO NOCTABM MeHN BO MEHNTO NOCTABK (DOCTANHOCTa 3aBNCo OD TB-MoJenOT u OD HerOBtE KapakTePcnTKn). O3NaHETe ja OBaa ONUJA IN pINTCHETe OK.Ke ce npNKaxe NOTBPDAH nopaka N36epete DA u npITnCHETe OK 3a Da npoDOnXnTE. Imajte npedvnd DeKa Hema da MoKTe da ja N3BPswBaTe OBaa ONUJa IOBTOPO CNEDHnTe 2 MNHyTu.
CTabaBe 6aTeepn BO daJHnHckNt ynpaByBaY
OTctpaHete ro 3aHnO T kanak 3a da ro OTbOpnte OndeIOT 3a 6aTePnn. BMeTHete DBe 6aTePnn AAA. PpOBepTe dAn 3HaunTe (+) n (-) ce NOKJOnyBaat (BHMabajTe Ha nonapuTeToT). He KopncTeTe cTapn HOBN 6aTePnn NCTOBpeMeHo. 3ameHeTe rN caMo co nCT INN NCTOBeTeH TIN. BpaTeTe ro kanaKOT.
Ke ce npkake nopaka Ha ekpaHOT kora 6aTePnHTe Ce nCTpoWeHN Mopa Da ce 3ameHaT. NmajTe npedBnD DeKa Kora 6aTePnHTe Ce npu Kpaj, Toa MoKe Da BnJaee Bp3 pa6oTeHBeTo Ha daJeunHcKnOT ynpaByBaU.
BaTePnnte He Tpe6a Da ce N3JIOxYbaaT Ha Bucoka ToNnHa KaKo Ha npImep Ha coHcE, orAH JIn cI.
PnKnyBaHe Ha cTpyja
BAxHO! TeIeBn3OpOT e HapabEn 3a da pa6oTn Ha npKnyok od 220-240V AC, 50 Hz. IIO OTnakyBaHcTo, Do3BOJTe My Ha TeIeBn3OpOT da ja DOCTnHre TEMnepaTypaHa OKOJIINHaTa IpeD Da rO BKnyHTe B cTpyja. PpIKnyeTe rKa6eJNot 3a HanojyBaHe BO uTekeP 3a cTpyja.
Nobp3yBaHe Ha aHTeHa
Iobp3eTe ja aHTeHaTa nnn npnknyokot 3a ka6encka TeJeBn3na Bo AHTEHCKN BJE3 (ANT) Ha 3aHaTa cTpaHa Ha TB-ypeoT.
3ADHNOT DEJ ODTB-YPEDOT


Ako cakate da noBp3eTe heKoJ ypei Ha TB, toraU Tpe6a da rH ncknyute obata, ypeot n TB, nped Da rH nobp3eTe. No BocnoctabyBaheTo Ha BPCKATA, MoKeTe NOBtOphO da rH BKnyute i Da
TN KOPNCTNTe.
Nobp3yBaHe Ha aHTeHa
Iobp3eTe ro npKnyokOT aHTeHa" uNn ,Ka6encka TB" BO AHTEHCKN BJE3 (ANT) OTBOPOT uNn caTeHNTCKNOT npKnyok BO CATEJIITCKN BJE3 (ANT SAT) kon ce haoraat Ha 3aHaTa cTpaHa Ha TeJeBu3OpOT.
3ADHNOT DEJ ODTB-YPEDOT
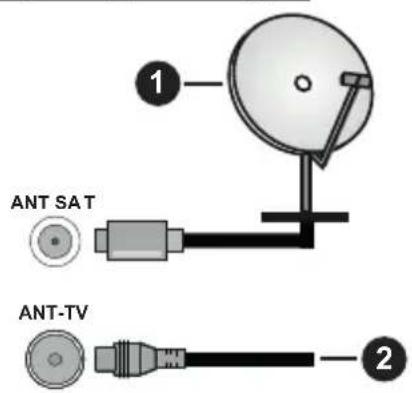
- CateJnt
- AHTeHa nn Ka6en

Ako cakate da noBp3eTe Hekoj ypeJ HA TB, toraU Tpe6a da rH ncknyute obata, ypeoT n TB, nped Da rH nobp3eTe. IIO BocnoctabyBaHeto Ha BpCKaTa, MoKeTe NobTOphO da rH BKnyute n da
KOPNCTNE.
HotnФнkaциja 3a Лиценцра№
YcnoBnte 3aHDMI n High-Definition Multimedia Interface, n HDMI Ioroto ce 3aHTnTHn 3Haun nn pernctpnpaHn 3aHTnTHn 3Haun HaHDMI Licensing LLC BO CAD n npyn 3emjn.

Пронзveдени соред Лиценcaта на Dolby Laboratories. Dolby, Dolby Audio, Dolby Vision n cIMболOT Двоьно-D ce Трвскmaрkn Ha Dolby Laboratories. ДоверпиВи Heoбравен deena. Copyright © 1992-2019 Dolby Laboratories. Cite npaba ce 3аджан.
(*) MOE KONQUE 1 & MOE KONQUE 2:
Bo 3aBnCHoCT OJ MOeJIOT OBNE KONUHb MoKe da NMaat DOnONHHTeHN HfHKuN. Cenak, MoxTe da NoCTABNTe CneunjAnHa FyHKuJa 3a OBNe KOnHbTaKa ITO Ke Tn PnITNCHeTc 3a NET CeKHyN KOra CTe Ha NocayBaHnO T3BOp, KaHJI INBpCKa. Ha ekpaHOT Ke ce npKkaxe NOTBpDHa nopaka. IToToa N36paHOT MOE KOUPHE Ke 6nIe NOBp3aHO co n36paHata fYHKuJa.
IImajTe npedBnD, aKO npaBnTe PpBa HnctanaJna, MOE KONue 1&2 Ke ce Bpatat Ha cTaHapdHaTata yHKunja.
Iloro no Mepka npn noDurhae
Mokete da My daJe nUHn OndnKn Ha TB-ypeoT n da ja rIeIate cBojata omNHeHa CInKa nn PhOTorpaPnJa Ha ekpaHOT, npu ceKe noIrahe Ha Baunot TB-ypeed. 3a da ro cTope OBA, konipajTe rn Baunite omnEni DaTOEKN CO CInKn HA YCB-DnCK N OTBOpTe rO mEHnTO Ha npEnCTyBaOH T ha MeDnymn. N3BepTe YCB-N3BOP OD MeHnTO N3BOpN IN pINTNCHEt OK. Moxete nCto taka da ro npITNCHEt KOnHeTo Source Ha daJeunHcKnOT ynpabYBauch NOToa da ro nCbepeTe cBOJOT YCB-ypeed 3a cknaInpaBe od CnncOKOT n3BOpN. Kora ke ja n3bepete cakahata CInKa, o3NaHTe ja n pINTNCHEt OK, 3a da ja Bvndte Ha uekpan.
IpnTnCHTe ro konyeTo HhOTo cIeKtnpajTe ro Cm60JOT co 3aunHeHikOT Ha nHOpMaTHBHaTa JeHTa I npTnCHTe OK. N36epTe OncuN npTnCHTe OK 3a da Bne3eTe.Ke 6nnde DoCTaHa onCuJaTa NocTabu Ioro 3a noDnRaBe. CeJIeKtnpajTe ro n npTnCHTe OK 3a da ja n36epTe cInkata KaKO Joro NO CONCTBEH n36op.Ke ce npKaXe NotBpDaHa nopaka N36epTe Da n npTnCHTe nobTOPOK.AKO cInkata e COoDbETHa*), Ke ce nojabn Ha ekpaHOT, pni cJeHOTO noDnraBe Ha TB-ypeDoT.
3a6eewka: Ako Hanpaume INI (uHcmaauja no npenam), TB-ypedom noemopno ke da zo Kopucmu cmandapdHom nozo, ako e docmanho.
(*)Cnukume mopa da umaam nponopuja od 4:3 do 16:9 u mopa da budam eo φopmam Ha damomeka .jpeg, jpg unu jpe. Cnukama yuja pezonyuja He ce nojaeya Ha unfohamnucom He moke da ce nocmaeu kako noo npu noduzahe.
FollowMe TV
Co Baunot Ta6nueh Komnytepe Ta ro pe npodyuipate Bo pealno Bpeme TEKOBHnot npehoc od Baunot nHTenirente TB-ypeed co NOMOHa Ondnkata FollowMe TV. HcTaNpajTe ja COoDbetHaTa annkaunja Cmapt LcHtap Ha Baunot MoBnien ypei. POnHeTe ja annkaunjata.
3a noHaTAMoHn HOpMauN 3a KopnteHe Ha OBaa OJInka yNaTyBaat Ha yNaTCTBaTa 3a anNkauJaTa ITO ja KopNCtnte.
3a6eneuka:Bo 3aucchocm od modenom, aauuom TB-yped moke da he ja nodpkyea oaa fynkuja. Oaaa anlukauaja He e komnamubunha co cume budosu mobunhu ypedu. Kahanu HD he ce nodpkahu u deama ypedu mopa da budam noep3ahu ha uca ma MPeka.
[CEC]
ObaaФyHKnJa Bn OBO3MOxBya Da Tn KOHTpOJInpaTe ypeIte co CEC, Kon ce NOBp3aHn Ha XDMN Bne3OBn, co DaneHHcknOT ynpabvBaH na BaHnOT TeNEBn3Op.
KoHTpOJa Bp3 3ByKOT Ha CnCTeMOT
I03BOJyBa co TB-ypeoT da ce Kopnctn aydno3acnnyBa/npneMnK. JaunHata Ha 3BykOT MOKe da CE KOHTPOJnpa npeky daJeuHcNtO ynpaBvBaHa TeNEBn3OpOT. 3a da ce aKTbNpA pdyHKnJaT, BO MeHnTO NocTabka>3Byk NoCTabete ja onuJaTa IV3Ne3 Ha 3Byk KaKo HDMI ARC. Kora e n36paHa onuJaT HDMI ARC, onuJaT CEC Ke ce noCTaBn ABToMaTcKn Ha AKTNbPapaHa, ako He e BeKe NoCTaBeHa Ha Taa onuJa. TB-3ByuHnUte Ke 6nDat npriyuWeHn 3BykOT Ha rIeDaHnOt n3BOp Ke ce o6e36eDn Od NOBp3AHnOT 3ByueH CNCTem.
3a6eneuka: Ayuo-ypeom mpe6a da ja nodopxyba odukama Cucmemcka ayuo KOmpona.
CodpxnHa Ha MeHnTo 3a NOCTaBKn
| Содъхина на мениста сліка | ||
| Реким | Можete на постения рекимOT на слікata сноpeс сбоиte петточ'tува на щь бары. РекимOT на слікma може на бide постaven на edha od obne ошпim: КИно, игра (о上诉онлho), снор, динhamunho порюно. Dolby-peжUMU: Ако ce зашиху Dolby Vision-coорхина ошпumte 3a слікu Dolby Vision - memno u Dolby Vision - севно ке buam docsmnru hamecmо рекumime КИно u Пирочю. | |
| Конту pact | Ги поедува сvetлина и temнина на ekpanот. | |
| Освetedенocst | Ja поедува сvetлина на ekpanot. | |
| Острина | Ja поедува острина на поедмтente рпikалжни на ekpanot. | |
| Боба | Ja поедува в Breadоста на bojata, посносobуайки ng boi boite. | |
| Зашема на �ершиja | Зашема на зашема на зашема на по морka, минимуm, сreedno, мakсимуm, abTo, Исклун却不оган лу,在 skлунно. Замени: Досмалнime ошпимо можеда се ралпухуавam bo 3abushocm od uzbranuom pekzumm. | |
| Задно сvetло | Ова поедува на зашема на позадинсковocetлува. Фуннцијата за зашема на поедуда на поеду? Фуннцијата за зашема на поеду? Фуннци�? Фуннци? Фуннци? Фуннци? Фуннци? Фуннци? Фуннци? Фуннци? Фуннци? Фуннци? Фуннци? Фуннци? Фуннци? Фуннци? Фуннци? Фуннци? Фуннци? Фуннци? Фуннци? Фуннци? Фуннци? Фуннци? | |
| 3ум на сліка | Ja поедува са��аны Гал'mина на слікata. | |
| Поместува? сліка | Ова поедума може на поедима на позадинсковocetлува. Фуннци? Фуннци? Фуннци? Фуннци? Фуннци? Фуннци? Фуннци? Фуннци? Фуннци? Фуннци? Фуннци? Фуннци? Фуннци? Фуннци? Фуннци? Фуннци? Фуннци? Фуннци? Фуннци? Фуннци? Фуннificу? Фуннificу? Фуннificу? Фуннificу? Фуннificу? Фуннificу? Фуннificу? Фуннificу? Фуннificу? Фуннificу? Фуннificу? Фуннificу? Фуннificу? Фуннificу? Фуннificу? Фуннificу? Фуннificу? Фун网IMYHANDA Фуннificу? Фуннificу? Фуннificу? Фуннificу? Фуннificу? Фуннificу? Фуннificу? Фуннificу? Фуннificу? Фуннificу? Фуннificу? Фуннificу? Фуннificу? Фуннificу? Фуннificу? Фуннificу? Фуннficу? Фуннificу? Фуннificу? Фуннificу? Фуннificу? Фуннificу? Фуннificу? Фуннificу? Фуннificу? Фуннificу? Фуннificу? Фуннificу? Фуннificу? Фуннificу? Фуннificу? Фуннificу? Фуннificу? Фjohn? Фjohn? Фjohn? Фjohn? Фjohn? Фjohn? Фjohn? Фjohn? Фjohn? Фjohn? Фjohn? Фjohn? Фjohn? Фjohn? Фjohn? Фjohn? Фjohn? Фjohn? Фjohn? Фjohn? Фjohn? Фjohn? Фjohn? Фjohn? Фjohn? Фjohn? Фjohn? Фjohn? Фjohn? Фjohn? Фjohn? Фjohn? Фjohn? Фjohn; Фjohn? Фjohn? Фjohn? Фjohn? Фjohn? Фjohn? Фjohn? Фjohn? Фjohn? Фjohn? Фjohn? Фjohn? Фjohn? Фjohn? Фjohn? Фjohn? Фjohn? Фjohn? Фjohn? Фjohn? Фjohn? Фjohn? Фjohn? Фjohn? Фjohn? Фjohn? Фjohn? Фjohn? Фjohn? Фjohn? Фjohn? Фjohn? Фjohn? Φjohn? Фjohn? Фjohn? Фjohn? Фjohn? Фjohn? Фjohn? Фjohn? Фjohn? Фjohn? Фjohn? Фjohn? Фjohn? Фjohn? Фjohn? Фjohn? Фjohn? Фjohn? Фjohn? Фjohn? Фjohn? Фjohn? Фjohn? Фjohn? Фjohn? Фjohn? Фjohn? Фjohn? Фjohn? Фjohn? Фjohn? Фjohn? Фjohn? Фgin? Фjohn? Фjohn? Фjohn? Фjohn? Фjohn? Фjohn? Фjohn? Фjohn? Фjohn? Фjohn? Фjohn? Фjohn? Фjohn? Фjohn? Фjohn? Фjohn? Фjohn? Фjohn? Фjohn? Фjohn? Фjohn? Фjohn? Фjohn? Фjohn? Фjohn? Фjohn? Фjohn? Фjohn? Фjohn? Фjohn? Фjohn? Фjohn? Фjohn. Фjohn? Фjohn? Фjohn? Фjohn? Фjohn? Фjohn? Фjohn? Фjohn? Фjohn? Фjohn? Фjohn? Фjohn? Фjohn? Фjohn? Фjohn? Фjohn? Фjohn? Фjohn? Фjohn? Фjohn? Фjohn? Фjohn? Фjohn? Фjohn? Фjohn? Фjohn? Фjohn? Фjohn? Фjohn? Фjohn? Фjohn? Фjohn? Фjohn? Fonem Фок: В�л: В�л: В�л: В�л: В�л: В�л: В�л: В�л: В�л: В�л: В�л: В�л: В�л: В�л: В�л: В�л: В�л: В�л: В�л: В�л: В�л: В�л: В�л: В�л: В�л: В�l: В�l: В�l: В�l: В�l: В�l: В�l: В�l: В�l: В�l: В�l: В�l: В�l: В�l: В�l: В�l: В�l: В�l: В�l: В�l: В�l: В�l: В�l: В�l: В�l: В�л: В�l: В�l: В�l: В�l: В�l: В�l: В�l: В�l: В�l: В�l: В�l: В�l: В�l: В�l: В�l: В�l: В�l: В�l: В�l: В�l: В�l: В�l: В�l: В�л: В�л: В�л: В�л: В�л: В�л: В�л: В�л: В�л: В�л: В�л: В�л: В�л: В�л: В�л: В�л: В�л: В�л: В�л: В�л: В�л: В�л: В�л: В�л: В�lor В�л: В�л: В�л: В�л: В�л: В�л: В�л: В�л: В�л: В�л: В�л: В�л: В�л: В�л: В�л: В�л: В�л: В�л: В�л: В�л: В�л: В�л: В�л: В�л: В�л В�л: В�л: В�л: В�л: В�л: В�л: В�л: В�л: В�л: В�л: В�л: В�л: В�л: В�л: В�л: В�л: В�л: В�л: В�л: В�л: В�л: В�л: В�л: В�л: В�l В�л: В�л: В�л: В�л: В�л: В�л: В�л: В�л: В�л: В�л: В�л: В�л: В�л: В�л: В�л: В�л: В�л: B B B B B B B B B B B B B B B B B B B B B B B B B B B B B B B B B B B B B B B B B B B B B B B B B B B | |
| 3ум на сліка | Ja поедува са��аны Гал'mина на слікata. | |
| Поместува? сліка | Ова поедума на поедима на поедима на поедима на поедима на поедима Фуннци? Фуннци? Фуннци? Фуннци? Фуннци? Фуннци? Фуннци? Фуннificу? Фуннificу? Фуннificу? Фуннificу? Фуннificу? Фjohn? Фjohn? Фjohn? Фjohn? Фjohn? Фjohn? Фjohn? Фjohn? Фjohn? Фjohn? Фjohn? Фjohn? Фjohn? Фjohn? Фjohn? Фjohn? Фjohn? Фjohn? Фjohn? Фjohn? Фjohn? Фjohn? Фjohn; Фjohn? Фjohn? Фjohn? Фjohn? Фjohn? Фjohn? Фjohn? Фjohn? Фjohn? Фjohn; Фjohn? Фjohn? Фjohn? Фjohn? Фjohn? Фjohn? Фjohn? Фjohn? Фjohn? Фjohn? Фjohn? Фjohn? Фjohn? Фjohn? Фjohn? Фjohn? Фjohn? Фjohn? Фjohn? Фjohn? Фjohn? Фjohn? Фjohn? Φjohn? Φjohn? Φjohn? Φjohn? Φjohn? Φjohn? Φjohn? Φjohn? Φjohn? Φjohn? Φjohn? Φjohn? Φjohn? Φjohn? Φjohn? Φjohn? Φjohn? Φjohn? Φjohn? Φjohn? Φjohn? Φjohn? Φjohn? Φjohn? Φjohn? Φjohn? Φjohn? Φjohn? Φjohn? Φjohn? Φjohn? Φjohn? Φjohn? ΦJohn? Φjohn? Φjohn? Φjohn? Φjohn? Φjohn? Φjohn? Φjohn? Φjohn? Φjohn? Φjohn? Φjohn? Φjohn? Φjohn? Φjohn? Φjohn? Φjohn? Φjohn? Φjohn? Φjohn? Φjohn? Φjohn? Φjohn? Φjohn? Φjohn? Φjohn? Φjohn? Φjohn? Φjohn? Φjohn? Φjohn? Φjohn? Φjohn? Φjohn; Φjohn? Φjohn? Φjohn? Φjohn? Φjohn? Φjohn? Φjohn? Φjohn? Φjohn? Φjohn? Φjohn? Φjohn? Φjohn? Φjohn? Φjohn? Φjohn? Φjohn? Φjohn? Φjohn? Φjohn? Φjohn? Φjohn? Φjohn? Φjohn? Φjohn? Φjohn? Φjohn? Φjohn? Φjohn? Φjohn? Φjohn? Φjohn? Φjohn? Фjohn? Φjohn? Φjohn? Φjohn? Φjohn? Φjohn? Φjohn? Φjohn? Φjohn? Φjohn? Φjohn? Φjohn? Φjohn? Φjohn? Φjohn? Φjohn? Φjohn? Φjohn? Φjohn? Φjohn? Φjohn? Φjohn? Φjohn? Φjohn? Φjohn? Φjohn? Φjohn? Φjohn? Φjohn? Φjohn? Φjohn? Φjohn? ΦJohn? ΦJohn? ΦJohn? ΦJohn? ΦJohn? ΦJohn? ΦJohn? ΦJohn? ΦJohn? ΦJohn? ΦJohn? ΦJohn? ΦJohn? ΦJohn? ΦJohn? ΦJohn? ΦJohn? ΦJohn? ΦJohn? ΦJohn? ΦJohn? ΦJohn? ΦJohn? ΦJohn? ΦJohn? ΦJohn? ΦJohn? ΦJohn? ΦJohn? ΦJohn? ΦJohn? ΦJohn? ΦJohn? ΦJohn; ΦJohn? ΦJohn? ΦJohn? ΦJohn? ΦJohn? ΦJohn? ΦJohn? ΦJohn? ΦJohn? ΦJohn? ΦJohn? ΦJohn? ΦJohn? ΦJohn? ΦJohn? ΦJohn? ΦJohn? ΦJohn? ΦJohn? ΦJohn? ΦJohn? ΦJohn? ΦJohn? ΦJohn? ΦJohn? ΦJohn? ΦJohn? ΦJohn? ΦJohn? ΦJohn? ΦJohn? ΦJohn? ΦJohn? Фг. Фг. Фг. Фг Фг Фг Фг Фг Фг Фг Фг Фг Фг Фг Фг Фг Фг Фг Фг Фг Фг Фг Фг Фг Фг Фг Фг Фг Фг Фг Фг Фг Фг Фг Фг Фг Фг Fonem Fonem Fonem Fonem Fonem Fonem Fonem Fonem Fonem Fonem Fonem Fonem Fonem Fonem Fonem Fonem Fonem Fonem Fonem Fonem Fonem Fonem Fonem Fonem Fonem Fonel Fonel Fonel Fonel Fonel Fonel Fonel Fonel Fonel Fonel Fonel Fonel Fonel Fonel Fonel Fonel Fonel Fonel Fonel Fonel Fonel Fonel Fonel Fonel Fonel FonEL FonEL FonEL FonEL FonEL FonEL FonEL FonEL FonEL FonEL FonEL FonEL FonEL FonEL FonEL FonEL FonEL FonEL FonEL FonEL FonEL FonEL FonEL FonEL FonEL FonIL FonIL FonIL FonIL FonIL FonIL FonIL FonIL FonIL FonIL FonIL FonIL FonIL FonIL FonIL FonIL FonIL FonIL FonIL FonIL FonIL FonIL FonIL FonIL FonIL FonL FonL FonL FonL FonL FonL FonL FonL FonL FonL FonL FonL FonL FonL FonL FonL FonL FonL FonL FonL FonL FonL FonL FonL FonL FonIL FonIL FonIL FonIL FonIL FonIL FonIL FonIL FonIL FonIL FonIL FonIL FonIL FonIL FonIL FonIL FonIL FonIL FonIL FonIL FonIL FonIL FonIL FonIL FonIe FonIL FonIL FonIL FonIL FonIL FonIL FonIL FonIL FonIL FonIL FonIL FonIL FonIL FonIL FonIL FonIL FonIL FonIL FonIL FonIL FonIL FonIL FonIL FonIL Fon IL FonIL FonIL FonIL FonIL FonIL FonIL FonIL FonIL FonIL FonIL FonIL FonIL FonIL FonIL FonIL FonIL FonIL FonIL FonIL FonIL FonIL FonIL FonIL FonIL Fon(IL FonIL FonIL FonIL FonIL FonIL FonIL FonIL FonIL FonIL FonIL FonIL FonIL FonIL FonIL FonIL FonIL FonIL FonIL FonIL FonIL FonIL FonIL FonIL FonIL Fonill FonIL FonIL FonIL FonIL FonIL FonIL FonIL FonIL FonIL FonIL FonIL FonIL FonIL FonIL FonIL FonIL FonIL FonIL FonIL FonIL FonIL FonIL FonIL FonIL Fonil FonIL FonIL FonIL FonIL FonIL FonIL FonIL FonIL FonIL FonIL FonIL FonIL FonIL FonIL FonIL FonIL FonIL FonIL FonIL FonIL FonIL FonIL FonIL FonIL FonILL FonIL FonIL FonIL FonIL FonIL FonIL FonIL FonIL FonIL FonIL FonIL FonIL FonIL FonIL FonIL FonIL FonIL FonIL FonIL FonIL FonIL FonIL FonIL FonIL FonIl FonIL FonIL FonIL FonIL FonIL FonIL FonIL FonIL FonIL FonIL FonIL FonIL FonIL FonIL FonIL FonIL FonIL FonIL FonIL FonIL FonIL FonIL FonIL FonIL FonIll FonIL FonIL FonIL FonIL FonIL FonIL FonIL FonIL FonIL FonIL FonIL FonIL FonIL FonIL FonIL FonIL FonIL FonIL FonIL FonIL FonIL FonIL FonIL FonIL FonII FonIL FonIL FonIL FonIL FonIL FonIL FonIL FonIL FonIL FonIL FonIL FonIL FonIL FonIL FonIL FonIL FonIL FonIL FonIL FonIL FonIL FonIL FonIL FonIL Fonll FonIL FonIL FonIL FonIL FonIL FonIL FonIL FonIL FonIL FonIL FonIL FonIL FonIL FonIL FonIL FonIL FonIL FonIL FonIL FonIL FonIL FonIL FonIL FonIL FonIII FonIL FonIL FonIL FonIL FonIL FonIL FonIL FonIL FonIL FonIL FonIL FonIL FonIL FonIL FonIL FonIL FonIL FonIL FonIL FonIL FonIL FonIL FonIL FonIL FonID FonIL FonIL FonIL FonIL FonIL FonIL FonIL FonIL FonIL FonIL FonIL FonIL FonIL FonIL FonIL FonIL FonIL FonIL FonIL FonIL FonIL FonIL FonIL FonIL FonIFc FonIL FonIL FonIL FonIL FonIL FonIL FonIL FonIL FonIL FonIL FonIL FonIL FonIL FonIL FonIL FonIL FonIL FonIL FonIL FonIL FonIL FonIL FonIL FonIL FonIR FonIL FonIL FonIL FonIL FonIL FonIL FonIL FonIL FonIL FonIL FonIL FonIL FonIL FonIL FonIL FonIL FonIL FonIL FonIL FonIL FonIL FonIL FonIL FonIL FonILE FonIL FonIL FonIL FonIL FonIL FonIL FonIL FonIL FonIL FonIL FonIL FonIL FonIL FonIL FonIL FonIL FonIL FonIL FonIL FonIL FonIL FonIL FonIL FonIL FonIPc FonIL FonIL FonIL FonIL FonIL FonIL FonIL FonIL FonIL FonIL FonIL FonIL FonIL FonIL FonIL FonIL FonIL FonIL FonIL FonIL FonIL FonIL FonIL FonIL F-onIL F-onIL F-onIL F-onIL F-onIL F-onIL F-onIL F-onIL F-onIL F-onIL F-onIL F-onIL F-onIL F-onIL F-onIL F-onIL F-onIL F-onIL F-onIL F-onIL F-onIL F-onIL F-onIL F-onIL F-onIL F.onIL F-onIL F-onIL F-onIL F-onIL F-onIL F-onIL F-onIL F-onIL F-onIL F-onIL F-onIL F-onIL F-onIL F-onIL F-onIL F-onIL F-onIL F-onIL F-onIL F-onIL F-onIL F-onIL F-onIL F-onIL F onIL F onIL F onIL F onIL F onIL F onIL F onIL F onIL F onIL F onIL F onIL F onIL F onIL F onIL F onIL F onIL F onIL F onIL F onIL F onIL F onIL F onIL F onIL F onIL F onIL F-onIL F-onIL F-onIL F-onIL F-onIL F-onIL F-onIL F-onIL F-onIL F-onIL F-onIL F-onIL F-onIL F-onIL F-onIL F-onIL F-onIL F-onIL F-onIL F-onIL F-onIL F-onIL F-onIL F-onIL F-ONIL F-onIL F-onIL F-onIL F-onIL F-onIL F-onIL F-onIL F-onIL F-onIL F-onIL F-onIL F-onIL F-onIL F-onIL F-onIL F-onIL F-onIL F-onIL F-onIL F-onIL F-onIL F-onIL F-onIL F-onIL F- F-onIL F-onIL F-onIL F-onIL F-onIL F-onIL F-onIL F-onIL F-onIL F-onIL F-onIL F-onIL F-onIL F-onIL F-onIL F-onIL F-onIL F-onIL F-onIL F-onIL F-onIL F-onIL F-onIL F-onIL F-onIL | |
| Реки'm Ha Φил'm | Во odнoc Ha HopmaJIHnTe TeIeBnIeNcKn IprOpamn, ФиIMOBnTe ce ChIMaat Ha pa3JIuHem брОя pamКИ BO seKUHda. Вklучete ja OBа onциja KORA cakate jaacno da ra ng rIpeIATE сцeHnTe od ФиIMOT co 6br3n DBVJKeHbA. | |
| ToH Ha KOxata | Hиjahcata Ha KOxata MoKe Da ce npomEni nOmefY -5 i 5. | |
| ПROMeHa Ha 6oJa | Го princncocobya nocakvbaHnOT ToH Ha 6oJaTa. | |
| МAnIPA'he Ha oncerot (Gamut Mapping) | Оваа onциja moxe Te Da ja kopructte 3a da ro noctabIne oncerot Ha 6oIe kon ce npikakjBaAT Ha TB-ekpaHOT. Kora e noctabEHa Ha „BkIyUeHo“, 6oIe ce princncocobyaat Bo corlachocT co n3BOPHNOT cRHaJI. Kora e noctabEHa Ha „IcknyeHo“, cTAHdApDnO ce kopructn MAKCImaJIHnOT kanaIeT Ha 6oI HA TB-ypeIot (релорача Na onZju).3a6eNeuKa: Oea a onzja MoKe Da He e docmHa ha 3aBucHocm od Tc-Modenom u HezeBume odnku. | |
| Dolby Vision- n3BeCTyBaHbE | Ги поставьп поференциte 3a n3rIeIodT Ha n3BeCTyBaHbEto 3a coDPKlnHATA Dolby Vision Kora e BkIyueHa onzjuata, loroTo Dolby Vision Ke ce npikacke da doJHnata dechna Stpana Ha ekpanot kora Ke ce 3a6eNeXn Dolby Vision-codpxinHa. | |
| ZeIocSeH oncer Ha HDMI | Дodeka rIeIaTe od HDMI n3Bop, OBa aФункuzja Ke 6bide BvIINBa. МokTe Da ja kopructte OBa onZju 3a da Ги nctakHete cPrHnTe TOHOBn Ha cnLkata. | |
| Pecetnpa'be | Ги постуь NaocTBKHe Na cnLkata Ha noyETHnTe cTaNapdHn NocTABKN (OCBeH peKIMOT Mrpa). | |
| PC-n03nziJa | Сe nojabvBa cAmO KORA n3BOpOT e noCTabEHa Ha VGA/PC. | |
| АВТOMATСКО NoCTaByBaHbE Ha No3nziJa | Ако с啉кота He e zentropaHa BO pexim VGA , kopructete ja OBa onZju 3a abTomatcKn Da ja HaMeCTHne ПОЗИZjata Ha cnLkata.ПритисHTe OK 3a da noyHete abTomatcKo MeCTeHbE. | |
| ПОЗИZJa X | Оваа onZju Ja noCTaByBa cnLkata BA XOpIzHOtALHa nOLOX6a Ha deChata Или Леват stPapaHa Ha ekpanot. | |
| ПОЗИZJa B | Оваа onZju Ja noCTaByBa cnLkata BA BeRTNKaIIHa nOLOX6a KOH rOpHnOT Или DoJHnOT dcl Od ekpanot. | |
| Ф配电ВeHzIJa Ha ToUka | ПоDECyBaHbEtO Ha Ф配电fenZjata Ha tockite Ги пограВaAT npechITE kORA ce jabyBaAT BeRTNKaIIHn ЛeHTN BO INTEH3INBHO tOuchETraIzM, Каб ТбELN Или naparpaФи, Или ce nojabvBa TekCT BO nOMaIInФontOBn. | |
| Фa3a | Во завиност od n3BOpOT (komPjyterp ид.) мokTe Da amate zaamgarLEHa Или NeuchSTa cnIka Ha ekpanot. МokTe co npobvBaJIbEDA ja noCTabNTe pha3aTa n da doBnIeTe poyncta cnIka. | |
| Соджина на Meнito 3a 3Byk | ||
| Dolby-aydnio | Кe бидах досларно onциnte Паметно, Кино, Музиka, Вectи Исклучно. Постави касклучно за Deakтвираъе. Забелшka: Неко салему ву менио 3Byk Ke budam nocubehu u hedocmanu akо ce nocmaeehu Ha dpyza onizuja od Исклучно. | |
| DTS TruSurround HD | Го akтвира плд дacrtbира DTS TruSurround HD. | |
| Bluetooth | Притисhev Ok 3a до Го отвори te ekpanot на MeнITO Bluetooth . Корисейки ro oboj ekpan може до Го оdkриete и порзete на TB-уpeiodOT 3ByuHnite урediaktвиранcoBluetooth-6e3xunha texhoologna. | |
| Mok Ha Aynio N3ne3 | Ги поставва рпесереньи te 3a aydnio n3ne3 Ke bидах досларно onциnte TV, S/PDIF HDMI ARC. Нema заима aydnio n3ne3 ocbenпpeky n3brpaHaTa onциja. Ако e n3brpaHa celenekuziata HDMI ARC, Ke bи ded obOZMOJKeHa odlinka CEC. Забелшka: В завuchocm od uzbranama onциJa Hekou салему ew ayduo MeHumo Ke uzaladaam noscueHo u hema da buadam docmanlu. | |
| AO3 (АВТOMATСКО огранисту Звк). | Го поставва звекот на чимсрано НИВО РOMEЧ рогрампес. Ако орцьа на мениху Dolby Audio e поставва на орциja koja He e Исклучно, Орцье на AVL-поставkaразе ке с缄н. Ке бидат достанин орцьente АВTO, HoК, Hормално и Исклучно . Во ржим АВTO, TB-уpeдот ке с пемechтп на ржим Hормално упь НИВО за вис的高度 ДЕТКOBНITE Искрмачи за вис.To АКо Нем Инфоматуся за висовeto obaa орциja седогаше Ке Функшионира како Hopмално. KORA TB-уpeдот ке с畴фprп на ржим НИ КпВПТ NO ПОставва на орциьа На АВTO, Ке сокне Инфоматиньда Лента на ekраот. Be молиме,有很大ite постбд дега bo сpondеба co ржимOT Hopмално, ржимOT HoК, hydn постесивна дINHamчина COнТрOLA на KMпpresсinasда koja e coodbetna 3a ТИВКИ ONКРУЖВА. | |
| Наре徴ни поставки | ||
| Евлиajзер | Го ИЗбира ржимOT на львлиajзерOT. Поставки можатда с prinлагдат по желба само Во ржимOT Корочник. | |
| Засильва ще на 6ac | Го кONDрлра НИВOTO на Засильва щe на 6acot. Поставете го с кONDETо Левши Дecho. | |
| DTS DRC | КONDрla Na Динhamчиnot oncesг овозмочува писнособува щe на засильва щeTo На НИСКИ BИСОКИ НИВО GA на релюдуцшаьe. Ке Функшионирсамоaco Изворнот aydno Формат e DTS. AKТВИрайтеша DeakTВИрайт� DTSDRC поставыajкю Га каб Вклчении Упслчени. Ржим на 3вукOTМожete Дд ИЗбэрпес ржим на 3вук(а кизбрав�пот канл Га подржува тоа). | |
| Диитален ИЗлес | Го поставва тиNot на ДииталлнOT aydno ИЗлес. Овада орцья НEMA на Бide дocstан псд орцья Na Oрцья Na Oрцья Na Oрцья Na Oрцья Na Oрцья Ако орцьяда за ИЗлес на 3вук He e постavenа на S/PDIF. | |
| Слшалки/ИЗлес 3a линиja | При постува щeTo Na Надворшенин засильва на вадиOT TB-уред Корис tejkn Ту ржимOT Зышалки, можete Дд ja ИЗбэрпес obua орцья КAKO ИЗлес 3a Линиja. Ако на ТелевизорOT стЕ NOВЗALE Na NOВЗALE ja obua орцья КAKO Слшалки. Вес молиме,有很大да яи ржимOT слшалки, обeЗдete Овог ИЗлес od MeHITO да e постavenа на Слшалки. Ако e постavenа КAKO ИЗлес на Линиja, ИЗлест od пжимOT на слшалки Ке bide CTABEN Ha MaKCSMUM, a ToA Бide можени на Ви То Oштети слухот. | |
| Слшалки | Го постува 3вукOT на слшалки. Oвада орцья НEMA на Бide дocstанна Akо орцья Слшалки/ИЗлес 3a линиja He e постavenа на Слшалки. Вес молиме,обeЗдete НИВОТ Дд ErykOT Дд e постaveno Ha HINGKO pereДа Г КориспспспспспспспспспспспспспспспспспспспспспспспспспспспспспспспспспспспспспспспспспспспспспспспспспспспS. | |
| Рестуарыe | Рестуарын НЕКО ON 3вунITE ПOSTавки на STANДAPДHITe Фабричкь врEDHOCTN. | |
| Соджина на Meнito 3a Мрека�� Вид мрека | Дeakтвира ja Мрекиота Врска илсмени Го Видот КОнКцида. Сkeнирaj 6e3Жични Мреки | Залочни пребарува.Table 3a 6e3Жични мреки. Ова орциja ке биde дocтаниа по Видот Мрека e постaven Ha Бe3Жичен уред. |
| Притисе WPS на wifi-pутерот | Ако вашот морем/pутерima WPS, може діректо са ce поразете co помош на ова орциja. Oзучete ja ова орциja и рір思索е OK. На модемот/pутерот рір思索е ro WPS-Кончeto 3a за вocstoctabite Врска. Ова орциja ке bиde дocтаниа по Видот Мрека e постaven Ha Бe3Жичен уред. | |
| Testа 6р3инatable на Иntер在网络 | Почnéтetest 3a 6р3инatable за за щroduberпеширина на поjasot на Врската. Рezултытό ке ce піріхале на ekpanот kora ке завши. | |
| Наре徳ни постовки | Сmenе ти конфигурациnte IP и DNS на TB-уpechod. | |
| ВКЛУЧЕНО Wake (Wake On) | ВКЛУЧЕТЕ илд за щroduberпеше ja ова орциja co постavenыgesha ВКЛУЧЕНО ил Искльчесо. 3a demalnu unffopmauzu 3a оршиме до оea mehu, koncynmupajme zu delom Повозаанe | |
| Содрахина на мению заInsсталачида | ||
| Автomatско скешие kaналу (Повторно штелвае) | Ги посякува обчине за ветоматскоштелвае.Д. Аntенско: Пцеарува и Зачыва стонckи.D. Кабелско: Пцеарува и зачыва набелско DVB стонц.Аhalогно: Пцеарува и зачыва наhalогни стонц.Сателтуко: Пцеарува и зачыва сателтуко. | |
| Рачно скешие kaналу | Овaa оочида сегостп за весувае на діректөн пөнөс. | |
| Скешие мөхнл kaналу | Пцеарува за поsprотима каналу ВССТЕМOT на рөмтөр.Д. Аntенско: Ги посярува аhtенскгп лүмөхнл каналу.Д. Кабелско: Ги посярува савелскгп мөхнл каналу. Сателтуко: Ги посярува сателтускгп мөхнл каналу. | |
| Аhalогно Фину штелвае | Можete за ja kористо obaa постама за Фину лүмвагье на р halогнгп каналу. Овaa одана не достама akо не се зачываи р halогнн каналу и.akо каналot кoj Momentално се г LEда не се рhalоген канал. | |
| Поставки на catelintot | Ги посякува постама на сателлгп.Спссok сателтп: Ги посякуваaktibнite сателлгп.Можete за діодавate, бришпсо сателлгп уллд за Ги мehувае поставки над сателлгп на спссokot.Инстамярье на р halогнэ: Можete за Ги сmedнite Поставки на сателлскatinga р halоги р halогп. Табел на сателлскн канал: Може за постаме уллд рhalогмп Табелata co сателлскп tabeili co coodbetнгп оочи. | |
| Инсталциони noctabkn (посьбог) | Ги посякува мению на постама за п halогнгп. Пцеаруваь bo ржим на mihuвае(*):Вашnot TB-уред ке Ги посярува сITE Нови пьпзгьэн канал дodeka в BO мihuваь.Кe ce посяхат сITE НOBHAДен Имтуваь.Диhamчно хурши�е на каналn(*):Ако поочида в постаме на р halоги р halоги, над сдаха на р halоги. Над сдаха на р halоги. Табел на сателлскп дodeka тгеда. (*) Дoscmanнocma завUCO od MODEnom. | |
| Поставete ro domaшно trpanснодер (*) | Со ова мени, можete за Ги мениates и за зачывае розервна кориja од范围内 пapametрни на DOMaшно.Tранснодер, Вklnyчвajkn Гrid на coodbetног M7-onepatop,што сегостат за симн�ваье на спссokot канал.Поставete ringrelnoptyanithe noctabkn и рignitschete Ге ЗелentOTOКочу за Ги зачыва noctabknte. Пого поочente п Hal'tanaцида на M7-onepatop со мениTo ABtomatsko скешие канал>Catelint (*) Oвaa onciua на менио ке смане docmanha сamo akо санразу unichmanauju на M7-onepamop. | |
| Избршии ja писта co услуги | Корисて ja obaa onciya за SFRISEBE на зачывае канал.Овaa постама e Видлива сamo kora oncijaatura за SFRIJЯ e постама на Дадская, Шевская, Норveшka ил Phinhcka. | |
| Изберete ak independен Мрека | Овая постовка ви дзволува на ги Изберete само EMITува на за вор рамкite на Избраза та мрека на бидат сравени на спсокот канал. Овая Функуда в doctанна само за ощьajata за землatingа. | |
| Информачи 3a сигналot | Може за то корисITE оobo щелемп.TOD мени за ги сдених иформачи te 3a СигналITE с好吗 ШTO с НИВКВАЛТЕТ на сигналOT, НAZIB на мрека на ITH., 3a спte Доста пни Фразковци. | |
| Пробнонстары | Ги Брише спte Зачваши Канали и поставки, по сесетура TB-OT до phабричп поставки. | |
| Опции „Фразсан“ | Ги рірочува орциITE „Фразсан". | |
| Рodingsлесka Контулona | Ги рірочува орциITE за рірочтесka КContrpoла. Весete ro ПИН-КODOT ШTO сte го ИЗбразе BO пвичны сизаласа за ги поледенеTekOBнITE поставки. | |
| Систemskn Информачи | Ги рірочува сизlemckITE Информачи. | |
| Приемни Информачи | Ги рірочуваTekOBнITE Информачи за сателитскит прием. | |
| Мodyл-CAS | Ги рірочуваTekOBнITE Информачи за мodyлOT-CAS. | |
| Надгалда | Ги рірочува орциITE за надгалда на софевер. | |
TnabHa TB onepaunja
KopncTeBe Ha cnncOKOT Ha KaHaJI
TeJEBn3OpOT rncopTnpa CNTe KaHAn BO CnucOK Ha KaHAn. MoKe Da ro ypeDyBaTe OBOj CnucOK Ha KaHAn, da NOCTaByBaTe OMJIeHN IIN da NOCTaByBaTe AKTNBn CTAHnIu WTo Ke BnDat HABeDEHn CO NOMoI HA ONUInTe „CnucOK Ha KaHAn". PpNTnCHete Ro KOnHeTO OK 3a Da ce OTBOPN CnucOKOT KaHAn. MoKe Da rN cHINTnPate HABeDEHnTE KaHAn IIN da InpaBnTe HAppeHN I3MeHN BO TEKOBHnOT CnucOK Co ONUInTe Ha KapTnUKNΦnTep n YpeDN. CeNeKTnpajTe ja KapTnUkata wTo ja cakate n npNTnCHete OK 3a da rN BVnTE DoCTaHnTE ONUIN.
3a da ro dondaTe KaHAnot KoJ MOMeHTaJIHO ro rIpeTe KOH MeHnot PoyetHo, O3HaueTe ja OnuJaTa Doaj KOH PoyetHo BO TabyNaTopoT YpeN BO MeHnTo KaHAni npITncHeTe OK:
3a6eneuka: He ce docmanHu KOMaHdume Ipemecmu Ha no3uua, IV3puu unu N3MeHu Ume eo MeHumo TB-ypedu > KaHAnu > IV3MeHu He ce docmanHu 3a KaHAnu umo ce emumybaam od M7-onepamop.
YnpaByBaHe co CnncOKOT Ha OMnJeHn
Moxete da Hapabnte Yetnpa3nunn cnncouna Ha BaunTe OMnEnn KaHnn. Bne3eTe BO MeHNTOB>KaHa nn npntncheTo KO nOKeTO OK 3a Da ro OTBopnte MeHnTo KaHa nn. CeJeKtnpajte ja KaptnuKaTa YpeN n npntncheTo OK ok 3a da Tn BnInTe onnnte 3a ypeDyBaBe n n36epete ja onnjata O3NaU/OTcTpaHn O3haka. N36epete ro cakAHOT KaHAn Ha CNsOKOT CO npTnCKaBe Ha KOnHeTo OK DoEka e CenKeTpann KaHAnOT. Moxe da Hapabnte NOBeKeKpAteH n36Op. Moxe da ja KOpNCtnte n onnjata O3NaU/OTcTpaHn O3haka 3a Da rN n36epete CHTe KaHa nn Ha CNsOKOT. Notoa npTnCHeTe Ro KonHeTo Ha3a/Bpatn ce 3a da ce BpaTne Ha onnnte Ha MeHnTo YpeN. N36epete ja onnjata ChmAJ n NobTOpHo npTnCShe Ha KOnHeTO OK. Ke 6ndat npkKaJHn ONnnte 3a CNsOKOT Ha OMnEnn KaHa nn. PocTabete ja cakHaTATA ONnJa 3a CNsCOUHa BKnUyeHo. N36paHnOt KaHa nn/n36paHnTE KaHa nn Ke 6ndat DODaDeHn Ha CNsOKOT. 3a Da OTCTPahnte KaHaan JIIN KAHa nn OD CNsOKOT OMnEnn, CJIeTe rN nCTnTe YeKOpn INOCTaBeTe ja cakHaTATA ONnJa 3a CNsOKOT Ha NcknyeHo.
Moxete da ja kopuctnte fynkunjatafupert BO MeHTo KaHann 3a da rnfupate kaHannte Ha CnncOKOT KaHann 3aceKoraawBO cornaCHOCT CO Toa wTO ro npetnoHTate. Co onujata fupert mokeTe Da noCTabnte eDeH od CBONTe YETnpn OMnneHn Cnncoun da ce npkaKe ckojnat Kora Ke ce OTBOPn CnncOKOT KaHann.
NocTaByBaHBe Ha pOdUTeJcKa 3aUHTa.
OnuNTe OJ MeHnTo PoUTeNcKn NOCTaBKn MoKe da ce KopNCtata 3a da ce cnpey KOpNCHnCtpe Da rneDaat onpeJeHn nporpamn, KaHaJI nn Da Kopncat
MeHnja.ObneNoDecyBaHaCeNoUpaHnBO MeHnTO NocTabKn>CnCTeM>PoOnTeJckn.
3a da ce npkaKaT onuHte Ha MeHTo 3a 3aknyBaHe od poNTeHTe, Tpe6a da ce BHece INH-6poj. Po BHeCyBaHbeto Ha ToCHNOT INH-6poj, Ke ce npkaKe MeHTo PoDHTeNcKn NoCTabKn.
3aKnyyBaBe Ha MeHnTo: Obaa noctabka ro aKTbBnpa nnr To DeKaTbBnpa npncTanot Do cnte MeHnja nnm MeHnja 3a nHcTanauJa ha TB-ypeDor.
3aKnyuBaHe 3a Bo3pacta: Ako e nocTaBeHa OBaa onuja, TB-ypeoT do6nBa HOpMaun 3a Bo3pacta oIpeHOCOT, a aKO e DeakTNBupaHO 3a Taa OndpeDeHa BO3pact, ro DeakTNBupa npicTanOT Do npeHOCOT.
3a6eenuka: Ako onujama 3a 3emja 60, Ipba Hnctanaunja, e nocmaea Ha paHua, Umauja uNu Aecmuja, epeh6oema Ha 3aknyuebemo 3a 8o3pacma ke 6ude nocmaeaHa 18, kako cmandapda epehocm.
3aknyBaBe 3a deca: Ako Obaa onuja e nocTaBeHa Ha,BknyeHo", TB-ypeoT moKe da ce koHTpOnnpa camo npeky daneHnckn ynpaBybau. Bo oBoj cnyaj, Hema da cyHKnOHHpaat konHbata 3a KOHTpOHa TB-ypeoT.
3aKnyuBaBe 3a nHTepHeT: Ako Obaa onuja e noCTaBeH Ha BknyeHo, anNkaunTe uTo Kopnctat nHTepHET Ke 6nDat DeakTNBupAH. NocTabn Ha NcknyeHo 3a da ce nywtat nobTOpHO OBne anNkaun.
Noctabete INH: To dePhiHnpa 6pojoT PIN.
CTaHdapDnBpeDnOCTNaPiN-6pjoToHa CICAM: OnujataKe ce nojabn kako nocuBeHa aKO He ce BHece 3N-Moyn Bo OTbOpOT 3Ha TB-ypeDot. Moxete da ja cMeHnTe CTaHdapDHaTa BpeDnOCT Ha PiNHa CI CAM co OBaa onuja.
ПИН HA TB-YPEДOT(*): Co akTNbupaHe и DeakTNbupaHe Ha OBaa OnuJa MOKeTe Da do3BOJIte Илд a 3a6paHnTe HeKo KaHaJn Ha M7- OneparOpn DA nCpKaaT ПИN-6apAba. OBne ПИH- 6apaHa npeTcTaByBaat MexaHn3am 3a KOHTpoJa Ha прICTaNT 3a COODBeTHnTe KaHaJn. Ako OBaa OnuJa e AkTNbupaHa, He MoKe Da ce npIcTaan Do KaHaJInte шTO npakaAT ПИN-6apaHa 6e3 Da ce BHece npBO TOUHnOT ПИH.
(*) Osea onuja Ha MeHmo Ke cmaHe docmanHa camo aKo ce HnpaEu unCmanauju Ha M7-onepamop.
3a6eewka: Cmahdapdama bpehocm ha INH-6pojom moke da ce nocmaeu kako 0000 unu 1234. Ako umame u36pan INH (ce 6apa eo 3aeucnoom od u36opom Ha 3emja) npu npueuHomo uhcmanupabe kopucmeme zo INH-6pojom umo 20 umame u36pano.
Hekou onuMoKe da He ce docmanHu 8o 3auechocm od
moden u/uU o od u3bopom Ha 3emjama npu npBaTa
nHctanaunja.
Bodn3a eNeKtpoHcKn nporpaMnpaHse
CoФункиjuana eJneKtpoHcN nporpamckn BODnHa Baunot TB-ypeD, MoKe Da ro npereJeYbATEpacnppeDoT Ha TeKOBHO INCTaIIpaHHTe KaHAn HaBaunOT CnncOK Ha KaHAn. 3aBnCn OD KOHKpETHOTo EMNTyBaHe daJI N OBAA OJINKa e NOIDPkaHa IIN He.
3a da npuctannte do nporpamcknot BODnuy, npntncheTe ro konueTo BoNnHa daeneHHcknot ynpabvBauch. Moxe da ja kOpuctne n onujaTb OOnu BO MeHnTO TB.
Ima 2 pa3nHn BnDa Ha npereJHa pacnopei, BpemeHckn pacnopei npacnopei Cera/CneHNo.
3a da npemnheTe od ehen npereIeHa dpyr, 03haeTe ja KapTuKata co mMeTo Ha anTepHaTbHnOT npereIe Ha rohpata ctpaHnua Ha ekpaHOT n pntncheTe OK.
KopncTeTe rKoynHbata 3a Hacoka 3a da ce DnXknte Hn3 nporpamckata ncta. KopncTeTe rKoynHbata
Ha3aI/BpaTn ce 3a Da IIN KOpNCTnte OOnuNTe Ha KapTNuKata Ha roPHaTa cTpaHa Ha ekpaHOCT.
PacnopeHaBpeMeTo
Bo obaa onuja 3a npereJe, cnte HactaHn Ha HabedeHnte kaHAnKe 6ndat npKakAHn CnopeBpeMeHcN paCnope. Moxe da rN Kopncnte KOnHHbTa 3a HAcoka 3a Da ro npereJeDyBaTe cNtcoKoT HacTaHn. O3HaueTe HactaH n npNTCHete OK 3a da ce npKakxe MeHTo 3a onuH 3a HactaHOT.
PnTNCHeTe ro KonueTo Ha3a/BpaTu ce 3a da
rKopnCTnte DoCTanHnTe Ouun Ha KapTuKhata.
O3NaUeTe ja KapTuKhata OInTep n npTnCHete OK
3a Da rBnTe CnTe OUnn 3a oInTpnpaHbe.3a
da Ro CmEHnTe ppeJeDoT, O3NaUeTe Cera/CneNo
n npTnCHete OK. MoKe da rN KopnCTnte OnuNTte
PepTxOeH DeH n CneDeH DeH 3a da Tn npKaKeTe HactaHTe OJ ppeXoDHNOt N CJIeHNOT DeH.
O3HaYe ja KapTnUkata Ektpa n npTnChTe OK 3a Da npCTaNTe Do OUnNTe daJeHn NDoJy.
I36epn KaHp: To npkaKyBa MeHTo I36epn KaHp. I36epTe KaHp n npTncHeTc OK. HactaHnte BO NoprpamckNt BODuKo OndroBapat Ha I36paHnO T KaHp Ke 6nDAt O3NaYeHn.
Ppe6apyBaHe Ha BOnuOT: Tn npkaKyaB OOnuNTe 3a npe6apyBaHe. Co Obne onu MoKe Da npe6apyBATE Hn3 6a3aTa Ha noaTou Ha nporpaMcknot BOnu CnopeN 36paHnte Kpntepnym. CooBbETnTe pe3yIaTn Ke ce npkaKaT Ha cnncok.
Cera: I npikaxyBa TEKOBHnot HactaH OJ HarnaceHnot KaHaJ.
3ymnpaj: N36epTe n npntncheTe OK 3a da rN Bnnte HactaHnte 3a nooJr nepnoD.
Pacnope cera/cneiHo
Bo oba onuja 3a npereid, ke 6nata npikaxaHn camo TeKOBHNTe n CneHNTE HacTaHn Ha HabeDeHNTe kaHann. Moke da rN KopNCHTe KOnHbata 3a Hacoka 3a da ro npereJeDyBaTe cnCOKOT HacTaN.
IpnTnCHte ro konyeto Ha3a/Bpatu ce 3a da
rKopnCTnTe DoctanHnte onuHa KapTuKhata.
O3NaYeTe ja KapTuKhata FInTpep n npTnCHte OK 3a
da rN BuInTe CIne OOnu 3a FInTpnpaHe. 3a da ro
cMeHnTe ppeJeDoT, O3NaYeTe BpmHckn pacnopei
I npTnCHte OK.
Onznn 3a HacTaHnTe
KopncTeTe rKoNcHb a 3a Hacoka 3a da oBeJeXnTe nporpama n npTncHe TE OK 3a da ce npkaKe MeHTo Onu. CneHNTE onu ne DoCTaHn.
N36op Ha KaHAn: Co OBaa onuJa, MoXeTe Da npemHHete Ha N36paHnOT KaHAn 3a Da ro rJeDATE. Ke ce 3aTBOp nporpamcknOT BODNu.
NoBeKe HOpMaun: PnKaJN DeTaHn HOpMaun 3a n36paHnot Hactan. KopcTeTe rKoPbHaT a 3a Hacoka Harope n HaOny 3a da ce DnKHTe Hn3 TEKCTOT.
Hamectete rja cTonepkata Ha hactaHot / n36pnwete ja cTonepkata Ha hactaHot: Ondepete ja onujata NocTabn cTonepka Ha hactan npitnche TE OK. Moxete da noCTabnte cTonepka 3a ndn Hactaan. 3a da OTkaxte Hekoja cTonepka ITO e Beke NOdeceHa, ceneKTupajTe ro Toj Hactan npitnche TE HA KOnHeTo OK. Itoa ceneKTupajTe ja onujata n36pnwn ja cTonepkata 3a HactaHot. Mepaot Ha BpeMe Ke ce otkaKe.
CHMaj / N36pHn CHMka Tajmep: Ondepete ja onuJata ,CHMaj" n npTncheTe Ha konyeTo OK. Ako ce emTuBa nporpaMaTa BO HeKoe uHObpeMe, Ke 6nde DoaHeHa Na CNsCOkOT CO CTonePkn 3a CHMaJIbe. Ako n36paHaTa nporpama ce emTuBa BO MOMeHTOT, CHMHaBeTo Ke NOUHe BeDHaI.
3a da otkajte Beke noctabeh cnonepka 3a chImahe, ceNeKTnupajTe ja Taa nporpama n npTnche Te Ha konyeto OK n n36epete ja onujaTa N36pnwn chIMka. Ctonepka. Ctonepkata 3a chImahe ke ce otkakke.
BAXKHO: Noep3eme YC5 Ha Bauuom TB-yped dodeka TB-ypedom e ucknyuen. Toaaw mpe6a da yknyumte TB-ypedom 3a da ce nojaeu onuujama 3a chumahe.
3a6eNeu: He moKeme da ce npEcpneme Ha dpya KaHAn ako UMa akmueupaHo cmonepka Ha KaHAnom uMo zo cneDume.
He moke da ce nocmaeu cmonepka unu cmonepka 3a chumahe 3a dea unu noeke noedunehu Hacmanu 80 ucm spemehcku uhmepean.
HnterpnpaHy ycnytn 3a nooouHexHo rneDaHe
Mоже дужибATE BO TB-услгnte 3a NOdoцнжho rneDAbe Ha Freeview Play wTo pa6oTaT dIpeKTHO npeky eNeKTPoHcKNOT nporpaMckN BODnU (ENB). DoTeKa CTe Ha HeKOJ KaHaJI, KopNCTe Tn KOnuHbata 3a HAcOKa 3a Da Ondte HAna3aD Bo BpeMeTO npeky BpeMeHcKnOT pacnopeД Ha EINB. Ke ja BnInTe COdpxHHATA OD NocJeHNITE HeKOLKy DeHOBN. DoCTaHHTE COdpxHHn 3a NOdoZHeXHo rIeDaBe moKeJa ce CMeHaT BO 3aBnCHOC Td EMHTyBaUnTe n Ha HNB Ke nMa nKOHa 3a penpOdyKunja. ObelExeTe
ja coDpxHHaTa ITO cKaTe da ja penpoDyucpaTe n npTnCHeTe ro konHeTo OK:
06e36eTe DeKa Baunot TB-ypee nOBp3aH co Baata DomaHa Mpeka 3a Da rK KopnCTte ycnyrnte 3a noouHeXHO TneAbe. 3a DOONHITENH INΦopMaun 3a Oba N 3a dpyrnte ycNOBn 3a ycnyrnte Freeview Play, BndeTe ro denot NOBp3yBahe n nnatΦopmata Freeview Play.
Bodn3a eNektpoHcNo nporpaMnpaHbE
CoФункила eJektpoHcN nporpaMckn BODnHa Baunot TB-ypei, moKe da ro npereIeDyBaTepacnppeIoT Ha TeKOBHO INCTaIIpAHTe KaHAn HaBaUNOT CnICOK Ha KaHAn. 3aBnCn OJ KOHKpETHOTOemITyBaHe dani OBaa ODNkAe nOndPkaHa Nn He.
3a da npuctannte do nporpaMCKNOT BODnU, npTncHete ro konueTo BoNnHa daJeHHCKNt ynpabvBauch. Moxe da ja Kopuctne n onuJaTa BoNn BO MEHnTO TB.
Ima 2 pa3nHn Bnda Ha npereIeHa pacnopei, BpemeHckn pacnopei npacnopei Cera/CneIHO.
3a da npemnhe Te od eeden npereHn Ha dpyr, 03naeTe ja Kaptnukata co nmeTo Ha aNTepHaTUBHnOT npereNd Ha rophata cTpaHnca Ha ekpaHOT n npntncHeTe OK.
KopncTeTe n KOnuHbTa 3a Hacoka 3a Da Ce DnXknte Hn3 nporpamckata NcTa. KopncTeTe n KOnuHbTa
Ha3aI/BpaTn ce 3a Da rN KOpNCtnte OOnuNTe Ha KapTuKhata Ha roPHaTa CtpaHa Ha ekpaHOCT.
PacnopeHaBpeMeTo
Bo obaa onuja 3a npere, cte hactaHn Ha HabeHeHte KaHaJI Ke 6ndat npkaKaHn CnpopeBpeMeHcN pacnope. MoKe Da rKopncTe KOHNbTa 3a Hacoka 3a da ro nperrneDyBaTe cncOKOT HactaH. O3haeTe HactaH n npntucheTc OK 3a da ce npikaxe MeHtO 3a onuIN 3a HactaHOT.
PnTnCHTe ro KonueTo Ha3aBpaTn ce 3a da Tn KopnCTnte DoctanHnTe onuHa Kaptnkata.
O3haeTe ja KapTuKaTa ΦnTep n npTuChTe OK 3a da rN BnIte CnTe onu nn 3a fnnTpnpaHe. 3a da ro cMeHnte npErJeDoT, O3haeTe Cera/CneHno npTuChTe OK. MoKe da rN Kopuctne onuInTe
PpeTxoJehn CJeJeh n 3a da Tn npKaeTe HactaHTe Ond PpeXoHNOT n CJeHNOt DeH.
O3HaHeTe ja KapTnUkKaTa Ektpa n npTnChTe OK 3a Da npCTanITE do OOnUnte daJeHn NDoJy.
I36epn KaHp: I npkaKyBa MeHnto I36epn KaHp. I36epTe KaHp n npTncHeTe OK. HactaHnte BO Ioprramcknot BoDn KOn OJROBapat Ha I36paHnot KaHp Ke 6ndat O3HaueHn.
Ppe6apyBaBe Ha BODnOr: Tn npKakJyBa onuHte 3a Ppe6apyBaHe. Co OBne onuMoKe da Ppe6apyBATE H3 6a3aTa Ha noDaToCuHa nporpamcknot BoDnU cNopei n36paHnTe Kpntepnym. CooDbetHnTe pe3yIraTn Ke ce npKakat Ha cnncok.
Cera: I npkaKyBa TeKOBHnot HactaH OJ HarnaceHnot KaHn.
3ympaj: N36epete n npntncheTe OK 3a da rN BnNTe HactaHnte 3a nooJr nepnoiD.
Pacnope cera/cneiHo
Bo obaa onuja 3a npereJed, Ke 6ndaT npkaKaHn cAmo TeKOBHnte HcneHNte HaCTaHn Ha HabeJeHNTe KaHaJI. MoKe Da rN KOpNCHTe KOChNbTa 3a HAcOka 3a da ro npereJeDyBaTe CnncOKOT HaCTaHn.
PnTnCHeTe To KOnyeto Ha3aI/BpaTnc 3a Da Tn KopnCTnTe DoCTaHnTe OOnu Ha KapTuKkata.
O3HaueTe ja KapTnUkata ΦnIeep n npNTncHeTe OK 3a Da rBnDnTe cnte onuun 3a cnItpnpahe. 3a da ro CMeHnTe npereJeDoT, O3HaueTe Bpmenckn pacnopei n npNTncHeTe OK.
Onznn 3a HacTaHnTe
KopncTeTe rN KOChnHa 3a HAcOka 3a Da oBeJeKeHTe nporpama n npntuche Te OK 3a da ce npkKaKe MeHTo Onu. CneHNte onu ne Ce DocTaHn.
H36op Ha KaHa! Co Obaa onuJa, MoKeTe Da npemHHeHa H36paHnot KaHa 3a Da ro rIeDaTe.
Ke ce 3aTbOpn nporpaMckNt BOdNt.
NoBeKe HOpMaun: PnKaJN DetaHn HOpMaun 3a n36paHnot Hactan. KopcTeTe rKoPbHaTa 3a Hacoka Harope n HaDony 3a da ce DnKHTe Hn3 TEKCTOT.
HameTe rja cTonepkata Ha hactaHT / m36pnuuete ja cTonepkata Ha hactaHT: Od6epete ja onujuata
Noctabn cTonepka Ha HactaH n npntnche TE OK. Moxete da noctabnTe cTonepka 3a ndn HactaHn.3a Da otkaxete Hekoja cTonepka wTo e BeKe nOdeceHa, ceNektnapajTe ro ToJ hactaH n npntnche Ta KOnyeTo
OK. Itoa ceIeKTIpaJte ja onuJaTa n36pnuJa cTonepkata 3a HactaHOT. MepaOT Ha BpeMe Ke ce OTkaxe.
CHMaj / N36pNIH CNMka TajMep: Ondepete ja onuJaTa "CHMaj" n npTnCHeTe Ha konUeTo OK.
Ako ce emTuBa nporpamata BO HeKoe uNo BpeMe, Ke 6nDe IoJaHeHa Ha CnncOKOT CO CTonepkn 3a CHImaHe. Ako n36paHATA nporpama ce emTuBa BO MOMENTOT, CHImaHeTo Ke NoUHe BeDHaI.
3a da OTkaxe Te Beke Noctabeh Cnonepka 3a CHMaHbe, ceIeKTIupajTe ja Taa nporpama N npTncheTe Ha konyeTo OK n 36epete ja onujaTa N36pnu chmka. Ctonepka. Ctonepkata 3a CHMaHbe ke ce OTkaxe.
BAXKHO! Nop3eme YC5 Ha Bauuom TB-ypeD odeKa TB-ypeDom e ucknyen. Toaau mpe6a da yknyume TB-ypeDom 3a da ce nojaeu onuujama 3a cHumahe.
3a6eNeu: He Moxeme da ce npeppneme Ha dpyz KaHa nako UMa akmueupaHo cmonepka Ha KaHaonom umo zo cneDume.
He moze da ce nocmaeu cmonepkau unu cmonepkau 3a chumae 3a dea unu noeke noeduneyu hacmanu 80 ucm epemehku unhmepean.
TeneTeKCTycnyr
PnTnCHete Ha konyeto TEXT 3a da Bne3eTe. PnTnCHete ywTe eHaaw 3a da aKTHBnpate MeuHo, To Ke BN OBO3MOxN BO NCTO BpeMe Da rIteAte TeJeBn3NcKaTa npOrpama N TeJTeKCTOT. PnTnCHete ywTe eHaaw Da n3Ne3eTe. DOKJky e MOXHO, Nornajata Ha cTpaHncaTa 3a TeneTeKCT Ke ce KoDnpaaat Co 6oJa m MoKe Da ce n3bnpaat Co npTnCHyBaHe Ha oBoEHnte KOnHbA. CneDeTe ryn ynatCTbata npkackaHn Ha ekpaHot.
DnrtaneH TeJeTeKCT
PnTncheTe ro KonyeTo TEXT 3a da npereJeBate HOpMaun Ond dHrtanEn TeJeTeKCT. KopcTeTe rKoNnBaTa BO 6oja, KypCopnte N konyeTo OK. MeToOnT Ha pa6OteHe moKe Da ce pa3NkYBa BO 3aBnCHoc Tc OD CoDPxHnHa Ha dHrtanHnOT TeKCT CneDeTe rN yNaTcTBaTA npKaKaHN Ha ekpaHOT Ha dHrtanHnOT TeJeTeKCT ekpan. Kora Ke ro npTncheTe NOBTOPOKoTcTe TB-ypeoT ce Bpaka Ha TeJIeBn3NCKO eMHTyBaHe.
HaIgpaI6a Ha coΦTBeP
Baunot TB-ypeD moKe da 6apa n aBtOMaTCKn Da axypupa cnCTeMckn coTbep aBtOMaTCKn npeky cnHAnOT Ha emTePOT nn npeky nHTepHeT.
Ipe6apyBaHe Ha haadrpa6a Ha coΦTBeP npeky KopnCHNknot nHTeppejc
Ha rnaBHOTo MeHn 136epete CnCTeM>PiodeCyBaHa a noToa Nobeke. OTe Do HaIrpad6a Ha coTBeP nnoToa npHTCHETe Ha KOnTuO OK. INoToa H36peTe CKeHnpaBte 3a HaIrpad6a n npHTCHETe TO KOnTuO OK 3a Da npOBepnte 3a HOBn CoTBPcCKn HaIrpad6n.
- Ako ce Hajde HOBA Hndrpa6a, noCyBa da ce cImHyBa nctata. OTKako ke ce 3abpun npesMaheTo, ce nojabyBa npdynpeyBaHe, npTnCHeTe ro konHeTo OK 3a da ro 3abPunTe axypnpaBeTo Ha coTbepoT n da ro pectaptnpate TB-ypeDoT.
PexmHa npe6apyBaBe n Hndrpa6a Bo 3 YacOT HayTpo
Baunot TB-ypek ke 6apa HOBn HAdrpa6n BO 3:00
yacOT DOKOJky aBTOMaTCKOTO CKeHnpaHe BO MEHITO
Onuim 3a HaIrpad6a e BknyeHo n TeJeBu3OpoTe
noBp3ah Ha cHnHa Ha aHTeHa nn Ha INHTepHeT. Ako e
HajdeHn HOB COPTBep n ycneuHO e npesemH, Ke 6nnde
HHCTaIInapH Na CNeIHOTO BKnyUbaHe.
3a6eneuka: Hemojme da zo ucknyyame ka6enom dodeka mpenka neo-duodama 3a epeme Ha pecmapmupahemo. Ako meeubzopom He ce eknyya nocne hadepadba, ucknyeme zo od cmpyja, noekajme 2 Muhymu u eknyeme zo noemopno.
Cume axypupaBa ce konmponupaam aemomamcku. Ako ce Hnnpau MaHyenHO npebapyeaBe ce u He ce Hajoe codmep, moazaw oaaa e mekoehama eep3uja.
PewabaHe Ha npo6nmu coBETu
TB-ypeoT He ce BknyuBa
OcHpyeTe ce deKa Ka6eNoT e npabUNHO BknyueH Bo 1tKepeo. PnITnCHete ro konyeTo HanojyBaHe Ha TeIeBn3OpOT.
Jowacnka
- PpOBepeTe dann e pnaBnJIHO HaHTmAH BaHnot TB-ypeI.
- HnCKO HnBO Ha cnHn MoXe Da DoBeDe Do nCKpBvBaHbHe Ha cInKaTa. PpOBepTe rN BpCKnTe Ha aHTeHaT.
-Дokолу paquho cte wTeJyBaIe, npOBepTe daJIc nTe ja BHeCne npabHnHaT aPpeKBenju.
Hema cJnka
TB-ypeoT He npMa HnKaOB CnHaJ, PpOBepTe DaJIe n36paH BnCTnHCKNOT n3BOp 3a BJe3.
-Дали aHTeHaTae npaBnHNo nobp3Ha?
-Даи e owteteH aHTeHcknOT ka6eJ?
-Дали ce KOpuctaT COOdBETHn npNKJyOuN 3a NOBp3yBaHBe Ha aHTeHa?
- Ako ce comHeBaTe, KOHcyItnpajTe ro Baunot npoIaBaY.
Bε3ByK
- PpOBepeTe DaJIH 3ByKOT Ha TeJIeBn3OpOT He e npIpyuJH. PpITncHeTe Ro Mute IJIH NOBUnTe ro TOHOt 3a da pOBepHTe.
- 3BykOTdoara oJcAmO eENH3ByuHnK.Bo MeHnTO 3Byk npOBepete ja pAMHOTeXaTa Ha 3BykOT.
Далачнскуnpаыва-He pa6oTn.
- Batepnte moke6n ce npa3Hn. 3amehe Te 6atepnte.
Moxe6n 6aTeepnte ce cTaBeHN norgpeHNO. PpoHTajTe ro denot ,CTabaHe Ha 6aTePN BO daJeHHCKNOT ynpabyBaY.
Hema cnHaHa Na BnE3eH n3BOp
- MoXHo e Da He e NOBp3aH HneDeH ypeI.
- PpOBepeTe rN AV-Ka6JIInTe n BpCKnTe Od BaUHnot ypeI.
- PpOBepeTe dann e BknyueH ypeDoT.
Clnkata He e cHTpnpaHa BO n3BOp VGA
3a Baunot Tb-ypea ABOMATcKn da ja uehtnpa cnkaT, Bne3eTe BO MeHnTO PC no3nju BA MOHnTO Cnka, O3HaueTe ABOMATcKn HameCTn IN npTncHe OK. Nouekajte da 3abpwn. 3a MaHyelHO NOCTaByBaBe Ha CnKaTa MoKe Da n KopnCTnte ONuNTe H-no3nju a V-no3nju. N36epete ja cakaHata onuJa n KopnCTe Tn JEBOTO n DecHOTO KOnye 3a Hacoka Ha daJeHHCKNt UnpaBvBauch 3a da ja noCTaBnte.
CHImaHeTo He e DocTaHNO
3a da chIMnte nporpama, npBO Tpe6a da nobp3eTe YCB-Memopnja co Baunot TB-ypeDdoKea TeNeBn3OpOT e NcknyueH. Toraw Tpe6a da ro yknynte TB-ypeoT 3a da ce nojabn onujata 3a chImaHe.Ako He MOKeTe Da CHIMATE, npOBepTe dAnyupeoT 3a CKnaIpaHBe e npabINHO opmatipanN daJIIN IMa DOBOJHO npocToP.
USB eMHORY 6aBHO
Ako npakata ,Bp3nHaTa Ha npeHecyBaHe Ha USBDnCKOT e MHOry 6abHa" ce npkaKe Ha ekpaHotdokea 3anOHyBaTe co ChImaBe, npobajTe da ro pectapntape ChImaBeTo. Ako n noHaTamy ja do6neTe nCTa Ta rpeWka, MoXHo e Baunot dNcK YCb Da He e BO cornaChocT co 6apaBaTa 3a 6p3nHa. O6ndete ce da KopncTte pa3nueh ypei 3a cknaInpaBe USB.
TnnuH npKa3Ha KOMnjyTepcN Bne3
CneHaTa Ta6eNa e NlyucTpaunja 3a HeKoN od TnHHTe peKIMn Ha BnDeOpnPKaKyBaHe. BaUnOT TB-ypeM MoKe Da He TN NoDpKByBa Cnte pe3Onyu.
| Индес Рецолуциа Фreamвениja | ||
| 1 | 850 85Hz | |
| 2 | 80 60Hz | |
| 3 | 80 72Hz | |
| 4 | 80 75Hz | |
| 5 | 600 56Hz | |
| 6 | 60 60Hz | |
| 7 | 60 72Hz | |
| 8 | 60 75Hz | |
| 9 | 768 60Hz | |
| 10 | x768 70Hz | |
| 11 | x768 75Hz | |
| 12 | x768 85Hz | |
| 13 | x864 75Hz | |
| 14 | x768 60Hz | |
| 15 | x768 75Hz | |
| 16 | x960 60Hz | |
| 17 | x960 75Hz | |
| 18 | x1024 60Hz | |
| 19 | x1024 75Hz | |
| 20 | x768 60Hz | |
| 21 | x768 60Hz | |
| 22 | k1050 59Hz | |
| 23 | k1050 60Hz | |
| 24 | x1050 75Hz | |
| 25 | x900 60Hz | |
| 26 | k900 75Hz | |
| 27 | k1200 60Hz | |
| 28 | k1050 59Hz | |
| 29 | k1050 60Hz | |
| 30 | x1080 60Hz | |
| Извор Пс | Ддржани сигнали Достаю | ||
| Задни АВ | PAL O | ||
| SECAM O | |||
| NTSC4.43 O | |||
| NTSC3.58 O | |||
| YPbPr | 480i, 480p 60Hz O | ||
| 576p, 576i 50Hz O | |||
| 720p 50Hz,60Hz O | |||
| 1080i 50Hz,60Hz O | |||
| HDMI | 480i 60Hz O | ||
| 480p 60Hz O | |||
| 576p, 576i 50Hz O | |||
| 720p 50Hz,60Hz O | |||
| 1080i 50Hz,60Hz O | |||
| 1080p | 24Hz, 25Hz, 30Hz, 50Hz, 60Hz | O | |
| 3840x2160p | 24Hz, 25Hz, 30Hz, 50Hz, 60Hz | O | |
| 4096x2160p | 24Hz, 25Hz, 30Hz, 50Hz, 60Hz | O | |
(X:He e doctanHO,O:doctaneH)
Bo Hekon cnyuan, cnHAnOT Ha TeIeBn3OpOT MoKe Ja He 6Ne IpnKaJaan npaBnHoo.. Toa MoKe Da 6npe npaDi He yocorIaceHoCT co CtAnDapDITe OJ n3BOPHaTa ONpema (IBD, YpeJ 3a IrpN, nTH.) Ako HauTe Ha TAKOB npo6JIem, KOHTaKTIpajTe CO 3actaHNIKOT J CO npOIN3BOUInTeJOT Ha n3BOPHaTa ONpema.
Iopdpxahn opmatn BO USB-pexim
IopdxKaHn fOpMaTu Ha BnDeoTaToTeKn
| Ekstehnija na daTOTeka | Формат | |
| Виdeo Dekomпесор Адno | ||
| .mpg/.mpeg/.dat/.vob | MPEG1/2, H.264, VC1 | MPEG сюj1/2/3, AC3 |
| /ts/.trp/.m2ts/.mts | MPEG сюj 1/2/3, AC3, E-AC3 | |
| .avi | MPEG1/2, MPEG4, H.264, MJPEG | MPEG сюj 1/2/3, AC3, E-AC3 |
| .mp4/.m4a/.m4v/.mov/.qt/.3gp/.3g2/.3gpp | MPEG1/2, H.263, MPEG4, H.264 | MPEG сюj 1/2/3, AAC LC, AC3 |
| .mkv | MPEG 1/2, MPEG4, H.264 | MPEG Layer 1/2/3, AAC, AC3 |
| flv | Sorenson Spark, MPEG4, H.264 | MPEG сюj 3, ADPCM, AAC LC |
| .ogm/.ogg MPEG1/2, MPEG4 MP3, Vorbis | ||
| asf, wmv MPEG4, WMV3, VC1 WMA, AMR-NB | ||
| .rm/.rmvb RV30, RV40 COOK, AAC LC / HE-AA | ||
| .webm VP9, VP8 O PUS, Vorbis | ||
IopdxkannbopmatnHaBndeoataTeKN
| Ekstetenija на Дато-teka | Формат |
| .jpg/.jpeg JPEG, PJPPEG | |
| .bmp BMP | |
| .gif GIF | |
| .png PNG | |
| .tiff/.tif TIFF | |
| .webp Webp |
ΦopMaTH Ha ayDnOdaToTeKN
| Екстенциja на датOTекa | Формат | |
| Виdeo Dekomпесор Адno | ||
| .mp3 mp3 | ||
| .ac3 ac3 | ||
| .aac AAC | ||
| .wma | .WMA | |
| .wav | MPEG сюг 1/2/3, AAC, PCM | |
| .flac | FLAC | |
| .ogg OGG | Vorbis | |
| .m4a M4A | AAC | |
| Надворецни ревоз | |
| Екстенциja Спеси Фигаций | |
| .ssa SubStation Alpha | |
| .ass Advanced Sub Station Alpha | |
| .srt Subripper | |
| .sub Миро DVD / SubViewer | |
| .sub + .idx VOBSub | |
| .txt Миро DVD / MPIPlayer / MPL2 | |
| .mpl MPL2 | |
| .smi Sami | |
| .jss JACOSUB | |
| .ttm TTML | |
| .txt / .sub DVDSUB TITLE | |
| .lrc - | |
| Вnatрешиen певод | |
| Ектейзija Спеси | ф尼克шии |
| .mkv VOBSub | |
| .mkv ASS / SSA / T | TEKCT |
| .dat, .mpg, .mpeg, .vob | Певод DVD |
| .mp4 Певод DVD | TEKCT |
PdpxaHn DVI pe3onyu
Kora rnoBp3yBaTe ypeinte co cnojknte Ha Baunot TB-ypead co nomou Ha DVI ka6n 3a KOHbepTnpaBe BO XDMN (He ce doctabehn), moKeTe da ja npOHTate cJeHaBa HOpMaunja 3a pe3oJyunjata.
| 56Hz 60Hz | 66Hz 70Hz | 72Hz 75Hz | ||||
| 640x480 | X | X | ||||
| 800x600 | XXX | |||||
| 1024x768 | XXX | |||||
| 1280x768 | X | X | ||||
| 1280x960 | X | |||||
| 1360x768 | X | |||||
| 1366x768 | X | |||||
| 1280x1024 | XXX | |||||
| 1400x1050 | X | |||||
| 1600x900 | X | |||||
| 1920x1080 | X |
Nobp3yBaHe
Nobp3yBaHBe co Xnua
Pobp3yBaHe co MpeKa co Xnua
Mopa da noBp3eTe moEm/pyTep co aKTHBHa shipokonojacha Bpcka.
- IOBp3eTe ro Baunot TB-ypeD co MoJeMOT/pyTePOT npeky ka6eJ eTepHET. Ima LAN-nOpTa Ha 3aHnOT DeI (O3aN) Ha Baunot TB-ypeD.
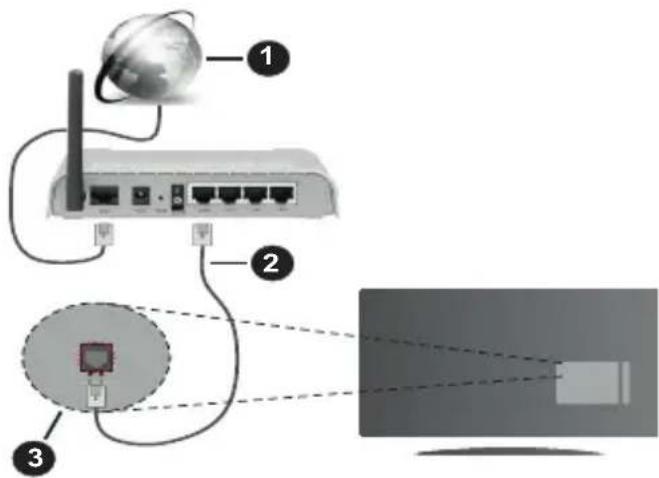
1.ИspokonojaHa ICn-Bpcka
2. JAH-(eTepHeT) Ka6eJ
3. JAH-Bne3 o3aHn Ha TB-ypeoT
3a da rKoHcHpynpaTe XnUaHnTe NOCTaBKn, BuDeTe ro DeNoT U36Op Ha MpeXa BO MeHnTO NoCTaBKn.
Mozekne moke Te da ro noBp3e Taunot TB-ype co BauHOT LAN BO 3aBnCHoCT od KOHpypaunjata Ha BaWATA MPexa.Bo ToJ cIyuaJ, KopucTe Ka6en etepHET 3a da ro noBp3e Taunot TB-ype dInpeKTHO BO SUnHnOT n3Ne3 3a MPexa.
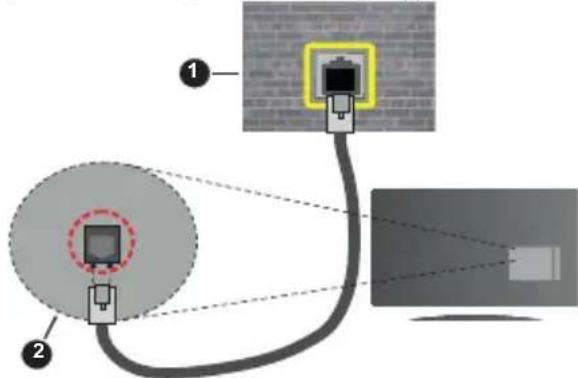
- SIneH uTeKepe 3a MpeKa
- JAH-Bne3 Ha ctpaHaTa Ha TB-ypeoT
KoHpIpypaIbe nocTaBKn Ha XnueHnOT ypei BnMpeka
3a BnD mpeka MoKeTe da n36bnpate KnueH ypei, 6e3KnueH ypei NII NdeakTnBpuHo, BO 3aBnCHoCT oI aKTNBHaTa Bpcka co TV-ypeIoT. N36epete ja
onujaTa KnueH ypeaKO ce NOBp3yBaTe npeky etepHeT.
Tec3a 6p3nHaTa Ha nHTepHeTO
ObeJexTe Tect 3a 6p3nHaTa Ha HHTepHETOT npTncHeTo KOCheto OK. TB-ypeoT Ke ja npOBepu ShbnpOKoJoachOCTa Ha HHTepHET BpCKata NKe r npKakxe pe3yntatnte Kora Ke 3abPun.
HanpeHn noCTaBKn
OBeJIeKTe HanpeHN NoCTaBKn n npNTnCHTe ro KonTuTo OK. Ha cIeHNoT ekpan MoXeTe da rN CMeHnTe NoCTaBKnTe IIN n DHC Ha TB-ypeDoT. OBeJIeKTe ja NocakYBaHaTa n npNTnCHTe ro KonTuTo JIeBO IIN DecHO 3a da ja CMeHnTe NoCTaBKaTa oD aBTOMatcKn BO MaHyEnHo. Cera MoXeTe da rN BHeCete BpeHnOCTnTe paueH IN/Inn paueH DHC. IV36epTe ro COoDBetHNOt eIemEHT od na'ayKOto MeHn HBeCeTe HOBn BpeHnOCTn Co HymepuKNe T KOnUHbA Ha dAneeHHckNt ynpaByBauch. PpNTnCHTe ro KonTuTo 3aCyBajn npNTnCHeT Ok 3a da rN 3auyBaTe NOCTaBKnTe Kora Ke 3aBPunTe.
Bε3xuHNO noBp3yBaHe
Nobp3yBaBe co 6e3xHnHa mpeKa
TB-ypeoT He MoKe Da ce NOBp3e Ha MpeKHTe CoCKPneH SSID. 3a da cTaHe BnDnB CCnHa BaWnOT MOeM, Tpe6a Da n CMeHnTe NOCTaBKnTe 3a CCnD Ppeky COfTBepoT Ha MoDEMOT.
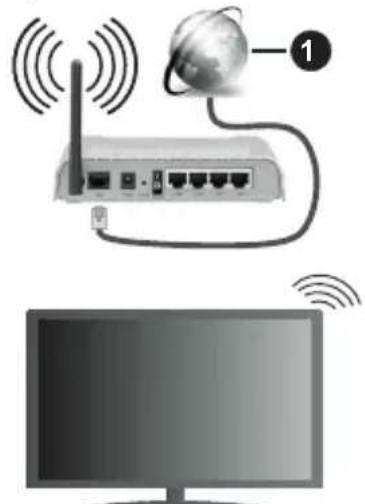
1.卍ponokonojacHa Icπ-Bpcka
Be3KuHnOT N-pyTeP (IEEE 802.11a/b/g/n) co cmyIaHn noJacn od 2,4 n5 GHz e HappaBEn 3a da ja 3roJeMn uipOunHata Ha noJacnte. Tne ce ONTIMn3npaHn 3a NOMa3Ho nNo6p3o IpeneCcyBaHe Ha HD BnDeo, Ipehocn Ha DaToTeKn i Be3KuHNO irpaHe.
- ΦpeKBHeHcJeta n KaHaJIInTe ce pa3NkYBaat BO 3aBnCHoCT oD o6NaTa.
-БрзинатаHa npehocOT ce pa3nkyBa BO 3aBnchoCT od daJIeunHata n od 6pojot Ha oncTpyKuIN NOMeIy npo3BOJNTe 3a npehoc, KOHfNrypaunjata Ha OBne npo3BOJn, paoobpaHOBnte ycNOBn, NHHJcknOT coobpakaj n npo3BOJNTe ITO rN KOpNCHTe. PpehocOT moKe n da CE npekHe nn
MOKe Da Ce OTKaUH BO 3aBnCHOC T OJ yCNoBHTe CO paAno6paHObNTe, TeNeΦoHNTe DECT nIu DpyrN WLAN 11b-ypeu. CtaHapdHnte BpeHocTn Ha 6p3nHaTa Ha IpeHoc Ce TeOpetCKn MaKcImaJIHNTe BpeHocTn 3a 6e3xUnHNTe CTaHapdN. Tne He ce BnCTInHckNTe 6p3HHn Ha IpeHeCyBaHbe NODaTOU.
- Iokaunjata Kaide wTO npehocot e HajekekTUBeH ce pa3nkyBa BO 3aBnCHoCT OJ OKOJIHaTa BO KOja ce KopnCTN.
- Be3xuHaT a onuJa ha TB-ypeoT noDpKyBa TnIOBm Moem 802.11 a, 6, rH. Ce npenopayBa da ro Kopuctte KOMyHkaucKnOT npotoKoI IEEE 802.11n 3a da n36erHeTe cekkMoXHn npOBeMn DoNeKa rJeDaTe BnDeo-3aNcN.
Mopa da ro cmeHnte SSID Ha Baunot moem kora nma npuMoEMn co nctnoT SSID. Hnaky mokeTe da nMaTe npo6nemn co BpckaTa. KopncTeTe xnueHa Bpcka aKO nMaTe npo6nemn co 6e3xNUnHaTbPcKa.
KoHpIpynpaHe nocTabKn Ha 6e3xuHnoT ypeI
OTbopete ro MeHnTo MpeXnNoCTaBKn n N36epTe IoN BnD MpeXa 6e3XnueH ypeI 3a da noUHe npouecOT Ha NOBp3yBaHbe.
O3haeTe ja onuJaTa CKeHnpaj 6e3XnUHMpeKIn npTncn OK 3a da noHte npebapyBaHe 3a DocTaNHTe 6e3XnUHMpeKn.Ke ce nojBat Ha cnCOK cnte HajdeHN MPexN. N36epTe ja cakaHaTa MPexKa OD CNICOKOT IN pTncHeTe OK 3a da ce NOBp3eTe.
3a6eNeuka: Ako Modemom noodpkyba N-pexum, mpe6a da cmaume nocmaeku 3a N-pexum.
Ako n36paHaTa MpeXa e 3aWtTeHa CO JIo3nHka,Be MOJIme,BHeCeTe Ro npABUNHNO T Kny Co NOMOu Ha BnptyeHb TaCTaTpy.MaKTe Da ja KopucTte OBaa TactaTpy Ipeky HABINrAuncknte KOUnHb a KOnHTo OK Ha daJeunHcKnOT ynpabByBaY.
Noyekaje Dokeka He ce nojabn IP-aDpecata Ha ekpaHot.
Oba 3haui Deka BpckaTa cera e BocnoctaBeHa. 3a Da ce NCKIyUHTe OJ 6e3KUnHa Bpcka, NCTaKHete BnMpeKa I pNTiCHETe Ha KOnYeTo 3a JEBO ININ DeCHO 3a Da NoCTaBNTe Ha HeAKTINBnpaHo.
Ako Baunot pyTepe WPS, MoKeTe DupeKTHo da ce noBp3eTe 3a pyTepot 6e3 Da BHeCyBaTe lo3nHka nIIN npBO da ja DoJaTe MpeXata. H36epTe ja onuJATA "PnTncHete WPS Ha wifi-pyTepot" npTncHete OK. Ha moEmOT/pyTepot npTncHete ro WPS-KonHeTo 3a Da BocNoCTabITE Bpcka. Ke BnDnte notBpda 3a BpckaTa Ha TB-ypeDoT kora Ke ce cnojatypeiTE. H36epTe OK 3a Da npOOnJxnte. Hem aNotpe6a od DonolnHTenHO KOHfNpynpaBe.
06eHexTe Tect Ha 6p3nHaTa Ha nHTepHTo I npTnCHete ro KonHeTo OK 3a da ja npOBepnte 6p3nHaTa Ha nHTepHET BpCKata. O6eHexTe HanpeDnIOCTaBKn I npTnCHete ro KonHeTo OK 3a da ro
OTBOPHTe MeHTo 3a HAnpeDn NoCTaBKn. KopNCTeTe rKoPnHbTa 3a HAcOka N HymepuYKInTe KOpHbA 3a NOCTaByBaHe. PnTnCHTe Ro KOnYeTO 3aUyBajn PnTnCHTe OK 3a Da rN 3aUyBaTe NoCTaBKnTe KOra Ke 3aBpHInTe.
Ipyn HOpmaun
Ke ce npkake ctaTycot Ha Bpckata KaKO nobp3aHa nn HeNoBp3aHa n TeKOBHata IV-apeca, ako ce BocnoCTABn Bpcka.
Pobp3yBaBe Ha Baunot Mo6nJeH ypei npeky WLAN
Ako Baunot MoBneneH ypeI nMa WiFi-ФyHKuJa, moKeTe Da ro NOBp3eTe Baunot TB-ypeI npEky pyTep 3a Da npicTannte Do codpxHHte Bo Baunot ypeI. 3a OBaa ceI, Baunot MoBneneH ypeI mOp a Da nMa cooDBeTeH coDTBep 3a cNoJeNyBaHe.
Iob3eTo TB-ypeoT co pyTePoT cneJeKn rN YekOpntcNoHMHaTN BO DeNoBHTe Norope.
Itoa, BknyeTe ro Baunot MoBnneH ypeD BO pyTepOT n Iotoa akTNbnpajTe ro coPTBepOT 3a cnoJeNyBHe Ha MOBnHnOT ypeD. IToa, n36peTe rN daToteKnte wTO 6n caKane Da rN cNoDeNtE Ha Baunot TB-ypeD.
Ako ce BocnoCTaBn BpCKaTn npaBnJHO, Ke MoKeTe da npctannte do cnoJeHnte daTOTeKN HcTaInpaHn Ha Baunot MObIneH Telefoh Ppeky Ondnkata Ayno-Bndeo cnoJeNyBaHe ABC) Ha Baunot TB-ypei.
O3haeTe ja onujiata ABC BO MeHnTo N3BOpn npTnCHete OK, Ke ce npKaKAT DocTaHnTeMeDnymckn cepBepn BO mpeXata. N36epTe ro Baunot MobnEn ypei npTnCHete ro KonYeTO OK 3a da npoDOnknte.
Ako e DocTaHa, MoKe Da ja caMHeTe anNkaunjata 3a BnptyeHnOT daJeHHckn ynpabYBauch oC cepBepot Ha do6aByBaOH Ta anNkaun 3a BaHnOT moNJIeH ypeI.
3a6eenuka: Nocmou moKnoCm oBa a onuja da He e nooDPxkaHa ha cume MObuHn YupeDu.
Wake ON
Wake-on-LAN (WoL) e cTaHdapd wTo Do3BOJyBa ypeI da ce Bknyu nn pa36ydn oMpexHa nopaka. Iopakata ce npaKa do ypeIoT co nporpama n3BpneHa Ha daJeunHcN ypeI IOB3aHn HnCTaTJIOKALHa 0bnacHa mpeka, kako wTo e Cmapr TeNefoH.
Baunot TB-ypeeK e komnatnbHEn co WOL n WoWLAN . Obaa odnka moKe da ce deakTbNpa BO TeKOT ha npBaTa nCHCTanauija. 3a da ja akTbNpaTe oBaa odnka, noCTaBeTe ja onujiata Wake On od MeHTo Mpeka/HTepHeT NoCTabKn KaKO BKnyeHa. Tpe6a n ypeoT od koj ce npaka MpexHaT a nopaka do TB-ypeoT n TB-ypeoT da ce nobp3AHn Ha ncta Mpeka. Ondnkata Wake On moKe da ce KopncTn camo 3a
ypeDnte Android OS n moKe da ce kopncTn camo npeky annkaunTe Youtube n Netflix.
3a da ce kopnctn Obaa odnka, TB-ypeoT n daJeHHcknoT ypeD Tpe6a da 6nDat noBp3AHn Hajmanky eHaaw Doekae BknyeH TB-ypeoT. Ako TB-ypeoTe BknyeH, Tpe6a nobtopHO da ce Bocnoctabn Bpckata cneHNOT nat kora Ke ce Bknyu. Bo npyr cnuyaj, odnKata He eoCTanHa. Oba He Baxk 3a kora TB-ypeoTe BknyeH BO pexim Ha mnpyBahe.
Ako caKaTe TB-ypeoT da TpoUH nomAnky cTpya BO pexIM Ha MnpyBaHe, MoKe da ja deaKTHBnpuTe OBaa Ondika aKO onuJaTa Wake On ja nocTabte Ha NcknyeHo.
Be3xHueH ducnnej
Be3KnHNOt DnCnJIeJ e cTaHdApD 3a CTpIMyBaHe Ha BnDeo n 3ByuHn CoDPxHH. Obaa oDnka Bn OBO3MOxUyBa Da ro KOpNCHTe TeNeBn3OpOT kako ypei 3a Be3KnUeH npKa3.
KopncTeHe co Mo6nHn ypei
Ima pa3nHn cTaHdapn KOn OBO3MOxyBaat CnoJeLyBaHe Ha ekpaHn NOMEy Baunot Mo6nJen Hypei TeNeBn3OpOT, BknyuBajKn rpaqnka, aydno IN BnDeo codpxHa.
HajnpBo BknyeTe ro YCb-xapDbepcknOT Knyu Bo TeJeBn3OpOT DOKoIky TeJeBn3OpOT Hema BrpaDeHa onuJa WiFi.
Notoa npntnche Ta KOJyTo n3Bop Ha daJeHHcknOT ynpaByBaU nppePpIe Ce Ha n3BOpOT Be3KuueH ducnnej.
Ce nojabyba ekpan Koj Belen Deka TeJeBn3OpOT e roTOB 3a NOBp3yBaHbe.
OTbopete ja annkaunjata 3a cnoJeNyBaHe Ha Baunot Mo6nIeH ypeI. Obne annkaunn Imaat pa3nnuHn mHbA 3a cekoja Mapka, 3a noTeanH nHΦopMaunn BndTe rN yNaTCTBaTHa Baunot Mo6nIeH ypeI.
CkeHnpajTe 3a ypeiN. OTKako ke ro n36epeTe Baunot TB n ke ce noBp3eTe, ekpaHOT ha Baunot ypei Ke ce nokaxe Ha Baunot TB.
3a6eNeuKa: O8aa odnka moKe da ce KopucmU eDunCMeHo doKoIky bauuom Mobunen yped ja noDpKyuBa Hea. Ako umame npoblemu co epckama, npoepeme danu eep3ujama Ha onepamueHuom cumem umo zo Kopucmume ja noDpKyuBa oea odnka. MoKe da uma npoblemu co HekomnamubunHcma co eep3uume Ha onepamueHuom cumem nyumehu no npou3bOcmbomo ha o0oj TB-yped. Ppoecom Ha ckeHupaBe u noBp3yeAbe e pa3nueH 80 3aueChoc md yonmpe6ybaHama npospama.
POpBp3yBaHbE ypeDn Bluetooth
Baunot TB-ypeД noДржУВа nTo Taka 6e3KuHa Bpcka Bluetooth. Tpe6a cnapyBaJIbe nped Da ce KOpnstat ypeInte Bluetooth co TB-ypeDOT. 3a da ro cnapnte Baunot ypeD co TB-ypeDOT, cIeTe rOOBue YekOpN:
*IocTaBeTe ro ypeDoT BO peKIM 3a cnapyBaHe
*Pouhete co otKpmbaHbe Ha ypeoT ha TB-ypeoT
3a6eNeuKa: Koncynmupajme 20 ynamcm8omo 3a Kopucmehe od ypedom „Blyymm" 3a da hayume kaKo ce nocma8ya pexumom Ha cnapyeahe 3a ypedom.
Mоже да порзerte aydno уpeи nii dajelueHHckny npabvbaun Ha TeleBn3opOT co 6e3xuHnataTexhONorjna Bluetooth. OTKaHTe nii NCKIyUeTe KaKBN 6nIO npyrn noBP3aHn aydno-ypei 3a da pa6oTn npabuHNO oDnKATA 3a 6e3xuHa Bpcka. 3a aydno ypei Tpe6a da ja KopncTnte onujiata Bluetooth BO MeHTo NocTabKn>3Byk, 3a daJeunHcN ynpabvbaun, onuJata PAmTeH daJeunHcN ypei BO MeHTo NocTabKn>CnCTem >noBeke. N36epete ja onujata BO MeHTo n npITNCheTe ro KOnHeTO OK 3a da ro OTbOpnte COODBETHO To MeHn. Co MeHTo, MoKeTe da OTkpneTe n da NObp3eTe ypei wTO KOpNCtAT NCTa 6e3xuHa TexHoJorNiJa Bluetooth n da NoCHte Da rN KopNCtnte. CJIeDETe rN ynatCTBaTaHa ekpaHot. 3anOChTe ro OTKPnBaHeTo Ha ypeoT. Ke ce npkaKe cncOK Ha DoCTaHn ypei „BlyTuT". N36epete ro ypeoT wTO caKaTe da ro NObp3nTe n npITNCheTe ro KOnTeo OK 3a da ce noBP3nTe. Ako ce nojabn nopakata „ypeodet e nobp3ah", nobp3yBaHeTo e ycNeuHo. Ako He ycnee Nobp3yBaHeTo, obundTe ce nobTOPho.
IpeHoc Ha cInka n pePPOdyuHaPaHe ayDnO BoPeaJHo BpeMe
Moxete OoBj BnD Bluetooth Bpcka Da ro KopnCTnte 3a nppeppnahe cnilkn nn 3a pePnoDyunpaBe BO peanHO Bpeme Ha aydno OD Baunot Mobnen ypei Do Baunot TB-ypei.
Cnapete ro Mo6nHnot ypei TB-ypeoT kako 7to onuHaNo npetXoJHO. Poohete npe6apyBaHe Ha ypei BO BaHnot paeh ypei. N36peTe ro BaHnot TB-ypei od IncTaTa ypei. N0TBPDeTe ro 6apaBeTo 3a noBp3yBaHe Ha BAHOT TB-ekpan Hn HnpaBeTe ro nCTOTO Ha ekpaHOT Ha BAHOT paeh ypei. Ako He Dojde Io cnapyBaHe, HeMa Da MoKe Da ce npePpN CInkata Nn Da ce pe npOduunpa ayDIO BO peaHNO BpeMe .
CJIHKTe IpaTeHn NO MO6JIeH ypeI Ke ce npKakat Ha TB-ypeoT 6e3 6apaHe 3a nOTBpda, aKO OIORObapa DaTOTeKaTa-CNIka. MoKeTe DaTOTeKaTa-CNIka da ja 3aYbATE Ha YCB-MemOpjia nn Da ja NaCTabNTe KaO Ioro 3a NOnrAbe Ha CnCTeMOT, aKO Ce NODpKByBa OBaa ONika n aKO e COODBeTHa DaTOTeKaTa. PInTnCHete ro KonUeTo "N3ne3n" Da ppeTaHe npKakyBaHbeto Ha CNIkata.
AynotoKe ce npenecyba npeky 3ByuHnnte Ha TB-ypeot otkako Ke ce do6ne notBpda.3a da 3anohe penpoyuupaheTo ayno BO peanHO BpeMe, oTcapete ro yepoT od Baunot TB-ypead ako 6nil npetxodno cnapen co Baunot TB-yped. Otkako Ke 3aBPnCnapyBaHeTo,Ke ce nojabn nopaka-notBpda Koja npauyBa daann caKaTe da noUHe penpoyuupahe
aydno BO peaJIHO BpeMe OD BaWnOT Mo6nIeH ypeI. N36epete Da n npTncHe ro konyeo OK Ha daJeHHckNoT ynpaBvBaH na TB-ypeDTo.Ako e ycneuHa BpCKaTa, ceto aydno Ke 6nde HacOeHo Hn3 3ByuHbInTe Ha TB-ypeDTo.Ke ce nojabn Cm60Jn Ha rOpHata cTpaHa Ha TB-epaHOT cdoEka e aKTHBHa BpCKaTa 3a pePOnduUcnpaHBe aydno BO peaHNO BpeMe. 3a da ce npKeHne pePOnduUcnpaHBeTO BO peaJIHO BpeMe Ha aydno, ncknyte ja BpCKata Bluetooth Ha BaWnOT Mo6nIeH ypeI.
3aTbopete r n cnte OTBOpEHn anJInkaun n CNTe MeHnja ha TB-ypeoT 3a nppepnahe 6e3 npobneMn. CoOdBteHN ce camo daToTeKN-cnKn nomAn o5 Mb n BO OBne fOpMaTu: jpg, .jpeg, .png, cmp. Ako daToTeKa npateHa no MobuHe ypeH He odroBaHa OBne 6apabha, Hema da ce npinkae Ha TB-ypeoT.
Ako ce deaktnbnpa onujata AVS BO MeHnTo NocTabKn>Cntem>NoBeKe, Tb-ypeoT Ke rHnOpnpa 6apaBata 3a cnacyBaHe n Hema da ce npkaKe npaka co nHopmaun Ha ekpaHot. Ako ypee BeKe cnapen nped da ce OHeBO3MOxN onujata AVS, Ke MOxe da npdoJnx Da cnoDeNyBa ayDIO/BnDEO co Tb-ypeoT dypn i Kora e deaktnbnpaHa onujata AVS
3a6eneuka: Be3xuHume ypedu moke da paBomam Ha ucmama paduooppekeenuja u moke da cu nonpeyeaam meycebo. 3a da zo nodobpume paBomehemo ha bauuom 6e3xuueh yed, cmaebeme zo Hajmky Ha 1 Memap od koj 6uno dpya 6e3xuueh yed.
PeuBaHbe npo6Jemn co noBp3yBaHbTeO
He e doctanHa 6e3xuHa Mpeka
- O6e36eTe cHTe 3aHTTNH sIOBn Ha BaWata Mpeka Da DO3BOJyBaat 6e3XnUHO NOBp3yBaHe Ha TB-ypeDot.
- Ośniude te ce na npebapybaTe 6e3xuynm PpeknoBTOPOCo NOMOHa ekpaHr Ha MeHnTo Mpeka.
Ako He yHKuHnpa npabUNHO 6e3xNHaTa Mpeka, oBnTe ce da ja KopnCTnte Mpekata npeky ka6en BO BAunOT dom. BnI rO denot Bpcka npeky ka6en 3a NOBeke INΦopMaun 3a npouecot.
Ako TB-ypeoT He pa60Tu Co Bpcka wTo He e 6e3KnUHa, npOBepTe ro MoEmOT (pyTePOr). Ako Hema npO6IeM CO pyTePOT, npOBepTe ja nHTepHET BpCKaTa Ha BaUNOT MOeM.
Bpckatae6aBHa
Bnnde ja Knirata co ynatCTBa Ha BaHnot 6e3Knyeh MoDem n DoobjTe HOpMaun 3a BHaTpeHHOT ycJyKeH perNoH, 6p3HnHaTa Ha BpCKaTa, KBaJIrTeTOT Ha CnHAnOT nDpyrnte noctabKn. Tpe6a Da NMaTe Bpcka co roJema 6p3HnHa 3a BaHnot MoDem.
IpeknHn 3a BpeMe Ha penpoDyucpaHeTo nIn 6abHn peakcun
Bo Toj cnuyaj, moxe Ta npo6aTe eHNO od cneHNBe HeuTa:
Држete ce Ha pactojaHne od HajmaNky Tprn MeTpN od MInKpo6paHOBn NeuKn, Mo6nJHn TeJefoHn, ypeDi
bluetooth nnn kakbn 6nlo dpyr nppei komnatahnn co 6e3knuHa nHTepHmpeka.ObndeTe ce da ro cMeHnTe aKTHBnOT kaHn Ha WLAN-pytepot.
He e doctanha nHTepHET Bpcka / He cyHKUHOHPa aydno-Bndeo cnoJeNyBaBe
Ako MAC aadecata (eHnCTBEN 6poj 3a ndeHTnKauJa) Ha BAunot nepcoHaen KOMnyTepe nn moDEM e TpaJHO pernctpnpaH, MOxHo e BAInOT TB-ypei Da He e NOBp3aH Ha INTEpHET. Bo TakOB cnuyaj, MAC aadecata ce npOBepyBa cekojnat kora Cte IOBp3aHn Ha INTEpHET. Oba e npBeHtNBA npOTNB HeOBnacten npIcTan. BndejKn BAunot TeNEBn3Op mAm Cboja MAC aadeca, BAunot daBaTeJn Ha INTEpHET ycLyHn He MoKe Da ja npOBepn MAC aadecata Ha BAunot TB-ypei. Od OBaa npuHa, BAunot TB-ypei He MoKe Da Ce Nobp3e Ha INTEpHET. KOtAKtnpajTe ro BAunot daBaTeJn Ha INTEpHET ycLyHn 6apajTe HHopMauii 3a Toa KaKO da NoBp3eTe Dpyrypei, KaKO Ha npimep BAunot TB-ypei, Ha INTEpHET.
IcTo Taka, MoXHo e Obaa Bpcka Da He e DoCTaHa nopadn npo6lem co 3aWHTHaTa 6apnepa. Ako MncInTe Deka Oba e npuHnata 3a BaHnot npo6lem, KOHTaKtnpajTe ro BaHnOT daBaTeHa NHTEpHET ycnyr. 3aWHTHaTb6apnepa MoKe Da e npuHnA 3a npo6lemot CO BocnoCTaByBaHeTo N OKPnBaHeTo Ha Bpckata,doEka ce Kopnst TB-ypeDot BO pexm aydno-BuJeO cNoDeLyBaHe nn DoKeKa ce npelncTyBa Ppeky FyHKunjata 3a aydno-BuJeO CNoDeNyBaBe.
HeBaXeUKNDOMeN
PpOBepTe daHn BeKe CTe NOBp3aHn Ha BaHNO TepcoHaleH KOMNjyTep co ABTopuHaHO KOpNCnU KoMe/No3nHka n PpOBepTe daHn BaHNO T OmeH e AKTNBeH npE d a CnoJeNyBaTe DaToTEKN BO npOrpaMata Ha BaHNO T MeDnymckn cepBep Ha BaHNO T NpCOnHaleH KOMNjyTep. AKO DomeHot e HeBaJIndeH, MoKe da npEdu3BnKa npo6Jemn npn nppeJInCTyBaHeTo Ha daToteKITE BO pexIMOT ayINO-BnDeO cNoDeNyBaHe.
KopncTeHe Ha MPexHaTa ycnyrata aydnoBnDeo cNoDeNyBaBe
Функида aydno-Bndeo cnoJeIyBaIbe KOpNCTn CTaHdapI wTO ro ONEChyBa npOecOT Ha rIeJaBe Ha DInrTaJIHnTe eJekTPOHcKn ypei N rI npABy nOJIeCHN 3a KOpNCTeIbe Ha DOMaShHa MpeXa.
Ctahapot Bn OBO3MOkyBa da npereJeBbate n da pe npoyuipate oToIpaHm, My3nKa n BndeocHMKn 3auybaHn Ha cepBepOT 3a MeDnym NOBp3aH co BaWata DomaHa Mpeka.
TV-bediening & Operation 5
PC-invoernormaleweergavemodi 29
TV-bediening & Operation

PC-invoernormaleweergavemodi
Freeview Play Platform
Merk: Skiltet Pb under symbol for batterier indikerer at dette batteriet ineholder bly.

- Produktter
- Batteri
Zintegrowane uslugi catch-up
Platform Freeview Play
Specifications transmitator LAN wireless
| Intervale freventa | Putere ilesire maxima |
| 2400 - 2483,5 MHz (CH1-CH13) < 100 mW | |
| 5150 - 5250 MHz (CH36 - CH48) < 200 mW | |
| 5250 - 5350 MHz (CH52 - CH64) < 200 mW | |
| 5470 - 5725 MHz (CH100 - CH140) | < 200 mW |
Ghid electronic de programme (GEP)
Conectivate wireless
Conectarea la o retea wireless
CLASS1 LASER PRODUCT
Raspored Sada/Sledece
Kod ove opcije rasporeda, prikazace seismo trenutni i sledeci dogadaji izlistanih kanala. Mozete koristiti tastere sa strelicom da biste se pomerali kroz listu dogadaja.
Pritisnite taster Povratak/Nazad da biste koristili dostupne opcije kartice. Oznacite aplikaciju Filter i pritisnite OK da biste videli sve opcije filtriranja. Za promenu rasporeda, oznacite Vremenski rasporedi pritisnite OK.
Opcije dogadaja
Koristeci navigacione tastere, oznacite dogadaj i pritisnite dugme OK da bi se prikazao meni OpciJE. Dostupne su sledece opcije:
Biranje kanala: Koristite ovu opciju za prelazak na izabrani kanal da biste ga mogli gledati. Programski vodič ce biti zatvoren.
Vise informacija: Prikazuje detaljnije informacije o izabranom dogaadju. Koristite taster sa strelicom za kretanje nagore i nadole da boste se pomeral kroz tekst.
Postavi tajmer za dogadaj / Izbrisi tajmer za dogadaj: Izaberite opciju Postavi tajmer za dogadaj i pritisnite OK. Mozete podesiti tajmere za buduce dogadaje. Da biste otkazali postavljeni tajmer, označite taj dogadaj i pritisnite dugme OK. Zatim izaberite opcjju „lzbrisi tajmer za dogadaj". Tajmer ce biti otkazan.