IAN 420550 - Lighting Livarno Lux - Free user manual and instructions
Find the device manual for free IAN 420550 Livarno Lux in PDF.
| Product type | Decorative outdoor solar light |
| Brand | Livarno Lux |
| Model | IAN 420550 |
| Dimensions (assembled) | Height approx. 34 cm (small tube) or 44 cm (large tube), diameter approx. 15 cm |
| Weight | Approx. 200 g |
| Power supply | Solar panel + rechargeable NiMH AAA 1.2 V, 300 mAh battery |
| Light source | Integrated LED, non-replaceable |
| Functions | Automatic dusk activation, automatic color change red/green/blue, manual color selection |
| Adjustable heights | Two spacer tubes: approx. 19 cm and approx. 8 cm |
| Materials | Plastic, metal (stand) |
| Protection | Water splashes (not suitable for general indoor lighting) |
| Use | Domestic outdoor, decorative |
| Assembly | Insert the stand into the ground; no power source required |
| Battery | Type AAA NiMH 1.2 V, 300 mAh, replaceable |
| Runtime | Varies with sunlight; battery life ~12 months before replacement |
| Maintenance | Clean with a damp cloth; do not use harsh cleaning products |
| Safety | Do not modify; non-replaceable light source; keep out of reach of children |
| Replacement parts | Replaceable battery; other parts not available separately |
| Warranty | 3 years (excluding normal wear and fragile parts) |
| Package contents | Stand, spacer tubes (2), sphere, solar module with LED and battery, instruction manual |
Frequently Asked Questions - IAN 420550 Livarno Lux
User questions about IAN 420550 Livarno Lux
0 question about this device. Answer the ones you know or ask your own.
Ask a new question about this device
Download the instructions for your Lighting in PDF format for free! Find your manual IAN 420550 - Livarno Lux and take your electronic device back in hand. On this page are published all the documents necessary for the use of your device. IAN 420550 by Livarno Lux.
USER MANUAL IAN 420550 Livarno Lux
LAMPA SOLARNA LED W KSZTAŁCIE KULI
Instructions for use
NL BE
LED-SOLAR-BOLLAMP
Gebruiksaanwijzing
CZ
SOLÁRNÍ LED KULATÉ SVÍTIDLO
Návod k použití
ES
LÁMPARA SOLAR LED ESFÉRICA
You have chosen to purchase a high-quality product. Familiarise yourself with the product before using it for the first time.

Read the following instructions for use carefully.
Use the product only as described and only for the given areas of application. Store these instructions for use carefully. When passing the product on to third parties, please also hand over all accompanying documents.
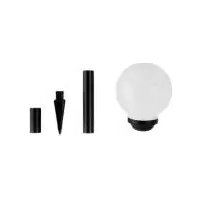
Package contents (Fig. A)
1 x ground peg (1)
1 x spacer tube approx. 19cm (2)
1 x spacer tube approx. 8cm (3)
1 x ball (4)
1 x solar module incl. LED and rechargeable battery, AAA/1.2V/300mAh (5)
1 x instructions for use
Technical data
Dimensions (assembled):
approx. 34 x 15cm (H x ∅) with short spacer tube approx. 44 x 15cm (H x ∅) with long spacer tube
Rechargeable battery power supply:
1 × 300mAh, 1.2V=AAA, NiMH

DC voltage symbol

Delta-Sport Handelskontor GmbH hereby declares that this product meets
the following basic requirements, as well as other important regulations:
2014/30/EU - EMC Directive
2011/65/EU - RoHS Directive

Delta-Sport Handelskontor GmbH hereby declares that this product meets the following basic requirements, as well as other important regulations:
Electromagnetic Compatibility Regulations 2016
The Restriction of the Use of Certain Hazardous Substances in Electrical and Electronic Equipment Regulations 2012

Date of manufacture (month/year): 08/2022
Intended use
The product is only for private outdoor areas and not for commercial use. The product can be used for decorative purposes.

Splash resistant
Not suitable for general household lighting.

Safety information
Important: read these instructions for use carefully and keep them in a safe place!

Life-threatening hazard!
- This product can be used by children above the age of 8 and by people with reduced physical, sensory, or mental capacities or by those lacking experience and knowledge provided they are supervised or have been instructed in the safe use of the product and understand the risks involved. Children may not play with the product. Cleaning and user maintenance may not be performed by children without supervision.
- Never leave children unattended with the packaging materials. There is a risk of suffocation.
• The product is not a toy. - Check the product for damage or wear before each use. Only use the product if it is in perfect condition!
-
No modifications may be made to the product!
-
The light source for this lighting fixture is not replaceable; when the light source has reached the end of its service life, the entire lighting fixture must be replaced.
- Make sure the solar cell does not get dirty or covered in snow or ice in winter. This reduces the performance of the solar cell.
- Note that cold temperatures have a negative impact on battery life.

Risk of injury!
- Ensure that when the light is removed, the ground peg is also removed, so that it does not pose a danger (e.g. tripping).

Warnings regarding the storage battery!
- Only charge intact and undamaged storage batteries.
- Protect the storage battery from mechanical damage. Fire risk!
- If electrolyte solution leaks from the storage battery or the product then avoid contact with your eyes, mucous membranes, or skin. Rinse the affected areas immediately with plenty of clear water and consult a doctor. The electrolyte solution can cause irritation.
- Never charge or store the storage battery in the vicinity of large heat sources or open fire as this could cause the storage battery to explode.
- The charging contacts on the storage battery may not be connected using metal objects.
- Never try to manipulate, modify, or repair a storage battery or the product.

Danger!
- The storage battery may not be thrown into the fire or short-circuited after removal. The storage battery could overheat and explode.
- Do not dismantle the storage battery.
Assembling the product
-
Remove the individual parts from the packaging and assemble the product according to Figure B. You have two options here: with the spacer tube (3), the product will be approx. 34cm high (Fig. D), and approx. 44cm high with the spacer tube (2) (Fig. C).
-
Insert the chosen spacer tube (2) or (3) into the recess on the solar module (5) (Fig. B).
- Finally, insert the ground peg (1) into the underside of the spacer tube (2) or (3) (Fig. B).
Setting up the product
Note: the product can be set up independently of a power source.
- Only use the product with the ground peg (1) supplied.
- Insert the assembled product far enough into the ground (lawn, flower bed) to ensure its stability. As the product depends on solar energy, you must remember and observe the following points before setting it up:
- Select a spot where the solar module (5) is exposed to sunlight throughout the day.
- Position the product so that the solar module (5) does not become covered or shaded (trees, leaves, etc.).
- Ensure the solar module (5) is not influenced by other light sources, such as garden or street lighting, otherwise the product will not switch on at dusk. Remember that many light sources are dependent on time and movement and only come on in the middle of the night.
Before using the product for the first time
Note: the product has a twilight sensor and an on/off switch (5d).
- Unscrew the ball (4) anticlockwise from the solar module (5). Before using it for the first time, slide the on/off switch (5d) to ,ON'.
- Screw the ball (4) clockwise back onto the solar module (5) until it stops and place the product in the sun.
Switching the product on/off
- Slide the on/off switch (5d) to ,ON'. The product automatically switches on at dusk.
- With KL-11868, there is an automatic colour change from red to green to blue.
Note: push the button (5f) once to stop it on the required colour. Push the (5f) button again to reactivate the colour sequence.
The colour selection must be set manually each day.
- The product automatically switches off when it starts to get light or if the battery is flat.
- Slide the on/off switch (5d) to ,OFF'. The product is permanently switched off.
Changing the rechargeable battery
Note: the rechargeable battery (5b) is designed for long-term use. However, it may be necessary to change the battery after a long period of use. Rechargeable batteries are subject to natural wear and tear and their performance can decrease. To achieve optimum performance, rechargeable batteries should be replaced every 12 months. Change the battery as shown in Figures E-F.
- Unscrew the ball (4) anticlockwise.
- Slide the on/off switch (5d) on the solar module (5) to ,OFF'.
- Remove the solar module (5) from the spacer tube (2)/(3).
- Unscrew the screw (5e) anticlockwise, using a suitable cross-head screwdriver (not included in the package contents), and remove the housing (5a) from the rest of the module (Fig. E).
- Remove the rechargeable battery (5b) and replace it with a new, charged battery of the same type (see „Technical data“). When inserting the battery, ensure the polarity (+/-) is correct (Fig. F).
- Put the housing (5a) back on and secure this with the screw (5e), turning it clockwise.
- Put the solar module (5) back onto the spacer tube (2)/(3).
- Slide the on/off switch (5d) back to ,ON'.
- Screw the ball (4) clockwise back onto the solar module (5) until it stops.
Storage, cleaning
When not in use, always store the product switched off, dry and clean at room temperature. Only clean the exterior of the product with a damp cloth and wipe dry afterwards.
IMPORTANT! Never clean the product with harsh cleaning agents.
Disposal
The accompanying symbol indicates that this device complies with Directive 2012/19/EU. This directive indicates that you may not dispose of this device along with basic household waste at the end of its useful life and instead must hand it in to specifically designated collection sites, valuable substance collection stations, or waste disposal facilities.
Look after the environment and dispose of waste properly.
Batteries may not be disposed of with household waste. They may contain toxic heavy metals and are subject to hazardous waste treatment. The chemical symbols of the heavy metals are as follows: Cd = cadmium, Hg = mercury, Pb = lead. Dispose of used batteries at a municipal collection site.
For further information about disposal of the product no longer needed, contact your local council. Dispose of the product and the packaging in an environmentally friendly manner. Store the packaging materials (foil bags, for example) out of the reach of children.
Note the label on the packaging materials when separating waste, as these are labelled with abbreviations (a) and numbers (b) with the following meaning:
1-7: plastics / 20-22: paper and cardboard / 80-98: composite materials.
The product and the packaging materials can be recycled, dispose of them separately for better treatment of waste.
The Triman logo only applies to France.
Notes on the guarantee and service handling
The product was produced with great care and under continuous quality control. DELTA-SPORT HANDELSKONTOR GmbH gives private end customers a three-year guarantee on this product from the date of purchase (guarantee period) in accordance with the following provisions.
The guarantee is only valid for material and manufacturing defects. The guarantee does not cover parts subject to normal wear and tear that are thus considered wear parts (e.g. batteries) or fragile parts such as switches, rechargeable batteries, or parts made of glass.
Claims under this guarantee are excluded if the product has been used incorrectly, improperly, or contrary to the intended purpose, or if the provisions in the instructions for use were not observed, unless the end customer proves that a material or manufacturing defect exists that was not caused by one of the aforementioned circumstances.
Claims under the guarantee can only be made within the guarantee period by presenting the original sales receipt. Please therefore keep the original sales receipt. The guarantee period is not extended by any repairs carried out under the guarantee, under statutory guarantees, or as a gesture of goodwill. This also applies to replaced and repaired parts.
If you wish to make a claim please first contact the service hotline mentioned below or contact us by e-mail. If there is a guarantee case, then the product will be repaired or replaced free of charge to you or the purchase price will be refunded, depending on our choice.
Your legal rights, in particular guarantee claims against the respective seller, are not limited by this guarantee.
IAN: 400509_2204
GB Service Great Britain
Tel.: 0800 404 7657
E-Mail: deltasport@lidl.co.uk
IE Service Ireland
Tel.: 1800 101010
E-Mail: deltasport@lidl.ie
Félicitations!
2011/65/UE - Directive RoHS