FruttiPro XL ZN4001 - Juicer TEFAL - Free user manual and instructions
Find the device manual for free FruttiPro XL ZN4001 TEFAL in PDF.
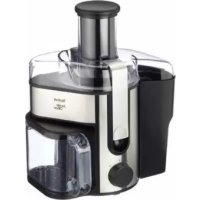
| Product type | Centrifugal juicer |
| Brand | Tefal |
| Model | FruttiPro XL ZN4001 |
| Power supply | 220-240 V, 50 Hz |
| Speeds | 2 speeds (1 for soft fruits, 2 for hard fruits) |
| Filling chute diameter | 74.5 mm maximum |
| Filter type | Stainless steel rotary filter |
| Safety | Safety lock securing the lid |
| Maintenance | Removable parts dishwasher-safe |
| Included accessories | Pusher, filter, juice collector, pulp container, pitcher with foam separator, cleaning brush |
| Features | Juice extraction with foam separator |
| Cord storage | Integrated under the base |
| Repairability | Replaceable filter |
| Juice preservation | Consume immediately to avoid oxidation |
| Unrecommended fruits | Banana, avocado, blackberry, fig, eggplant, strawberry |
Frequently Asked Questions - FruttiPro XL ZN4001 TEFAL
User questions about FruttiPro XL ZN4001 TEFAL
0 question about this device. Answer the ones you know or ask your own.
Ask a new question about this device
Download the instructions for your Juicer in PDF format for free! Find your manual FruttiPro XL ZN4001 - TEFAL and take your electronic device back in hand. On this page are published all the documents necessary for the use of your device. FruttiPro XL ZN4001 by TEFAL.
USER MANUAL FruttiPro XL ZN4001 TEFAL
natural_image
Line drawing of a blender with handle and control panel (no text or symbols)www.moulinex.com
text_image
Technical diagram of a blender with labeled parts and exploded view, showing internal components and assembly steps.
flowchart
graph TD
    A["Step 1: Stacking into blender with liquid"] --> B["Step 2: Stacking with liquid"]
    B --> C["Step 3: Stacking with liquid"]
    C --> D["Step 4: Stacking with liquid"]
    D --> E["Step 5: Stacking with liquid"]
    E --> F["Step 6: Stacking with liquid"]
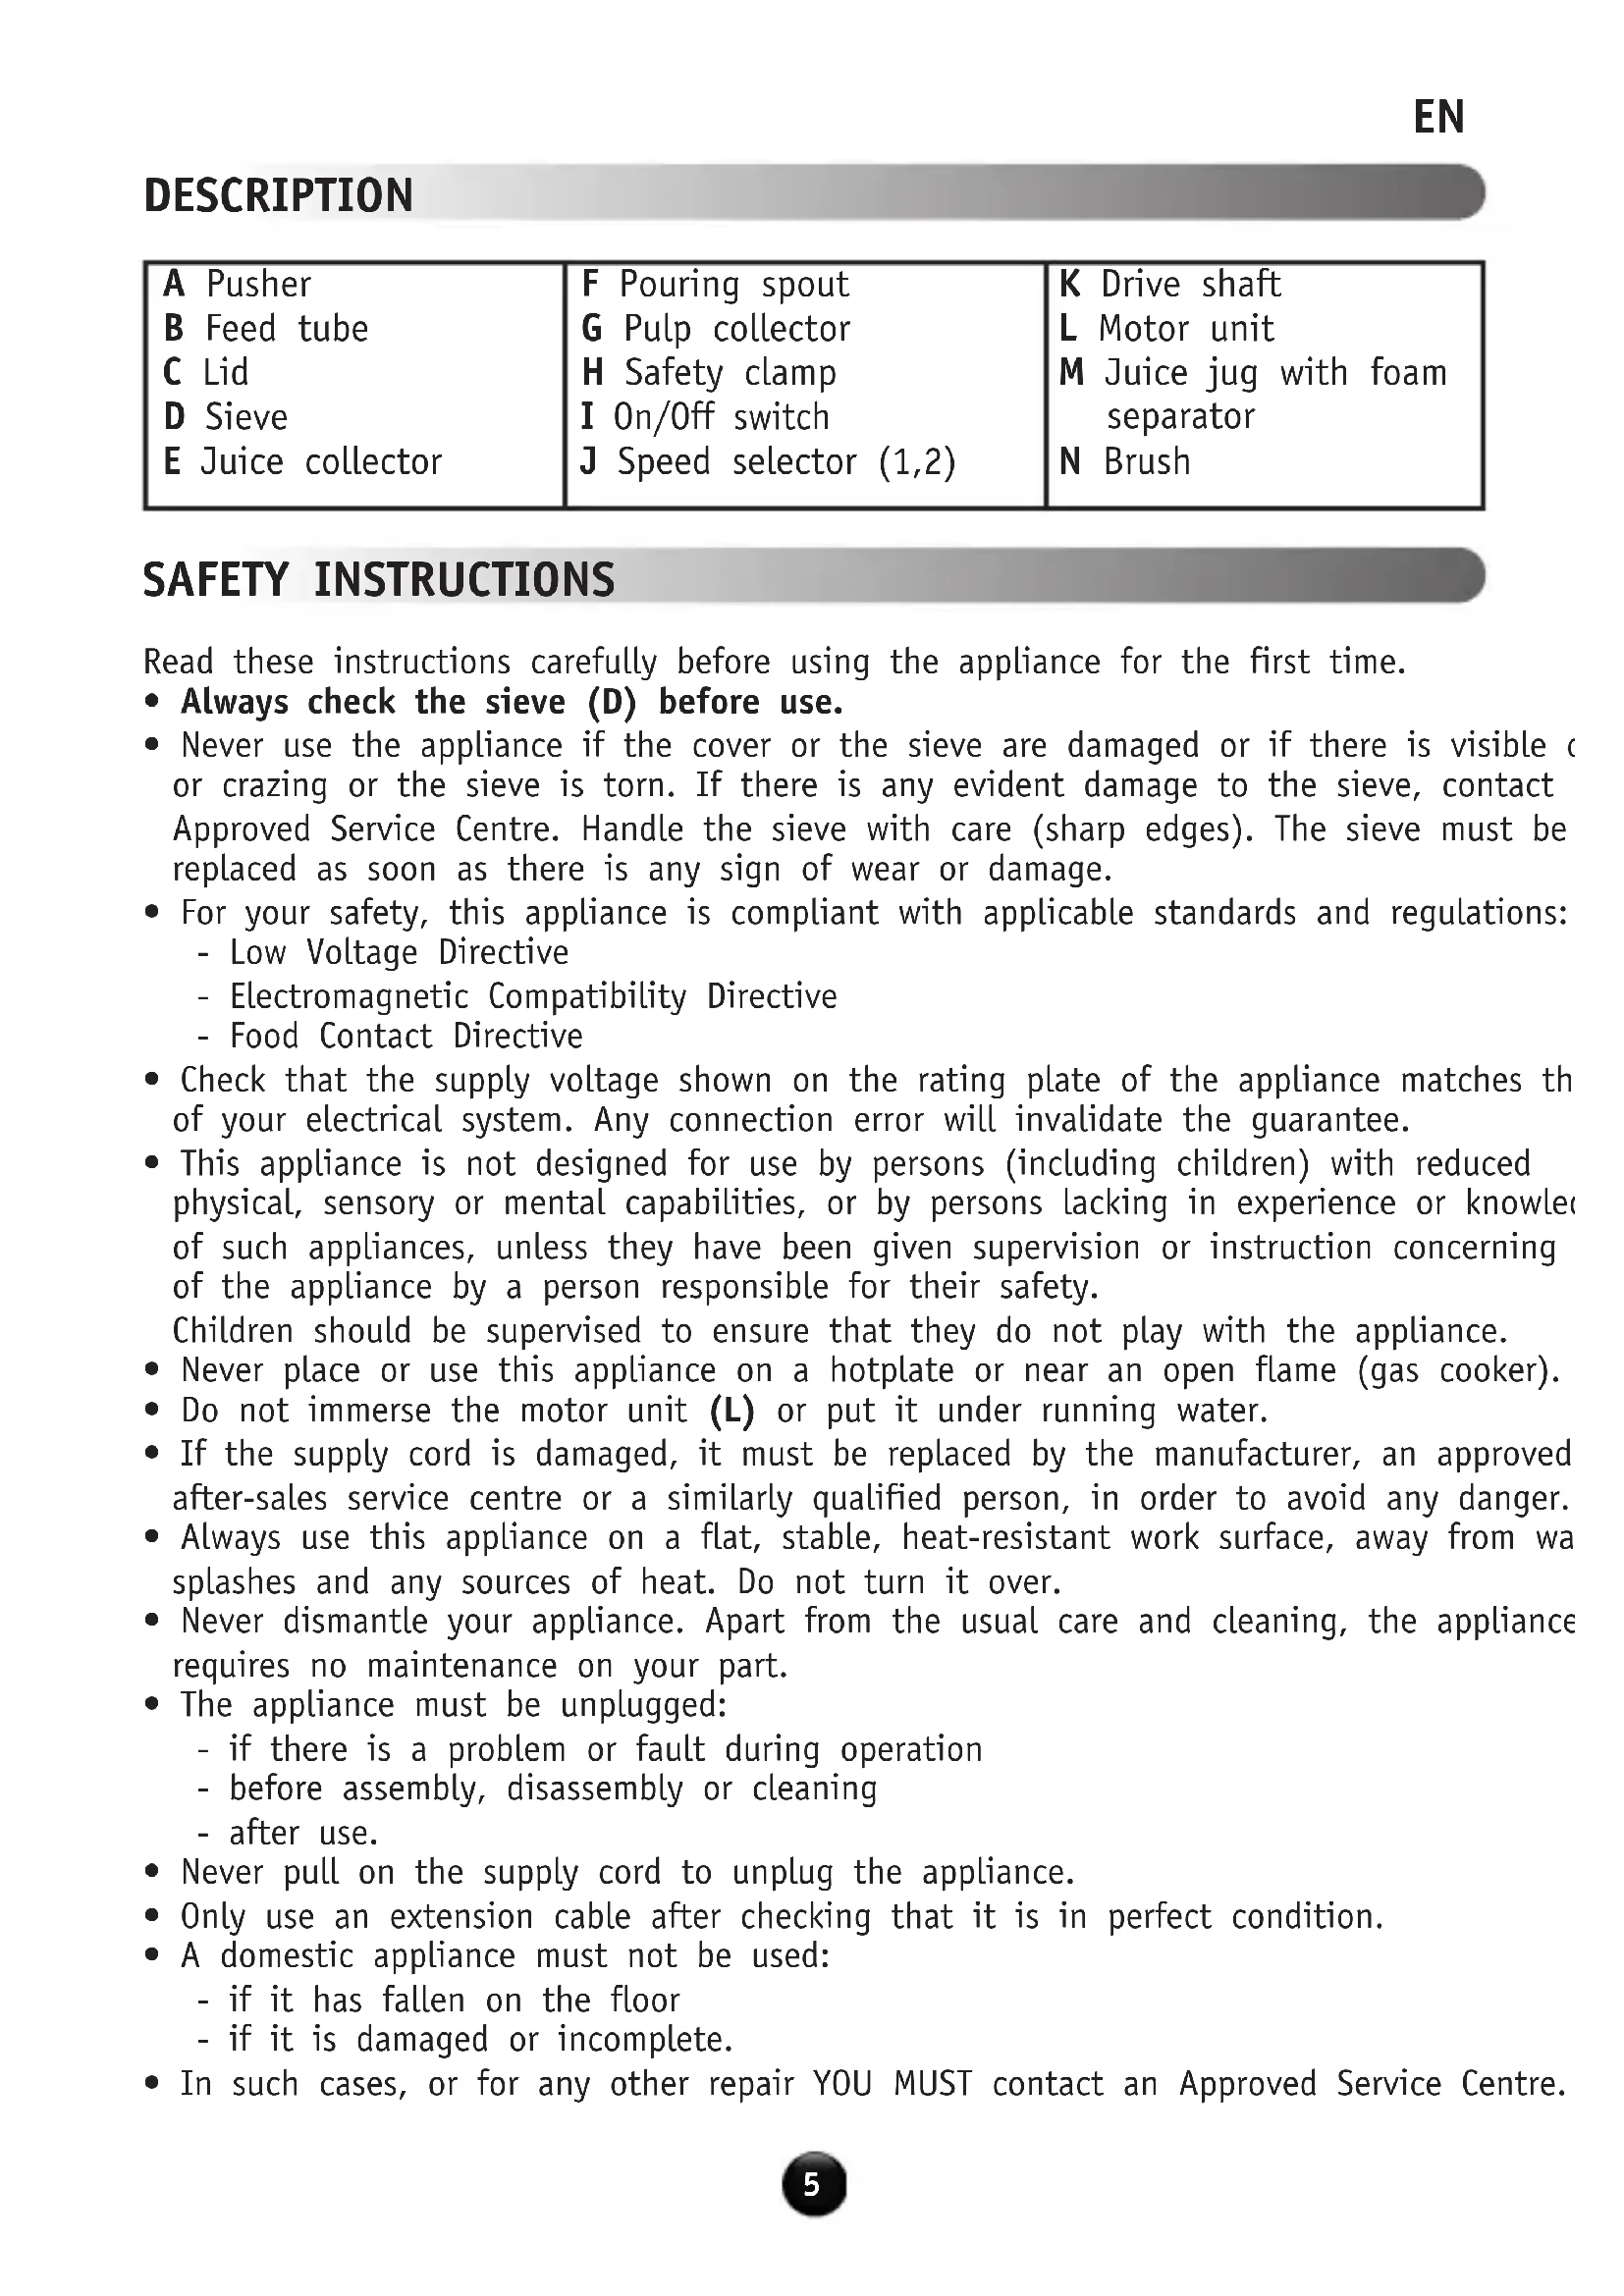
DESCRIPTION
Read these instructions carefully before using the appliance for the first time.
• Always check the sieve (D) before use.
- Never use the appliance if the cover or the sieve are damaged or if there is visible (or crazing or the sieve is torn. If there is any evident damage to the sieve, contact Approved Service Centre. Handle the sieve with care (sharp edges). The sieve must be replaced as soon as there is any sign of wear or damage.
- For your safety, this appliance is compliant with applicable standards and regulations:
- Low Voltage Directive
- Electromagnetic Compatibility Directive
- Food Contact Directive
- Check that the supply voltage shown on the rating plate of the appliance matches th of your electrical system. Any connection error will invalidate the guarantee.
- This appliance is not designed for use by persons (including children) with reduced physical, sensory or mental capabilities, or by persons lacking in experience or knowledge of such appliances, unless they have been given supervision or instruction concerning of the appliance by a person responsible for their safety.
Children should be supervised to ensure that they do not play with the appliance.
- Never place or use this appliance on a hotplate or near an open flame (gas cooker).
- Do not immerse the motor unit (L) or put it under running water.
- If the supply cord is damaged, it must be replaced by the manufacturer, an approved after-sales service centre or a similarly qualified person, in order to avoid any danger.
- Always use this appliance on a flat, stable, heat-resistant work surface, away from wa splashes and any sources of heat. Do not turn it over.
- Never dismantle your appliance. Apart from the usual care and cleaning, the appliance requires no maintenance on your part.
-
The appliance must be unplugged:
-
if there is a problem or fault during operation
- before assembly, disassembly or cleaning
-
after use.
-
Never pull on the supply cord to unplug the appliance.
- Only use an extension cable after checking that it is in perfect condition.
- A domestic appliance must not be used:
- if it has fallen on the floor
- if it is damaged or incomplete.
- In such cases, or for any other repair YOU MUST contact an Approved Service Centre.
- This product has been designed for domestic use only. Any commercial use, inappropriate use or failure to comply with the instructions, the manufacturer accepts no responsibility and the guarantee will not apply.
- Only use original accessories and components. The manufacturer cannot accept any responsibility if this is not the case.
- Switch off the appliance and disconnect from the mains before changing accessories of approaching parts that are in movement.
- Never put your fingers or any other object in the feed tube while the appliance is in operation. Always use the pusher provided for this purpose.
- Never open the cover until the sieve (D) has ceased rotating.
- Do not remove the pulp collector (G) while the appliance is in use.
- Always unplug the appliance from the mains after use.
SAFETY SYSTEM
This appliance is fitted with a safety mechanism. To start the juice machine the cover must be properly secured by the safety clamp (H). At the end of a cycle:
- place the On/Off switch (I) to 0
- wait until the sieve (D) stops completely before removing the cover
- open the safety clamp (H).
BEFORE USE
- Unpack the appliance and then place it on a flat, stable, heat-resistant work surface.
- We recommend that you wash all the removable parts (A, C, D, E, G, M) in hot soapy water (see Cleaning and Maintenance §). Rinse and dry them carefully.
- Ensure that all packaging has been removed before starting the appliance.
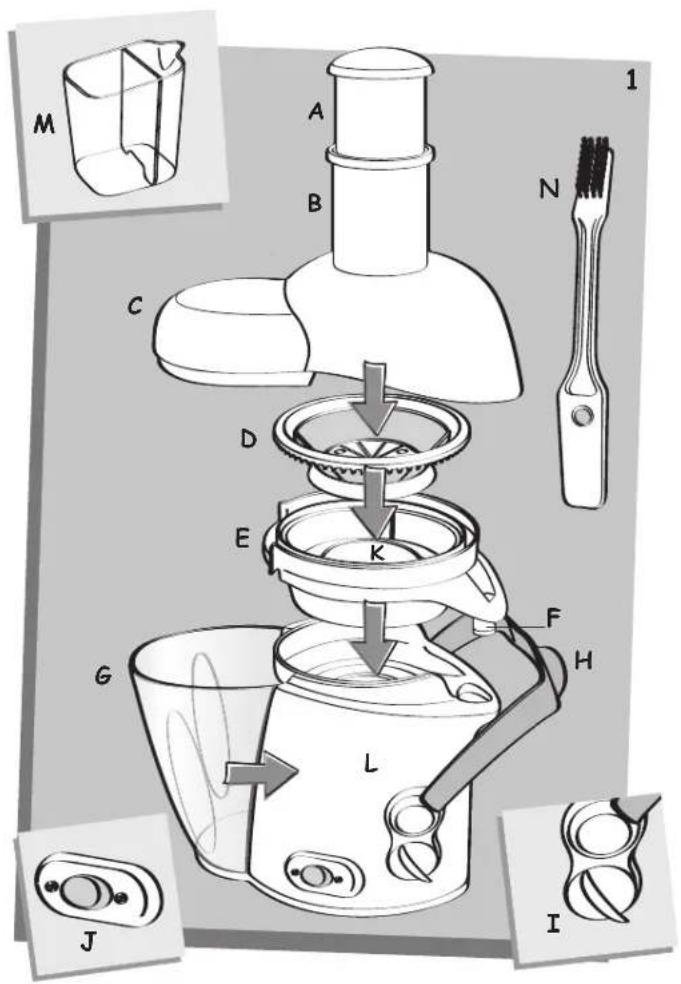
USING THE APPLIANCE
- Fit the juice collector (E) onto the drive shaft (K) (see Fig. 1).
- Place the sieve (D) in the juice collector (E). Ensure that the sieve is correctly clipped onto the drive shaft (K). You can hear an audible click (see Fig. 1).
- Fit the cover (C) on the appliance (see Fig. 1).
- Fit the pulp collector (G) at the rear of the appliance by clipping it into the slot (see Fig. 2)
- Click the safety clamp (H) into place over the cover (C) (see Fig. 3).
- Slide the pusher (A) into the feed tube (B), aligning the groove of the pusher with the small ridge in the feed tube.
- Position the juice jug (M) under the pouring spout (F) in front of the appliance as shown on Fig. 4. The foam separator allows you to keep the froth into the juice collector while you pour the juice into a glass (see Fig. 5).
- Plug in the appliance. You can use the cord storage to adjust the length of the cord Fig. 6).
- Start the appliance using the On/Off switch (I).
- Select the appropriate speed (J): 2 for pineapple and carrots; 1 for all other fruits and vegetables. The quality and quantity of juice varies greatly according to the date of harvest and the particular variety of fruits or vegetables.
- Incorrect choice of speed can induce abnormal vibrations of the appliance.
- Insert the fruits or vegetables through the feed tube (B).
- The fruits and vegetables must be inserted while the motor is running.
- Do not press too hard on the pusher (A). Do not use any other utensil. NEVER push with your fingers.
- When you have finished, stop the appliance, turning the On/Off switch (I) to 0 and wait until the sieve (D) has stopped completely. Open the safety clamp (H).
- When the pulp collector (G) is full, or the juice flow diminishes, empty the pulp coll and clean the sieve.
USEFUL ADVICE
- Wash the fruits carefully before removing any stones.
- You do not need to remove the skin or peel the fruits. You only need to peel fruits thick (and bitter) skin: citrus fruits, pineapple (remove the stalk).
- Some varieties of apples, pears, tomatoes, etc. will fit into the feed tube whole (74.5 maximum diameter), so choose the appropriate size of fruits or vegetables.
- It is difficult to extract juice from bananas, avocados, blackberries, figs, aubergines and strawberries.
- The appliance should not be used for sugar cane and excessively hard or fibrous fruit.
- Choose fresh, ripe fruits and vegetables, they will yield more juice. This appliance is suitable for fruits such as apples, pears, oranges, grapes, pomegranates and pineapple; for vegetables such as carrots, cucumbers, tomatoes, beetroot and celery.
- If you juice over ripe fruit, the sieve will be blocked more quickly.
- Important: All juice must be consumed immediately. On contact with air, the juice quickly oxidizes which can change the taste, colour and, above all, the nutritional value Apple and pear juices quickly turn brown, if required add a few drops of lemon juice slow this discoloration.
CLEANING AND MAINTENANCE
- Unplug the appliance before cleaning.
- All removable parts (A, C, D, E, G, L, M) can be cleaned in the dishwasher.
- This appliance is easier to clean immediately after use.
- Do not use scouring pads, acetone, alcohol (spirit) or harsh abrasive cleaning products etc. to clean the appliance.
- The sieve must be handled with care. Avoid any mishandling that may damage and all the performance of the sieve. The sieve can be cleaned with the aid of the brush (N). Change your sieve at the first sign of wear or damage. Never use bleach or scouring to clean the sieve, use hot water and washing-up liquid.
- Wipe the motor unit down with a damp cloth. Dry carefully.
- Never plunge the motor unit under running water.
WHAT TO DO IF YOUR APPLIANCE DOES NOT WORK ?
| PROBLEM CAUSES SOLUTIONS | ||
| The appliance does not work. | The plug is not inserted correctly, the On/Off switch (I) is not on position I. | Plug the appliance into a socket with the correct voltage. Turn the On/Off switch to speed I. |
| The cover (C) is not properly secured. | Check that the covers (C) is properly fitted and secured by the safety clamp (H). | |
| The appliance is giving off a smell or is very hot to touch, is making an abnormal noise or smoking. | The sieve (D) is not properly fitted. | Check that the sieve (D) has been fitted properly onto the drive shaft (K). |
| The quantity of food being processed is too great. | Leave the appliance to cool down and reduce the quantity of food to be processed. | |
| Juice flow decreases. The sieve (D) is blocked. | Switch off the appliance, clean the feed tube (B) and the sieve (D). | |
HELPLINE:
If you have any product problems or queries, please contact our Customer Relations Team first for expert help and advice:
0845 602 1454 - UK
010 677 4003 - Ireland
or consult our website - www.moulinex.co.uk
RECYCLING


Environment protection first !
Your appliance contains valuable materials which can be recovered or recycled.
Leave it at a civic waste collection point.
BESCHRIJVING
natural_image
Two parallel gray horizontal bars with dotted lines on the right side, no text or symbols present.
natural_image
Gray horizontal bar with a small curved arrow icon in the bottom right corner (no text or symbols)
①

natural_image
Abstract geometric pattern with horizontal gray bars and dotted lines (no text or symbols)AR

natural_image
Gray horizontal bar with a small curved arrow icon on the right end (no text or symbols)(2 Ê1)

natural_image
Gray horizontal bar with a small curved arrow icon on the right end (no text or symbols)
natural_image
Two parallel gray horizontal bars with arrow indicators on the left and right sides, no text or symbols present.
natural_image
Gray horizontal bar with a small curved arrow icon in the bottom right corner (no text or symbols)
①

natural_image
Pure horizontal gray bars with dotted alignment lines, no text or symbols present(2 E1)