LiDAR Range Finder - Tripod DJI - Free user manual and instructions
Find the device manual for free LiDAR Range Finder DJI in PDF.

| Product Type | LiDAR Range Finder for autofocus |
| Brand | DJI |
| Model | LiDAR Range Finder (DF02) |
| Dimensions | 66 x 57 x 24 mm (L x W x H) |
| Weight | Approx. 130 g |
| Power Supply | 7-16 V DC, 6.8 W (via DJI RS 3 Pro or external power supply) |
| ToF Sensor | 240 × 180 pixels, range 0.5 to 14 m |
| ToF Frequency | 25 Hz |
| Visible Light Camera | 448 × 298 pixels, 30 fps, equivalent focal length 30 mm |
| Field of View | 57.4° horizontal, 44.6° vertical, 70.1° diagonal |
| Ports | USB-C (firmware update), USB-C (power and communication) |
| Compatibility | DJI RS 3 Pro, DJI RS Focus Motor, compatible manual lenses |
| Main Functions | Manual autofocus, ActiveTrack Pro, Wide and Spot modes, face/head/body tracking |
| Lens Profiles | Up to 3 profiles (C1, C2, C3) with calibration |
| Firmware Update | Via DJI Assistant 2 (Ronin series) on computer |
| Operating Temperature | -20 to 45 °C |
| Included Accessories | LiDAR Range Finder control cable (USB-C, 30 cm), multi-camera cable (USB-C, 30 cm) |
| Maintenance | Clean with a dry cloth; do not use alcohol or solvents |
| Safety | Laser class 1 (IEC/EN 60825-1), do not obstruct ventilation slots |
| Repairability | User calibration possible; spare parts available via DJI |
Frequently Asked Questions - LiDAR Range Finder DJI
User questions about LiDAR Range Finder DJI
0 question about this device. Answer the ones you know or ask your own.
Ask a new question about this device
Download the instructions for your Tripod in PDF format for free! Find your manual LiDAR Range Finder - DJI and take your electronic device back in hand. On this page are published all the documents necessary for the use of your device. LiDAR Range Finder by DJI.
USER MANUAL LiDAR Range Finder DJI
DJI LiDAR Range Finder (RS)
User Guide
使用说明
使用說明
ユーザーガイド
사용자 가이드
Bedienungsanleitung
Guía del usuario
natural_image
Line drawing of a mechanical device with no visible text or symbolsContents
EN User Guide 5
CHS 使用说明 10
CHT 使用說明 15
JP ユーザーガイド 20
KR 사용자 가이드 26
natural_image
Technical line drawing of a DSLR camera module with no visible text or symbolsB
natural_image
Technical line drawing of a camera assembly with labeled components (no readable text or symbols)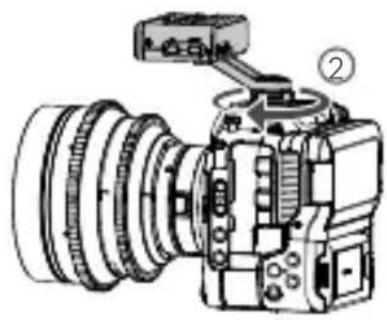
natural_image
Technical line drawing of a DSLR camera with no visible text or symbolsC
text_image
7V-16VA1A2A3A4A5A6A7A8A9A10A11A12
text_image
GND CANH CANL VCC GNDVCC GND CANL CANH VCC GNDVCC B12B11B10B9B8B7B6B5B4B3B2B1
EN
Carefully read this entire document and all safe and lawful practices provided before use.
CHS
LiDAR Range Finder Control Cable (USB-C, 30cm)
DJI ^™ LiDAR Range Finder with LiDAR focus technology features a built-in camera with an equivalent focal length of 30 mm. Autofocus for manual lenses is available when used with DJI RS 3 Pro and the DJI RS Focus Motor. In addition, ActiveTrack Pro and autofocus can be used simultaneously.
Overview
text_image
Diagram of an electronic device with labeled ports and connectors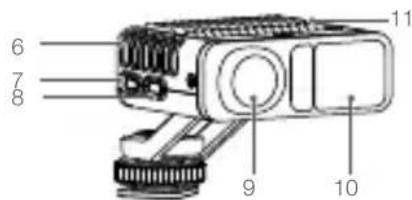
text_image
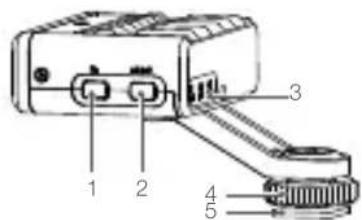
6 7 8 9 10 111. Function Button
Press once to switch lens profile. Press twice to initiate focus motor calibration.
Press and hold to enter sleep mode during usage. Press again to exit sleep mode.
2. AF/MF Button
Press once to switch between manual and auto focus.
3. Status Indicators
Indicates C1, C2, or C3 lens profile is in use when C1, C2, or C3 is on. Refer to the table below for more information.
Blinking Pattern Descriptions
Solid green AF mode
Blinks green twice Lens not calibrated
Solid red MF mode
Off Sleep mode
Blinks red twice Focus motor not calibrated
Blinks red Firmware updating
4. Lock Knob
Tighten the lock knob after attaching the LiDAR Range Finder to a camera.
5. 1/4"-20 Thread to Cold Shoe Adapter
Attach the LiDAR Range Finder to the hot shoe of a camera.
6. Heat Dissipation Slot
DO NOT obstruct the slot during use.
7. Firmware Update Port (USB-C)
Connect the LiDAR Range Finder to a computer when updating firmware.
8. Power and Communication Port (USB-C)
Connect the LiDAR Range Finder to the power and communication port of DJI RS 3 Pro for power and data transfer.
9. Visible Light Camera
10. LiDAR Camera
11. Heat Dissipation Slot
DO NOT obstruct the slot during use.
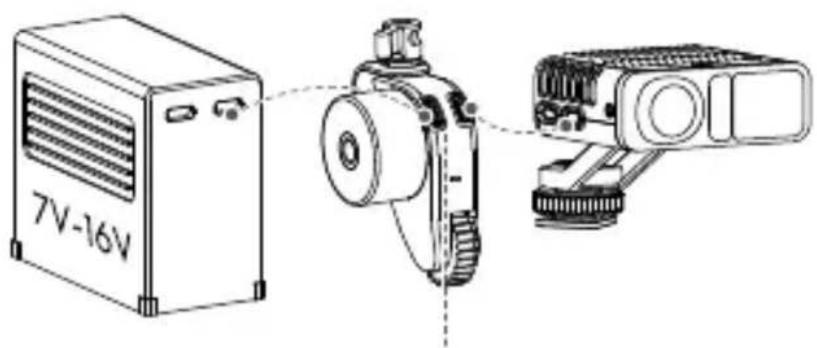
Used with DJI RS 3 Pro
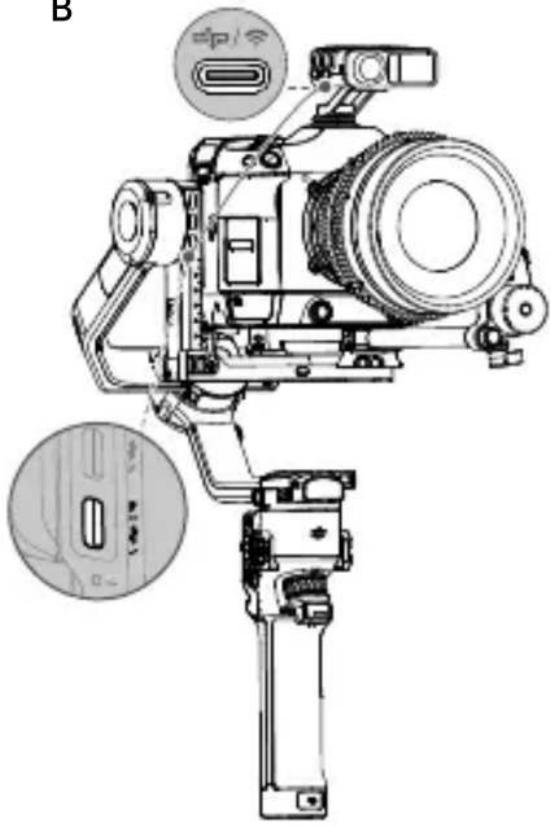
- Attach the LiDAR Range Finder to the hot shoe of the camera and tighten the lock knob. (Figure A)
- Connect the power and communication port of the LiDAR Range Finder to the video transmission/LiDAR Range Finder port of DJI RS 3 Pro using the multi-camera control cable provided. (Figure B)
- The LiDAR Range Finder is powered by DJI RS 3 Pro and turns on after the gimbal has power. The visible light camera view (not the view of the attached camera) displays on the touchscreen of the gimbal.

*The 1/4"-20 thread to cold shoe adapter can be detached. The user can also attach the LiDAR Range Finder to a camera cage via the 1/4"-20 screw.
If the camera view on the touchscreen is blurred, use the LiDAR Range Finder control cable instead of the multi-camera control cable to obtain a clear camera view. Note: the end with the shorter part of the cable should be connected to the power and communication port of the LiDAR Range Finder, the longer part of the cable should be connected to the video transmission/LiDAR Range Finder port of DJI RS 3 Pro.
LiDAR Settings
Lens Profile
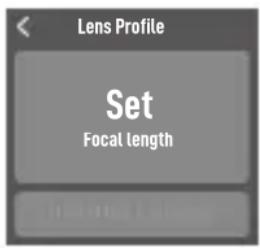
Tap Lens Profile to calibrate the lens, autofocus can be used after calibration.

- During camera lens calibration, it is recommended to shoot as few subjects as possible. The subject should be a person or flat surface with discernible features (such as a picture on the wall). The accuracy of the lens calibration will affect the autofocus performance.
- The lens parameters will be stored in the focus motor after calibration. Only focus motor calibration is required after choosing the lens profile. There is no need to calibrate the lens again.
Steps:
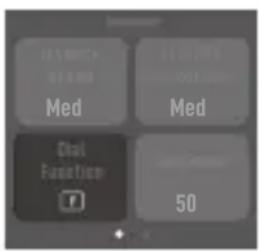
- Set the function of the front dial for the gimbal to Focus Motor. Power on DJI RS 3 Pro, swipe up from the bottom of the touchscreen, and tap Dial Function. Scroll to select Focus Motor.
text_image
Medical Med Medical Medical Function 50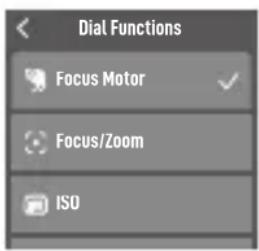
text_image
Dial Functions Focus Motor Focus/Zoom ISO- Tap < and swipe down from the top of the touchscreen to return to the homepage.
Swipe right from the left of the touchscreen to enter the LiDAR page. Tap the icon on the bottom right corner of the touchscreen to enter LiDAR settings.
natural_image
Silhouette of a human figure with a rectangular head, viewed from the side (no text or symbols)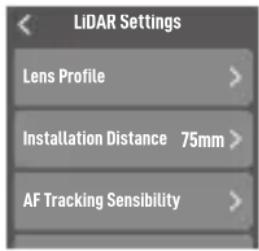
text_image
LiDAR Settings Lens Profile > Installation Distance 75mm > AF Tracking Sensibility >- Tap Lens profile. Tap + and tap Set, then tap +/- or drag the bar to input focal length.
text_image
Lens Profile Set Focal length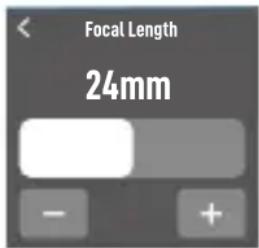
text_image
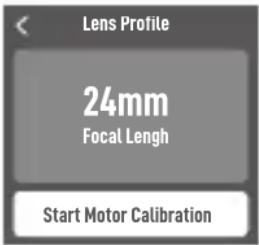
Focal Length 24mm- Tap < and then tap Start Motor Calibration. The focus motor will begin to rotate when calibrating. Tap Confirm when the calibration is complete.
text_image
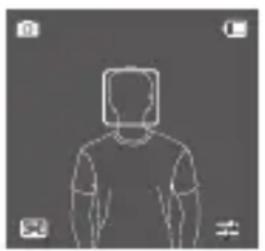
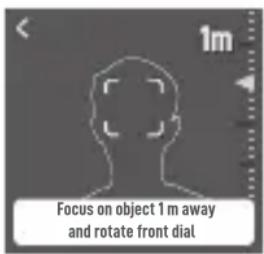
Lens Profile 24mm Focal Lengh Start Motor Calibration- Power on the attached camera before calibrating the lens. Focus on a subject in the center of the camera view that is approx. 1 m (0.7 m to 1.2 m) away. A white box will appear on the subject. Check if the subject is in focus on the attached camera view (not the touchscreen). Adjust the front dial of the gimbal until the subject is in focus and tap Confirm.
Repeat the previous step with a subject that is approx. 4 m (3.5 m to 4.7 m) away.
text_image
1m Focus on object 1 m away and rotate front dial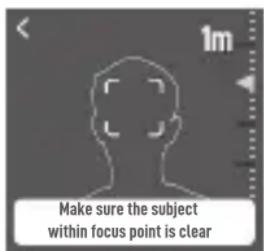
text_image
Make sure the subject within focus point is clearLens profile is complete after the lens calibration has been completed. DJI RS 3 Pro supports up to three lens profiles. The indicator light of C1, C2, and C3 turn on to indicate which lens profile is applied.
For the existing lens profile, delete the lens profile and recalibrate the lens if autofocus is inaccurate. Motor calibration is needed if the endpoint of the focus motor is changed due to the mounting position being changed. Tap Motor Calibration or press the Function button twice to start calibration.
Non-Calibration Lenses
LiDAR Range Finder can be used with specific lenses, which do not require calibration.
Refer to the DJI LiDAR Range Finder product page on the official DJI website for supported lenses. Connect the data port of the lens to the USB-C port of the focus motor using the camera cable provided.
Installation Distance
The installation distance is defined as the distance between the focus plane of the camera and the LiDAR Range Finder. The default distance is 75 mm, which is the length of the LiDAR Range Finder mounting bracket plus the length of the LiDAR Range Finder. Fine-tune the value to improve the auto focus accuracy. When mounting the LiDAR Range Finder to other positions, such as the top of the camera lens, adjust the distance to compensate for errors.
AF Tracking Sensibility Settings
Supports 5 levels. Level 1 offers the slowest change in focus. Level 5 offers the fastest change in focus.
ActiveTrack Settings
ActiveTrack Speed: Indicates the speed of the gimbal when using ActiveTrack. Select from Slow, Medium, and Fast settings.
Tilt Follow Switch: Enable or disable tilt follow as needed. The tilt axis follows gimbal movements when turned on.
Autofocus
Autofocus can be used after the lens profile is completed.
Focus Mode
Tap the bottom left corner icon to switch between Wide and Spot modes.
natural_image
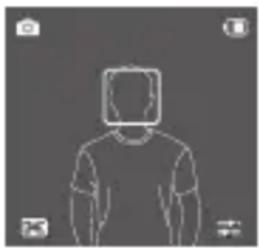
Silhouette of a person wearing a T-shirt with a face mask (no text or symbols)In Wide mode, the LiDAR Range Finder automatically recognizes people in the camera view and focuses on the people nearest to the center. A white box appears on the person selected. Adjusting the front dial of the gimbal can switch the subject and lock into focus. A yellow box will appear on the locked subject.
In Spot mode, the LiDAR Range Finder will focus on the subject inside the focus box. Drag the box or tap a subject to use autofocus.
Using ActiveTrack Pro
In Wide mode, press the trigger of the gimbal to enable ActiveTrack when a subject is selected. The box turns green, which indicates that ActiveTrack is enabled.
Use the control stick to adjust the frame. If the frame turns red, the subject is lost. Press once on the trigger to exit ActiveTrack, press twice on the trigger to exit ActiveTrack and recenter. The frame turns white to indicate that ActiveTrack is disabled.
AF/MF Mode
Press once on the AF/MF Switch or the M button of the gimbal to switch between auto focus and manual focus. Note that the M button function should be set prior to LiDAR AF/MF. In Manual focus mode, adjust the front dial to focus. Half press the camera control button of the gimbal to focus each time.

- DO NOT use corrosive organic solvents such as alcohol wipes to clean the lens of the LiDAR Range Finder.
• Make sure the LiDAR cameras are not blocked. Otherwise, the autofocus will be inaccurate.
Using LiDAR Range Finder Only
Follow the steps below to use the LiDAR Range Finder without DJI RS 3 Pro:
- Calibrate the lens via DJI RS 3 Pro, the camera parameter will be stored in the focus motor.
- Attach the LiDAR Range Finder and focus motor to the camera, and then connect the power and communication port of the LiDAR Range Finder and one of the USB-C ports of the focus motor using the multi-camera control cable. Connect an external power supply (7 to 16 V) to the other USB-C port of the focus motor to power the LiDAR Range Finder and focus motor. (Figure C)
- Power on the external power supply, and then press twice on the Function button to start motor calibration. Press the AF/MF button to switch the focus mode to auto focus, the indicator glows solid green indicating auto focus is available.
Firmware Update
Update the LiDAR Range Finder firmware via DJI Assistant 2 (Ronin Series). It is recommended to update the firmware for the LiDAR Range Finder when connected to DJI RS 3 Pro.
- Launch DJI Assistant 2 (Ronin Series) and log in with a DJI account.
- Connect the firmware update port to a computer using a USB-C cable.
- Click DJI LiDAR Range Finder and then click Update.
- Select the firmware version.
- DJI Assistant 2 (Ronin Series) will download and update the firmware automatically.

- Do not disconnect from the internet while updating firmware. Otherwise, the update will fail.
Specifications
| Accessory Port | Cold Shoe |
| 1/4"-20 Mounting Hole | |
| Firmware Update Port (USB-C) | |
| Power and Communication Port (USB-C) | |
| Image Sensor | Resolution: 448 × 298 on the RS touchscreen |
| FOV: 57.4° (horizontal), 44.6° (vertical), 70.1° (diagonal) | |
| Frame Rate: 30fps | |
| Focal Length: 30mm equivalent | |
| ToF Sensor | Resolution: 240×180 |
| Sensing Range: 0.5 to 14 m (in environments with a brightness level of 80,000 lux or below) | |
| FOV: 57.4° (horizontal), 44.6° (vertical), 70.1° (diagonal) | |
| Frequency: 25 Hz | |
| Focal Length: 30mm equivalent | |
| Distance Error: 1% | |
| Machine Learning | Frequency: 30 Hz |
| Tracking Subjects: Can recognize up to five subjects at the same time, and choose one to follow | |
| Smart Object Identification: Human face, head, and body | |
| Electrical Properties | Power Consumption: 6.8 W |
| Input: 7 to 16 V | |
| Operating Temperature | -20° to 45°C (-4° to 113°F) |
| Mechanical Properties | Dimensions: 66×57×24 mm (L×W×H) |
| Weight: Approx. 130 g (0.28 lbs) | |
| Mounting Plate Height: 30 mm |
CHS
简介
text_image
Diagram of an electronic device with labeled ports and connectors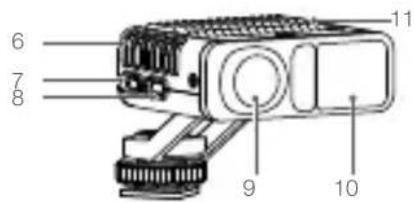
text_image
6 7 8 9 10 111. Fn 功能按键
natural_image
Silhouette of a person wearing a T-shirt, viewed from behind (no text or symbols)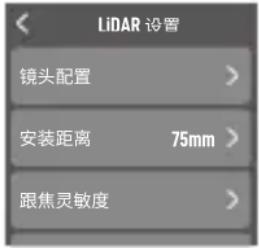
natural_image
Silhouette of a person with a face mask, viewed from behind (no text or symbols)natural_image
Silhouette of a human figure with a rectangular head on top, viewed from the side (no text or symbols)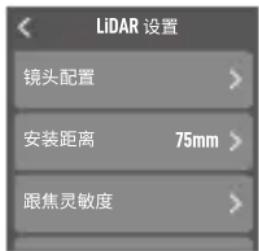
natural_image
Silhouette of a human figure with a headboard, viewed from the side (no text or symbols)text_image
Medical Med Medical Dual Function 7 50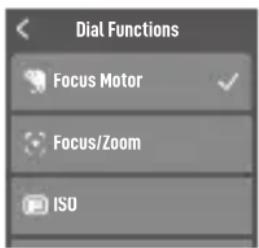
text_image
Dial Functions Focus Motor Focus/Zoom ISOnatural_image
Silhouette of a human figure with a headboard, viewed from the side (no text or symbols)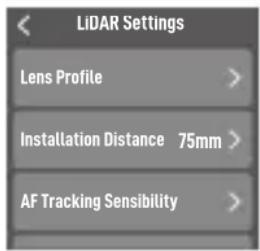
text_image
LiDAR Settings Lens Profile > Installation Distance 75mm > AF Tracking Sensibility >text_image
Lens Profile Set Focal length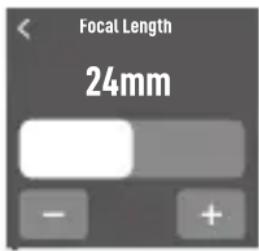
text_image
Focal Length 24mmtext_image
Lens Profile 24mm Focal Length Start Motor Calibrationtext_image
Focus on object 1 m away and rotate front dial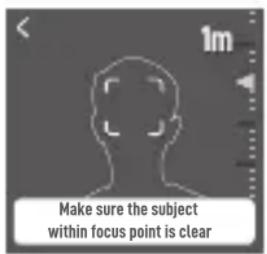
text_image
Make sure the subject within focus point is clearnatural_image
Silhouette of a person wearing a T-shirt, viewed from the side (no text or symbols)text_image
Diagram of an electronic device with labeled ports and connectors
text_image
6 7 8 9 10 111. 기능 버튼
text_image
Dial Functions Focus Motor ✓ Focus/Zoom ISOnatural_image
Silhouette of a person wearing a hooded shirt, standing against a plain background (no text or symbols)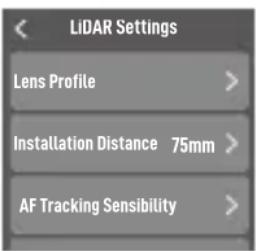
text_image
LiDAR Settings Lens Profile > Installation Distance 75mm > AF Tracking Sensibility >text_image
Lens Profile Set Focal length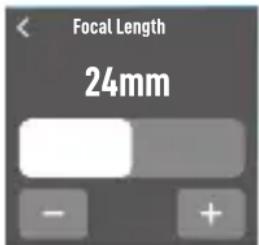
text_image
Focal Length 24mmtext_image
Lens Profile 24mm Focal Lengh Start Motor Calibrationtext_image
1m Focus on object 1m away and rotate front dial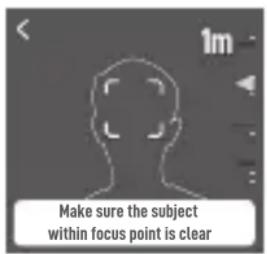
text_image
Make sure the subject within focus point is clearnatural_image
Silhouette of a person wearing a T-shirt, viewed from the side (no text or symbols)text_image
Diagram of an electronic device with labeled ports and connectors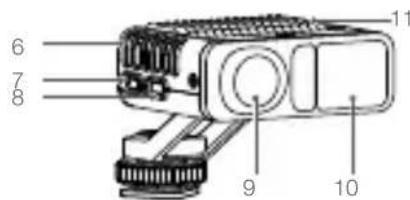
text_image
6 7 8 9 10 111. Funktionstaste
text_image
Med Medical Function 50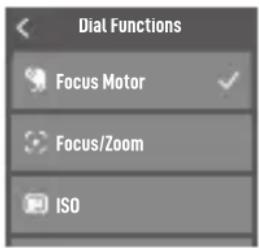
text_image
Dial Functions Focus Motor Focus/Zoom ISOnatural_image
Silhouette of a person wearing a T-shirt with a face mask (no text or symbols)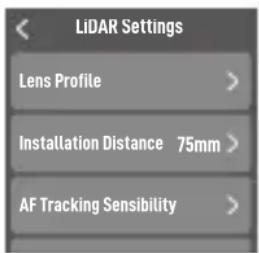
text_image
LiDAR Settings Lens Profile > Installation Distance 75mm > AF Tracking Sensibility >text_image
Lens Profile Set Focal length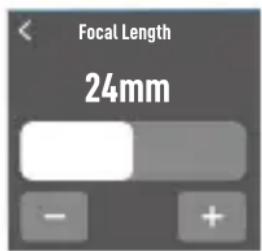
text_image
Focal Length 24mmtext_image
Lens Profile 24mm Focal Lengh Start Motor Calibrationtext_image
1m Focus on object 1 m away and rotate front dial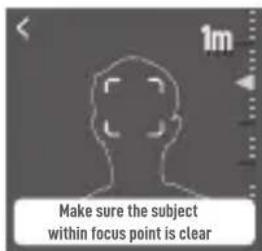
text_image
Make sure the subject within focus point is clearnatural_image
Silhouette of a person wearing a T-shirt, viewed from behind (no text or symbols)text_image
Diagram of an electronic device with labeled ports and connectors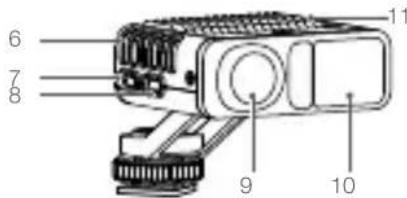
text_image
6 7 8 9 10 111. Botón de función
text_image
Dial Functions Focus Motor Focus/Zoom ISOnatural_image
Silhouette of a human head with a square head on top, viewed from the side (no text or symbols)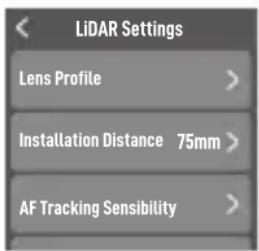
text_image
LiDAR Settings Lens Profile > Installation Distance 75mm > AF Tracking Sensibility >text_image
Lens Profile Set Focal lengti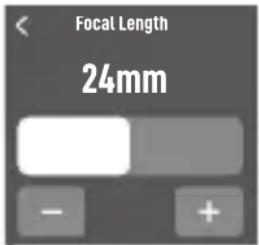
text_image
Focal Length 24mmtext_image
Lens Profile 24mm Focal Lengh Start Motor Calibrationtext_image
1m Focus on object 1 m away and rotate front dial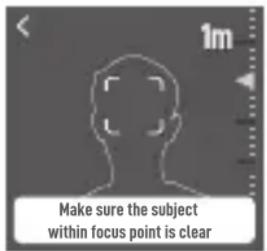
text_image
Make sure the subject within focus point is clearnatural_image
Silhouette of a human figure with a rectangular head, viewed from the side (no text or symbols)text_image
Diagram of an electronic device showing labeled ports and connectors, including ports 1 through 5.
text_image
6 7 8 9 10 111. Bouton fonction
text_image
Dial Functions Focus Motor Focus/Zoom ISOnatural_image
Silhouette of a person wearing a T-shirt with a face mask (no text or symbols)
text_image
LiDAR Settings Lens Profile > Installation Distance 75mm > AF Tracking Sensibility >text_image
Lens Profile Set Focal lengthl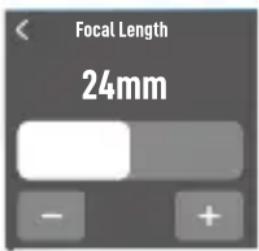
text_image
Focal Length 24mmtext_image
Lens Profile 24mm Focal Lengh Start Motor Calibrationtext_image
1m Focus on object 1m away and rotate front dial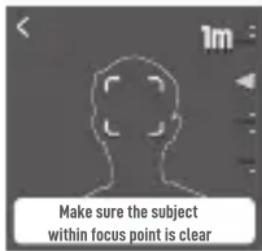
text_image
Make sure the subject within focus point is clearnatural_image
Silhouette of a person wearing a face mask and holding a rectangular object (no text or symbols)text_image
Diagram of an electronic device with labeled ports and connectors, showing numbered parts for identification.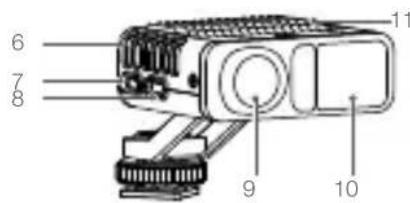
text_image
6 7 8 9 10 111. Tasto funzione
text_image
Dial Functions Focus Motor Focus/Zoom ISOnatural_image
Silhouette of a human figure with a rectangular head on top, viewed from the side (no text or symbols)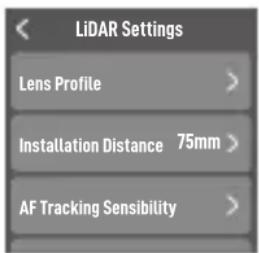
text_image
LiDAR Settings Lens Profile > Installation Distance 75mm > AF Tracking Sensibility >text_image
Focal Length 24mmtext_image
Lens Profile 24mm Focal Length Start Motor Calibrationtext_image
1m Focus on object 1 m away and rotate front dial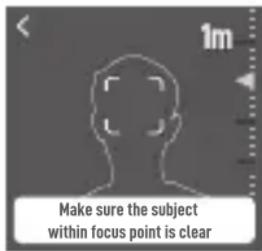
text_image
Make sure the subject within focus point is clearnatural_image
Silhouette of a human figure with a rectangular head on top, viewed from the side (no text or symbols)text_image
Diagram of an electronic device with labeled ports and connectors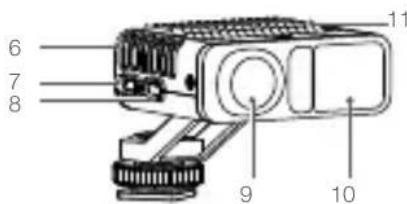
text_image
6 7 8 9 10 111. Functieknop
text_image
Dial Functions Focus Motor Focus/Zoom ISOnatural_image
Silhouette of a person wearing a face mask and holding a rectangular object (no text or symbols)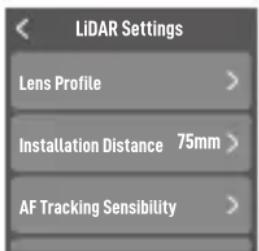
text_image
LiDAR Settings Lens Profile > Installation Distance 75mm > AF Tracking Sensibility >text_image
Lens Profile Set Focal lengthl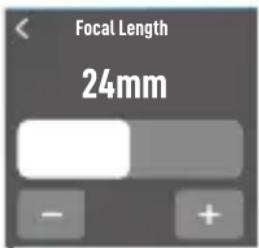
text_image
Focal Length 24mmtext_image
Lens Profile 24mm Focal Length Start Motor Calibrationtext_image
1m Focus on object 1 m away and rotate front dial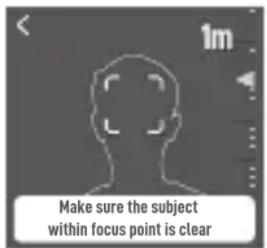
text_image
Make sure the subject within focus point is clearnatural_image
Silhouette of a person wearing a face mask and holding a rectangular object (no text or symbols)text_image
Diagram of an electronic device with labeled ports and connectors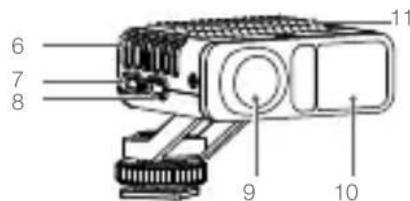
text_image
6 7 8 9 10 111. Botão de função
text_image
Dial Functions Focus Motor Focus/Zoom ISOnatural_image
Silhouette of a human figure with a rectangular head on top, viewed from the side (no text or symbols)
text_image
LiDAR Settings Lens Profile > Installation Distance 75mm > AF Tracking Sensibility >text_image
Lens Profile Set Focal length1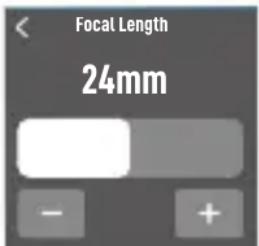
text_image
Focal Length 24mmtext_image
Lens Profile 24mm Focal Length Start Motor Calibrationtext_image
1m Focus on object 1 m away and rotate front dial
text_image
Make sure the subject within focus point is clearnatural_image
Silhouette of a person viewed from behind, wearing a T-shirt (no text or symbols)text_image
Dial Functions Focus Motor Focus/Zoom ISOnatural_image
Silhouette of a human figure viewed from behind, with no text or symbols present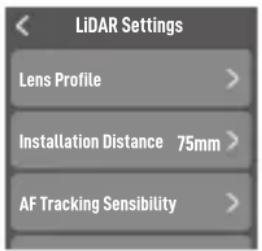
text_image
LiDAR Settings Lens Profile > Installation Distance 75mm > AF Tracking Sensibility >text_image
Focal Length 24mmtext_image
Lens Profile 24mm Focal Length Start Motor Calibrationtext_image
Focus on object 1 m away and rotate front dial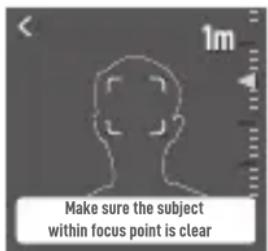
text_image
Make sure the subject within focus point is clearnatural_image
Silhouette of a person wearing a T-shirt, viewed from the side (no text or symbols)text_image
Diagram of an electronic device with labeled ports and connectors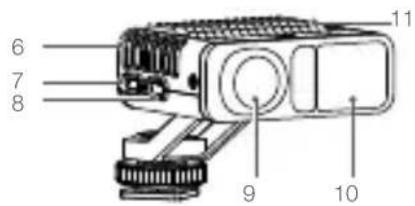
text_image
6 7 8 9 10 111. Кнопка функций
text_image
Dial Functions Focus Motor Focus/Zoom ISOnatural_image
Silhouette of a person wearing a T-shirt, viewed from behind (no text or symbols)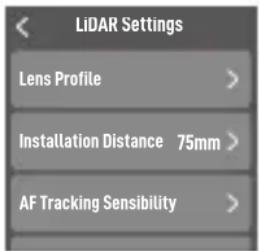
text_image
LiDAR Settings Lens Profile > Installation Distance 75mm > AF Tracking Sensibility >text_image
Focal Length 24mmtext_image
Lens Profile 24mm Focal Length Start Motor Calibrationtext_image
1m Focus on object 1 m away and rotate front dial
text_image
Make sure the subject within focus point is clearnatural_image
Silhouette of a person wearing a T-shirt, viewed from the side (no text or symbols)FCC Compliance Statement: Supplier's Declaration of Conformity
Product name: LiDAR Range Finder RS
Model Number: DF02
Responsible Party: DJI Technology, Inc.
Responsible Party Address: 201 S. Victory Blvd., Burbank, CA 91502
Website: www.dji.com
We, DJI Technology, Inc., being the responsible party, declares that the above mentioned model was tested to demonstrate complying with all applicable FCC rules and regulations.
This device complies with part 15 of the FCC Rules. Operation is subject to the following two conditions: (1) This device may not cause harmful interference, and (2) this device must accept any interference received, including interference that may cause undesired operation.
Any changes or modifications not expressly approved by the party responsible for compliance could void the user's authority to operate the equipment.
ISED Compliance
CAN ICES-003 (B)/NMB-003(B)

EU Compliance Statement: SZ DJI Osmo Technology Co., Ltd. hereby declares that this device (DF02) is in compliance with the essential requirements and other relevant provisions of the Directive 2014/30/EU.
A copy of the EU Declaration of Conformity is available online at www.dji.com/euro-compliance
EU contact address: DJI GmbH, Industriestrasse 12, 97618, Niederlauer, Germany
GB Compliance Statement: SZ DJI Osmo Technology Co., Ltd. hereby declares that this device (DF02) is in compliance with the essential requirements and other relevant provisions of Electromagnetic Compatibility Regulations 2016.
A copy of the GB Declaration of Conformity is available online at www.dji.com/euro-compliance
Environmentally friendly disposal

Old electrical appliances must not be disposed of together with the residual waste, but have to be disposed of separately. The disposal at the communal collecting point via private persons is for free. The owner of
old appliances is responsible to bring the appliances to these collecting points or to similar collection points.
With this little personal effort, you contribute to recycle valuable raw materials and the treatment of toxic substances.
text_image
CLASSE 1 PRODUIT LASERtext_image
CLASS 1 LASER PRODUCTIEC/EN 60825-1:2014. Complies with 21 CFR 1040.10 and 1040.11 except for conformance with IEC 60825-1 Ed. 3., as described in Laser Notice No. 56, dated May 8, 2019

FR
Cet appareil at sa accessoires se recyclent