
4LD6052 - Clock AURIOL - Free user manual and instructions
Find the device manual for free 4LD6052 AURIOL in PDF.
| Type de produit | LED Wall and Table Clock |
| Marque | Auriol |
| Modèle | 4LD6052 |
| Dimensions (W x H x D) | Approx. 235 x 38 x 92 mm |
| Weight | Approx. 227 g (USB cable included, button cell not included) |
| Main Power | USB cable DC 5 V, 1 A (DC 3.5 mm connection) |
| Backup Battery | 1 CR2025 button cell, 3 V, 160 mAh (for memory) |
| Infrared Remote Control | Batteries: 1 x CR2025, 3 V; Range: 3 to 5 m |
| Display | LED with 115 lighting colors |
| Time Formats | 12 h / 24 h |
| Alarm Functions | 3 independent alarms + weekend alarm; signal duration: approx. 2 minutes |
| Temperature Display | Range: 0 to 50 °C; Tolerance: ±2 °C; Units: °C / °F |
| Date Display | Yes (day, month, year) |
| Settings | Time, date, alarms, color, brightness (2 levels) |
| Connection | USB (cable included, power adapter not included) |
| Intended Use | Indoor, private use |
| Care and Cleaning | Soft, dry, lint-free cloth; do not use harsh agents; avoid moisture |
| Safety | Do not open the housing; keep batteries out of reach of children; use only the supplied cable |
| Warranty | 3 years (spare parts available during warranty period) |
| Manufacturer | digi-tech gmbh |
| Year of Manufacture | 2024 |
| Article Number | 480208_2410 |
Frequently Asked Questions - 4LD6052 AURIOL
User questions about 4LD6052 AURIOL
0 question about this device. Answer the ones you know or ask your own.
Ask a new question about this device
Download the instructions for your Clock in PDF format for free! Find your manual 4LD6052 - AURIOL and take your electronic device back in hand. On this page are published all the documents necessary for the use of your device. 4LD6052 by AURIOL.
USER MANUAL 4LD6052 AURIOL
natural_image
Exterior view of a modern office building (no signage)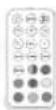
Art-Nr.: 4-LD6915
LED-WAND- UND TISCHUHR HORLOGE MURALE ET DE TABLE À LED LED WALL & DESK CLOCK
DE AT CH LED-WAND- UND TISCHUHR
Operating and safety instructions
NL BEED-WAND- EN TAFELKLOK
Operating and safety instructions 40
Erzeuger: Manufactured by
LTD Tianqiu Industrial Park, Xinji
Industrial Zone. Machong, Dong-
guan, Guangdong, P. R. China
www.digi-tech-gmbh.com/downloads
LTD Tianqiu Industrial Park, Xinji
Industrial Zone. Machong, Dong-
guan, Guangdong, P. R. Chine
www.digi-tech-gmbh.com/downloads
GB|IE|NI|CY|MT Operating and safety instructions
Table of Contents
Table of Contents 40
Intended use 41
Package contents 41
Technical specifications 41
LED wall and desk clock 41
Infrared remote control 41
Information on button cells CR2025, 3 V 41
Explanation of signal words 42
Explanation of sign 42
Important safety instructions 43
Safety instructions for the user 43
Battery safety information 44
Safety instructions for the USB cable 44
Hang or place the product securely 45
Display and controls 46
Product 46
Infrared remote control 47
Setup 48
Operation 48
Quick setting 48
Infrared remote control 48
Led display setting 48
Basic settings on the product 49
Basic setting with the infrared remote control ..... 50
Setting alarms with alarm buttons 51
Switching off the alarm signal 51
Display the 12/24-hour format 51
Temperature indicator 51
Display and set the date 51
Button tone 52
Enable/disable LED lighting 52
Reset to factory default (RESET) 52
Removal of the button cell from the product ..... 52
Troubleshooting 53
Cleaning instructions 53
Storage 53
Disposal 53
Disposal of the electrical device 53
Disposal of batteries 54
Simplified EU declaration of conformity 55
The digi-tech gmbh warranty 55
Warranty terms 55
Warranty period and statutory claims
for defects 55
Scope of Warranty 55
Processing in the event of a warranty claim 56
Service 56
Supplier 56
LED WALL & DESK CLOCK
Introduction
Congratulations on purchasing your new led wall and table clock (hereinafter referred to as „product“ or „device“). In choosing this item, you have opted for a high-quality product. These operating instructions form an integral part of this product. It contains important instructions pertaining to its safety, use and disposal. Please familiarise yourself with all the operating and safety instructions before using this product. Only use this product as described and for the purposes stated.

If you give this product to anyone else, please be sure to pass on these documents. Please keep the packaging and operating instructions for future reference.
Intended use
The product is suitable for displaying the time and for using the additional functions described. Any other use or modification of the product is considered improper use.
The product is only suitable for indoor use.
The manufacturer is not liable for damage caused by improper use or incorrect operation. The product is not intended for commercial use.
Package contents
Note: Please check the delivery contents after purchase.
Check that all parts are present and not defective. If the delivery is incomplete and/or parts are damaged, do not use the product. Contact the service department (see „Processing in the event of a warranty claim“).
1 x LED wall and desk clock
1 x USB cable
1 x infrared remote control
2 x button cells CR2025, 3 V 160 mAh (Japanese or European brand)
1 x Short manual
Technical specifications
LED wall and desk clock
- Measuring range/temperature: 0 – 50°C
• Temperature display/tolerance: +/- 2 °C
• Dimensions: approx. 235 x 38 x 92 mm
• Weight: approx. 227 g (incl. USB cable, excl. button cell battery)
• USB cable connection: - DC 3.5 mm 5 V 1-A, DC 3.5 mm to USB-A
• USB cable length: approx. 1.5 m +/- 3% tolerance - Button cell: 1 x CR2025, 3 V 160 mAh
Infrared remote control
• Rang: approx. 3 - 5 m
• Weight: approx. 11 g (excl. button cell battery)
- Button cell: 1 x CR2025, 3 V 160 mAh
- Indicator for DC voltage
Information on button cells CR2025, 3 V
Producer: Manufactured by
Place of production: Dongguan Tianqiu Enterprise CO LTD Tianqiu Industrial Park, Xinji Industrial Zone. Machong, Dongguan, Guangdong, P. R. China
Labelling: For details, see battery imprint
Date of production: For details, see battery imprint
Weight: approx. 5 g
Capacity: For details, see battery imprint
Chemical composition: Zinc manganese dioxide
Hazardous substances contained in the battery: None
fire extinguishing any fire class (no restriction) agent to be used:
critical raw materials: Manganese, graphite, nickel
Explanation of signal words
 DANGER! DANGER! | This symbol indicates a hazard with a high degree of risk which could result in death or serious injury. |
 WARNING! WARNING! | This symbol/word indicates a hazard with a medium level of risk, which, if not avoided, could result in death or serious injury. |
 CAUTION! CAUTION! | This symbol/word indicates a hazard with a low degree of risk which, if not avoided, can result in minor or moderate injury. |
 RISK OF ELECTRICSHOCK/DEATH RISK OF ELECTRICSHOCK/DEATH | This symbol indicates a risk of electric shock. |
| ATTENTION: | This signal word warns against potential damages to property. |
| Note: | This signal word is used for additional information. |
Explanation of sign
 | Improper use of the batteries/recharge-able batteries may result in explosion and leakage of the battery fluid. |
 Incl. Incl. | Button cells included |
 | Button cells: 2 x CR2025, 3 V |
 | Indicator for DC voltage,DC 5 V - 5 Volt |
 | Read these operating instructions! |
| CE | digi-tech gmbh uses the CE marking to show compliance with the applicable EU directives. |
 | USB cable |
| - ⊖ +⊖ - ⊖ | USB cable connection:5 V -1 A |
 | Protection class III |
 | Always keep batteries out of the reach of children. |
 | Do not throw batteries into the fire or place them near fire. |
 | Batteries must always be inserted with the correct polarity. |
 | Do not deform or damage batteries. |
 | Do not open or disassemble batteries. |
 | Do not mix batteries of different brands and types. |
 | Do not mix new and used batteries. |
 | Do not charge batteries. |
 | Protect batteries from moisture and keep them away from liquids. |
 | Do not short-circuit batteries. |
 | Always insert the batteries with the correct polarity. |
 | Protective gloves must be worn! |
Important safety instructions
Safety instructions for the user

WARNING! Danger of death and accidents for toddlers and children!
Children frequently underestimate the risks. Always keep children away from the product.
- This product may be used by children aged 8 years and older and by persons with reduced physical, sensory or mental capabilities or a lack of experience and knowledge if they are supervised or have been instructed in the safe use of the product and understand the hazards involved. Children are not allowed to play with the product. Cleaning and user maintenance is not to be carried out by children without supervision.
• The packaging material is not a toy. Children can get
caught in it and suffocate while playing.
- Do not operate the product if it is damaged.
- Do not expose the product to moisture.
- Only use the product indoors.
- This product does not contain any parts that can be serviced by the consumer.
Battery safety information

WARNING! Danger of death!
- Keep batteries/rechargeable batteries out of the reach of children. If swallowed, seek medical attention immediately!
- Ingestion can result in burns, perforation of soft tissue and death. Severe burns can occur within 2 hours after swallowing.
- Do not use rechargeable batteries.
- Never recharge non-rechargeable batteries.
- Do not short-circuit batteries/rechargeable batteries and do not open them. This can result in overheating, fire hazards or explosions.
- Never throw batteries/rechargeable batteries into fire or water.
* Do not subject batteries/rechargeable batteries to mechanical stress.
Risk of battery/rechargeable battery leakage

CAUTION! Risk of injury!
Leaking or damaged batteries/rechargeable batteries can cause burns if they come into contact with skin.
Therefore, wear suitable protective gloves in such cases.

- Avoid extreme conditions and temperatures that may affect batteries/rechargeable batteries, e.g. radiators/direct sunlight.
- If batteries/rechargeable batteries leak, prevent chemicals from coming into contact with skin, eyes and mucous membranes. Rinse any affected areas immediately with clear water and seek medical attention.
- In case of leakage from the batteries/rechargeable batteries, remove them from the product immediately to avoid damage.
- Remove the batteries/rechargeable batteries if the product will not be used for a prolonged period.
ATTENTION: Risk of damage of the product!
- Only use the specified type of battery/rechargeable battery.
- Insert batteries according to the polarity markings (+) and (-) into the battery/rechargeable battery and the product.
- Clean the contacts on the battery/rechargeable battery and in the battery compartment with a dry, lint-free cloth or cotton swab before inserting them.
- Remove discharged batteries/rechargeable batteries from the product immediately.
Safety instructions for the USB cable

DANGER! Mortal danger from electric shock!
Improper use, incorrect electrical installation or excessively high mains voltage can lead to electric shocks.
- Check whether the information on the nameplate
corresponds to the mains voltage of the socket.
- Only use a SELV power supply.
- Safety Extra Low Voltage describes a voltage that is selected to be so low that there is no danger of excessive body currents when touching it directly, both during normal operation and in the event of a single fault.
- Only connect the USB cable of the product to a suitable power supply unit that corresponds to the specifications (volts and amperes) on the type label.

RISK! Damage to the product!
- Only connect the USB cable to an easily accessible power source so that you can quickly disconnect the product from the power supply in the event of a fault.
- Do not operate the product if it or the accessories show visible signs of damage or defects.
- Do not open the housing or make any changes to the product. Leave the repairs to specialists. To do this, contact the specified service address. Liability and warranty claims are excluded if repairs are carried out independently or by improper connection or incorrect operation.
- Do not immerse the product or the USB cable in water or other liquids.
- Never touch the USB cable with wet hands.
- When disconnecting the USB cable from the USB socket, always pull at the plug.
- Never use the USB cable as a carrying handle.
- Keep the product and the USB cable away from open flames and hot surfaces.
- Do not bend the USB cable and do not place it over sharp edges.
Hang or place the product securely
The product is not designed for use in rooms with high humidity (e.g., bathrooms). Before mounting to the wall, make sure that there are no gas, water or electricity lines at the drilling location. Use suitable screws and dowels (not included in the package contents). Be mindful of the wall's condition. The manufacturer accepts no liability for damage caused by improper fastening. Be sure to protect sensitive surfaces before setting up the product, otherwise scratches may occur.
Make sure that:
- adequate ventilation is always ensured (do not place the product on shelves or where curtains or furniture cover the ventilation holes/sensor and on 12 the sides);
- the product is not placed on a thick carpet or bed during operation and no direct heat sources (e.g. heaters) act on the product;
- it is not placed in the path of direct sunlight;
- contact with splashing or dripping water is avoided;
- the product does not hang or stand in the immediate vicinity of magnetic fields (e.g., loudspeakers);
• no foreign bodies or dust can enter the product;
- Candles and other open flames must be kept away from this product at all times to prevent the spread of fire.
Display and controls
Product
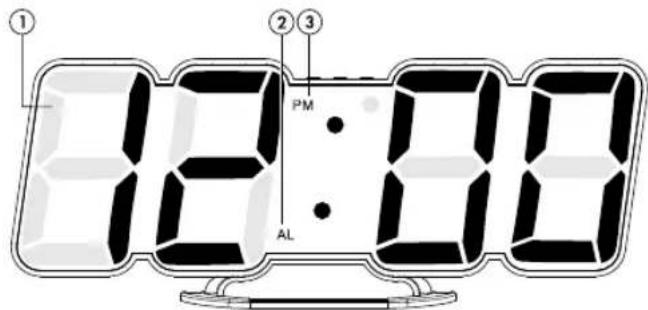
1 LED display 2 AL display, alarm
3 PM display, 12 h display, afternoon
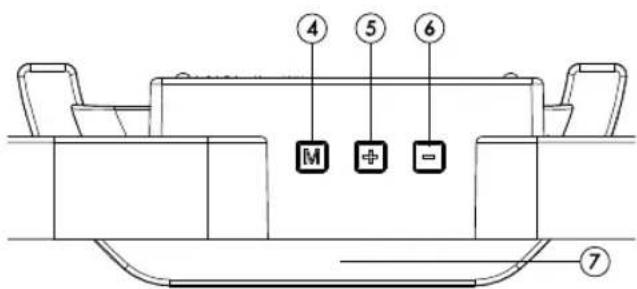
4 M button, MODE 5 + up button
6 - down button 7 Stand
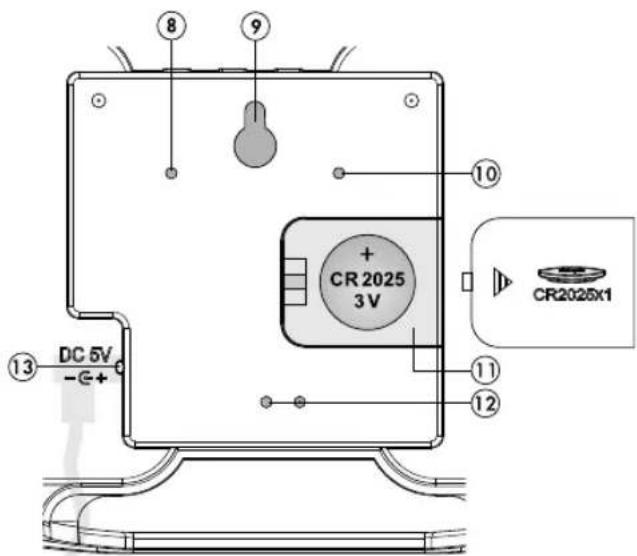
| 8 Speaker 9 Wall hanger | |||
| 10 Ventilation hole 11 | Battery compartment | ||
| 12 | Ventilation holes, sensor | 13 | Socket for USB cable |
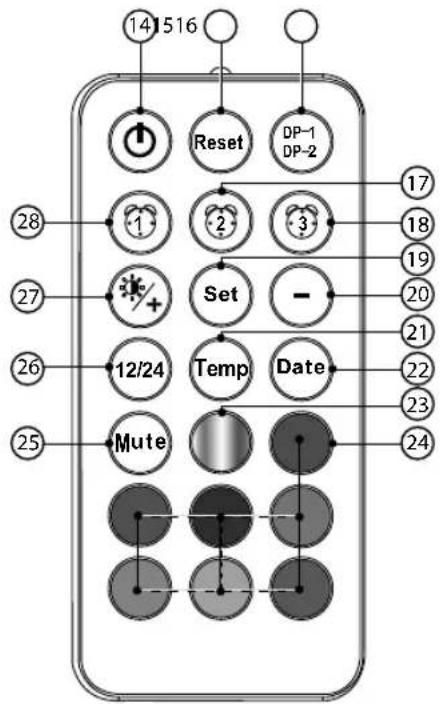
Infrared remote control
flowchart
graph TD
    A["14"] --> B["Reset"]
    C["516"] --> D["Reset"]
    E["17"] --> F["Set"]
    G["18"] --> H["Set"]
    I["19"] --> J["Set"]
    K["20"] --> L["Set"]
    M["21"] --> N["Set"]
    O["22"] --> P["Temp"]
    Q["23"] --> R["Date"]
    S["24"] --> T["Mute"]
    U["25"] --> V["Mute"]
    W["26"] --> X["12/24"]
    Y["27"] --> Z["+/-"]
    AA["28"] --> AB["1"]
    AC["29"] --> AD["1"]
    AE["30"] --> AF["-"]
    AG["31"] --> AH["3"]
    AI["32"] --> AJ["3"]
    AK["33"] --> AL["3"]
    AM["34"] --> AN["3"]
    AO["35"] --> AP["3"]
    AQ["36"] --> AR["3"]
    AS["37"] --> AT["3"]
    AU["38"] --> AV["3"]
    AW["39"] --> AX["3"]
    AY["14"] --> AZ["Reset"]
    BA["516"] --> BB["Reset"]
| 14 | ON/OFF button, | 15 | RESET button |
| 16 | DP-1/DP-2-button | 17 | Alarm 2 button |
| 18 | Alarm 3 button | 19 | SET button |
| 20 | button, down 21 Temp button | ||
| 22 | Date button, Date 23 Colour change button | ||
| 24 | Colour selection button | 25 | Mute-button |
| 26 | 12/24 h button | 27 | Light/+ button, up |
| 28 | Alarm 1 button | ||
Back
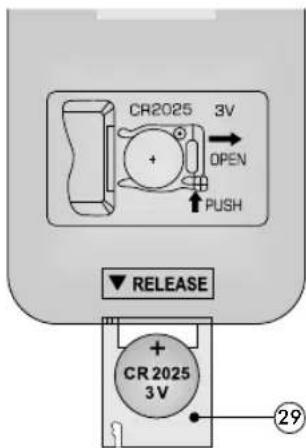
29 Button cell holder
Setup
-
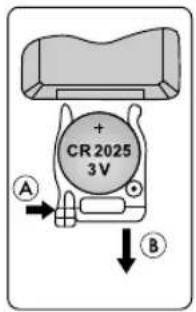
Open the button cell holder of the infrared remote control 29 by pressing the lever A to the right and at the same time carefully pulling out the button cell holder 29 B.
-
Insert a button cell CR2025 with the correct polarity +/- .
-
Slide the button cell holder 29 back into the infrared remote control.
-
Open the battery compartment of the product . 11
-
Insert a button cell CR2025 with the correct polarity +/-
-
Close the battery compartment . 11
-
Connect the USB cable to your computer or to a USB power adapter (not included).
-
Insert the connector into the socket for the USB cable .13
Note:
Use only the supplied USB cable.
The LED display lights up completely for about 3 seconds, a beep sounds and the product checks the room temperature.
After that, the preset time 12:00 will appear on the LED display and you can set up the product.
Note:
The product takes a few minutes to adjust to the room temperature and display the exact room temperature.
Operation
Note:
If you do not press any button for approx. 15 seconds during manual setting, setting mode is exited. Entries that have already been made will be saved.
Quick setting
When setting numeric values, press and hold the + up button 5r the - down button on the product or the - button 20+ button on the infrared remote control to use the quick setting.
Infrared remote control
The infrared remote control has a range of approx. 3 - 5 m. Aim for the product you want to adjust.
Led display setting
Display
dP-1 - Changeover display: Time -> Date -> Temperature -> Time -> etc. dP-2 - Continuous display: Time
On the product
- Press the M-button 4 in the standard display. dP-1 or dP-2 will appear.
- Press the M button to switch between dP-1 or dP-2. The product will immediately return to the default display with your entry.
With the infrared remote control
- Press the DP-1/DP-2 button in the standard display 1dP-1 or dP-2 appears.
- Press the DP-1/DP-2 button, to switch between dP-1 and dP-2. The product will return to the default display with your entry.
Colour options
CL-n - 115 alternating colours
CL-1 - 1 permanent colour
On the product
- Press and hold the M-button in the standard display. CL-n flashes and can be switched between the colour variants CL-n and CL-1 (1 permanent colour) with the +-up button for the -down button .6
- Press the M-button to confirm your entry.
- Press the M -button repeatedly until you are back in the standard display, or wait about 15 seconds, and the product will return to the standard display.
With the infrared remote control
115 alternating colours
- Press the colour change button in the standard display to display a continuous change of the 115 colours.
1 permanent colour
- Press one of the seven colour selection buttons 24 in the standard display to display the colours continuously.
LED display brightness
You can dim the LED display twice.
On the product
- Press the + up button in the standard display to make the LED display one or two levels brighter.
With the infrared remote control
- Press the light/+ button in the standard display 27 to make the LED display dne or two levels brighter or darker.
Basic settings on the product
You can adjust the following settings:
Colour variant, year, month, day, 12/24 hour format, hours, minutes, weekend alarm, alarm 1, alarm 2, alarm 3, °C/°F unit, key tone.
- Press and hold the M-button in the standard display. CL-n flashes the colour and can be switched between the colour variants CL-n and CL-1 (1 permanent colour) with the+-up button 5r the - down button .6
| CL-n 1 | 15 alternating colours |
| CL-1 1 | permanent colourPress the M button and use the +upbutton 5or the - down button to select a colour from 115 colours. |
- Press the M-button to confirm the setting. 2023 the year blinks and can be set with the + up button 5 or the - down button .6
- Press the M-button to confirm the setting.
- Set the month, day, 12/24 hour format, hours and minutes in the same way.
- Press the M-button 4 to confirm the setting. -- EA the weekend alarm flashes and can be activated (ON) or deactivated (--) with the + up button 5r the - down button 6
- Press the M-button to confirm the setting. -- A1 the alarm 1 flashes and can be activated (ON) or de-activated (--) with the + up button for the - down button .6
| -- Alarm 1 is deactivated. |
| ON Alarm 1 is activated.Press the M-button , the4 hours flash and can be set with the + -up button 5r the --down button .6Press the M button to confirm the setting. The minutes flash and can be set with the + up button 5r the - down button 6. |
- Press the M button to confirm the setting.
- Set alarm 2 and alarm 3 in the same way.
- Press the M-button to confirm the setting. °C degrees Celsius of the temperature unit flashes and can be switched to °F degrees Fahrenheit with the + -up button or the -down button. 6
- Press the M-button 4 to confirm the setting. -- Sd button press sound off flashes and can be switched to ON Sd button sound on with the + up button or the - down button .6
- Press the M-button to confirm your entry. The product will return to the standard display or wait about 15 seconds.
Basic setting with the infrared remote control
You can adjust the following settings:
Colour variant, 12/24 hour format, hours, minutes, weekend alarm.
- Press the SET button in the standard display. CL-n flashes (115 colours alternating) and can be switched to CL-1 (1 permanent colour) with the button 20 orligh-t/+ button 27
| CL-n 1 | 15 alternating colours |
| CL-1 1 | permanent colourPress the SET-button and use the - button20the Light/+button to select a colour from 115 colours. |
- Press the SET button, to confirm the setting. 12-or 24h flashes and can be set with the --button 20thelight-/+ button 27
- Press the SET button, to confirm the setting.
- Set the hours and the minutes in the same way.
- Press the SET button, to confirm the setting. -- EA the weekend alarm flashes and can be activated (ON) or deactivated (--) with the - button of the Light-/+ button 27
- Press the SET button to confirm the setting. The product will return to the default display.
Setting alarms with alarm buttons
- Press the alarm 1 button . -281 the Alarm 1 flashes and can be activated (ON) or deactivated (--) by pressing the - button 20 the Light-/+ button . 27
| -- Alarm 1 is deactivated. | |
| ON • | Alarm 1 is activated.Press the SET button , the hours flash and can be set with the - button 20 the Light/+button 27Press the SET button to confirm the setting. The minutes flash and can be set with the - button 20 Light / + button . 27 |
- Press the SET button to confirm the setting. You can set alarm 2 and 3 in the same way with the alarm 2 button 1 or the alarm 3 button . 18
Switching off the alarm signal
The alarm signal sounds for approx. 2 minutes at the set time.
- Press any button except the RESET-button to15rn off the alarm signal.
The alarm feature does not have to be re-enabled. The alarm signal automatically switches on again the next day at the set time.
Display the 12/24-hour format
- Press the 12/24 hour button to display the time in 12 or 24 hour format.
Temperature indicator
- Press the temp button to display the temperature for a short time.
- In temperature mode, press the -button to20vitch between °C degrees Celsius and °F degrees Fahrenheit.
Display and set the date
- In the dP-2 continuous display (time), press the Date button 2a display the date.
- Press the Date button again to return to the default
display.
- Press the Date button in2be standard display to enter date mode.
- Press the SET button. The year 2023 flashes and can be set with the - button 20 the Light-/+ button 27.
- Press the SET button, , to confirm the setting.
- Set the month and day in the same way.
- Press the SET button to confirm your entry and return to the default display.
Button tone
- Press the mute button. The following appears --:Sd, the key tone is switched off.
- Press the mute button again to switch on the button tone ON:Scd.
Enable/disable LED lighting
- Press the ON/OFF button to turn the LED lighting on or off.
Reset to factory default (RESET)
Press the RESET-button 1All settings will be deleted and the product will restart.
Removal of the button cell from the product
Note:
- Disconnect the USB cable from the product before removing the button cell.
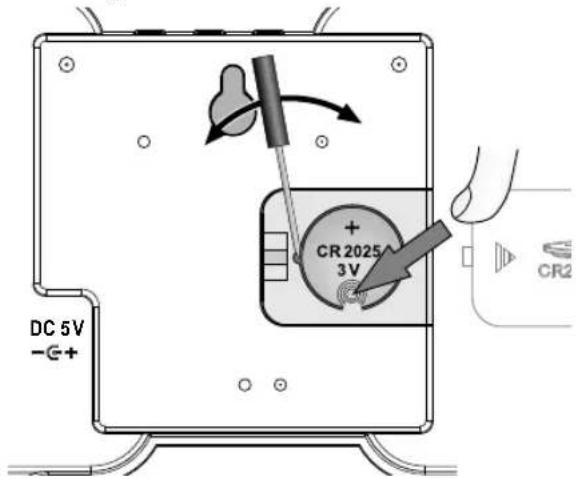
- Press the button cell loosely with your finger at the height of the button cell holder until it bends slightly.
DANGER! Mortal danger from electric shock!
Carefully pry out the button cell with a very thin, non-metallic tool, otherwise a short circuit may occur.
Troubleshooting
| Problem Solution | |
| No display • Check the USB cable. | |
| Incorrect display • Check the USB cable.• Check the setting. | |
Cleaning instructions
DANGER! Mortal danger from electric shock!
- Disconnect the USB cable from the product before cleaning the product.
- Remove the button cells from the product and the infrared remote control before cleaning.
- The product and the infrared remote control must not be exposed to moisture: avoid dripping and splashing water.
Improper cleaning can damage the product. Do not immer-se the product or the USB cable in water or other liquids. Avoid any aggressive cleaning agents, brushes with metal or nylon bristles, or any sharp or metallic cleaning objects such as knives, hard spatulas and the like. These can damage the surface. Clean the product with a soft, dry, lint-free cloth, such as that used for cleaning glasses lenses.
Storage
If the product is not used for a long time, remove the button cells and store the product and the infrared remote control, cleaned and protected from sunlight, in a dry, cool place, preferably in the original packaging.
Disposal
The product and packaging material are recyclable. Please dispose of them separately for better waste management. To learn options for disposal of the used product, please contact your municipal or city administration.

Check the labelling on the packaging material when separating waste - they are marked with abbreviations (a) and numbers (b) with the following meaning:
1-7: Plastics
20-22: paper and cardboard 80-98: Composites.

Disposal of the electrical device
The symbol with the crossed-out dustbin means that electrical and electronic equipment must not be disposed of together with household waste.
Consumers are legally obliged to dispose of electrical and electronic equipment at the end of their life separately from unsorted municipal waste.
This is to ensure environmentally friendly and resource-saving recycling. Batteries and rechargeable batteries that are not an integral part of the electrical or electronic device and can be removed without being destroyed, must be separated from the device before handing it in at a collection point for designated disposal. The same applies to lightbulbs that can be removed from the device without being destroying. Owners of electri-
cal and electronic equipment who are private individuals can hand them in at the collection points operated by the public waste disposal agencies or at the collection points set up by manufacturers or distributors. Returning used devices is free of charge. This free take-back obligation applies both to purchases in shops and to home deliveries. The place of performance of the obligation to take back is the same as the place of performance of the delivery. Transport costs may not be charged for returned equipment. In general, distributors have the obligation to ensure the free return of used devices by providing suitable return facilities within a reasonable distance. Consumers have the option to return an old device free of charge to a distributor who is obliged to take it back if they purchase an equivalent new device with essentially the same function. This option is also available for deliveries to a private household. In the case of distance selling retailers, the option of free collection when purchasing a new device is limited to heat exchangers, display screen devices, and large devices that have at least one outer edge with a length of more than 50 cm. The distributor must ask the consumer at the time of concluding the sales contract about any corresponding intention to return the product. Beyond this, consumers can hand in up to three old devices of one type free of charge at a distributor's collection point without this being linked to the purchase of a new device. However, the edge lengths of the respective devices must not exceed 25 cm.
Remove the battery without destroying it before disposal and dispose of it separately (see Disposal of batteries).
Disposal of batteries
This symbol indicates that batteries and rechargeable batteries must not be disposed of with normal household waste. You are legally obliged to hand them in free of charge at the end of their service life at a public collection point of collection points set up by distributors for recycl

Batteries and rechargeable batteries that are not firmly enclosed by the device and can be removed non-destructively must be separated and disposed of as intended when discharged. Recycling waste equipment and batteries is an important contribution to the protection of our environment. If disposed of improperly, toxic ingredients that have harmful effects on the health of humans, animals and plants can enter the environment.
Below are some best practices and recommendations to extend the life of your single-use or rechargeable batteries and allow them to be reused:
- Charge your rechargeable batteries correctly and completely to maximize their life. If necessary, completely discharge them with a suitable charger before recharging them.
- Consider the possibility of using rechargeable batteries. These can be reused and recharged several times, reducing the amount of battery waste.
- Always use the correct type of batteries for your devices. Improper use can shorten the lifespan of the batteries and potentially have harmful effects.
Always follow the safety instructions when handling
used batteries. Used batteries containing lithium (Li = lithium) have a higher risk of fire. Therefore, special attention must be paid to the proper disposal of used batteries and rechargeable batteries containing lithium. Incorrect disposal can also lead to internal and external short circuits due to thermal effects (heat) or mechanical damage. A short circuit can lead to a fire or an explosion and can have serious consequences for humans and the environment. To avoid a short circuit, tape off the poles or contacts of the battery before disposal.
Simplified EU declaration of conformity
Digi-tech gmbh hereby declares that the LED wall and desk clock 4-LD6915 complies with directives RoHS 2011/65/EU, EMC 2014/30/EU and the Battery Regulation 2023/1542/EU.

You can download your operating instructions and declaration of conformity here:
www.digi-tech-gmbh.com/downloads Then click on the magnifying glass and enter the article number 480208_2410.
The digi-tech gmbh warranty
This device has a 3-year warranty valid from the date of purchase. In the event of defects in this device, you have legal rights against the seller of the device. These statutory rights are not limited by our warranty set out below.
Warranty terms
The warranty period begins on the date of purchase. Please keep the receipt. This document is required as proof of purchase. If a material or manufacturing defect occurs within three years of the date of purchase of this device, the device will be repaired or replaced – at our discretion – by us free of charge. This warranty requires that the defective device and the purchase receipt are presented within the three-year period with a briefly written statement stating the nature of the defect and when it occurred. If the defect is covered by our warranty, you will receive the repaired or a new device back. No new warranty period begins with the repair or replacement of the device.
Warranty period and statutory claims for defects
Statutory warranty rights do not extend the warranty period. This also applies to replaced and repaired parts. Any damage or defects already present at the time of purchase must be reported immediately after unpacking. After the warranty has expired, any repairs are subject to a charge.
Scope of Warranty
The device was carefully manufactured according to strict quality guidelines and carefully checked before delivery. The warranty applies to material or manufacturing defects. This warranty does not cover parts of the product that are subject to normal wear and tear and can therefore be regarded as wear parts or for damage to fragile parts, e.g. switches, batteries or parts made of glass. This warranty is void if the unit has been damaged or improperly used or maintained. For proper use of the device, all instructions given in the manual must be strictly observed. Uses and actions that are advised against or warned against in the operating
instructions must be avoided at all costs. The device is designed exclusively for private and not for commercial use. The warranty expires in the event of abusive or improper handling, the use of force or repairs that were not carried out by our authorised service branch.
Processing in the event of a warranty claim
To ensure that your request is processed quickly, please follow the instructions below:
- For all inquiries, please have the receipt and item number (480208_2410) ready as proof of purchase.
- Please refer to the type plate, engraving, title page of your manual (bottom left) or to the sticker on the back or underside for the item number.
- If functional errors or other defects occur, first contact the following service department by phone or email.

You can download these instructions and many other manuals, product videos and software at www.lidl-service.com.
This QR code takes you directly to the Lidl service page (www.lidl-service.com) and you can open your user manual by entering the item number (480208_2410).
Service
Inter-Quartz GmbH, Valterweg 27A, 65817 Eppstein, GERMANY
Email: support@inter-quartz.de
Telephone: +49 (0)6198 571825

GB IE00800 5515 6616
CY 8009 4403 800 62851

Supplier
Please note that the following address is not a service address. Contact the Service Office named above first.
digi-tech gmbh, Valterweg 27A, 65817 Eppstein, GERMANY


Year of manufacturing: 2024
IAN 480208_2410, Item No.: 4-LD6915
Producent: Manufactured by
LTD Tianqiu Industrial Park, Xinji
Industrial Zone. Machong, Dong-
guan, Guangdong, P. R. China
WAARSCHUWING! Levensgevaar!
www.digi-tech-gmbh.com/downloads
Producent: Manufactured by
LTD Tianqiu Industrial Park, Xinji
Industrial Zone. Machong, Dong-
guan, Guangdong, P. R. Chiny
www.digi-tech-gmbh.com/downloads
Výrobce: Manufactured by
LTD Tianqiu Industrial Park, Xinji
Industrial Zone. Machong, Dong-
guan, Guangdong, P. R. Čína
Výrobca: Manufactured by
LTD Tianqiu Industrial Park, Xinji
Industrial Zone. Machong, Dong-
guan, Guangdong, P. R. Čína
Dongguan Tianqiu Enterprise CO
LTD Tianqiu Industrial Park, Xinji
Industrial Zone. Machong, Dong-
guan, Guangdong, P. R. China
www.digi-tech-gmbh.com/downloads
LTD Tianqiu Industrial Park, Xinji
Industrial Zone. Machong, Dong-
guan, Guangdong, P. R. Kina
www.digi-tech-gmbh.com/downloads
Klik derefter på forstørrelsesglasset og indtast artikelnummeret 480208_2410.
Produttore: Manufactured by
Orario -> Data -> Temperatura -> Orario -> ecc.
Gyártó: Manufactured by
LTD Tianqiu Industrial Park, Xinji
Industrial Zone. Machong, Dong-
guan, Guangdong, P. R. Kína
www.digi-tech-gmbh.com/downloads


- LED-WAND- UND TISCHUHR HORLOGE MURALE ET DE TABLE À LED LED WALL & DESK CLOCK
- GB|IE|NI|CY|MT Operating and safety instructions
- Table of Contents
- LED WALL & DESK CLOCK
- Introduction
- Intended use
- Package contents
- Technical specifications
- LED wall and desk clock
- Infrared remote control
- Information on button cells CR2025, 3 V
- Important safety instructions
- WARNING! Danger of death and accidents for toddlers and children!
- Battery safety information
- WARNING! Danger of death!
- Risk of battery/rechargeable battery leakage
- CAUTION! Risk of injury!
- ATTENTION: Risk of damage of the product!
- Safety instructions for the USB cable
- DANGER! Mortal danger from electric shock!
- RISK! Damage to the product!
- Hang or place the product securely
- Display and controls
- Product
- Setup
- Note:
- Operation
- Quick setting
- Led display setting
- Display
- On the product
- With the infrared remote control
- Colour options
- alternating colours
- permanent colour
- LED display brightness
- Basic settings on the product
- Basic setting with the infrared remote control
- Setting alarms with alarm buttons
- Switching off the alarm signal
- Display the 12/24-hour format
- Temperature indicator
- Display and set the date
- Button tone
- Enable/disable LED lighting
- Reset to factory default (RESET)
- Removal of the button cell from the product
- Troubleshooting
- Cleaning instructions
- Storage
- Disposal
- 1-7: Plastics
- Disposal of the electrical device
- Disposal of batteries
- Simplified EU declaration of conformity
- The digi-tech gmbh warranty
- Warranty terms
- Warranty period and statutory claims for defects
- Scope of Warranty
- Processing in the event of a warranty claim
- Service
- Supplier
- WAARSCHUWING! Levensgevaar!
Brand : AURIOL
Model : 4LD6052
Category : Clock