USER MANUAL PWS 20 C2 PARKSIDE
Translation of the original instructions
NL BE
Natte zuiger
Before reading, unfold the page containing the illustrations and familiarise yourself with all functions of the device.
FR BE
GB / MT Translation of the original instructions Page
Intended purpose. 17
General description 18
Extent of the delivery 18
Overview. 18
Description of operation. 18
Technical data. 19
Symbols and icons 19
Symbols used in the instructions 19
Symbols on the appliance 19
Pictograms regarding the use of nozzles and filters. 19
Safety information 20
Assembly 21
Operation 22
Switching on/off 22
Washer function 22
Breaks 22
Dry vacuuming 22
Wet suctioning. 23
Carpet cleaning 23
Cleaning/Maintenance 24
General Cleaning Work 24
Maintenance 24
Storage. 24
Disposal/
Environmental protection .24
Trouble shooting 25
Replacement parts/Accessories..26
Guarantee 27
Repair Service. 28
Service-Center 28
Importer 28
Translation of the original
EC declaration of conformity.....158
Exploded Drawing 169
Introduction
Congratulations on the purchase of your new device. With it, you have chosen a high quality appliance.
During production, this equipment has been checked for quality and subjected to a final inspection. The functionality of your equipment is therefore guaranteed. In some cases, residual amounts of water may be present on or in the device or in hose lines. This is not a flaw or a defect and is no cause for concern.
The operating instructions constitute part of this appliance. They contain important information on safety, use and disposal. Before using the appliance, familiarise yourself with all of the operating and safety instructions. Use the appliance only as described and for the applications specified. Keep this manual safely and in the event that the appliance is passed on, hand over all documents to the third party.
Intended purpose
The appliance is intended as a carpet cleaner. The appliance can also be used as a wet and dry vacuum cleaner in residential applications, e.g. in the home, hobby room, car or garage, or for suctioning up water. This equipment is not suitable for commercial use. Commercial use will invalidate the guarantee. Vacuuming of flammable or explosive materials or those which endanger health is prohibited. The manufacturer will not be held responsible for injuries resulting from use which does not comply with the directions, or from incorrect use.
General description
The illustration of the principal functioning parts can be found on the front and back foldout pages.
Extent of the delivery
Carefully unpack the appliance and check that it is complete:
The appliance is supplied with the motor head fitted (A 4). To remove the motor head, open the fastening clips (A 6).

4 Motor head Container
8 4 castors with accessory holders
11 Foam filter
12 Paper filter bag
14 Suction pipe (2 parts)
16 Suction hose
20 Floor nozzle
21 Crevice nozzle
22 Upholstery nozzle
23 Washer nozzle for cleaning upholstery
24 Washer nozzle with attachment for hard surfaces
25 Carpet and upholstery cleaner (100 ml)
- Instruction Manual
Dispose of the packaging material correctly.
Overview

Housing
Carrying handle (not visible)
2 On/Off switch
3 Pump switch
4 Motor head with filter basket (4a)
5 Water duct connector
6 Fastening clip 7 Container
8 4 castors with accessory holders (8a)
9 Mains connection cable
10 Suction connector
Filters
11 Foam filter for wet su
12 Paper filter bag to va
coarse dirt
Accessories
13 Water duct at the suction pipe 13a Release
14 Suction pipe
15 Handle with air regulation
15a Lever for spray function
16 Suction hose
17 Water duct at the suction hose 18 Notch
19 Water tank
19a Water tank lid
Nozzles
20 Floor nozzle
21 Crevice nozzle
22 Upholstery nozzle
23 Washer nozzle for cleaning upholstery
24 Washer nozzle with attachment for hard surfaces
25 Carpet and upholstery cleaner (100 ml)
D 26 Drain plug
Description of operation
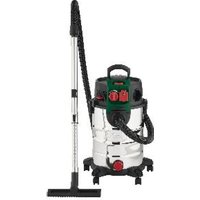
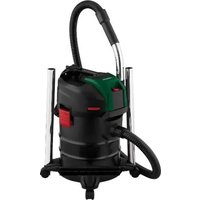
The carpet cleaner is equipped with a stable stainless steel container for collecting dirt and a separate water container for the washer function. The castors provide good manoeuvrability of the appliance. The suc
tion flow is switched off by a float during wet vacuuming once the waste tank is full. The following describes the function of the operating parts.
Technical data
Carpet Cleaner.. PWS 20 C2
Mains voltage (U) ..220-240V\~,50/60Hz
Power consumption of motor (P) ...1600 W
Suction power . . . . . . . . . . . . . . . . . . . . . . . . . . . . . . . . . . . . . . . . . . . . . . . . . . . . . . . . . . . . . . . .
Spray pressure (p) .. ..2 bar (200 kPa)
Fluid quantity (Q) .. ..1 l/min
Protection class... II (Double insulation)
Protection type. IPX4
Cable length. ..7,5 m
Waste tank capacity (gross).. 20 I
usable container volume (water).. 11 I
Water tank content (gross).. 4 I
Weight (incl. all
accessories)...approx.8.5 kg
Sound pressure level
(LpA) .. ..79 dB(A); K pA=3 dB
Symbols and icons
Symbols used in the instructions

Read the operating instructions carefully.

Hazard symbols with information on prevention of personal injury and property damage.

Precaution symbol with information on prevention of harm / damage.

Pull out the mains plug.

Connect the machine to the power supply.

Notice symbol with information on how to handle the device properly.
Symbols on the appliance
Electrical machines must not be disposed of with household refuse.

Protection class (Double insulation)

Turn the drain plug in the direction of the arrow to open
Pictograms regarding the use of nozzles and filters

Nozzle to vacuum carpets.

Nozzle to vacuum smooth surfaces and hard floor surfaces.

Nozzle to vacuum dust and dirt from joints and cracks.

Specific nozzle to vacuum cushions and mattresses.

To absorb liquids.

Not suitable to absorb liquids.

To absorb dry dirt from the house, garage and workshop.

To absorb fine dust e.g. stone dust or wood dust.

Caution! When using power tools, observe the following basic safety measures for the prevention of electric shocks and the risk of injury and fire:
To avoid accidents and injuries:
- This device is not intended for use by children, individuals with limited physical, sensory or mental capabilities, those with insufficient experience or knowledge or individuals who are not familiar with the instructions. Children should be supervised to ensure that they do not play with the device. Cleaning and maintenance must not be carried out by children.
The device must not be used at altitudes over 2000m
-
Never let children or persons who are not familiar with these instructions use the machine. Local regulations may restrict the age of the operator.
-
Never leave a machine which is ready for operation unattended at the workplace.
- People and animals must not be vacuumed with the machine.
- Do not vacuum any hot, incandescent, flammable, explosive materials, or those which endanger health. This includes hot ashes, petrol, solvents, acids or caustic solutions. Personal injury could occur.
- Nozzles and suction tubes must not reach head level whilst in use. Personal injury could occur.
To avoid accidents and injuries from electric shocks:
- Ensure that the mains cable is not damaged by being pulled over sharp edges, by jamming, or by pulling on the cable.
- Before each use, check the power supply lead and the extension cable for damage and ageing. Do not use the equipment if the cable is damaged or worn. Danger of electric shock hazard.
- If the power cable for this equipment is damaged, it must be replaced by the manufacturer, a customer service agent of the same or a similarly qualified person in order to prevent hazards.
- Switch the machine off and disconnect the mains plug:
- when the machine is not in use,
-
before the machine is opened up,
-
for all maintenance and cleaning work.
-
if the connecting cable is damaged or tangled up.
-
Never use the mains lead to pull the plug out of the socket or to pull the appliance. Protect the cable from heat, oil, and sharp edges.
Make sure that the mains voltage corresponds with the information on the rating plate.
- Only plug the appliance into a socket which is safeguarded.
The device must only be connected to a mains socket via a residual-current circuit breaker (RCD) with a rated leakage current of not more than 30mA .
- Do not expose the unit to rain

CAUTION! The following states how damage to the appliance and possible injury to people can be avoided:
- Ensure that the machine is correctly assembled and the filters are in the correct position.
- Do not use without the filter. This could damage the machine.
-
Only use replacement parts and accessories delivered and recommended by our Service Centre. The use of parts by other manufacturers immediately renders the guarantee void.
-
Only have repairs carried out at our authorised customer service points.
- Observe the instructions for cleaning and maintenance of the machine.
- Store the appliance in a dry place and out of reach of children.

Assembly

Pull out the mains plug. Danger of electric shock.
-
Attach the castors (8) with accessory holders (8a) to the underside of the container (7).
-
Place the motor housing (4) on top of the container (7) and close it with the clips (6).
The motor head (4) can only be placed in one position on the container (7). The air flow control (3) and the device socket (11) must be above the suction connection (10). The water duct connector (5) must be above the suction connector (10).
-
Installing the accessories:
-
Push the vacuum hose (16) into the suction connection (10) until it locks in place.
To remove it, press the catch (18) and pull the vacuum hose (16).
- Press the water duct button on the suction hose (17) and slide it onto the water duct connector (5).
- Press the water tank (19) into the holders on the back of the motor head (4) and the container (7).
- Assemble the suction pipes (14).
Make sure to connect the water channels (13 + 17) correctly. To disas
semble the suction pipes, press the release (13a) on the water duct and pull the suction pipes apart.
- Install the nozzle (A 20-24) desired.
Never vacuum without a filter!

The nozzles (20-24) can be attached directly onto the handle with air regulation (15).
Operation

Fully unwind the suction hose (A 16) before commencing work.
Switching on/off

Connect the mains plug.
Switching on the vacuum cleaner (Permanent operation):
Move the On/Off switch (2) to the "1" position.
Switching off the vacuum cleaner: Move the On/Off switch (2) to the "0" position.
Washer function
Switching on the washer function
- Turn the appliance on (On/Off switch).
- Move the pump switch (3) to position "1".
Switching off the washer function
- Move the pump switch (3) to position "0".
- Turn the appliance off (see Switching on/off).

Breaks
If you want to store away the assembled suction equipment when you take a break, you can plug the suction pipe into the accessory holders (8a) on the castors.

Dry vacuuming
Vacuuming with the paper filter bag:

To avoid the fluted filter becoming clogged, we recommend the additional use of a paper filter bag (brown).
- Fold the side flaps on the paper filter bag (12) down on the perforation.
- Unfold the paper filter bag (12) completely and invert it over the internal suction fitting of the suction connection (10). The sealing ring on the filter bag opening must completely enclosed the arm on the suction nozzle.

A fine dirt filter bag made of micro filter fleece is also optionally available, which can be used in place of the included paper filter bag (see "Replacement parts/Accessories").
Vacuuming fine dust:
Certain suction processes (e.g. sanding paints and varnishes, drilling walls, grinding or drilling hard wood) can pose a risk due to hazardous dust.
We recommend using the following optional filter combination, which is available, for fine dust (see "Spare parts/Accessories"):
- Fine dust filter bag made of fleece (optionally available see "Replacement parts/Accessories"), which is used in stead of the paper filter bag (12) included in the scope of delivery.

Wet suctioning

For wet suctioning, always attach the water tank (A 19).
-
For wet suctioning, place the foam filter (11) onto the filter basket (4a). To prevent the foam filter (11) from tearing,
-
Only insert dry filters;
Before inserting, twist the edge of the filter slightly and then roll it back.
-
Suctioning up (draining): Place the suction hose (16) on the handle part (15) into the water tank and suction up the water.
- Empty the dirt container immediately after vacuuming, as it is not designed to store liquids (see "Cleaning/Maintenance").

Never reach into the water to be suctioned up. Danger of electric shock.

When the container (7) is full, the suction opening is shut off by a float, and suction is then cut off. Switch the device off, remove the water tank (B 19) and the motor head (4) and empty the container (7). Afterwards, make sure to re-assemble the device completely.

If the container is full, a float closes the suction opening and the suction is interrupted.
- Turn off the device.
-
Empty the container (7) by
-
removing the water tank (B 19) and the motor head (4) and tipping out the container (7),
or
- opening the drain plug (26) and letting the container (7) run empty.

draining in this way, make sure that no liquids remain in the device. Tip the contain slightly when only a small t of liquid runs out.
Afterwards, make sure to re-assemble the device completely.

If foam or liquid exits, switch off the machine immediately.

Carpet cleaning

For carpet cleaning, only use the washer nozzle with the attachment for hard surfaces (24) or the washer nozzle for cleaning upholstery (A 23).
- Place the foam filter (11) onto the filter basket (4a). To prevent the foam filter (11) from tearing,
-Only insert dry filters;
Before inserting, twist the edge of the filter slightly and then roll it back.
-
Fill the water tank (B 19) with fresh water (max. 4 l). Pay attention to the markings on the container (A 19).
-
Pull (do not push!) the nozzle (A 23/24) in rows over the carpet/ upholstery.
Overlap the rows a bit to ensure thorough cleaning.
GB MT
- Press the lever for the spray function (15a) on the handle part to turn on the spray function.
- Empty the container (7) immediately after vacuuming, as it is not designed to store liquids (see "Cleaning/Maintenance").

In case of excessive dirt or stains, add some cleaning agent, e.g. carpet and upholstery cleaner (A 25), to the water tank.
Cleaning/Maintenance

Pull out the mains plug. Danger of electric shock.
General Cleaning Work

Never hose the appliance down with water. Never use aggressive cleaning agents or solvents. This could damage the appliance.
- Remove the water tank (A 19) and empty the container (A 7) after use.
- Clean the container (Z) with a damp cloth.
- Wash the foam filter (11) with warm water and soap and let it dry.
- Rinse the water channels ( A 13+17) with fresh water.
- Replace the paper filter bag (A 12) when full (see "Replacement parts/Accessories" for reordering).
After finishing the cleaning work, reinstall the motor head (A 4) and the water tank (A 19).
Always check the appliance before use for any obvious faults such as a defective mains cable, and have these repaired or replaced.
Maintenance
The device is maintenance free.

Storage
- Wind up the mains connection cable (9) and hang it on the hook on the motor head (4).
- Wind the vacuum hose (16) around the motor head (4).
- The accessory holders (8a) on the castors (8) are used to store the suction pipes and the smaller accessories.
- Store the appliance in a dry place (recommended ambient temperature 15 - 30^) and out of reach of children.
Disposal/Environmental protection
Be environmentally friendly. Return the tool, accessories and packaging to a recycling centre when you have finished with them.
Machines must not be disposed of with household refuse.
In accordance with the Directive 2012/19/EU on waste electrical and electronic equipment, used electrical devices must be collected separately for disposal and recycled in an environmentally sound manner.
Depending on the implementation in national law, you may have the following options:
- Return to a shop,
-
Hand over to an official collection point. For more information, please contact your local waste management provider or our service centre.
-
Return to the manufacturer/distributor. We will dispose of any defective devices that you send to us free of charge. This does not affect accessories enclosed with the old devices or tools without any electrical components.
Hand the device in to a recycling point. The plastic and metal parts used on your device can be properly sorted according to materials and grades and efficiently recycled. Please contact our service centre for more information.

Trouble shooting
| Problem Possible cause Fault correction | |
| Device does not start | Mains voltage is not present | Check plug socket, cable, line, plug and fuse, where appropriate, repair through electrical specialist |
| Defective on/off switch (2) | Repair through customer service |
| Worn carbon brushes |
| Defective motor |
| Low or lack of suction | Suction hose (16) or nozzle (20-24) blocked | Remove obstructions and block-ages |
| Air control on the handle (15) open | Close the air control |
| Container (7) open Close container |
| Container (7) full Empty container |
| Filter (11/12) full or clogged | Empty, clean or replace filter |
| Float in the filter basket (D 4a) cannot move | Release float |
| Float in the filter basket (D 4a) faulty | Repair by Customer Care |
| Float does not switch the appliance off | Float in the filter basket (D 4a) cannot move | Release float |
| Float in the filter basket (4a) faulty | Repair by Customer Care |
| Dust or dirt is blow out of the device | Filter (11/12) is not or not correctly assembled | Use missing filters or check the correct position of the filter |
Replacement parts/Accessories
If you have issues ordering, please use the contact form.
If you have any other questions, contact the "Service-Center" (see page 28).
Item Item Description Use Product No.
Instruction Exploded
Manual Drawing
| A 6 | 18-20 | 2 Fastening clips | | |
| A 7 | 23-36 | Container | | |
| A 8 | 35+36 | Castors with accessory holders, 4 piece | | 91105810 |
| A 11 | 93 | Foam filter | 91105707 | |
| A 13+14 | 66-72 | Suction pipe with water duct | | 91105813 |
| A 16 | 73-86 | Suction hose | | 91105823 |
| A 19 | 58-62 | Water tank | | 91105822 |
| A 20 | 88 | Floor nozzle | | 91105815 |
| A 21 | 90 | Crevice nozzle | | 91105818 |
| A 22 | 89 | Upholstery nozzle | | 91105819 |
| A 23 | 91 | Washer nozzle for cleaning upholstery | | 91105817 |
| A 24 | 92 | Washer nozzle with attachment for hard surfaces | | 91105816 |
| A 12 | 94 | Paper filter bags, 20 l, pack of 5 | | 91105830 |
| | Fine dust filter bag, 20 l, pack of 5 | | 30250111 |
| A 25 | | Carpet and upholstery cleaner | | 30990030 |
| D 26 | | Drain plug | | 91103985 |
Guarantee
Dear Customer,
This equipment is provided with a 3-year guarantee from the date of purchase.
In case of defects, you have statutory rights against the seller of the product. These statutory rights are not restricted by our guarantee presented below.
Terms of Guarantee
The term of the guarantee begins on the date of purchase. Please retain the original receipt. This document is required as proof of purchase.
If a material or manufacturing defect occurs within three years of the date of purchase of this product, we will repair or replace - at our choice - the product for you free of charge. This guarantee requires the defective equipment and proof of purchase to be presented within the three-year period with a brief written description of what constitutes the defect and when it occurred.
If the defect is covered by our guarantee, you will receive either the repaired product or a new product. No new guarantee period begins on repair or replacement of the product.
Guarantee Period and Statutory Claims for Defects
The guarantee period is not extended by the guarantee service. This also applies for replaced or repaired parts. Any damages and defects already present at the time of purchase must be reported immediately after unpacking. Repairs arising after expiry of the guarantee period are chargeable.
Guarantee Cover
The equipment has been carefully produced in accordance with strict quality
guidelines and conscientiously checked prior to delivery.
The guarantee applies for all material and manufacturing defects. This guarantee does not extend to cover product parts that are subject to normal wear and may therefore be considered as wearing parts (e.g. Filters or attachments) or to cover damage to breakable parts (e.g. switches).
This guarantee shall be invalid if the product has been damaged, used incorrectly or not maintained. Precise adherence to all of the instructions specified in the operating manual is required for proper use of the product. Intended uses and actions against which the operating manual advises or warns must be categorically avoided.
The product is designed only for private and not commercial use. The guarantee will be invalidated in case of misuse or improper handling, use of force, or interventions not undertaken by our authorised service branch.
Processing in Case of Guarantee
To ensure efficient handling of your query, please follow the directions below:
-
Please have the receipt and identification number (IAN 377366_2110) ready as proof of purchase for all enquiries.
-
Please find the item number on the rating plate.
-
Should functional errors or other defects occur, please initially contact the service department specified below by telephone or by e-mail. You will then receive further information on the processing of your complaint.
After consultation with our customer service, a product recorded as defective can be sent postage paid to the service address communicated to you,
with the proof of purchase (receipt) and specification of what constitutes the defect and when it occurred. In order to avoid acceptance problems and additional costs, please be sure to use only the address communicated to you. Ensure that the consignment is not sent carriage forward or by bulky goods, express or other special freight. Please send the equipment inc. all accessories supplied at the time of purchase and ensure adequate, safe transport packaging.
Repair Service
For a charge, repairs not covered by the guarantee can be carried out by our service branch, which will be happy to issue a cost estimate for you. We can handle only equipment that has been sent with adequate packaging and postage.
Attention: Please send your equipment to our service branch in clean condition and with an indication of the defect. Equipment sent carriage forward or by bulky goods, express or other special freight will not be accepted. We will dispose of your defective devices free of charge when you send them to us.
Service-Center
GB Service Great Britain
Tel.: 0800 4047 657
E-Mail: grizzly@lidl.co.uk
IAN 377366_2110
MT Assistenza Malta
Tel.: 80062230
E-Mail: grizzly@lidl.com.mt
IAN 377366_2110
Importer
Please note that the following address is not a service address. Please initially contact the service centre specified above.
Garantie - France. 40
Inschakelen zuiger (Continue working):
Do wchfaniania plynow.

Pooblasceni serviser:
Tel.: 080080917
E-Mail: grizzlyy@lidl.si
(Birotehnika, Hodošček Renata s.p., Lendavska ULICA 23, 9000 Murska Sobota)
Garancijski list
| Translation of the original
EC declaration of conformity |
| We hereby confirm that the
Carpet Cleaner
model PWS 20 C2
Serial number
000001 - 430000
conforms with the following applicable relevant version of the EU guidelines: |
| 2014/35/EU • 2014/30/EU • 2011/65/EU* & 2015/863/EU |
| In order to guarantee consistency, the following harmonised standards as well as natio-
nal standards and stipulations have been applied: |
| EN 60335-1:2012/A15:2021 • EN 60335-2-2:2010/A1:2013 • EN 62233:2008
EN 55014-1:2017/A11:2020 • EN IEC 55014-1:2021 • EN IEC 55014-2:2021
EN 55014-2:2015 • EN IEC 61000-3-2:2019/A1:2021 • EN 61000-3-3:2013
EN 61000-3-3:2013/A1:2019 • EN 61000-3-2:2014 • EN 50564:2011
EN IEC 63000:2018 |
| This declaration of conformity (22)** is issued under the sole responsibility of the manuf-
acturer: |
| CE Grizzly Tools GmbH & Co. KG
Stockstädter Straße 20
63762 Großbostheim
GERMANY
10.04.2022 | Christian Frank
Documentation Representative |
- The object of the declaration described above satisfies the provisions of Directive 2011/65/EU of the European Parliament and the Council of 8 June 2011 on limiting the use of certain harmful substances in electrical and electronic appliances.
** The last two digits of the year in which the CE marking was affixed.