GRIT GI 75 2H - Grinder Fein - Free user manual and instructions
Find the device manual for free GRIT GI 75 2H Fein in PDF.
| Product Type | Belt Grinder |
| Brand | Fein |
| Model | GRIT GI 75 2H |
| Power Supply | Three-phase (3~), 400 V, 50 Hz |
| No-load speed | 3000 rpm (adjustable on 2H models) |
| Weight | Approx. 70 kg |
| Main functions | Grinding of metals (except magnesium), deburring with optional modules |
| Application | Flat surfaces, chamfering, tube grinding |
| Optional accessories | GIR module, GIC module, GIL adapter, GIM base |
| Commissioning | Check rotation direction, center the belt, adjust guards |
| Adjustments | Inclination, spark guard, grinding support, stop |
| Safety | Emergency stop, protective covers, spark protection, overload shutdown |
| Noise level | Up to 94 dB(A) under load |
| Daily maintenance | Clean ventilation slots, lubricate marked points, empty chip tray after cooling |
| User-replaceable parts | Abrasive belt, protective screen |
| Repairs | By FEIN customer service or authorized workshop |
| Warranty | In accordance with legal regulations, FEIN manufacturer warranty |
| Environmental protection | Recycling of packaging, accessories, and device at end of life |
Frequently Asked Questions - GRIT GI 75 2H Fein
User questions about GRIT GI 75 2H Fein
0 question about this device. Answer the ones you know or ask your own.
Ask a new question about this device
Download the instructions for your Grinder in PDF format for free! Find your manual GRIT GI 75 2H - Fein and take your electronic device back in hand. On this page are published all the documents necessary for the use of your device. GRIT GI 75 2H by Fein.
USER MANUAL GRIT GI 75 2H Fein
The machine may only be operated by specialised personnel or instructed persons.
fr
Utilisation prévue.
HcnoJb30BaHHe no Ha3NaYeHHIO.
K pa6ote c MaunHoi dOnyckaeTcra TOnbKO KBaHnΦnUropoBaHHbI nepcoHaJI nn IIna, npOweAWe IHCTpykTaxK.
zh(CM)
预期用途。
机器只能由合格人员或受训人员操作。


7
Translation of the Original Instructions.
Symbols, abbreviations and terms used.
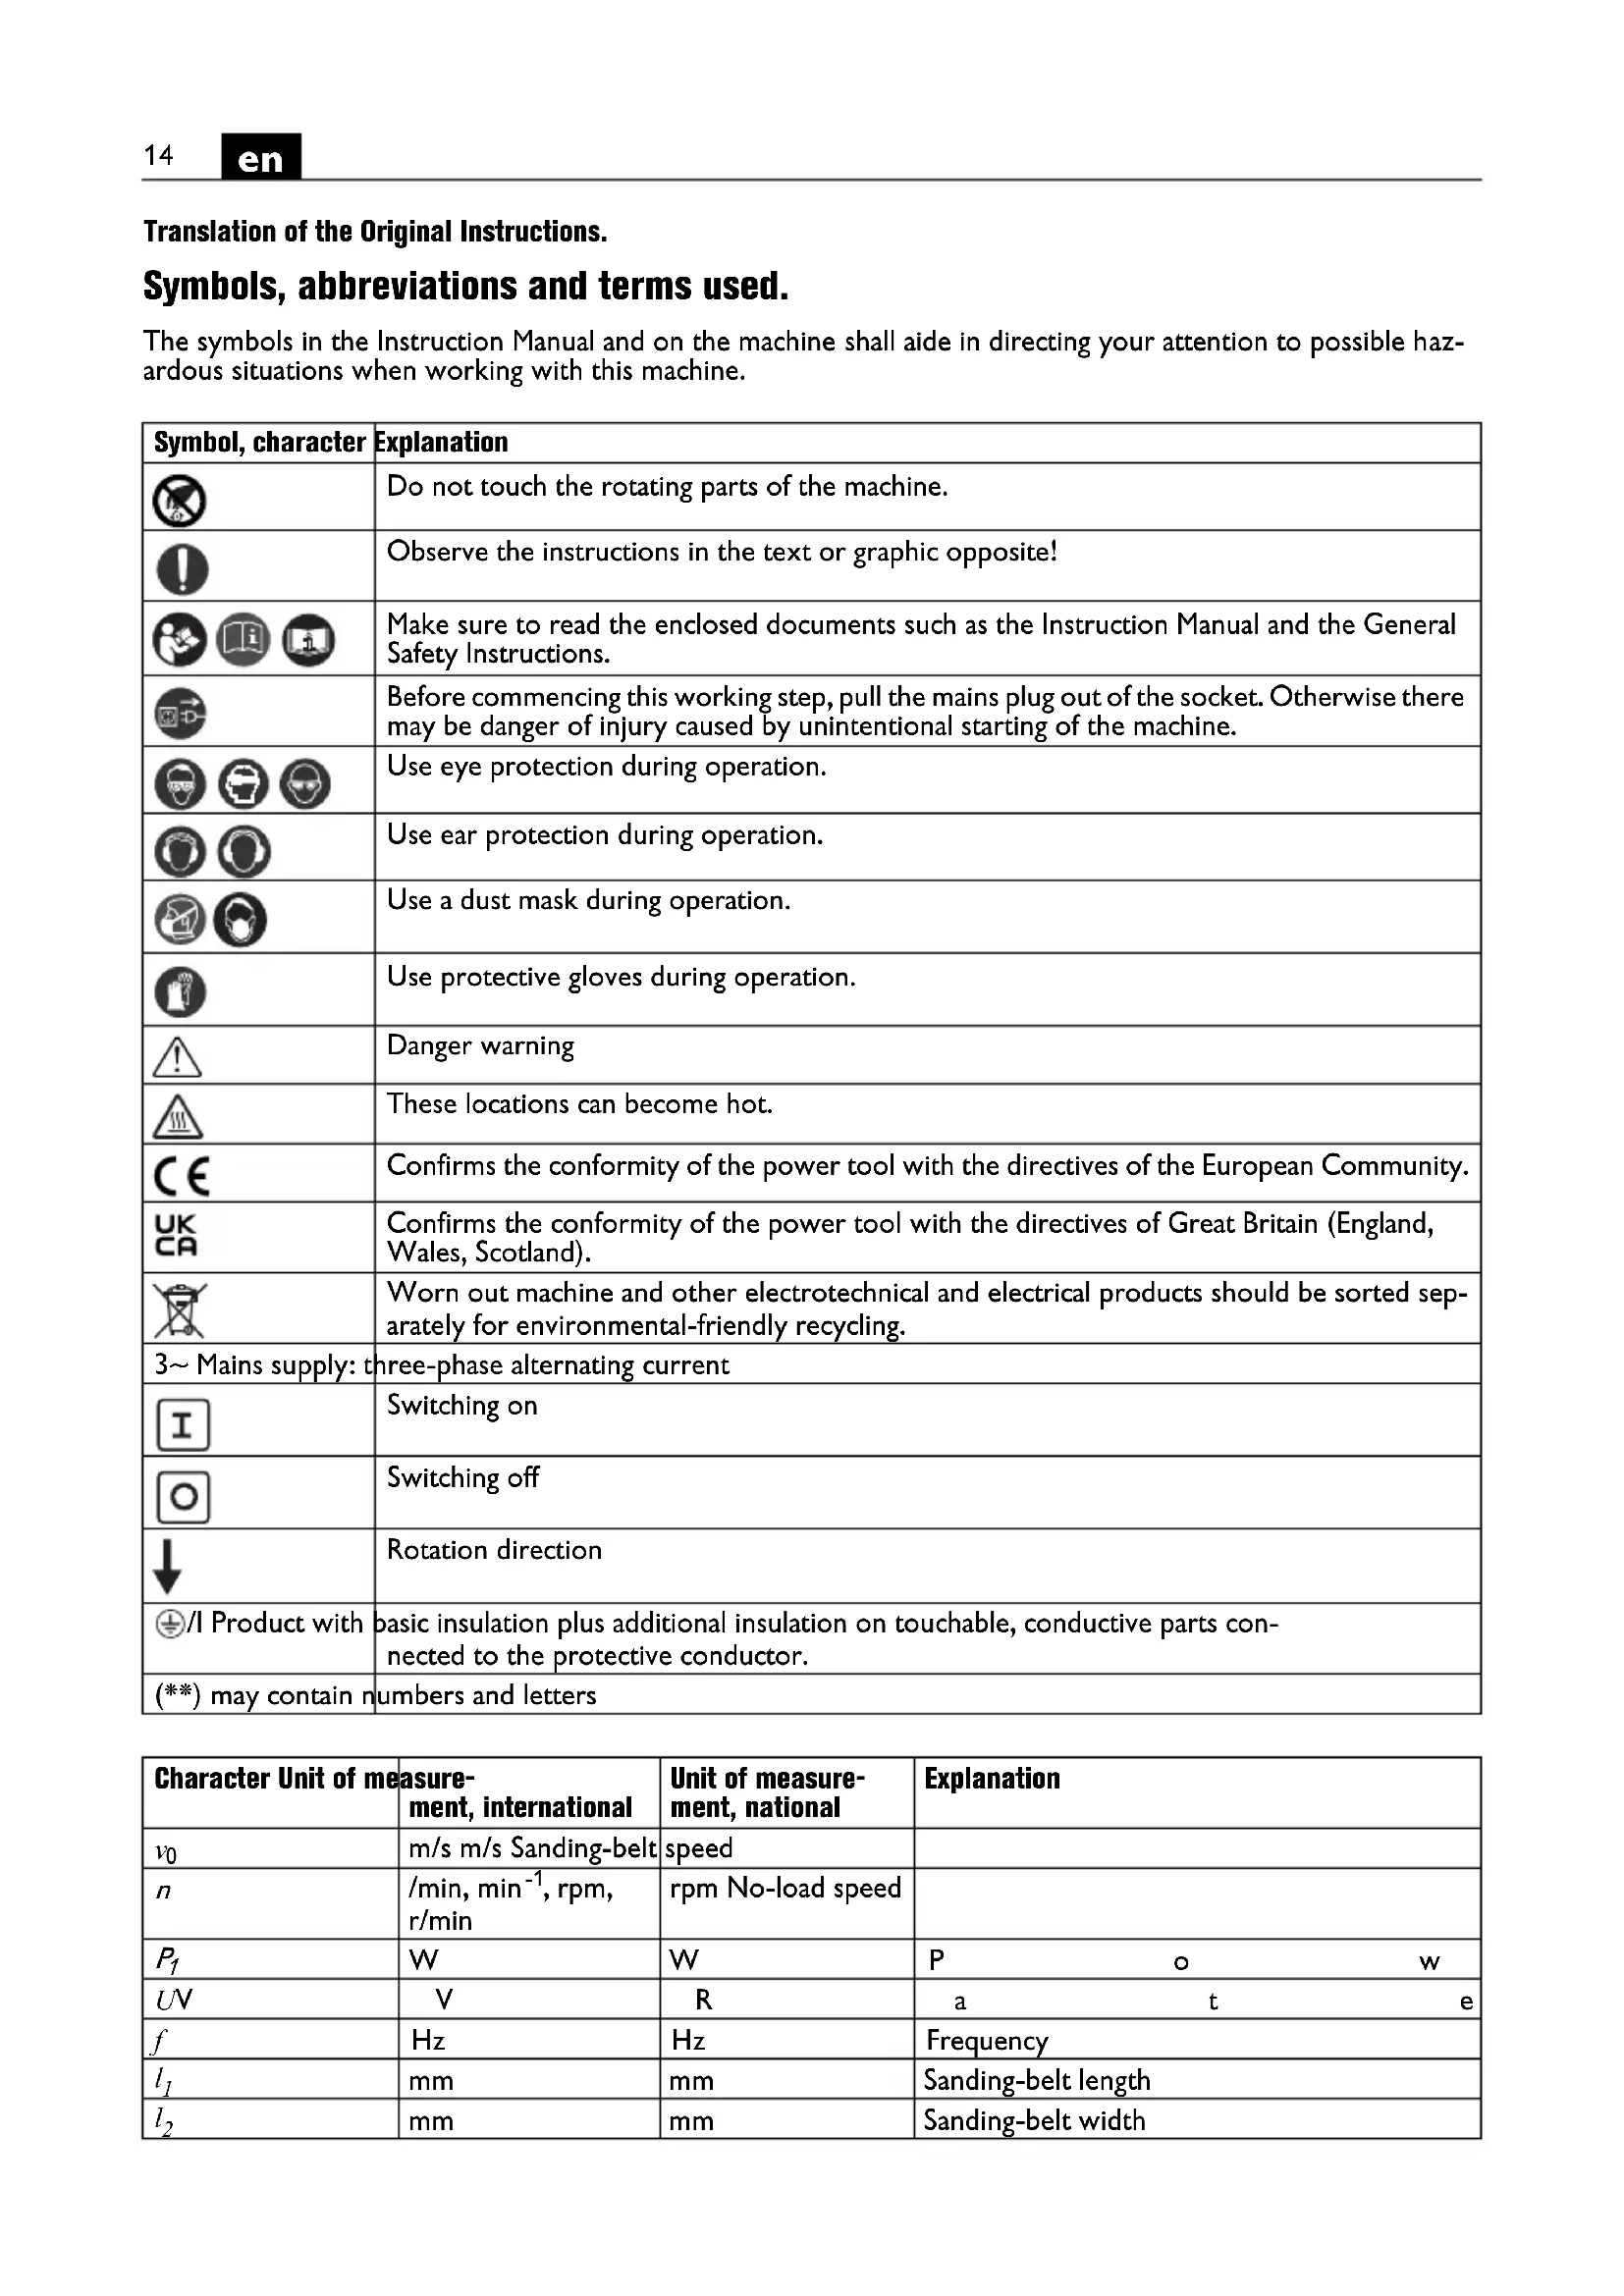
The symbols in the Instruction Manual and on the machine shall aide in directing your attention to possible hazardous situations when working with this machine.
| Symbol, character | Explanation |
| Do not touch the rotating parts of the machine. | |
| Observe the instructions in the text or graphic opposite! | |
| Make sure to read the enclosed documents such as the Instruction Manual and the General Safety Instructions. | |
| Before commencing this working step, pull the mains plug out of the socket. Otherwise there may be danger of injury caused by unintentional starting of the machine. | |
| Use eye protection during operation. | |
| Use ear protection during operation. | |
| Use a dust mask during operation. | |
| Use protective gloves during operation. | |
| Danger warning | |
| These locations can become hot. | |
| Confirms the conformity of the power tool with the directives of the European Community. | |
| UKCA | Confirms the conformity of the power tool with the directives of Great Britain (England, Wales, Scotland). |
| Worn out machine and other electrotechnical and electrical products should be sorted separately for environmental-friendly recycling. | |
| 3~ Mains supply: | three-phase alternating current |
| I | Switching on |
| Switching off | |
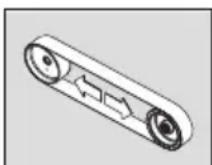
| Rotation direction | |
| /1 Product with | basic insulation plus additional insulation on touchable, conductive parts connected to the protective conductor. |
| (**) may contain n | numbers and letters |
| Character Unit of mea- ment, international | Unit of measure- ment, national | Explanation |
| v0 | m/s m/s Sanding-belt | speed |
| n | /min, min-1, rpm, r/min | rpm No-load speed |
| P1 | W | W P o w |
| UV | V | R a t e |
| f | Hz | Hz Frequency |
| l1 | mm | mm Sanding-belt length |
| l2 | mm | mm Sanding-belt width |
| Character Unit of mea | Measure-ment, international | Unit of measure-ment, national | Explanation |
| kg kg Weight according to EPTA-Procedure | 01 | ||
| m, s, kg, A, mm, V, W, Hz, N, °C, dB, min, m/s2 | m, s, kg, A, mm, V, W, Hz, N, °C, dB, min, m/s2 | Basic and derived units of measurement from the international system of units SI. |
For your safety.

Do not use this machine before you have thoroughly read and completely understood this Instruction Manual and the enclosed "General
Safety Instructions" (document number 3 41 30
054 06 1), including the figures, specifications and safety regulations.
Please also observe the relevant national regulations on electrical safety and occupational safety.
Non-observation of the safety instructions in the said documentation can lead to an electric shock, burns and/or severe injuries.
This Instruction Manual should be kept for later use and enclosed with the power tool, should it be passed on or sold.
Intended use of the machine.
This machine is intended for grinding metal materials (except magnesium) and for grinding with the GIR radius grinding module, the GIC cylindrical grinding device, the GIL grinding device or for mobile use with the GIM undercarriage using the grinding belts approved by FEIN in weather-protected environments.
Special safety instructions.
Wear personal protective equipment. Depending on application, use face shield, safety goggles or safety glasses. Where appropriate, wear dust mask, hearing protectors, gloves and workshop apron capable of stopping small abrasive or workpiece fragments. The eye protection must be capable of stopping flying debris generated by various operations. The dust mask or respirator must be capable of filtrating particles generated by your operation. Prolonged exposure to high intensity noise may cause hearing loss.
While working, do not wear loose clothing, jewellery or open, long hair. Despite protective devices, loose objects can be snagged or caught by moving parts and lead to injury.
Do not use worn, torn or heavily clogged grinding belts. Handle grinding belts carefully and store them according to the manufacturer's instructions. Do not bend or fold grinding belts! Damaged grinding belts can tear, be flung away and injure someone.
Do not use grinding belts or other accessories which are not specifically designed and recommended by the power tool manufacturer. Safe operation is not ensured merely because a grinding belt or accessory fits your machine.
Always use the protective devices attached on the machine. The protective devices must be securely mounted to the machine in order to achieve maximum safety. The protective devices are supposed to protect
the user from grinding particles thrown from the machine and from accidental contact with the grinding belt.
Warning! Danger of fire and explosion! When grinding metals (e.g., aluminium), dust develops that may be combustible or explosive. Do not operate the machine near flammable materials. Sparks could cause these materials to ignite.
Warning! Danger of fire! When grinding metals, glowing metal and sanding-belt particles develop that are collected in the chip/grinding-dust box. Before emptying, the contents of the chip/grinding-dust box must have cooled down sufficiently and may only be disposed of in suitable containers.
Pay attention that other persons are not put at risk from sparking. Remove flammable materials in close vicinity. Sparking occurs when grinding metal.
Keep bystanders a safe distance away from work area. Anyone entering the work area must wear personal protective equipment. Fragments of workpiece or of a broken accessory may fly away and cause injury beyond immediate area of operation.
The workpiece must always lie securely on the grinding rest and the stop. Workpieces that are too small or too thin may not be worked. Danger of injury from workpieces being thrown from the machine.
The surface being worked can become very hot. Do not touch it with your hands.

Never touch the running grinding belt. Danger of injury.
In situations of danger, immediately press the safety pushbutton. The machine runs on for approx. 50 seconds.
Clean the ventilation openings on the power tool at regular intervals using non-metal tools. The blower of the motor draws dust into the housing. An excessive accumulation of metallic dust can cause an electrical hazard.
Ensure that the machine is positioned securely and horizontal. Serious injuries can be caused if the machine tips over during operation.
The mains plug of the machine may be mounted only by a qualified electrician. The protective conductor in the mains socket outlet must be connected with the protective earthing of the mains supply.
Pull out the mains plug for maintenance and repair!
Switching the machine on unintentionally can lead to serious injuries.
Have the electrical safety of the machine checked regularly in accordance with statutory regulations. For machines that have not been checked, there may be danger of electrical shock!
Check the rotation direction of the motor before starting the operation of the machine for the first time. If the rotation direction of the motor is incorrect, the workpiece can be thrown from the machine and cause an accident. The rotation direction may be changed only by a qualified electrician.
Make sure that you or other persons are not standing directly next to the grinding belt when switching the machine on. The grinding belt can tear apart and cause serious injuries.
Handling hazardous dusts
For work procedures with this power tool where material is removed, dusts develop that can be hazardous to one's health.
Contact with or inhaling some dust types, e. g. asbestos and asbestos-containing materials, lead-containing coatings, metal, some wood types, minerals, silicate particles from materials containing stone, paint solvents, wood preservatives, antifouling paints for vessels, can trigger allergic reactions to the operator or bystanders and/or lead to respiratory infections, cancer, birth defects or other reproductive harm. The risk from inhaling dusts depends on the exposition. Use dust extraction matched appropriately for the developing dust, as well as personal protective equipment and provide for good ventilation of the workplace. Leave the processing of asbestos-containing materials to specialists.
Wood and light-metal dust, hot mixtures of grinding dust and chemical materials can self-ignite under unfavourable conditions or cause an explosion. Avoid sparking in the direction of the dust collector as well as overheating of the power tool and the materials being sanded, empty the dust collector/container in time, observe the material manufacturer's working instructions, as well as the relevant regulations in your country for the materials being worked.
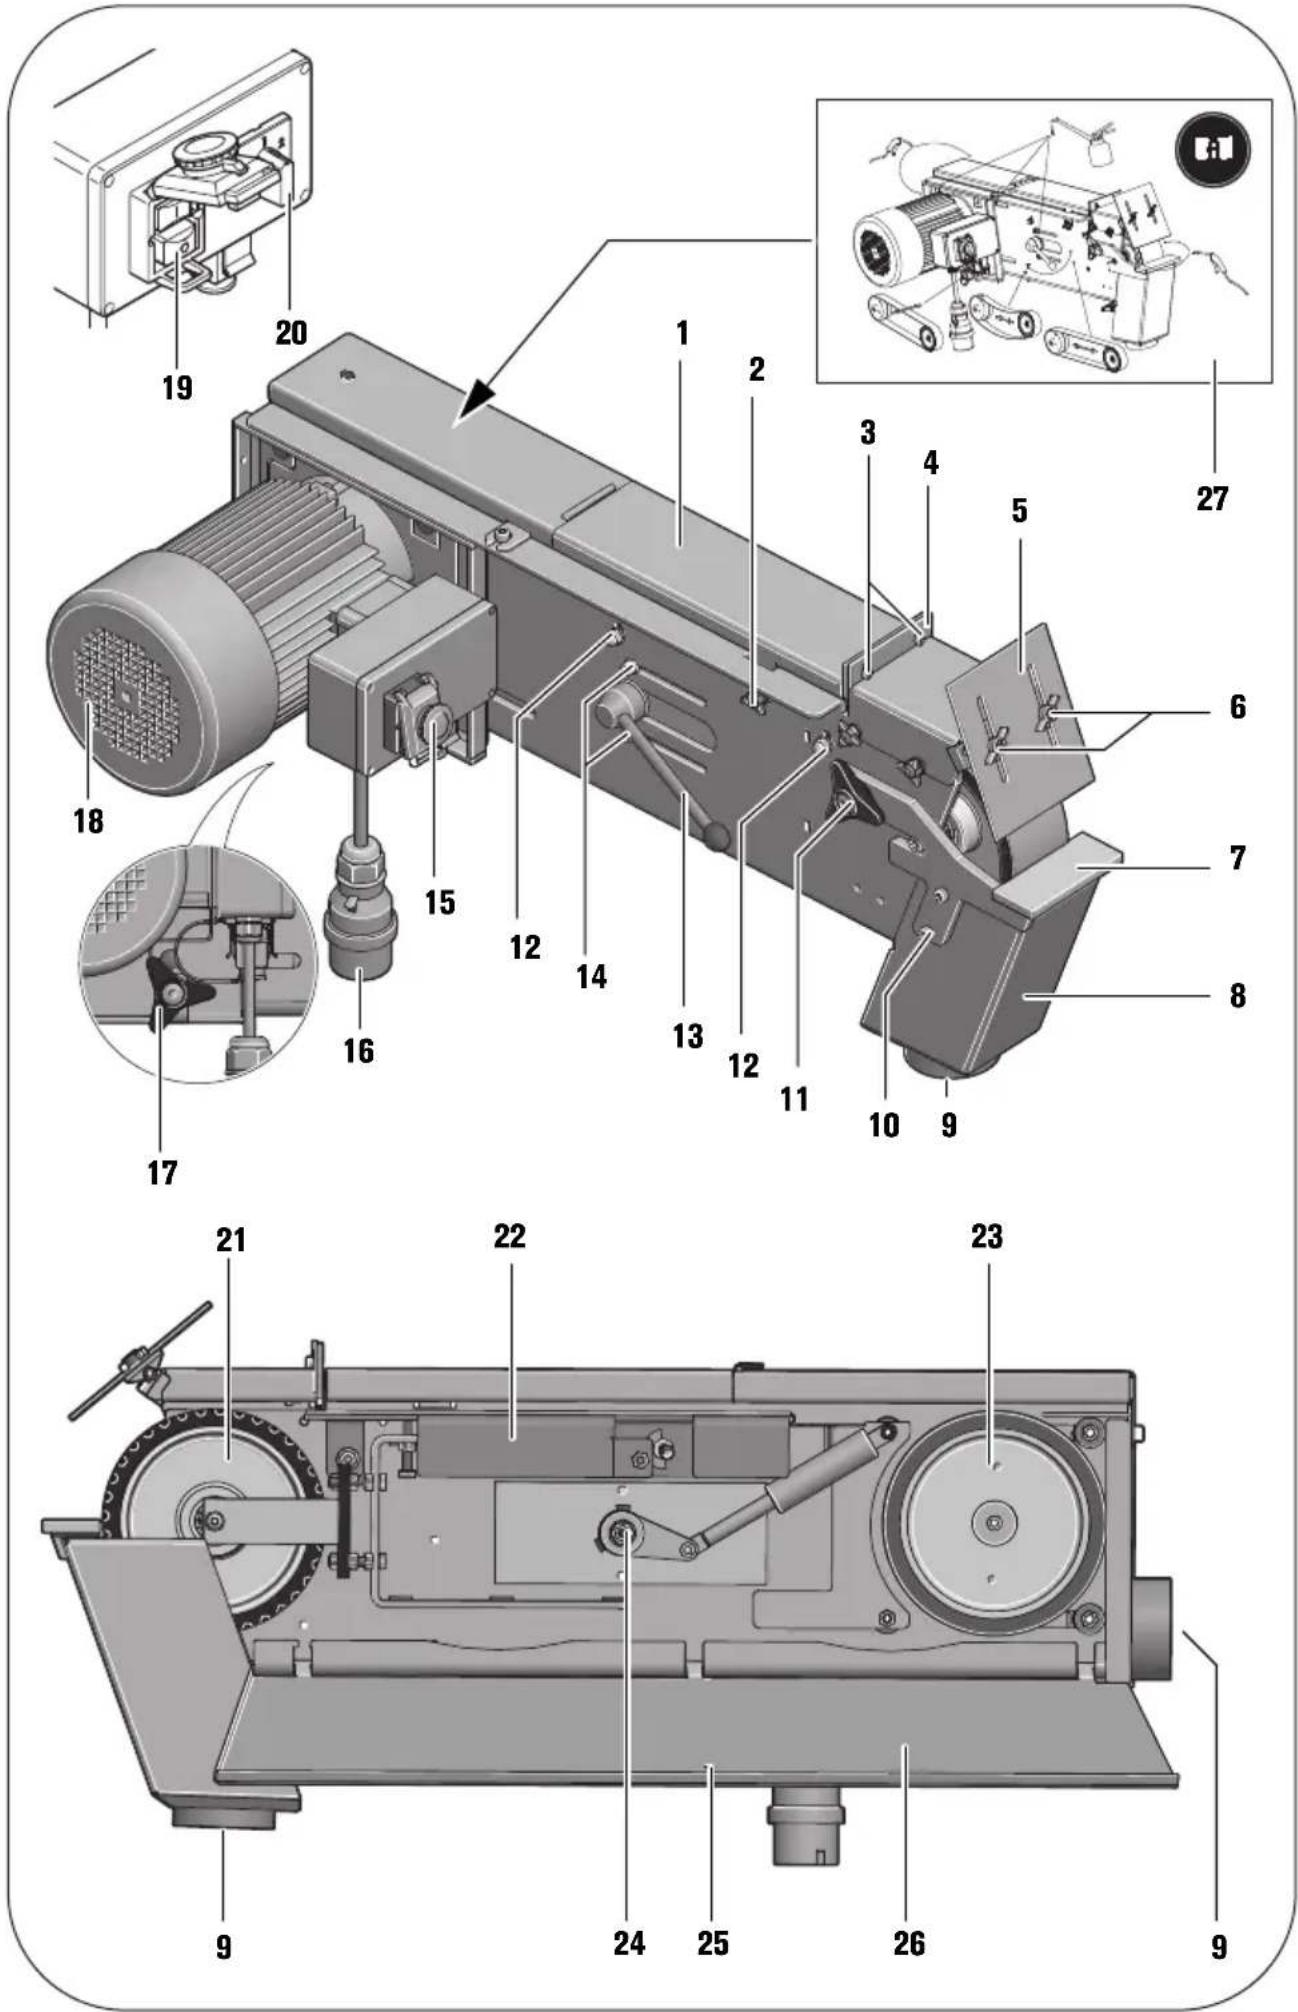
At a glance.
1 Safety cover, top
2 Star-knob bolt, safety cover
3 Screws for adjustment of the gap clearance
4 Stop
5 Spark guard
6 Wing bolts of the spark guard
7 Grinding rest
8 Dust collector
9 Hose connection socket for dust extraction
10 Screw for chip/grinding-dust box
11 Star-knob bolt for grinding rest
12 Adjustment screw of support surface for plane grinding
13 Clamping lever
14 Screws for coarse adjustment of the belt tension
15 Safety pushbutton
16 Plug
17 Star-knob bolt for adjusting the tracking of the grinding belt
18 Ventilation openings
19 On/Off switch
20 Speed selector (only 2H models)
21 Contact wheel
22 Support surface for plane grinding
23 Drive wheel
24 Lubricating nipple
25 Screw for side cover
26 Side cover
27 Instruction label
28 Clamping lever for adjustment of the working height
Assembly instructions (figure 7).
Mount the machine on the Fein GIB/GIBE sub base (see assembly instructions).
Fasten the sub base to the floor using suitable dowel/bolt connections. The connections must withstand the forces that arise during working.
Faulty assembly can cause the sub base or work bench to tilt over or the machine to loosen from the sub base or work bench during operation, and lead to serious accidents.
Electrical connection.

The electrical connection, which is to be provided by customer, must be carried out by a qualified electrician.
Observe mains voltage: The mains voltage and the frequency of the power source must agree with the data onthe type plate of the machine.
Before starting operation for the first time, check the rotation direction of the motor. The rotation direction may be changed only by a qualified electrician.
Adjustments.

Before any work on the machine itself, pull the mains plug.
Adjusting the incline (figure 7).
Loosen both clamping levers (28). Set the machine to the required working height.
Tighten both clamping levers (28) again.
Adjusting the spark guard (5).
Loosen both wing bolts (6) and adjust the spark guard (5) in such a manner that the grinding belt is covered off as far as possible.
Tighten both wing bolts again.
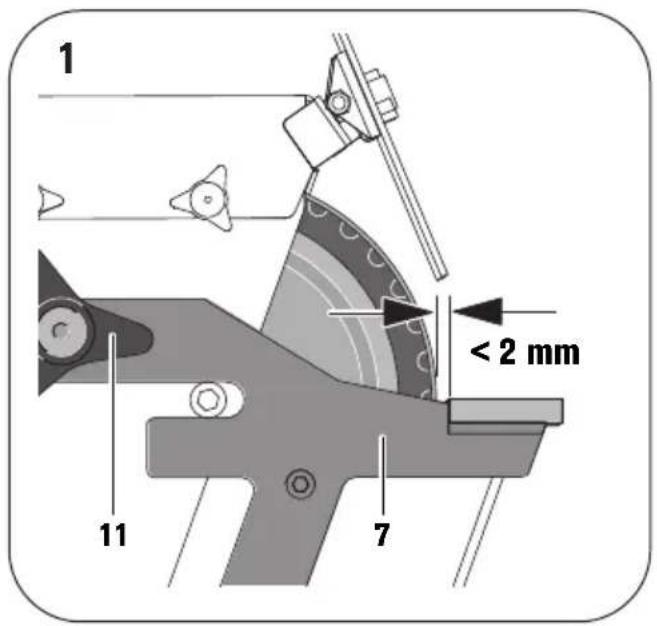
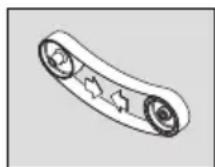
Adjusting the grinding rest (7) [figure 1].
Loosen star-knob bolt (11) and adjust the gap size to 2 mm [max.].
Tighten the star-knob bolt again.
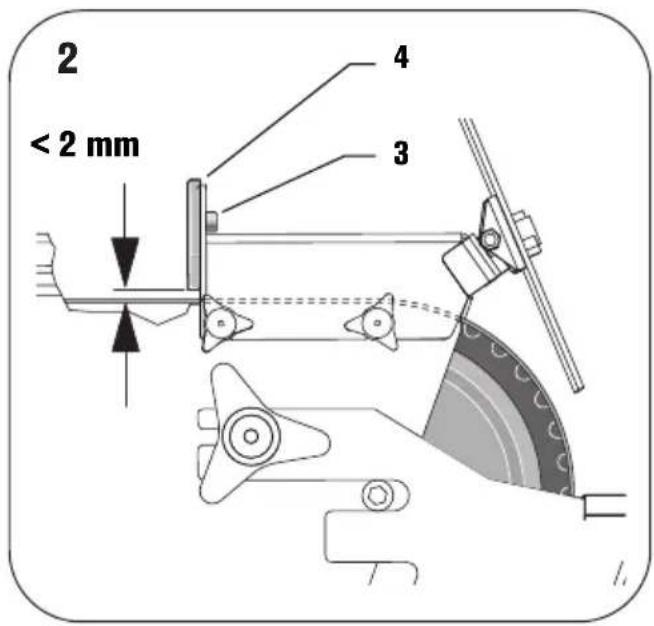
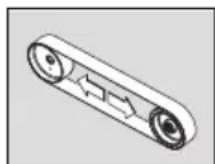
Adjusting the stop (4)(figure 2)
Loosen screws (3) and adjust a max. gap clearance of 2mm .
Tighten screws (3) again.
Adjusting the support surface for plane grinding (22).
For plane grinding, the support surface for plane grinding (22) must be aligned parallel to the grinding belt and face against it over the complete surface.
Loosen screw (25) and fold down the side cover (26).
Loosen the screws (12) and align the support surface for plane grinding (22). The gap clearance may not exceed 2 mm max.(figure 2)
Tightenscrews(12)again.
Shut the side cover (26) and tighten screw (25) again.
Adjusting the belt tracking.
Switch the machine on only briefly and check the belt tracking.
If the grinding belt moves left or right, adjust the belt tracking with the starknob bolt (17) until centred.
If the belt tracking cannot be adjusted centred:
Clean the drive wheel (23) and the contact wheel (21) with compressed air.
Check the drive wheel and the contact wheel for wear, deformation and damage. Have damaged components replaced without delay!
Replacing the grinding belt.

Before any work on the machine itself, pull the mains plug.
Loosen screw (25) and fold down the side cover (26).
Loosen star-knob bolt (11) and remove the grinding rest and the chip/grinding-dust box (8).
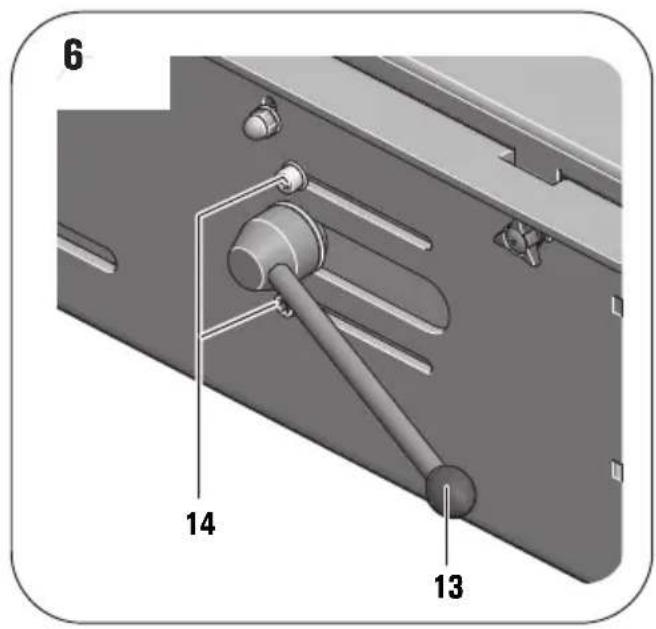
Tilt lever (13) downward to release the tensioning device.
Remove the old grinding belt.
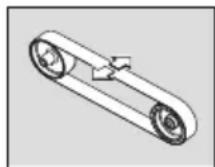
Before mounting the new grinding belt, observe the running-direction
indication on the rear of the grinding belt! It mus correspond with the rotation direction of the drive wheel.
Place the grinding belt both around the drive wheel (23) and around the contact wheel (21).
Tilt lever (13) upward to tension the grinding belt.
If the grinding belt can not be tensioned sufficiently, the tensioning device must be readjusted. Loosen
both screws (14), change the position of the tensioning device and retighten the screws. (figure 6)
Shut the side cover (26) and tighten screw (25) again.
Mount the grinding rest (7) and the chip/grinding-dust box (8).
Check the gap size of the grinding rest.
Switch the machine on and adjust the belt run.
Operating instructions.
Switching on:
Disengage and fold up the safety pushbutton (15). Press pushbutton "I" (19).
Switching off:
Fold up safety pushbutton (15). Press pushbutton "0" (19).

After switching off, the machine runs on for approx. 50 seconds.
Safety pushbutton:
In situations of danger, press the safety pushbutton to switch the machine off.
Reversing the speed (only 2H models)
Switch position 1: Low speed
Switch position 2: High speed

The speed may only be reversed with switch (3) when the machine is stopped.
Overload protection.
In case of continuous high load over a longer period of time, the machine is switched off. After a cooling-down period of approx. 15 minutes, the machine is ready for operation again.
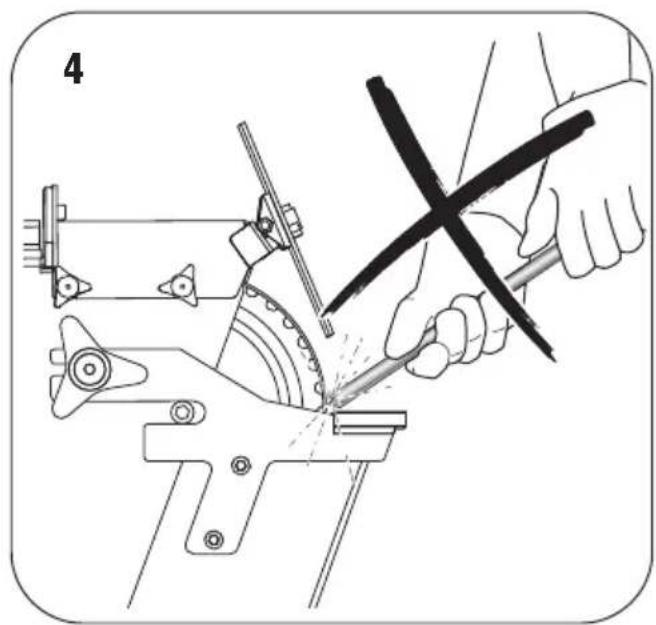
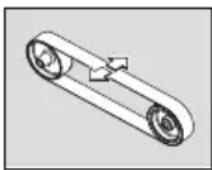
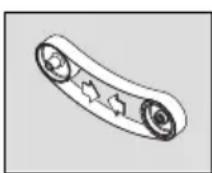
Contact grinding (figures 3 + 4
Check if the star-knob bolt (11) is firmly tightened.
Make sure that the top safety cover (1) is secured with star-knob bolt (4) and the side cover (26) is closed.
Check the gap size of the grinding rest. (figure 1)
Check the position of the support surface for plane grinding (22). The screws (12) must be in the lower position.
Check if the spark guard (5) is properly adjusted and tightened.
Switch the machine on and check the belt run.
Place the workpiece firmly onto the grinding rest.
Guide the workpiece with both hands or fasten it in a fixture.
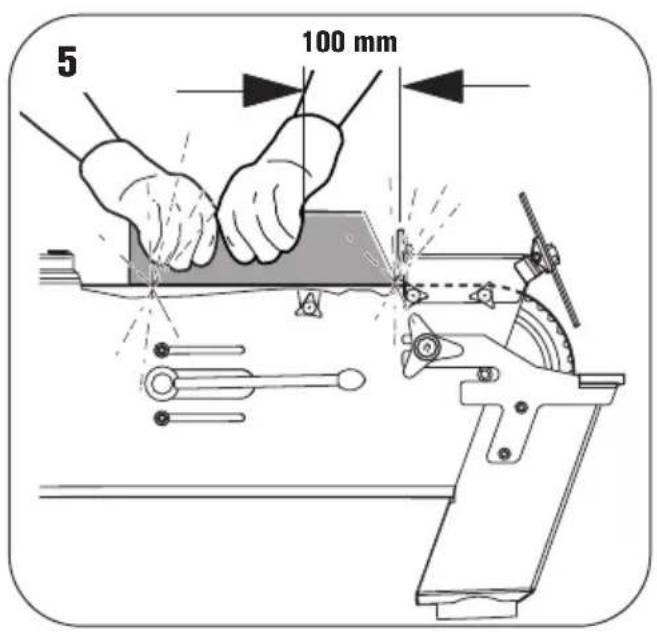
Plane grinding (figure 5)
Loosen star-knob bolts (4) and remove the top safety cover (1).
Ensure that the gap clearance is correctly adjusted.(figure 2)
Switch the machine on and check the belt run.
Guide the workpiece with both hands and remove it upwards after the working procedure.
Extraction device
We recommend the use of an extraction device.
The machine can be connected via sleeve (9) to an exhauster.
Noise emission values.
Idle Sanding
A-weighted emission pressure power level measured at the workplace L_PA (re 20~ Pa ), in decibels 80.5 94
Measuring uncertainty K_pA , in decibels 4.4
Measured A-weighted sound power level L_wA (re 1 pW), in decibels 90 100,5
Measuring uncertainty K_wA , in decibels 2.5 2.5
Operating conditions
| Speed (rpm) | 3 000 | 3 000 |
| Material | - | ST 37 |
| Dimension | - | 8 x 40 |
| Grinding belt | - | GRIT by Fein |
| 36Z |
REMARK: The sum of the measured emission value and respective measuring inaccuracy represents the upper limit of the values that can occur during measuring.

Wear hearing protection!
Measured values determined in accordance with the corresponding product standard (see last page in this Instruction Manual).
Repair and customer service.

Repairs may be carried out only by qualified persons in conformity with the valid regulations.
For repairs, we recommend our FEIN customer service centre, the FEIN authorised service centres and FEIN agencies.
When the machine's power supply cable is damaged, it must be replaced using a specially prepared power supply cable, available from your FEIN customer service agent.
The current spare parts list of this machine can be found on the Internet under www.fein.com.
Daily maintenance

Blow out the ventilation slots (18) at the motor housing and the marked locations with compressed air (see Instruction label (27)).

Lubricate the machine daily (when in use) with machine oil at the locations marked (see Instruction label (27)).
Check the drive disc (23) and the contact disc (21) for wear and damage each time when replacing a grinding belt. Have damaged parts replaced.
Loosen star-knob bolt (11).
Remove the chip/grinding-dust box (8) and dispose of the metal dust.
Before emptying, the contents of the chip/grinding-dust box must have cooled down sufficiently and may only be disposed of in suitable containers.
Mount the emptied chip/grinding-dust box again and set the gap clearance of the grinding rest. (figure 1) Tighten star-knob bolt (11).
Cleaning the exterior of the machine with compressed air.
Lubricate the bearings of the tensioning device monthly via the lubricating nipple (24).
If required, you can change the following parts yourself: Grinding belt, spark guard
Warranty and liability.
The warranty for the product is valid in accordance with the legal regulations in the country where it is marketed. In addition, FEIN also provides a guarantee in accordance with the FEIN manufacturer's warranty declaration.
The delivery scope of your machine may include only a part of the accessories described or shown in this instruction manual.
Declaration of conformity.
This CE declaration is only valid for European Union and EFTA (European Free Trade Association) countries and only for products intended for the EU- or EFTA market. After placing the product on the EU market the UKCA mark loses its mark validity.
The UKCA declaration is only valid for the Great Britain market (England, Wales and Scotland) and only for products intended for the Great Britain market. After placing the product on the Great Britain market the CE mark loses its mark validity.
FEIN declares itself solely responsible for this product conforming with the relevant provisions given on the last page of this Instruction Manual.
Technical documents at: C. & E. Fein GmbH, C-D1 IA, D-73529 Schwabisch Gmünd
Environmental protection, disposal.
Packaging, worn out machines and accessories should be sorted for environment-friendlyly recycling.
Connection diagrams.
Type GI75, GI150 Page 104
Type GI75 2V, GI150 2V Page 105
Type GI75 2H, GI150 2H Page 106
Type GI75 2H2V, GI150 2H2V Page 107
Bande abrasive GRIT by Fein
- 36Z
Sving armen (13) opad for at spende landslide.
Slipeband, gnistvern
Miljøvern, deponering.
Niepewnosc K_pAw
decybelach 4 4
Pomierzony,
skorygowany
charakterystyka
czechotliwośćowa
poziom mocy
3aHTbIe yCTpoiCTBa DOJXHbI 3aUuTaTb
NoB3OBaTeJIa OT pa3NeTaIOxxCra6pa3NBbIX
YactnU, n CnyauHOro npKOCHOBeHn K a6pa3HBHO
JeHTe.
BHHMaHHe: onaCHOCTb noHaapa HnB3PbIBa! PnH 7nnΦOBaHH MetaIIIOB (HAnp., AnOMHHN) O6pa3yETc Nblb, HOTOPa MOHT Obitb rOpOey HnB3PbIBoONaCHO. He paOtaIte C MaunHO B6JH3n RopOCHMATEpHaIbO. NckpbIMoRyT BOCPiMaEHITb TaKHe MaTepHaJIbI.
BHHMaHHe: onachocTb BO3ropaHH! PnH WJHΦoBaHH MeTannOB 6Opa3yOTc paKanEHHbI qAcTHcbl MetaIIa N WJHΦoBaIbHO JENTbl, KOTOpbl CObHpAOTcB KOHTeHepe dN OONIOK CneAyeT AOCTaTOUHO KOHTeHepa dN OINIOK CneAyeT AOCTaTOUHO OXNaINTb IpeA OOnopoXHeHEm, pa3peWaeTcR OOnopoXHrTB eRO TOnbKO B NOxAODaYIO EMKOCtB.
CneHnte 3a TEM, yTO6bI dpyrHe IInca He noDBeprAnHcb onaCHOCTBcNEdCTBnE pa3JIetaOuHXc HcNp.
YdaJIyTe TropOuHne MaTePnaIbI, HaxOaJUncEra IIO6IIIN3OCTn. PpN ⅢNΦOBaHN MeTaNIOB pa3NeTaIOTcNckpbI.
CJIeIHTe 3a TEM, YTO6bI BCE JIOHN HAXOINHcB Ha 6e30nacHom paCCToHHN OT pa6ooyero yuactka. KaJbIy CEIOBek B ppeJeIax pa6ooyero yuaCTka IOnKeH HMeTb CpeICTBa HNDHBNUyA/lbHOH 3aUHTb. OckonKn DeTaN Hn pa3OpBaHHbx pa6oynx HHCTpyMeHTOB MOrYT OTNeTeTb B CTOPOH N CTAb TpnuHHoT TaBM TaKke N 3a PpeDenamn HeNoCpeAcTBeHHoro pa6ooyero yuaCTka.
3aROTOBKa IOJXHa BCeIgHaJaEJXHO JExKaTb Ha OIOpe HnPiJIeATb K yIOpy. 3aIpeIaTeCra 6pa6aTbIBaTb He6OJIbIIHe IIN TOHKe 3aROTOBKn. OT nNoxo 3aKpeIeHHo 3aROTOBKn IcXoAHT OnaCHOCTb TpaBM.
O6pa6aTbIbAemnIOBepxHOCTb MOKeT OueHb CHIbHO HArpeBaTc. He npKacaiTecb K Hei pyko.

HnKOrHa He npHKacaiTecb KDbNkUeicra 6pa3HBHOJIeHTe.CyueCTByET onaCHOctb
TpaBM.
Pn BO3HKnHOBeHHN ONaCHOCTH HemeIeHHO HAXMNTe 3aHTbB BbIKIOHaTeJIb. Nocne 3TOrO MaunHa BpaaeTcHa Bb6ere eue OKoNo 50 cekyHa.
PeryIpaHNo OuHuaTe BeHTnJIauHOHHbIe OTBepCTNaMauHHbI. BeHTnJIaTOp dBHrAteJIa 3aTaNHbAe Tblb B KOpIyc. PnpUpe3MePHOM CKoJIeHN MeTaJIInueckOINbIMMOKeT BO3HKnHYb ONaCHOCTb HeCHaCThIx CnyuaeB B pe3yNbTaTe BO3dEiCTBnA 3NeKtpNueCTBa.
ObeceHnBaTe HaJeKHOe TOpHToJIbHOe IIOJIOKeHHe MaHHbI. OnpOKaBHaHne MaHHbI BO BpeMa6Otbl MoKeT npNBecTH K TaKeJIbIM TpaBMam.
CeTeByIO BnIKy MaINHbI pa3peWaeTc MOHTnpoBaTb TOJIbKO KBAJIHΦNtIPoBAHHbIM 3JIeKTPHKaM. 3a3emJIOUnn IPOBOA PO3eTKN DOJXHeN 6bITb COeAnHeH C 3aUNTHbIM 3a3emJIeHNHeM 3JIeKTPocETn.
IpeE, BbIOJIHeHem pa6OT IO TEXHueCKOMy 06ClyKHaHHIO O63aTeJIbHO H3BJIeKHTe CeTeBYIO BnIKy! BKnIOUeHHa NO HeOcTOPOXHOCTN MaUNHa MOKeT npuHHHTb TAgKeJIbIe TpaBMbl.
PeryIpaHo OToBaBte MaunHy Ha npOBepky 3aKHOdaTeIbHbIMn IpeIINcaHNMy. HnpoBepHHa MaunHa ABnEeTcNCTOCHKOM ONaCHOCTn Nopaxehna 3neKtpnueckm TOKOM!
IpeEi nepBbIM 3aynckOM B KcIIyatauHIO npOBepbTe HnnpabJIeHne BpaueHn IIBnraTeJ. Pn HnnpabINbHOM HnnpabNeHn BpaueHn 3arOTobKa MOxET 6bITb OT6poWeHa, YTO MoXET cTaTb npuHOn HeCuaCTbIX cnUyaeB. HnnpabHeHne BpaueHn pa3peSeHO MeHrTb TOnbKO KBaHnΦNpOBAHHbIM 3JIeKTPnKaM.
HnKOrJa He CTAHOBHTecb Camn H He IIO3BOJIte
dpyrIm JInzam CTAHOBHTBCa B HeIOCpeCTBeHHoH
6JIIN3OCTN K DBHXyUeCra IIINΦOBaJIbHOJ JeHTe
BKJIIOueHHoMaIIHHbI. UINΦOBaNbHaJ NeHTa MoXeT
pa3OpBaTbCn IN PpNBecTn K TAgKeNbIM TpaBMam.
O6paHHe c oPAnOH IIbIbIO
Pn pa6Tox co ChTneM MaTepnaJa C
HcNoB3OBAHnEM DaHHoro HHCTpyMeHTa 06pa3yETc
IbIb, KOTopar MoKeT IpeACTabJIrTa co6oJ
ONaCHOCTb.
KoHTAKT C HeKOTOpbIMN BuaM NbIIN NJIIN BdbixAHne
HeKOTopbIX BnAOB NkA, HAp., ac6ecTa n
ac6ecTOcoepKaunx MaTePnaIOB,
CBNHcOBOcoepKaunx NaKOKpaCOnhix NOKpbTnH,
MeTaNOB, HeKOTopbIX BnAOB ApeBeCNbI, MNHePAIOB,
KaMeHHbIX MaTePnaIOB C COePkaHNem CNIKaTOB,
pactBOpHTeNei KpacOK, cpeCTB 3aUnTb IapeBeCNbI,
cpeACTB 3aUnTb cyoB OT o6paTahN, MOKeT
Bbl3bBaTb y IIOeN aJIpeRnueckne peakuH n/nn
CTaTb npUHHO 3abObeAHN DbIXaTeNbHbX nyTei,
paka, a TAKKe OTPnauTeNbHO cKa3aTbcra Ha
pePnoDyKTNBHOCTN. CTeNeHb PnCKa pnp BVdxHaHn
PiJIIN 3aBNCHT OT 3KcNo3nOHHO AO3bl.
NcnoB3yIe COOTBeTCTBYUOuee DaHHOMY BnADy Nblnn NblneOTcMbIAIOuue yCTPOHCTBO HnHAnBnAaNbHbIe CpeAcTBa 3aunTbI XopoWo nPoBeTpBaIte pa6ooye MeTo. IopyuAte o6pa6Otky coApKauero ac6ec T MaTePnAna ToIbKO cneuaJIInCTam.
ApeBecHn nIb nIbN JERKnx MeTaNIOB, Ropyne Cmecn a6pa3NBHO n IxMnueckNX BeueCTB MOYcAMOBOCnJIaMeHrTbcra npn He6NaIarOpnraTHbIX YCNOBHX nII cTAb npuHHoB B3pbBa. N36eaiTe NCKpeHnB CTOPOHKOHTeHepa dIy nIbpI, PpePeba 3NeKTPOINHCTpymeHa n IJNΦyeMoro MaTePnaIa, CBOEbpeMeHNO ONOpOxHraTe KOHTeHep dIy nIbpI, Co6NJoDAaTE yKa3AHn IpnON3BOADNTeJI MaTePnaIa NO o6pa6OTKe, a TAKKe AeJcHCTByUoUne B BaWei cTpaHe yKa3AHn dJa O6pa6aTbIBaEMbIX MaTePnaIob.
KpaTKn 063op.
1 3aunTHa KpbuKa, BepxHra
2 BnHT co 3Be3Aoo6pa3HOH pyuKo, 3aunTHbI KOxYX
3 BnntbIaJna HactpoNk 3a30pa
4 Ynop
5 3aunnta ot nckp
6 BapaawkoBbIe BNHTbl, 3aunTa oT NCKP
7IbnfoBaHnaonopa
8KoHTeHepAJIaONnOK
9 NaTpy6OK AIN OTCaCbIBAHN Iblnn
10 BnHT, KOHTeHep dIa ONNOK
11 BnHT co 3Be3Aoo6pa3HOpyKoI AJIa WnHΦOBaNbHOOnOpbl
12 PerynnpoBOuHb BnHT, ONOpHa nlaCTnHa dJa nnocKOrO wHnfoBaHHa
13 3aekmnoi pyuar
14 BnHTbI, rpy6a HacTpoKa HaTaeHnJ neHTbl
15 3aunTHbI BbIKIOuTaTeNb
16 LUTekep
17 BnHT co 3Be3Aoo6pa3HOH pyuKo,IOCTnPOBka XOa JeHTbI
18 BeHTnIaHNoHHbE OTBepCTnA
19 BbIKHIOaTeIb
20 NpeeknioyateIb Yncna O6opOTOB (TOnbKO B MoJeJx 2H)
21 KOHTaKTHbI dNcK
22 Onopna nlaactnHa dIy nlockoro uHOBAHNA
23 PnHBOHOH ANCK
24 Cma3oHyb HnHnneB
25 BnHT dJa 6OKOBoK KpbIuKN
26 Bokobar Kpbioka
27 INΦopMaζηΟΗΝΑ ΜαδλινΚα
283aKHMHOBpyuargnHaCTPOKynrnaHaKNOHa
Yka3aHnno MoHTaHy (pHc. 7).
3akpenTe MaunHy Ha noAcTabke Fein GIB/GIBE (cm. HnctpykuuNo MOHTaKy).
PnKpeHnTe NOCTaBky K NOy npn NOMOuN COOTBeTcTBYIOUeRO AIO6eJIbHOrO/BnHTOBORo COeAHHeHn.KePnIeHn DOJXKnbl 6bITb AOCTaTOUHbIMn AIN BO3HNKaIOUxnpn pa6Ote cIn.
HenpaBnBn MOHTaK MoKeT npBecTu K OnpOKnDbBaHIO BepCTaka HIN OTcoeAnHeHIO MaunHbOT NOCTaBKN HIN BepCTaka BO BpeM pa60tbl, YTO ypeBaTO cepbe3HbIMN HeCuaCTHbIMN cnUyamn.
3nKtpnueckoe noKnIoueHne

3NeKtpPONoAKJIIOueHHe CO CTOpOHbI 3aKa3uKa AOJXHO 6bITb BBINOJIHeHO KBAINHΦNtUPOBaHHbIM 3NeKTPNKOM.
Clende 3a ceteBbIM HanpaeHHeM: HanpaeKeHne NHTAHN I YaCTOTA HCTOUYHka 3JeKTPoNTAHN AONXHbI COBNaAdTb C DaHHbIMn Ha NaCnOpTHoN Ta6NIuKe MaunHbI.
IpeA nepBbIM 3aynckOM B 3KcNpyaTaunIO npOBepbTe HaipablenHe BpaueHn AByraTeJ. HapableneHn BpaueHn pa3peeHo MeHrToJbKO KbaINΦuNPOBaHHbIM 3JIeKTpNKaM.
HacrtpoHH.

Ipeed IIO6bIMN MaHHnylaunHMN C MaunHOn H3BnkeaTe CeteByO BnHy H3 p03eTHN.
HactpoHa hAnloHa (pnc. 7).
OTnyctnTe 06a 3axmmhbyx pbyara (28). YcTaHOBnTe MaunHy Ha Tpe6yeMyIO pa6oyIO BbICOTy.
CHOBa Tyro 3aTAHnTe o6a 3aXkIMhBix pbIyara (28).
HactpoHa 3aunhtbI OT Hcnp (5).
OTnyctnte 66a6apawkoBbIX BnHTa (6) nHaCTpOInTe 3aunTy OT nckp (5) TaK, yTo6bl WnHΦOBaNbHaj NeHTa 6bIa MaKcMAmbHo 3aKpbTa.
Choba KpeNKo 3aTaNHTe o6a 6apaWKOBbIX BnHTa.
HactpoHa Ka JnHFOBaIbHoN onOpbl [7] (pnc. 1).
OTnyctHTe BnHT CO 3Be3DOO6pa3HOH pyKoN (11) HacTpoIte WnPnHy 3a3Opa MaHC. Ha 2 MM.
CHOBA KpeIKO 3aTAHnTe BnHT CO 3Be3AOO6pa3HOpyKoI.
HacrpoHa ynpa (4) (pnc. 2)
OTnyctHTe BnHTbl (3) n HactpoTe uHpHy 3a3opa MaKc. Ha 2 M M.
CHOBA TYRO 3aTAYHTE BnHTbl (3).
Hactpoite onophyo nlaCTHHy dIa IIOCKORO uHFOBaHHa [22].
Pn PNOCKOM 0HIOFOBAHN ONOPHa PNaCTHa AJI
PNOCKORO 0HIOFOBAHNA (22) OONKa 6bITb
HaNPaBHe NaPaJIeNbHO 0HIOFOBaNbHOJneHTe N
OONKaCaTbCBy BcE NOBepXHOCTN.
OTnyctte BNHT (25) n onyctnte 6okobyIO KpbuKy (26) BHn3.
OTnyctte BnHTbI (12) n BbipOBHnTe onOpHyIO nnactnHy dnnnoCKoro wnnfoBaHnra (22).3a3op DOnKeH COCTabNtB MaKChMym 2 MM! (pnc.2)
CHOBA TYO 3aTaNHTe BnHTbl (12).
3aKpOHTe 6OKOBYIO KpbIuKy (26) n cHOba KpeNko 3aTaNHTe BnHT (25).
HcthpoBka xOaJeHtbI.
Hopotko BKNIOUHTe MaUNHy IN pOBoEpbTe XOA JeHTbl.
BbINHnTeIOCTnPOBkyXoDa
JIeHTbBIHNTOmCO3Be3DOO6pa3HO
pyKo17TAKyTo6bl
WnHOBaHbHaJeHTa Wna
NocepeAHe,ecnOHa OTKIOHReTcBnpaBO HINBNeBO.
EcnxOaJeHTbI He ydaetcYCTaHOBnTb TaK, YTO6bl OHa Wna NocpeAne:
OuHCTnTe npHBoHOH AnCK (23) N KOHTaKTbHAnCK (21) CKaTbIM BO3dYXOM.
PpOBepaTe npBDOHONK KOHTaKTHbN HcKaHa HAnuHne n3HOca, DeOpMaunn N cTnpaHna.
HemeIeHHo 3aMeHnTe IOBpeKdEHHbIe dTaII!
CmeHa ⅢHΦOBaJIbHOJ NENTbl.

Ipeed IIO6bIMM MaHHnyJauHmN C MaunHoH N3BnkeaTe CeteByO BnKHy H3 p03eTHN.
OTnyctte BNHT (25) n onyctnte 6okobyIO KpbuKy (26) BHN3.
OTnyctHTe BnHT co 3Be3a06pa3HOH pyKoN (11) n CHmnte ⅢnΦOBaJIbHyIO ONOpY N KOHTeHep AIIa ONnIOK (8).
OTBeAHTe pblar (13) BHN3, YTO6bI pa3rpy3nTb HATAKHOe yCTPOINCTBO.
CHIMITE cTapyIO wJINΦOBaJIbHyIO neHTy.
IpeaYKlaDbBaHneMHOBOI
HINFOBAHNOIeHTbIco6IOaIte HAnpabHeHne XoA, yKa3aHHoe C TBInbHOI CTOpOHbI IINFOBaHNOI eHTb! Ee XoA dONJKeH COOTBeCTBOBaTb HApabNEHIO ABHXKeHnI pNBOADHO rOPIKA.
YLOXKHTe ⅢHΦOBaIbHyIO JeHTy OaHOBpeMeHHo Ha npBOADHOJ AnCK (23) N KOHTaKTbIy Anck (21).
OTBeAHTe pbyar (13) BBepx, yTo6bl 3aKaTb uHNOBaBbHyIO JeHTy.
EcH He ydaetca DocTaTOUHO HATaHTb ⅢNΦOBaNbHyIO NeHTy, HATaXKHOe yCTPOINCTBO
Heo6xOAMOIOCTnPOBaTb3aHOBO.OTnyCTnTe 06a BnHTa (14), CmecTnTe HaTAAHHe yCTpOnCTBO n CHOBA Tyro 3aTaNHTe BnHTbl. (Pnc.6)
3akpoTe 6okobyo Kpbikky (26) n CHOBA KpeIko 3aTAHTE BnHT (25).
MoHTnpyuTe ⅢnΦOBaJIbHyIO ONOpY (7) N KOHTeHep AJIra OINIOK (8).
PpOBepbTe 3aOpApnHy
BknHcHTe MaunHy N BblnoJHnTe IOCTnPOBky XoDaJIeHTbl.
Hnctpykun no 3Kcnnyataun.
BkIouenHe:
Pa36NoKpyuTe npackpoTte 3aunTHbI BbIKHouaTeJb (15).HaXMMTe KHOINKy « (19).
BbIKIOueHHe:
PackpoTe 3aunTHbB bIKIOuATEb (15).HaXMMTe KHOKNy 0 (19).

Iocne BbIKIOeHnMaunHa BpauaetcHa BB6ere eue OKoNo 50 ckyHa.
3aunthbBbHJIOyateJIb:
B ONaChbIX CnTyαunx HaXMMte KpaChbI 3aunTHbI BbIKNIOUaTeJIb, YTO6bl BBKIIIOUHTb MaUNHy.
IpeeknoueHne YHCna 060pOToB (Tolbko B MoedJeX 2H)
IonoKeHne nepeKIOuOaTeJra 1: Hn3Koe Yncno o6oPoTOB
IOnIOXeHHe IpeKJIIOuHaTeTn 2: BbICOKoe YncNo 06OpOTOB

Uncno 606pOToB pa3peWaeTcNepeKIOuAtb TOIbKO npN OCTaHOBHeHOn MaUNHe npN NOMOUs NepeKIOUoTeTn (3).
3aunta ot neperpy3KN
Ipn HnpepbBHO BbICOKo Harpy3Ke Ha npotxkeHn AInTeBHorO OTe3Ka BpeMeH MaHHa OTKnIOyaeTc. NcTeueHn nepNoa OxJaXDeHn, 3aHMaIOJero OK.15 MInHyT, MaHHa CHOBA rOTOBa K pa6ote.
KoHTaKTHOe WJINΦOBaHne (pHc. 3+4).
Y6eAHTecbTOM, YTO BnHT CO 3Be3AOO6pa3HOI pyKoN (11) Tyro 3aTAYT.
Y6eAHTecbBTOM,TOBepxHra3aunTHaR KpbuHa (1) 3aKpePiHeBAHTOM CO 3Be3DOO6pa3HOpyKoR (4) n 6OKOBa KpbuKa (26) 3akpbita.
PpOBepeTe 3aOpApIuHOBHOJIOpbl. (pnc.1)
PpOBepbTe nOLOXKeHne onOpHoi nIaCTnHbI dJI nnocKOro WnHΦOBaHHa (22).BnHTbI (12) OJXHbI HxOAnTbcR BnXHHem nOLOXKeHH.
Y6eAHTecb,yTO 3aunTa OT NcKp (5) npaBnIbHO HAcTpoEHa n Tyro 3aTMyTa.
BknIOuHTe MaunHy npoBepbTe XoA neHTbl.
Tyro npxMMte 3aROTOBky K JnnnoBaJIbHOI onope.
BeaHTe 3arOTOBky AByM pyKaAMn HIn 3aHKnCpyTe ee B npncnoc6neHH.
Плосhoe wнфованne (pnc. 5)
OTnyctnte BnHTb co 3Be3aoo6pa3Ho npKo (4) n CHMNTe BepXHIO 3aunTHyIO KpbIshky (1).
y6eAHTecbBTOM,HTO WnpuHa 3a3Opa yCTaHOBneHa npabHbHO. (pnc.2)
BknHouHTe MaunHy n npOBepbTe XoA NeHTbl.
BeaTe 3aTOBky AByMaPyKaMn IIO OKOHaHIN npOeAypbI NOAHMaHTe ee BBepx.
PbIneydAnHoue yctpoNCTBO
PekomeHApem npimeHaTb nbileydaJIOUeeyCTPOIcTB.
Pn NOMOu NaTpy6ka (9) MaunHy MoKHO NOAKIOUaTb K BblTAAHHOMy yCTPOIcTBY.
3haeHnC03daBaEmbIX wymOB.
XoIOCTOxOuIINΦOBaHne
N3MepeHHbI A-
B3BeWeeHHbI yPOBeHb
3ByKOBOORO DaBJIeHnHa
pa6ooyemMeCte LpA (OTH.
20MKIIa),Aeun6en80,594
Norpewhoctb KpA,
Aeun6en 44
N3MepeHHbI A-
B3BeWeeHHbIyPOBeHb
3BYKOBOI MOUHOCTN
LwA (OTH. 1 nB),
Aeun6en 90100,5
IorpeuHoctb K_wA
Aeun6en 2,5 2,5
YcnoBn3KcnnyatauHH
Yncno o6oPoTOB (/mH.) 3000 3000
MaTePnAn-ST37
Pa3Mepbl-8x40
山NnΦOBaJIbHaJneHTa
GRIT by Fein
- 36Z
ПРИМЕЧАHп:Сумmaизмеренголзачении COOTBeTCTBlyOuSeI NOrpeShHOCTH npeAcTabnreT co60и ВсрхнйпpeДeн 3нau�еня,КOTOPoe MoKTe 6bIb ПОУЕНВ pe3yЛbTaTe ИЗмерени.


IcnoJb3yIe cpeAcTba 3aunTbI opraHOB cnyuxa!
Pe3ynbTaTbI N3MepeHn NOJyueHb B COOTBETCTBnC
PpIMeHMbIMN K N3DeENIO HOpMaMn (CM. NocneAHOIO
CTpaHNU HaCTOaero PYKOBoAcTBA NO
3KcNpyatauIN).
Texo6cnyHHBaHne n cepBnchaj cnHy6a.

Pemont pa3pewaeTc BbINOHrTa Tolbko KbaHnHnHPOBaHHOMy nepcoHaNc co6JIIOAeHNEm AeICTBvIOxN PpeAnncAHn.
AЯ peMOHTa peKOMeHdyEcTcO TAn O6CnyKbAHnFEIN,MacTePckne rapaHTnHOro peMOHTa FEIN nIpeCTabNTbCTBa FEIN.
PnIOBpeKdEHHN WHypa NtTaHnMaunHbI WHyp Heo6xoAIMO 3aMeHHTb Ha cneuaNbHO NOrTOBJIeHHbI WHyp, KOTOpBI MOxHO npno6pcTeB CepBnCHOH MaTepckOi FEIN.
AkyaHbHcNcOK 3aHAcTeK DaHHoMaHHe HaxoHTcB IVHTepHeTe No aDpecy: www.fein.com.
EHeHHeBHeIpepaOToI noTexo6cnyHnBaHHIO

ПpoAуBaIte CxKaTbIM BO3aYXOM BeHTnIaUIOHHbIe OTBepCTnI (18)Ha KOpnyce ABHraTeJI N OTMeueHHbIe MeCTa (CM. INHΦopMaUHOHHyTO Ta6NHyKy (27)).

EkeAHeBHO Cma3bIbAaTe MaunHy B yKa3aHHbIX MecTAX MaunHHbIM MacnOM (CM. INHOpMaUNOHHyTO Ta6NHy (27)).
KaKbI pa3 npn 3aMeHe a6pa3NBHOJ neHTbl npOBepaTe npBODHOJ dNCK (23) n KOHTaKTbHbI dNCK (21) Ha ppeAMET H3HOca N NOBpeXdEHH. 3aMeHrTe NOBpeXdEHbIe AeTann.
OTnyctnte BnHT co 3Be3Ao06pa3Hoi pyuKoI (11).
CHHMMTe KOHTeHep AnOnIOK (8) n yTnIn3npyIte MetaJIuueCKyIO nbIb.
CoepKHMoe KOHTeHepa AnOuNOK CneAyeT AOCTaTOUHO OXNaNTb NpeA ONOPOXHEHEm, pa3pe7aetcOnOPOXHrTB eO TOBko B IoADxOAdyUO EMKOCTb.
IocTaBbTe ONOpOxKHeHHb KOHTeHep AINoONIOK Ha MeTo N HactpoTe WnPnHy 3a3Opa WnNΦOBaBbHOJ ONOpbl. (pnc.1)
3aTAHHTe BnHT CO 3Be3Aoo6pa3HOH pyKoN (11).
OuHCTHe MaunHy chapyKcXaTbIM BO3dYxOM.
EkeMeecyHcMa3bBaIteNoAunnHnKnHaTAAHOrnpncocO6JeHHcNOMoUbIO CMA3OHORo WTyepa(24).
Pn Heo6xOaHMoCTN Bbl MoHete CaOCToTeIbHo 3aMeHHTb CNeDyUoune YactH: a6pa3NBHyIO JeHTy, 3aunTy OT NcKp
06a3aTeIbHa rapaHTHa n DonoJIHHTeIbHa rapaHTHa H3rOToBHTeJI.
063aTeNbHa rapaHTnHa n3AeHne
IpeOCTabNAreTCB COOTBeTCTBnC
3aKoHONOJKeHnMa B CtpaHe NOnb3OBaTeNc. Cbepx
3Toro,FEIN npEoCTaBnReT AOONHnTeNbHyIO
rapaTHIO B COOTBeTCTBnC rapaHTnHbIM
063aTeNbCTBOM n3ROTOBnTeNf FEIN.
KOMNNEKT NOCTABKN HAcTOnaIeM MaunHbIMoXeT He BKNIOUaTB BeCb Ha6Op OINcaHHbIX INN N3O6paXeHHbIX B 3Tom pyKOBOACTBE IOKCNpyatauIN PpHaADNeXHOCTeN.
Деклараши COOTBETCTBHA.
Deknapaue CE AeNCTByeT TOnbKO Anr CTpaH Ebponeckoro co103a n EACT (Ebponecko accounauin CBO6OAnHOI TOPROBn) n ToIbKO Anr 3Aen, npEHa3NaueHHbx AIn pblHKa EC nn EACT. Iocne BBOda n3AeJnB O6OpOT Ha pbHKe EC 3NaK UKCA cTaHOBNTc HDeiCtBNTeJIbHbIM.
Eknapaun UKCA DeICTByeT TOIbKO AINpBInKa BeNko6pTaHn (AHnn, Y3nbca n IIOToHaHn) IN ToBKO AIN3deHn, PpeHa3HaYeHHbIX AINpBInKa BeNko6pTaHn. Iocne BBOda n3deHn B O6opOT Ha pbIHke BeNko6pTaHn 3HaK CE cTAHOBTcR HeDeIcTBNTJIbHbIM.
C NCKHIOHTeINbHOI OTBeTCTBEHHOCtBIO HnPMA FEIN 3aBJIaET, YTO HAcTOJUee H3dEInne COOTBeTCTByET HOpMaTHNBHbIM DOKymeHTAm, PnPBEdEHbIM Ha NocNeAHei CTpaHnue HaCTOJUero pyKOBOAdCTBa INo 3KcNlNyTaun.
TexHnuecka DOkymeHTaun: C. & E. Fein GmbH, C-D1 IA, D-73529 Schwabisch Gmund
OxpaHa OhpyHaIOUeN CpeDbI, yTHn3aun.
YnakoBky, npHweAWe B HeRoAHOCTb MaunHbI n npHaJNeXHOCTHn CneAyeT YTNn3NpOBAtB 3KoIOnrueckn YnCTbIM O6pa3OM.
Cxembl coeHHENH.
Ttn GI75, GI150 Crp. 104
Ttn GI75 2V, GI150 2V Crp. 105
Ttn GI75 2H, GI150 2H Ctrp. 106
Tnn GI75 2H2V, GI150 2H2V Ctp. 107
正本使用说明书的翻譯。
使用的符号,缩写和代名词。
Table of Toxic and Hazardous Substances/Elements and their Content as required by China's Management Methods for Controlling Pollution by Electronic Information Products
有毒有害物质/成分及其含量表
This CE declaration is only valid for European Union and EFTA (European Free Trade Association) countries and only for products intended for the EU or EFTA market. After placing the product on the EU market the UKCA mark loses its mark validity.

EN ISO 3744:2010
EN ISO 11202:2010
EN ISO 4871:2009
EN ISO 12100:2011
2006/42/EG, 2011/65/EU

U. Hegosell
i.V.S.Bohm i.V.Dr.M.Hergesell Director of Quality Director of Product Management Development
The UKCA declaration is only valid for the Great Britain market (England, Wales and Scotland) and only for products intended for the Great Britain market. After placing the product on the Great Britain market the CE mark loses its mark validity.

EN ISO 3744:2010
EN ISO 11202:2010
EN ISO 4871:2009
EN ISO 12100:2011
Supply of Machinery Regulations 2008, The Restriction of the Use of Certain Hazardous Substances in Electrical and Electronic Equipment Regulations 2012

U. Hegosell
i.V.S.Bohm i.V.Dr.M.Hergesell Director of Quality Director of Product Management Development