SoundTestMaster - Sound level meters Laserliner - Free user manual and instructions
Find the device manual for free SoundTestMaster Laserliner in PDF.
| Product Type | Digital Sound Level Meter with dB A and dB C filters |
| Brand | Laserliner |
| Model | SoundTestMaster |
| Manual Measurement Ranges | 30-80 dB, 40-90 dB, 50-100 dB, 60-110 dB, 70-120 dB, 80-130 dB |
| Automatic Measurement Range | 30-130 dB |
| Accuracy | ±1.5 dB (reference condition 94 dB/1 kHz) |
| Frequency Range | 31.5 Hz to 8 kHz |
| Time Weightings | Fast (125 ms) and Slow (1 s) |
| Main Functions | dB A / dB C measurement, MAX function, memory recording (16,000 points), real-time data transfer via PC, DC/AC outputs |
| Internal Memory | 16,000 measurement points |
| PC Interface | Opto-isolated RS232, cable included |
| DC Output | 10 mV/dB, impedance ≈ 100 ohms |
| AC Output | 0.70 Vrms at full scale, impedance ≈ 600 ohms |
| Power Supply | 6 AA batteries (1.5 V) or 9 V DC power adapter ≥ 500 mA |
| Dimensions (W × H × D) | 80 × 245 × 35 mm |
| Weight (with batteries) | 350 g |
| Operating Conditions | 0 °C to 40 °C, max RH 80 % non-condensing, max altitude 2000 m |
| Storage Conditions | -10 °C to 60 °C, max RH 80 % |
| Maintenance and Cleaning | Clean with a slightly damp cloth, no solvents. Remove batteries for prolonged storage. |
| Safety | Proper use, avoid mechanical stress, extreme temperatures, humidity. Keep out of reach of children. Follow EMC guidelines. |
| Spare Parts and Repairability | Windscreen included, transfer cable, calibration screw. Annual calibration recommended by Umarex-Laserliner service. |
| General Information | Instruction manual available in multiple languages. Complies with EU and UK. Mandatory recycling at end of life. |
Frequently Asked Questions - SoundTestMaster Laserliner
User questions about SoundTestMaster Laserliner
0 question about this device. Answer the ones you know or ask your own.
Ask a new question about this device
Download the instructions for your Sound level meters in PDF format for free! Find your manual SoundTestMaster - Laserliner and take your electronic device back in hand. On this page are published all the documents necessary for the use of your device. SoundTestMaster by Laserliner.
USER MANUAL SoundTestMaster Laserliner
natural_image
Top-down view of a black electronic device with battery pack and external casing (no visible text or symbols)2 ON / OFF
text_image
SoundTest-Master MAX 1 sectext_image
SLOW 40:17:03:08 TIME 90 52.8 A dB LEVEL| Messbereich: Manuell | |
| 30 ... 80 dB 60 ... 110 dB | |
| 40 ... 90 dB 70 ... 120 dB | |
| 50 ... 100 dB | 80 ... 130 dB |
| Messbereich: Automatisch | |
| 30 ... 130 dB | |
text_image
UNDER 80° SLOW OVER 130° 17:03:08 TIME LEVEL 52.8 A dBtext_image
40 introduced FAST 17:03:08 TIME 90 CLA A dBtext_image
SENDING 40:10:00:00 SLOW 90 17:03:08 TIME 52.8 A dB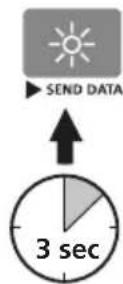
text_image
Correction14 Netzteilbetrieb
natural_image
Close-up of a black camera control panel with adjustment knobs and an arrow pointing to the right side (no text or symbols on the panel itself)Completely read through the operating instructions, the „Warranty and Additional Information” booklet as well as the latest information under the internet link at the end of these instructions. Follow the instructions they contain. These documents must be kept in a safe place and passed on together with the product.
Intended use
The sound level meter is used to measure sound level with the frequency weighting filters based on the standard curves dB A and dB C as well as two time weighting factors (fast/slow). An internal memory stores the data measured during long-term measurements and the internal interface enables real time logging on a PC.
General safety instructions
- The device must only be used in accordance with its intended purpose and within the scope of the specifications.
- The measuring tools and accessories are not toys. Keep out of reach of children.
- Do not expose the device to mechanical stress, extreme temperatures, moisture or significant vibration.
- The structure of the device must not be modified in any way.
- The device must no longer be used if one or more of its functions fail or the battery charge is weak.
- Please ensure compliance with the safety regulations set out by local and national authorities with regard to the correct and proper use of the device.
text_image
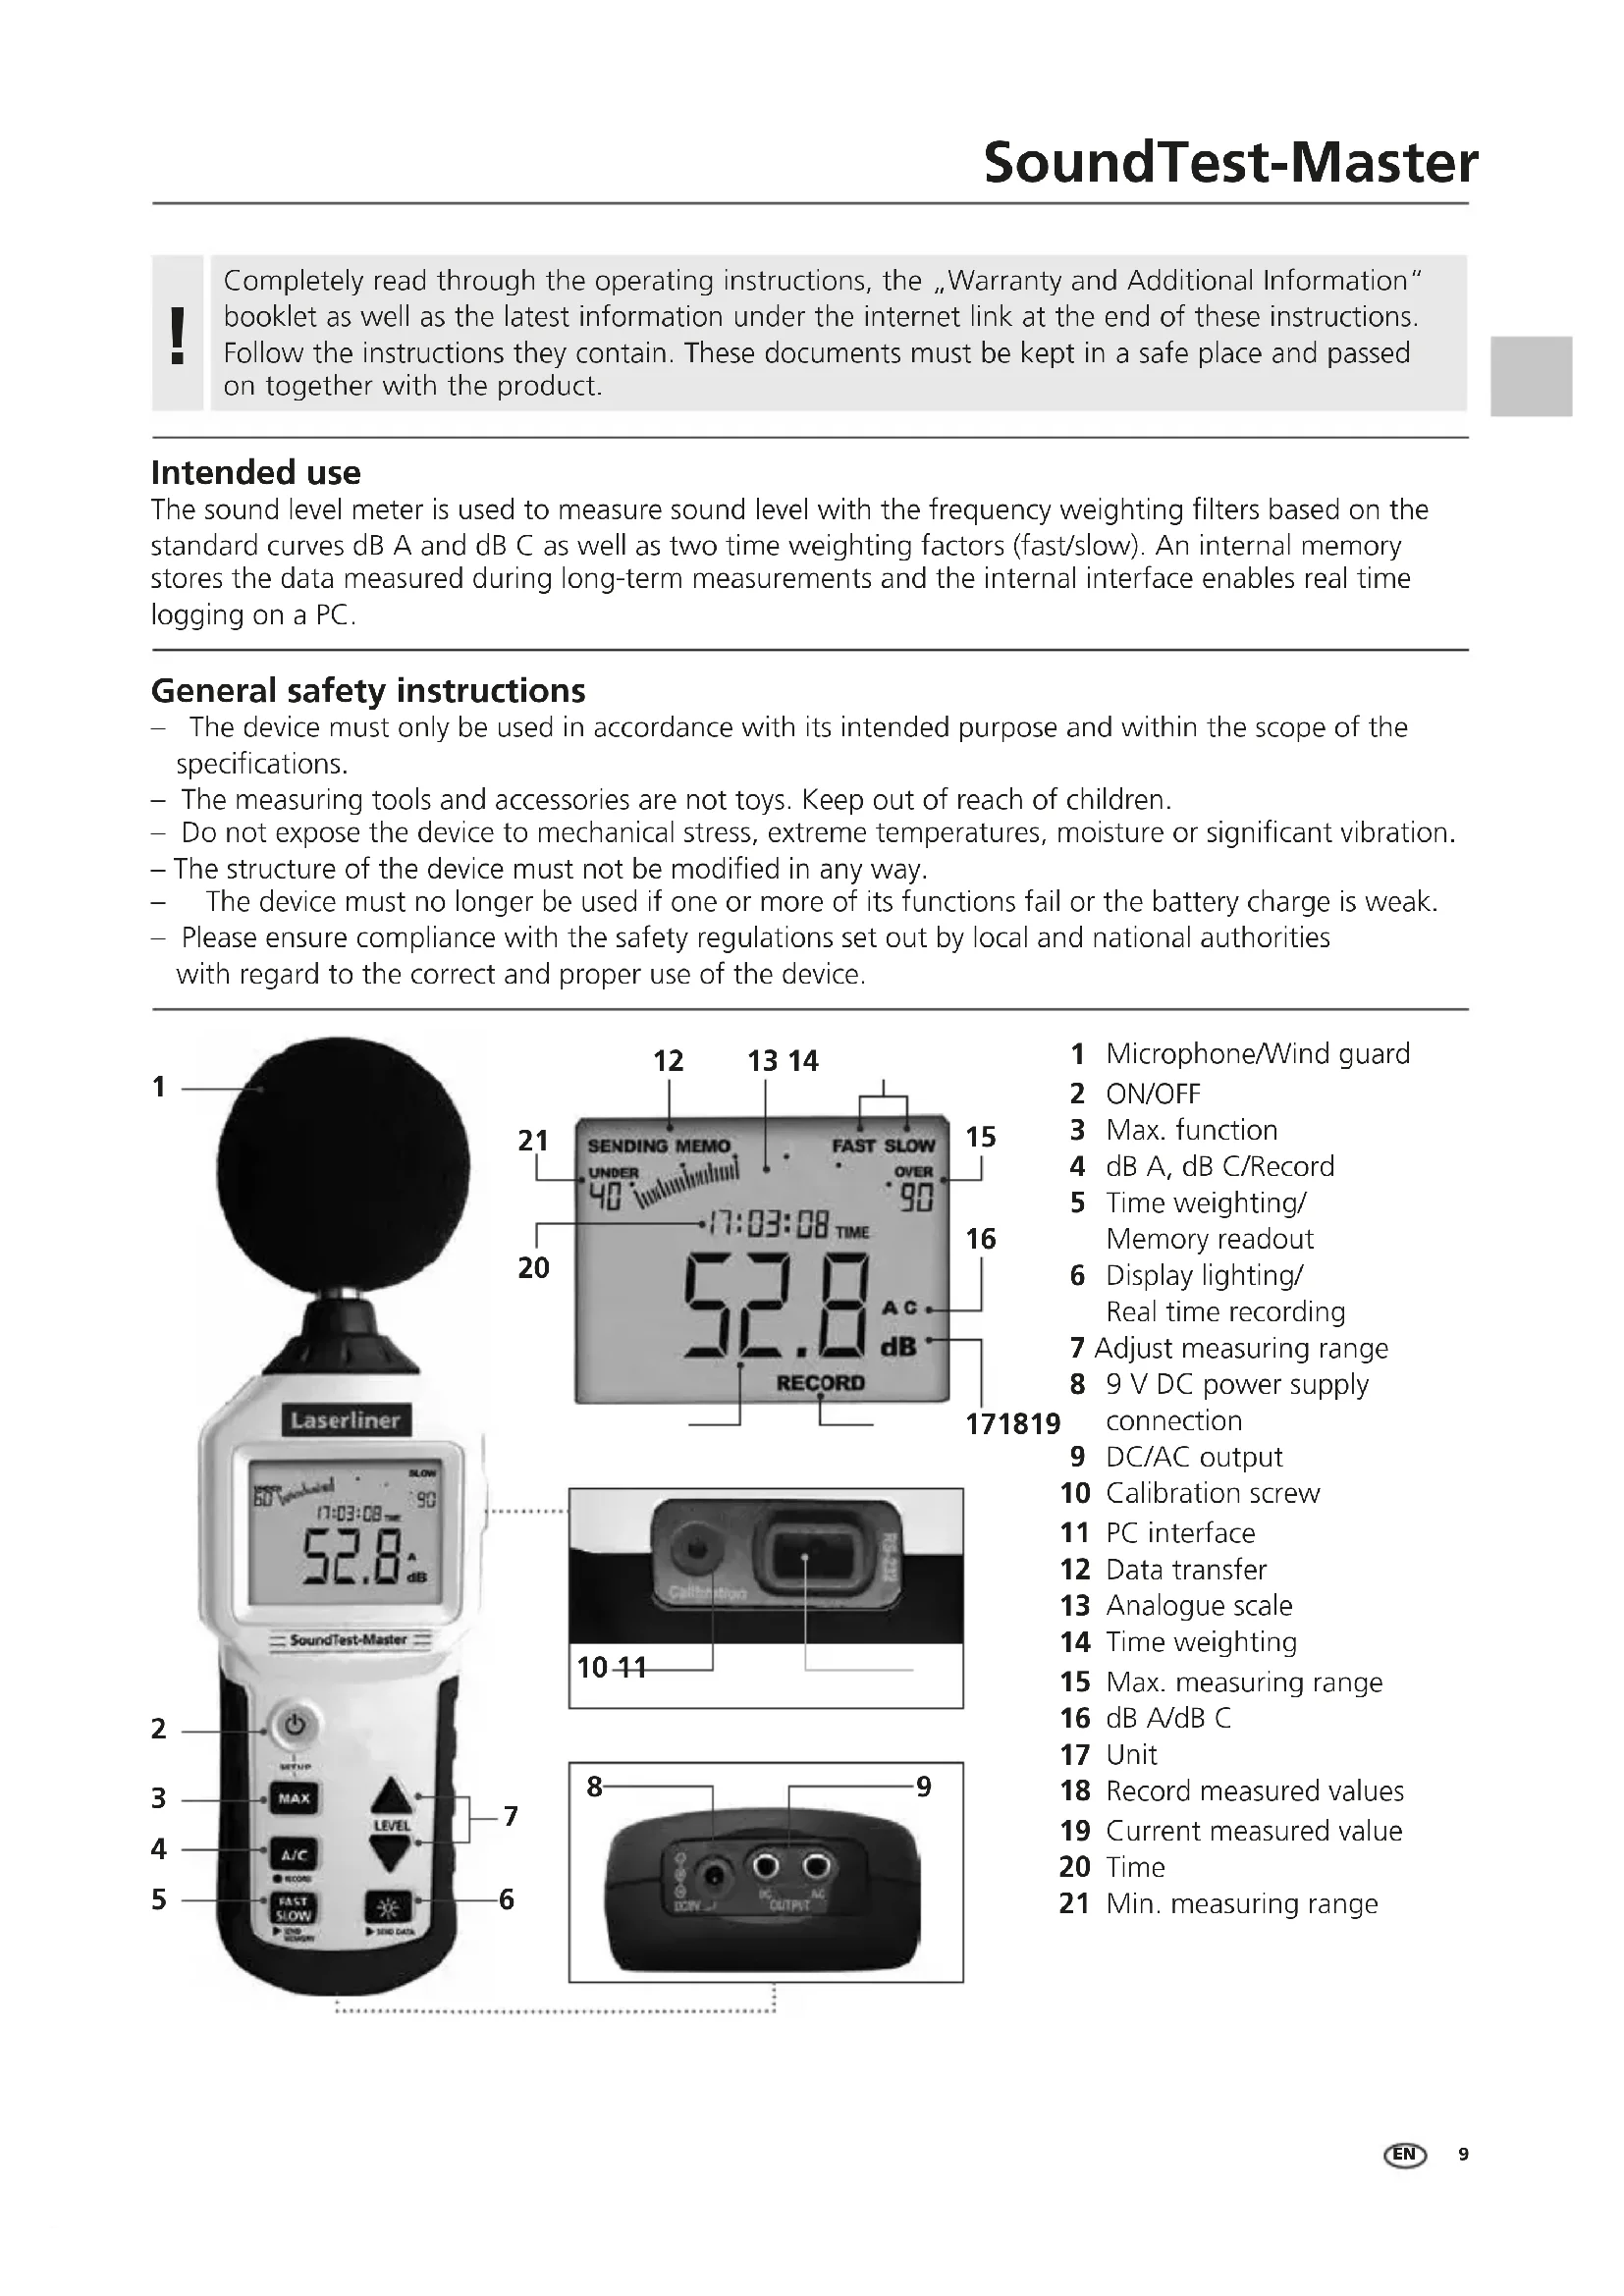
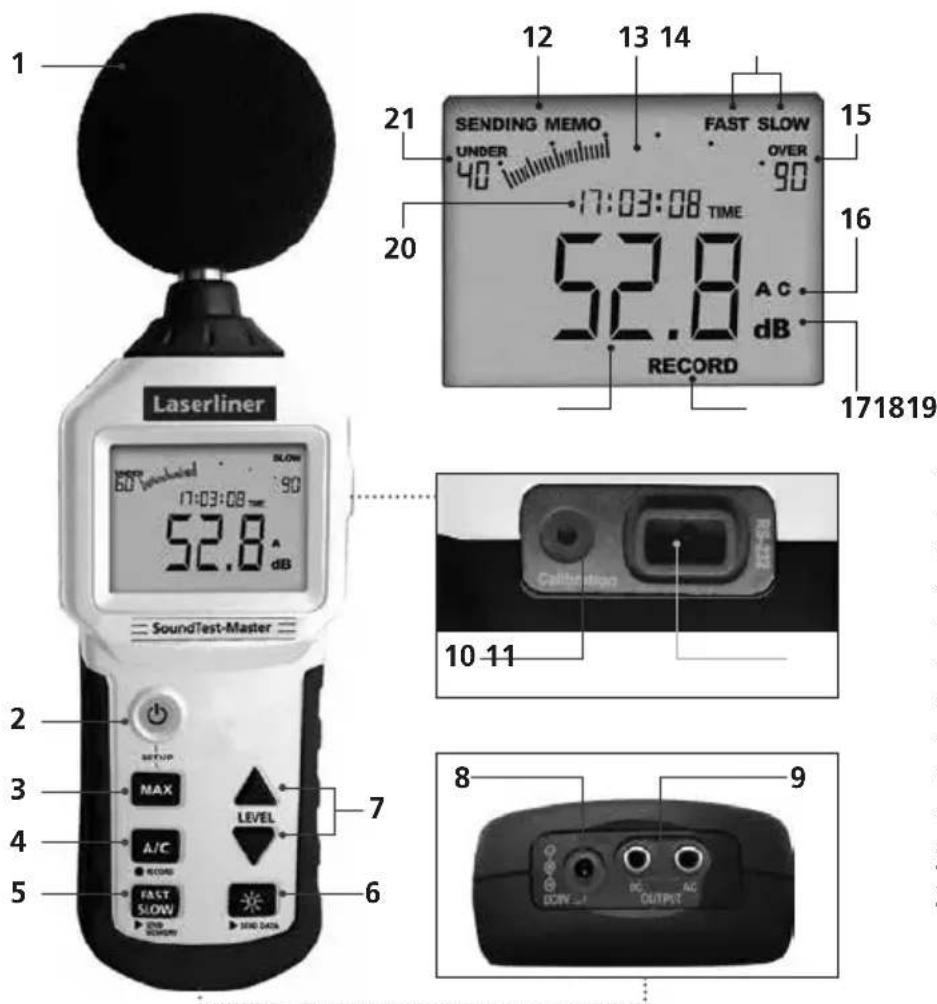
1 21 SENDING MEMO UNDER 40 FAST SLOW OVER 90 17:03:08 TIME 52.8 dB AC dB 171819 20 Laserliner 60 V endothel 52.8 dB SoundTest-Master 10-11 2 3 MAX LEVEL A/C RECORD FAST SLOW SIND DATA 6 8 9 DC AC DOW OUTPUT1 Microphone/Wind guard
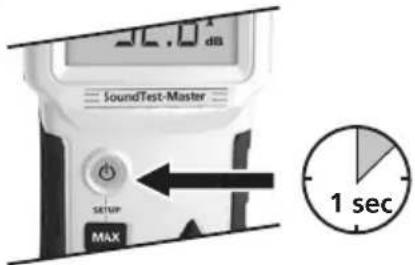
2 ON/OFF
3 Max. function
4 dB A, dB C/Record
5 Time weighting/Memory readout
6 Display lighting/Real time recording
7 Adjust measuring range
8 9 V DC power supply connection
9 DC/AC output
10 Calibration screw
1 PC interface
12 Data transfer
13 Analogue scale
14 Time weighting
15 Max. measuring range
16 dB A/dB C
17 Unit
18 Record measured values
19 Current measured value
20 Time
21 Min. measuring range
Laserliner
Safety instructions
Dealing with electromagnetic radiation
- The measuring device complies with electromagnetic compatibility regulations and limits in accordance with the EMC Directive 2014/30/EU which is covered by the Radio Equipment Directive 2014/53/EU.
- Local operating restrictions – for example, in hospitals, aircraft, petrol stations or in the vicinity of people with pacemakers – may apply. Electronic devices can potentially cause hazards or interference or be subject to hazards or interference.
- The measuring accuracy may be affected when working close to high voltages or high electromagnetic alternating fields.
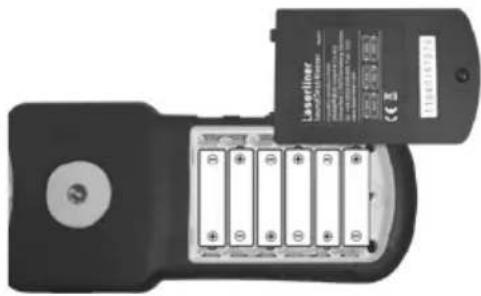
1 Insert battery
Open the battery compartment and insert batteries (6 x type AAA) according to the symbols. Be sure to pay attention to polarity.
natural_image
Top-down view of a black handheld device with battery modules and a partially visible card labeled 'Laserliner' (no readable text or symbols on the device body)2 ON / OFF
text_image
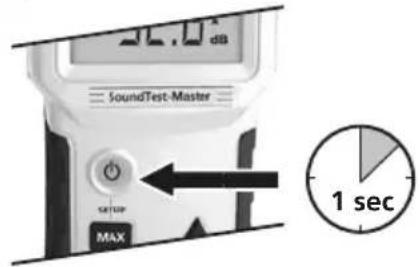
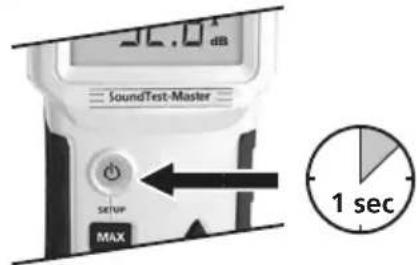
30.0 dB SoundTest-Master SETUP MAX 1 secB Setting date/time (setup)
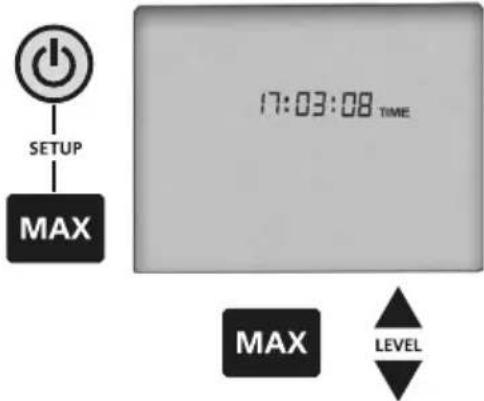
The current data and time should be set before using the device for the first time to ensure stored measured values are assigned for subsequent evaluation. Press and hold the "MAX" button while switching on. You can change the value with the "LEVEL" buttons and move to the next value with the "MAX" button.
Date format: Year/month/day. Switch off the device to store the setting.
text_image
SETUP MAX 17:03:08 TIME MAX LEVEL4 Sound pressure level (dB)
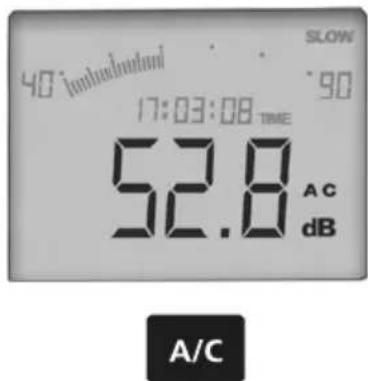
This device registers sound in a similar way to the human ear. The integrated microphone receives the incoming sound waves and converts them into electrical signals. Human hearing involves specific auditory curves. The greater the sound pressure, the louder the sound is perceived to be. The higher the frequency, the higher the pitch of the sound is perceived to be. To ensure that measurements are aurally compensated, this measuring device is fitted with filters. The A-weighting (dB A) replicates the frequency response associated with human hearing and is used for the majority of industrial noise and environmental noise measurements.
The C-weighting is used in industrial measurements.
After switching on the device, correspondingly switch over the dB A/dB C weighting filter by pressing the "A/C" button.
text_image
40° undesetzen SLOW 90 17:03:08 TIME 52.8 AC dB A/CPowerful wind noises (> 10m/s) can affect the measured value. In such cases, you should use the wind deflector supplied with the product.
Sound source Sound pressure level in dB (A)
| Auditory threshold | 0 |
| Quiet residential area | 30 to 40 |
| Low-level conversation, quiet office | 40 to 50 |
| Normal conversation | 50 to 60 |
| Heavy road traffic | 70 to 80 |
| Shouting, screaming | 80 to 85 |
| Pneumatic hammer (10 m away) | 90 to 100 |
| Start-up of a jet aircraft (100 m away) | 120 to 130 |
| Pain threshold | 140 |
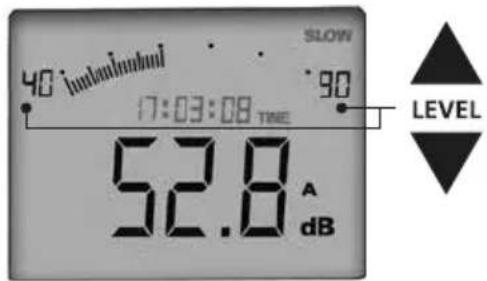
5 Measuring range
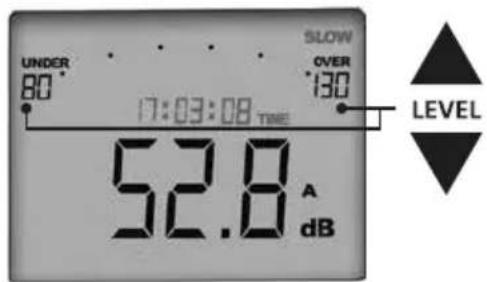
Select the corresponding measuring range in the device to achieve the required degree of accuracy of measurement results. In addition to the option of selecting the measuring range manually, the device also features an automatic range detection function. You can set the required measuring range by pressing the "LEVEL" buttons. To set the automatic measuring range, press and hold the "LEVEL ▲" button until the measuring range 30...130 dB appears in the display.
text_image
SLOW 40 iunouinuui 90 17:03:08 TIME 52.8 A dB LEVEL| Measuring range: Manual | |
| 30 ... 80 dB 60 ... 110 dB | |
| 40 ... 90 dB 70 ... 120 dB | |
| 50 ... 100 dB 80 ... 130 dB | |
| Measuring range: Automatic | |
| 30 ... 130 dB | |
text_image
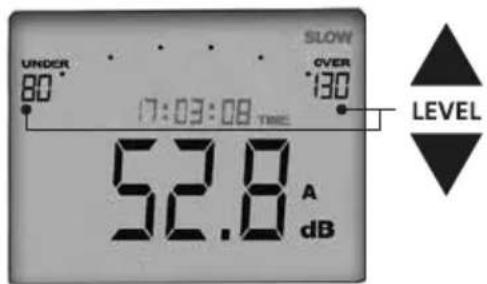
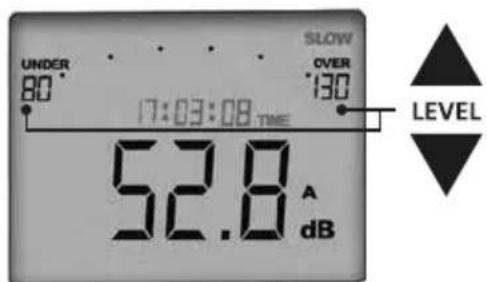
UNDER 80° SLOW OVER 130° 17:03:08 TIME LEVEL 52.8 A dBThe following alert is shown on the display when the measured values are outside the preset measuring range:
| UNDER | The measured value is below the measuring range. Correct the measuring range downward. |
| OVER | The measured value is above the measuring range. Correct the measuring range upward. |

Use the automatic measuring range to gauge the corresponding range. Then switch over to the determined manual measuring range as greater accuracy is achieved in this range. Ideally, the measured value should be in the middle of the defined measuring range.
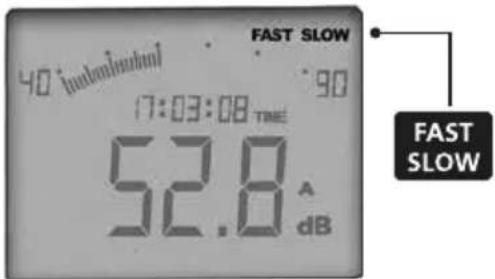
6 Time weighting (FAST/SLOW)
text_image
FAST SLOW 40 dB 17:03:08 TIME 52.8 A dB FAST SLOWThe device features two different measuring intervals. "FAST" time weighting should be set for signals that change quickly. "SLOW" time weighting should be set for continual signals that change slowly. The "FAST" measuring interval is 125 milliseconds while the "SLOW" measuring interval is 1 second. The time weighting can be changed at any time during the measurement by pressing the "FAST/SLOW" button.
Always make sure the time weighting is set correctly to match the signal to be measured. If "SLOW" weighting is used for signals that change fast the measurement result may be falsified as peak levels may not be recorded.
7 MAX function
The MAX function is activated by pressing the "MAX" button. The measured value currently displayed corresponds to the largest measured value. Lower measured values are not displayed. Press the "MAX" button again to deactivate the function.
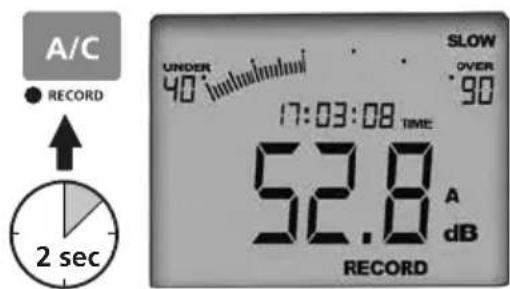
8 Record measured values (RECORD)
An internal memory makes it possible to record measured data during a measurement session. The stored data can be read out for subsequent evaluation. The memory can hold up to 16,000 measurements. Press the "RECORD" button for 2 seconds to start recording. "RECORD" appears at the bottom of the display. Press the button again for 2 seconds to stop recording. "FULL" is shown on the display as soon as the memory in the device is full.
text_image
A/C ● RECORD ↑ 2 sec UNDER 40 °C SLOW OVER 90 17:03:08 TIME 52.8 A dB RECORDDo not start measurement recording before the device has been securely set up and adjusted. Measurements may be falsified if settings are changed during recording.
The internal storage space is limited to 16000 measuring points; longer measurements can be carried out in real time with the Windows application.
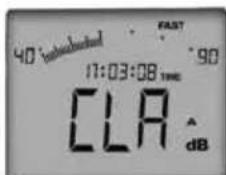
9 Clear memory
Press and hold the "LEVEL ▲" button for 3 seconds to completely delete the data in the memory. "CLR" appears on the display. Press and hold the "LEVEL ▼" button for 3 seconds to confirm that you wish to delete the data. The "CLR" display then flashes for a short time. The delete operation is concluded as soon as the normal display view appears again.
text_image
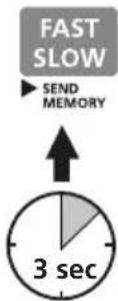
40:intubated FAST 17:03:08 TIME 90 CLA dB10 Transfer stored data (SEND MEMORY)
The software must be installed on your PC before the data can be read out. To do this, follow the instructions at https://packd.li/ll/stm/ap/wi, start the installation program and follow the installation routine.
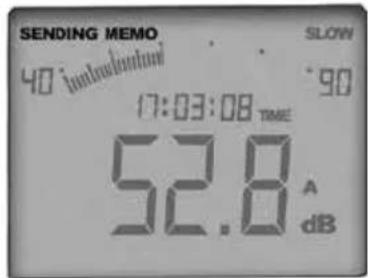
After successful installation, start the application. Then connect the supplied transfer cable to the PC interface on the device. Connect the other end of the cable to a free port on your PC. Press and hold the "SEND MRMORY" button for 3 seconds to transfer the data. "SENDING MEMO" appears on the display and goes out again as soon as data transfer has been completed.
text_image
SENDING MEMO 40 introduction SLOW 90 17:03:08 TIME 52.8 A dBIf the whole measurement memory is transferred to the PC, the entire transfer can take a long time. The connection to the PC is made via an optically decoupled interface to prevent interference during real-time transmission, meaning that only moderate data transfer rates can be achieved.

text_image
80° 745° 180 00:00:00 THE 188.8 dB START Cancel OK Cancel Cancel OK Cancel Cancel11 Real time recording (SEND DATA)
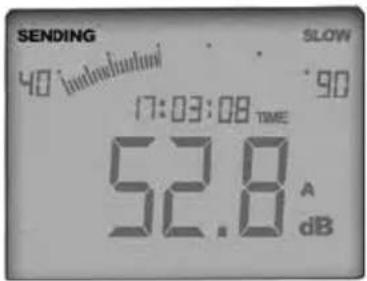
It is possible to transfer the data to the PC in real time when conducting extensive measurements where there is not sufficient space in the internal memory for the recorded data. Data storage takes place directly at the PC. The measured data can also be displayed and observed directly on the PC monitor.
text_image
SENDING SLOW 40 (moderate) 90 17:03:08 TIME 52.8 A dB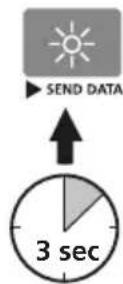
Connect the device to the PC as described under Point 10 and start the program. Press and hold the "SEND DATA" button for 3 seconds to start data transfer. "SENDING" appears on the display. All recorded data are now shown in real time on the PC. Press the "SEND DATA" button again for 3 seconds to stop data transfer.
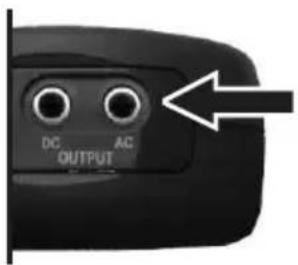
12 DC/AC output
The device is equipped with analogue signal outputs. The dB A or dB C signal is output via the CD output for connection to a chart recorder for instance. The unfiltered signal that is recorded directly from the microphone is made available at the AC output for a possible connection to an oscilloscope.
text_image
DC AC OUTPUTLaserliner
13 Calibration and adjustment
The calibration can be checked by means of a sound pressure level calibrator in accordance with IEC/EN 60942:2003ff. The calibrator defines a target volume of 94 dB. The device should be checked in the 80...130 dB setting and show 94 dB plus the tolerance range on the display. If the displayed value deviates from the target volume, you can adjust the sound level meter to the required 94 dB by means of the calibration screw.
text_image
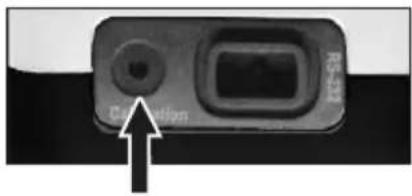
Centricle R-10014 Power pack operation
It is recommended to operate the device with a controlled power pack (9 V, > = 500 mA DC, DC power plug 3.5 x 1.3 mm). High quality control and filtering of the power pack is required in order to rule out possible interference on the measurement signal (ripple <= 100 mV).

natural_image
Close-up of a black camera control panel with an arrow pointing to the right side (no text or symbols visible)15 Mounting on tripod
For certain measuring tasks it may be of advantage to secure the device on a tripod. To do so, screw the device on to a tripod with a 1/4" connection. Undo the device by turning in anticlockwise direction.
Information on maintenance and care
Clean all components with a damp cloth and do not use cleaning agents, scouring agents and solvents. Remove the battery(ies) before storing for longer periods. Store the device in a clean and dry place.
Calibration
The meter needs to be calibrated and tested on a regular basis to ensure it produces accurate measurement results. We recommend carrying out calibration once a year. Contact your distributor or the UMAREX-LASERLINER service department.
| Technical data (Subject to technical modifications. 23W23) | |
| Manual measuring range 30 dB ... 80 dB | 40 dB ... 90 dB50 dB ... 100 dB60 dB ... 110 dB70 dB ... 120 dB80 dB ... 130 dB |
| Automatic measuring range 30 dB ... 130 dB | dB |
| Accuracy ± 1.5 dB (reference condition 94 dB / 1 kHz) | |
| Dynamic range 50 dB | |
| Test condition 94 dB, 1 kHz sinusoidal signal | |
| Frequency range 31.5 Hz ... 8 kHz | |
| Measuring interval Fast: 125 ms, Slow: 1 s | |
| Resolution of digital display 0.1 dB, Measuring rate: 2 measurements/second | |
| Resolution of analogue display 1 dB, Measuring rate: 20 measurements/second | |
| Microphone Electret microphone | |
| Data memory 16,000 measurements | |
| AC voltage output 0.70 Vrms at full deflection, approx. 600 ohm output impedance | |
| DC voltage output 10 mV/dB, approx. 100 ohm output impedance | |
| Interface Optoinsulated RS 232 | |
| System requirements Windows XP / Vista / 7 / 8 / 10 / 11, 32bit / 64bit | |
| Power supply | 6 x 1.5 V AAA |
| Power pack connection | DC 9V ≥ 500 mA (ripple < 100 mV) |
| Operating temperature | 0°C ... 40°C, max. humidity 80% rH, no condensation, max. working altitude 2000 m above sea level |
| Storage temperature -10°C ... 60°C, max. | humidity 80% rH |
| Dimensions (W x H x D) | 80 x 245 x 35 mm |
| Weight (including batteries) | 350 g |
EU and UK directives and disposal
This device complies with all necessary standards for the free movement of goods within the EU and the UK.
This product, including accessories and packaging, is an electrical appliance that must be recycled in an environmentally appropriate manner in accordance with European and UK directives on waste electrical and electronic equipment, batteries and packaging, in order to recover valuable raw materials.
Further safety and supplementary notices at:
https://www.laserliner.com
!
natural_image
Top-down view of a black handheld device with battery pack and external label (no readable text or symbols)2 ON / OFF

text_image
SoundTest-Master SETUP MAX 1 sectext_image
90 w/ulbered FAST 17:03:08 TIME 90 CLA A dBtext_image
RS-132 Correction14 Netadaptervoeding
natural_image
Close-up of a black camera control panel with adjustment knobs and an arrow pointing to the right side (no text or symbols on the panel itself)natural_image
Top-down view of a black handheld device with battery pack and external label (no readable text or symbols)2 ON / OFF

text_image
SoundTest-Master SETUP MAX 1 sectext_image
40 (intels/ohms) SLOW 90 17:03:08 TIME 52.8 AC dB
text_image
Correctionnatural_image
Close-up of a black remote control panel with indicator lights and a pointing arrow (no text or symbols on the panel itself)natural_image
Top-down view of a black handheld device with battery pack and external label (no readable text or symbols)2 ON / OFF
text_image
SoundTest-Master SETUP MAX 1 sectext_image
FAST SLOW 40 (induction) 90 17:03:08 TIME 52.8 A dB FAST SLOWtext_image
SENDING MEMO 40 lmachmout SLOW 90 17:03:08 time 52.8 A dB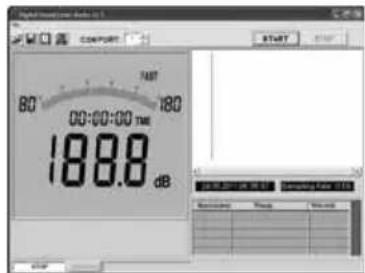
text_image
Digital Inverter Audio 10.1 COMPART 80 FAST 180 00:00:00 TIME 188.8 dB START Computer App 10.1 Settings Timing Preview!
text_image
Correction RS-32natural_image
Close-up of a black remote control panel with indicator lights and a labeled button (no readable text or symbols beyond the label)natural_image
Top-down view of a black handheld device with multiple battery modules and a label reading 'Laserliner' (no visible text on device body)2 ON / OFF

text_image
SoundTest-Master SETUP MAX 1 sectext_image
40 subhatched FAST 17:03:08 TIME 90 CLA A dBtext_image
Digital Signal Display 60° 745° 180 00:00:00 tms 188.8 dB START Cancel Control Panel 1 Control Panel 2 Control Panel 3 Control Panel 4 Control Panel 5 Control Panel 6 Control Panel 7 Control Panel 8 Control Panel 9 Control Panel 10 Control Panel 11 Control Panel 12 Control Panel 13 Control Panel 14 Control Panel 15 Control Panel 16 Control Panel 17 Control Panel 18 Control Panel 19 Control Panel 20 Control Panel 21 Control Panel 22 Control Panel 23 Control Panel 24 Control Panel 25 Control Panel 26 Control Panel 27 Control Panel 28 Control Panel 29 Control Panel 30 Control Panel 31 Control Panel 32 Control Panel 33 Control Panel 34 Control Panel 35 Control Panel 36 Control Panel 37 Control Panel 38 Control Panel 39 Control Panel 40 Control Panel 41 Control Panel 42 Control Panel 43 Control Panel 44 Control Panel 45 Control Panel 46 Control Panel 47 Control Panel 48 Control Panel 49 Control Panel 50 Control Panel 51 Control Panel 52 Control Panel 53 Control Panel 54 Control Panel 55 Control Panel 56 Control Panel 57 Control Panel 58 Control Panel 59 Control Panel 60 Control Panel 61 Control Panel 62 Control Panel 63 Control Panel 64 Control Panel 65 Control Panel 66 Control Panel 67 Control Panel 68 Control Panel 69 Control Panel 70 Control Panel 71 Control Panel 72 Control Panel 73 Control Panel 74 Control Panel 75 Control Panel 76 Control Panel 77 Control Panel 78 Control Panel 79 Control Panel 80!
text_image
SENDING 40:17:03:08 SLOW 90 17:03:08 TIME 52.8 A dB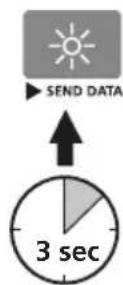
natural_image
Close-up of a black remote control panel with a dial indicator and an arrow pointing to it (no text or symbols on the panel itself)text_image
40 -intercathode SLOW 90 17:03:08 TIME 52.8 AC dB A/Ctext_image
SENDING 40 [induction] SLOW 90 17:03:08 TIME 52.8 A dB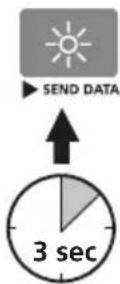
text_image
RS-132 Correctionnatural_image
Close-up of a black camera control panel with adjustment knobs and an arrow pointing to the right side (no text or symbols on the panel itself)natural_image
Top-down view of a black handheld device with battery pack and external circuit board (no visible text or symbols)2 ON / OFF

text_image
SoundTest-Master MAX 1 sec3 Ajustar data / hora (Setup)
text_image
40:17:03:08 SLOW 90 17:03:08 TIME 52.8 A C dB A/Ctext_image
SLOW 40:17:03:08 17:03:08 TIME 90 52.8 A dB LEVELtext_image
40 Intubated FAST 17:03:08 TIME 90 CLA A dBtext_image
SENDING MEMO 40 indolubation SLOW 90 17:03:08 TIME 52.8 A dB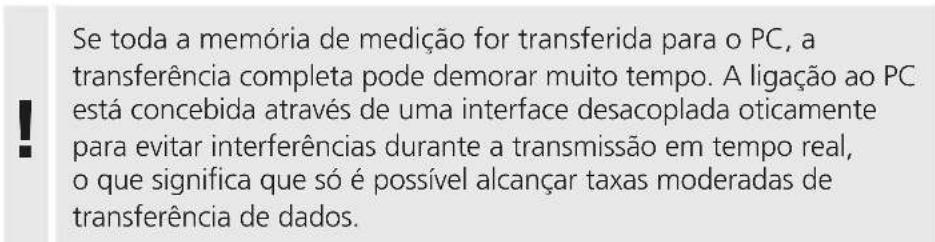
text_image
Correctionnatural_image
Close-up of a black remote control switch with indicator lights and a pointing arrow (no text or symbols on the switch itself)natural_image
Top-down view of a black handheld electronic device with battery pack and external label (no readable text or symbols)2 ON / OFF

text_image
SoundTest-Master MAX SETUP 1 sectext_image
40° industrial SLOW 90 17:03:08 TIME 52.8 A C dB A/Ctext_image
SLOW 40:17:03:08 TIME 90 52.8 A dB LEVEL| Mätområde: Manuell | |
| 30 ... 80 dB 60 ... 110 dB | |
| 40 ... 90 dB 70 ... 120 dB | |
| 50 ... 100 dB 80 ... 130 dB | |
| Mätområde: Automatiskt | |
| 30 ... 130 dB | |
text_image
UNDER 80° SLOW OVER 130° 17:03:08 TIME LEVEL 52.8 A dBtext_image
40 introduced FAST 17:03:08 TIME 90 CLA A dBtext_image
SENDING MEMO 40:17:03:08 SLOW 90 17:03:08 TIME 52.8 A dB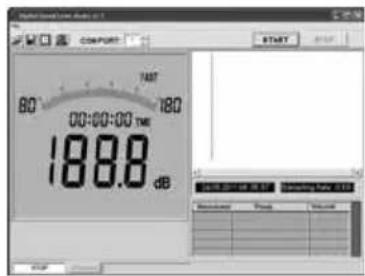
text_image
Digital Signal Time Display COMPORT 80° 745° 180° 00:00:00 TIME 188.8 dB START OK Cancel Balance Finish Help!
text_image
SENDING SLOW 40 lmvalental 90 17:03:08 TWE 52.8 A dB SEND DATA 3 sectext_image
Correction RS-2314 Nätadapterdrift
natural_image
Close-up of a black camera lens with control buttons and an arrow pointing to the right side (no text or symbols on the lens itself)natural_image
Close-up of a black handheld device with battery pack and external label (no readable text or symbols)2 ON / OFF

text_image
SoundTest-Master MAX 1 sectext_image
Correctionnatural_image
Close-up of a black camera control panel with buttons and an arrow pointing to the right side (no text or symbols on the panel itself)natural_image
Interior view of a modern industrial facility with robotic arms and a digital thermometer (no visible text or symbols)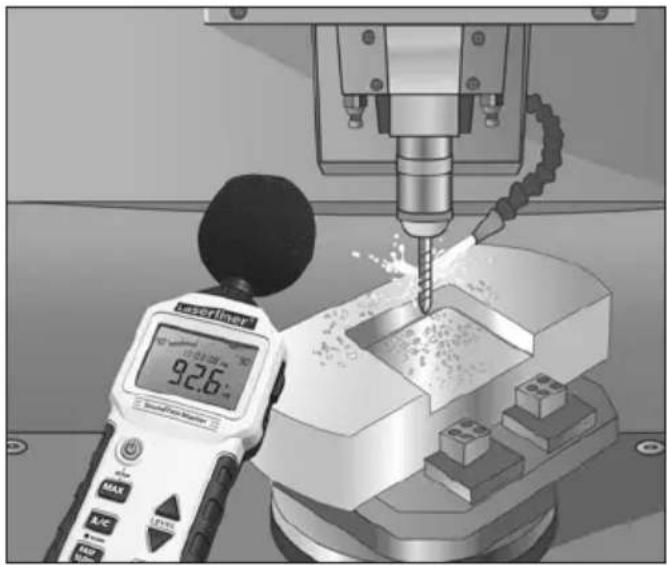
natural_image
Industrial CNC machine tool in operation with a digital display showing 92.6% speed (no text or symbols on the machine itself)