
AD 1192 - Alarm Clock ADLER - Free user manual and instructions
Find the device manual for free AD 1192 ADLER in PDF.
| Product Type | Clock Radio |
| Brand | Adler |
| Model | AD 1192 |
| Power Supply | 230 V, 50 Hz |
| Backup Batteries | 2 AAA 1.5 V batteries (not included) |
| Bluetooth | Version 5.0 |
| FM Frequency Range | 87.5 - 108 MHz |
| Wireless Charging | 5 V, 1 A (Qi compatible) |
| USB Charging Port | 5 V (max 1 A) |
| AUX Input | 3.5 mm jack |
| Display | Digital with dimming (3 levels) |
| Main Functions | FM Radio, Bluetooth, AUX, 2 alarms (buzzer or radio), Snooze (9 min), Sleep timer, Wireless charging, USB charging, Radio presets (auto/manual) |
| Maintenance and Cleaning | Unplug the device, clean with a soft slightly damp cloth. Do not let water get inside. |
| Safety | Use only indoors. Do not expose to water or moisture. Unplug if not used for a long time. Repair only by approved professional. |
| Reparability | Approved professional service center for any repairs |
| General Information | Compliant with directive 2014/53/EU. Declaration available online. |
Frequently Asked Questions - AD 1192 ADLER
User questions about AD 1192 ADLER
0 question about this device. Answer the ones you know or ask your own.
Ask a new question about this device
Download the instructions for your Alarm Clock in PDF format for free! Find your manual AD 1192 - ADLER and take your electronic device back in hand. On this page are published all the documents necessary for the use of your device. AD 1192 by ADLER.
USER MANUAL AD 1192 ADLER
SAFETY CONDITIONS IMPORTANT INSTRUCTIONS ON SAFETY OF USE PLEASE READ CAREFULLY AND KEEP FOR FUTURE REFERENCE
The warranty conditions are different, if the device is used for commercial purpose.
- Before using the product please read carefully and always comply with the following instructions. The manufacturer is not responsible for any damages due to any misuse.
- The product is only to be used indoors. Do not use the product for any purpose that is not compatible with its application.
- The applicable voltage is 230V , 50Hz . For safety reasons it is not appropriate to connect multiple devices to one power outlet.
- Please be cautious when using around children. Do not let the children to play with the product. Do not let children or people who do not know the device to use it without supervision.
- WARNING: This device may be used by children over 8 years of age and persons with reduced physical, sensory or mental capabilities, or persons without experience or knowledge of the device, only under the supervision of a person responsible for their safety, or if they were instructed on the safe use of the device and are aware of the dangers associated with its operation. Children should not play with the device. Cleaning and maintenance of the device should not be carried out by children, unless they are over 8 years of age and these activities are carried out under supervision.
- After you are finished using the product always remember to gently remove the plug from the power outlet holding the outlet with your hand. Never pull the power cable!!!
7.Never put the power cable, the plug or the whole device into the water. Never expose the product to the atmospheric conditions such as direct sun light or rain, etc.. Never use the product in humid conditions.
8.Periodically check the power cable condition. If the power cable is damaged the product should be turned to a professional service location to be replaced in order to avoid hazardous situations. - Never use the product with a damaged power cable or if it was dropped or damaged in any other way or if it does not work properly. Do not try to repair the defected product yourself because it can lead to electric shock. Always turn the damaged device to a professional service location in order to repair it. All the repairs can be done only by authorized service professionals. The repair that was done incorrectly can cause hazardous situations for the user.
- Never put the product on or close to the hot or warm surfaces or the kitchen appliances like the electric oven or gas burner.
11.Never use the product close to combustibles. - Do not let cord hang over edge of counter or touch hot surfaces.
- Never leave the product connected to the power source without supervision. Even when use is interrupted for a short time, turn it off from the network, unplug the power.
- In order to provide additional protection, it is recommended to install residue current
device (RCD) in the power circuit, with residual current rating not more than 30mA . Contact professional electrician in this matter.
- Avoid getting the device wet.
- The device may only be wiped with a dry cloth. Do not use water or cleaning fluids.
- The device should be kept in a dry room.
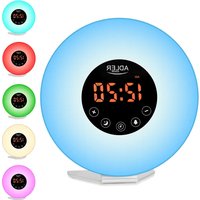
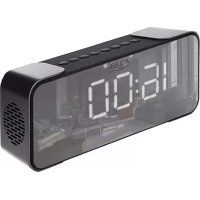
Device description (Clock radio):
-
DISPLAY
-
STANDBY / FUNCTION button
-
CLOCK/MEMORY button
-
VOLUME-/ALARM 1 button
-
VOLUME+ / ALARM 2 button
-
SNOOZE / DIMMER button
-
SCAN- button 8. SCAN+ button
9.SLEEP/PRESET button 10.PLAY/PAUSE button
-
WIRELESS CHARGE LOCATION 12. ANTENNA
-
AC POWER CORD
-
BACKUP BATTERY DOOR
-
AUX-IN JACK
-
USB CHARGING PORT
Before powering the device on. Remove all packing material and read the instruction manual carefully. Keep it for future reference.
Setting up the device:
- Remove all the packing material from the device.
- Open the backup battery door (14).
- Insert 2 AAA 1.5V batteries in the position shown inside.
- Close the backup battery door (14).
- Insert the device AC power cord (13) into the wall socket (220-240 V 50/60Hz.)
Clock setup:
- Press and hold the Clk. / MEM. Button (3). The display (1) will start to blink.
- Choose time format 12 / 24H by pressing the SCAN + / - buttons (7,8).
- Confirm your choice with the CLK / MEM (3) button by pressing it once.
Alarm 1/2 setup:
- Press and hold the Vol-/Vol+/ Al.1/Al.2 Button (4,5). The display (1) will start to blink.
- Choose time by pressing the SCAN - and SCAN + button (7,8).
- Confirm your choice with the Vol-/Vol+ / Al.1/Al.2 Button (4,5). button by pressing it once.
- Choose alarm type between BUZZ and TUNE. Buzzer or Radio. The radio choice will turn the last used radio station.
- Confirm your choice with the Vol-/Vol+ / Al.1/Al.2 Button (4,5). button by pressing it once.
- Choose the volume level of the Buzzer or Radio playing by pressing the SCAN +/- buttons (7,8).
- Confirm your choice with the Vol-/Vol+ / Al.1/Al.2 Button (4,5). button by pressing it once.
Alarm turning On:
- To turn on the alarm press the Vol-/Vol+ / Al.1/Al.2 Button (4,5) button once.
- The dot next to the AL-1 or AL-2 respectfully on the left side of the display (1) to signal the alarm is turned on.
- The display (1) will also show the alarm current setting.
Snoopze
Press the "SNOOZE / DIMMER" button (6) to suspend alarm sound for a few minutes.
The alarm will start again after approx. 9 minutes.
Dimmer
NOTE:
This function can be used in both "Standby Mode" and "Turned On Mode"
- Press and hold the "SNOOZE / DIMMER" button (6) for 2 seconds to select the dimmer. Dimmer has 3 steps.
Turning on the device:
- Press the STANDBY / FUNCTION button (2) once.
- The device will turn on.
- TO turn off the device press and hold the STANDBY / FUNCTION button (2).
Radio setting:
- Turn the device on by pressing the STANDBY / FUNCTION button (2) once.
- The device will turn on the radio function.
3 You can change the frequency by pressing the Scan - and Scan + button (7,8). - You can also press and hold the Scan - and Scan + button (7,8) for the device to automatically find the next radio signal.
Volume control:
- Turn the device on by pressing the STANDBY / FUNCTION button (2) once.
- The device will turn on the radio function.
- Press the Vol-/Vol+/ Al.1/Al.2 Button (4,5) buttons to change the volume UP or DOWN.
Bluetooth function:
- Turn the device on by pressing the STANDBY / FUNCTION button (2) once.
- Press the STANDBY / FUNCTION button (2) again to change to the Bluetooth function.
- The device will be in "Pairing" mode.
- Find on your playback device the "AD 1192" and press PAIR.
- After pairing the device is ready to play.
- Control the music playback with your playback device.
Automatic frequency finding and assigning presets to each signal:
- Turn the device on by pressing the STANDBY / FUNCTION button (2) once.
- The device will turn on the radio function.
- Press and hold for at least 3 seconds the CLK./MEM. Button (3).
- The radio will start to search for radio signals and assign presets numbers to the found station.
- Once the device has covered all of the frequencies the radio will stop searching.
Automatic radio station setup to preset stations:
- Turn the device on by pressing the On/ Off button (2) once.
- The device will turn on the radio function.
- Press the PRE. Button (9).
- You can change the preset number by pressing the Skip - and Skip + button (7,8).
- Press the PRE. Button (9). To confirm your choice.
- The device will switch to the frequency assigned to the preset.
Manual setting of the preset number to the radio station.
- Turn the device on by pressing the STANDBY / FUNCTION button (2) once.
- The device will turn on the radio function.
- Change the frequency by pressing the SCAN - and SCAN + button (7,8).
- Press the CLK./MEM. Button (3) once.
- By using the SCAN - and SCAN + button (7,8) choose the desired preset number.
- Press the CLK./MEM. Button (3) once to confirm your choice.
Choosing the preset radio station:
- Turn the device on by pressing the STANDBY / FUNCTION button (2) once.
- The device will turn on the radio function.
- Press the SLEEP/PRESET Button (9).
- PX will show. Where the X is the number of the station.
- Press the SLEEP/PRESET Button (9) repeatedly to choose the desired preset number.
- The radio will change to the frequency assigned to the number chosen.
AUX playback:
- Turn the device on by pressing the On/ Off button (2) once.
- Press the STANDBY / FUNCTION button (2) twice to change to the AUX-IN function, the display will show "AU".
- Connect the device via the AUX port (15) on the back.
- The device will automatically change to the AUX function.
- Change the tracks on the playback device.
- You can change the volume of the music by using the playback device or the Vol-/Vol+ / Al.1/Al.2 Button (4,5) buttons to change the volume UP or DOWN.
USB Port charging:
- Plug the device to the mains power.
- Using an USB cable insert one side of the cable into the USB port (16) at the back of the radio.
- Once done, unplug the USB cable.
Wireless charging:
- Plug the device to the mains power.
- Remove your phone from its case.
- Put your phone that has the ability to be charged wirelessly.
- Put the phone on the upper part of the device marked with the Lightning / Charging logo.
- Once the phone has finished charging please remove it from the device.
Please note the thickness of your charging case. If the case is thicker than 5mm the charger will not work properly.
Due to the interference from wireless charging, the wireless charging function will be suspended under the FM radio mode.
Please use the USB charger slot to charge your device under the FM radio mode.
Cleaning and Maintenance:
-
Unplug the device from the mains power.
-
Use a slightly damp cotton cloth to clean the front and upper part of the device.
- DO NOT LET ANY WATER ENTER THE DEVICE.
Technical details:
Power: 230 V50Hz
Bluetooth: V 5.0
Battery: 2x AAA 1,5V (batteries for clock backup only)
FM:87.5-108MHz
Wireless charging: 5V 1A

To protect your environment: please separate carton boxes and plastic bags and dispose them in corresponding waste bins. Used appliance should be delivered to the dedicated collecting points due to hazardous components, which may effect the environment. Do not dispose this appliance in the common waste bin.
Hereby, Adler Sp. z o.o., Ordona 2a, 01-237 Warsaw, Poland declares that the radio equipment type radio CR 1180 is in compliance with Directive 2014/53/EU. The full text of the EU declaration of conformity is available at the following internet address: https://adler.com.pl/dane/CE/ad_1192.pdf
DEUTSCH
(6aTeepn cAmo 3a pe3epBHa KOniJa Ha YacOBHnKOT)
FM:87.5-108MHz
Be3xuHNO nonHeBe: 5V1A
Co oba, AДпер Cn. z o.o., OpdoHa 2a, 01-237 BapшаВа, ПОпса Изяавва Deka TINOT Ha paДNo onpeMa paДиоTo AД1187 e Bo corIacHocT co ДИрЕКТиВаТа 2014/53 / EY. ZeIOnCHNt TeKCT Ha DeКларациjata Ha EY Ha coO6pa3HocTa e DoctanHa Ha cIeДhaT a INHTepHET-aDpeca: https://adler.com.pl/dane/CE/ad_1192.pdf
(CZ)ČESKY
BEZPECNOSTNI PODMINKY DULEZITE POKYNY PRO BEZPECNOST POUZIVANI PRECTETESI POZORNE PRECTETESIA Uchovacejte BUDOUCI REFERENCE Zaručni podminky jsou odlisné,Pokud je zařizení použivano pro komercné učely.
Bapsha, Poinbwa 3aBjraeT, TTO
paDnOo6OpyDoBaHna
paIIO CR 1180 COOTBeTCTByeT IupeKtInBe 2014/53
/EC. NohbI TeKCT dEklapaun EC
COOTBETCTBNE DOCTynHO NO CneDyUOeMy aDpecy B
VHTepheTe:
https://adler.com.pl/dane/CE/ad_1192.pdf

3a60TcB 6bKpaHIOe Cpe.ynakOBky n3 KAPToHa nepeaIte, noKaIyIctA, Ha MaKyIaTyp. NIOINTHIneHOBBie MeUK (PE) BbIKDaTb B pe3epByap nnnactMaccbI. N3HOseHHe yCTpoiCTBO HADo nepeDaTB COOTBeTCTBYUOYTOuy TOky XpaHEnH, TAK KAKHXoJIueCAB YCTPOICTEONACBIE COCTABNIAIOUme MOYrABnTBcRA yPo3oJ dIg OKpykaioSe cpebl. 3NeKTPuYeCKoe yCTpoiCTBO HADo nepeDaTB TAKIM o6pa3OM, UTObI OrpanHHTbe erO NOBtPOHe yNOtpeBHeHne HcNoNtB3OBaHne. EcnB yCTpoiCTBe HaxoJrTa6BaTapeH, IN HADo BbITryHbNpePaTb B TOUYKxpaHEnH OTeJIbHo. YCTPOICTBO He BBkNAtB B pe3epByap nIeKOMMyHaNbHbIX OTXoIDob!
(NL) NEDERLANDS
MoUHOC: 230 V50Hz
Bluetooth: V 5.0
- SAFETY CONDITIONS IMPORTANT INSTRUCTIONS ON SAFETY OF USE PLEASE READ CAREFULLY AND KEEP FOR FUTURE REFERENCE
- Bluetooth function:
- Automatic radio station setup to preset stations:
- Manual setting of the preset number to the radio station.
- Choosing the preset radio station:
- AUX playback:
- USB Port charging:
- Wireless charging:
- Please note the thickness of your charging case. If the case is thicker than 5mm the charger will not work properly.
- Cleaning and Maintenance:
- DEUTSCH
- (CZ)ČESKY
- (NL) NEDERLANDS
Brand : ADLER
Model : AD 1192
Category : Alarm Clock