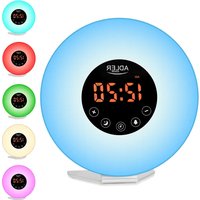
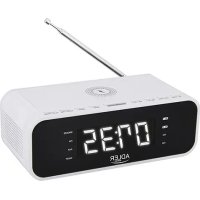
AD 1190 - Alarm clock radio ADLER - Free user manual and instructions
Find the device manual for free AD 1190 ADLER in PDF.
| Product type | Clock radio |
| Brand | Adler |
| Model | AD 1190 |
| Power supply | Built-in battery 1800 mAh, charging via USB 5V/1A |
| Bluetooth version | 5.0 |
| Speaker power | 2 x 5 W |
| FM frequency range | 87.5 – 108 MHz |
| Supported SD card formats | FAT32, MP3 files |
| Main functions | FM radio, Bluetooth, SD card playback, AUX input, dual alarm, snooze, display dimming |
| Display | Screen with time, frequency, indicators |
| Time setting | Manual with 12h/24h format |
| Alarms | 2 independent alarms, choice of ringtone (buzzer) and volume |
| Snooze function | Yes, repeat after 2 minutes |
| AUX input | AUX IN 3.5 mm jack |
| FM antenna | Built-in, possibility to use the USB cable as external antenna |
| Maintenance and cleaning | Wipe with a dry cloth, do not use water or liquid products |
| Safety | Do not immerse, do not expose to water or heat, use only indoors |
| Batteries / Battery | Built-in lithium battery, not user-replaceable |
| Included accessories | USB charging cable (FM antenna) |
Frequently Asked Questions - AD 1190 ADLER
User questions about AD 1190 ADLER
0 question about this device. Answer the ones you know or ask your own.
Ask a new question about this device
Download the instructions for your Alarm clock radio in PDF format for free! Find your manual AD 1190 - ADLER and take your electronic device back in hand. On this page are published all the documents necessary for the use of your device. AD 1190 by ADLER.
USER MANUAL AD 1190 ADLER
text_image
20:30 AM PM 24 FM AUX TFAD 1190
(GB) user manual - 3
SAFETY CONDITIONS IMPORTANT SAFETY INSTRUCTIONS
USE PLEASE READ CAREFULLY AND KEEP FOR FUTURE REFERENCE
The warranty conditions differ if the device is used for commercial purposes.
- Please read carefully and always follow the instructions before using the product the instructions below. The manufacturer is not liable for any damage resulting from improper use.
- The product is intended for indoor use only. Do not use of the product for any purpose inconsistent with its use.
- The device is powered by a built-in battery, to charge it, use the 5V / 1A supply voltage, for this purpose you can also use the USB port, which is available on the computer.
- Be careful when using near children. Don't let the kids play product. Do not let children or people unfamiliar with the device use it without supervision.
5 WARNING: This appliance can be used by children over 8 years of age and persons with reduced physical, sensory or mental abilities or persons without experience or knowledge of the device, only under the supervision of a person responsible for their safety, or if they have been instructed to keep it safe using the device and are aware of the risks associated with its operation. The kids don't should play with the device. Cleaning and maintenance of the device should not be performed by children, unless they are over 8 years of age and these activities are performed under supervision. - Never put the USB power cord, plug or the entire device into water. Never no expose the product to the elements such as direct weather sunlight, rain, etc. Never use the product in wet conditions.
- Never use the product with a damaged USB power cable or if it has been inserted it has been dropped or damaged in any way, or if it does not function properly. Do not try repair the damaged product yourself, as this may lead to electric shock. Always take the damaged device to a professional service in order to repair. All repairs may only be performed by authorized persons service technicians. Repair done incorrectly can make it dangerous situations for the user.
- Never place the product on hot or warm surfaces or appliances such as or near an electric oven or gas burner.
- Never use the product near flammable materials.
- Do not let the USB power cord touch hot surfaces.
- Never leave the device connected to a power source unattended. Even if the use of the product is interrupted for a short time, disconnect the power.
- Avoid getting the device wet.
- The device may only be wiped with a dry cloth. Do not use water or liquids cleaning agents.
-
The device should be stored in a dry room.
-
Display
Upper side Button description:
-
Bluetooth mode
-
Previous song, Volume down
-
FM search / Play / Pause / Call
-
Next song / Volume up 6. Numerical value down 7. Alarm mode 8. Numerical value up
-
Snooze / Dimming
Back side description:
-
On / Off button
-
Aux In 12. Charge / FM antenna
-
Charging indicator
-
SD card slot.
Setting up the device:
- Remove all packing material from the device. Please save the manual for future reference.
- Turn on the device by long pressing the ON / Off button (10).
- To turn off the device long press the ON / Off button (10).
Bluetooth function:
- Long press the On / Off button (10), the device will turn on and will enter clock mode.
- Press the Bluetooth mode button (2). The device will enter Bluetooth mode.
- The Bluetooth logo on the display (1) will start blinking and searching for connection.
- Find the device AD 1190 on your playback device and connect with the radio clock.
- After successful connection the device will notify you.
- To cancel current connection press the Bluetooth button (2) once more. Now you can connect a new device.
Playback functions:
- To play the next of previous song short press the Previous song, Volume down (3), Next song / Volume up (5) buttons.
- To start of pause the current song press the FM search / Play / Pause / Call (4) button.
SD card function:
- Insert the Micro SD card into the SD card slot (14) in the back of the device.
- The device will automatically enter the SD card playback function.
- You can also long press the FM search / Play / Pause / Call (4) button to enter the SD card playback.
- Long press the Previous song, Volume down (3), Next song / Volume up (5) buttons to adjust the volume.
Playback functions:
Playback functions:
- To play the next of previous song short press the Previous song, Volume down (3), Next song / Volume up (5) buttons.
- To start of pause the current song press the FM search / Play / Pause / Call (4) button.
AUX function:
- Insert the AUX cable card into the AUX IN (11) in the back of the device.
- The device will automatically enter the SD card playback function.
- You can also long press the FM search / Play / Pause / Call (4) button to enter the AUX IN playback.
- Long press the Previous song, Volume down (3), Next song / Volume up (5) buttons to adjust the volume.
FM Radio:
- After turning the device on press and hold the FM search / Play / Pause / Call (4) button.
- You will enter the FM mode.
- On the display (1) you can see the current frequency.
- To start auto search of radio stations press once the FM search / Play / Pause / Call (4) button.
- The device will start to find all available FM stations.
- Once the device has finished you can use the Volume down (3), Next song / Volume up (5) to switch between the found stations.
(Please note that if the device has poor reception you can also insert the USB cable into the Charge / FM antenna (12) slot to act as an external antenna and improve the reception.)
Clock Setting:
- When the clock is displayed long press the M button Alarm mode (7) button.
- You will enter the clock setting.
- The current edited value will be flashing.
- To change the value press the Numerical value down (6) or Numerical value up (8) buttons to change.
- To confirm your selection press the M button, Alarm mode (7) button.
- After changing the Hour and Minutes setting and confirming them you can change between 24 and 12 H display.
-
On the display the lower part of the display will flash showing either the flashing icon of 24 H or PM / 12H display setting.
-
You can change the selection by pressing the M button Alarm mode (7) button.
-
To exit the clock edit mode, long press the M button Alarm mode (7) button. Or wait 15 seconds.
Alarm Setting:
You can turn on 1 or 2 alarms.
- To set the alarm time press the M button Alarm mode (7) button once. You will be shown the current 1 alarm setting, short press the M button Alarm mode (7) button again to change to 2 alarm setting.
- To edit the alarm time for 1 or 2 alarm first select the alarm you want to change and long press the M button Alarm mode (7) button.
- You first will edit the Hour, press the Numerical value down (6) or Numerical value up (8) buttons to change the settings, short press the M button Alarm mode (7) button to confirm.
- Then you will edit the minutes, press the Numerical value down (6) or Numerical value up (8) buttons to change the settings, short press the M button Alarm mode (7) button to confirm.
- Then you will edit the type of buzzer noise. Press the Numerical value down (6) or Numerical value up (8) buttons to change the settings, short press the M button Alarm mode (7) button to confirm.
- Then you will change the loudness level of the previously selected ring tone. Press the Numerical value down (6) or Numerical value up (8) buttons to change the settings, short press the M button Alarm mode (7) button to confirm.
- You can also choose the "OFF" option. This will turn off the currently edited alarm.
NOTES:
When the alarm is ringing use any button to enter snooze mode, after 2 minutes the alarm will ring again. During snooze mode press the Snooze / Dimming (9) button twice. The alarm will not ring on the same day again.
When the alarm is ringing and you don't press any button it will stop after 1 minute and then start back again after 2 more minutes. It will do so 3 times. After that the alarm will no longer ring on the same day.
Troubleshooting:
Problem: Device can't connect to Bluetooth.
Solution:
-
Check if the product is not connected to another device. Disconnect the current device and reconnect the new.
-
The device has less than 20% battery charge. Charge the device.
Problem: Unable to charge.
Solution: Check the charging cable.
Problem: Device not booting / turning on.
Solution: Charge the device.
Problem: No sound during playback.
Solution: Increase volume on device. Increase the volume on phone, playback device.
Problem: Can't find any radio station.
Solution: Plug in the USB cable into the Charging slot (12). Change the placement of the radio closer to a window.
Problem: No SD card playback.
Solution: Check the SD card file format and music file format. The format of the SD card should be FAT32 and music format MP3.
Technical details:
Charging current : 5V---1A
Bluetooth version: 5.0
Battery capacity: 1800 mAh
Speaker Power: 2x 5W
FM frequency Range: 87.5 – 108 MHz

To protect your environment: please separate carton boxes and plastic bags and dispose them in corresponding waste bins. Used appliance should be delivered to the dedicated collecting points due to hazarsous components, which may effect the environment. Do not dispose this appliance in the common waste bin.
OHUTUSTINGIMUSED OLULISED OHUTUSJUHISED
KASUTAGE PALUN LUGEGE HOOLIKALT JA SÄILITA EDASISEKS KASUTAMISEKS Garantiitingimused on erinevad, kui seadet kasutatakse ärilistel eesmärkidel.
SIGURNOSNI USLOVI VAŽNE SIGURNOSNE UPUTSTVA
UPOTREBA MOLIM VAS PROČITAJTE PAŽLJIVO I ZAČUVAJTE ZA BUDUĆE REFERENCE
Uslovi garancije se razlikuju ako se uređaj koristi u komercijalne svrhe.
- Pažljivo pročitajte i uvijek slijedite uputé prije korištenja proizvoda donje upute. Proizvođač nije odgovoran za bilo kakvu štetu nastalu nepravilnim korištenjem.
- Proizvod je namijenjen samo za unutrašnju upotrebu. Nemojte koristiti proizvod u bilo koju svrhu koja nije u skladu s njegovom upotrebom.
- Uređaj se napaja ugrađenom baterijom, za punjenje koristite napon napajanja 5V/1A, u tu svrhu možete koristiti i USB port koji je dostupan na računaru.
- Budite oprezni kada koristite u blizini djece. Ne dozvolite djeci da se igraju proizvoda.
Nemojte dozvoliti djeci ili osobama koje nisu upoznate s uređajem da ga koriste bez nadzora.