
RB33B610EBN - Freezer SAMSUNG - Free user manual and instructions
Find the device manual for free RB33B610EBN SAMSUNG in PDF.
| Brand | Samsung |
| Model | RB33B610EBN |
| Product type | Fridge-freezer |
| Total net volume | Approximately 330 L |
| Fridge volume | Approximately 230 L |
| Freezer volume | Approximately 100 L |
| Climate class | SN-T (extended subclass) |
| Number of doors | 2 doors |
| Cooling type | No Frost (fan-assisted) |
| Interior lighting | LED |
| Door alarm | Yes |
| Energy class | E (according to new label) |
| Annual consumption | Approximately 250 kWh/year |
| Noise level | 35 dB |
| Dimensions (H x W x D) | 178 x 59.5 x 66 cm |
| Net weight | Approximately 68 kg |
| Power supply | 220-240 V, 50 Hz |
| User-repairable parts | Handles, gaskets, drawers, hinges |
| Maintenance and cleaning | Automatic defrost, interior cleaning with soft cloth and soapy water |
| Safety | Unplug before any intervention, use safety gloves |
Frequently Asked Questions - RB33B610EBN SAMSUNG
User questions about RB33B610EBN SAMSUNG
0 question about this device. Answer the ones you know or ask your own.
Ask a new question about this device
Download the instructions for your Freezer in PDF format for free! Find your manual RB33B610EBN - SAMSUNG and take your electronic device back in hand. On this page are published all the documents necessary for the use of your device. RB33B610EBN by SAMSUNG.
USER MANUAL RB33B610EBN SAMSUNG
English. 1
French - Français 9
German-Deutsch 17
Dutch -Nederlands. 25
Italian - Italiano 33
Portuguese - Português. 41
Spanish-Espanol. 49
Hungarian - Magyar 57
Polish-Polski. 65
Czech - Cestina. 73
Slovakian - Slovenica. 81
Romanian - Româna. 89
Serbian - Srpski. 97
Greek - ελληνικά……………………………………… 105
Bulgarian -Быларскn.........113
Croatian - Hrvatski 121
Albanian - Shqip 129
Macedonian - MaKeDoHcKn ....137
Latvian-Latviešu 145
Estonian - Eesti keel 153
Lithuanian - Lietuviy kalba....161
Danish - Dansk 169
Norwegian - Norsk. 177
Finnish - Suomi 185
Swedish - Svenska. 193
Slovenian-Slovenscina 201
- You can check where to buy replacement parts at http://samsung.com/support
-
Visit the part purchase site and enter the model code of your product to check the parts available for purchase. The model code is labelled on the outer side of your product.
-
You can check the model code and version on the barcode label at the bottom left of the product.
-
For replacement parts, make sure the part name matches that of the illustration in this manual.
-
User-serviceable parts are limited to handles (some models only), gaskets, drawers, and hinges.
NOTE
Following the repair by a non-authorised service provider, self-repair or non-professional repair of the product, Samsung is not liable for any damage to the product, any injury or any other product safety issue caused by any attempt to repair the product which does not carefully follow these repair and maintenance instructions. Any damage to the product caused by an attempt to repair the product by any person other than a Samsung certi-yed service provider will not be covered by the warranty.
CAUTION
- The part name listed on the site may di°er from that in this manual. Please make sure you choose the right part name.
-
Replacing hinges requires extreme caution because it involves detaching the door.
-
Be sure to wear safety gloves while making repairs.
The actual image and provided parts of the refrigerator may differ, depending on the model and the country.

01 Top hinge
03Drawer
05 Middle hinge
07 Bottom hinge
02 Gasket
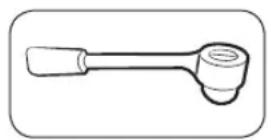
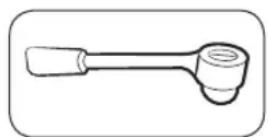
04 Handles (Applicable models only)
06 Barcode label
Handle replacement
Model name looks like this: RB29F, RB29H, RB30J, RB31F, RB31H, RB33J, RB34J, RB3CJ What replaces the asterisks may dier depending the model.
Asterisk(s) in the model code indicate a variant model and may replace (0-9) or (A-Z) in the model code.

CAUTION
- When replacing the door handle, take care not to scratch the front of the door.
- Firmly press the handles at the supports. Make sure there is no gap between the supports and the door.
Tightly fasten the screws when attaching the handle. - Check that the handle is rmly attached before using the product.
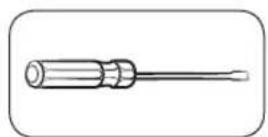
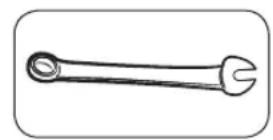
Tools required (not provided)
Philips screwdriver Flat-head screwdriver
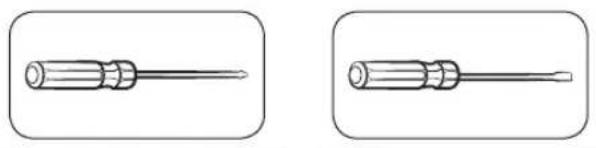
To detach the handles

NOTE
This procedure applies to both the fridge and freezer compartment.
- Use a at-head screwdriver to remove the screw covers.
After detaching the handle, attach the screw covers back on the screw holes.
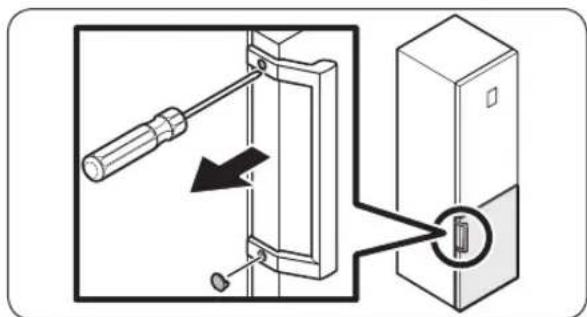
- Use a Phillips screwdriver to remove the screws and detach the handle.

NOTE
Use these screws to fasten the handle on the opposite side.
- Assemble the new handle in the reverse order of disassembly.
Gasket replacement

CAUTION
Make sure you yrmly attach the gasket. Otherwise, cold air from the refrigerator may leak.
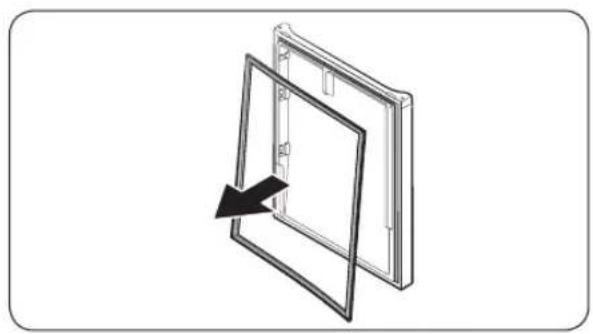
To remove the gasket
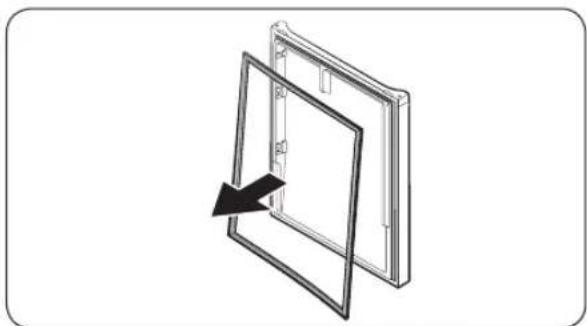
Open the door and remove the gasket from the door.
To replace the gasket
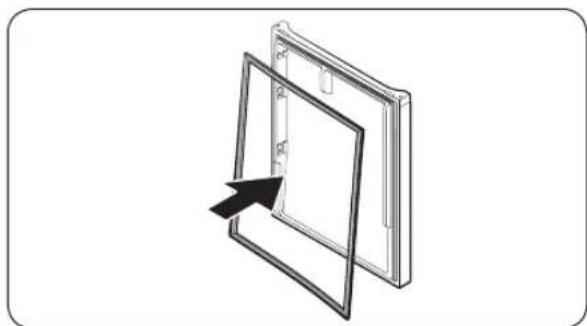
Attach a new gasket to the refrigerator door. Make sure there is no gap between the new gasket and the door.
Drawer replacement

CAUTION
Check that the drawer is inserted properly into the rail during assembly.
To remove the drawer
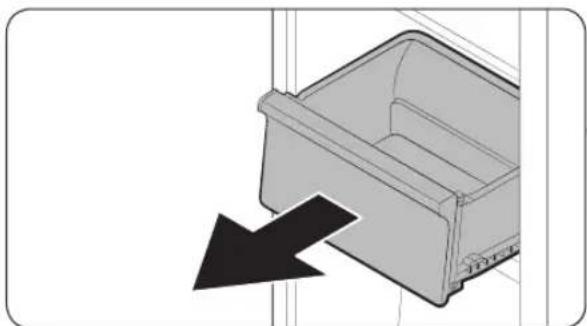
Gently lift up the front of the drawer and slide it out.
To reattach the drawers
Reattaching the drawers follows the reverse order of their respective removal steps.
Hinge replacement
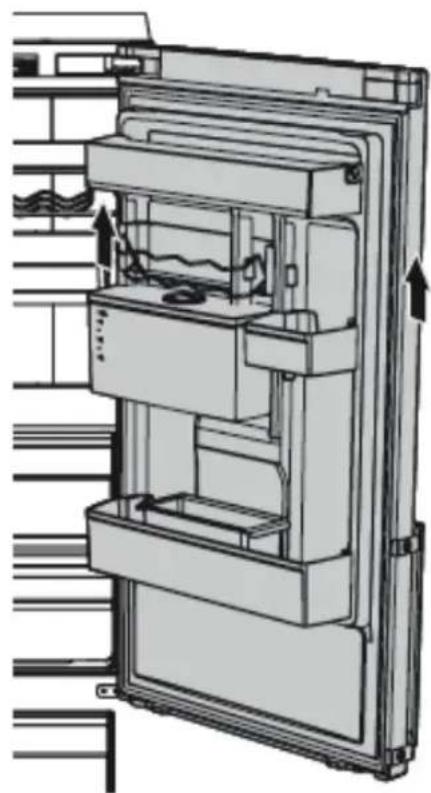
To replace the hinges, you must remove the doors yirst.
CAUTION
- When removing the doors, take extreme caution because the doors are heavy.
Before replacing the hinges, put a soft pad such as cardboard on the oor to prevent scratches on the door when you place the doors down.
- As the hinges must be handled carefully and replaced by two or more persons, we recommend you to call for professional technical service.
If you remove the hinge without holding the door, the door may fall and cause injury.
-
Ensure that the shaft is rmly tightened on the hinge.
-
Check that the hinge is rmly attached to the cabinet.
-
Make sure the wire connectors are connected properly.
-
Be careful not to damage the wires when fastening the top cover.
WARNING
- Tilting/laying the refrigerator requires a minimum of 2 people.
- Disconnect the power cord before reversing the doors.
Tools required (not provided)
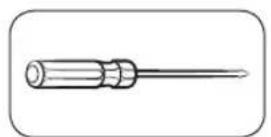
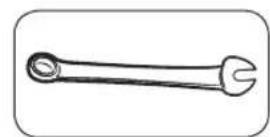
Philips screwdriver Flat-head screwdriver 11 mm spanner
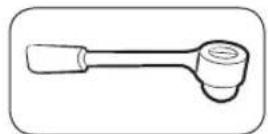
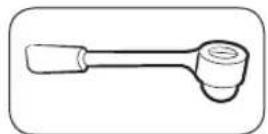
10 mm socket wrench 8 mm socket wrench 10 mm spanner
Reversing the door

NOTE
For the models with handles, reverse the handles rst. (For detailed information, see the "Reversing the door handle position (For models with bar handles)" section.)
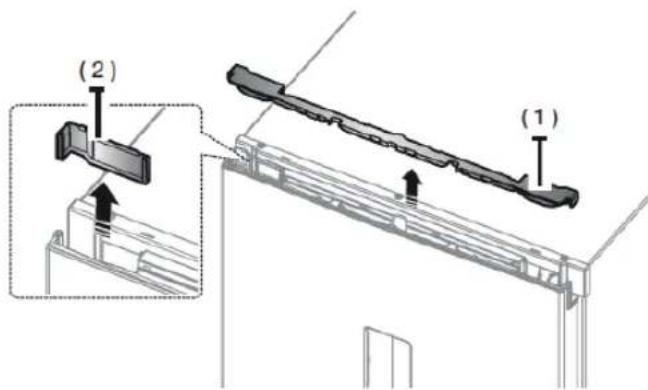
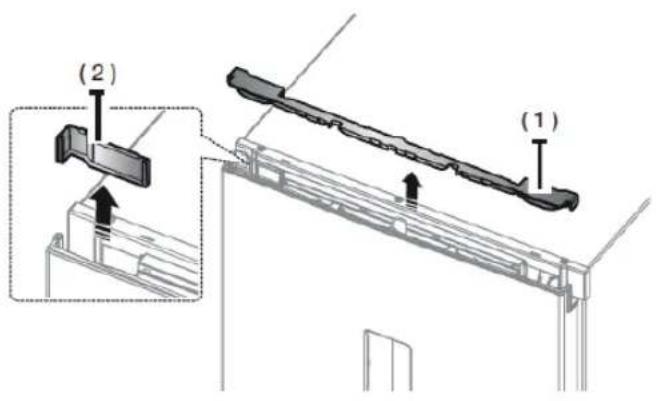
- Remove the Cover Wire Door (1). Disassemble the Cap space Door (2).
- Remove the Cover Hinge to push a hook
- Insert a at-head screwdriver and put it back
- Lever up the cover and push a hook (Take care not to damage the Cover Hinge Wire by pushing by pushing it too hard)
- Disassemble it by pushing
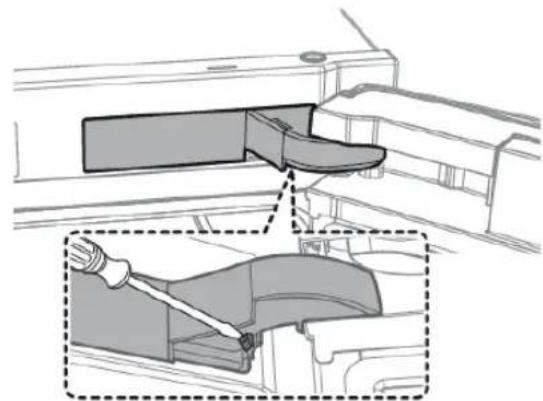
- Disconnect the wiring connector for the fridge door. This step may not apply to some models.
CAUTION
Do not pull the connectors too hard.
- Remove the screws.
- (Be careful not to drop the door when you disassemble it.)
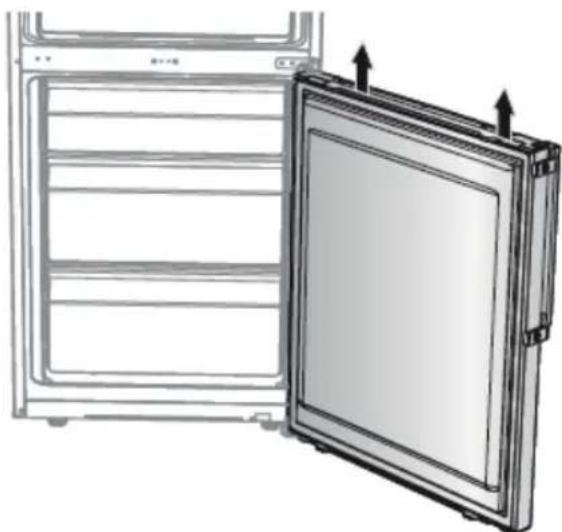
- Remove the fridge door from the middle hinge by carefully lifting the door straight up.
CAUTION
The door is heavy, be careful not to injure yourself when removing the door.
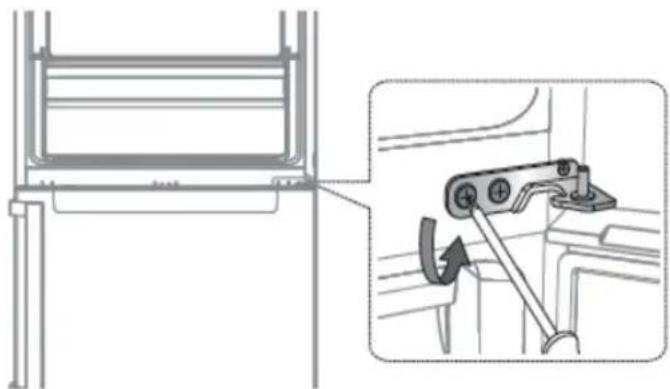
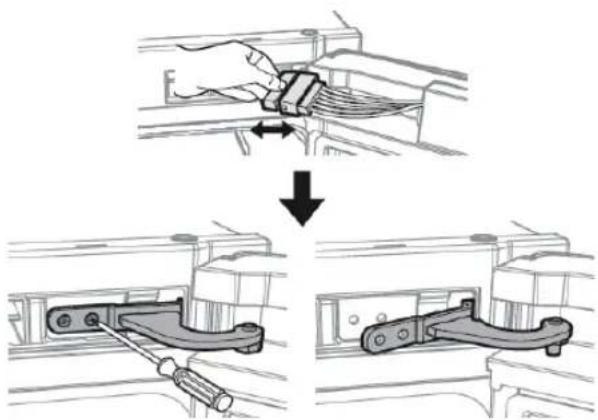
- Disassemble the middle hinge by removing the screws using a Phillips Head (+) screwdriver.
CAUTION
The freezer door may fall forward so please support the door.
- Remove the freezer door from the bottom hinge by carefully lifting the door straight up.
CAUTION
The door is heavy, be careful not to injure yourself when removing the door.
- With the freezer door sitting on the bottom hinge (A), slowly pull the bottom hinge (A) to remove it from the holder on the bottom of the refrigerator. Once the bottom hinge (A) is removed from the holder, remove it from the freezer door, and then pull the freezer door down to remove it from the middle hinge (B).
CAUTION
To prevent the freezer door from falling, make sure to hold the freezer door tight until it is safely removed from the middle hinge (B).
- Use a Phillips screwdriver and socket wrench (10mm) to remove the screws fastening the middle hinge (A).
- Reassemble in the opposite order of disassembly after replacing the top, middle, and/or bottom hinge.
CAUTION
Pour-retirer le joint
POnMaHa Ha YeKMeJxKeTaT

BHIMAHNE
YBepete ce,ue yekMeJxKeTo e nocTaBeNo npabnHbpeLcata no BpeMe Ha crIIO6BaHeto.
3a da cBaInte ueKMeJKeTo
BHHMaTeHNO NOBdNfHeTe npedHaTa qact Ha yeKMeJKeTo I Go N3DbpNaIe HABbH.
3a da noctabnte yeKMeJxKeTata o6paTHO
NoCTaBHeTo Ha yeKMeJxKeTata o6paTHo CJIeDba o6paTHnI NopAdbK Ha CbOTBeHTHe Tm CTbIKN
no OTCpaHbAHeTo m.
3a da noDmeHnte naHTnte, nbpBO Tpr6Ba da cBaJInte BpaNTte.
BHIMAHHE
Korato cBaIaTe BpaTne, 6bJeTe KpaHOBHMaTeJIHH, 3aIoTO BpaTne ca TeJKN.
- Ipei Da noDMeHnte NaHTte, NoCTaBeTe MeKa noIIOKka KaTO HApPIMeR KaOH Bbpxy nOda, 3a da npedOTBpaTte DpackOTHH NO BpTaTa, KOrato NoCTaBRe T BpaTte dOly.
TbN KaTo C nAHTnte Tp86Ba Da ce pa60Tu BnHMaTeJHo I da Ce NOpMeHrOT OBe HIn NObeYe LnUa, Hne BN npEnOpBvBaMe Da n3BnKaTe pOoecnoHaIHO TexHnuecko 06cnyKbaHe.
Ako cBaJInte naHTaTa, 6e3 da nbpJxte BpaTata, BpaTata MoKe da naIHe n da npEiN3Bnka HapaHbAhe.
- yBepete ce, ye octa e 3dpaBO 3aTeRHaTa KbM nHTaTa.
-Поберете далпантata e зakpeneha ЗдраВКьм Корпуca.
-Поберете дали ka6elenнite koHeKTOpn ca CBbP3aHn npabuHNo.
BHHMaBaIte Da He NoBpeInte npoBOHnIuTe, KOraTo 3aTgAte rOpHna KaNaK.
!PPEyIPEKDEHNE
HaKnaHReTo/NoCTaBHeTo Ha XlaDnJIHnKa B IeHaJIO NoIooKeHne N3NCKBa MHNmym 2 nIua.
-ИЗкlioуete зхранвашиka6eи,Iпeдида оьбрhte вразиTe.
Heo6xoDnMn HNCTpyMeHTn (He ca npdeocTaBeH)
Kpbctata oTBeptka IIOsKa oTBeptka 11 mm raeuen KInou
10 mm tpecyotka 8 mm tpecyotka 10 mm raeuen Kliou
06pbuaneHaBpaTaTa
BEJEEXKA
3a MoJeIte c npbKnn PbPBO o6bpHeTe npbKnTe. (3a noDpo6Ha nHopMaunBnKe pa3eJ "O6pbuahe Ha n0uTnTa Ha dpbKkata Ha Bpata (3a MoJeN C npbKkOT TnPpeCa).
- OTeTpaHete KaNaka Ha BpaTata (1). Pa3IIO6eTe KanaUkata Ha pa3JeNTeNa Ha BpaTata (2).

-
OTepaHete KaNaka Ha NaHTata, 3a da HATNCHeTe Kykata
-
BkapaTe nlocka OTBepTKa IЯ BBpHete o6paTHO
-Повднг themselves KaNaKaиHaTnchTe KyKaTa (BHHMaBaIte Da He NoBpeIte KaNaKa Ha NaHTata, KaTo HATnCKate TBbPde CnHNo) - Pa3rno6eTe c hatackaHe
- Pa3kayeTe Ka6eHnHa KoHeKToP Ha BpaTaTa Ha XlaIuHnKa.
-Ta3nCTbPkAmoKeJaHeepnpIoKIma3a HAKONMOJeJI.
BHIMAHHE
HeIbPnaiTe KOHEKTopTe TBbpDe cnHNO.
-
OTeTaHete BnHTOBete.
-
(BHHMaBaIe Da He n3nycHete BpaTata, KOrato pa3rno6BaTe.)
- CbaIe BpataHa XlaIINHnka OT cpeHaTa NaHTa, KaTO BHMATEJIHO NOBdNfHete Bpata Ta npabo HaRope.
BHIMAHHE
BpatataeTeKka;BHnMaBaIteJaHeceHapaHnte, KOratoRCBAJIaTe.
- Pa3rIIO6eTe cpeHaTa nAHTa, KaTo CBAJIInTe BnHTOBeTe C KpbCTaTa OTBeptKa (+).
BHIMAHNE
BpataHaΦpnsepaMoKeJaNaHeHappe, TaKaYe,MoJn,NoDdbpxkaTe Bpata.

- Cbane BpataHa HApn3epa OToDolHaTa NaHTa, KaTO BHMATEHNOOBnHHeTe BpataTnpaBO Harope.
BHIMAHNE
BpataeTeKka; BnMaBaIte Da He ce HapaHnte, KOrato cBaJIaTe.
8.Дokato BpataHa ΦриЗepa CTOn Ha DoIHaTa NaHTa(A),6abH0 n3dIpnaite DoIHaTa NaHTa(A),3a DaЯ CBaIte OT dIbpxkaaB DoIHaTa YacT Ha XlaIINHnka.Cnei KaTO DoIHaTa NaHTa(A) 6bJe cBaIeHa OT dIbpxkaa,OTcpaHeteЯ BTpataHaΦprnzepaN Cnei TOBa n3Dbpnaite BpataHaΦprnzepa HANOly,3a DaЯ CBaIte OT cpeHata NaHTa(B).
BHIMAHHE
3a Da He Donyche Te BpaTata Ha φpnsεpa Da NaIHe, yBepTe ce, Ye DbpxnTe BpaTata Ha φpnsεpa 3dpaBO, IDOKATO THe 6bJe CbaIeHa 6e3oNaCHO OT cpeHATA naHTa (B).
9.ИЗнOL3ВаΙTe KрьСТаТа OТВЕРТka
и ТPECЧОТka (10mm),за Да CBаΙΝΙΤe
ВИNTOBеTe,ЗАкpenВаιи СрEdHаТа паHTa (A).
10. CrIIO6eTe 6bO B 6paTeH nOpAdbK Ha pa3rIo6BaHeTo, cIeI KaTO nOIMeHnTe rOpHaTAt, cpeIHATA n/nnn DoJIHATA naHTa.