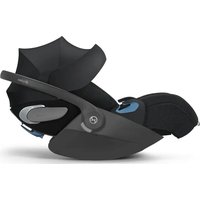
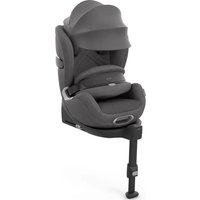
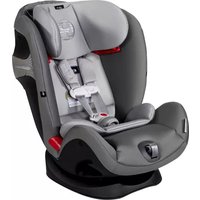
Solution B2Fix + Lux - Car seat CYBEX - Free user manual and instructions
Find the device manual for free Solution B2Fix + Lux CYBEX in PDF.

User questions about Solution B2Fix + Lux CYBEX
0 question about this device. Answer the ones you know or ask your own.
Ask a new question about this device
Download the instructions for your Car seat in PDF format for free! Find your manual Solution B2Fix + Lux - CYBEX and take your electronic device back in hand. On this page are published all the documents necessary for the use of your device. Solution B2Fix + Lux by CYBEX.
USER MANUAL Solution B2Fix + Lux CYBEX
text_image
cybex SILVER SOLUTION B2-FIX+LUX UX RHP-60, No. 1500 LHS User guide

text_image
Diagram of car seat components with labeled parts and zoomed-in insets for detail
text_image
2 Cut off the flower + line 15.35 kg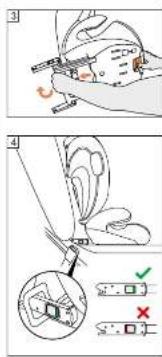
text_image
Medical illustration showing surgical procedure steps with labeled diagrams and check/cancel buttons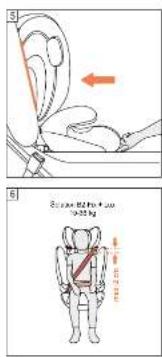
text_image
Medical illustration showing two steps of a human shoulder replacement procedure with labeled instructions and directional arrows.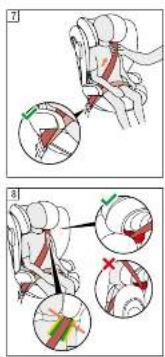
text_image
Medical illustration showing two steps of a robotic arm manipulation, with labeled diagrams and directional arrows indicating movement.
GO TO WWW CYBEX-ONLINE.COM TO WATCH AN INSTRUCTIONAL VIDEO
DE 2
EN 5
IT 8
FR....11
NL 14
PL....17
HU 20
CZ....23
SK 26
ES....29
PT 32
SE 35
NO 38
FI 41
DK 44
SL 47
HR 50
EE....53
LV 56
LT....59
EL 62
RO 65
TR....68
RU 71
UK 74
BG 77
SR 80
AR 83
BS 86
SQ 89
MK 92
CNR....96
HI....99
TH....102
VI 105
MS 108
HY....111
CMN 115
YUE 118
JA 121
KO 124
text_image
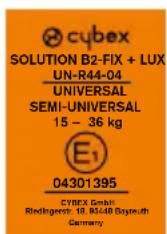
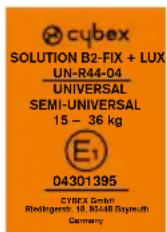
cybex SOLUTION B2-FIX + LUX UN-R44-04 UNIVERSAL SEMI-UNIVERSAL 15 - 36 kg E₁ 04301395 CYBEX GmbH Riedinger: 10, R3448 Bayneuth GermanyZULASSUNG
UN R-44/04
CYBEX Solution B2-Fix + Lux - group 2/3, 15 to 36 kg Recommended from approx. 3 years to 12 years
Thank you for deciding on the Solution B2-Fix + Lux when choosing your child seat.
Carefully read the instructions before installing the seat in your car and always keep these instructions to hand in the designated compartment.
IMPORTANT INFORMATION
Without the approval of the Type Approval Authority, the child seat may not be modified or added to in any way.
!In order to keep your child properly protected, it is absolutely essential that you use the child seat as described in this manual.
!This child seat may only be installed on vehicle seats which are approved for the use of child restraint systems according to the vehicle manual.
!Only suitable for vehicle seats with automatic three-point belts approved in accordance with UN regulation 16 or a comparable standard.
!Do not use any load bearing contact points other than those described in the instructions and marked on the child restraint.
!The full surface of the backrest of the child seat must make contact with the backrest of the vehicle.
!The shoulder belt must run upwards and back at a recline. It must never run forward to the upper belt point in your vehicle.
!The vehicle belt buckle must never cross the belt guide of the seat. If the belt whip is too long, the child seat is not suitable for use in this position in the vehicle. In case of doubt please contact the child restraint manufacturer.
!The three-point vehicle belt must only be passed through the designated routings. The belt routings are described in detail in this manual and are marked in red on the child seat.
!The lap belt must run as low as possible across your child's groin to have optimum effect in the event of an accident.
!Before each use make sure that the automatic three-point vehicle belt is correctly adjusted and fits tightly to the child's body. Never twist the belt!
!Only an optimally adjusted headrest can offer your child maximum protection and comfort while ensuring that the shoulder belt can be fitted smoothly.
!The child seat must always be secured correctly with the vehicle belt in the vehicle even when not in use.
!Always ensure that the child seat is never jammed when closing the car door or adjusting the back seat.
!The child seat is also tested and homologated without the Linear Side impact Protectors.
!Luggage or any other objects present in the vehicle must always be firmly secured. Otherwise, they may be thrown within the car, which could cause fatal injuries.
!The child seat must never be used without the seat cover. Ensure that only an original CYBEX seat cover is used, as the cover is a key element of the seat's function.
!Never leave your child unattended in the car.
!The parts in the child restraint system heat up in the sun and could potentially burn your child's skin. Protect your child and the child seat from direct sun exposure.
!An accident may cause damage to the child seat that is not identifiable with the naked eye. Please replace the seat after an accident. In case of doubt, please consult your dealer or the manufacturer.
!Do not use this child seat for more than 9 years. The child seat is exposed to high stress during its product life span, which leads to changes in the quality of the material with increasing age.
!The plastic parts can be cleaned with a mild cleaning agent and warm water. Never use harsh cleaning agents or bleaches!
!On some vehicle seats made of sensitive materials, the use of child seats may leave marks and/or cause discolouration. To prevent this, you can place a blanket or towel or similar underneath the child seat to protect the vehicle seat.
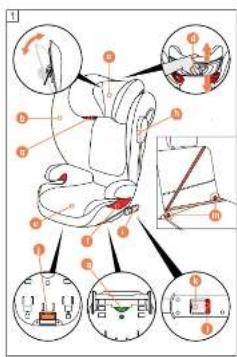
PRODUCT PARTS
(a) User Guide Storage Compartment
(b) Backrest
(c) Adjustable Headrest
(j) ISOFIX-Connect Adjustment Handle
(k) ISOFIX-Connect Release Button
(I) ISOFIX-Connect Safety Indicator
(m) ISOFIX Anchorage Points
INITIAL ASSEMBLY
Connect the backrest (b) to the booster (e) by hooking the guide lug on the axis of the booster. The backrest (b) is then folded forward. Clip the L.S.P. (h) onto the marked area on the side of the seat. Push until it clicks into the slots in the car seat shell.
THE CORRECT POSITION IN THE VEHICLE
The child seat with retracted ISOFIX-Connect locking arms (i) can be used on all vehicle seats with automatic three-point safety belts approved in the vehicle manual for “universal” use.
A "semi-universal" certification is given to restraint systems that are connected to the car through ISOFIX-Connect locking arms (i). For this reason, ISOFIX-Connect can only be used in certain vehicles. Refer to the enclosed vehicle type list for approved vehicles. You can obtain the most up-to-date version from www.cybex-online.com.
In exceptional cases, the child car seat may also be used on the front passenger seat. Always comply with the recommendations of the vehicle manufacturer.
INSTALLING THE CHILD SEAT IN THE VEHICLE
- Always ensure that...
- the backrests in the vehicle are locked in their upright position.
- when installing the child seat on the front passenger seat, adjust the vehicle seat as far back as possible without affecting the belt routing.
- Use the ISOFIX-Connect adjustment handle (j) under the booster (e) and pull the two ISOFIX-Connect locking arms (i) to their furthest extent.
-
Now twist the ISOFIX-Connect locking arms (i) 180° so that they are facing the direction of the ISOFIX anchorage points (m).
-
Place the child seat on the appropriate seat in the car.
- Push the two locking arms (i) into the ISOFIX anchorage points (m) until these lock into place with an audible "CLICK".
- Use the ISOFIX adjustment handle (j) and push the car seat against the vehicle seat.
- Ensure that the entire surface of the backrest (b) of the child seat is placed against the backrest of the vehicle seat.
If the headrest of the vehicle is in the way, pull it upwards to its furthest extent or remove it completely (except in rear-facing vehicle seats).
- Ensure the seat is secure by trying to pull it out of the ISOFIX anchorage points (m). The green safety indicators (l) must be clearly visible on both sides of the seat.
- In case the seat is used without ISOFIX-Connect, it can be stored away on the bottom of the seat.
By using ISOFIX-Connect, a connection to the vehicle is created which increases your child's safety. Your child still needs to be secured with the three-point belt of the vehicle.
If the "Linear Side-impact Protection" (L.S.P.) is in conflict with the car door of if it affects the space on the passenger seat, it is possible to detach it by squeezing the top and bottom of the element and pulling it out of the slot in the car seat shell. In order to put the L.S.P. back on the seat, clip it onto the marked area on the side of the seat and push until it clicks into the slot.
REMOVING THE CHILD SEAT FROM THE VEHICLE
Perform the installation steps in the reverse order.
- Unlock the ISOFIX-Connect locking arms (i) on both sides by pushing the release buttons (k) and pulling them back simultaneously.
- Pull the seat away from the ISOFIX anchorage points (m).
- Remove the child seat and store the ISOFIX-Connect in reverse order to installation.
RECLINING HEADREST
The Reclining Headrest (c) helps to prevent the child's head from dangerously tipping forward during sleep. It can be set to one of 2 positions. Push the Reclining Headrest (c) forward until the desired position is reached.

child's head should always be in contact with the Reclining Headrest.
ADJUSTING THE HEADREST
The headrest (c) can be adjusted by using the headrest height adjuster (d) at the back of the headrest (c). Adjust the headrest (c) so that max. 2 cm (approx. 2 finger's width) remain between the child's shoulder and the headrest (c).
The height of the headrest can still be adjusted while the seat is installed in the car.
SECURING THE CHILD
- Route the vehicle seat belt around your child and insert the belt tongue into the belt buckle. It must lock into place with an audible "CLICK".
- Place the lap belt in the red coloured lap belt guides (f) of the child seat.
- Pull the shoulder belt to tighten the lap belt.
- On the side of the car seat next to the belt buckle, the shoulder belt and the lap belt must be inserted together in the lap belt guide (f).
- Feed the shoulder belt through the shoulder belt guide (g) until it is inside the belt guide.
- Ensure that the shoulder belt runs across your child's clavicle and does not touch your child's neck. If necessary, adjust the height of the headrest (c) to change the position of the belt.
REMOVING AND REATTACHING THE SEAT COVER
The cover of the child seat consists of 4 parts (headrest (x2), backrest and booster). These are held in position at several places by press-studs. Once all studs have been released, the single parts of the cover can be removed. In order to put the covers back on the seat, follow the removal instructions in the reverse order.
The cover may only be washed at 30 °C with a delicate wash program otherwise it may result in discolouration of the cover fabric. Please wash the cover separately from other laundry and do not dry in the dryer or in direct sunlight!
MANUFACTURER'S WARRANTY AND DISPOSAL REGULATIONS
CYBEX GmbH (Riedingerstr. 18, 95448 Bayreuth, Germany) gives you 3 years warranty on this product. The warranty is valid in the country, where this product was initially sold by a retailer to a customer. The contents of the warranty and all essential information required for the assertion of the warranty can be found on our homepage go.cybex-online.com/manufacturer-warranty-car-seats. If a warranty is shown in the article description, your legal rights against us for defects remain unaffected.
Please observe the waste disposal regulations in your country.
CERTIFICAZIONE
UN R-44/04
GWARANCJA PRODUCENTA I PRZEPISY W ZAKRESIE USUWANIA
REPOSACABEZAS RECLINABLE
RIKTIG POSISJON I KJ∅RET∅YET
SETTE INN BARNESETET I KJ∅RET∅YET
GALVAS ATBALSTA BALSTS
الم Expected Assistance
U42FLU44L UNLSUDNHUE
Uunwqntp qhljuwuh (b) Uwnwuntn pnwntnhu (e) 'ungutinu nnnnnnuwlu utnuhsg pnwntnh wnwuggh dtg: Ujunchtunl qhljuwuh (b) dwujnuu E unwug: Uunwqntp 497-1 (h) Uwnwuntnh lynphu 2yuw hwnnwoh ynw: Utnutp pfhu5i wju zhyngnu dunh dtptluwjh uwnwuntnh ywnwwwnh hnwnwlutnh dtg:
الله بعربية
Utptluwjh 乌luyluylu luunwintnh htun pu2luw ISOFIX-Connect lynwnnq thwlulutynu (i) lwnp n E oqnwnqndu1i unpwluwnpnuwju uhengh gwlluwgw wluunwintnh ynw 'nluhltpnuw' oqnwnqndu1u hudwn utptluwjh d###wnlnu hwuunwnluyw wjunnfuun tntp ytunwung wuqlnuwqnpuw uwnwnhutynu:
«Чуунлuhултну» hwulwunwqh n unpnu l wuwu h wultnwulqnlpjw u hwulwunptnh u, nnnp uhwgulw du utptluwj h ISOFIX-Connect ynwnn yhuwulutth ufngnu (i): Uju uwunwwnn l ISOFIX-Connect-p ywnn t oqnwqnnbdt i yhuu jnn2wuh wufnnutptluwutnnu: Ununfuwwhntp hwunwnluw du npwluwnpnwnwj h uhgngutph utnwptnjwi uguw dwuyn: ywnn tip atnp ptnti pwnuuguw du wnwnptnwl ywww.cybex-online.com lywjphg:
Aguunhly ntuptnnu, utptuwj huiyuwju wunwuntnh yunnn E oqnwnqnoulti luwi angluh nunlunh wunwuntnh ynw: Uhzn htunutp unwulwwnnwnwjhu uqngh wnwnwnnngh ynnuhg 124w0 hnwnhnnnutnhu:
UUUUUUU USUSTNH STUNURHUF SRULBUNRSUASH UHONSENHU
- Uh2n hwunqutp, np...
• υπωμυωνηνωμήν υχηριλύ ρεγμωμίτης υπωμίω σ τι νηλη ηηρησι:
• utptluwjh luunwuntnju wnguh nntlunnh luunwuntnh ynw untnwnntnju dwwluwly lqnqwynnpap nnwluwynnuwjhu chengh luunwuntnghluwnwnphluu hton' unwug qnnni nlnnnlpejwu ynw wqntnju: - Oqnwnqnnpdp ISOFIX-Connect lynqnwnnnn pnluwln (j) luwnwntn pnluwtnh unwly (e) u puqtp tnlnl ISOFIX-Connect lynwnn thwlquwuttn (i) hntug wnwultwnqnu ywhny;
- Ujdu wunntp ISOFIX-Connect lynwnn yhuylwulutng (i) 180°-nu, nnwtuqh nnwup nunnluw o jhutu ntuw ISOFIX wunwugulu ytuntng (m):
- Stnwnntp uwlywlywu luunwuntng utptluwjh hudwwwnuwuhwu luunwuntnh ynw:
- Utnutp tlnynl lynwnn yhuwultng (i) ISOFIX wunwglwu ytuntgh utg (m) yhuu nnpup lynwultu lutih «2h4n8n4»:
- Oqunwqnptinj ISOFIX lwnquwnnnn prluwyn (j) htutp utptluwj h wluwlywu luwnwntnn wulnnutptluwj luwnwnwuhu:
- Rwunqutp, nn dwlyuwylu luunwuntnh rhyluwih wupnng dwytntug (b) untwnwnlud t utptluwih luunwuntnh rhyluwih nunnlajwup:
t utptluwj qhuwjuh huulqwnnu t, wuu puztp wju hluunwlnnhlu nduh utn lyu wultp wju wupnnuwrjwup (pwgunnurjwup ntyuh hun nuynnwrjwup utptluwj luunwntntnh ntwpnu):
-
3wunqutp, np wuwuntng wuwuhn l' yhnntinu wlu nlnu puztl ISOFIX wlnwgulu lyuntphg (m): Wujnwugnujwul yiwus gnighutng (l) wtupb t hwnwy untuwutih jhtu wuwuntng tnyni ynnytgnu:
-
Uju ntwpnl, tnp luunwuntnu oqunwqnnbjnlu E unwug ISOFIX-Connect-h, wju lqwnn t wwhulti luunwnwuh unw:
ISOFIX-Connect-h uŋəngnu uuntnɔynuu E tyuuy utptluuwj htun, nnh uttəwugnuu E atn tntthuwj wulwnuwqnuəjnlu: 2tn tntthuwj wulwnuwqnuəjnlu wutu ndwpunu utpng E wuwuhnuuud jih udptluuwj tntp ytunwung qnnnl oqunpəjuup:
^1 《4nnwju hwnuwduh ndwluwly dawjhu wu2nuwunlnejnlu»-n (147) hwluqwnnu E utptluwj npwng ywu tiet nu wannu E nlnwnh buunwuntnh unwnwph ynw, hwnwnjn E wju wu2wnnti utnutjn uwnph utpnu ni utnpug i nnnu pntinj utptluwj buunwuntnh ywnwwwnh yhnwwuthg: Nnwguq 497-tu tan untwnwnjh buunwuntnh ynw, utnutpe wju buunwuntnh lynph t24w6 hwnuwoh ynw l. hntp uhyu wju shyungnu dunuh hnwnwyh uto:
VULYUULUSUSTH RUTLC UTECUHS
Чуинпрт пртнунпуwu pwjttn hwlwnwy htnewlywnupjwup:
- Uwylwnutp ISOFIX-Connect lynwnn uhwylutqn (i) 'tplynl lynutngh utnutjnu wnawlyuwu ynawylutqn (k), L uhwudwuwu puztjnu npulup htun:
- Rtnnl pu2tp uunwuntnp ISOFIX wupugulu ytuntphg (m):
- Rtnwgntp dtptluwjh dwlywlywu luunwuntqn L uqwhtp ISOFIX-Connect-n utnwnpnwu hwlywnwly lwnqnj:
RTS OTEVAN ALHUYUL
Atun ptpynn qhwuwju (c) oqunuf t ywuhut, nnyguqh tntfuuhj qinlup puwó dwuwuwu ypuluh ntuh wnug: Ulu ywnnn t nulti 2 nhnpthg utih ynw: Utnutip htun ptpynn qhwuwju (c) ntuh wnug uhluy hwuutp gwuluwuh nhph:
bghuwj qinlun uh2un wtunp E huih 3tan petpynn qhuwlywihu:
ALWYULH YURWYNNUE
qhuwlywn (c) yuntb h wunluntgutj oqnwnqnptinu qhuwlywn pwnnnyjwlu ywnquynhsh (d) qhuwlywn htunuh uwunu (c): qwnquwnntp qhuwlywn (c) wjuwbu, nn wnwbl 2 uv (wnwnwnnwbu 2 uwun wjuwnyjnlu) uuw tnthwuh niuh lu qhuwlywn uhqlu (c):
Qhuwlywih pwnànnlajnclun yuhtih E ywnquwntnl unyuhuly uuuwunttnp utptluwjnluf untnwnnting htunn:
trthuusht uurusttle
- Τυνυτρ υχριωμή υυλυνωμαγμω μηνμό δη στηθυμή 2πηροι υ αυτωνητρ υυλυνωμαγμω μερμίων ημω νωμων λυψωνυτυλωσ δωνυλυμην: Uμι υχριωρ Ε γηνωμή μερμίων «Συγκηδ»-nμ:
- Stnwnntp qnulywuntnh wluynwuqnujwu qnuhlu uwuylwylwu lwwunntnh ywnuhq qnujh qnulywuntnh wluynwuqnujwu qnuhutinh nnnnnngh(h) (f) utg:
- 2w2tp nluwqnunhu qnulywuntnh wluqlnwuqlrjwu qnuhlu wuhpugutnl hwiUwn:
- Uptluwih wuluwjwulu wunwuntnh lynuh ynw, qnnnl 6wnuwuh lynphu, nuwqnuhu u qnuwuntnh wulwnwqnujwul qnuhui wtng t uhwhu ulngut qnuwuntnh wulwnwqnujwul qnnnl nnnnnnhsh (f) utg:
- Ungntp nluwqnunhu nluwqnunnl nnnnnnhhzh (g) uhenu uhuyu wju yhwjunluh qnnnnl nnnnnnhhzh utg:
- 3wlnqutp, nn nuwqnunhlu wugunuw t δttn tntghuwjh wlpnwqh ynwnjnl u sh nhwqnlu δttn tntihuwjh ,wwwnunghlu: Uuhnpwtzunnlpejuw l ntupjnul ywnqwunnptp qhwuwjh pwnànnuρjntlún (c) qnnnn nhhnpn ynhfutni huvfup:
LUSUSTH MUSAUL RUTLE by LARHS UURUSTLE
Utptluw h wluqwlu wunwnnth wwnjwug punlyugw t 4 uwhg (qhuwluw (x2), phluwu w l wunwntn pnwntn): Prwup wufwglud tu uh puuh nhptnnu wtnuh awnulunutnpu: Pnnn awnulunutng unawytin ntpwnu wwnjwuh wnwuhu wutng lwuntgh t hwut:
^1 Wunjwun lynjhu wupwglutini hwuwn htunltp hultini gnlgnluutnhu hwlywnwuh thpewlywnlpejwup: