Powerline 5 Pro - Battery charger ANSMANN - Free user manual and instructions
Find the device manual for free Powerline 5 Pro ANSMANN in PDF.
| Product type | Intelligent battery charger |
| Brand | Ansmann |
| Model | Powerline 5 Pro |
| Dimensions (approx.) | 140 x 100 x 60 mm |
| Weight (approx.) | 150 g |
| Mains power supply | 100-240 V AC, 50-60 Hz |
| Car power supply | 12 V DC (via included adapter) |
| Charger input voltage | 12 V DC |
| Number of slots | 4 for cylindrical batteries (AAA/AA/C/D) + 1 for 9V E-block battery |
| Supported rechargeable battery types | NiMH, NiCd (cylindrical and 9V) |
| Charging current (cylindrical batteries, 1-4) | 400, 600, 800 mA |
| Charging current (cylindrical batteries, 1-2) | 400, 600, 800, 1500, 1800 mA |
| Charging current (9V battery) | 15 mA |
| Discharge current (DISCHARGE/REFRESH programs) | 200, 300, 400 mA |
| Charging programs | Charge, Discharge, Refresh, Test |
| Display | Backlit LCD screen with individual channel information (voltage, capacity, time, current) |
| USB output port | 5 V / 1000 mA (for charging other devices) |
| Protections | Per-cell overcharge, detection of faulty or alkaline batteries, automatic shutoff |
| Trickle charge | Yes, after full charge |
| Warranty | 3 years |
| Maintenance and cleaning | Disconnect before cleaning; use a dry cloth; keep contacts clean |
| Safety instructions | Do not open; use only with NiMH/NiCd batteries; observe polarity; keep out of reach of children |
| Repairability | Not user-serviceable; contact an authorized dealer |
| Included accessories | Mains cable, DC car cable, interchangeable connector |
Frequently Asked Questions - Powerline 5 Pro ANSMANN
User questions about Powerline 5 Pro ANSMANN
0 question about this device. Answer the ones you know or ask your own.
Ask a new question about this device
Download the instructions for your Battery charger in PDF format for free! Find your manual Powerline 5 Pro - ANSMANN and take your electronic device back in hand. On this page are published all the documents necessary for the use of your device. Powerline 5 Pro by ANSMANN.
USER MANUAL Powerline 5 Pro ANSMANN
Theorem 1.2. (Theorem of [3.6]). Let be a finite field and let (x) be the set of all elements of such that x (x) . Then
|
1
[Non-Text]
[Non-Text]
[Non-Text]
[Non-Text]
[Non-Text]
[Non-Text]
[Non-Text]
[Non-Text]
[Non-Text]
[Non-Text]
[Non-Text]
[Non-Text]
[Non-Text]
[Non-Text]
[Non-Text]
[Non-Text]
[Non-Text]
[Non-Text]
[Non-Text]
[Non-Text]
[Non-Text]
[Non-Text]
[Non-Text]
[Non-Text]
[Non-Text]
[Non-Text]
[Non-Text]
[Non-Text]
[Non-Text]
[Non-Text]
[Non-Text]
[Non-Text]
[Non-Text]
[Non-Text]
[Non-Text]
[Non-Text]
[Non-Text]
[Non-Text]
[Non-Text]
[Non-Text]
[Non-Text]
[1]
text_image
[Klick][2]
text_image
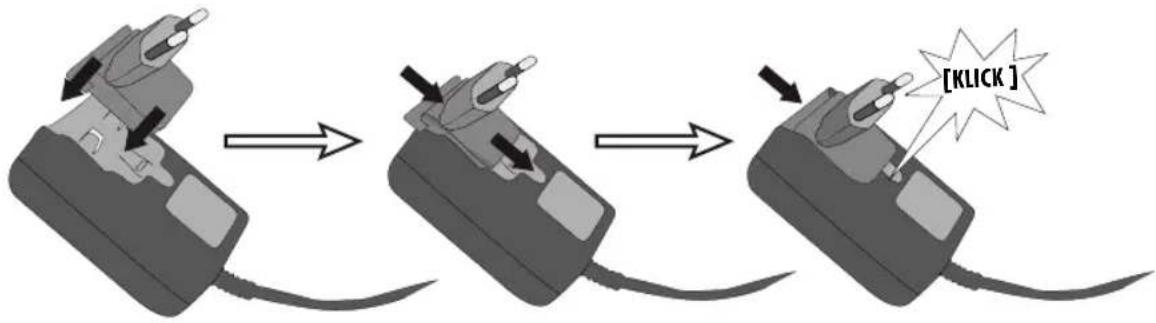
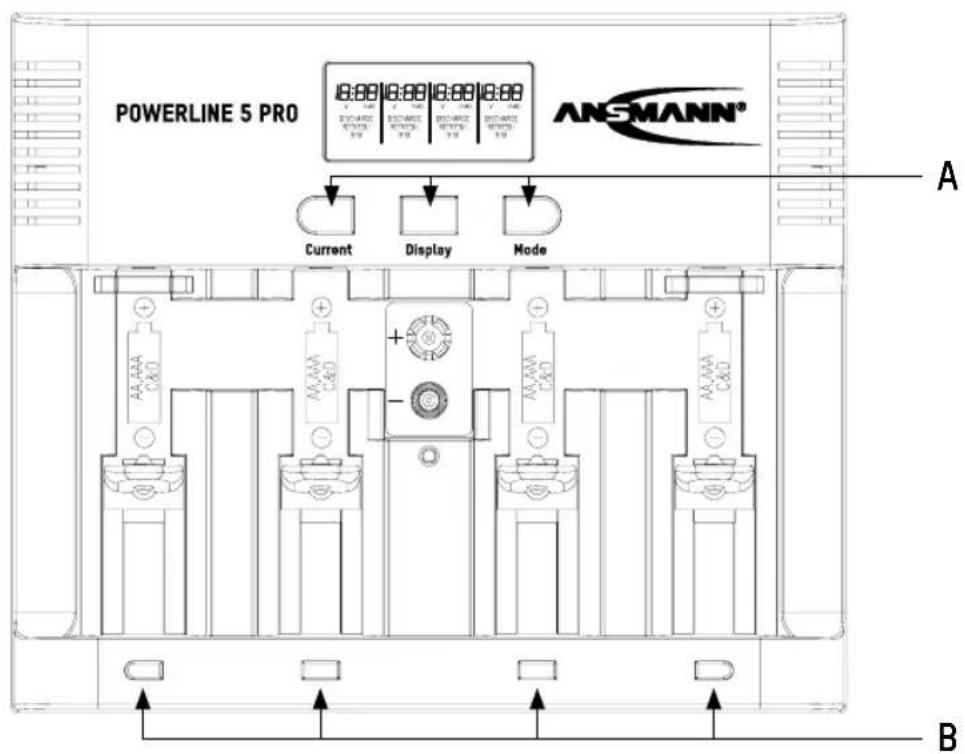
POWERLINE 5 PRO 18:00 18:00 18:00 18:00 ANSMANN® Current Display Mode A AA AAA C&D AA AAA C&D AA AAA C&D B[3]
text_image
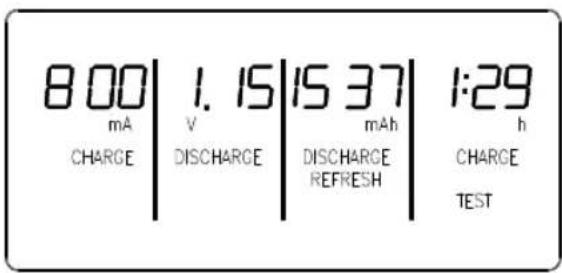
800 mA V 1.15 | 15 37 mAh 1:29 h CHARGE DISCHARGE DISCHARGE REFRESH CHARGE TESTThank you for purchasing the multifunction POWERLINE 5 PRO charger. These operating instructions will help you to get the best from your charger. We hope you will be happy with your new charger,
Your ANSMANN Team
SAFETY INSTRUCTIONS
- Please read these operating instructions carefully before using the charger!
- Do not use the device if there are any signs of damage to the housing, plug or cable. If you do find any damage to the unit, please contact an authorised dealer!
- Use only with NiMH/NiCd cells. Other battery types may explode!
- Please make sure batteries have been inserted with the correct polarity (+/-) prior to use!
- Please note that due to the high charging current, only high performance brand rechargeable batteries should be charged with this device! Low quality cells may leak and damage the charger and invalidate the warranty!
- Keep the charger in a dry place away from direct sunlight!
- In order to avoid the risk of fire and/or electric shock, the charger must be protected against high humidity and water!
■ Before cleaning the unit, disconnect it from the mains and only use a dry cloth!
■ Never attempt to open the charger!
- Keep out of children's reach! Children should be supervised to ensure that they do not play with the charger!
- The device is not to be used by children or people with reduced physical, sensory or mental capabilities. In addition, novice users who have not fully read these instructions should be supervised or given instruction before use!
- If the safety instructions are not followed, it may lead to damage to the device or battery and could cause injury to the user!
■ We recommend the use of ANSMANN rechargeable batteries with this product!
TECHNICAL OVERVIEW
- Charger for 1-4 AAA, AA, C or D and 1.9V E-block; includes USB charging output (5V / 1000mA) that can be used at the same time as charging batteries.
■ Suitable for NiCd, NiMH batteries
■ Reverse polarity protection
- Trickle charging
- For worldwide use (100V-240V AC / 50-60Hz) and car use (12V DC only. Not 24V used in trucks)
FOR ROUND CELLS:
■ Multifunction clear LCD display with backlight
- Adjustable charging current for each charging slot 400mA, 600mA, 800mA for 1-4 rechargeable batteries 400mA, 600mA, 800mA, 1500mA, 1800mA for 1-2 rechargeable batteries
■ Individual charging programs for each charging slot: CHARGE
DISCHARGE (discharges battery before charging to minimize the "memory effect" of batteries REFRESH (cycle of charging and discharging to refresh old batteries)
TEST (fully charges battery - discharge battery and measures capacity recharges battery)
■ Capacity measurement in mAh/Ah
- The selected charging program can be easily read on the LCD display
- Microprocessor controlled charging and supervision of each battery
■ Individual monitoring of the current parameters: VOLTAGE (V)
CAPACITY (mAh/Ah)
TIME (hh:mm)
CURRENT (mA)
■ Multiple over charging protection per bay and auto cut-off function
■ Faulty cell detection / accidental Alkaline insertion detection
FOR 9V RECHARGEABLE BATTERY:
■ LED charging indication
- Charging current 15mA
■ Automatic termination of the charging process by 24 hour timer
OPERATION
USING THE CHARGER IN A MAINS POWER OUTLET
(SEE ILLUSTRATION [1]
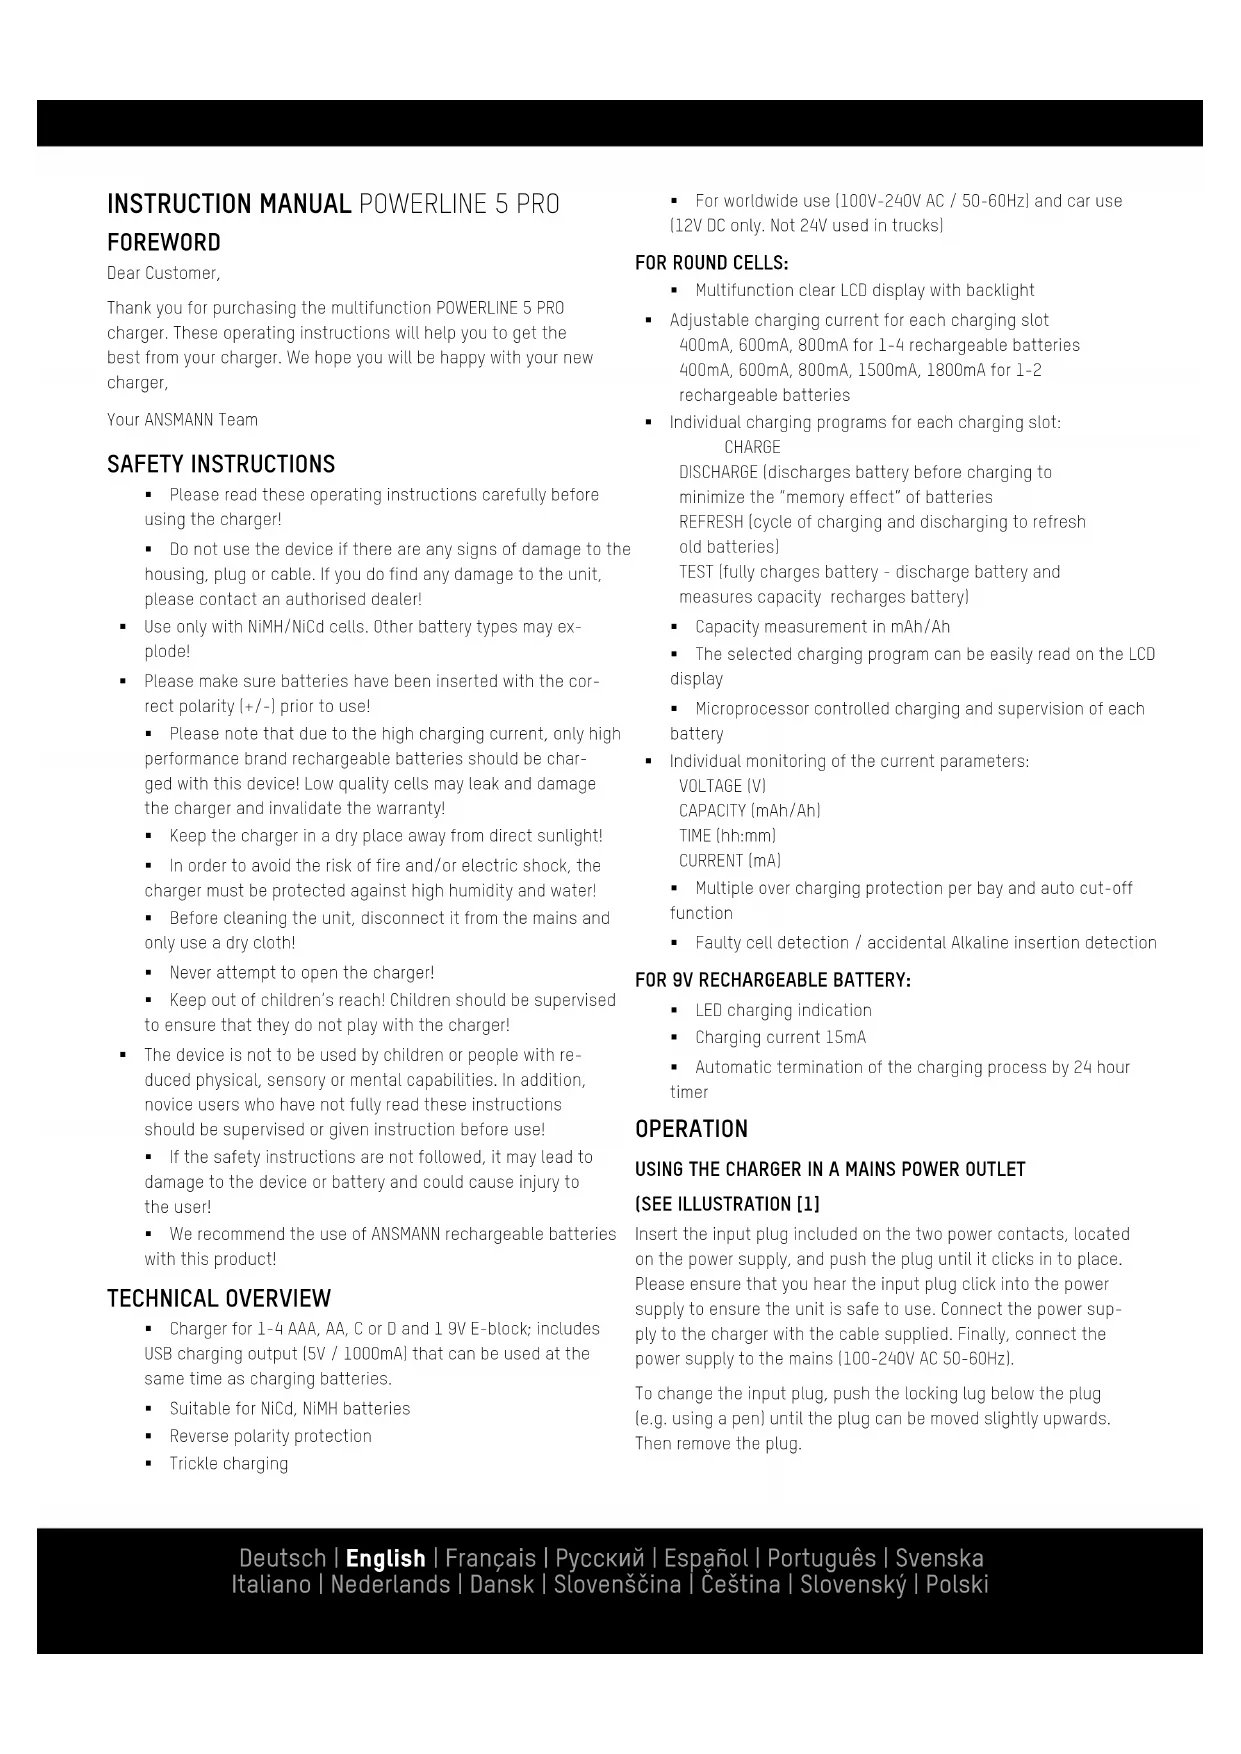
Insert the input plug included on the two power contacts, located on the power supply, and push the plug until it clicks in to place. Please ensure that you hear the input plug click into the power supply to ensure the unit is safe to use. Connect the power supply to the charger with the cable supplied. Finally, connect the power supply to the mains (100-240V AC 50-60Hz).
To change the input plug, push the locking lug below the plug (e.g. using a pen) until the plug can be moved slightly upwards. Then remove the plug.
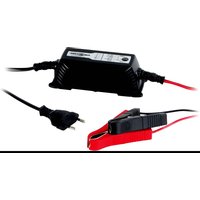
USING THE CHARGER IN A VEHICLE
Connect the DC charging cable to the charger. Connect the DC charging cable to the 12V DC car socket of your vehicle (Do not use in 24V DC truck sockets!). Please make sure that the power of the socket is switched on. Some cars require the ignition to be switched on.
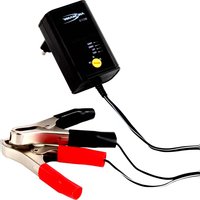
The charger is now ready for use. You can insert one 9V E-block and up to 4 AA/AAA/C/D [in any combination] NiMH or NiCd rechargeable batteries. You can also connect an USB cable using the USB charging socket to charge other devices, for example; mobile phone, smart phone or MP3 player. Insert all batteries with correct polarity, corresponding to the symbols in the charging slot.
CHARGING OF ROUNDCELLS
The charger has 3 function buttons; "CURRENT", "DISPLAY" and "MODE" (see illustration [2A]). Using these buttons, it is possible to use the following settings:
1. MODE button
Push the "MODE" button within 8 seconds of inserting 1-4 rechargeable batteries, to access one of the following charging programs:
a. CHARGE: Charges battery. After charging is complete, charger will automatically switch to trickle charging (Trickle charge will commence after all modes)
b. DISCHARGE: Discharges battery before charging to minimize the "memory effect" of batteries
c. REFRESH: "DISCHARGE REFRESH" or "CHARGE REFRESH" status is shown on the LCD display when charger cycles between discharging and charging. This process will refresh old batteries and bring them back to the maximum capacity. Refresh will be repeated (max. 10x) until the charger can no longer register a rise in capacity.
d. TEST: Fully charges battery. LCD display shows "CHARGE TEST" Discharges battery and measures capacity. The LCD display shows "DISCHARGE TEST". Recharges battery, ready for use. LCD display shows "CHARGE TEST".
2. CURRENT button
Push the "CURRENT" button within 8 seconds of selecting a charging program or after inserting batteries in order to select the charging current for the program "CHARGE" or "TEST". Alternatively, choose the discharging current for the program "DISCHARGE" or "REFRESH".
3. DISPLAY button
Push the "DISPLAY" button whilst charging or discharging to display the charging/discharging current (mA), the voltage of the rechargeable battery (V), the charging/discharging capacity (mAh or Ah) or the remaining charging/discharging time (hh:mm). Once the settings have been selected, the charger automatically starts with the selected parameters after 8 seconds. If no settings are chosen, the LCD display will flash after inserting the rechargeable batteries. First the voltage of the rechargeable batteries as well as the pre-set charging program "CHARGE" is shown. Next, the pre-set charging current of 600mA is shown. After 8 seconds the charging process starts automatically using the pre-set parameters.
By using the 4 charging slot buttons (see illustration [2B]) you can make individual settings for each rechargeable battery. To change a function for a single rechargeable battery, press the corresponding button below the charging slot for the chosen battery. The display will flash for this battery and you can now change settings, as described above, for the single charging slot using the function buttons "MODE" and/or "CURRENT".
If only one or two rechargeable batteries are inserted into the charger using the two outer charging slots, in the mode "CHARGE" and "TEST" the charging current can be increased up to 1500mA or 1800mA with the "CURRENT" button. In this case the inner charging slots are disabled and cannot be used. When charging three or four rechargeable batteries at the same time, the charging current can be set to 400mA, 600mA or 800mA. Using the programs "DISCHARGE" and "REFRESH" discharging currents of 200mA, 300mA or 400mA can be selected. The charging current is generally twice as high as the chosen discharging current.
A few minutes before the rechargeable batteries are completely charged, the charger reduces the charge current to ca. 200mA, regardless of the previously selected charge current. This gentle full-charging extends the service life of your rechargeable batteries.
After every charge/discharge procedure is complete, the charger adds a short pause for the benefit of the rechargeable batteries before continuing with the selected charging/discharging program.
ATTENTION: Please ensure that the rechargeable batteries are designed for the respective charging current. For example, AAA rechargeable batteries should not be charged with a 1500mA or 1800mA charging current! We recommend choosing the maximum charging current (mA) so that it does not exceed the capacity value (mAh) of the inserted rechargeable battery.
It is normal that batteries may become warm during charging. After charging is complete, the charger switches automatically to trickle charge. The trickle charge prevents self-discharge of the batteries when left in the charger.
LCD DISPLAY
“- -” is shown when there is no rechargeable battery inserted but the charger is connected to mains.
"- -- mAh" is shown during the first charging cycle when in "TEST" mode.
"Full" is shown when the charging process is finished and the charger switches to trickle charging. After finishing the charging program "TEST" or "REFRESH", the display switches between "Full" and the measured discharging capacity in mAh/Ah.
"ERR" and "Lo" are displayed alternately if the rechargeable battery inserted has an internal short-circuit and so is defective.
"ERR" and "Hi" are displayed alternately if the rechargeable battery inserted exhibits a very high resistance or a non-rechargeable battery is inserted. In all such cases, no charging occurs. Please remove the defective batteries and dispose of these in an environmentally friendly manner.
During the charging process the pre-set parameters are displayed as mentioned under point 3 (DISPLAY). In addition, the chosen charging program and the current process (CHARGE or DISCHARGE) are shown. In the illustration [3] you can see an example of the LCD display. This example shows 4 different display modes and 4 different charging programs.
CHARGING OF 9V RECHARGEABLE BATTERIES
One 9V battery can be charged, if no D batteries are inserted in the inner round cell charging slots. When inserting the 9V battery pay attention to the correct polarity referring to the symbol in the charging slot. The LED charging indication lights up red when the battery is inserted correctly. The 9V battery is charged with a gentle current of ca. 15mA. After approx. 24 hours, the charge process ends automatically and the LED illuminates green. The rechargeable battery is charged and will be supplied with the trickle charge current so long as it remains in the device. If the indicator flashes red, the battery has an internal short circuit and should be disposed of.
ENVIRONMENT
Do not dispose of the device in the normal household waste. Please return it to your dealer, nearest recycling centre or collection point. Please also recycle all packing materials.
CARE & MAINTENANCE
To make sure that the charger works properly, please keep the contacts in the charging slots free from dirt and dust. To clean the unit disconnect it from the mains and only use a dry cloth.
TECHNICAL DATA
Input voltage external power supply: 100-240V AC / 50-60Hz Input voltage car adapter: 12V DC (Do NOT use with 24V sockets!)
Input voltage charger: 12V DC
Charging current for round cells: 400mA - 1800mA
Charging current for 9V batteries: 15mA
Maximum charging capacity: 11000mAh for round cells 300mAh for 9V block-style batteries
USB-charging socket: 5V / 1000mA. [Can be used at the same time as cell charging].
DISCLAIMER
Information in these operating instructions can be changed without prior notice. ANSMANN cannot accept liability for direct, indirect, accidental or other claims by not using this device as indicated by these operating instructions. Consequential losses are not accepted at any time.
WARRANTY NOTICE
We hereby offer a 3 year warranty on this charger. This does not apply to damages caused by: low quality batteries leaking inside the charger, non-compliance of the operating instruction or physical damage due to lack of care.
Technical details subject to change without prior notice. No liability accepted for typographical errors or omissions. 02/2016
MANUEL D'INSTRUCTIONS POWERLINE 5 PRO AVANT-PROPOS
Chers clients,
FÖR 9V UPPLADDNINGSBART BATTERI:
■ LED laddnings indikation
■ Laddström 15mA