STC 1740x56 - Spotting scope SWAROVSKI OPTIK - Free user manual and instructions
Find the device manual for free STC 1740x56 SWAROVSKI OPTIK in PDF.

| Product type | Spotting scope |
| Brand | Swarovski Optik |
| Model | STC 1740x56 |
| Magnification | 17x to 40x (zoom) |
| Objective lens diameter | 56 mm |
| Threaded tripod mount | 3/8'' UNC, reducible to 1/4'' UNC with ring |
| Focusing | Focusing ring |
| Magnification adjustment | Zoom adjustment ring |
| Eyecup | Rotating, adjustable for use with or without glasses |
| Half-case | Removable, allows use without tripod and 360° rotation |
| Shoulder strap | Included, loop attachment |
| Protective caps | For objective and eyepiece |
| Care and cleaning | Microfiber cloth included; blow and brush before wiping; housing cleanable with damp soft cloth |
| Storage | Ventilated, dry and dark place; use silica gel in humid environment |
| Safety | Never observe the sun directly; avoid shocks; repair only by SWAROVSKI OPTIK |
| Warranty | 10 years international (conditions: date of purchase, dealer stamp) |
| Optional accessories | Digiscoping adapters, special eyepieces |
| Languages of the manual | FR, DE, EN, ES, FI, IT, NL, RU, SV, DA, and others on request |
| Country of manufacture | Austria (SWAROVSKI OPTIK Absam) |
Frequently Asked Questions - STC 1740x56 SWAROVSKI OPTIK
User questions about STC 1740x56 SWAROVSKI OPTIK
0 question about this device. Answer the ones you know or ask your own.
Ask a new question about this device
Download the instructions for your Spotting scope in PDF format for free! Find your manual STC 1740x56 - SWAROVSKI OPTIK and take your electronic device back in hand. On this page are published all the documents necessary for the use of your device. STC 1740x56 by SWAROVSKI OPTIK.
USER MANUAL STC 1740x56 SWAROVSKI OPTIK
SPEND ONE MINUTE. EARN ONE YEAR
text_image
Labeled diagram of a mechanical device with numbered parts, likely a camera or scanner assembly.natural_image
Technical illustration of a mechanical component with cross-sectional view and side view (no text or symbols)2.2 MONTAGE TRAGERIEMEN
text_image
Six-step diagram illustrating a mechanical or electrical device operation with numbered steps for tool application and assembly.natural_image
Diagram of a hairdryer with a numbered component, showing mesh texture and a button (no text or symbols)ATC/STC / DC
SPEND ONE MINUTE. EARN ONE YEAR
Register under MY ACCOUNT at SWAROVSKIOPTIK.COM for a handy overview of all your devices. This also makes it easy to organize any necessary repairs. And if you register your products, we will extend your warranty for an extra year.*

Do you need help with selling up, operating, or looking after our products? Find all necessary information and our FAQs at MYSERVICE.SWAROVSKIOPTIK.COM.
*When you register a product, we will extend its warranty in line with our warranty conditions by one year. Electronics are excluded from the extended warranty.
16
ATC/STC / DR
1. OVERVIEW

text_image
Labeled diagram of a mechanical device with numbered components for identificationATC/STC / DNI
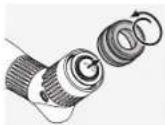
I AIC spelling scope
2 STC spotting scope
3 Adjustment ring for focusing
4 Adjustment ring for changing
magnification
5 Eyecup
6 Eyepiece cover
/ Objective lens cover
8 ATC half shell
9 STC half shell
10 Locking screw for half shell
11 O-ring transport protection
for locking screw)
12 Connection thread for tripod
13 Side carrying strap
2. OPERATION
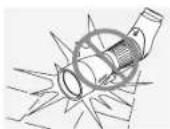
2.1 REMOVING THE OBJECTIVE LENS COVER AND EYEPIECE COVER

natural_image
Technical illustration of a mechanical component with cross-sectional and top views (no text or symbols)2.2 ATTACHING THE SIDE CARRYING STRAP
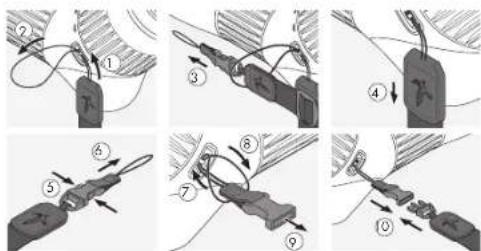
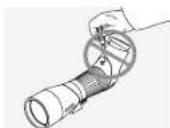
The objective lens cover is mounted when the instrument is delivered. The side carrying strap can be attached quickly and easily when required. To attach the side carrying strap to the ATC/STC, hold the side that does not have the click fastener and feed the loop through the loop holder [1+2]. Then pull the other end of the side carrying strap [3] through the loop and tighten it [4].
18
ATC/STC / DE
text_image
Six-step diagram illustrating a mechanical or electrical device operation with numbered steps for tool application and assembly.On the other side, release the end of the clip mechanism (5+6) and feed the loop through the loop holder (7) . Then pull the end through the loop (8) , tighten it (9) , and attach the clip to the other end of the side carrying strap (10) .

Note: When the carrying strap is mounted, the objective lens cover can be fixed to the carrying strap.
ATC/STC / DNATC/STC / CN
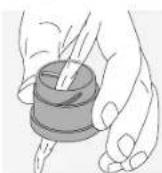
2.3 MOUNTING ON THE TRIPOD HEAD
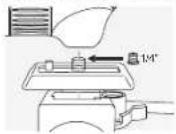
The ATC/STC has a 38 " UNC connection thread. The bush that has been inserted reduces the thread to 14 " UNC. The thread can therefore be used to mount an adapter plate and the spotting scope is compatible with all common tripod heads.
2.4 USE WITHOUT A TRIPOD
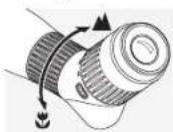
For use without a tripod, a detachable half shell is supplied. This can be attached using the locking screw provided and the connection thread.
Step 1: Remove the bush from the connection thread in the spotting scope.
Step 2: Remove the O-ring [black ring] supplied to protect the locking screw during transport.

text_image
Technical diagram showing mechanical assembly steps with numbered components and directional arrows indicating motion
natural_image
Diagram of a hairdryer with labeled parts (no text or symbols present)20
ATC/STC / DE
Step 3: Secure the half shell to the bottom of the spotting scope using the locking screw.
The sporting scope and half shell can be used either hands-free or supported, for example, on a backpack. The protective half shell allows both the focusing ring and the magnification adjustment ring to be rotated by 360° when placed on a surface.
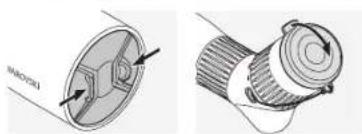
For use without glasses: unscrew the twist in eyecup (counter-clockwise) as far as it will go.
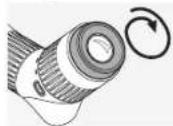
For use with glasses: screw in the twist-in eyecup (clockwise) as far as it will go.
ATC/STC / DNATC/STC / CN
Practical tip for eyeglass wearers: the special SWAROVSKI OPTIK eyecups, available from selected retailers, offer additional viewing comfort.
2.6 ADJUSTING THE FOCUS
- For distant objects, turn the focusing adjustment ring to the right (clockwise).
- Turning the adjustment ring to the left [counterclockwise] allows you to observe objects from a close distance.
- For effortless observation, turn the focusing adjustment ring to
the left (counterclockwise) until the image is slightly blurred. Then turn the adjustment ring to the right (clockwise) until the maximum image definition is reached.
Practical tip: use the focusing wheel on the spotting scope to continually set the focus. This will help to stop your eyes feeling tired.
2.7 USING THE ZOOM ADJUSTMENT RING

Changing magnification: turning the adjustment ring to the right increases the magnification, turning it to the left reduces the magnification. The index mark shows the current magnification setting.
3. CARE AND MAINTENANCE
3.1 LENS-CLEANING CLOTH
With the included microfiber lens-cleaning cloth you can clean even the most sensitive glass surfaces. It is ideal for objective lenses, eyepieces, and eyeglasses.
Please keep the cloth clean, as dirt can damage the lens surface. If the cloth is dirty, you can wash it in lukewarm soapy water and let it air dry. Please use it only for cleaning glass surfaces.
3.2 CLEANING
We have designed all the components and surfaces of the scope to be easy to clean.
To ensure the long-lasting optical brilliance of your spotting scope, you should keep the glass surfaces free from dirt, oil, and grease. To clean the optics, first brush off any larger particles of dirt using an optical lens brush. Then breathe gently on the lens and polish it with the cleaning cloth to remove any remaining dirt.
The housing is best cleaned with a soft, moist cloth (please do not use the lens-cleaning cloth for this). If it is very dirty (e.g. with sand), the twist-in eyecup can be completely unscrewed for very easy cleaning.
3.3 STORAGE
You should store your spotting scope in a well-ventilated, dark location. If the spotting scope is wet, it must be dried first. In tropical areas or areas with high humidity, it is best to store it in an airlight container with a moisture-absorbing agent (e.g. silica gel).
24
ATC/STC / DE
3.4 COMMENTS
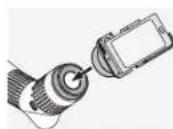
Turn your spolling scope into a telephoto lens with SWAROVSKI OPTIK digiscoping adapters.
4. SAFETY RECOMMENDATIONS
4.1 WARNUNG!
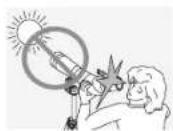
Never look at the sun with the spotting scope! This leads to injury of your eyes!
ATC/STC / DNATC/STC / CN
4.2 GENERAL INFORMATION
Please protect your spotting scope from jolls and jars.
Repair and service work shall only be carried out by either SWAROVSKI OPTIK Absam (Austria) or SWAROVSKI OPTIK North America and any work by non-authorised parties shall render the warranty void.
MERCI D'AVOIR CHOISI CE PRODUIT DE LA MAISON SWAROVSKI OPTIK. POUR TOUTE QUESTION ADRESSEZ-VOUS À VOTRE DÉTAILLANT OU CONTACTEZ- NOUS DIRECTEMENT SUR SWAROVSKIOPTIK.COM.
All details are typical values
We reserve the right to make changes regarding design and delivery. We accept no liability for pairing errors.
26
ATC/STC / DE
ATC/STC / DEATC/STC / CN

PRENEZ UNE MINUTE. ET GAGNEZ UNE ANNEE
text_image
Labeled diagram of a mechanical device with numbered parts, likely a camera or scanner assembly.natural_image
Technical illustration of a mechanical component with cross-sectional view and side view (no text or symbols)2.2 INSTALLATION DE LA BANDOULIÈRE
natural_image
Diagram of a hairdryer with a numbered component, showing mesh texture and a button (no text or symbols)text_image
Labeled diagram of a mechanical device with numbered components for identificationnatural_image
Technical illustration of a mechanical component with cross-sectional view and side view (no text or symbols)text_image
Technical diagram showing three-step assembly steps of a mechanical component with labeled parts ①, ②, and ③.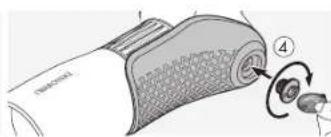
natural_image
Diagram of a device with a textured grip and two buttons, no visible text or symbolstext_image
Labeled diagram of a mechanical device with numbered parts, likely a camera or scanner assembly.I Telescopio AIC
2 Telescopio STC
natural_image
Technical illustration of a mechanical component with cross-sectional view and side view (no text or symbols)2.2 COLOCAR LA CORREA DE TRANSPORTE LATERAL
text_image
Six-step diagram illustrating a mechanical or electrical device operation with numbered steps for tool application and assembly.natural_image
Diagram of a device with a textured grip and two buttons, no visible text or symbols56
ATC/STC / DE
text_image
Labeled diagram of a mechanical device with numbered parts, likely a camera or scanner assembly.natural_image
Technical illustration of a mechanical component with cross-sectional view and side view (no text or symbols)2.2 DE ZIJDRAAGRIEM BEVESTIGEN
text_image
Six-step diagram illustrating a mechanical or electrical device operation with numbered steps for each step.natural_image
Diagram of a hairdryer with a numbered component, showing mesh texture and a button (no text or symbols)text_image
Technical diagram of a mechanical device with numbered components for identificationnatural_image
Technical illustration of a mechanical component with cross-sectional view and side view (no text or symbols)2.2 FÄSTA SIDOREMMEN
text_image
Six-step diagram illustrating a mechanical or electrical device operation with numbered steps for tool application and assembly.natural_image
Diagram of a hairdryer with labeled parts and a numbered callout (no text or symbols present)80
ATC/STC / DE
text_image
Labeled diagram of a mechanical device with numbered components for identificationARC/SRC/BOA/C/SRC/II
2. KÄYTTÖ
2.1 OBJEKTIIVIN SUOJAN JA OKULAARIN SUOJAKANNEN IRROTUS
natural_image
Technical illustration of a mechanical component with cross-sectional view and side view (no text or symbols)2.2 SIVUKANTOHIHNAN KIINNITYS
text_image
Six-step diagram illustrating a mechanical or electrical device operation with numbered steps for tool application and assembly.text_image
Diagram showing a device with labeled parts and numbered callouts, likely illustrating a mechanical or electronic component.text_image
Labeled diagram of a mechanical device with numbered parts, likely illustrating a cutting or assembly process.natural_image
Technical illustration of a mechanical component with cross-sectional view and side view (no text or symbols)2.2 MONTERING AF SIDEBÆREREMMEN
text_image
Six-step diagram illustrating a mechanical or electrical device operation with numbered steps for tool application and assembly.natural_image
Diagram of a hairdryer with a numbered component, showing mesh texture and a button (no text or symbols)104
ATC/STC / DC
text_image
Labeled diagram of a mechanical device with numbered parts, likely a scanner or optical device.natural_image
Technical illustration of a mechanical component with cross-sectional view and side view (no text or symbols)text_image
Six-step diagram illustrating a mechanical or electrical device operation with numbered steps for tool application and assembly.natural_image
Diagram of a hairdryer with a numbered component, showing mesh texture and a button (no text or symbols)116
ATC/STC / DE
In procuring his optical product from SWAROVSKI OPTK you now own a top-quality instrument for which we grant a worldwide warranty of 10 years from the date of purchase in accordance with the following conditions:
If defects in material and/or workmanship appear, we will take over material costs for the entire warranty period. We receive the right in such instances to repair or replace the instrument or the defective part at our discretion. During the first five years we will take over the costs for materials and work.
This guarantee in no way limits the statutory warranty obligations.
In the event that the range of products is charged, we reserve the right to repair defective instruments or to replace them with those of equal value.
We undertake no liability for repairs carried out by a repair shop which has not been authorized by us, nor for damages caused by improper use, nor for direct or indirect damages brought about by defects on the instrument. In addition, all plots are excluded from the warranty which are subject to nature: wear, such as eye cups, carry shoes, cases, armobating, etc.
This warranty is valid only when this warranty/service document has been duly dated, stamped and signed by the Authorized dealer on the day of purchase.
In a warranty case one as well for service and/or repair work please present the instrument to your authorized SWAROWSKI ORTJK dealer together with this warranty/service document or sent it, delivery tree, directly to our address. Its contents sent without the warranty/service document enclosed will be retained and the costs charged to the customer. The return shipment of the instrument, imported (incents of transport or our discretion), is free of charge. In the case of repairs covered under warranty, otherwise charged to the customer. For shipments to foreign countries any foreign customs duties or fiscal charges are charged to the recipient.
This warranty is given by SWAROVSKI OPTIK AG & CO. KG, Absom, Austria. The pace of jurisdiction is Innsbruck: Austrian law applies.
Insolar as other guarantices/warrantos (whether legally or voluntary) are pledged in individual countries, these must be fulfilled by the respective importer or authorized dealer. SWAROVSKI OPTIK AG & CO. KG, Absom. Austria, can therefore accept locally only when a legal obligation exists to do so.
Remarks for the United States of America:
For warranty services a products purchased in the United States, our only warranty authorized service is through SWAROVSKI OPIK North America. For further information please call 18004763089.