SOL 80 ALU IP 44 - Lighting BRENNENSTUHL - Free user manual and instructions
Find the device manual for free SOL 80 ALU IP 44 BRENNENSTUHL in PDF.

| Product type | LED solar floodlight |
| Brand | Brennenstuhl |
| Model | SOL 80 ALU IP 44 |
| Protection rating | IP44 |
| Power supply | 2W solar panel, 3 x NiMH AA 1.2V 2200mAh batteries included |
| Light source | 8 LEDs (8 x 0.5W) |
| Luminous flux | Approximately 350 lumens |
| Lighting duration | Up to 110 minutes with fully charged batteries |
| Detector type | Passive infrared sensor (PIR) |
| Detection angle | 130° horizontal |
| Detection range | Max. 10 m (at 25°C, installation height 2-2.5 m) |
| Available settings | LUX (day/night threshold), TIME (lighting duration 10-60 s), SENS (sensitivity) |
| Connection cable | 5 m (solar panel to lamp) |
| Solar panel dimensions | 210 x 160 x 16 mm |
| Total weight | Approximately 1.3 kg |
| Operating temperature | -5°C to +45°C |
| Material | Aluminum (housing) |
| Installation | Wall mounting, recommended height 2-2.5 m for the detector |
| Solar panel orientation | South, tilt approximately 30° in Central Europe |
| Maintenance | Clean the solar panel and detector regularly with a damp cloth |
| Warranty | Refer to the manual |
Frequently Asked Questions - SOL 80 ALU IP 44 BRENNENSTUHL
User questions about SOL 80 ALU IP 44 BRENNENSTUHL
0 question about this device. Answer the ones you know or ask your own.
Ask a new question about this device
Download the instructions for your Lighting in PDF format for free! Find your manual SOL 80 ALU IP 44 - BRENNENSTUHL and take your electronic device back in hand. On this page are published all the documents necessary for the use of your device. SOL 80 ALU IP 44 by BRENNENSTUHL.
USER MANUAL SOL 80 ALU IP 44 BRENNENSTUHL
Directions for use SOLAR LED Light SOL 80 ALU IP 44
INTRODUCTION
Thank you for choosing this product.
Familiarize with the product before installation and first use. Carefully read this instruction manual and safety precautions. Only use the appliance for its intended use in the specified areas.
Keep the user manual in a safe place and pass it on together with the product.
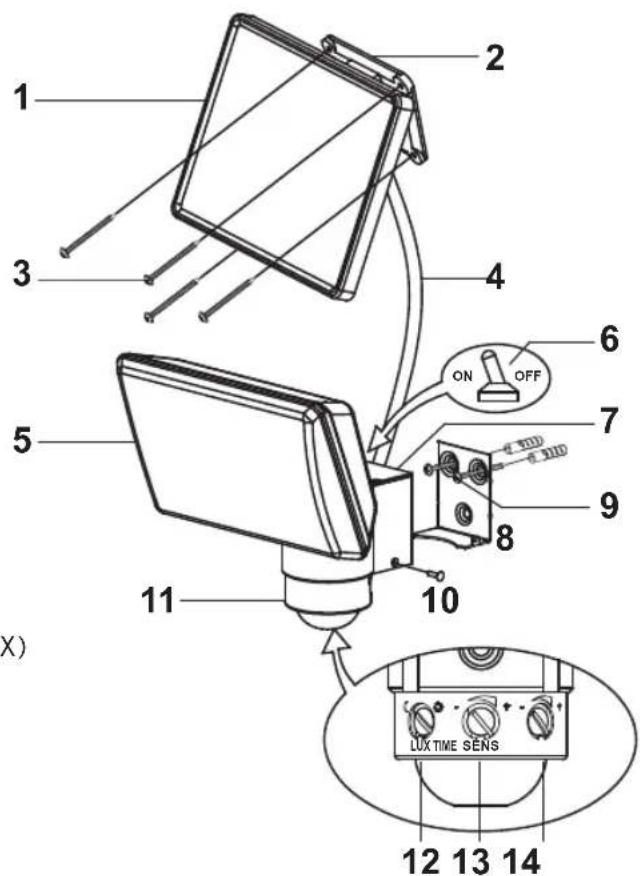
PARTS LIST
Solar Unit
- Solar module
- Mounting plate
- Mounting screws solar module (4x)
- Connecting cable
LED Lamp
- LED unit
- ON / OFF switch
- Battery compartment
- Mounting plate for main unit
- Mounting screws for main unit (2x)
-
Safety screw
-
Movement detector
-
Control knob response sensitivity (LUX)
-
Control knob sensitivity (SENS)
-
Control knob light duration (TIME)
Important information before operation:
Before first use charge the integrated rechargeable batteries. Follow these steps:
Charge with solar energy via the solar module:
Connect the solar module cable with the LED lamp. The lamp switch must be set to OFF position. Find exact information regarding the switch settings below. Place the solar module in a location where it is as long as possible in direct sunlight. Observe the instructions for best placement in the next section.
Depending on the time of year, weather and position of the solar module charging can take several days before the lamp is ready to use. As a guide, charging time if fully unloaded is approx. 3-4 days in full sunshine.

Directions for use SOL 80 ALU IP 44
Alternatively charge with external charger:
You can charge the appliance before first use with a suitable charger (not supplied). Remove the batteries from the lamp and charge directly in the battery charger. Check the charger specifications. The charger must be compatible for charging NiMH batteries (AA / 1.2 V / 2200 mAh).
INSTALLATION INSTRUCTIONS SOLAR MODULE AND LAMP
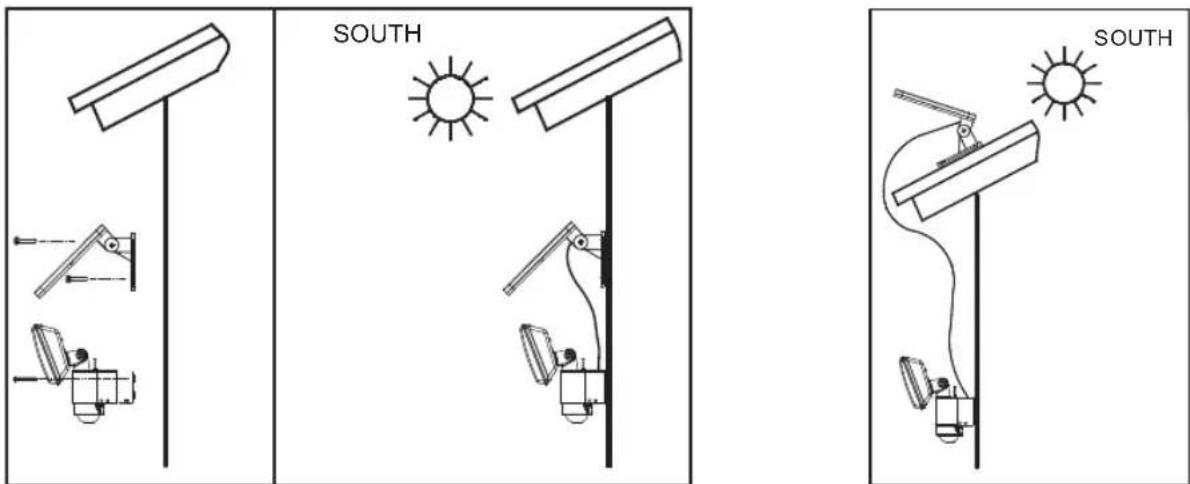
Figure A (South) Figure B (South)
LED lamp:
The lamp consists of a light fitting with 8 high performance LEDs, a light casing with battery compartment and a rotating movement detector. Observe the motion detector's detection area when selecting the installation location. The movement detector has a range of 10 m in an angle of 130^ horizontally at an ambient temperature of 25^ C. The recommended installation height above ground level is 2 m to 2.5 m. Install the lamp's mounting plate with the supplied screws on a suitable surface. Place the lamp on the mounting plate and secure with the safety screw (see Figure A).
Solar module:
The solar module converts the radiation energy in the sunlight in electric energy. This environmentally friendly solar energy charges the batteries and allows the use of this lamp independently from mains power supply. Please remember that the installation site of the solar module needs direct sunlight for best performance. Do not place the module in the shade and direct it South, if possible. In Central Europe a tilt angle of approx. 30^ is recommended. This also ensures to a certain degree self-cleaning from leaves, dust and snow by wind and rain. Install the solar module with the supplied mounting screws on a solid surface. Set the tilt angle accordingly with the mounting bracket (see Figures A and B). Adjust the solar module to the desired direction.
SETUP AND OPERATION
After successful installation connect the solar module cable with the lamp. The solar LED lamp is now ready to use.
Important:
Remember to charge the batteries before first use of the lamp. The switch must be in OFF position. Charging with the solar module takes approximately 3-4 sunny days.
SWITCH SETTINGS:
On top of the lamp casing you find the main switch with two possible settings (Figure C):
ON: Position when switched on.
The batteries are charged via the solar module, the lamp is activated via the motion detector.
OFF: Lamp and movement detector are switched off, battery charging via solar module still active.
Position during delivery and recommended position during longer periods of non-use.
Switch position during fast battery charge without operational lamp.

Figure C
MOVEMENT DETECTOR
This is a passive infrared sensor detecting motion due to heat radiation changes within the protected area, which turns the lamp on/off.
Set the main switch after initial charging to ON position.
Turn the movement detector until you have access to the control knobs (see Figure D).
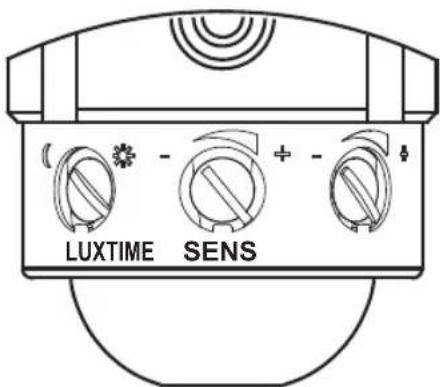
Figure D

Directions for use SOL 80 ALU IP 44
CONTROL KNOBS TIME / SENS / LUX
1. TIME = Light duration
Set the lamps On time after detecting motion within the detection area between 10 and 60 seconds. Turn the TIME control knob towards (+) to increase the On time and towards (-) to decrease the On time.
Note: The set On time starts with triggering the motion detector. After further movement is detected in activated lamp mode the On time is started again. A red indicator light in the motion detector signals motion detection.
2. SENS = Sensitivity
The ambient temperature influences the motion detector's sensitivity.
The lower the ambient temperature, the more sensitive is the motion detector. Use the SENS control knob to adjust to changing temperatures. The sensitivity increases on the (+) side of the control knob.
3. LUX = response sensitivity
Twilight setting to differentiate between daylight and twilight operation. Set the lamps desired response threshold continuously between approx. 2 and 2000 Lux. This adjusts the lamps response sensitivity to the ambient brightness. With the control knob in (○) position the motion detector responds in daylight and at night. The lamp is enabled during night and day → daylight operation. With the control knob in (D) position the motion detector responds only in twilight→twilight operation. Adjust according to ambient brightness with the control knob.
Set the control knob further to (D) if the lamp responds too sensitive in daylight.
Set the control knob further to (D) if the lamp does not switch on in twilight or at night despite setting to (C). In this case the motion detector might be compromised by other light sources such as street lights.
FUNCTION TEST
Set the TIME control knob to minimum (-) and the LUX control knob to bright position (✗). Turn the motion detector back until the arrow (at the bottom of the motion detector) is directed to the centre of the detection area. Test by walking slowly through the detection area. Achieve the desired response time and sensitivity by adjusting the three described control knobs.
Check the motion detector's direction if the lamp does not respond as desired and adjust die control knob settings, if necessary.
MAINTENANCE AND NOTES ON BATTERIES
The integrated rechargeable batteries last with proper and correct use of the lamp 800-1000 charge cycles. This corresponds to up to 2 years.
If reliability and brightness of the lamps decrease, first try to achieve a better battery capacity by charging similar to initial charging (see description above, 3-4 days charge with switch in OFF position or with separate battery charger) or change the batteries.
CHANGE BATTERIES:
Change the batteries if the lamp does not turn on or the batteries are exhausted.
Set the main switch to OFF position, disconnect the connecting cable, loosen the safety screw and slide the lamp from the mounting plate.
Open the battery compartment cover, remove the batteries and replace with same type batteries (see technical data). Observe the correct polarity when replacing the batteries. Assemble the lamp in reverse order. Charge the new batteries before first use for at least 3-4 days via the solar module as instructed.
GENERAL SAFETY PRECAUTIONS
- DC power is generated as soon as light strikes the solar module. Only use the supplied cables and do not shorten the cables.
- Only use the supplied solar module. The solar module is adjusted to lamp and batteries. The use of a different solar module can result in personal injury or damages to the lamp and will void your warranty.
- Install the cable safe and secure and without causing any danger (e.g. trip hazard). Do not use the solar lamp with a defective or damaged cable.
CLEANING
Keep the motion detector free of dust and debris; clean it regularly with a damp cloth. Do not use any chemicals or aggressive agents for cleaning the device. Ensure that the solar module is free of dirt and debris at all times. A dirty solar cell cannot charge the batteries properly. This can result in premature aging of the batteries and malfunctions of the device.
STORAGE
Observe the following steps to avoid damages to the batteries when storing the lamp for a longer period of time without direct sunlight:
- Switch the lamp off (switch in OFF position).
- Store the lamp with connected solar module in a place, where the solar module is subjected at least indirect lighting, if possible. This prevents deep drain of the batteries.
- During a longer storing period of the lamps (e.g. during winter) of more than 4 months ensure regular recharge of the batteries. Place the lamp with connected solar module for several days (3-4) in direct sunlight or remove the batteries and regularly charge with a suitable battery charger.
FAQ / TROUBLESHOOTING:
- Problem: Lamp does not turn on if there is movement in the detection area.
Solution: Ensure that:
- the lamp is switched on (switch in ON position);
- the brightness is not set too dark. Set the LUX control knob further towards ☐;
- the motion detector is directed to detect movement. Ensure that the arrow under the motion detector points towards the detection area;
- the solar module is directed for being stricken during the day by as much sunlight as possible for charging the batteries with solar energy;
-
the batteries are not exhausted. Charge exhausted batteries at least for 3-4 sunny days (switch in OFF position).
-
Problem: Lamp turns already on in bright daylight.
Solution: Motion detector adjusted too sensitive. Check your settings. Change the LUX control knob setting towards ). The lamp should only be enabled during twilight and at night.

Directions for use SOL 80 ALU IP 44
- Problem: Lamp flashes fast.
Solution: The batteries are exhausted. Set switch to OFF position and charge the batteries for at least 3-4 days in direct sunlight. Afterwards set the switch back to ON position.
- Problem: Luminosity is weaker than usual.
Solution: The batteries are exhausted. Set switch to OFF position and charge the batteries for at least 3-4 days in direct sunlight. Afterwards set the switch back to ON position.
TECHNICAL DATA
Illuminant: 8 high performance LEDs (8 x 0.5 W)
Luminous flux approx. 350 lm
Luminous period: Up to 110 minutes with fully charged batteries
Solar module: P=2 W
$$ U _ {p m} = 1 0 ^ {p} \mathrm{V} $$
$$ I _ {p m} = 1 4 0 \pm 1 0 \mathrm{mA} $$
Dimensions: 210 x 160 x 16 mm
Motion detector: Type: PIR
Detection angle: 130° horizontal
Range: max. 10 m at 25 °C ambient
temperature
and 2 m to 2.5 m installation height
Light duration adjustable between 10 ± 5s to 60 ± 10s
Response threshold continuously adjustable between daylight and night (approx. 2-2000 lx)
Connecting cable:
5 m (solar module - lamp; 4,75 + 0,25 m)
Batteries:
3 x NiMH / AA / 1.2 V / 2200 mAh
Charge protection:
Overcharge protection and discharge protection
Protection class:
IP 44
Ambient temperature:
-5 °C to +45 °C
Weight:
approx. 1.3 kg
DISPOSAL

Dispose of waste electric and electronic appliances environmentally responsible.
Do not dispose of electrical appliances with the household waste. According to
European directive 2002 / 96 / EG for waste electric and electronic appliances and national implementation waste electric appliances must be collected separately and must be environmentally friendly recycled. Enquire at your municipally collection points for waste electric and electronic appliances.

Environmental damages caused by incorrect battery disposal!
Batteries and rechargeable batteries do not belong in the household waste.
They can contain toxic heavy metals and must be disposed of as hazardous waste.
Return exhausted batteries to a municipal collection point.

natural_image
Simple line drawing of a streetlight setup with a sun and a pole, no text or symbols presentFigure A (IOr) Figure B (IOr)
LED прожектор:
Решение: The batteries are exhausted. Set switch to OFF position and charge the batteries for at least 3-4 days in direct sunlight. Afterwards set the switch back to ON position.
ТЕХНИЧЕСКИЕ ДАННЫЕ
$$ I _ {p m} = 1 4 0 \pm 1 0 m A $$
Izmēri: 210 x 160 x 16 mm
Kustību detektors: Tips: PIR