
Bolero Aguazero 6400 - Dishwasher CECOTEC - Free user manual and instructions
Find the device manual for free Bolero Aguazero 6400 CECOTEC in PDF.

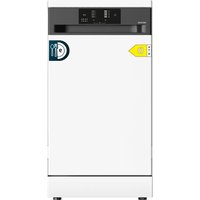
| Product type | Compact dishwasher |
| Brand | Cecotec |
| Model | Bolero Aguazero 1006 Compact |
| Reference | 02363 / 02364 |
| Capacity | 6 place settings |
| Dimensions (H x W x D) | 43.8 x 55 x 50 cm (approx) |
| Net weight | Approximately 20 kg |
| Nominal voltage | 220-240 V AC, 50 Hz |
| Total current | 10 A |
| Total power | 1480-1760 W |
| Water pressure | 0.04 - 1 MPa |
| Wash programs | Intensive, ECO, Glass, Hygiene, Rapid, Pre-wash, Auto, Easy cleaning |
| Special functions | Delay start (up to 24h), Extra drying, Fresh air, Child lock |
| Indicators | Salt, rinse aid, child lock, extra drying |
| Installation type | Built-in or freestanding (worktop compatible) |
| Water connection | Cold water only |
| Drain hose length | Up to 4 m (recommended maximum) |
| Tub material | Stainless steel |
| Filtration | 3-filter system (main, coarse, fine) |
| Energy consumption (ECO cycle) | 0.60 kWh |
| Water consumption (ECO cycle) | 8.0 L |
| Noise level | Approximately 48 dB(A) (approx) |
Frequently Asked Questions - Bolero Aguazero 6400 CECOTEC
User questions about Bolero Aguazero 6400 CECOTEC
0 question about this device. Answer the ones you know or ask your own.
Ask a new question about this device
Download the instructions for your Dishwasher in PDF format for free! Find your manual Bolero Aguazero 6400 - CECOTEC and take your electronic device back in hand. On this page are published all the documents necessary for the use of your device. Bolero Aguazero 6400 by CECOTEC.
USER MANUAL Bolero Aguazero 6400 CECOTEC
Safety instructions 8
- Parts and components 63
2.Before installation 63
3.Installation 64
4.Before using the dishwasher 66 - Loading the dishwasher 69
- Programmes table 70
- Control panel 73
8.Cleaning and maintenance 76
9.Troubleshooting 78 - Technical specifications 82
- Disposal of old electrical appliances 83
- Technical support and warranty 83
- Copyright 83
SOMMAIRE
| Icon Type Meaning | |
| WARNING Risk of serious injury or death | |
| RISK OF ELECTRIC SHOCK | Risk of dangerous voltage |
| FIRE | Warning: Risk of fire/flammable materials |
| WARNING Risk of injury or damage to property | |
| IMPORTANT/NOTE Correct system use | |
Please, keep this instruction manual in a safe place for future reference or new users.
- Read these instructions carefully before assembling or using the product. These instructions contain important information that will help you get the best out of your equipment. It is your responsibility to make sure every user is informed about the warnings and precautions stated in this instruction manual.
- This appliance can be used by children aged 8 years and above and persons with reduced physical, sensory or mental capabilities or lack of experience and knowledge if they have been given supervision or instruction concerning the use of the appliance in a safe way and understand the hazards involved. Children should not play with the appliance. Cleaning and user maintenance should not be carried out by unsupervised children.
- After using the dishwasher, there may be remains in the interior. Keep children away from the machine when it is open.
- WARNING: check the dishwasher and package are not
damaged. Never use the dishwasher if it is damaged, immediately contact the Cecotec Technical Support Service.
- Packaging material may be dangerous to children.
Remove it and place it out of their reach.
- Choose a suitable and safe place to install the dishwasher.
- Do not install the dishwasher on a surface in which the base cannot air properly, like a carpet.
- Use the provided hoses, do not reuse old hoses.
- Don't plug the dishwasher before installing it. The machine must be unplugged during its installation.
- It is recommended that the dishwasher is installed by authorised personnel.
- Never use an extension cord or a multi SOCKET connection.
- The socket must be accessible after the dishwasher installation.
- After the installation, the first time you run the dishwasher, do it while it is empty.
- If the power cord is damaged, it must be replaced by the Technical Support Service of Cecotec or similar qualified personnel to avoid risks.
- Always use the socket provided with the dishwasher.
Do not modify the socket provided with the device if it does not match the power socket.
- Check the power cord regularly for visible damage.
If the cord is damaged, it must be replaced by the official Technical Support Service of Cecotec in order to avoid any type of danger.
- Do not operate the product if its cord, plug or structure show visible damage, do not operate properly or have been dropped.
-
In case of malfunctioning, repair must be carried out by the Cecotec Technical Support Service.
-
Before repairing the dishwasher, you must disconnect it from the power supply and close the stopcock.
- Tou nplug the dishwasher, pull from the socket, never from the cord.
- This dishwasher is intended for household use only. Do not operate it outdoors.
- During use, the dishwasher uses less energy and water than washing dishes by hand, provided that the household dishwasher is used according to these instructions.
- Do not misuse it, do not stand, sit or place any heavy object on the door or baskets.
- Do not use the dishwasher if all interior elements are not correctly placed.
- Use only detergents and rinse aids specific for dishwashers.
- Some dishwasher detergents are very alkaline. They may be extremely dangerous if you ingest them. Avoid contact with skin and eyes and keep children away from the dishwasher when the door is open.
- Due to the danger of explosion, do not place chemical solvents in the machine washing section.
- Do not place articles which are not dishwasher safe in the machine.
- Do not fill the basket over its capacity.
- Cecotec is not responsible for any deformation produced in the interior of the machine due to misuse.
- Do not open the door while the dishwasher is running, as it could spill hot water. The machine features safety devices which will stop the operation if you open the door.
-
Do not leave the door open, as it could cause accidents.
-
Place knives and other sharp objects in the cutlery basket with the blade facing down.
- For safety reasons, disconnect the mains plug after the programme has finished.
- To avoid electric shock, do not disconnect the dishwasher with your hands wet.
- To save energy, on the standby mode, the device will automatically turn off after 15 minutes of inactivity without any user interaction.
- The maximum place setting capacity is 6.
- The maximum inlet water pressure is 1MPa .
- The minimum inlet water pressure is 0.04MPa .
INSTRUCTIONS DE SECURITE
- Interior tube
- Salt compartment
- Dispenser
- Spray arm
- Filtering set
- Cup rack
- Basket
Note
The graphics in this manual are schematic representations and may not exactly match the product.
2. BEFORE INSTALLATION
- This product includes a safety package to protect it during transport. Unpack the appliance and keep the original packaging and materials in a safe place. It will help prevent any damage if the product needs to be transported in the future. In case the original packaging is disposed of, make sure all packaging materials are recycled accordingly.
- Make sure all parts and components are included and in good conditions. If there is any piece missing or not in good condition, immediately contact the Technical Support Service of Cecotec.
Box contents
- Bolero Aguazero 1006 Compact/ Silver dishwasher
- Water supply hose
- Drain hose
- Funnel
- Instruction manual
3. INSTALLATION
Step 1: Selecting the dishwasher location
Connecting the electric supply, the water supply and the drain
- When placing the machine, do it in an area in which the tableware can be loaded and unloaded easily. Do not place the dishwasher in an area in which room temperature is below 0^ .
- If you want to install the dishwasher in an existing cabinet, you must make sure there is enough space to do so and that the wiring and plumbing are appropriate.
- Place the dishwasher near a tap, a water drain and a grounded electrical outlet. Remember you should not modify the connections once the dishwasher is installed.
- You must leave at least 5 mm space between the upper part of the dishwasher and the cabinet, and the exterior door must be aligned with the piece of furniture.
- Follow the indications on image 2 on the dimensions the gap where you want to install the dishwasher must have.
- WARNING: the worktop under which you want to install the dishwasher must be stable in order to avoid imbalances.
- If you want to install the dishwasher in the corner of a cabinet, you must make sure there is enough space to open the door completely. Fig. 3
- Dishwasher
- Dishwasher door
- Minimum space of 5mm
- Cabinet
Note
- Leave an appropriate distance around the machine to make its disconnection from the mains and movement easier when cleaning it.
- Do not hold the device by its door or panel.
Step 2: Water supply hose connection
Fig. 4
- Connect the water supply hose to a cold water tap, and make sure it is secured in place.

WARNING: use the water supply hose provided with your dishwasher, do not reuse the water supply hose from your old dishwasher.

WARNING: open the tap and let water run through the water supply hose before connecting it to the dishwasher.

WARNING: connect the water supply hose directly to the water inlet. The pressure
supplied by the inlet must be at least 0.04 MPa and at most 1 MPa. If the pressure is over 1 MPa, you must install a pressure release valve to the inlet.

After connecting the water supply hose, open the tap completely and check if there is any water leakage. Close the water supply tap after every washing programme.
Step 3: Drain hose connection
Fig. 5
- You can install the dishwasher following 3 different methods (A, B, C), either in a cabinet or over a worktop. Connect the drain hose directly to a drain, over the sink or to an outlet with at least a 4-cm diameter.
- If the end of the drain hose is free, it should not be immersed in water, to avoid water backflow.
- If you need a drain hose extension, make sure you use a similar drain hose.
- The drain hose must be correctly placed to prevent water leakage.
- Make sure the drain hose is not twisted or crushed.
- The height of the drain pipe A must be higher than the sink edge height.
- Secure the pipe to the end of the drain hose.

IMPORTANT: if the sink is at a 1-m height from the floor, the excess water in the drains cannot be directly drained in the sink. You will need to empty the remaining water from the hoses in an exterior bucket or adequate container and lower than the sink.

IMPORTANT: utensils will not be washed correctly if you use a drain hose with over 4-m length.
Step 4: Electric connection
- Connect the dishwasher to the electric circuit.

WARNING: make sure that the mains voltage matches the voltage stated on the rating label of the appliance and that the wall outlet is grounded.

The dishwasher plug must be connected to a grounded socket. If you do not have a grounded socket, a grounded installation must be carried out by a licensed electrician. In case of ungrounded use, Cecotec shall not be liable for any action or damage that this may cause.
- Make sure there is an appropriate grounded socket before using the appliance.
Step 5: Placing the dishwasher
Fig. 6
- You must leave at least 5mm between the upper part of the dishwasher and the cabinet, and the exterior door must be aligned with the piece of furniture.
- The dishwasher must be placed near the water and drain hose, previously connected, and the power supply.
- You must ensure enough space to open the door completely.
ENGLISH
Note
Depending on where the power supply is, you may need to drill a hole on the opposite side of the cabinet.
4. BEFORE USING THE DISHWASHER
Fig. 7
- For a correct washing, the dishwasher needs soft water. Otherwise, water will leave scale remains in the tableware and in the interior of the machine which may block the dishwasher.
- To do this, water goes through a system that removes the ions that form the hardness of the water, either special dishwasher salt or a water softener.
- Before the first use, follow these steps:
- Set the water softener.
- Add salt to the water softener.
- Load the basket.
- Fill the detergent compartment.
4.1. Dishwasher salt
- Use only salt special for dishwashers.
- The salt compartment is located under the basket.
Filling the compartment with dishwasher salt
Fig. 8
- Remove the basket and loosen the compartment cap.
- Open the salt compartment cap by turning it counterclockwise.
- Fill the compartment with the dishwasher salt. The use of a funnel will make the process easier. (Fig. 8)
- Add water to the salt compartment until the limit (only in the first use). It is normal for a small amount of water to come out of the salt compartment.
- Place the cap back and tighten it.
-
The salt indicator light will turn off after the salt compartment is filled with salt.
-
When running the dishwasher, the salt compartment will fill with water, so you must fill the compartment before running the dishwasher.
-
Fill the salt compartment immediately before running the dishwasher as, otherwise, the filtering system, pump and other important parts of the machine may get damaged. The guarantee shall not cover this eventuality.
Warnings
-
Use exclusively salt for dishwashers.
-
Any other type of salt may damage the salt softener. In case of damage caused by the use of unsuitable salt, Cecotec does not give any guarantee and is not liable for any damage caused.
4.2 Water softener
- This dishwasher is equipped with a water softener which uses a salt compartment specifically designed to reduce water hardness.
- To find out the hardness level of your tap, you can contact your water company or use a test strip
- You must set the water softener manually according to the water hardness in your area, to do so use the water hardness dial. The goal is to optimise and customise the salt consumption level.
Water hardness table
| Water hardness Level | |
| 0-50 HE-HF | |
| 50-100 H7-Hd | |
| 100-150 H5-H6 | |
| 150-200 H4 | |
| 200-300 H3 | |
| 300-400 H2 | |
| More than 400 H1 |
The factory setting is H3.
Setting the water softener
- Close the door. Turn the device on.
- In the next 60 seconds, hold down the Start/Pause icon more than 5 seconds to enter the water softener setting mode.
- Press the Start/Pause icon again to select the proper setting according to your local area, the setting will change following this sequence: "H1→H2→H3→H4→H5→H6→H7→H8→H9→HA→Hb→HC→Hd→HE→HF→H1"
- Do not press any icon for more than 5 seconds or press the power button to complete the setting and exit this mode.
4.3 Detergent use
- Use only detergents designed specifically for household dishwashers. Keep the detergent in a cool, dry place and out of reach from children.
ENGLISH
- The ingredients used in the detergents are necessary to remove dirt from the dishwasher.
- Do not fill the compartment with powder detergent until it is ready to wash the tableware.
- The necessary detergent quantity will depend on the cycle, the load size and the tableware soiling level. Add an adequate quantity to ensure optimum performance.
- If the detergent amount is too high, you will notice glass and dishes have whitish stripes or bluish layers, which may rust the tableware. Continued use of too much detergent may cause damage to the dishwasher.
- If the amount of detergent is too low, it can cause bad cleaning, as well as whitish stripes if the water is hard.
- Check the manufacturer instructions for the detergent to get more information.
Filling the detergent. Fig. 9
- Slide the detergent compartment release tab to the right to open the cover.
- Add detergent in the biggest hole (A) for the main wash. For dirtier loads, also add detergent in the smaller hole (B) so that detergent is released during prewash.
- Close the cover and press it until it is blocked in place.
Notes
- Remember that, depending on the water hardness, the setting can be different.
- Respect the manufacturer recommendations in the detergent package.
4.4 Rinse aid use
- Use only detergents designed specifically for household dishwashers. Keep the rinse aid in a cool, dry place and out of reach from children.
- Rinse aid is used to promote the drying of the dishes without marks and stains. Rinse aid is automatically released during the last rinse to prevent water droplets from forming on the tableware.
- This dishwasher is designed to use liquid rinse aids.
- If the rinse aid dose is too low, there will be whitish stains in the tableware and it will not dry correctly.
- If the rinse aid dose is too high, you will see bluish layers on glass and dishes.

Never fill the rinse aid compartment with other substances, as this could damage the dishwasher.
Filling the aid rinse dispenser
Fig. 10
- Open the cover in the arrow direction.
- Pour the rinse aid in the dispenser, careful not to pour too much.
- Close the cover in the arrow direction.
When to refill the rinse aid dispenser
- The frequency with which you need to refill the compartment depends on the frequency with which you wash your tableware and the rinse aid setting used.
- The low rinse aid level indicator will turn on when it needs more rinse aid.
- Do not overfill the compartment.

NOTE: be careful not to spill rinse aid outside the compartment and clean it if it is spilled.
5. LOADING THE DISHWASHER
Recommendations
- To get better results, follow the loading tips.
- If you do not overload the dishwasher capacity, you will save energy and water.
- Loading the dishwasher to its full capacity will contribute to energy and water saving.
- Remove any coarse residue from the tableware before placing it in the machine. Manual pre-rinse of the tableware will lead to higher water and energy consumption and is not recommended.
- Place every container, like mugs, glasses and pots upside down on the dishwasher, otherwise water may accumulate in the interior.
- Do not wash too small utensils in the dishwasher, as they may fall off the basket and cause serious interior damage to the dishwasher.
- Some types of glass can lose their brightness after a great amount of dishwasher washing cycles.
- Use utensils labelled as dishwasher safe.
- Silver and aluminium pieces tend to discolour during dishwasher washing.
- Enamelled pieces may fade if they are washed frequently in the dishwasher.
- For some utensils, select a programme with the lowest possible temperature.
- To avoid damage, do not remove the tableware from the dishwasher immediately after finishing the programme.

WARNING: make sure the rotation of the spray arm is not blocked after loading the dishwasher.

WARNING: make sure after loading the dishes you can open the detergent compartment.

NOTE: do not overload the basket.

Do not wash too small utensils on the dishwasher, as they may fall off the basket and cause serious interior damage to the dishwasher.

WARNING: to avoid any possible injury, place sharp knives with its sharp part upside down on the cutlery basket.
WARNING: wait for at least 15 minutes before unloading the dishwasher, as the objects may be hot when the programme finishes.
ENGLISH
Loading the basket
Fig. 11
- Platters
- Mugs
- Flat dishes
- Soup plates
- Melamine bowls
- Small melamine dishes
- Small dishes
- Dessert bowls
- Cups of coffee
- Pots
- Glasses
- Cutlery basket
- Soup spoons
- Saucers
Cutlery basket
Fig. 12
- Gravy ladles
- Serving forks
- Soup spoons
- Forks
- Knives
- Teaspoons
-
Dessert spoons
-
Cutlery pieces 1, 2 and 3 are placed in the lower part of the cutlery basket.
- Cutlery pieces 6 and 7 are placed in the higher part of the cutlery basket.
Warning
- Do not leave any utensil move through the bottom of the dishwasher.
- Always load sharp objects with the point upside down.
6.PROGRAMMESTABLE
The consumption values and programme length are just for reference, except for the ECO programme.
| Programme Cycle | Description | Pre/main wash detergent | Time (min) | Energy (kWh) | Water (litres) | Rinse aid |
| Intensive Pre-wash | wash (50°C) | 4/16 grams (or 3-in-1) | 110 0.94 | 12.1 | Yes | |
| Wash (60°C) | ||||||
| Rinse | (60°C) | |||||
| Rinse | (60°C) | |||||
| Rinse | (60°C) | |||||
| Dry | (60°C) | |||||
| ECO Pre-wash | wash (45°C) | 4/16 grams (or 3-in-1) | 160 0.60 | 8.0 | Yes | |
| Rinse | (60°C) | |||||
| Rinse | (60°C) | |||||
| Dry | (60°C) | |||||
| Glass Pre-wash | wash (45°C) | 4/16 grams (or 3-in-1) | 120 0.52 | 8.1 | Yes | |
| Rinse | (60°C) | |||||
| Rinse | (60°C) | |||||
| Dry | (60°C) | |||||
| Hygiene Pre-wash | wash (50°C) | 20 g | 12.1 | Yes | ||
| Wash (60°C) | ||||||
| Rinse | (70°C) | |||||
| Rinse | (70°C) | |||||
| Dry | (70°C) | |||||
| Rapid | wash (60°C) | 20 g | 30 | 0.47 | 8.1 | Yes |
| Rinse | ||||||
| Rinse | (60°C) | |||||
| Pre-Wash Pre- | wash - 15 0.02 | 2.1 No | ||||
| Auto Pre-wash A | (40°C) Wash (60°C) Rinse (60°C) Dry | 24 g 90-150 | 0,84 | 6.4/8.4 Yes | ||
| Easy to clean Pre | pre-wash 5 0.1 2 | 1 No |
Note
The ECO programme is suitable to clean normally soiled dishes; it is the most efficient programme in terms of combined energy and water consumption and is used to assess compliance with EU eco-design legislation.
- The programme duration can change according to the amount of dishes, water temperature, room temperature and the selected additional functions.
- Washing dishes in a household dishwasher generally consumes less energy and water than manual dishwashing when the dishwasher is used according to the manufacturer's instructions.
- It is recommended that you leave the door slightly open after the washing cycle has finished to speed up drying.
- You can access the product database where the information for this model is stored by scanning the QR code on the energy label.
| Bolero Aguazero 1006 Compact dishwasher | Bolero Aguazero 1006 Compact Silver dishwasher |
7.CONTROL PANEL
Fig.13
| 1. On/off | Press this icon to turn on the dishwasher, the display will light up. | |
| 2. Start/Pause | Press this icon to start the selected washing programme and to pause the running washing programme. | |
| 3. Programme | Press this icon to select the adequate washing programme, the programme indicator will light up. | |
| 4. Fresh air | If the fresh air indicator is lit up, the dishwasher will renew the internal air for 5 minutes every hour. After 48 cycles, the fresh air programme will stop automatically. If you reset any washing programme, the fresh air function will restart with 48 cycles. | |
| 5. Delay start | Press this icon to confirm the delay start time to run the dishwasher. You can set the delay start up to 24 hours. Every time you press the delay start icon, the time will increase in 1-hour intervals. | |
| 6. Extra dry | Hold down the programme and fresh air icons at once for more than 3 seconds to start the extra dry function. | |
| 7. Child lock system | To activate or deactivate the child lock, hold down the delay start and fresh air icons at once for more than 3 seconds. |
ENGLISH
| 8. Programme indicators | Intensive For very soiled tableware, like slightly soiled pots, pans, dishes, etc. | |
| Hygiene Wash the tableware with a higher temperature to the Intensive programme one to sterilise it. | ||
| ECO For loads with normal soiling, such as lightly soiled pots, dishes, glasses and pans. | ||
| Glass For lightly soiled crockery and glassware. | ||
| Rapid A short wash for lightly soiled loads which do not need drying. | ||
| Pre-wash To rinse the dishes you wish to wash later. | ||
| Auto It automatically detects the tableware soiling degree and choose the adequate washing programme. | ||
| Easy to clean It is used to clean the interior of the dishwasher. | ||
| 9. Display | It shows the remaining time, the delay start, error code, etc. | |
| 10. Operation indicators | Child lock system If the child lock indicator is lit up, this function is active and you cannot use other programmes. | |
| Rinse aid If the rinse aid indicator lights up, the dishwasher has few rinse aid and needs more. | ||
| Salt If the salt indicator lights up, the dishwasher has few salt and needs more. | ||
| Extra dry If the extra dry indicator lights up, the programme will dry the tableware in a more complete manner. (You can only use it with the Intensive, Hygiene, ECO and Rapid programmes). |
Power save
- Manual pre-wash of the tableware will lead to higher water and energy consumption and is not recommended.
- Washing the tableware in a household dishwasher generally consumes less energy and water than manual dishwashing when the dishwasher is used according to the manufacturer instructions.
Starting a programme
- Remove the basket, load the tableware and push it back inside.
- Pour the detergent.
- Press the Start/Pause icon.
- Choose a programme and the indicator light will light up. Close the door. The dishwasher will start the cycle.
Introducing dishes during the cycle. Fig. 14
You can add dishes at any time before the detergent compartment is activated. In this case, follow these steps:
- Press the Start/Pause icon to pause the running washing programme.
- Open the door slightly to stop the dishwasher.
- When the spray arm has stopped, you can open it completely.
- Add the tableware you forgot.
- Close the door.
- Press the Start/Pause icon.
- The dishwasher will resume the programme.
Warning
It is dangerous to open the door in the middle of the cycle, as the hot steam can burn you.
Using the basket
Adjusting the basket
- Remove the basket. Fig. 15
- The basket is placed in the dishwasher by means of a guide rail. Fig. 16
Folding the cup rack
When placing the tableware, lift the cup rack and place coffee cups or other small objects. Fig. 17
Note
Very small items should not be washed in the dishwasher as they could easily fall out of the basket.
ENGLISH
Warnings
- Do not leave any utensil move through the bottom of the dishwasher.
- Always load sharp objects with the point upside down. Fig. 18
8. CLEANING AND MAINTENANCE
- The dishwasher cleaning is important to preserve the machine shelf life.
- Make sure that water softener has been adjusted correctly and the correct amount of detergent is used to prevent limescale build-up.
- Refill the salt compartment when the salt indicator lights up.
- Oil and limescale may accumulate in the dishwasher over time. If this happens:
-
Fill the detergent compartment, but do not load any dish.
-
Select a high-temperature programme and let the dishwasher run with no load.
- If this operation does not clean the dishwasher enough, use a cleaning agent designed to be used in dishwashers.
- To lengthen your dishwasher shelf life, clean the device regularly every month.
- Clean the door gaskets and the door regularly with a damp cloth to remove any accumulated remain or strange object.
- Clean the control panel with a soft and slightly damp cloth.
- Clean the filters and the spray arm at least once a week. If there are food remains or strange objects in the fine and coarse filters, remove the filters and wash them thoroughly with water.
Warnings
- To avoid water from entering the door gasket and the electric components, do not use any type of spray cleaning agent to clean the dishwashing exterior.
- Never use abrasive cleaning agents or scouring pads in the exterior surfaces, as they can scratch the finish. Some paper towels can also scratch or leave stains in the surface.
Filtering system
Fig. 19
- Main filter
- Coarse filter
- Fine filter
- The filtering system retains coarse remains from the wash cycle, including foreign objects such as toothpicks or splinters. Coarse remains may block the filters.
- Check the condition of the filters regularly and wash them whenever it is necessary.
- Hold the coarse filter and turn it counterclockwise to unlock it. Lift the filter upwards and remove it from the dishwasher.
- The fine filter can be removed from the lower part of the filtering set. The coarse
filter can be separated from the main filter by slightly pressing the tabs on the upper part and pulling it.
- The biggest food remains can be cleaned by placing the filter under running water. For a more complete cleaning, use a soft cleaning brush.
- Reassemble the filters in the reverse order of disassembly, place the filter insert again and turn it clockwise until you reach the locking arrow.

WARNING: do not press the filters too much. Place the filters again in a safe manner; otherwise, large remains may enter the system and cause a blockage.

WARNING: never use the dishwasher without the filters installed. Incorrect substitution of the filters may reduce the performance level of the device and damage the tableware and utensils.

WARNING: do not wash any filter in the dishwasher.

NOTE: the washing effectiveness will decrease if the filters are placed incorrectly. NOTE: the use of clean filters is necessary for the correct operation of the dishwasher.
Spray arm
Fig. 20
Make sure the spray arm is not clogged and there are no food remains or strange objects sticking to it. If there is some blockage, remove the spray arm and clean it under running water.
- To remove the spray arm, pull the spray arm upwards.
- Clean the arm with soap and warm water and use a soft brush to clean the holes.
Frost protection
Take frost protection measures in winter. After every washing cycle, follow these steps:
- Turn off the electrical power to the dishwasher from the power supply.
- Turn off the water supply and disconnect the water supply hose from the water valve.
- Empty the water from the supply hose and from the water valve. (Use a bucket to pick up water).
- Connect the water supply hose again to the water valve.
- Remove the filtering set from the bottom of the dishwasher and use a sponge to absorb the water on the drain.
After every wash
After every wash, close the device water supply and leave the door slightly open for some minutes so moisture and odours are not trapped in the interior.
ENGLISH
When not in use for a long time
- We recommend running a washing cycle without any load and, next, disconnect the plug from the mains supply, close the water supply and leave the door slightly open.
- This will help preserve the door gaskets for more time and will prevent odours forming inside the device.
Transporting the device
If you want to move the device, try to do so in an upright position. If it is absolutely necessary, you can place it backwards.
Gaskets
One of the factors that cause odours to form in the dishwasher is food trapped in the gaskets.
Regular cleaning with a damp sponge will prevent this from happening.
9. TROUBLESHOOTING
| Problem Possible causes Possible solutions | ||
| The dishwasher does not turn on | The fuse has blown or the circuit breaker has tripped. | Replace the fuse or restart the circuit breaker. Remove any other device sharing the same circuit as the dishwasher. |
| The power supply is not on. Make sure the dishwasher is on and door is properly closed. Make sure that the power cord is plugged into the socket properly. | ||
| Water pressure is too low. Check the water supply is connected properly and it is not cut off. | ||
| The dishwasher door is not properly closed. | Make sure you properly close the door and it clicks. | |
| The dishwasher water is not drained | Twisted or trapped drain hose. | Check the drain hose. |
| Blocked filter. Check the filtering system. | ||
| Blocked kitchen sink. Check the | kitchen sink to make sure it is draining correctly. If the problem is the kitchen sink is not draining, you may need a plumber instead of the Technical Service. | |
| Foam in the interior Unsuitable | detergent. Use only detergent special for dishwashers to prevent foam formation. If there is foam forming, open the dishwasher and let it evaporate. Add a litre of cold water in the bottom of the dishwasher. Close the dishwasher door and select any cycle. At the start, the dishwasher will drain the water. Open the door after the drainage to check the foam has disappeared. Repeat the process if necessary. | |
| Spilled rinse aid. Always clean spilled rinse aid immediately. | ||
| The interior is stained You may have used detergent with colouring. | Make sure your detergent does not contain colouring. | |
| White film on the interior surface | Hard water. To clean the interior, use a soft and damp cloth with detergent for dishwasher and use rubber gloves. Never use any cleaner other than dishwasher detergent, as this may cause foaming. | |
| There are rust stains on the cutlery | The affected items are not dishwasher safe. | Avoid washing articles which are not dishwasher safe. |
| You did not run a programme after adding salt to the dishwasher. There were salt remains in the washing cycle. | Always run a wash programme with no load after adding salt. Do not select the Turbo* function (if it is included in your model) after adding salt to the dishwasher. | |
| The water softener cover is loose. | Check the water softener cover is properly closed. | |
| Knocking noise in the dishwasher | The spray arm is hitting an item in the basket. | Pause the programme and place the items blocking the spray arm again. |
| Rattling noise in the dishwasher | The tableware is loose in the dishwasher. | Pause the programme and place the items again. |
| Knocking noise on water hoses | This may be caused by the installation or the pipe section. | It does not affect the dishwasher operation. If you have any doubts, contact a qualified plumber. |
| Dishes are not clean You have not loaded them correctly. | Read the 'Loading the dishwasher' section. | |
| Select a more intensive programme. | ||
| Use more detergent or change the detergent. | ||
| Place the items again so the spray arm can move freely. | ||
| Clean and/or place the filter correctly. Clean the spray arm holes. | ||
| Clean the top of the dishwasher. | ||
| Opaque glass Combination of soft water and too much detergent. | Use less detergent if you have soft water and select a shorter cycle to wash the items made of glass. |
| White spots appear on the tableware | Areas with hard water may cause lime deposits. |
| Black or grey marks on tableware | Aluminium items have brushed against the tableware. |
| There is detergent in the dispenser | The dishes block the detergent dispenser. |
| The dishes are not dry. Inadequate | ate load. Wear gloves if you find detergent residues on the dishes to avoid skin irritation. |
| You are removing the dishes too fast. | |
| Do not empty the dishwasher immediately after the wash. Open the door slightly to allow steam to escape. Do not remove the tableware until the interior temperature is safe to the touch. | |
| You have selected an inadequate programme. | |
| With a short programme, the washing temperature is lower, which decreases the cleaning performance. Choose a programme with longer washing time. | |
| Use of low-quality coated cutlery. |
Warning
Cecotec cannot be held responsible for unprofessional repair as this may cause serious risks to the safety of the user of the appliance and affect the warranty.
ENGLISH
Error codes
If there is a malfunction, the dishwasher will display an error code. The next table shows possible error codes and their causes.
| Codes Problem Possible causes | ||
| E1 Overflow There is too much water or | the machine is leaking | |
| E2 Abnormal water inlet The tap is not open, the water | pressure is too low or the water supply hose is clogged | |
| E6 Abnormal heating Heating element failure / | water leakage in the machine causing low water volume / the machine leans and leaks / the water pump is clogged or you did not use detergent specific for dishwashers. | |
| E7 Open circuit / thermistor short-circuit | Device temperature detection failure | |
| Ea Failure of communication between the main printed circuit board and the main printed circuit board display. | Open circuit or breakage of wiring for communication. | |
Warnings
- If an overflow occurs, turn off the main water supply before contacting the Technical Service.
-
If there is water in the base due to overfilling or a small leak, the water must be removed before restarting the dishwasher.
-
TECHNICAL SPECIFICATIONS
| Reference 02363 02364 | ||
| Model | Bolero Aguazero 1006 Compact dishwasher | Bolero Aguazero 1006 Compact Silver dishwasher |
| Code | ||
| Nominal voltage 220-240 V AC, 50 Hz | |
| Total current 10 A | |
| Water pressure Max | Maximum 1 MPa Minimum 0.4 MPa |
| Total power 1480 W | |
| Capacity 6 place settings | |
| IPX IPX1 | |
Manufactured in China | Designed in Spain
(*) Technical specifications may change without prior notification to improve product quality.
11. DISPOSAL OF OLD ELECTRICAL APPLIANCES
This symbol indicates that, according to the applicable regulations, the product and/or battery must be disposed of separately from household waste. When this product reaches the end of its shelf life, you should dispose of the batteries/accumulators and take them to a collection point designated by the local authorities.
Consumers must contact their local authorities or retailer for information concerning the correct disposal of old appliances and/or their batteries.
Compliance with the above guidelines will help to protect the environment.
12. TECHNICAL SUPPORT AND WARRANTY
Cecotec shall be liable to the end user or consumer for any lack of conformity that exists at the time of delivery of the product under the terms, conditions and deadlines established by the applicable regulations.
It is recommended that repairs be carried out by qualified personnel.
If at any moment you detect any problem with your product or have any doubt, do not hesitate to contact Cecotec official Technical Support Service at +34 963 210 728.
13. COPYRIGHT
The intellectual property rights over the texts in this manual belong to CECOTEC INNOVACIONES, S.L. All rights reserved. The contents of this publication may not, in whole or in part, be reproduced, stored in a retrieval system, transmitted or distributed by any means (electronic, mechanical, photocopying, recording or similar) without the prior authorization of CECOTEC INNOVACIONES, S.L.
1. PIECES ET COMPOSANTS
Img.1
De fabrieksinstelling is H3.
- SOMMAIRE
- INSTRUCTIONS DE SECURITE
- Note
- BEFORE INSTALLATION
- Box contents
- INSTALLATION
- Step 1: Selecting the dishwasher location
- Connecting the electric supply, the water supply and the drain
- Step 2: Water supply hose connection
- Step 3: Drain hose connection
- Fig. 5
- Step 4: Electric connection
- Step 5: Placing the dishwasher
- Fig. 6
- ENGLISH
- BEFORE USING THE DISHWASHER
- Fig. 7
- Dishwasher salt
- Filling the compartment with dishwasher salt
- Fig. 8
- Warnings
- Water softener
- Water hardness table
- Setting the water softener
- Detergent use
- Filling the detergent. Fig. 9
- Notes
- Rinse aid use
- Filling the aid rinse dispenser
- When to refill the rinse aid dispenser
- LOADING THE DISHWASHER
- Recommendations
- Loading the basket
- Cutlery basket
- Warning
- 6.PROGRAMMESTABLE
- 7.CONTROL PANEL
- Power save
- Starting a programme
- Introducing dishes during the cycle. Fig. 14
- Using the basket
- Adjusting the basket
- Folding the cup rack
- CLEANING AND MAINTENANCE
- Filtering system
- Spray arm
- Frost protection
- After every wash
- When not in use for a long time
- Transporting the device
- Gaskets
- TROUBLESHOOTING
- Error codes
- DISPOSAL OF OLD ELECTRICAL APPLIANCES
- TECHNICAL SUPPORT AND WARRANTY
- COPYRIGHT
- PIECES ET COMPOSANTS
Brand : CECOTEC
Model : Bolero Aguazero 6400
Category : Dishwasher