Bolero Aguazero 4350 - Dishwasher CECOTEC - Free user manual and instructions
Find the device manual for free Bolero Aguazero 4350 CECOTEC in PDF.

| Product type | Compact dishwasher |
| Capacity | 9 place settings |
| Wash programs | ECO, Daily, Quick, Intensive |
| Number of programs | 4 |
| Water softener | Yes, adjustable (levels H1 to H6) |
| Salt consumption | 0 to 60 g/cycle depending on setting |
| Rinse aid | Built-in dispenser, adjustable level (R1 to R5) |
| Detergent dispenser | Yes, main compartment (15 ml/25 ml) + prewash |
| Baskets | Height-adjustable upper basket, lower basket with foldable tines, cutlery basket |
| Spray arms | Upper and lower, removable for cleaning |
| Filtration system | Coarse filter, flat filter, microfilter |
| Child lock | Yes, key lock |
| Delayed start | Yes, via timer icon |
| Automatic stop when door opened | Yes |
| Visual indicators | Cycle in progress, rinse, drying, end, lack of salt, lack of rinse aid, water inlet fault |
| Error code display | E1 (leak), E2 (water supply fault), E4 (valve), E5 (fan), E6 (overheating), E7 (thermistor), EA (communication) |
| Tub material | Stainless steel |
| Installation | Built-in under counter (remove top plate) or freestanding |
| Water connection | Cold water inlet, drainage hose (max 600 mm height) |
| Cleaning and maintenance | Clean filters and spray arms regularly; use specific dishwasher products |
Frequently Asked Questions - Bolero Aguazero 4350 CECOTEC
User questions about Bolero Aguazero 4350 CECOTEC
0 question about this device. Answer the ones you know or ask your own.
Ask a new question about this device
Download the instructions for your Dishwasher in PDF format for free! Find your manual Bolero Aguazero 4350 - CECOTEC and take your electronic device back in hand. On this page are published all the documents necessary for the use of your device. Bolero Aguazero 4350 by CECOTEC.
USER MANUAL Bolero Aguazero 4350 CECOTEC
natural_image
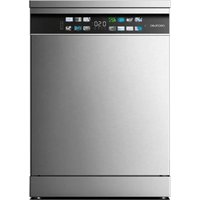
Front view of a stainless steel kitchen appliance with control panel and door (no visible text or symbols)Safety instructions 8
-
Parts and components 65
-
Before use 65
-
Installation 65
-
Operation 67
-
Cleaning and maintenance 75
-
Troubleshooting 78
-
Recycling of electrical and electronic equipment 82
-
Copyright 82
-
Simplified EU Declaration of Conformity 82
SOMMAIRE
EN • The coding in this manual is generic and applies to all code variants of the appliance.
Read the following instructions carefully before using the appliance. Keep this instruction manual for future reference or new users.
- Read these instructions carefully before assembling or using the appliance. These instructions contain important information that will help you get the best out of your equipment. It is your responsibility to make sure every user is informed about the warnings and precautions stated in this instruction manual.
- Warning: Knives and other utensils with sharp points should be loaded in the basket with the points facing downwards or placed in a horizontal position.
- The maximum number of cutlery to be washed is 9.
- This appliance is intended for domestic use only and is not suitable for use in commercial establishments such as bars, restaurants, farms, hotels, motels, and offices.
- Check the power cable regularly for visible damage. If the power cord is damaged, it must be replaced by Cecotec's Official Technical Support Service or similar qualified personnel to avoid risks.
- This appliance can be used by children aged 8 years and above and people with reduced physical, sensory, or mental capabilities or lack of experience and knowledge if they have been given supervision or instruction concerning the use of the appliance in a safe way and understand the hazards involved.
- Children must not play with the appliance.
- Cleaning and user maintenance must not be carried out by children without supervision.
- After using the dishwasher, there may be remains in the
interior. Keep children away from the appliance when it is open.
- WARNING: check the dishwasher and package are not damaged. Never use the dishwasher if it is damaged, contact the official Cecotec Technical Support Service immediately.
- Packaging material may be dangerous to children. Remove it and place it out of their reach.
- Choose a suitable and safe place to install the dishwasher.
- Never use an extension cord or a multi-socket connection.
- The socket must be accessible after the dishwasher installation.
- After the installation, the first time you run the dishwasher, do it while it is empty.
- Always use the plug provided with the dishwasher. Do not modify the plug provided with the appliance if it does not match the power socket.
- Do not operate the appliance if its cable, plug, or structure show visible damage, do not operate properly, or have been dropped.
- In case of malfunctioning, repairs must be carried out by the official Cecotec Technical Support Service; otherwise, the warranty will be void. Before repairing the dishwasher, you must disconnect it from the power supply and close the stopcock.
- To unplug the dishwasher, pull from the socket, never from the cord.
- During use, the dishwasher uses less energy and water than washing dishes by hand, provided that the household dishwasher is used according to these instructions.
- Do not misuse it, do not stand, sit or place any heavy object on the door or baskets of the dishwasher.
-
Do not use the dishwasher if all interior elements are not correctly placed.
-
Only use detergents and rinse aids specific for dishwashers.
- Some dishwasher detergents are very alkaline. They may be extremely dangerous if you ingest them. Avoid contact with skin and eyes and keep children away from the dishwasher when the door is open.
- Due to the danger of explosion, do not place chemical solvents in the interior of the machine.
- Do not place tableware which is not dishwasher safe in the appliance.
- Do not fill the baskets over their capacity.
- Cecotec shall not be held liable for any deformation that may occur inside the dishwasher due to misuse.
- Do not open the door while the dishwasher is running, as it could spill hot water.
- Do not leave the door open, as it could cause accidents.
- To avoid electric shock, do not disconnect the dishwasher with your hands wet.
- Cecotec shall not be held liable for any damage, accident, or incident resulting from the misuse of this dishwasher. It is the user's responsibility to operate and maintain the dishwasher according to the instructions and recommendations detailed in this manual. Failure to follow instructions may result in personal injury, property damage, or loss of product warranty.
INSTRUCTIONS DE SÉCURITÉ
- Detergent dispenser
- Upper basket
- Lower rack
- Upper spray arm
- Cutlery basket
- Lower spray arm
- Salt tank
Note:
The graphics in this manual are schematic representations and may not exactly match the product.
2. BEFORE USE
- This appliance comes in a packaging designed to protect it during transport. Remove the appliance from its box. You can keep the original box and other packaging materials in a safe place to prevent damage to the appliance if you need to transport it in the future. If you wish to dispose of the original packaging, make sure all items are recycled properly.
- Check that all parts and components are included and in good condition. If any of them are missing or damaged, please contact Cecotec's Official Technical Support Service immediately.
Box content:
- Dishwasher
- Lower basket
- Upper basket
- Cutlery basket
- Drain hose
- Salt funnel
- Instruction manual
- Do not remove the product's serial number in order to keep proper traceability if technical assistance is required.
3. INSTALLATION
Tips:
- Each dishwasher has undergone thorough quality control testing before leaving the factory to ensure reliability.
ENGLISH
- Water drops or water marks may be present in your new dishwasher as a result of quality control testing.
- The cutlery basket should be placed in the lower rack. For optimal performance, it is recommended to position it along the centre.
- All packaging materials must be removed from both the exterior and interior of the dishwasher before installation.
Installation
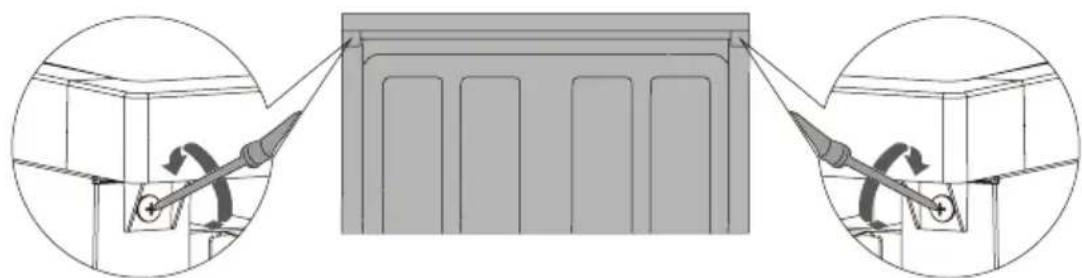
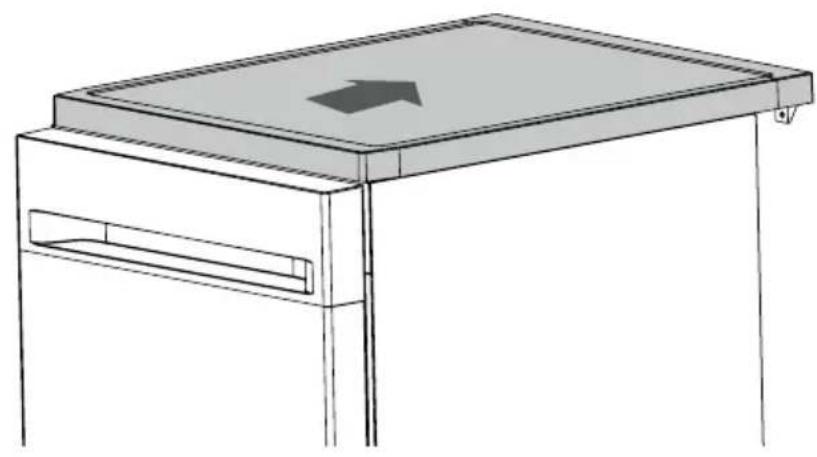
The dishwasher can be built under the worktop according to your requirements. To do so, you will need to remove the dishwasher's top plate using the two screws at the rear.
- Remove the two screws at the rear. Fig. 2
- Push backwards to remove the top plate. Fig. 3
Drain hose connection
Insert the drain hose into a drain pipe with a minimum diameter of 4 cm, or let it run into the sink, making sure to avoid bending or crushing it. The drain pipe height must not exceed 600 mm. The free end of the hose must not be immersed in water to prevent backflow.
⚠ Ensure the drain hose is securely fixed in either position A or position B. Fig. 4
Figure 4 key
- Dishwasher rear
- Power cord
- Drain pipe
- Water inlet
- Drain hose
- Worktop
How to drain excess water from hoses
If the drain pipe connection is positioned higher than 600 mm, excess water may remain in the drain hose. It will be necessary to drain excess water from the hose into a suitable container positioned outside and lower than the sink.
Water outlet
Connect the water drain hose. The hose must be properly fitted to prevent water leakage. Ensure it is neither bent nor compressed.
Extension hose
Should a drain-hose extension be required, ensure you use a similar hose. It must not exceed 4 metres; otherwise, the cleaning effectiveness of the dishwasher may be reduced.
Siphon connection
The drainage connection must be at a height less than 600 mm (maximum) from the base of the dishwasher.
Positioning the appliance
Position the appliance in the desired location. The rear must rest against the wall behind it, and the sides should be positioned next to adjacent cabinets or walls. The dishwasher is equipped with water supply and drain hoses that can be positioned on the right or left side to facilitate proper installation.

Warning!
- Place the dishwasher on a firm, flat floor.
- Do not install the dishwasher on an elevated surface.
4. OPERATION
Control panel
Fig. 5
- Power touch icon
- Programme touch icon
- Timer icon
- Start/Pause touch icon
- Wash cycle indicator light
Touch icon operation
| Touch icon Description | |
| Power Press this | icon to switch on the dishwasher. |
| Programme | Press this icon to select the appropriate washing programme; the programme indicator will illuminate. |
| Timer Press the | icon to set the timer. |
| Child Lock | Press and hold both the Programme and Timer icons simultaneously for 3 seconds; the child lock indicator light will illuminate and enter child lock status. All icons will be locked. Repeat these steps to exit child lock status. |
| Start/Pause | Touch this icon to start or pause a programme. *Reset: Press and hold for 3 seconds to cancel the existing programme and drain the unit, then select the new required programme. |
Indicator lights
| Programme | [1WD7] ECO: Ecological mode, saves energy and water, suitable for general cleaning needs. Daily: Daily cleaning mode, suitable for moderately soiled dishes. Daily: Daily cleaning mode, suitable for moderately soiled dishes. Quick: Suitable for cleaning fresh, slightly sticky food residues at maximum speed. Quick: Suitable for cleaning fresh, slightly sticky food residues at maximum speed. Intensive: Powerful cleaning mode, suitable for dishes, pots and pans with stubborn stains. Intensive: Powerful cleaning mode, suitable for dishes, pots and pans with stubborn stains. |
| Wash cycle indicator light | [X025] Start/Wash: The indicator flashes while the programme is in the washing cycle. Rinse: The indicator flashes while the programme is in the rinse cycle.[28ZX] Drying: The indicator flashes while the programme is in the drying cycle. Rinse: The indicator flashes while the programme is in the rinse cycle.[28ZX] Drying: The indicator flashes while the programme is in the drying cycle. End: After programme completion, the indicator illuminates for three minutes. End: After programme completion, the indicator illuminates for three minutes. |
| Warning indicator light | [4778] Rinse aid: If the indicator light is lit, it means the dishwasher is low on rinse aid and requires refilling. Salt: If the indicator light is lit, it means the dishwasher is low on salt and requires refilling.[22W7] Water inlet: If the indicator light is lit, it means that the water inlet is closed or blocked.[K'26] Child lock: If the indicator light is lit, it means that the child lock is activated. Salt: If the indicator light is lit, it means the dishwasher is low on salt and requires refilling.[22W7] Water inlet: If the indicator light is lit, it means that the water inlet is closed or blocked.[K'26] Child lock: If the indicator light is lit, it means that the child lock is activated. |
Initial setup
- Adjust the water softener level according to your area's water hardness.
- Add 500 g of salt to the salt compartment, then fill with water to the compartment's brim.
- Refill the rinse aid dispenser.
- Fill with detergent.
A. Water softener (Water hardness level setting)
The dishwasher is designed to allow adjustment of salt consumption based on the hardness of the water used. This is intended to optimise salt consumption.
To adjust salt consumption, proceed as follows:
- Switch on the appliance.
- Within 60 seconds of switching on, press and hold the Start/Pause touch icon for 5 seconds while the machine is in standby mode. This will activate the adjustment mode, and all wash cycle lights will flash three times before returning to the default softener level.
- Press the Start/Pause touch icon to select the appropriate level for your local environment. Settings will change in the following sequence:
$$ \mathrm{H} 1 \rightarrow \mathrm{H} 2 \rightarrow \mathrm{H} 3 \rightarrow \mathrm{H} 4 \rightarrow \mathrm{H} 5 \rightarrow \mathrm{H} 6 $$
- Finally, switch off the machine to save the settings.
It is recommended that adjustments be made according to the following table.
*Factory setting is H3.
| Setting | Water hardness | Indicators when setting the water hardness | Salt consumption (g/cycle) | ||
| dH dF dE | |||||
| H1 0 - 5 0 - 9 0 | -6 | H1 | 0 | ||
| H2 6 - 11 | 10 - 20 | 7 - 14 | H2 | 20 | |
| H3 (Default) | 12 - 17 | 21 - 30 | 15 - 21 | H3 + | 30 |
| H4 | 18 - 22 | 31 - 40 | 22 - 28 | H4 | 40 |
| H5 23 - 34 | 41 - 60 | 29 - 42 | H5 + | 50 | |
| H6 35 - 55 | 61 - 98 | 43 - 69 | H6 + | 60 | |
Contact your local water supplier for information about your water supply hardness.
ENGLISH
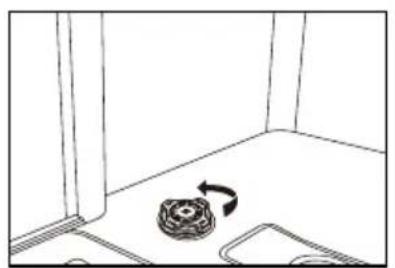
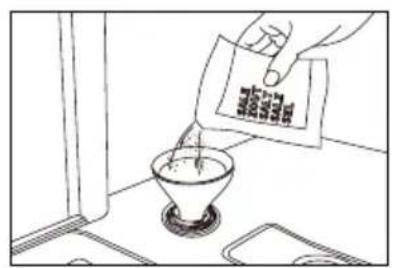
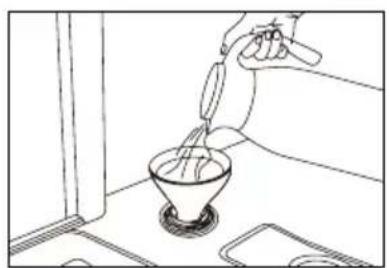
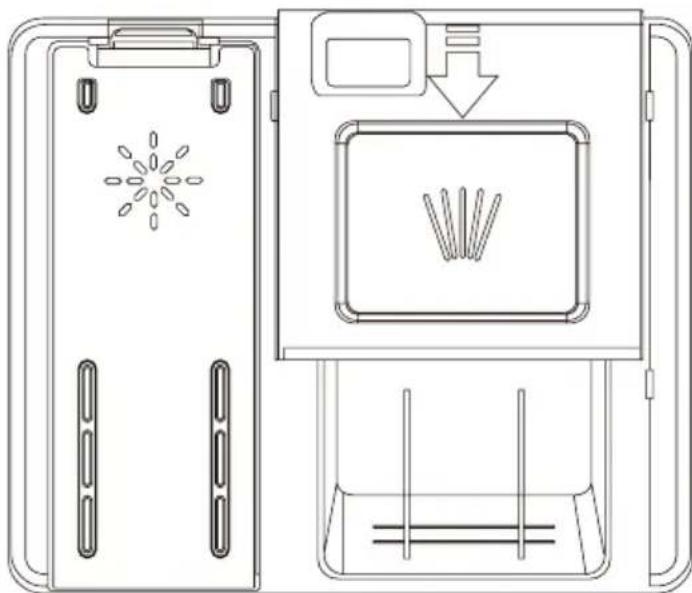
B. Loading salt into the water softener
Water hardness varies from location to location. If hard water is used in the dishwasher, deposits will form on dishes and utensils. The appliance is equipped with a special water softener that uses salts specifically designed to remove lime and minerals from the water.
Always use salt intended for dishwasher use. The salt compartment is located beneath the lower basket and should be filled as follows:
Instructions
Fig. 6.
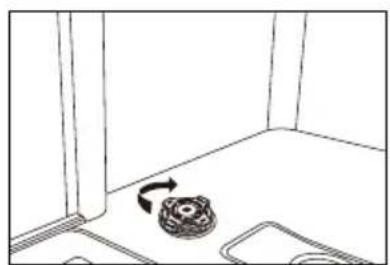
A. Remove the lower basket, then unscrew and remove the salt compartment cap.
B. Place the end of the funnel (supplied) into the hole and introduce approximately 500 g of salt. It is normal for a small amount of water to come out of the salt compartment.
C. For first-time filling, completely fill the compartment with water (approximately 700 ml).
D. Carefully screw the cap back on.
E. Typically, the salt warning light will switch off after the salt compartment has been filled.

Warning!
- Only use salt specifically designed for dishwasher use. Any other type of salt, especially table salt, will damage the water softener. In case of damage caused using unsuitable salt, Cecotec offers no warranty nor accepts responsibility for any damage caused.
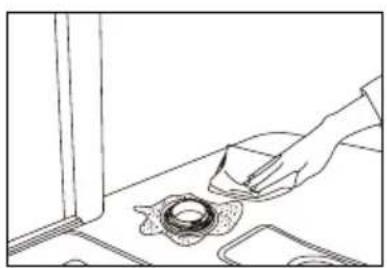
- Only fill with salt just before starting one of the complete washing programmes. This will prevent any grains of salt or salt water that may have been spilled from remaining on the machine's bottom for any extended period, which could cause corrosion.
C. Detergent usage
All dishwasher cycles require detergent in the corresponding compartment. Add the correct amount of detergent for the selected cycle to ensure optimal performance.

Only use detergents specifically designed for dishwashers. Keep detergent fresh and dry.
Do not put powder detergent into the dispenser until you are ready to wash dishes.

Never use soap, laundry detergent or hand washing-up liquid in your dishwasher.

Do not ingest dishwasher detergent. Avoid inhaling the vapours. Dishwasher detergent contains irritants and caustic chemicals that can cause respiratory problems. If dishwasher detergent has been ingested or vapours inhaled, seek medical attention immediately.

Keep dishwasher detergent out of children's reach.
Filling the detergent dispenser
Fig. 7
- Open the detergent compartment by pressing the button.
- Add the recommended amount of detergent to the main wash compartment. The main compartment has lines for measuring specific amounts of detergent, marked at 15 ml or 25 ml, according to dish soil level. If your dishes require intensive washing, add 5 ml of detergent to the pre-wash section of the compartment.
- Close the detergent compartment by sliding the lid in the direction of the arrow.
NOTE:
Please follow the manufacturer's recommendations on the detergent packaging.
D. Rinse aid usage
Fig. 8
Filling the rinse aid dispenser helps ensure better washing quality and improved drying performance.
- To fill the rinse aid compartment, open the compartment lid.
- Fill the compartment with rinse aid to the MAX level, then close the lid. Take care not to overfill the compartment and ensure any spillage is wiped clean.
- Close the lid to lock the rinse aid compartment.
- Rinse aid is automatically added during the final rinse, ensuring thorough rinsing and streak-free drying.

Warning!
Use only branded rinse aid for dishwashers. Never fill the rinse aid dispenser with any other substances (e.g., dishwasher cleaning agent, liquid detergent). This could damage the tool.
To change the rinse aid level, follow these steps before switching on the machine:
- Touch the power touch icon to activate the dishwasher.
- Within 60 seconds after switching on the appliance, touch the Timer touch icon for 5 seconds while the machine is in standby mode to enter setting mode. All wash cycle lights will flash three times, then change to the default rinse aid level. The factory setting is R3.
- To adjust the rinse aid level, press the Timer touch icon, and with each press, the level will change in the sequence:
- After selecting the appropriate level, press the Power touch icon to save the settings.
$$ " R 1 \rightarrow R 2 \rightarrow R 3 \rightarrow R 4 \rightarrow R 5". $$
ENGLISH
| Indicators during rinse aid level setting | ||
R1  |  | R5 |
R2  |  | |
Turning the buzzer sound on and off
By default, the buzzer sound is activated.
- Switch on the appliance.
- Press the Programme and Start touch icons simultaneously for 3 seconds; the buzzer sound will be deactivated, and the interior lamp will not illuminate when opening the door.
- Press the Programme and Start touch icons simultaneously again for 3 seconds to activate the buzzer sound.
Note: This function can only be configured in standby mode. After switching off and reconnecting the appliance, the buzzer sound will be activated by default.
Loading the dishwasher baskets
To achieve the best performance from your dishwasher, follow these loading guidelines.

Warning!
Items not suitable for dishwasher cleaning:
- Temperature-sensitive plastic items, copper and tin-coated items, aluminium and silver cutlery.
- Delicate glassware, hand-painted decorative porcelain; items with crystal elements, etc.
- Items with absorbent properties (sponges, household cloths).
Caution before or after loading the dishwasher baskets
- Remove any large food remnants.
- It is not necessary to rinse dishes under running water.
- For dishes or utensils with baked-on, burnt-on or stubborn food particles that are difficult to remove, soaking before washing is recommended.
- Place items in the dishwasher in the following order:
- Items such as cups, glasses, pots/pans, etc. should be placed upside down.
- Curved items or those with recesses should be loaded at an angle so water can drain.
- All items must be stacked securely and cannot tip over.
- They must not prevent the spray arms from rotating during washing.
- Place cutlery, chopsticks and small items in the cutlery basket. Very small items should not be washed in the dishwasher as they could easily fall from the baskets.
Removing dishes
To prevent water from dripping from the upper rack to the lower rack, we recommend emptying the lower rack first, then the upper rack.
Loading the upper basket
The upper rack is designed to hold more delicate and lighter tableware such as glasses, coffee and teacups and saucers, as well as plates, small bowls and shallow pans (as long as they are not too soiled). Position dishes and cookware so they do not move under the water spray. Always place glasses, cups and bowls upside down.
Upper basket
Fig. 9
- Dessert bowl
- Saucer
- Cup
- Mug
- Glass
- Glass bowl
- Serving spoon
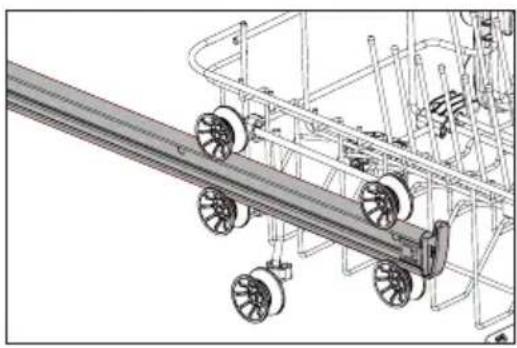
Adjusting the upper basket
- If needed, the height of the upper basket can be adjusted to create more space for large utensils in either the upper or lower basket.
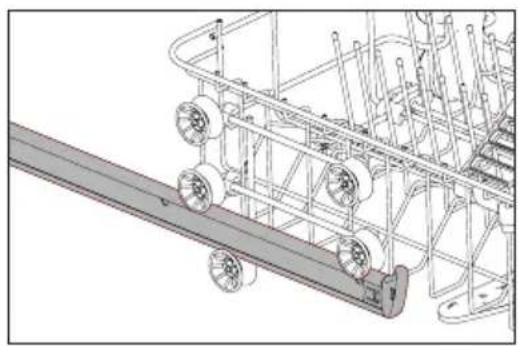
- The upper basket can be height-adjusted by placing wheels of different heights on the rails. Fig. 10
- Long items, serving cutlery, salad servers or knives should be placed on the shelf, so they do not obstruct the rotation of the spray arms. The shelf can be folded or removed when not required.

CAUTION:
We recommend adjusting the basket height before loading dishes. Adjusting the basket after loading dishes could damage them.
Lower rack
Loading the lower basket
- We recommend placing larger items which are more difficult to clean in the lower basket: pots, pans, lids, serving dishes and bowls, as shown in figure 11.
- It is preferable to place serving dishes and lids at the sides of the racks to avoid blocking the rotation of the upper spray arm. Pots, serving bowls, etc., must always be placed upside down. Deep pots should be slanted to allow water to flow out.
- The lower basket features fold-down tine rows to accommodate more large pots and pans.
ENGLISH
Fig. 8 key
- Small pot
- Dessert bowl
- Melamine bowl
- Melamine dessert plate
- Dessert plate
- Dinner plate
- Oval platter
- Soup plate
- Soup spoon
- Teaspoon
- Sauce ladle
- Dessert spoon
- Serving fork
Programmes
Washing programme
- Pull out the lower and upper basket, load the dishes and push them back. It is recommended to load the lower rack first, then the upper rack.
- Pour in the detergent.
- Ensure the water supply is turned on at full pressure.
- Close the door, press the Power touch icon, then press the Programme touch icon to select the desired "Washing Programme".
- Apply slight force to ensure the door is properly closed.
NOTE: A click can be heard when the door closes correctly.
Changing the programme
- Notice: A cycle in progress can only be modified if it has been running for a short time.
Otherwise, the detergent may have already been released and the appliance may have already drained the washing water. If this is the case, the detergent dispenser must be refilled. - During the washing process, press the Power touch icon to switch off the appliance.
- Press the Power touch icon again to switch on the appliance, then you can change the programme to the desired cycle.
NOTE: If you open the door during washing, the machine will pause, and the status light will flash. When you close the door, the machine will resume operation after 10 seconds.
The 4 programme lights show the dishwasher status:
a) One of the programme lights on --> cycle in progress
b) One of the programme lights flashing --> pause
NOTE: If all lights begin to flash, this indicates the machine is out of order. Please turn off the main power and water supply before calling for service.
Forgetting to add a dish
A forgotten dish can be added any time before the detergent dispenser opens.
- Press the Start/Pause touch icon to stop the washing.
- After the spray arms stop working, you can open the door completely.
- Add the forgotten dishes.
- Close the door; the dishwasher will start running after ten seconds.

WARNING!
It is dangerous to open the door during washing, as hot water may scald you. If the door is opened whilst the dishwasher is operating, the machine will stop automatically.
End of washing programme
After the programme has finished, the buzzer will sound three short beeps, sounding like "beep, beep, beep". At the same time, the indicator light will remain on for 3 minutes and automatically turn off if no further operation is performed, also switching off the machine.

Open the door carefully. Hot steam may escape when opening the door!
- Hot dishes are sensitive to knocks. Therefore, they should be allowed to cool for about 15 minutes before removing from the appliance.
- Open the dishwasher door, leave it ajar and wait a few minutes before removing the dishes. This way, they will be cooler and drying will improve.
Unloading the dishwasher
It is normal for the dishwasher interior to be damp. Empty the lower basket first, then the upper basket. This will prevent water from dripping from the upper basket onto dishes in the lower one.
5. CLEANING AND MAINTENANCE
Before beginning any care or maintenance, you must always disconnect the appliance from the electrical supply and also close the water supply.
Filtration system
Fig. 12
The filtration system consists of a coarse filter, flat filter and microfilter.
ENGLISH
- Flat filter: Food and debris will be trapped by a special jet on the lower spray arm.
- Coarse filter: Large debris, such as bone or glass that could clog the drain, will be trapped in this filter. To remove an item caught in this filter, gently squeeze the tabs on top of the filter and lift it out.
- Microfilter: This filter holds soil and food waste in the sump area and prevents it from being redeposited on dishes during a cycle.

Check the filters for blockages every time the dishwasher is used.

By unscrewing the coarse filter, you can remove the filtration system. Remove any food is and clean the filters under running water.
- The filter effectively prevents food residue from the dishes from falling into the washing system. However, food residue can sometimes clog the filter, affecting washing performance. It is recommended to check the flat filter for food residue immediately after finishing the washing programme and clean it if necessary.
-
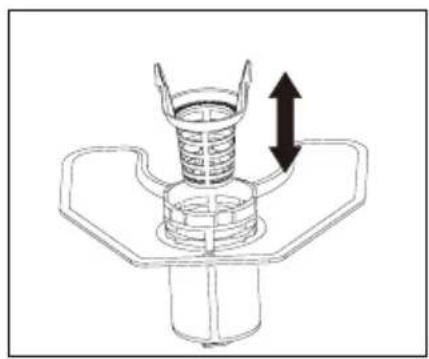
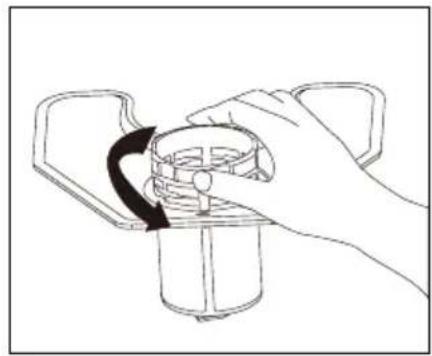
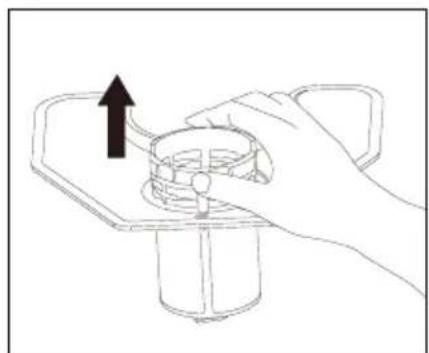
Additionally, it is advisable to disassemble and clean the filter at least once a week. The steps for cleaning the filter are shown in figure 13:
-
Remove the coarse filter from the microfilter.
- Turn the microfilter counterclockwise.
- Remove the microfilter and flat filter assembly from the dishwasher compartment.
- Clean the filters under running water.
Note: You must clean and rinse the filters thoroughly before replacing all sections in the reverse order to that mentioned above.
Important considerations:
- A programme should not be run without the filters in place.
- Incorrect filter placement can reduce washing performance and damage the appliance.
- When cleaning the filters, they should not be knocked. Otherwise, they could become deformed and dishwasher performance could decrease.
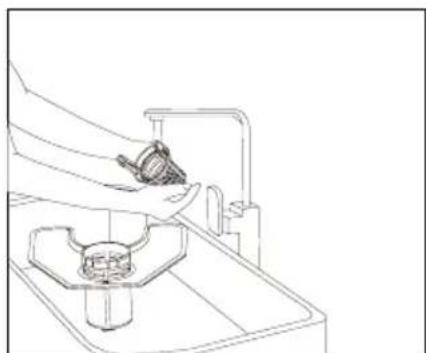
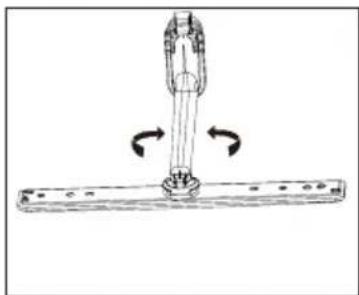
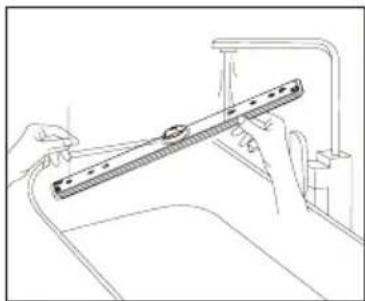
Cleaning the spray arms
It is necessary to clean the spray arms regularly, as hard water minerals can clog the jets and bearings.
To clean the spray arms, follow these steps shown in figure 14:
- Pull the lower spray arm upwards to remove it.
- To remove the upper spray arm, first remove the lock by turning it.
- The spray arms must be cleaned and rinsed thoroughly before replacing them.
Note: Ensure the upper spray arm lock is properly tightened when reinstalling.
Care of the dishwasher
To clean the control panel, use a slightly damp cloth and then dry thoroughly.
To clean the exterior, use a specific appliance cleaner.
Never use sharp objects, scouring pads or abrasive cleaners on any part of the dishwasher.
Cleaning the door
To clean around the door, use only a soft, warm, damp cloth.
To prevent water penetration into the door lock and electrical components, do not use spray cleaners of any kind. Also, never use abrasive cleaners or scouring pads on outer surfaces as they will scratch the finish. Some paper towels can also scratch or leave marks on the surface.
WARNING! Never use a spray cleaner to clean the door panel, as this may damage the door latch and electrical components. The use of abrasive agents or paper towels is not permitted due to the risk of scratching or leaving marks on the stainless steel surface.
Protection against freezing
If the dishwasher is left in an unheated location during winter, ask a service technician to:
- Cut off electrical power to the dishwasher.
- Turn off the water supply and disconnect the water inlet pipe from the water valve.
- Drain water from the inlet pipe and water valve. (Use a tray to collect the water)
- Reconnect the water inlet pipe to the water valve.
- Remove the filters and use a sponge to remove water in the sump.
How to maintain your dishwasher
After every wash
After each wash, turn off the water supply to the appliance and leave the door slightly ajar so moisture and odours are not trapped inside.
Unplug it
Before cleaning or performing maintenance, always unplug the appliance. Do not take risks.
Do not use solvents or abrasive cleaners
To clean the exterior and rubber parts of the dishwasher, do not use solvents or abrasive cleaning products. Use only a cloth with warm soapy water. To remove spots from the interior surface, use a cloth dampened with water and a little white vinegar, or a cleaning product specifically made for dishwashers.
When going on holiday
When going on holiday, it is recommended to run a wash cycle with the dishwasher empty and then unplug it, turn off the water supply and leave the appliance's door slightly ajar. This will help the seals last longer and prevent odours from forming in the appliance.
ENGLISH
Moving the appliance
If the appliance must be moved, try to keep it in a vertical position. If absolutely necessary, it can be positioned on its back.
Gaskets
One of the factors that cause odours in the dishwasher is food trapped in the seals. Regular cleaning with a damp sponge will prevent this.
6. TROUBLESHOOTING
Before contacting technical service, reviewing the information on the following pages might save you from needing to do so.
| Problem Possible cause | Possible solution | |
| The dishwasher does not work. | Blown fuse or circuit breaker tripped. | Replace the fuse or reset the circuit breaker. Remove any other appliance sharing the same circuit with the dishwasher. |
| Power supply is not turned on. | Ensure the dishwasher is switched on and the door is securely closed. Make sure the power cord is properly plugged into the wall socket. | |
| Water pressure is too low. | Check that the water supply is properly connected and the water is opened. | |
| The drain pump does not stop. | Overflow. | The system is designed to detect an overflow. When doing so, it turns off the circulation pump and turns on the drain pump. |
| Noise. | Some audible sounds are normal. | Sound from detergent compartment opening. |
| Utensils are not secure in the baskets or something small has dropped into the basket. | Ensure everything is securely loaded in the dishwasher. | |
| The motor hums. | The dishwasher has not been used regularly. If you do not use it often, remember to programme it to fill and pump out every week, which will help keep the seal moist. | |
| Problem Possible cause Possible solution | ||
| There is foam inside the dishwasher. | Unsuitable detergent. | The dishwasher has not been used regularly. If this occurs, open the dishwasher and let the foam evaporate. Add 4 litres of cold water inside the dishwasher. Close and secure the dishwasher, then start the "pre-rinse" wash cycle to drain the water. Repeat if necessary. |
| Rinse aid spilled. | Always clean up rinse aid spills immediately. | |
| Stained dishwasher interior. | Detergent with colourant was used. | Ensure the detergent is free of colourant. |
| Dishes and cutlery not clean. | Incorrect programme Improper basket loading. | Select a stronger programme. Ensure the detergent dispenser and spray arms are not blocked by large dishes. |
| Spots and filming on glasses and cutlery. | 1. Extremely hard water.2. Low inlet temperature.3. Dishwasher overloading. Improper loading.4. Old or damp powder detergent.5. Empty rinse aid dispenser.6. Incorrect detergent dosage. | To remove spots from glassware:1. Remove all metal utensils from the dishwasher.2. Do not add detergent.3. Choose the longest cycle.4. Start dishwasher and let it run for about 18-22 minutes, then it will be in the main wash.5. Open the door to pour 2 cups of white vinegar into the bottom of the dishwasher.6. Close the door and let the dishwasher finish the cycle. If vinegar does not work: Repeat as above except use 1/4 cup (60 ml) of citric acid crystals instead of vinegar. |
| Cloudiness on glassware. | Combination of soft water and too much detergent. | Use less detergent if you have soft water and select a shorter cycle to wash glassware and clean it. |
ENGLISH
| Problem Possible cause Possible solution | ||
| Yellow or brown film on internal surfaces. | Tea or coffee stains. | Use a solution of white vinegar and warm water or make a paste with bicarbonate of soda to remove stains safely. Apply, let sit, then rinse thoroughly. |
| White film on the interior surface. | Hard water minerals. | To clean the interior, use a damp sponge with dishwasher detergent and rubber gloves. Never use any other cleaner to avoid suds. |
| The detergent dispenser lid cannot close properly. | Detergent residue is blocking the opening. | Clean the detergent from the lock. |
| Detergent left in the dispenser. | Dishes blocking the detergent compartments. | Reload the dishes properly. |
| Steam. Normal phenomenon. | Some steam comes through the vent by the door latch during drying and water draining. | |
| Black or grey marks on dishes. | Aluminium utensils have rubbed against dishes. | Use a mild abrasive cleaner to eliminate those marks. |
| There is water in the bottom of the dishwasher interior. | This is normal. | A small amount of clean water around the outlet on the tub bottom keeps the water seal lubricated. |
| Dishwasher leaks. | Overfilled dispenser or rinse aid spills. | Take care not to overfill the rinse aid dispenser. Spills can cause oversuding and overflow. Wipe any spills with a damp cloth. |
| Dishwasher is not level. Ensure | the dishwasher is level. | |
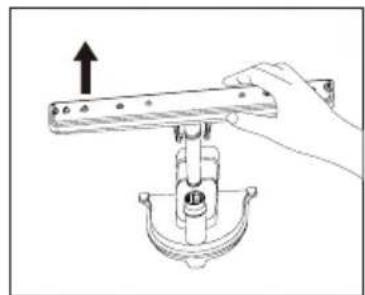
NOTE: Olive pits or similar objects can pass through the filter system and reach the drain pump area. In this case, the drain pump becomes blocked and needs cleaning. Please remove the pump cover by pushing the tail outwards, then you can clean the pump impeller yourself. After that, put the cover back in position. Fig. 15
Improper machine maintenance may endanger users' safety. Any repairs must be carried out by professionals.
Error codes
After starting the wash cycle, if there is a malfunction, the dishwasher will display an error code.
The following table shows possible error codes and the faults they represent, and the error indicator will keep flashing and beeping.
| Error code Indicator light Problem | ||
| E1 |  | Overflow/leakage. |
| E2 |  | Water inlet malfunction. |
| E4 |  | Water distribution valve malfunction. |
| E5 |  | Fan malfunction. |
| E6 |  | Abnormal heating. |
| E7 |  | Thermistor open/short circuit. |
| EA |  | Abnormal communication. |

Warning!
- For E2, first check the troubleshooting tips before calling Cecotec's Official Technical Support Service.
- For E1, turn off the main water supply before contacting Cecotec's Official Technical Support Service.
- For E4, E5, E6, E7, EA, please contact Cecotec's Official Technical Support Service.
ENGLISH
7. RECYCLING OF ELECTRICAL AND ELECTRONIC EQUIPMENT
This symbol indicates that, according to the applicable regulations, the product and/or battery must be disposed of separately from household waste. When this product reaches the end of its shelf life, you should dispose of the batteries/accumulators and take them to a collection point designated by the local authorities.
For detailed information on how to properly dispose of electrical and electronic equipment and/or the corresponding batteries, consumers should contact their local authorities.
Compliance with the above guidelines will help protecting the environment.
Information regarding national packaging recycling systems and their marking can be found on our website.
8. COPYRIGHT
The intellectual property rights over the texts in this manual belong to CECOTEC INNOVACIONES, S.L. All rights reserved. The content of this publication may not, either in part or in its entirety, be reproduced, stored in a retrieval system, transmitted or distributed by any means (electronic, mechanical, photocopying, recording or similar) without prior authorisation from CECOTEC INNOVACIONES, S.L.
9. SIMPLIFIED EU DECLARATION OF CONFORMITY
CE Cecotec Innovaciones hereby declares that this appliance complies with the essential requirements and other relevant provisions of the regulations applicable in the European Union. This appliance has been designed, manufactured and tested in compliance with required safety and quality standards. The full text of the EU Declaration of Conformity can be found on the following website: https://cecotec.es/es/information/declaration-of-conformity
1. PIÈCES ET COMPOSANTS
Image 1
6. PROBLEEMOPLOSSING
| 18-22 | 31-40 22-28 |  H4 H4 | 40 | H4 | |
| 23-34 | 41-60 29-42 |   - - | 50 | 5c | |
| 35-556 | 1-98 43-69 |   - - | 60 | 6c |
ت Connectivity, Business and Marketing (including the Information and Information) is a key function for the information that the information is not to be obtained.
“.R1 → R2 → R3 → R4 → R5”
https://cecotec.es/es/information/declaration-of-conformity
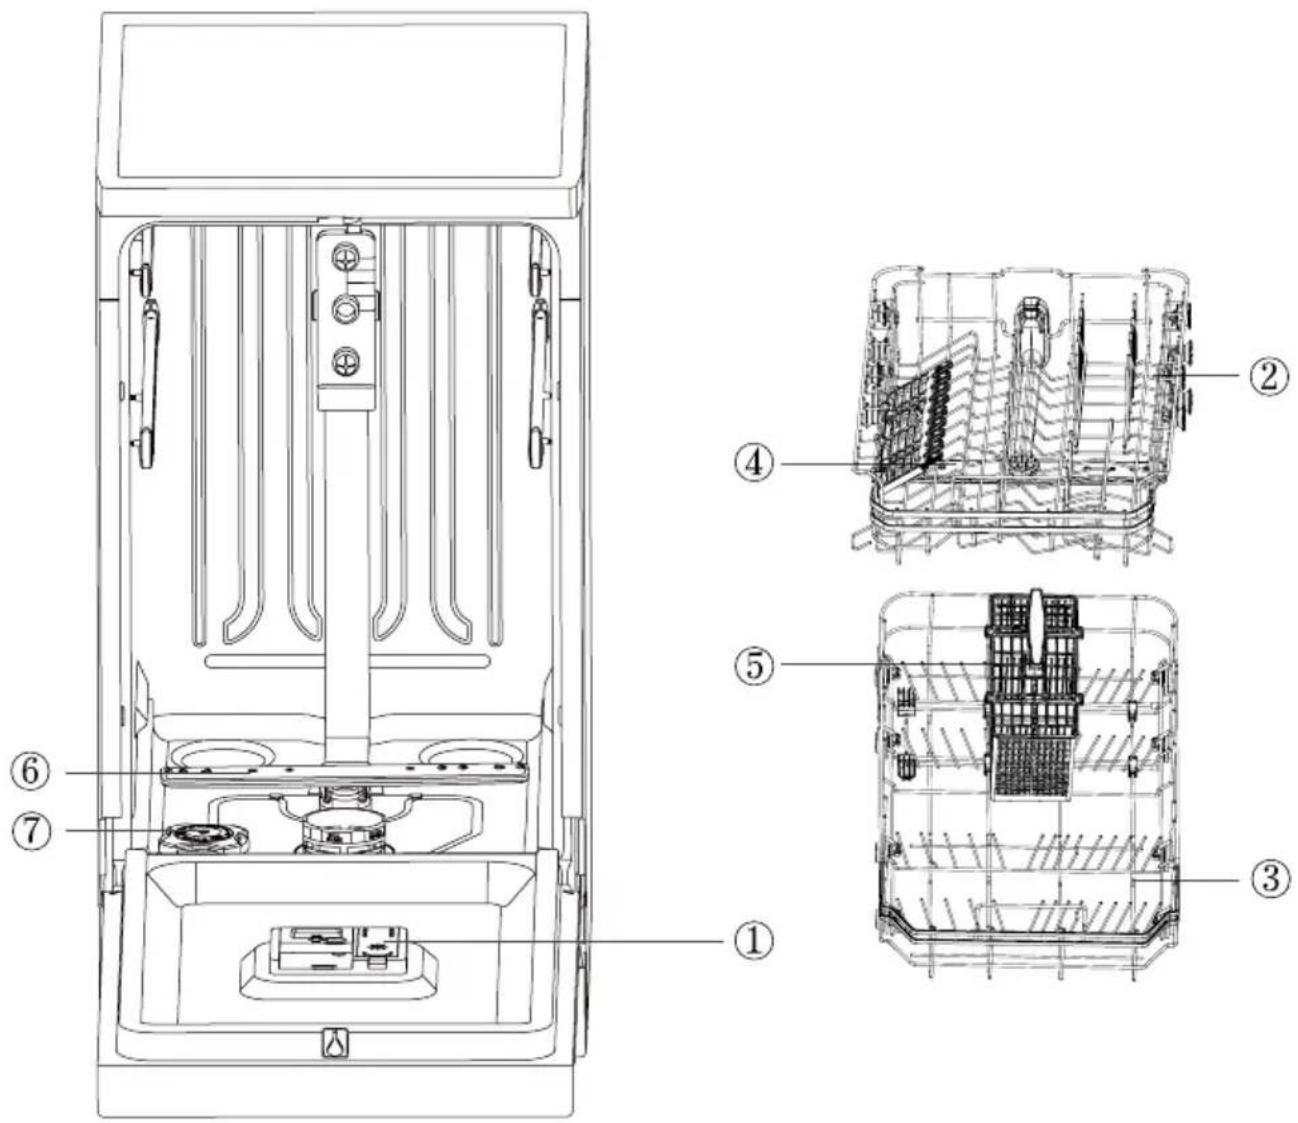
Fig./Img./Abb./Afb./Rys.1
natural_image
Diagram showing mechanical assembly with two circular insets illustrating rotational motion (no text or symbols)Fig./Img./Abb./Afb./Rys.2
natural_image
Line drawing of a simple cabinet or storage unit with a top shelf and an arrow indicating direction (no text or symbols)Fig./Img./Abb./Afb./Rys. 3
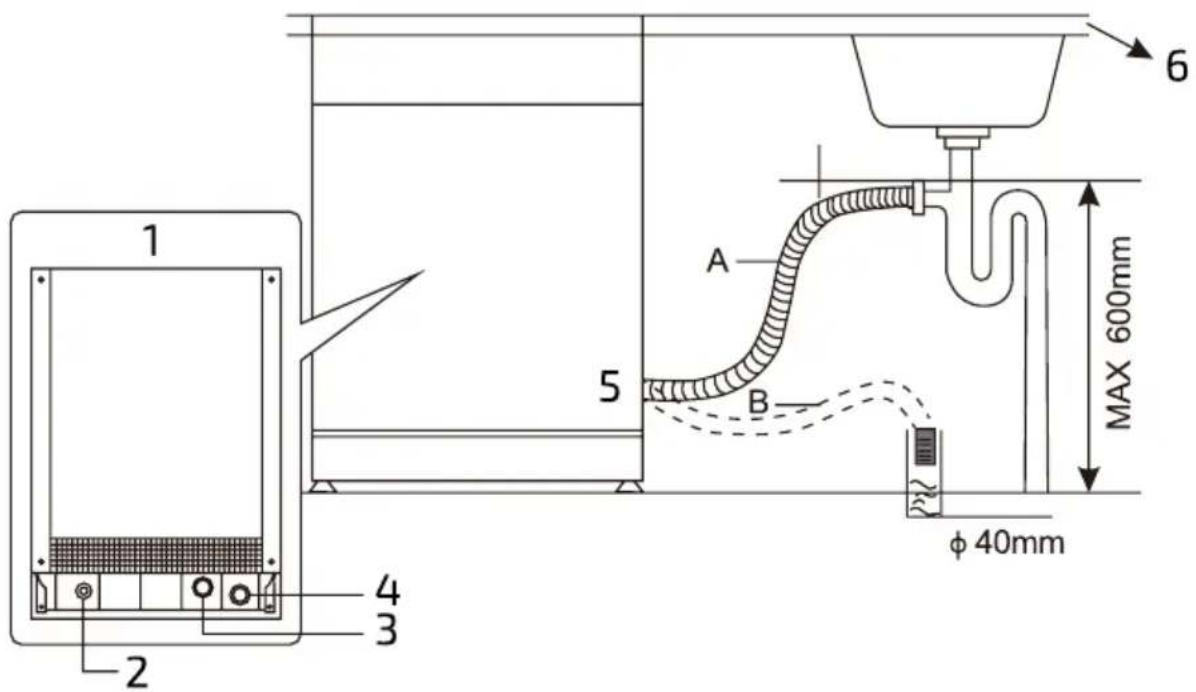
Fig./Img./Abb./Afb./Rys. 4
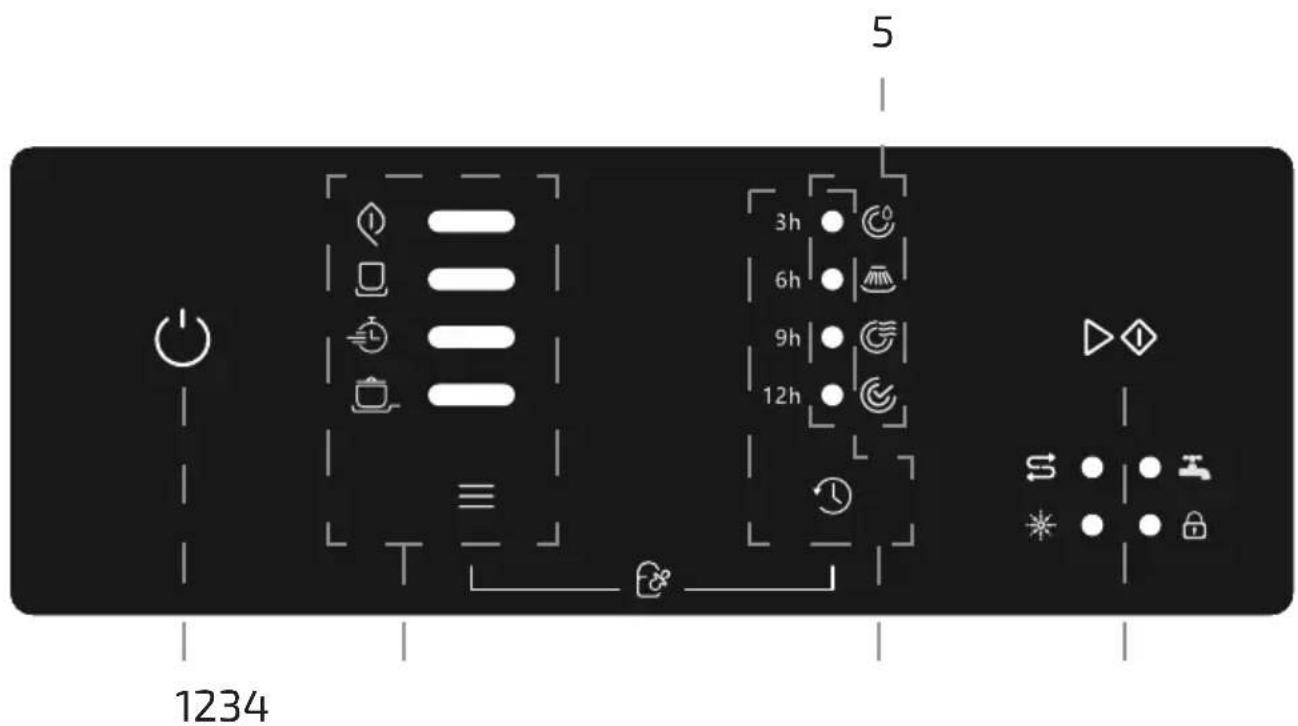
Fig./Img./Abb./Afb./Rys. 5
natural_image
Simple line drawing of a room corner with a decorative object and directional arrow (no text or symbols)A
natural_image
Line drawing of a hand pouring liquid into a glass bowl on a stove (no text or symbols)B
natural_image
Line drawing of a hand pouring liquid into a bowl on a stove (no text or symbols)C
natural_image
Line drawing of a hand cleaning a kitchen sink with a bowl and tool (no text or symbols)D
natural_image
Simple line drawing of a room corner with a circular object and an arrow indicating rotation (no text or symbols)E
Fig./Img./Abb./Afb./Rys. 6
natural_image
Line drawing of a kitchen appliance with a tray, drawer, and side panel (no text or symbols)Fig./Img./Abb./Afb./Rys.7
natural_image
Technical line drawing of a device interior with labeled components and an arrow pointing to a circular component (no text or symbols present)Fig./Img./Abb./Afb./Rys. 8
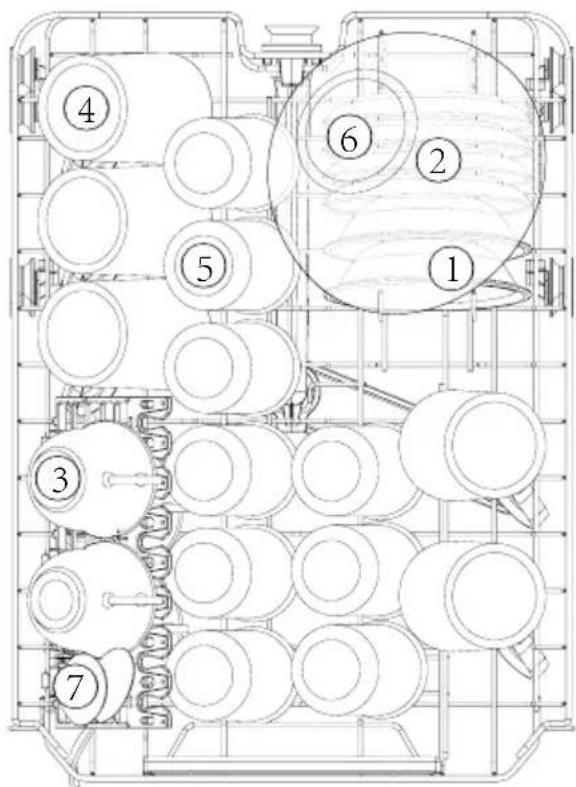
Fig./Img./Abb./Afb./Rys. 9
1
natural_image
Technical line drawing of a conveyor belt system with multiple wheel wheels (no text or symbols)2
natural_image
Technical line drawing of a mechanical conveyor system with rollers and shafts (no text or symbols)Fig./Img./Abb./Afb./Rys. 10
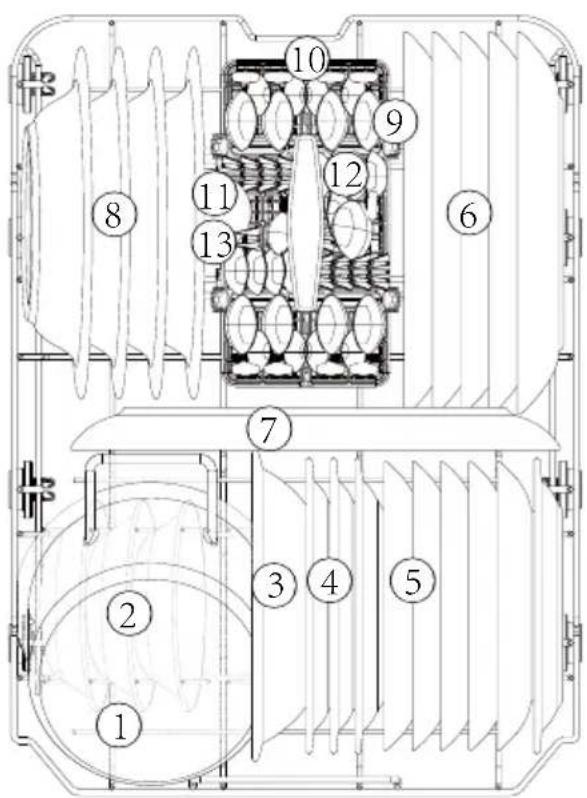
Fig./Img./Abb./Afb./Rys. 11
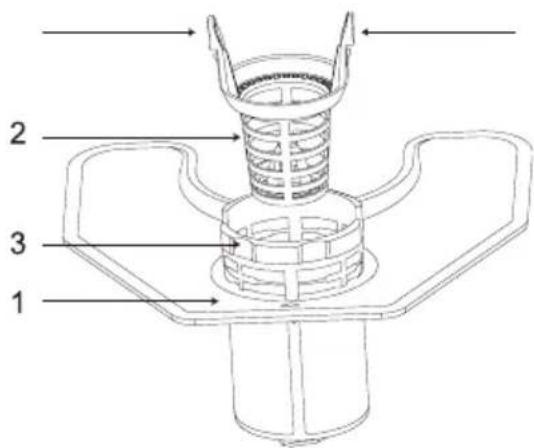
Fig./Img./Abb./Afb./Rys. 12
natural_image
Technical line drawing of a mechanical component with no visible text or symbols1
natural_image
Line drawing of a hand holding a mechanical component with a curved arrow indicating rotation (no text or symbols)2
natural_image
Hand holding a mechanical component with an upward arrow indicating motion (no text or symbols)3
natural_image
Line drawing of a hand using a tool to clean or install a mechanical component (no text or symbols)4
Fig./Img./Abb./Afb./Rys. 13
1
natural_image
Diagram of a hand operating a mechanical lever with an upward arrow indicating force or direction (no text or symbols present)2
natural_image
Diagram of a mechanical assembly with rotating components and directional arrows (no text or symbols)3
natural_image
Line drawing of hands holding a tool over a sink (no text or symbols)Fig./Img./Abb./Afb./Rys. 14

natural_image
Technical line drawing of a mechanical component with internal cavities and mounting holes (no text or symbols)Fig./Img./Abb./Afb./Rys. 15
www.cecotec.es