
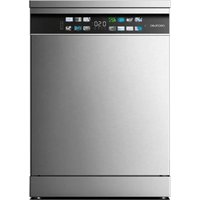
Bolero Aguazero 6210 - Dishwasher CECOTEC - Free user manual and instructions
Find the device manual for free Bolero Aguazero 6210 CECOTEC in PDF.

| Product type | Dishwasher |
| Brand | Cecotec |
| Model | Bolero Aguazero 6210 |
| Capacity | 15 place settings |
| Dimensions (W x D x H) | 60 x 60 x 85 cm |
| Power supply | 220-240 V ~, 50 Hz |
| Rated power | 1920 W |
| Energy efficiency class | D |
| Water consumption (ECO program) | 10.0 L/cycle |
| Energy consumption (ECO program) | 0.860 kWh/cycle |
| Duration of ECO program | 4 h 55 min |
| Noise level | 42 dB(A) |
| Available programs | ECO, Intensive, Glass, Hybrid, Pre-wash, Quick, Super, Hygiene |
| Special functions | Delayed start, Intensive+, Interior cleaning, Double wash, Half load, Dry+ |
| Adjustable water softener | Yes (9 levels) |
| Child safety | Yes |
| Installation type | Freestanding (independent) |
| Allowable water pressure | 0.03 - 1 MPa |
| Protection rating | IPX2 |
Frequently Asked Questions - Bolero Aguazero 6210 CECOTEC
User questions about Bolero Aguazero 6210 CECOTEC
0 question about this device. Answer the ones you know or ask your own.
Ask a new question about this device
Download the instructions for your Dishwasher in PDF format for free! Find your manual Bolero Aguazero 6210 - CECOTEC and take your electronic device back in hand. On this page are published all the documents necessary for the use of your device. Bolero Aguazero 6210 by CECOTEC.
USER MANUAL Bolero Aguazero 6210 CECOTEC
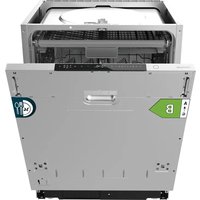
natural_image
Exterior view of three modern stainless steel kitchen appliances (no visible text or symbols)bolero
Safety instructions 9
-
Parts and components 77
-
Before use 77
-
Installation 78
-
Operation 84
-
Cleaning and maintenance 97
-
Troubleshooting 99
-
Technical specifications 106
-
Disposal of old electrical and electronic appliances 108
-
Technical support and warranty 109
-
Copyright 109
SOMMAIRE
EN • The coding in this manual is generic and applies to all code variants of the appliance.
Read these instructions thoroughly before using the appliance. Keep this instruction manual for future reference or new users.
| Symbol Type | Meaning | |
 | WARNING Risk | of serious injury or death |
 | RISK OF ELECTRIC SHOCK | Risk of dangerous voltage |
 | FIRE | Warning: risk of fire/ flammable materials |
 | WARNING | Risk of injury or damage to property |
 | IMPORTANT/ NOTE | Correct system use |
- Read these instructions carefully before assembling or using the product. These instructions contain important information that will help you get the best out of your equipment. It is your responsibility to make sure every user is informed about the warnings and precautions stated in this instruction manual.
- This appliance can be used by children aged 8 years and above and people with reduced physical, sensory, or mental capabilities or lack of experience and knowledge if they have been given supervision or instruction concerning the use of the appliance in a safe way and understand the
hazards involved. Children must not play with the appliance. Cleaning and user maintenance should not be carried out by unsupervised children.
- After using the dishwasher, there may be remains in the interior. Keep children away from the machine when it is open.
- WARNING: check the dishwasher and package are not damaged. Never use the dishwasher if it is damaged, immediately contact Cecotec's Technical Support Service.
- Packaging material may be dangerous to children. Remove it and place it out of their reach.
- Choose a suitable and safe place to install the dishwasher.
- Do not install the dishwasher on a surface in which the base cannot air properly, like a carpet.
- Use the provided hoses, do not reuse old hoses.
- Do not plug the dishwasher before installing it. The machine must be unplugged during its installation.
- It is recommended that the dishwasher is installed by authorised personnel.
- Never use an extension lead or a multi-socket connection.
- The socket must be accessible after the dishwasher installation.
- After the installation, the first time you run the dishwasher, do it while it is empty.
- Always use the plug provided with the dishwasher. Do not modify the plug provided with the appliance if it does not match the power socket.
- Check the power cord regularly for visible damage. If the cable is damaged, it must be replaced by the official Cecotec Technical Support Service in order to avoid any type of danger.
- Do not operate the product if its cord, plug, or structure show visible damage, do not operate properly, or have been dropped.
- In case of malfunctioning, repairs must be carried out by Cecotec's Technical Support Service; otherwise, the warranty will be void.
- Before repairing the dishwasher, you must disconnect it from the power supply and close the stopcock.
- To unplug the dishwasher, pull from the socket, never from the cord.
- This appliance is designed for domestic use only and is not intended for bars, restaurants, farmhouses, hotels, motels, and offices.
- During use, the dishwasher uses less energy and water than washing dishes by hand, provided that the household dishwasher is used according to these instructions.
- Do not misuse it, do not stand, sit or place any heavy object on the door or baskets of the dishwasher.
- Do not use the dishwasher if all interior elements are not correctly placed.
- Use only detergents and rinse aids specific for dishwashers.
- Some dishwasher detergents are very alkaline. They may be extremely dangerous if you ingest them. Avoid contact with skin and eyes and keep children away from the dishwasher when the door is open.
- Due to the danger of explosion, do not place chemical solvents in the interior of the machine.
- Do not place articles which are not dishwasher safe in the machine.
-
Do not fill the baskets over their capacity.
-
Cecotec is not responsible for any deformation produced in the interior of the machine due to misuse.
- Do not open the door while the dishwasher is running, as it could spill hot water. The machine features safety devices which will stop the operation if you open the door.
- Do not leave the door open, as it could cause accidents.
- Place knives and other sharp objects with the blade facing down in the cutlery drawer or in the cutlery basket.
- For safety reasons, disconnect the mains plug after the programme has finished.
- To avoid electric shock, do not disconnect the dishwasher with your hands wet.
- The maximum place setting capacity is 15.
- The maximum inlet water pressure is 1 MPa.
- The minimum inlet water pressure is 0.03 MPa.
INSTRUCTIONS DE SÉCURITÉ
- Control panel
- Door
- Trim panel
- Top cover
- Side panel
- Feet
Fig. 2
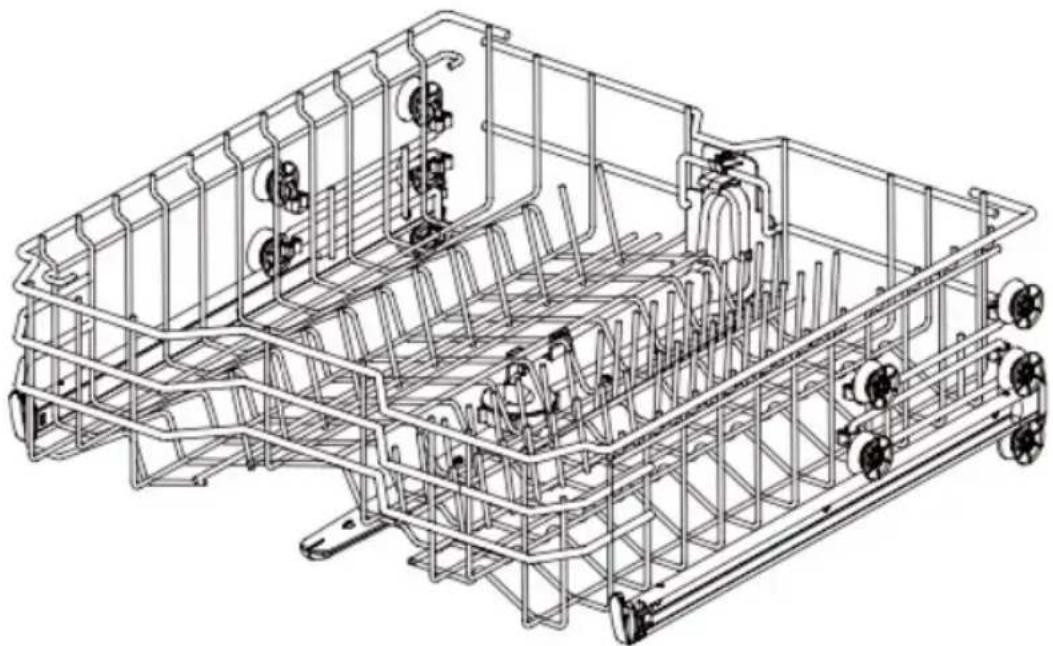
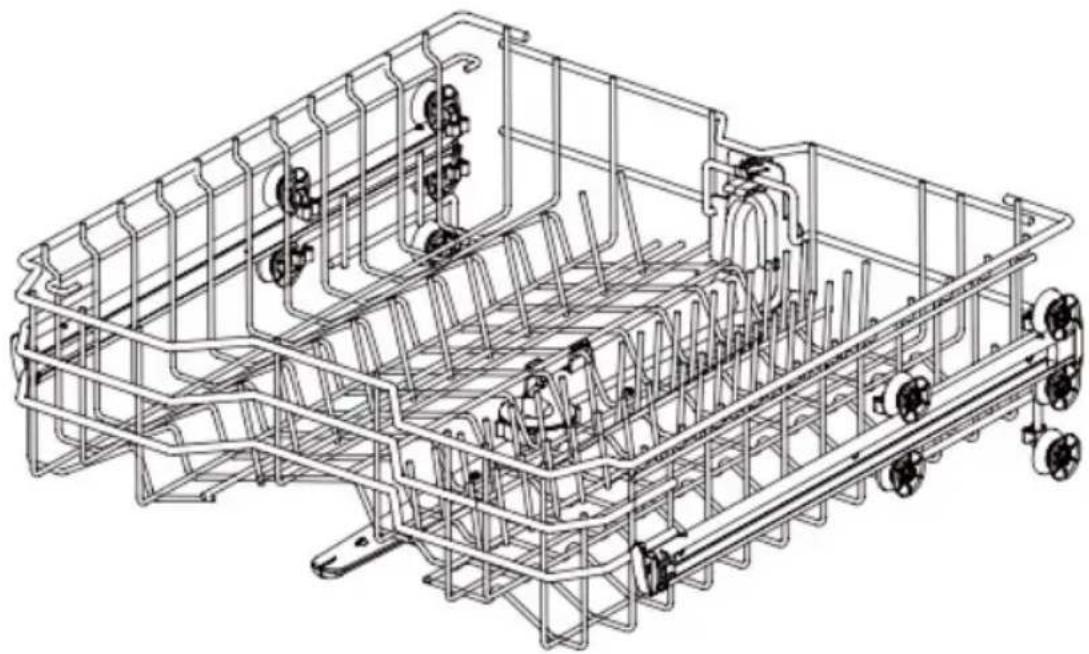
Internal parts
- Upper spray arm (included depending on model)
- Central spray arm
- Bottom spray arm
- Filter assembly
- Rinse aid and detergent dispenser
- Cutlery drawer (included depending on model)
- Upper basket
- Cutlery basket (included depending on model)
- Bottom basket
Note:
The graphics in this manual are schematic representations and may not exactly match the device.
Each dishwasher has undergone a thorough quality control before leaving the factory to ensure its reliability.
You may find water droplets generated by our quality control in your new dishwasher.
2. BEFORE USE
- This appliance is packaged in a way as to protect it during transport. Take the appliance out of its box and remove all packaging materials. You can keep the original box and other packaging elements in a safe place to prevent damage to the device if you need to transport it in the future. In case the original packaging is disposed of, make sure all packaging materials are recycled accordingly.
ENGLISH
- Make sure all parts and components are included and in good conditions. If there is any piece missing or in bad conditions, contact the official Cecotec Technical Support Service immediately.
Box content
- Dishwasher
- Instruction manual
- Energy efficiency certificate sticker
- Water supply hose
- Funnel for salt
3. INSTALLATION
- Place the cutlery basket in the bottom basket.
- For best performance, place the internal parts along the basket as shown in figure 3.
- Remove all packing materials from the inside and outside of the dishwasher before installation.
- Keep this instruction manual in a safe place for future reference. If you sell, give away or move the appliance, make sure to keep this manual with the appliance, so that the new owner can refer to it at any time.
- Please read this instruction manual carefully: it contains important information on the safe installation, use and maintenance of the appliance.
- If it is necessary to move the appliance at any time, keep it in an upright position; if absolutely necessary, it can be tilted on its back.
- Figure 4 shows the overall dimensions of the appliance.
Positioning and levelling
- Remove the device from its packaging and check that it has not been damaged during transport. If it is damaged, please contact the official Cecotec Technical Support Service and do not continue with the installation process.
- Check the dishwasher and place it in a suitable location.
- Place the dishwasher on a level, stable and sturdy floor. If the floor is uneven, the feet of the appliance can be adjusted until it reaches a horizontal position (the angle of inclination should not exceed 2 degrees). If the appliance is correctly levelled, it will be more stable and much less likely to move or cause vibration and noise during operation, as well as to prevent possible water leaks.
WARNING:
- If the dishwasher is not correctly levelled, water leakage, problems with closing the door or some noises may occur.
- If the recess of the cabinet in which the dishwasher is to be installed is narrower than recommended, the dishwasher must be levelled and aligned correctly; otherwise, water leakage will occur, you will not be able to close the door or the dishwasher.
- If you notice friction or any problems when opening the door, it means that the dishwasher is not properly levelled.
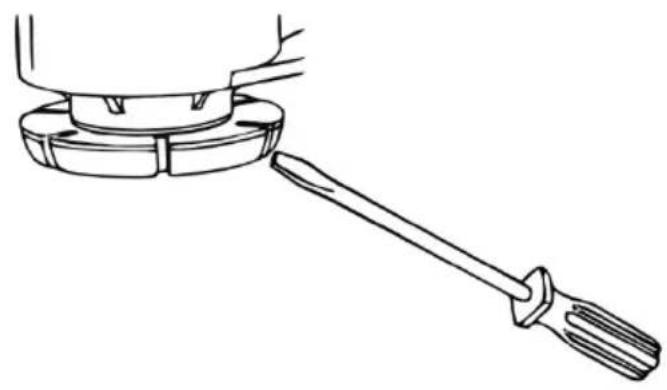
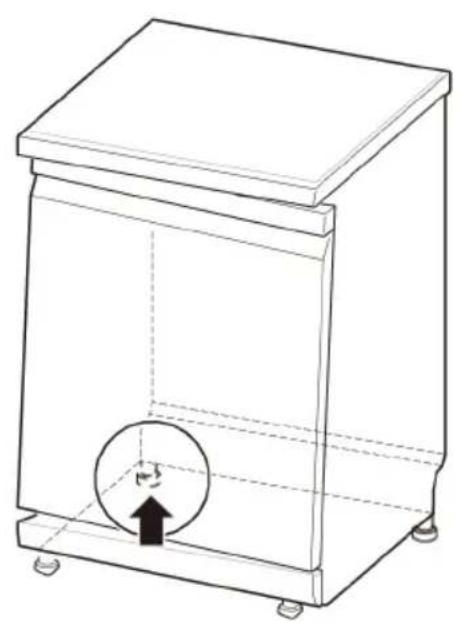
Feet adjustment
- The feet should be adjusted as necessary until the dishwasher is completely stable.
- If you wish to raise the dishwasher, adjust the feet clockwise; if you wish to lower it, adjust the feet counterclockwise.
- Use a flat-blade screwdriver or a suitable tool to adjust the feet as shown in figure 5.
Case I: door tilts to the right
- Unscrew the left rear foot by turning it counterclockwise and level it (Fig. 6).
- Check that the door opens and closes normally. If not, repeat the previous operation.
Case II: door tilts to the left
- Unscrew the right rear foot by turning it counterclockwise and level it (Fig. 7).
- Check that the door opens and closes normally. If not, repeat the previous operation.
Free-standing installation (Fig. 8)
- If the dishwasher is placed in a corner, at least 50 mm must be left free between the dishwasher and the adjacent wall to ensure that there is sufficient space for the door to be opened and closed without difficulty.
- If necessary, it can also be reinforced using wooden slats (not included). Fig. 9
WARNING:
- Place the dishwasher on a firm, flat floor.
- Do not install the dishwasher on a raised surface.
Installation under a worktop (Fig. 10)
- Please note that you may need holes on both sides to allow the hoses and power cable to pass through (approx. 100 mm x 75 mm).
- One of the holes should be as close as possible to the sink to facilitate the connection of the water inlet and drain hose.
- To ensure trouble-free drainage, the distance between the dishwasher and the sink should not exceed 1 m.
ENGLISH
- Make the necessary height adjustments before installing the dishwasher.
WARNING:
- If any wooden furniture is in contact with the dishwasher, it is advisable to varnish it with waterproof paint to prevent moisture or possible water leaks from spreading.
- Place the dishwasher in the recess provided and make sure that the drain hose, located at the rear of the dishwasher, is free of any kinks or obstructions.
- Place the dishwasher on a flat floor. Do not place any objects between the floor and the feet of the dishwasher.
Tips:
- Open the door and pull the top of the dishwasher carefully to move or lift it, as shown in Figure 11. Exercise extreme caution to avoid possible damage to the appliance or personal injury.
- Do not push the door of the dishwasher with your knees to close it but push it gently with your hand.
- Do not pull on the door to move or lift the dishwasher; doing so may damage the door or hinge.
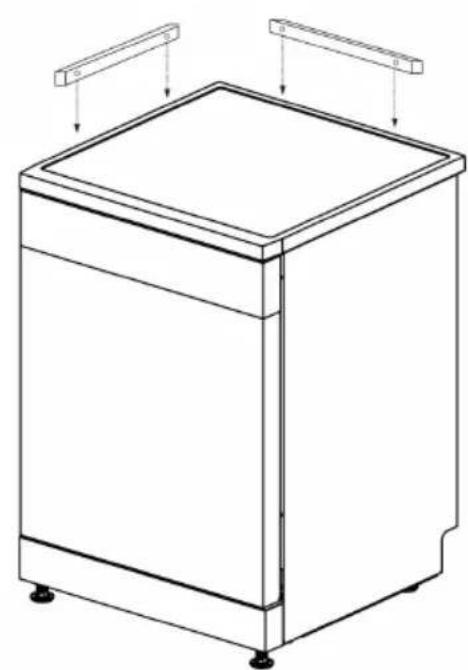
Removing the top cover (Fig. 12).
If the height of the cabinet in which the dishwasher is to be placed is less than 850 mm, you can remove the top cover by following the steps below:
- Use a suitable tool to press the two fasteners of the top cover together.
- Lift the top cover and remove it.
IMPORTANT:
IF YOU REMOVE THE TOP COVER, THE APPLIANCE WARRANTY WILL NOT COVER DAMAGE DIRECTLY CAUSED BY NOT HAVING THE TOP COVER, E.G. DAMAGE TO INTERNAL COMPONENTS DUE TO SPILLAGE OF WATER OR LIQUIDS INSIDE THE APPLIANCE.
Connecting water and electricity supplies
- The connection of the water and electricity supplies must only be carried out by a qualified technician.
- The dishwasher must not be placed on top of the water hoses or the power supply cable.
- The appliance must be connected to the water supply network by means of new hoses. Do not use old hoses.
Drain hose connection
ATTENTION:
- Please note that the drain hose cannot be disconnected, so the outlet must be fixed and as close as possible to the dishwasher. The drain hose must be at a maximum distance of 1\~1.5 metres from the dishwasher.
- In case the distance is longer, this will affect the draining process of the dishwasher, causing too much waste water to accumulate in the hose, thus affecting the performance of the dishwasher.
- If an extension is necessary, it is recommended that it is heat resistant to chemicals such as detergents.
- Before connecting the dishwasher, check that the hose is properly installed, unobstructed and free of water leaks. Otherwise, the control panel display may show the E2 error.
WARNING:
Carefully pass the drain hose through the hole in the furniture (if applicable), as the furniture may have sharp edges that could damage the hose. Sharp edges should be covered to ensure that they do not damage either the drain hose or the water supply hose.
Connection method 1
If the drain hose is connected to the drainpipe of a sink, it should be arched upwards and fixed to the underside of the worktop.
Please note:
To ensure that the water is drained optimally, install the hose as shown in figure 13.
Connection method 2
- When the drain hose is connected to a separate pipe riser (1), it must be ensured that the connector (2) is completely watertight. Otherwise, it may cause unpleasant odours.
- The diameter of the pipe riser shall be at least 40 mm.
Please note:
To ensure that the water is drained optimally, install the hose as shown in figure 14.
Connecting the water inlet hose to a tap
The seal must be fitted to the water inlet hose. Always use the provided hose. To ensure their quality, all dishwashers are tested before leaving the factory, so it is normal for some water to be present inside the dishwasher.
ENGLISH
Tips:
- The water supply pressure must be between 30 kPa and 1000 kPa.
- Try not to damage the thread when connecting the water inlet hose to the inlet valve.
- If the water supply pressure exceeds 1000 kPa, install a pressure reducing valve (not included).
- Open the tap and check for water leaks at the connector and/or hose.
- Check the hose regularly and replace it if it is found to be deteriorated.
- Make sure that the hoses are not damaged or criss-crossed.
To perform the connection, follow the steps below:
- Check the rubber seal on both sides of the hose. Insert the rubber seal into the threaded connection of the hose to prevent leakage (Fig. 15).
Fig. 15 key:
- Rubber seal.
-
Hose.
-
Connect the hose to the tap by hand and then tighten it with pliers or a suitable tool (not supplied). Tighten by about 2/3 of a turn (Fig. 16).
- Then turn on the tap to remove any dirt that may have accumulated in the hose. Pour the water into a container and check that the water is at room temperature (Fig. 17).
- Connect the hose to the water supply valve at the rear of the dishwasher. You can connect it by hand and then tighten it securely but carefully using pliers or a suitable tool (not included). Fig. 19
- Open the tap to check for water leaks. If you notice water dripping, repeat steps 1-4.
Connection of the power supply cable
- Connect the dishwasher to an earthed socket outlet in accordance with the current electrical specifications and regulations in your country and protect it with a circuit breaker or fuse of at least 15 Ampere.
- The two-wire system with earthing should be adopted for wiring.
- Try not to place the power cable behind the dishwasher, as it could get trapped and damaged. It is advisable to plug the appliance into a socket that is 1.2 metres from its side.
WARNING:
- Before plugging the appliance into the mains, make sure that:
- The plug is earthed and complies with current regulations.
-
The plug can withstand the maximum load of the appliance, which is indicated on the product rating plate.
-
The supply voltage is within the values indicated on the rating plate.
- The socket is compatible with the plug of the appliance. If not, have the socket replaced by an authorised technician. Do not use an extension lead or multiple sockets.
- Once the appliance has been installed, the power cable and the socket must be easily accessible.
- The cable must not be bent or compressed.
- If the power cable is damaged, it must be replaced by the official Cecotec Technical Support Service to avoid any potential risk.
- Cecotec will not be held responsible for any incidents that occur if these rules are not followed.
For safety reasons, remove the fuse, switch off the circuit breaker or disconnect the dishwasher before installation.
The plug must be inserted into a properly installed and earthed socket (in accordance with local regulations and standards).
Connect the dishwasher to a protected and adequately rated power supply circuit to prevent electrical overload.
Final checks
- Connect the dishwasher to the electric circuit.
- Open the water supply.
-
Make sure that the dishwasher door can be opened and closed smoothly.
-
If necessary, re-level the dishwasher.
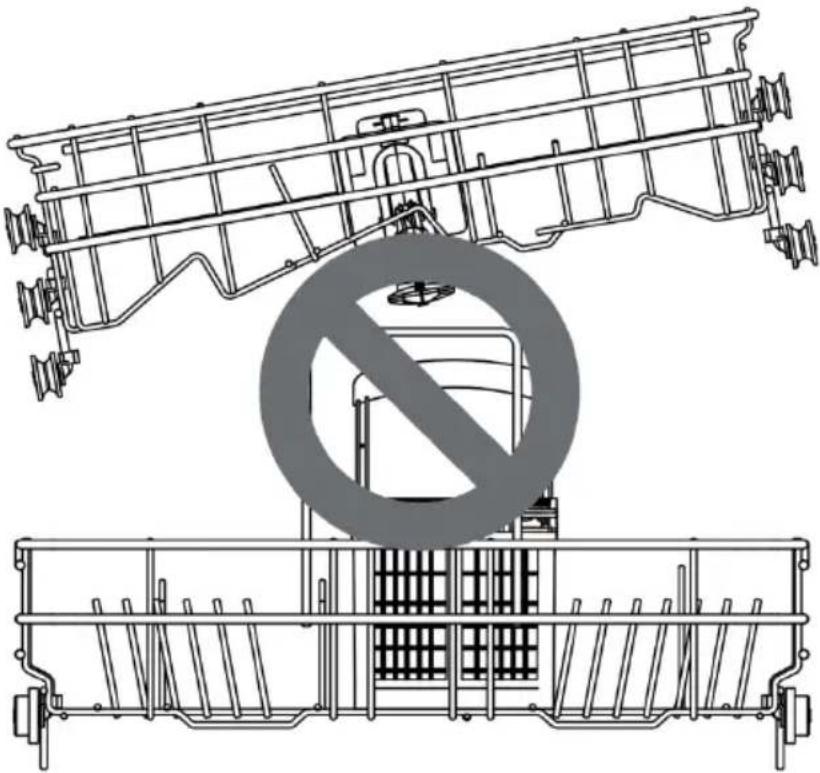
- If the door cannot close, check that the baskets are level (Fig.19).
-
Make sure that you have removed all packaging material.
-
Switch on the dishwasher and run the Intensive 65 °C programme to check that it is working properly.
- Check hoses for leaks.
- Check that you have removed all packaging material and the stickers on the dishwasher.
ENGLISH
4. OPERATION
- Read the safety instructions before using the appliance.
- Follow the instructions when placing items in the dishwasher to ensure effective cleaning.
- Remove insoluble substances such as bones, toothpicks and pieces of paper when inserting tableware and cutlery.
Loading the dishwasher
- Only load dishwasher-safe items.
- Remove solid debris from the tableware before putting it in the dishwasher.
- Place deep items at an angle to speed up the drying process.
Tip:
Do not put thermolabile items (which may deteriorate due to high temperatures), or items decorated with metal in the dishwasher.
Quick start guide
1. Load the tableware in the dishwasher
Remove excess food, bones and any other hard, insoluble residues from the tableware. Remove the two baskets and load the tableware according to the instructions in this manual.
2. Check the detergent
Add the recommended amount of detergent into the dispenser and close the door. If you need to prewash the tableware, the slot at the top of the door should also be filled with detergent.
3. Close the door
4. Switch on the dishwasher
Press the Power icon to switch the appliance on and off.
5. Check the rinse aid
If the rinse aid level is low, the rinse aid indicator light will flash.
IMPORTANT: always add rinse aid to improve the drying process.
6. Select the desired programme and options
See the programme guide in this manual. The display will show the estimated programme time and the selected option.
7. Start the dishwasher
First, close the door. Then, press the Start/pause icon ▷II. If you open the door while the programme is in operation, the dishwasher will stop. When you close the door, the programme will resume.
8. End of programme
When the washing programme is finished, the appliance will beep, and the dishwasher will switch off automatically after a few minutes.
WARNING:
Do not open the door during operation or immediately after the end of the washing programme, as steam build-up may cause burns.
Tips:
- You can first remove the tableware from the bottom basket and then from the upper basket. Doing so will prevent water from dripping from the upper basket onto the tableware in the bottom basket.
- To save energy and water, try to maximise the capacity of the baskets.
Before use
Soft water system
- This dishwasher is equipped with a soft water system (salt tank). Its mission is to soften, to a certain extent, the hardness of the water used and thus optimise the dishwashing result.
- If the water in your area does not need to be descaled (low hardness), the dishwasher can be used without dishwasher salt, but it is necessary to set the hardness level to H0 so that the corresponding indicator light is not lit all the time.
- To achieve an optimal washing effect, the dishwasher needs soft water, otherwise water spots will remain on the tableware and inside the dishwasher. Hard water can also produce limescale deposits in the dishwasher and cutlery.
- If the hardness of the tap water exceeds a certain level, it must be softened, i.e. decalcified, by adding salt to the water softener system inside the dishwasher. The amount of salt required is adjusted according to the hardness of the tap water.
ATTENTION:
- Only use salt special for dishwashers. Any other type of salt not specifically designed for dishwasher use, especially table salt, will damage the water softener. In case of damage caused by the use of unsuitable salt, Cecotec does not give any guarantee and is not liable for any damage caused.
- Only add salt just before starting one of the full washing programmes. This will prevent salt grains or salt water, which may have spilled, from remaining in the bottom of the machine for a certain period of time, which could cause corrosion.
Check water hardness
-
Check the water hardness in your area. You can contact your water supply company to get this information.
-
Adjust the water softener according to the hardness level of the water supplied.
ENGLISH
Adjustment of the descaling system
Adjust the descaler according to the hardness level of the water supplied. The descaling system has 9 levels of adjustment. The dishwasher has been set to water hardness level H5 when leaving the factory.
Settings for 15 place settings
- Make sure that the dishwasher is switched off and press the Dual Zone icon for 3 seconds to set the programme.
- Press the Dual Zone icon. The current configuration will be displayed.
- Press the Dry+ function icon and select the desired value. The range of values that can be selected is from H0 to H8.
- Once the necessary settings have been made, press the Power icon to switch off the dishwasher and save the settings.
Add salt
WARNING:
- The salt tank of the dishwasher must be full before starting the washing programme. If there is not enough salt, the corresponding indicator light will light up, unless the hardness level is set to H0.
- After filling the salt tank, it is recommended to start a washing programme immediately. This will remove the salt accumulated around the inner cylinder and prevent corrosion.
To add salt, follow these steps:
- Remove the bottom basket.
- Turn the salt tank cap counterclockwise to open it (Fig. 20).
- If you want to use the descaler before starting the dishwasher for the first time, use the funnel to add a maximum of 650 g of salt into the salt tank (Fig. 21).
- Only fill the salt tank with water before using it for the first time.
- Refit the cap.
- Run a washing programme with the dishwasher empty.
WARNING:
- Do not pour detergent into the soft water system.
- Clean any salt that may have accumulated around the cap of the salt tank. Otherwise, the salt solution could corrode the dishwasher and the tableware.
- Align the cap horizontally and turn it clockwise so that it is correctly fixed. If the cap is not completely fixed, the salt solution may leak out of the salt tank and cause corrosion.
- After adding the salt, run a washing programme without tableware inside. Otherwise, spilled salt may cause rust or damage to the dishwasher.
Adding detergent to the drawer
- The necessary detergent quantity will depend on the load size and the tableware soiling level.
-
Add detergent into the dispenser before starting any programme.
-
Press the tab on the dispenser cover to open it. (Fig. 22)
- Add dishwashing detergent into the main compartment of the dispenser until the liquid level is between the 15 and 25 marks.
If the water hardness is very high or the tableware is very dirty, the mark 25 may be exceeded.
If the water is soft or the tableware is lightly soiled, you can add detergent up to mark 15. (Fig. 23) - Push on the dispenser cover and slide it until you hear a "click". (Fig. 24)
- If you need to prewash, fill the prewash compartment with detergent. (Fig. 25)
WARNING:
Dishwasher detergents and rinse aids contain the same chemicals as other household detergents. Therefore, they should be kept out of the reach of children.
WARNING:
- Only use detergents for washing machines. Unsuitable detergent can cause the dishwasher to foam during operation. Excessive suds can reduce the washing performance and cause leaks in the dishwasher.
- Do not pull the dispenser to close the dishwasher door; doing so may damage the dishwasher.
Tips:
- We advise you to check whether the detergent has been completely used after the end of the washing programme.
- Some dishwasher detergent tablets may get stuck in the dispenser due to their large size. Before starting the programme, you can place the tablets at the bottom of the dishwasher, next to the filter.
- If you use too much detergent, a white film will remain on the tableware and in the dishwasher.
- IMPORTANT: if you use rinse aid, the water will be drained from the tableware after the final rinse, which will improve drying.
- Do not use dishwasher tablets in short washing cycles. If you do this, the tablets may not dissolve completely, resulting in detergent residues on the tableware.
- Rinse aid can help remove stains, residues and white films caused by hard water. But it does not remove excess detergent residues.
ENGLISH
Adding rinse aid into the dispenser
When the dishwasher needs more rinse aid, the corresponding indicator light will light up on the display.
The use of rinse aid is recommended to remove water stains from the tableware and to improve drying.
-
Open the cover of the rinse aid tank. (Fig. 26)
-
Add liquid rinse aid up to the maximum fill level. Pour the rinse aid into the dispenser carefully so that no bubbles form, as this would affect the drying of the tableware. Do not overfill the dispenser. (Fig. 27)
-
Close the cover. In the last rinse cycle, the rinse aid will be dispensed automatically. (Fig. 28)
Tips:
- Only use liquid rinse aids for dishwashers.
- Do not overfill the dispenser.
- Wipe up any spilled rinse aid around the dispenser.
Adjusting the rinse aid dispensing
The dispenser has 9 levels of adjustment. It has been set to level d3 when leaving the factory.
You can check and change this setting using the icons on the control panel.
- Make sure that the dishwasher is switched off.
- Press the Intensive+ and Machine care icons simultaneously to enter the setting programme. Then press Intensive to check the current settings.
- Press the Machine care icon to change the rinse aid dispenser settings. You can adjust the desired level (between d0 and d8) by gradually pressing that icon.
- Once the necessary settings have been made, press the Power icon to switch off the dishwasher and save the settings.
Tips:
If there is no Intensive+ function on 15-place settings dishwashers, press the Dual Zone icon instead.
Tips:
- If you use hard water and notice limescale build-up on the tableware, set the level to high.
- If the rinse aid dispenser is set too low, stains may appear on the tableware. In addition, drying will be poor.
- If the rinse aid dispenser is set too high, too much foam will be produced, resulting in poor dishwashing performance.
Refilling the rinse aid
- The frequency of refilling the rinse aid dispenser depends on the adjusted settings and the frequency of washing.
- When the dishwasher needs more rinse aid, the corresponding indicator light will flash, unless the rinse aid dispenser is set to level d0.
Control panel. (Fig. 29)
1. Power icon

- Press this icon to switch on the dishwasher.
- Also, use it to switch off the appliance after the washing programme has finished.
2. Start/pause icon

- Press this icon to run the programme you have selected.
- Also, press it to pause the dishwasher while it is in operation. Pressing it again resumes the paused operation.
- Press and hold it for 3 seconds to cancel the running programme and drain the water.
3. Special functions icons
- Press icon of the function you want to use.
- You can choose the following additional functions:
Delay start function icon
Press this icon to set the Delay start function. Each time you press this icon, the time of this function will increase by one hour. The time setting range is 1-24 hours. If you select a higher setting, the function will be disabled.
When the function is activated, you can cancel it before the dishwasher starts by opening the door and pressing and holding the Delay start icon. The value shown on the control panel display is the programme end time.
Intensive+ function icon
This optional function is used to adjust the temperature and time to achieve an optimal wash.
Machine care function icon (internal cleaning)
This function is used to clean the inside of the dishwasher and remove residues, odours, white spots and other types of dirt. Do not put tableware in the machine when this function is operating.
ENGLISH
Dual zone icon (dual wash)
This function allows the dishwasher to operate without being fully loaded. With the Dual Zone function you can save both water and energy while using the bottom and upper baskets. Special cleaning for selected areas (upper basket area or bottom basket area). The water pressure will be adjusted in both baskets.
Half load icon
This optional function can be used when the dishwasher is not fully loaded, thus saving water.
Dry+ icon
This optional function is used to adjust the temperature and drying time to achieve optimal results.
4. Display
Rinse aid low indicator light
This indicator light will light up when the rinse aid level is low. It will automatically switch off when the rinse aid is refilled or when the rinse aid dispenser setting is d0.
Digital display 8:88
The digital display on the control panel shows the estimated duration of the programme. When you select the desired programme and additional functions, the display will show the estimated total running time of the programme. When the programme is operating, the display will show the remaining time.
Tips:
The programme run time can be adjusted according to the level of soiling of the tableware.
Dual zone function indicator light —
This indicator light will flash when the Dual zone function is selected.
Child Lock function indicator light
This function is used to prevent settings from being changed during operation. Selecting it will lock all icons on the control panel except for the Power icon. This function does not lock the door.
While the programme is in operation, you can press and hold the icon of the corresponding programme for about 3 seconds to activate or deactivate the Child Lock function.
To run a new programme, this function must be deactivated.
Abnormal water supply indicator light
This indicator light will flash when the water supply is abnormal (e.g. if the tap is turned off or if there has been a water cut-off).
Low salt indicator light ↕
This indicator light will switch on when the salt level in the dishwasher is insufficient. It will automatically switch off when the salt is refilled.
Since the grains of the different brands of salt on the market are of different sizes and the hardness of the water can vary, it can take a couple of hours for the salt to dissolve in the water. Therefore, the salt indicator light will remain lit for some time even if you have already added salt in the dishwasher.
Water flow intensity indicator light

This indicator light will flash when the Intensive+ function is selected.
Delay start indicator light
If the Delay start function is activated, this indicator light will switch on.
Half load function indicator light
This indicator light will flash when the Half load function is selected.
5. Programmes table
All optional programmes are listed in the programme table below.
| Programme | Soiling level13 place settings | *Water consumption (l) | |||
| 14 place settings | 15 place settings | 13 place settings | |||
| ***ECO50 °C | The most economical washing programme for daily cleaning of moderately soiled tableware. Moderate | ate | 13.5 | 13.5 | 10.0 |
| Intensive65 °C(Intensive) | Suitable for tableware, pots and frying pans with a high level of soil-ing and dirt | High | 13.3 | 13.3 | 14.2 |
| Glass 40 °C(Glass) | Special programme for gentle clean-ing of delicate glassware | Low | 10.0 | 10.0 | 10.7 |
| Hybrid 60°C(Hybrid) | Suitable for cleaning dry, burnt or sticky food residues or residues containing starch or protein. | Any type | 13.3 | 13.3 | 14.2 |
| Prewash45 °C(Prewash) | Suitable for removing residues from dirty dishes that remain in the appli-ance for several days and to prevent the appearance of odours. | — | 3.5 | 3.5 | 3.7 |
| Speed 55 °C(Fast) | Suitable for cleaning slightly sticky fresh food residues. | Low | 6.8 | 6.8 | 7.2 |
| Super 60 °C | Suitable for removing slightly sticky fresh food residues in the quickest way. | Low | 6.8 | 6.8 | 7.2 |
| Hygiene70 °C(Hygiene) | Special programme for the cleaning of common dry and solid food waste and wear-resistant items. | Low | 10.0 | 10.0 | 10.7 |
| Temperature | (°C) | *Energy consumption (kWh) | ||||||
| 14 place settings | 15 place settings | 13 place settings | 14 place settings | 15 place settings | ||||
| 255 | 255 | 295 | 50 | 0.934 | 0.950 | 0.860 | ||
| 120 | 120 | 120 | 65 | 1.06 | 1.06 | 1.08 | ||
| 135 | 135 | 135 | 40 | 0.92 | 0.92 | 0.96 | ||
| 105 | 105 | 105 | 60 | 0.98 | 0.98 | 1.04 | ||
| 20 | 20 | 20 | 45 | 0.25 | 0.25 | 0.28 | ||
| 60 | 60 | 60 | 55 | 0.63 | 0.63 | 0.67 | ||
| 29 | 29 | 29 | 60 | 0.62 | 0.62 | 0.66 | ||
| 90 | 90 | 90 | 70 | 1.03 | 1.03 | 1.07 | ||
ENGLISH
*Actual water and energy consumption may vary depending on the level of soiling and water hardness.
**The actual running time and programme time shown on the display may vary depending on the programme options selected, the level of soiling, water temperature and water hardness. Therefore, the display time and the actual execution time may be different.
***Select the ECO programme for energy-saving dishwashing. This is the most efficient programme in terms of combined energy and water consumption for cleaning normally soiled dishes.
Loading the tableware
Always follow the instructions below to achieve an effective washing effect.
- Remove large pieces of food, including bones, before loading.
- Soak dishes containing burnt food before putting them in the dishwasher.
- Place the pots or bowls upside down.
- Make sure that all tableware does not touch each other.
- Tableware with excessive width should be placed at an angle so that water can drain freely and not accumulate.
- The tableware must not be placed with their mouths upwards.
- Tableware with excessive height cannot be placed in the corner of the dish rack.
- Make sure that small items do not fall out of the basket. Lids and similar items must be placed in the cutlery basket (not included in all models).
- The interior of small dishes is not easy to spray and clean, resulting in a poor washing effect. It is not recommended to wash small tableware in the dishwasher.
Items not to be washed in the dishwasher
The combination of high water temperature and dishwashing detergent may damage some items. Do not wash the following items in the dishwasher.
- Items of copper or anodised aluminium.
- Hand-painted ceramic items with silver leaf or gold leaf.
- Items made of wood or bone.
- Items made of iron, or which are not resistant to rust.
- Plastic items that are not dishwasher safe.
- Items such as silver cutlery or tableware decorated with gold.
- Fragile items such as crystal glasses.
Warning
- Do not put pots or frying pans with plastic handles in the dishwasher, as this part may deteriorate due to heat and detergent.
- Waterproof or long-lasting carmine stains on glasses may not be removed during washing.
- Some foods, such as carrots or tomatoes, contain natural dyes. Therefore, if a large amount of these foods come into contact with the tableware, they may discolour it (especially if it is made of plastic). Cleaning silverware can also cause discolouration of plastic items.
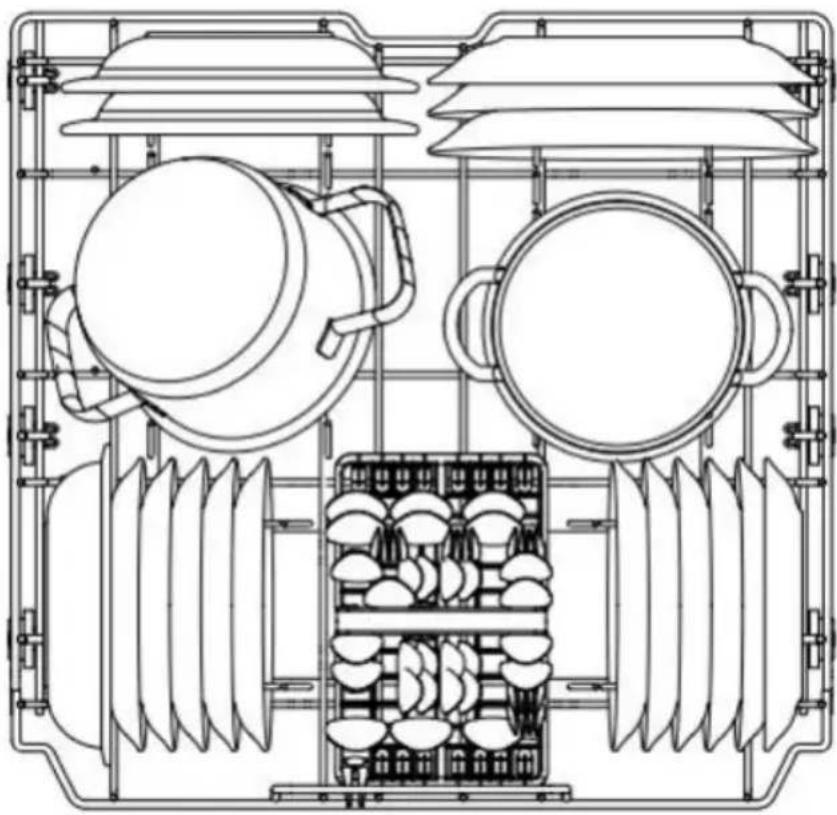
Loading the bottom basket
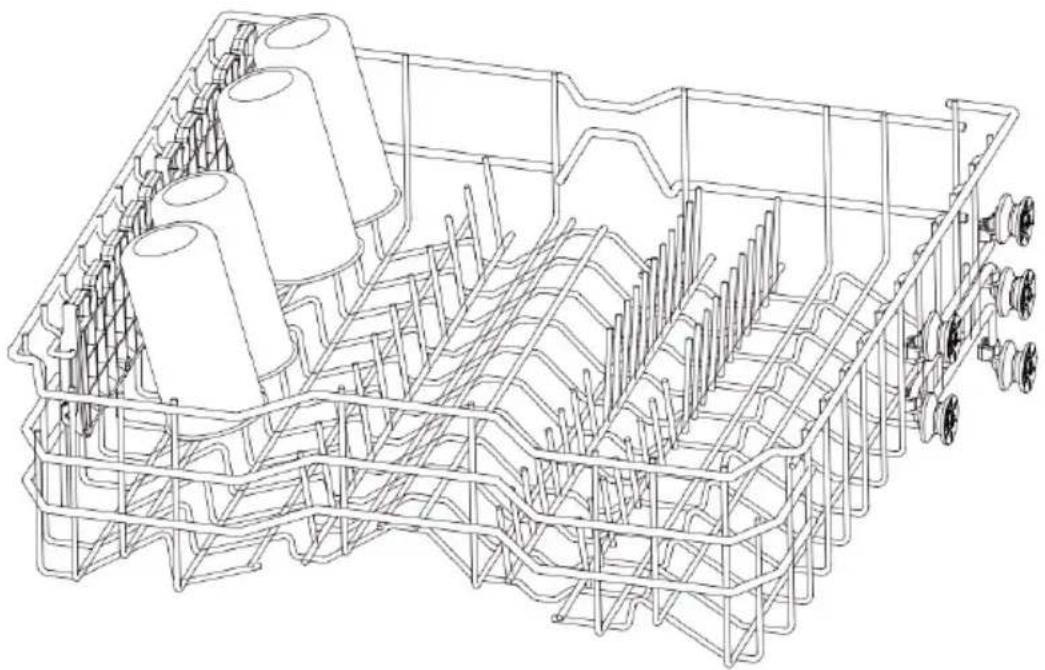
Figure 30 shows a schematic picture of how to load the bottom basket.
To load it efficiently, follow the Instructions below:
- Plates should be placed in an upright position. Pots, frying pans and larger plates should be placed upside down.
- Place soup bowls or similar sized items between the tines.
- Ensure that the handle of large items does not interfere with the movement of the spray arm.
- Small items such as cups, wine glasses or small plates should not be placed in the bottom basket, but in the upper basket.
- Make sure that large objects do not interfere with the movement of the spray arm and do not impede the opening of the detergent dispenser.
- Pots and frying pans should be placed in the bottom basket to keep them cleaner.
Tips:
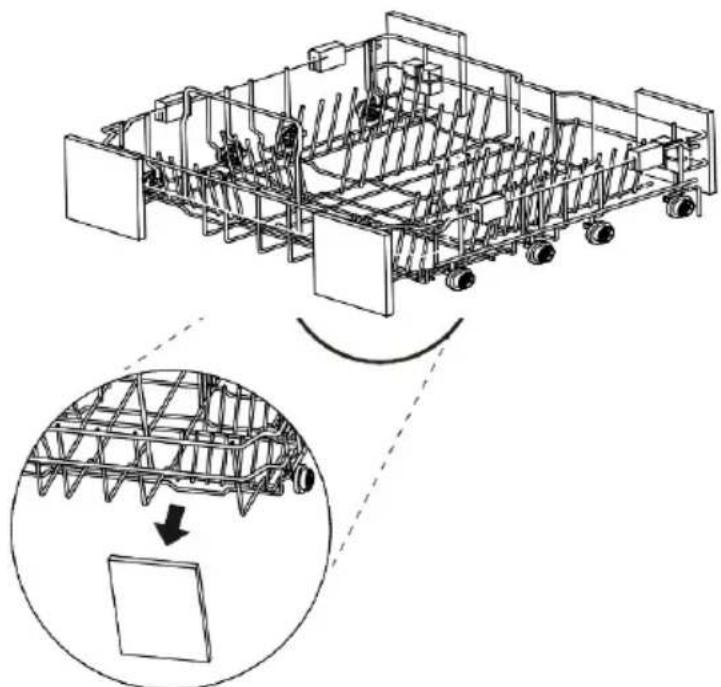
For best results, the cutlery basket should be placed in the centre of the bottom basket, as shown in figure 31.
NOTE: cutlery basket not available on all models.
Loading the cutlery basket
Figure 32 shows a schematic picture of how to load the cutlery basket.
The cutlery basket is equipped with a divider to prevent the cutlery from scratching.
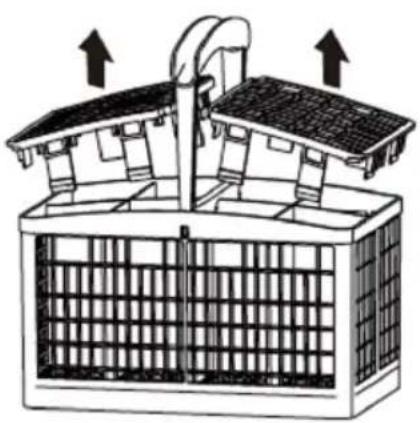
The lid on the top of the cutlery basket can be removed. (Fig. 33)
Instructions on how to place the cutlery:
- For optimal cleaning, use the lid of the cutlery basket.
- Place sharp objects (e.g. knives) facing downwards.
- When removing the tableware, start with the cutlery basket to prevent water droplets from the upper basket from falling on the cutlery.
ENGLISH
WARNING:
- Take care when inserting and removing sharp items. Place sharp knives with the handle facing upwards to reduce the risk of injury.
- Prevent sharp objects from scratching the door gasket.
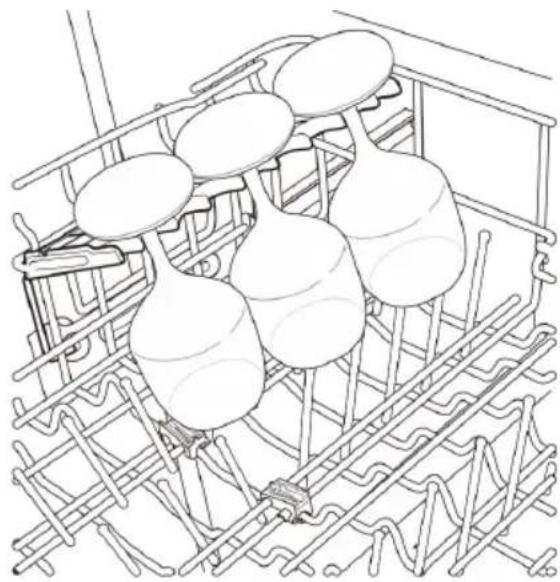
Loading the upper basket
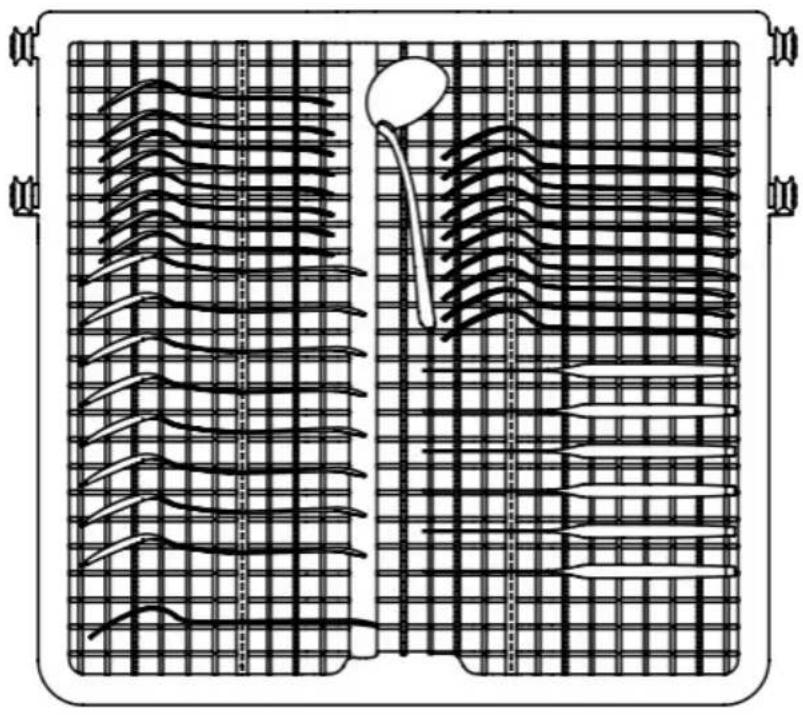
Figure 34 shows a schematic picture of how to load the upper basket.
To load it efficiently, follow the Instructions below:
- Place the cups and glasses in the row between the tines of the basket. If you place them directly on the basket, water spots may appear.
- Do not allow wineglasses to come into contact with other objects, as this may cause them to break.
- Place glasses upside down to facilitate cleaning and drying.
- Place cups, glasses and bowls upside down and make sure they are not stacked.
- Additional items can be placed in the flip tines (some models only).
- Make sure that the tableware does not interfere with the movement of the spray arm.
- When placing larger items in the upper basket, such as wine glasses or tall cups, it may be necessary to remove the flip tines, if present.
Loading of the flip tines (if your dishwasher model is equipped with it)
Some models are equipped with flip tines on which you can place additional items.
Figure 35 shows a schematic picture of how to load the flip tines.
This can be folded down so that you can place tall cups or wine glasses in the upper basket. (Fig. 36)
Adjusting the height of the upper basket
By adjusting the height, you can create a large space at the bottom or top of the dishwasher according to your needs.
Lowering the upper basket
Remove the upper basket from the guide rail and then replace it between the second and third row of castors. (Fig. 37)
Raising the upper basket
Remove the upper basket from the guide rail and then replace it between the first and second row of castors. (Fig. 38)
Warning
Make sure that there is no tableware in the basket before adjusting its height. Otherwise, it could be damaged, or you could be injured.
Tips:
- Make sure that both sides of the upper basket are at the same height before placing it in the dishwasher. If the height of the two sides is different, the dishwasher door will not be able to close, and the centre spray arm will not work properly.
- After adjusting the height, check whether the spray arm can rotate freely.
- Check that the spray arm does not collide with objects in the bottom basket.
Loading the cutlery drawer (if your dishwasher model is equipped with one)
This is the most suitable place for cutlery and most of the kitchen utensils used for serving.
The dividers on this tray help to keep cutlery separate, thus improving cleanliness.
Tips
For optimal cleaning, place the cutlery in the cutlery basket/drawer. Cutlery that is heavily soiled or contains food residue should be placed in the centre of the drawer or in the spoon compartment.
Figure 39 shows a schematic picture of how to place the cutlery.
Removing the cutlery drawer
- The cutlery drawer can be completely removed if you are going to place very large items in the upper basket and therefore need more space.
- Pull the drawer out to the end of the rails. Then, lift the front of the drawer so that the castors pass over the stop at the front end of the rails. You can now slide the drawer forward until it is completely removed from the rails. (Fig. 40)
Warning
Take care when placing and removing sharp-edged items. Place sharp knives with the handle facing upwards to reduce the risk of injury.
5. CLEANING AND MAINTENANCE
Maintenance
To avoid breakdowns, it is important to regularly check the exterior and interior of the dishwasher (including the filter assembly and spray arms).
Warning
- Do not use benzene or solvents to clean any part of the dishwasher (internal or external) to avoid the risk of fire or explosion.
ENGLISH
- Wear gloves and/or protective clothing to avoid injury when cleaning or servicing the dishwasher.
Tips
- If the dishwasher remains idle for a long time, run the Machine care function without detergent to refresh the interior. Once finished, you can clean the inside and outside of the dishwasher according to the maintenance instructions.
- If you are away for a long time during a hot season, turn off the water tap and disconnect the power cable, or turn off the circuit breaker; and clean the filter, inner tank and dispenser to avoid odours.
- If you are away for a long time during a cold season, take measures to prevent the water supply pipe and the dishwasher itself from freezing.
Cleaning the outside of the dishwasher
In most cases, the outer surface of the dishwasher can be cleaned with a soft damp cloth or sponge and then dried with a soft cloth. For models with a stainless steel coating, you can use a cleaner specifically for stainless steel.
Warning
Any oil splashes on the outer surface of the dishwasher must be cleaned immediately. To clean the external surface of the dishwasher, avoid using cleaners which may contain alcohol, solvents, bleach or benzene. Do not use flammable or abrasive liquids. Doing so may cause discolouration or damage to the machine.
Cleaning the inside of the dishwasher
- Regularly clean the inside surface of the dishwasher with a soft damp cloth or sponge to remove food residues and dirt.
- To remove white stains and odours inside the dishwasher, run a programme without detergent. Make sure that the only load in the machine during this process is a cup, glass or bowl filled with vinegar and placed in the upper basket. (Vinegar is an acid that can damage electrical appliances if used frequently.)
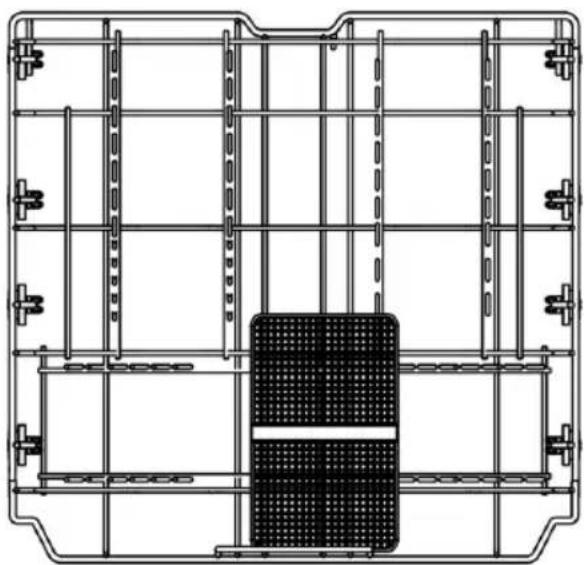
Cleaning the filter
- Remove the bottom basket and make sure that the spray arm does not impede the removal of the filter.
- Turn the filter cover cap counterclockwise and remove the filter assembly consisting of the filter cap, a metal filter grid and a microfilter. After disassembling the filter assembly, remove any foreign objects that may be present. (Fig. 41)
- Clean each filter part with tap water and a soft brush. Reassemble the filter assembly before refitting. (Fig. 42)
- Put the filter assembly in place and secure it by turning the cover cap clockwise. (Fig. 43)
Warning
Be careful of sharp edges when cleaning the filter assembly.
Tips:
- We recommend cleaning the filter assembly after each use of the dishwasher to achieve the best washing results. If food residues remain in the filter, they can cause unpleasant odours.
- Clean the filter with a soft brush at least once a month.
- Clean the filter with non-abrasive materials and warm water.
- Make sure that the filter assembly is properly assembled before starting any washing programme. Be sure to turn the filter cover cap until you hear a "click".
Cleaning the spray arms
If the holes in the spray arms are clogged with food debris, the dishes may not be cleaned properly. It is recommended to clean the spray arms every two weeks.
Cleaning the bottom spray arm
- Check that no holes are clogged with food debris.
- If any holes are clogged, remove food debris with a pin or any sharp tool. (Fig. 44)
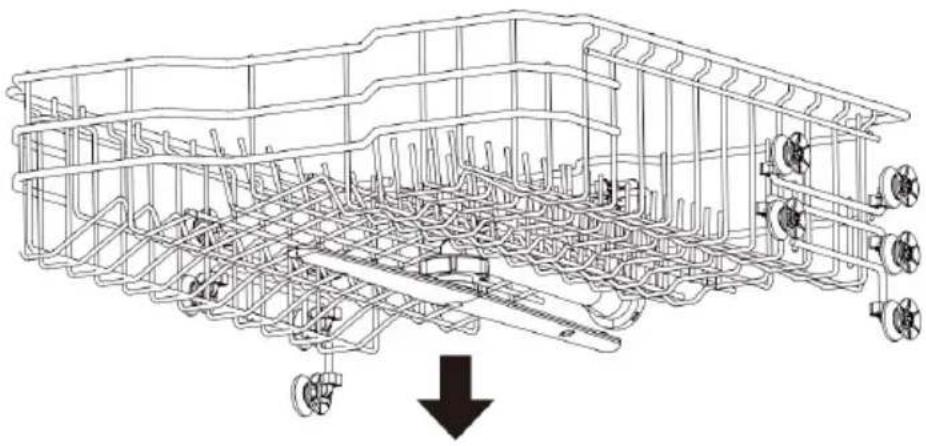
Cleaning the central spray arm
- Slide the upper basket forward and check that no holes in the central spray arm are obstructed by food debris.
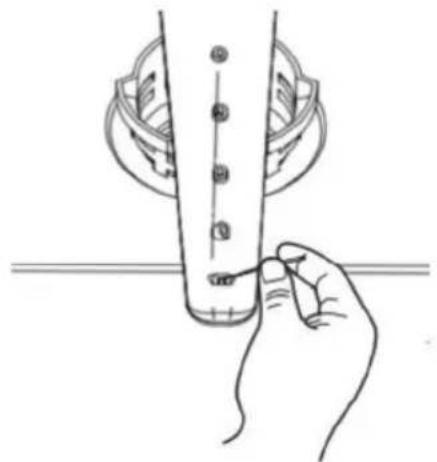
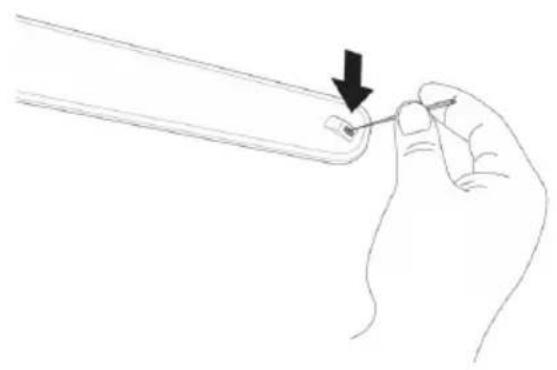
- Before cleaning it, turn the nut on the underside of the arm counterclockwise and pull it downwards to remove the arm. (Fig. 45)
- Remove food residues by rinsing or shaking the spray arm.
- If any holes are clogged, remove food debris with a pin or any sharp tool. (Fig. 46)
- Clean the holes of the spray arm with tap water after removing food residues.
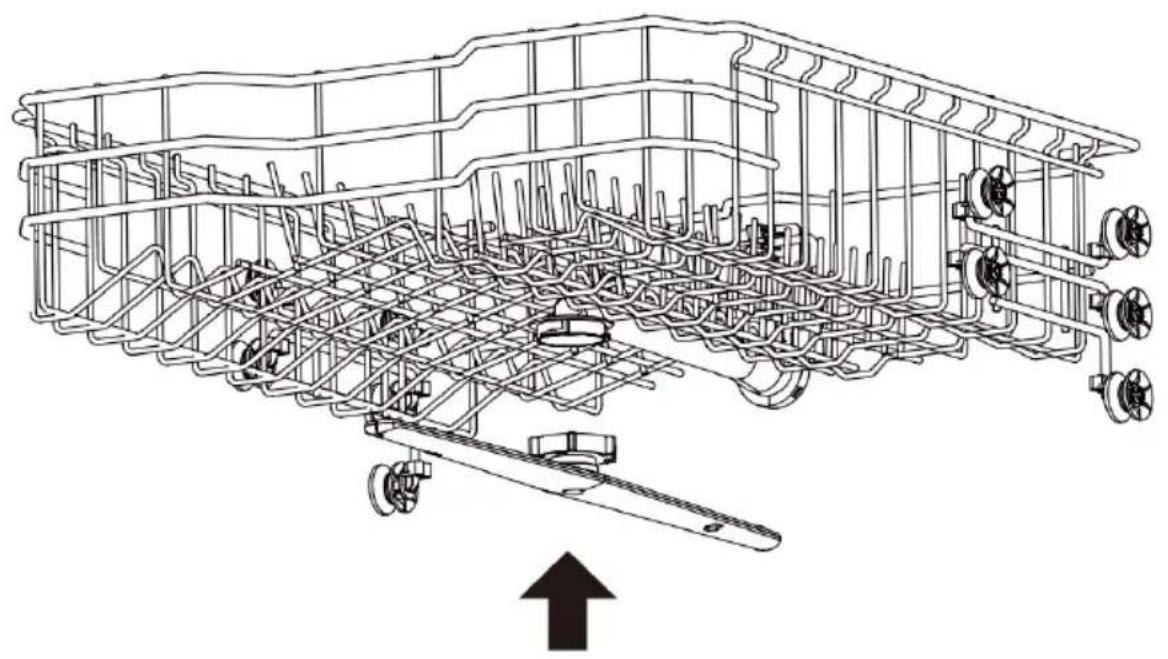
- Put the centre spray arm back in place after cleaning. Turn the nut clockwise to ensure that the spray arm is fixed in its original position. (Fig. 47)
- After assembly, check whether the spray arm can rotate freely.
6. TROUBLESHOOTING
FAQs
Q: Does this dishwasher need rinse aid?
A: The use of rinse aid is recommended to improve the drying process. If not used, water may remain on the dishes and on the dishwasher coating. The rinse aid helps to remove most of the water from the dishes at the end of the rinsing process.
ENGLISH
Q: Why is there a white film on the tableware after washing?
A: This is usually due to the reaction of the minerals in the water with the detergent in the dishwasher. Do not use too much detergent. This appliance consumes less water than a traditional dishwasher, so adding rinse aid will help to remove the film.
Q: How do I remove the white film from the dishwasher coating?
A: Put 3 tablespoons (40 g) of citric acid powder in the main detergent compartment. Run the Machine care function without detergent.
Q: Why does the dishwasher make strange noises?
A: It is important to determine the duration of the noise and when it occurs (during the cycle). It is normal to hear a hissing sound when the water is sucked in by the dishwasher. If the water pressure is too high, this sound will be louder. Therefore, you may need to adjust the water valve to reduce the pressure.
Q: Can this dishwasher run a cycle where the water is simply drained?
A: To drain the accumulated water, you can press and hold the Start/pause icon for 3 seconds. Once the water in the dishwasher has been drained, the dishwasher will turn off.
Q: Should dishes be washed before putting them in the dishwasher?
A: No. The dishwasher can clean the tableware without pre-washing.
Troubleshooting
| Problem Possible cause and solution | |
| The dishwasher does not start | You have not pressed the Start/pause icon. Press the Start/pause icon. |
| The door is not completely closed. Make sure the door is completely closed and locked. | |
| The dishwasher is not connected to the power supply. Connect the power cable to a suitable socket. | |
| A fuse has blown, or the circuit breaker has tripped. Replace the fuse or reset the circuit breaker. | |
| The Child lock function is enabled. Deactivate the Child lock function. | |
| The dishwasher gives off an unpleasant smell | The previous programme has stopped before the end and the residual water still remains in the dishwasher. Empty the dishwasher and then switch it on. Cancel the previous programme so that all residual water is drained, then put detergent in the dispenser and run the Intensive+ programme. |
| There is food residue at the bottom of the dishwasher or in the filter. Clean the filter and the inside of the dishwasher. | |
| Dirty tableware has been in the dishwasher for a long time. Fill a bowl (or cup) with white vinegar and place it in the top basket of the dishwasher (vinegar is an acid that can damage electrical appliances if used frequently.) | |
| Water remains in the dishwasher after the washing programme | Check if the drain hose is clogged or kinked. Stretch the hose or clear the blockage. |
| Food remains on the tableware | You have selected the wrong programme. Select the correct programme according to the level of soiling and type of items to be cleaned. |
| You have not used detergent. Use detergents suitable for your dishwasher. | |
| Water supply pressure is low. The water pressure must be between 0.03 and 1 MPa. | |
| A hole of the spray arm is clogged. Clean the spray arm holes. | |
| You have loaded the dishwasher incorrectly. Make sure that the tableware does not obstruct the movement of the spray arms or interfere with the dispenser. | |
| Filter blocked. Clean the filter. | |
| Problem | Possible cause and solution |
| The glassware is not shiny | You have used too much detergent and the water in your dishwasher is hard.Use less detergent and rinse aid. |
| There are black or grey marks on the tableware | You have introduced an aluminium item which has come into contact with the tableware during washing.Readjust the arrangement of the tableware. |
| Yellow or brown spots have formed on the inside surface of the dishwasher | They are tea or coffee stains.Use a specific cleaning product to clean this type of stains. |
| The crockery has stains You | have overloaded the dishwasher.Do not overload the dishwasher. |
| You have placed the tableware incorrectly.To find out how to place the tableware correctly, please refer to the relevant section of this manual. | |
| Water supply pressure is low.The water pressure must be between 0.03 and 1 MPa. | |
| You have not added enough detergent.Use the appropriate amount of detergent. To find out how much detergent to use, please refer to the relevant section of this manual. | |
| The rinse aid dispenser is empty.Refill the rinse aid dispenser. | |
| Hard water accumulates in the coating of the dishwasher.Remove all tableware and cutlery basket/drawer. Only the upper and bottom baskets should remain in the dishwasher.For best results, put 3 tablespoons (40 g) of citric acid powder in the detergent compartment. If citric acid powder is not available, you can pour about 1 cup (200-300 ml) of white vinegar into a shallow container and place this container in the upper basket. Once these steps are completed, run a Machine tare programme cycle without detergent in the dishwasher. | |
| The dishwasher makes noise | A certain level of noise during operation is normal, e.g. when: The detergent dispenser cover is opened. The drainage pump is running. |
| Dishwasher is not level. Adjust the feet. | |
| The spray arm hits the plates. Readjust the arrangement of the tableware. | |
| The tableware is not dry Refill the rinse aid dispenser. | |
| No icon/indicator light lights up | The appliance is not connected to the mains. Connect the dishwasher to the electric circuit. |
| One of the spray arms does not rotate properly | The spray arm has a clogged hole. Clean the spray arm holes. |
| The upper basket is inclined | You have not adjusted the height of the upper basket correctly. To know how to adjust the height of this basket, please refer to the relevant section of this manual. |
| Problem Possible cause and solution | |
| The door cannot be closed completely | The baskets are not properly fitted. Hold the door with your hand until it is securely closed. When this happens, you will hear a “click”. |
| There is a water leak at the front of the dishwasher | The dishwasher is not properly levelled. Make sure that all the feet of the dishwasher are correctly levelled. To know how to level the feet, please refer to the relevant section of this manual. |
| You used an inadequate detergent. If the excess foam causes water leakage, wait 24 hours until the foam disappears completely and then clean the inside of the dishwasher. | |
| d0, d1, d2, d3, d4, d5, d6, d7 or d8 appears on the display | Select the rinse aid level setting.This is not an error code. This code indicates the current rinse aid level. For more information, please refer to the relevant section. |
Error codes
| Problem Possible cause and solution | |
| E 1 | Water supply problems.Check if the water supply hose is clogged, kinked or frozen.Check the water supply. |
| E 2 | Drainage problems.Check if the drain hose is clogged, kinked or frozen. |
| The air outlet is blocked.Clean the air outlet. | |
| Filter blocked.Clean the filter. | |
| E 3 | Abnormal heating warning.Unplug the appliance and contact the official Cecotec Technical Support Service. |
| E 4 | Water leakage.Turn off the water supply to the dishwasher and contact the official Cecotec Technical Support Service.The dishwasher stops working, it beeps, and the drain pump runs intermittently. |
| E 5 | Heater circuit failure.Unplug the appliance and contact the official Cecotec Technical Support Service. |
| E 6 | Communication circuit failure.Unplug the appliance and contact the official Cecotec Technical Support Service. |
| E 7 | Excessive water supply.Unplug the appliance and contact the official Cecotec Technical Support Service. |
| E 9 | Bypass valve failure.Unplug the appliance and contact the official Cecotec Technical Support Service. |
| E 11 | Low voltage warning.Unplug the appliance and contact the official Cecotec Technical Support Service. |
| E 15 | High voltage warning.Unplug the appliance and contact the official Cecotec Technical Support Service. |
If none of these situations match your problem, do not attempt to disassemble or repair the appliance by yourself. Repairs carried out by unqualified people may result in injury or serious malfunctions. Contact the official Cecotec Technical Support Service. The repair must be carried out by an authorised technician, and you must use only original spare parts.
Unauthorised self-maintenance or maintenance will affect the safe use of the product and the application of the warranty policy.
NOTE:

Any electrical repairs to this appliance must conform to local and/or state laws. Please contact the official Cecotec Technical Support Service in case of doubt and before carrying out any of the above operations. Always disconnect the appliance from the power supply.
- TECHNICAL SPECIFICATIONS
| Reference 00219 00220 | 00221 | ||
| Model Bolero Aguazero 6210 D | Bolero Aguazero 6210 Inox D | Bolero Aguazero 6210 Dark D | |
| QR code |  |  |  |
| Voltage 220-240V ~ | |||
| Rated frequency 50 Hz | |||
| Rated power 1920 W | |||
| Protection Class I | |||
| Degree of waterproofing | IPX2 | ||
| Energy efficiency class* | D | ||
| Number of place settings | 15 | ||
^* A (highest efficiency) to G (lowest efficiency)
Technical specifications may change without prior notification to improve product quality. Made in China | Designed in Spain
Technical data sheet according to EU Directive 2019/2017
| SETTING | UNIT VALUE UNIT | ||
| Nominal place settings capacity | 15 | ||
| Energy consumption of the ECO programme (EPEC) rounded to the third decimal place | kWh/cycle 0.860 kWh/cycle | ||
| Standard programme energy consumption (SPEC) rounded to the third decimal place | kWh/cycle 1.725 kWh/cycle | ||
| Energy Efficiency Index (EEI) | -49.9 - | ||
| Water consumption in the standard programme (EPWC) rounded to the first decimal place | L/cycle 10.0 L/cycle | ||
| Washing Performance Index (PI) | -1.121 - | ||
| Drying performance index (DI) | -1.061 - | ||
| ECO programme duration (Tt) rounded to the nearest minute | (h:min) 4:55 (h:min) | ||
| Power consumption in off-mode (Po) rounded to the second decimal place | W | 0.49 W | |
| Power consumption in standby mode (Psm) rounded to the second decimal place | W | 0.49 W |
ENGLISH
| Is the ready mode included in the control panel? | - No - | ||
| Power consumption in ready mode (Psm) at mains operating conditions (if applicable) rounded to the second decimal place | W - W | ||
| Delay start power consumption (Pds) (if applicable) rounded to the second decimal place | W 1.50 W | ||
| Airborne acoustic noise emissions | dB(A) re 1 pW 42 dB(A) re 1 pW | ||
| Assembly | Free installation Free installation | ||
| Height (approx.) | 85 cm 85 cm | ||
| Width (approx.) | 60 cm 45 cm | ||
| Depth (approx.) | 60 cm 60 cm | ||
8. DISPOSAL OF OLD ELECTRICAL AND ELECTRONIC APPLIANCES
This symbol indicates that, according to the applicable regulations, the product and/or batteries must be disposed of separately from household waste. When this product reaches the end of its shelf life, you should dispose of the cells/batteries/accumulators and take them to a collection point
designated by the local authorities.
Consumers must contact their local authorities or retailer for information concerning the correct disposal of old appliances and/or their batteries.
Compliance with the above guidelines will help protecting the environment.
9. TECHNICAL SUPPORT AND WARRANTY
Cecotec shall be liable to the end user or consumer for any lack of conformity that exists at the time of delivery of the product under the terms, conditions, and deadlines established by the applicable regulations.
It is recommended that repairs be carried out by qualified personnel.
If at any moment you detect any problem with your product or have any doubt, do not hesitate to contact the official Cecotec Technical Support Service at +34 96 321 07 28.
10. COPYRIGHT
The intellectual property rights over the texts in this manual belong to CECOTEC INNOVACIONES, S.L. All rights reserved. The contents of this publication may not, in whole or in part, be reproduced, stored in a retrieval system, transmitted, or distributed by any means (electronic, mechanical, photocopying, recording or similar) without the prior authorization of CECOTEC INNOVACIONES, S.L.
1. PIÈCES ET COMPOSANTS
Img. 1
Pièces externes
Touch icoon "Half load"
6. PROBLEEMOPLOSSING
Veelgestelde vragen
Fig./Img./Abb./Afb./Rys./Obr.2
natural_image
Technical line drawing of a mechanical assembly with internal components and a magnified inset showing a structural detail (no text or symbols)Fig./Img./Abb./Afb./Rys./Obr. 3
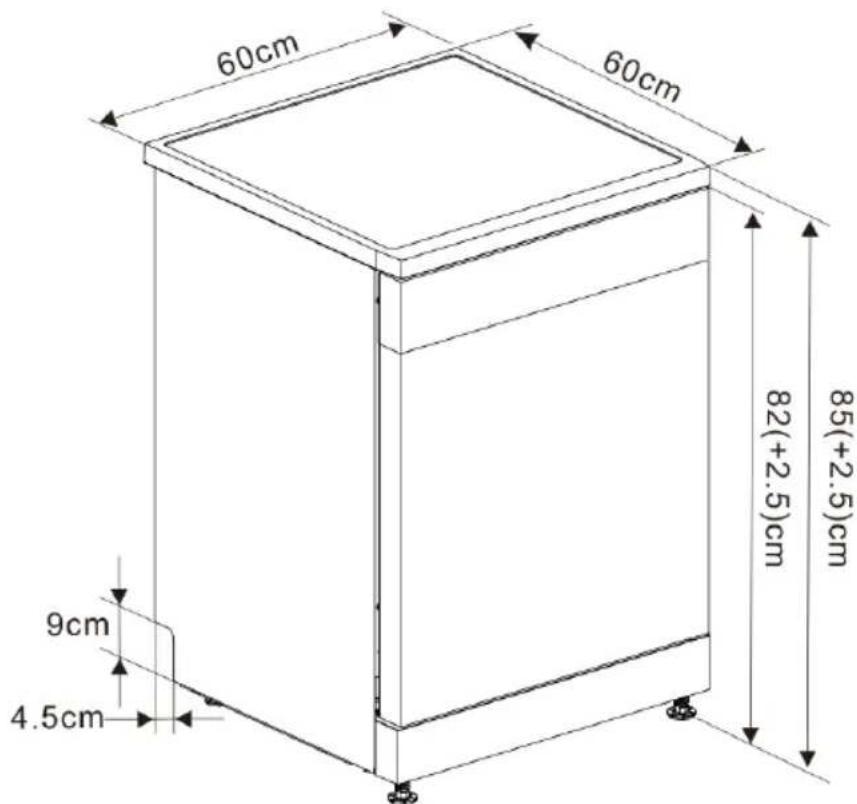
Fig./Img./Abb./Afb./Rys./Obr. 4
natural_image
Line drawing of a mechanical component with a screwdriver inserted, no text or symbols presentFig./Img./Abb./Afb./Rys./Obr. 5
natural_image
Line drawing of a rectangular box with a circular opening and an arrow indicating clockwise motion (no text or symbols)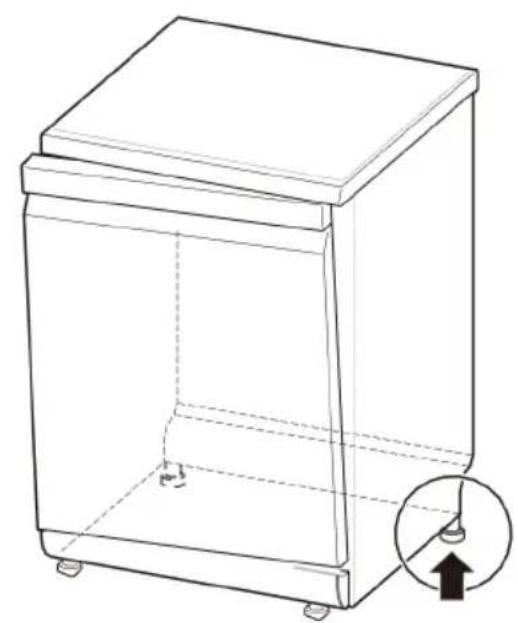
natural_image
Line drawing of a rectangular trash bin with a circular inset showing a downward arrow (no text or symbols)Fig./Img./Abb./Afb./Rys./Obr. 6 Fig./Img./Abb./Afb./Rys./Obr. 7
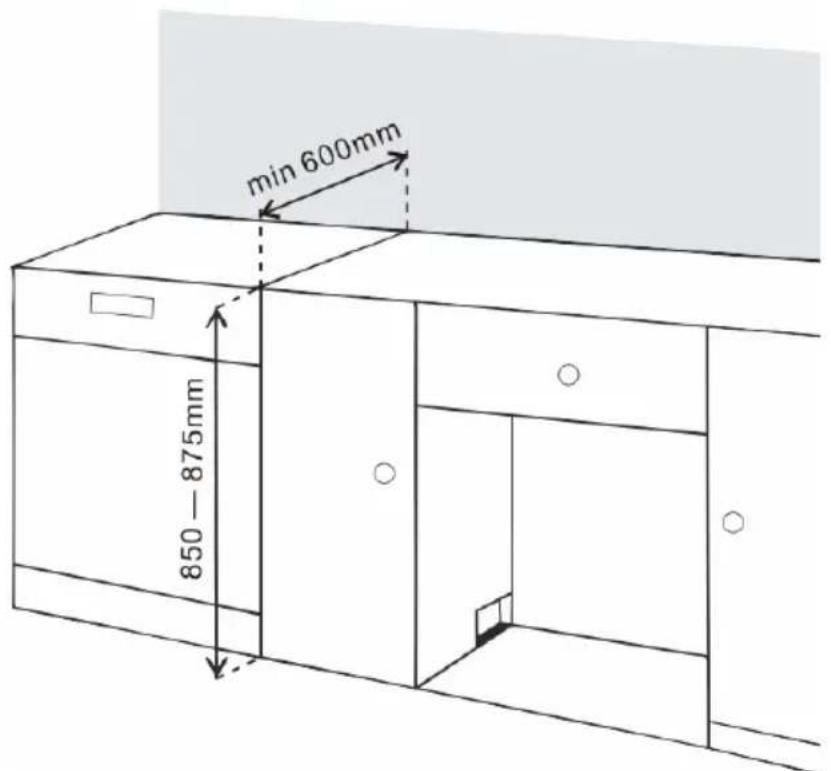
Fig./Img./Abb./Afb./Rys./Obr. 8
natural_image
Line drawing of a square kitchen appliance with two side-mounted handles (no text or symbols)Fig./Img./Abb./Afb./Rys./Obr. 9
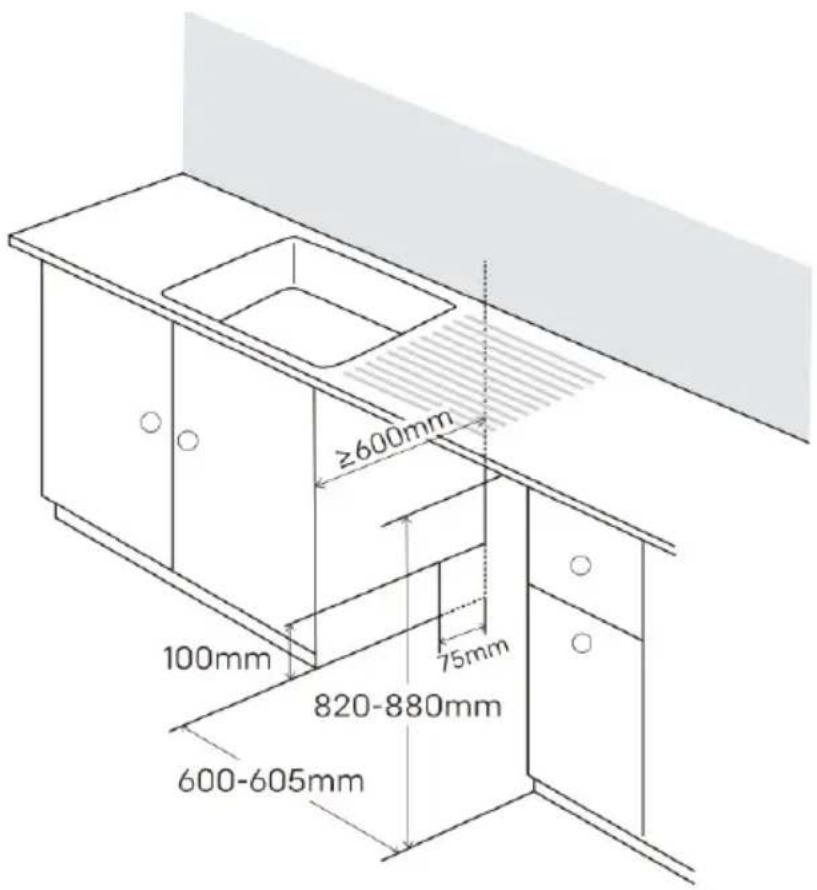
Fig./Img./Abb./Afb./Rys./Obr. 10
natural_image
Line drawing of a hand inserting into a mechanical device into a housing (no text or symbols)Fig./Img./Abb./Afb./Rys./Obr. 11
natural_image
Technical line drawing of a structural frame with curved supports and two circular annotations (no text or symbols)Fig./Img./Abb./Afb./Rys./Obr. 12
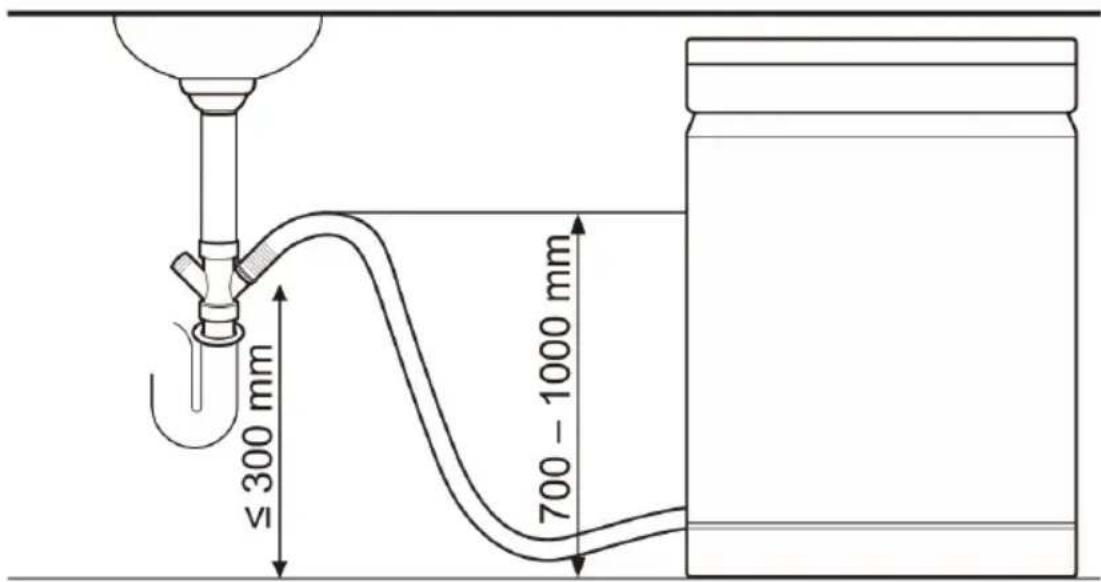
Fig./Img./Abb./Afb./Rys./Obr. 13
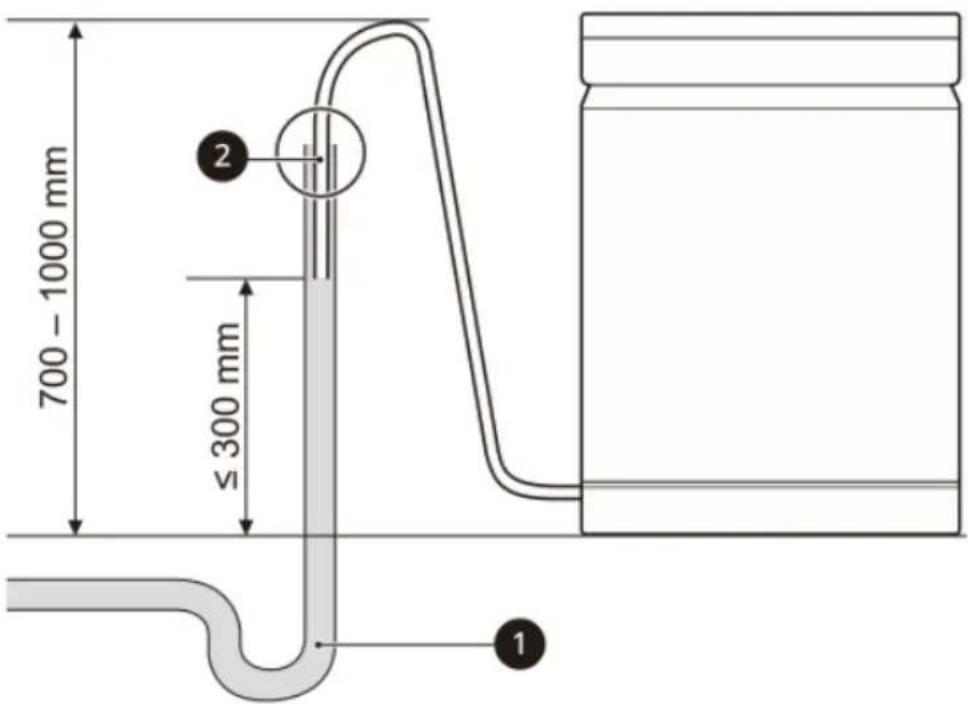
Fig./Img./Abb./Afb./Rys./Obr. 14
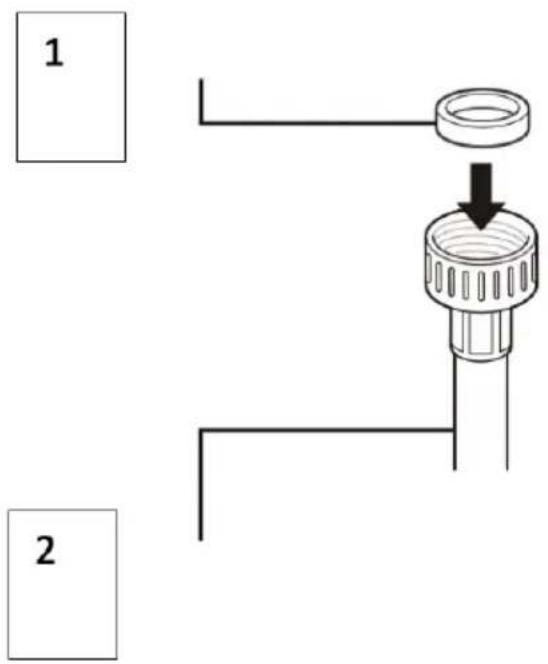
Fig./Img./Abb./Afb./Rys./Obr. 15
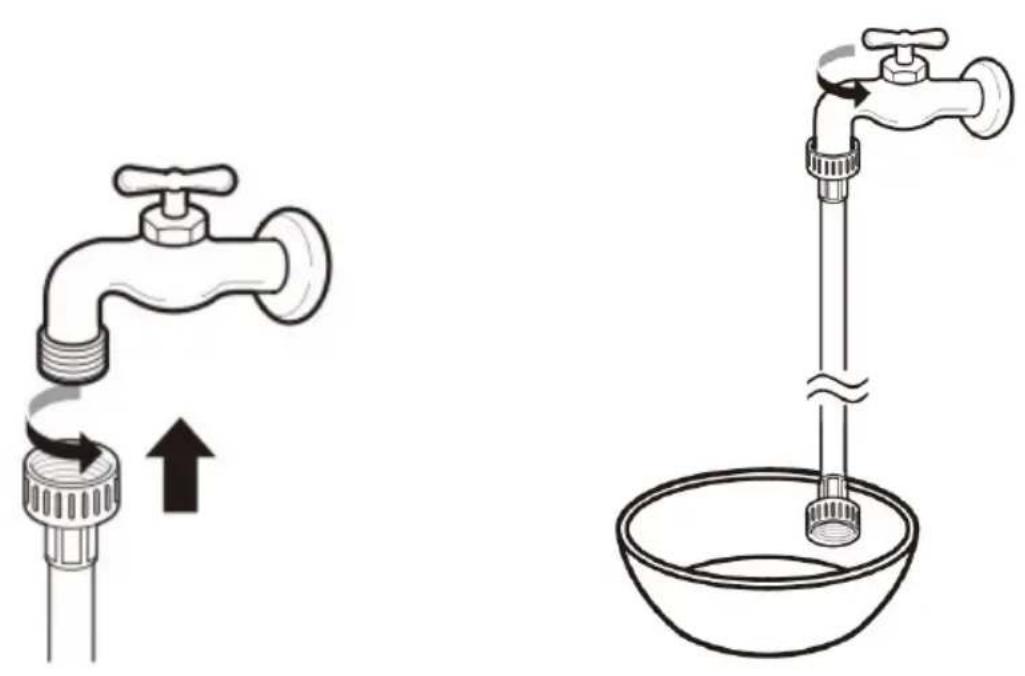
Fig./Img./Abb./Afb./Rys./Obr. 16 Fig./Img./Abb./Afb./Rys./Obr. 17
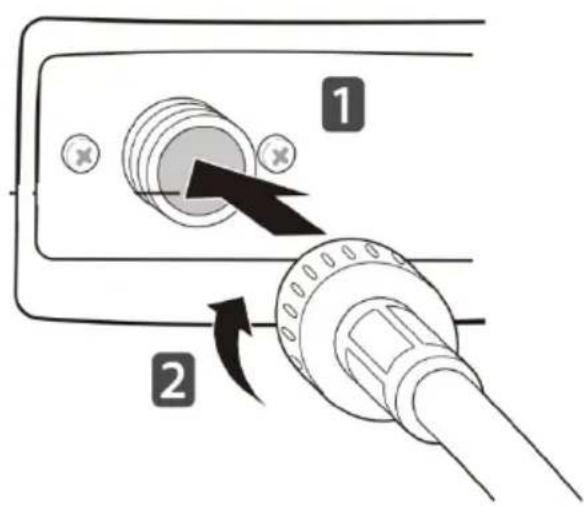
Fig./Img./Abb./Afb./Rys./Obr. 18
natural_image
Technical line drawing of a mechanical assembly with a circular prohibition symbol overlay (no text or labels)Fig./Img./Abb./Afb./Rys./Obr. 19
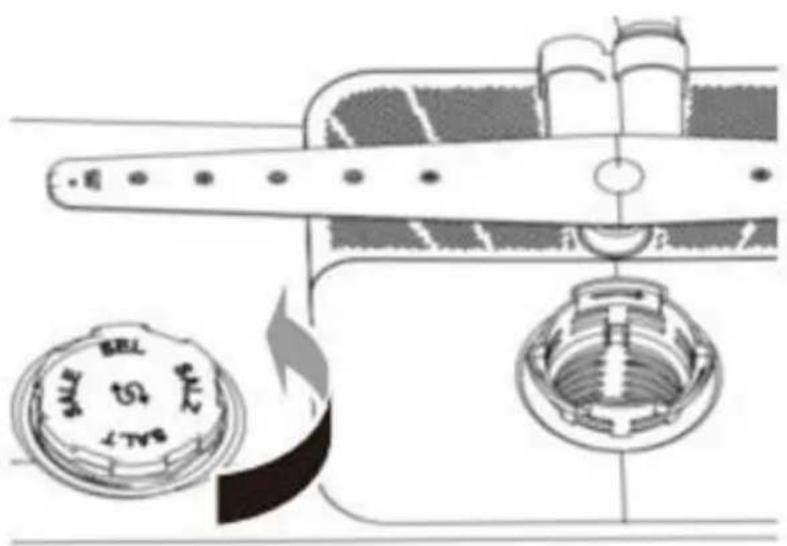
Fig./Img./Abb./Afb./Rys./Obr. 20
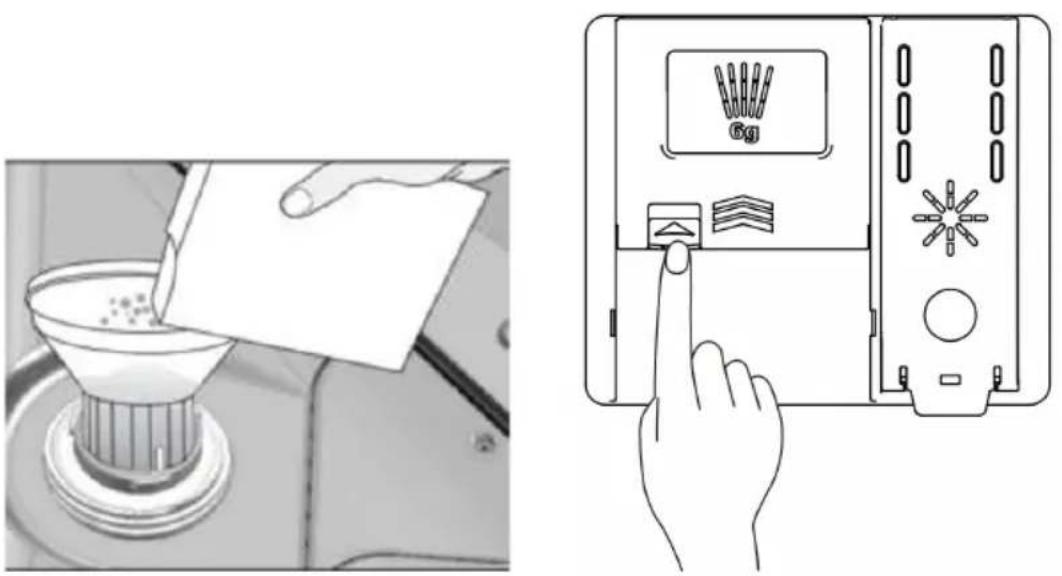
Fig./Img./Abb./Afb./Rys./Obr. 21 Fig./Img./Abb./Afb./Rys./Obr. 22

Fig./Img./Abb./Afb./Rys./Obr. 23

natural_image
Line drawing of a hand inserting a device into a device housing (no text or symbols)Fig./Img./Abb./Afb./Rys./Obr. 24

Fig./Img./Abb./Afb./Rys./Obr. 25
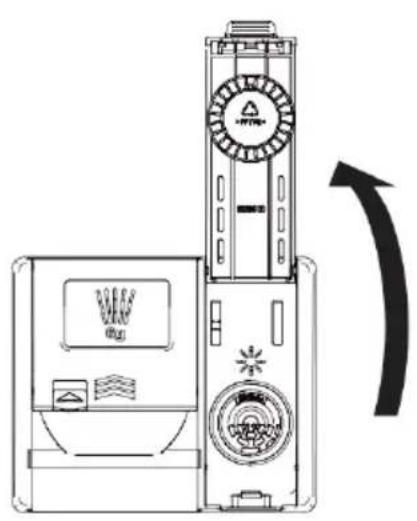
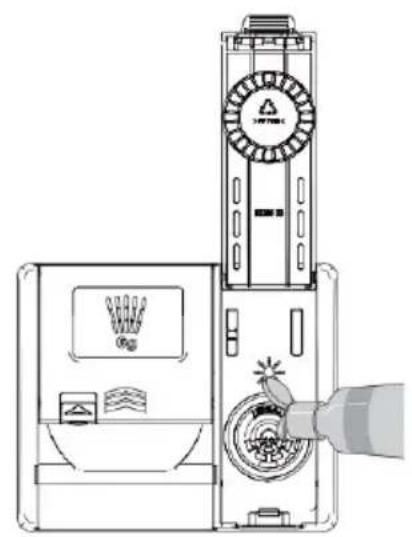
Fig./Img./Abb./Afb./Rys./Obr. 26 Fig./Img./Abb./Afb./Rys./Obr. 27
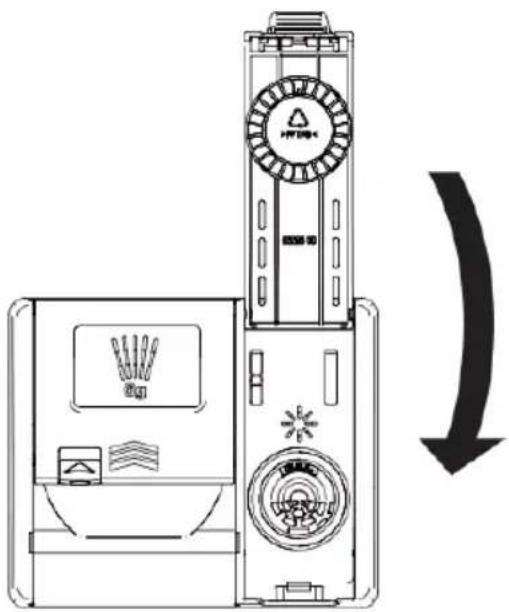
Fig./Img./Abb./Afb./Rys./Obr. 28

Fig./Img./Abb./Afb./Rys./Obr. 29
natural_image
Technical line drawing of an electrical enclosure with two cylindrical components and insulators (no text or labels)Fig./Img./Abb./Afb./Rys./Obr. 30
natural_image
Technical line drawing of a structural frame with internal supports and a central grid-patterned component (no text or symbols)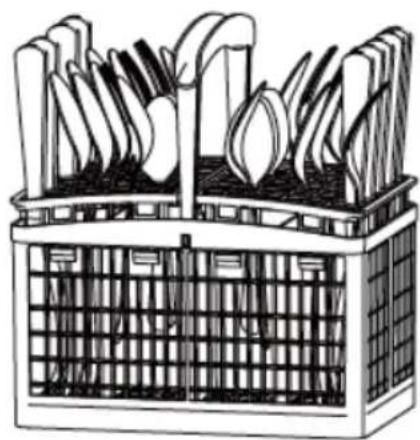
natural_image
Illustration of a basket filled with cutlery and leafy greens (no text or symbols)Fig./Img./Abb./Afb./Rys./Obr. 31 Fig./Img./Abb./Afb./Rys./Obr. 32
natural_image
Diagram of a multi-level building structure with ventilation ducts and grid-patterned facade (no text or symbols)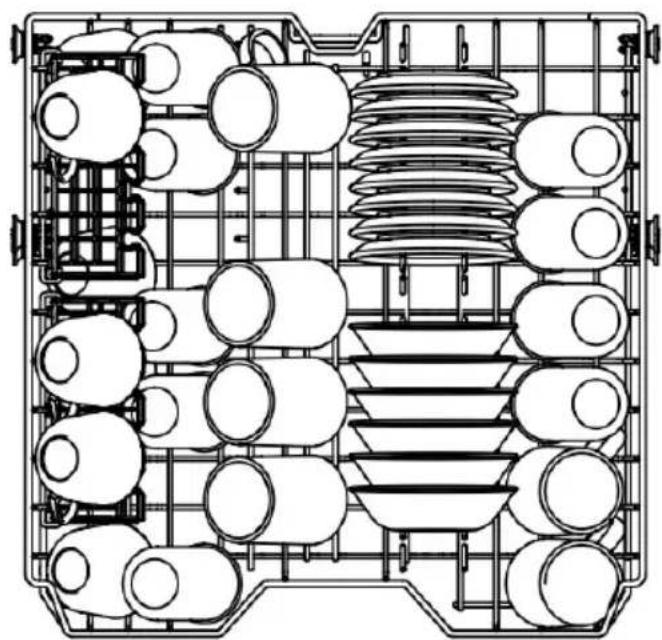
natural_image
Top-down schematic of a vehicle or industrial control room layout with multiple circular components and structural framework (no text or labels)Fig./Img./Abb./Afb./Rys./Obr. 33 Fig./Img./Abb./Afb./Rys./Obr. 34
natural_image
Line drawing of a basket filled with five large, bulbous objects, possibly tomatoes or similar food items (no text or symbols)Fig./Img./Abb./Afb./Rys./Obr. 35
natural_image
Technical line drawing of a mechanical assembly frame with no visible text or symbolsFig./Img./Abb./Afb./Rys./Obr. 36
natural_image
Technical line drawing of a vehicle chassis frame with internal components and mounting brackets (no text or symbols)Fig./Img./Abb./Afb./Rys./Obr. 37
natural_image
Technical line drawing of a vehicle chassis frame with visible structural components and mounting points (no text or labels)Fig./Img./Abb./Afb./Rys./Obr. 38
natural_image
Diagram of a grid-patterned structure with internal wavy patterns and a central rod-like element (no text or symbols)
natural_image
Line drawing of a food storage tray with multiple spoons and a magnified inset showing the interior (no text or symbols)
natural_image
Illustration of a food stall with a prohibition symbol overlay (no text or symbols present)Fig./Img./Abb./Afb./Rys./Obr. 39
natural_image
Technical line drawing of a conveyor belt system with directional arrow indicating motion (no text or symbols)Fig./Img./Abb./Afb./Rys./Obr. 40
natural_image
Technical line drawing of a mechanical device with internal components and directional arrows (no text or symbols)Fig./Img./Abb./Afb./Rys./Obr. 41

natural_image
Line drawing of a faucet with water droplets rising from the base (no text or symbols)Fig./Img./Abb./Afb./Rys./Obr. 42
natural_image
Line drawing of a propeller with internal components and directional arrows indicating motion (no text or symbols)Fig./Img./Abb./Afb./Rys./Obr. 43
natural_image
Hand holding a tool interacting with a vertical tube, no text or symbols visibleFig./Img./Abb./Afb./Rys./Obr. 44
natural_image
Technical line drawing of a mechanical assembly with internal components and a downward arrow indicating motion (no text or symbols)Fig./Img./Abb./Afb./Rys./Obr. 45
natural_image
Line drawing of a hand holding a pen with a black arrow pointing to the tip (no text or symbols)Fig./Img./Abb./Afb./Rys./Obr. 46
natural_image
Technical line drawing of a mechanical assembly with no visible text or symbolsFig./Img./Abb./Afb./Rys./Obr. 47
www.cecotec.es
- SOMMAIRE
- INSTRUCTIONS DE SÉCURITÉ
- Fig. 2
- Note:
- BEFORE USE
- ENGLISH
- Box content
- INSTALLATION
- Positioning and levelling
- WARNING:
- Feet adjustment
- Case I: door tilts to the right
- Case II: door tilts to the left
- Free-standing installation (Fig. 8)
- Installation under a worktop (Fig. 10)
- Tips:
- Removing the top cover (Fig. 12).
- IMPORTANT:
- Connecting water and electricity supplies
- Drain hose connection
- ATTENTION:
- Connection method 1
- Please note:
- Connection method 2
- Connecting the water inlet hose to a tap
- Connection of the power supply cable
- Final checks
- OPERATION
- Loading the dishwasher
- Quick start guide
- Load the tableware in the dishwasher
- Check the detergent
- Close the door
- Switch on the dishwasher
- Check the rinse aid
- Select the desired programme and options
- Start the dishwasher
- End of programme
- Before use
- Soft water system
- Check water hardness
- Adjustment of the descaling system
- Settings for 15 place settings
- Add salt
- Adding detergent to the drawer
- Adding rinse aid into the dispenser
- Refilling the rinse aid
- Control panel. (Fig. 29)
- Power icon
- Start/pause icon
- Special functions icons
- Delay start function icon
- Intensive+ function icon
- Machine care function icon (internal cleaning)
- Dual zone icon (dual wash)
- Half load icon
- Dry+ icon
- Display
- Rinse aid low indicator light
- Digital display 8:88
- Dual zone function indicator light —
- Child Lock function indicator light
- Abnormal water supply indicator light
- Low salt indicator light ↕
- Water flow intensity indicator light
- Delay start indicator light
- Half load function indicator light
- Programmes table
- Loading the tableware
- Items not to be washed in the dishwasher
- Warning
- Loading the bottom basket
- Loading the cutlery basket
- Loading the upper basket
- Loading of the flip tines (if your dishwasher model is equipped with it)
- Adjusting the height of the upper basket
- Lowering the upper basket
- Raising the upper basket
- Loading the cutlery drawer (if your dishwasher model is equipped with one)
- Tips
- Removing the cutlery drawer
- CLEANING AND MAINTENANCE
- Maintenance
- Cleaning the outside of the dishwasher
- Cleaning the inside of the dishwasher
- Cleaning the filter
- Cleaning the spray arms
- Cleaning the bottom spray arm
- Cleaning the central spray arm
- TROUBLESHOOTING
- FAQs
- Troubleshooting
- DISPOSAL OF OLD ELECTRICAL AND ELECTRONIC APPLIANCES
- TECHNICAL SUPPORT AND WARRANTY
- COPYRIGHT
- PIÈCES ET COMPOSANTS
- Img. 1
- Touch icoon "Half load"
- PROBLEEMOPLOSSING
- Veelgestelde vragen
Brand : CECOTEC
Model : Bolero Aguazero 6210
Category : Dishwasher