HG07006 - Parasol Livarno Lux - Free user manual and instructions
Find the device manual for free HG07006 Livarno Lux in PDF.
| Product type | Garden parasol |
| Brand | Livarno Lux |
| Model | HG07006 |
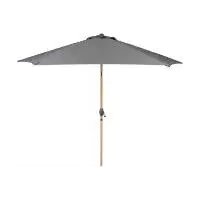
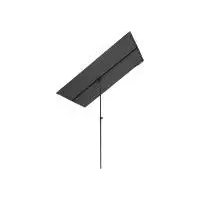
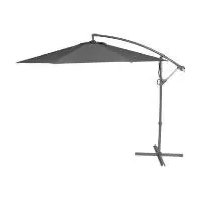
| Dimensions (W × D × H) | approx. 238 × 300 × 241 cm |
| Base dimensions (L × W) | approx. 90 × 90 cm |
| Required counterweight | At least 110 kg (4 paving slabs of 50×50×4 cm each, not included) |
| Tilt mechanism | Yes, via height adjustment lever |
| Rotation | Yes, via foot pedal on swivel mechanism |
| Opening and closing | Crank handle |
| Adjustable height | Yes |
| Intended use | Sun protection |
| Protective cover | Included |
| Warranty | 3 years |
| IAN reference | 384195_2107 |
| Cleaning | Lint-free damp cloth |
| Winter storage | Cool, dry place, avoid heated rooms |
| Spare parts | Available during warranty period |
Frequently Asked Questions - HG07006 Livarno Lux
User questions about HG07006 Livarno Lux
0 question about this device. Answer the ones you know or ask your own.
Ask a new question about this device
Download the instructions for your Parasol in PDF format for free! Find your manual HG07006 - Livarno Lux and take your electronic device back in hand. On this page are published all the documents necessary for the use of your device. HG07006 by Livarno Lux.
USER MANUAL HG07006 Livarno Lux
Assembly and safety advice
FR BE
PARASOLDéPORTE
GB/IE Assembly and safety advice Page 13
Introduction. Page 14
Intended use. Page 14
Scope of delivery. Page 14
Technical data . 15
Safety instructions. Page 15
Assembly/disassembly . Page 17
Assembling the paving stand . Page 17
Installing the main parasol body . Page 18
Opening the product . Page 18
Turning the product . Page 19
Inclining the product. Page 19
Closing the product . Page 19
Attaching/removing the crank. Page 21
Cleaning and maintenance. Page 21
Disposal. Page 21
Warranty . Page 21
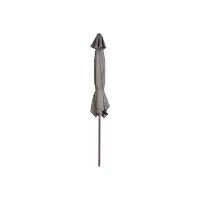
CANTILEVER PARASOL
Introduction
We congratulate you on the purchase of your new product. You have chosen a high quality product. Familiarise yourself with the product before using it for the first time. In addition, please carefully refer to the operating instructions and the safety advice below. Only use the product as instructed and only for the indicated field of application. Keep these instructions in a safe place. If you pass the product on to anyone else, please ensure that you also pass on all the documentation with it.
Intended use
This product is suitable for providing protection from the sun. Any other use or any product modification is prohibited and can lead to injuries and/or product damage. The manufacturer is not liable for any damages caused by any use other than for the intended purpose. The product is not intended for commercial use.
Scope of delivery
Check if the delivery is complete and all parts are in perfect condition. Do not assemble the product if the delivery is incomplete.
1 1x Cross member (cross base)
2 1x Cross member (cross base)
3 1x Bottom pole section
4 4x Bolt (M10× 25mm) 5 4x Bolt (M10× 20mm) 6 8x Washer ( 10mm) 7 1x Rotation mechanism
8 1x Lid (for rotation mechanism)
9 1x Cover cap (for rotation mechanism)
10 1x Main parasol body 11 1xCoversleeve (for bottom pole)
12 1x Bolt (M6 x 15 mm)
13 1x Crank
14 1x Hex key - small
15 1x Hex key - large
16 1x Extension rods
17 1x Cover
-Technical data
Dimensions
Sunshade: Approx. 238 × 300 × 241 cm (W × D × H)
Paving Approx. 90 × 90 cm
PLEASE READ ALL SAFETY AND ASSEMBLY INSTRUCTIONS BEFORE USE! PLEASE KEEP THIS DOCUMENT IN A SAFE PLACE!
WARNING! DANGER TO LIFE AND RISK OF
ACCIDENTS TO INFANTS AND CHILDREN! Never
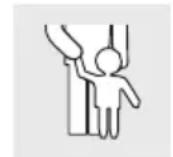
leave children alone and unsupervised with packaging material and the product. The packaging material constitutes a risk to life through suffocation and strangulation. Children often underestimate the risks. Always keep children away from the product. The product is not a toy.
CAUTION! RISK OF
INJURY! Ensure that all parts are undamaged and have been assembled appropriately. Risk of injury exists if the product is assembled incorrectly.
Damaged parts can affect the product's safety and function.
CAUTION! RISK OF
INJURY! Do not leave children unattended with the product. The product is not a climbing frame or toy. Make sure that nobody climbs on or leans against the product, particularly children. The product could become imbalanced and tip over. This can also lead to property damage.
CAUTION! RISK OF
INJURY! Ensure that the product stands in stable equilibrium on a firm surface. Before using the product: Place weights of at least 110kg on the cross base 1 2 as a counterweight. Always use the product together with 4 paving slabs of approx. 50× 50× 4 cm (not included). Otherwise the product may tip over. This can also lead to property damage.
CAUTION! RISK OF
INJURY! Never move the product when it is open. Always close the main parasol body [10] and retract the arm. Otherwise the product could become unbalanced and tip over. This can also lead to property damage.
CAUTION! FIRE HAZARD!
Never place the product near an open fire or radiant heaters.
Place the product on a solid, level surface.
Check before each use if the product is stable.
CAUTION! RISK OF
INJURY! Before opening and closing the product, make sure that there are no people in the vicinity.
CAUTION! RISK OF
INJURY! Be careful when opening and closing the product. Otherwise your fingers may be squeezed or crushed.
Check before each use, if the main parasol body [10] is attached firmly to the bottom pole section [3] on the paving stand.
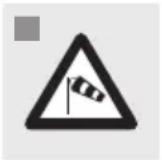
Close the product if the wind shows signs of increasing in speed or on the approach of sally showers.
Never use the product as protection against bad weather.
Never leave the product unattended when it is open. Damage could occur if strong winds arise unexpectedly.
Close the product during windy, snowy or rainy weather.
Do not hang any objects (e.g. clothing) from the product.
Assembly/disassembly
Note: For assembly you will need a working space of at least 16m^2 in area and 4 m in diameter.
Note: If possible, ask a second person to assist you during assembly.
-Assembling the paving stand
Description Fig.
Remove the bottom pole section 3 from the main A parasol body 10.
Place the cross member 2 on top of the B other cross member 1.
Mount the rotation mechanism 7 on the cross members 1 2. Insert the bolts 4 and B the washers 6.Use the large hex key 15 to tighten the bolts 4.
Description Fig.
Mount the bottom pole section 3 on the rotation mechanism 7. Insert the bolts 5 and the washers 6.Use the large hex key 15 to tighten the bolts 5.
Place the lid 8 over the cover cap 9. Place the combined parts 8 9 on the rotation mechanism 7.
Place the paving slabs (not included) evenly on the cross members 1 2.
Installing the main parasol body
Description Fig.
Place the cover sleeve 11 on the bottom D pole section 3.
Insert the main parasol body 10 into the bottom pole section 3. Insert the bolt 12.Use the small hex key 14 to tighten the bolt 12.
Opening the product
Description Fig.
Unlock the height adjustment lever by pressing it. Move the height adjustment lever upwards and lock it in the last position by releasing it.
Insert the c13kinto the height adjustment lever.
Description Fig.
- Open the hook-and-loop fastener and slightly pull the ribs apart at the beginning. The fabric might stick together.
Turn the crank in a clockwise direction until the top is completely open.
-Turning the product
Description Fig.
Press the foot pedal (on the rotation mechanism [7]).
- Swivel the product and move it to the desired H position.
Release the foot pedal to lock the position.
Inclining the product
Description Fig.
Release the height adjustment lever and move it downwards until I you reach the desired angle.
CAUTION! RISK OF
INJURY! Do not incline the product during strong wind. The product might tip over. This can also lead to property damage.
Closing the product
Description Fig.
Unlock the height adjustment lever by pressing it. Move the height adjustment lever J downwards and lock it in the last position by releasing it.
Description Fig.
Turn the 13km a counter-clockwise direction until the product is completely closed.
Press the height adjustment lever to release it. Move the height adjustment lever completely downwards. Release the height adjustment lever to lock the product.
Secure the product with the hook-and-loop L fastener.
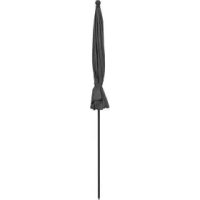
Use the cover 17 to protect the product.
Use the extension rods 16 to install the cover 17.
Description Fig.
Put the extension rods 16 together. M
Open the zipper of the cover 17.
Insert the extension rods 16 and lift the cover 17 over the main parasol body 10.
Close the zipper of the cover 17.
Removing the cover
Open the zipper of the cover 17.Use the extension rods to remove the cover 17.
Attaching/removing the crank
Description Fig.
Match the opening at the crank 13 with the pin at the crank mount. Slide the crank 13 onto the mount until the pin locks with the opening.
Use a pointy tool (screwdriver or pen) to press the pin and unlock the crank 13.
Cleaning and maintenance
Clean the product with a slight dampened, lint-free cloth.
Store the product in winter in cool, dry place. Avoid storing the product in a heated room.
Disposal
The packaging is made entirely of recyclable materials, which you may dispose of at local recycling facilities.
Contact your local refuse disposal authority for more details of how to dispose of your worn-out product.
Warranty
The product has been manufactured to strict quality guidelines and meticulously examined before delivery. In the event of product defects you have legal rights against the retailer of this product. Your legal rights are not limited in any way by our warranty detailed below.
The warranty for this product is 3 years from the date of purchase. The warranty period begins on the date of purchase. Please keep the original sales receipt in a safe location. This document is required as your proof of purchase.
Should this product show any fault in materials or manufacture within 3 years from the date of purchase, we will repair or replace it - at our choice - free of charge to you. This warranty becomes void if the product has been damaged, or used or maintained improperly.
The warranty applies to defects in material or manufacture. This warranty does not cover product parts subject to normal wear, thus possibly considered consumables (e.g. batteries) or for damage to fragile parts, e.g. switches, rechargeable batteries or glass parts.
Warranty claim procedure
To ensure quick processing of your case, please observe the following instructions:
Please have the till receipt and the item number (IAN 384195_2107) available as proof of purchase.
You will find the item number on the rating plate, an engraving, on the front page of the instructions for use (bottom left), or as a sticker on the rear or bottom of the product.
If functional or other defects occur, please contact the service department listed either by telephone or by e-mail.
You can return a defective product to us free of charge to the service address that will be provided to you. Ensure that you enclose the proof of purchase (till receipt) and information about what the defect is and when it occurred.
Service
GB Service Great Britain
Tel.:08000569216
E-Mail: owim@lidl.co.uk
IE Service Ireland
Tel.:1800200736
E-Mail: owim@lidl.ie
Introduction. Page 24
= 0 = 0 = 0 = 0 = 0 = 0 = 0 = 0 = 0 = 0 = 0 = 0 = 0 = 0 = 0 = 0 = 0 = 0 = 0 = 0 = 0 = 0 = 0 = 0 = 0 = 0
Montering/demontering 69
- Montering of parasol
Beskrivelse Fig.
Anbring
afdaekningshylsen
11pà den nederste
stangdel 3.
D
Saat parasollen 10
ind den nederste
stangdel 3. Saet
skruen 12 i. Anvend
den lille unbrakongle
14 for at spænde
skruen 12.
E
(non incluse) in modo
uniformesui supporti
trasversali 1 2.
C
Pooblasceni serviser:
Servisna telefonska stevilka:
OWIM GmbH & Co. KG
080082034
Stiftsbergstraße 1
74167 Neckarsulm
NEMCIJA