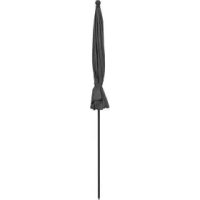
WK964AC - Parasol Livarno Lux - Free user manual and instructions
Find the device manual for free WK964AC Livarno Lux in PDF.
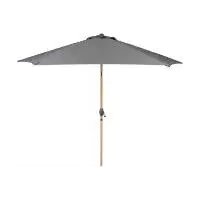
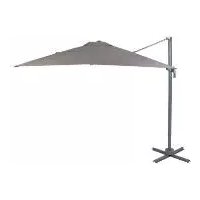
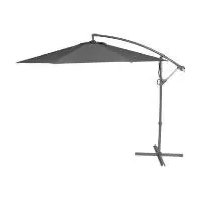
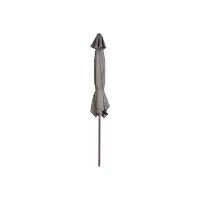
| Product type | Balcony umbrella |
| Brand | Livarno Lux |
| Model | WK964AC |
| Frame material | Steel |
| Canopy dimensions | Approx. 180 x 130 cm |
| Adjustable height | Approx. 130 - 230 cm |
| Lower support tube diameter | 25 mm |
| Upper support tube diameter | 22 mm |
| Fabric weight | 180 g/m² |
| UV protection factor | 50+ |
| Water-repellent | Yes |
| Lightfastness | Level 5 |
| Use | Domestic, non-commercial |
| Adjustments | Height, tilt, rotation, horizontal orientation |
| Opening type | Manual with lever |
| Canopy cleaning | Hand wash at 30 °C |
| Care | Dry lint-free cloth, no steam cleaner |
| Warranty | 3 years |
| Certifications | Öko-Tex 100, FSC |
| Package contents | Umbrella, instruction manual |
Frequently Asked Questions - WK964AC Livarno Lux
User questions about WK964AC Livarno Lux
0 question about this device. Answer the ones you know or ask your own.
Ask a new question about this device
Download the instructions for your Parasol in PDF format for free! Find your manual WK964AC - Livarno Lux and take your electronic device back in hand. On this page are published all the documents necessary for the use of your device. WK964AC by Livarno Lux.
USER MANUAL WK964AC Livarno Lux
natural_image
Black graduation cap with a vertical support structure (no text or symbols visible)
text_image
PDF ONLINE www.lidl-service.comBALCONY SUN SHADE / BALKONSCHIRM / PARASOL DE BALCON
CZ
BALKÓNOVÝ SLUNEČNÍK
Operating and safety information
IT MT CH
PARASOLE PER BALCONE
GB IE NI CY MT Before you start reading, please fold out the illustrations page and familiarise yourself with all of the item's functions.
Explanation of symbols....38
Intended use 39
Included in package....39
Description of parts....39
Technical specifications....39
Safety instructions....39
Assembly and installation......40
Assembly 40
Adjusting the product 41
Cleaning 42
Maintenance 42
Storage 42
Disposal 42
Warranty 42
Service 43
HU
Bevezető 44
Congratulations on the purchase of your new product. You have chosen a high-quality product. Please read these operating instructions thoroughly and carefully. These instructions are an essential part of the product and contain important information on first-time use and handling. Always observe all safety instructions. If you have any questions or are unsure how to operate the product, please contact your retailer or service centre. Please keep this manual in a safe place and pass it on to third parties where necessary.
● Explanation of symbols

Read the operating instructions!

Issue date of instruction manual (month/year)

Date of manufacture (month/year)

Risk of fatal injury and accidents for infants and children!

Observe warning notices and safety instructions!

UV protection

Water repellent
Ensure sufficient distance between the product and any obstacles

Do not adjust forcibly

Dismount product in windy weather

Certified to Oeko-Tex 100 standard
Care instructions:
Hand wash only

Dispose of packaging and product in an environmentally friendly manner!
Packaging made of FSC certified wood mix
- Intended use
This product is intended for use in private households only. It is unsuitable for commercial use. Any type of use other than that described herein or any modification of the product is prohibited and likely to cause damage or even personal injury. The manufacturer or retailer accepts no liability for loss or damage that occurs as a result of use other than intended or incorrect use.
- Included in package
1 x balcony parasol
1 x instruction manual
• Description of parts
1 Insertion point with lever
2 Canopy
3 Velcro fasteners
4 Frame
5 Insertion point
6 Pole
7 Cross beam
8 Height adjustment knob
9 Screw
• Technical specifications
Model number: WK964-AC
Material (frame): Steel
Dimensions (canopy): approx. 180 x 130 cm
Height (canopy): approx. 130-230 cm
Diameter (pole): 25 mm
Diameter (shaft): 22 mm
Light-fastness rating: Level 5
Weight (polyester canopy): 180 g/m2
UV protection factor: 50+
- Safety instructions

Safety instructions
WARNING!
RISK OF FATAL INJURY AND ACCIDENTS TO INFANTS AND
CHILDREN! Never leave children unsupervised with the packaging material. There is a danger of suffocation from the packaging material. Children often underestimate the dangers. Always keep children away from the product.
This product can be used by children aged 8 years and over, as well as by persons with limited physical, sensory or mental abilities or lacking in experience and knowledge if they have been supervised and instructed as to the safe use of the product and understand the resulting hazards. Do not let children play with the product. Cleaning and maintenance may not be carried out by children without proper supervision.
- Keep children away from the work area during installation. The product as supplied includes a number of screws and other small parts. These can be fatal if they are
swallowed or inhaled.
This product is not a toy!
- Do not leave children unattended near the product.
- Do not use the product if you notice any damage.
■ The manufacturer/distributor of this product accepts no responsibility whatsoever for personal injury or damage resulting from incorrect installation or use.
- Never tamper with or modify the product. Never use the product with external tubes or poles and never mount any electrical applications on the product or its components.

RISK OF INJURY! Incorrect
handling of the product or incorrect installation may potentially result in personal injury.
- Discontinue using the product if screws have loosened or if its metal or plastic parts show deformities, cracks, tears or other damage.
■ Plastic and metal react to mechanical stress or temperature changes by expanding or contracting. Check all screw connections regularly and tighten if required.
■ Never hang your weight on the product or pull yourself up by it.
The product can protect your skin from direct UV radiation, but not from reflected sunlight. Always wear sunscreen additionally.
■ When installing and using the product, be careful not to get your fingers trapped.
■ Only install the product on stable, even surfaces.
- Do not leave the product unattended while in use.

RISK OF DAMAGE! Improper handling of the product may result in damage to the product.
- Do not use steam cleaners for cleaning.
- Stop using the product if the plastic components of the product have cracks or have become deformed. Only replace faulty parts using matching original
components.
■ Use a suitable base for the product.
Please note: Please observe the instructions provided by the manufacturer of the base.
■ Dismount product when windy weather or thunderstorms are expected.
■ Dismount the product during longer periods of rain or snow to protect it from excessive stress.
- Do not hang items on the product.
■ Always secure the product with sufficient ballasting.
■ Never light an open fire near or underneath the product. Keep the product away from heat sources.
- Assembly and installation
Please note: Take the product out of its packaging and remove all packing material.
- Check that all package contents are present.
- Check if the product or individual parts are damaged. If that is the case, do not use the product. Contact the distributor via the service address given in the warranty section.
- Assembly
1. Lay out canopy
Lay the canopy 2 out flat on a clean and even surface.
Open the velcro fasteners 3 (see Fig. B). Unroll the canopy 2 fully and lay out flat on the ground. Make sure that the frame 4 is facing upwards (see Fig. B).
Close the velcro fasteners 3 (see Fig. B).
2. Insert cross beam (1/3)
Insert the insertion point 5 of the cross beam 7 at mid height, at the level of the opening on one side of the frame 4 (see Fig. C). There must be an audible click when the parts lock.
Check to ensure that the cross beam is fixed firmly in place.
3. Insert cross beam (2/3)
Open the insertion with lever 1.
Insert the insertion with lever at mid height, at the level of the opening on the other side of the frame 4 (see Fig. D). There must be an audible click when the parts lock.
4. Insert cross beam (3/3)
Fasten the insertion point with lever 1 by pressing down on the lever (see Fig. E). The canopy 2 is stretched over the stretchers.
Check to ensure that the cross beam is fixed firmly in place.
- Adjusting the product
Setting up, adjusting height and position
Place a suitable base (not included in delivery) in the desired spot.
Unscrew the screw 9 by turning counterclockwise in the direction of the "+" (see Fig. F) and adjust the pole 6 to the desired position.
Tighten the screw 9 by turning clockwise in the direction of the “-” to fix the pole in this position. Make sure that the toothing locks.

RISK OF INJURY! If the product is not sufficiently secured, it may tip over, which can lead to damage or injury.
Always make sure that the lower part of the pole is inserted at least 40 cm deep into the base.
Insert the pole 6 into the base and fasten, following the instructions provided by the manufacturer of the base.
Check to ensure that it is fixed firmly in place. Unscrew the height adjustment knob 8 by turning counter-clockwise in the direction of the “+” (see Fig. G).

RISK OF TRAPPING/PINCHING!
Take care not to get your hand
crushed.
Grasp the pole 6 between the height adjustment knob 8 and screw 9 and position it as desired (see Fig. G). You can adjust the height and, by rotating the pole, the angle.
To fix the pole in the desired position, tighten the height adjustment knob 8 by turning clockwise in the direction of the “-”. Make sure that the toothing locks.
Check to ensure that it is fixed firmly in place.
Please note: When adjusting the height, do not pull out the pole 6 more than about 106 cm in order for at least 10 cm of the shaft to remain inserted into the pole, as otherwise the product may be unstable.
Horizontal positioning of the parasol
Unscrew the screw 9 by turning counterclockwise in the direction of the “+” (see Fig. F). Make sure the toothing unlocks.
Move the cross beam 7 to the left or right (see Fig. H). Make sure that it is positioned inside the two markings (see Fig. H).
Tighten the screw 9 by turning clockwise in the direction of the “-” to fix the pole in this position. Make sure that the toothing locks.
Check to ensure that it is fixed firmly in place.
Tilting canopy
Unscrew the screw 9 by turning counterclockwise in the direction of the “+” (see Fig. F). Make sure the toothing unlocks.
Move the cross beam 7 forwards or backwards until the product is in the desired position (see Fig. I).
Tighten the screw 9 by turning clockwise in the direction of the “-” to fix the pole in this position. Make sure that the toothing locks.
Check to ensure that it is fixed firmly in place.
Rotating the canopy
Unscrew the screw 9 by turning counterclockwise in the direction of the "+" (see Fig. F). Make sure the toothing unlocks.
Move the cross beam 7 upwards or downwards until the product is in the desired position (see Fig. J).
Tighten the screw 9 by turning clockwise in the direction of the “-” to fix the pole in this position. Make sure that the toothing locks.
Check to ensure that it is fixed firmly in place.
- Cleaning
- Do not use corrosive cleaning agents, brushes with metal or nylon bristles or sharp or metallic cleaning implements such as knives, hard spatulas or the like. These may damage surfaces.
Use only a dry, lint-free cloth for cleaning. If the product is very dirty, dampen the cloth slightly.
The fabric can be carefully hand-washed at temperatures of up to 30^ . Remove from frame before washing.
- Maintenance
- Check all screw connections regularly and tighten if required. Losse screw connections impair the safety of the product and lead to a risk of injury.
Storage
- All parts must be completely dry before storage.
- When the product is not in use, store in the packaging in a dry place.
- Disposal

Note the labels on the packaging materials when sorting the waste;
they are marked with abbreviations (a) and numbers (b) with the following meanings:
1-7: Plastics
20-22: Paper and cardboard
80-98: Composite materials
You can find out how to dispose of the used product by contacting your local district or city council.


The product and packaging materials are recyclable. Please dispose of them separately for better treatment of waste. The Triman logo is only applicable to France.
In the interest of environmental protection, when the product has reached the end of its useful life, do not dispose of it as general household waste but have it properly recycled. For information on recycling centres and their opening times, please contact your local council.
- Warranty
Dear customer, This product comes with a 3-year warranty from the date of purchase. In the event that this product is faulty, you have legal rights against the seller of the product. These statutory rights are not
restricted by our warranty as set out below.
Warranty terms
The warranty period begins with the date of purchase. Please keep the original receipt in a safe place. It is required as proof of purchase. If a material or manufacturing defect occurs within three years of the date of purchase, we will repair or replace the
eproduct for you free of charge, or refund the purchase price, at our discretion. This warranty service is granted provided that the faulty device and the proof of purchase (receipt) are presented within three years, along with a brief written description of the fault and of when it occurred. If the fault is
covered by our warranty, we will return the fixed product or send you a new one. No new warranty period shall begin upon repair or replacement of the product.
Warranty period and statutory warranty claims
The warranty period is not renewed after a warranty service has been granted. This rule shall also apply for any replaced or repaired parts. Any damage or faults that already existed when buying the product must be reported immediately upon unpacking the product. A fee is charged for any repairs that are carried out after the end of the warranty period.
Warranty scope
The device was carefully manufactured according to the strictest quality guidelines and thoroughly tested before delivery. The warranty applies to material or manufacturing defects. This warranty does not apply to product parts that are subject to normal wear and tear and can therefore be regarded as wearing parts, or damage to fragile parts, such as switches, rechargeable batteries or parts that are made of glass. This warranty is void if the product has been damaged, improperly used or serviced. To ensure proper use, all instructions included in the manual must be followed carefully. All uses and actions that users are discouraged from or warned of in the manual must be avoided under all circumstances. The product is intended for private household use only, and not for commercial activities. The warranty is void, if the product is treated inappropriately, if force is applied, and in the case of any manipulation that is not carried out by our authorised service branch.
Warranty processing
To ensure your request is handled swiftly, please observe the following Notes:
Please have the receipt and the article
number (e.g. IAN 123456) ready as proof of purchase for all enquiries.
Please refer to the type plate on the product, an engraving on the product, the cover of the manual (bottom left) or the sticker on the back or base of the product to find out the product number.
In the case of any malfunctions or other defects, please call or email the service department indicated below as a first step. After your product has been registered as faulty, you can send it to the specified service address, free of charge. Please include the proof of purchase (receipt) and information about the defect and about when it occurred.
• Service
GB
Service Great Britain
Tel.: 00800 80040044
E-Mail: administration@mynetsend.de
IE
NI
Service Ireland
Tel.: 00800 80040044
E-Mail: administration@mynetsend.de
CY
Service Cyprus
Tel.: 00800 80040044
E-Mail: administration@mynetsend.de
MT
Service Malta
Tel.: 00800 80040044
E-Mail: administration@mynetsend.de
IAN 400220\_2107
Please have the receipt and the article number (e.g. IAN 123456) ready as proof of purchase for all enquiries.
You can find an up-to-date version of the operating instructions at: www.citygate24.de
Balkonernyö
- Bevezető

PERICOLO DI LESIONI! Incorrect handling of the product or incorrect installation may potentially result in
personal injury.
(polyesterbekleding):
UV-beschermings-
factor:
ca. 180 x 130 cm
ca. 130 - 230 cm
25 mm
22 mm
180 g/m²
50+
20 - 22: Papir in karton
80 - 98: Kompozitni materiali.