
TGH6001S - Cooker Tomado - Free user manual and instructions
Find the device manual for free TGH6001S Tomado in PDF.

| Product type | Gas hob |
| Brand | Tomado |
| Model | TGH6001S |
| Number of burners | 3 (1 simmer, 1 normal, 1 high) |
| Simmer burner power | 0.95 kW |
| Normal burner power | 1.70 kW |
| High burner power | 2.90 kW |
| Compatible gas types | Natural gas G20 (20 mbar), G25 (25.3-25 mbar), Liquid gas G30 (30 mbar) |
| Ignition | Automatic integrated spark |
| Safety | Thermocouple (gas leak protection) |
| Material | Stainless steel |
| Power supply | 220-240 V, 50/60 Hz, earthed |
| Protection class | I |
| Gas connection | G1/2 thread, with connectors supplied for Netherlands and Belgium |
| Spare parts | Injectors, burner caps, grates, thermocouple (recommended original parts) |
| Warranty | 24 months |
| Recycling | Compliant with WEEE directive (2012/19/EU) |
Frequently Asked Questions - TGH6001S Tomado
User questions about TGH6001S Tomado
0 question about this device. Answer the ones you know or ask your own.
Ask a new question about this device
Download the instructions for your Cooker in PDF format for free! Find your manual TGH6001S - Tomado and take your electronic device back in hand. On this page are published all the documents necessary for the use of your device. TGH6001S by Tomado.
USER MANUAL TGH6001S Tomado
- Please read these instructions before operating the appliance and retain for future use.
- The appliance is intended solely for domestic use within the home. The hob is only to be used for the preparation of food. The appliance is not designed for heating rooms.
WARNING: this appliance and the accessible parts will become hot during use. Do not touch hot parts. Keep children younger than 8 away from the appliance unless they are under continuous supervision. - This appliance can be used by children aged 8 years and over, as well as by people with reduced physical, sensory or mental capabilities or lack or experience and knowledge, provided they are supervised and instructed in the safe use of the appliance and understand the hazards involved.
Children must not play with the appliance. - Cleaning and maintenance shall not be made by children.
- Do not keep objects that children might find interesting in cupboards above or behind the appliance.
- The cooking zones heat up during use and stay hot for a while afterwards. Keep young children away from the hob during and immediately after cooking.
- The manufacturer cannot be held liable for any damage resulting from failure to follow the safety instructions and warnings.
- Never open the casing of the appliance.
- Do not warm closed tins on the hob. There will be a build-up of pressure that will cause tins to explode. You might get injured or scalded.
WARNING: danger of fire: never leave anything on the hob.
WARNING: cooking with fat or oil on a hob without supervision can be dangerous and can lead to fire. NEVER try to extinguish a fire with water. Instead, switch the appliance off and then cover the flames with for example a lid or a fire blanket. - The appliance should not be placed or used outdoors.
TOMADO
- Do not use the appliance as a worktop. The appliance may accidentally be switched on or still be hot or catch fire.
- Never cover the appliance with a cloth or something similar. If the appliance is still hot or is switched on, there is a risk of fire.
- Never use a pressure cleaner or steam cleaner to clean the hob.
- Do not use the appliance in temperatures below 5°C .
- When you use the hob for the first time you will notice a "new smell". Don't worry, this is normal. If the kitchen is well ventilated, the smell will soon disappear.
- Ensure that there is adequate ventilation during use.
- Keep all natural ventilation openings open.
- When using the hob for long periods, extra ventilation is necessary. For example, open a window or install an electric fan.
- Never flambé under a cooker hood. The high flames can cause a fire, even if the cooker hood is switched off.
- The burner components are hot during and immediately after use.
- Do not touch them and avoid contact with non-heat resistant materials.
- Never immerse the hot burner caps and pan supports in cold water. The rapid cooling can damage the enamel.
- The distance between the pan and a knob or non-heat resistant wall should always be greater than two centimetres. In case of smaller distances the high temperature may cause the knobs or wall to discolour and/or deform.
- Always use the pan supports and suitable cookware.
- Always place the pan on the pan support. Placing the pan directly on the burner cap can result in dangerous situations.
- Aluminium trays or foil are not suitable as cooking utensils. They can burn into the burner caps and pan supports.
- The hob can only function effectively if the burner components have been assembled using the guide ridges. Ensure that the pan supports lie properly against each other and flat on the drip tray. Only then the pans can be positioned stably.
- Keep oven gloves or oven cloths away from the flame.
- This appliance should only be connected by a registered installer.
TOMADO
- Faulty parts may only be replaced by original parts meet safety requirements.
- Damage caused by incorrect connection, incorrect fitting, or incorrect use is not covered by the warranty.
- If the connecting cable is damaged, it may only be replaced by the manufacturer, the manufacturer's service organisation or equivalently qualified persons, in order to avoid dangerous situations.
- The electrical connection must comply with national and local regulations.
- The wall plug socket and plug should always be accessible.
- The worktop onto which the hob is placed, should be flat.
- The walls and the worktop surrounding the appliance must be heat resistant up to at least 90°C . Even though the appliance itself does not get hot, the heat of a hot pan could discolour or deform the wall.
APPLIANCE DESCRIPTION
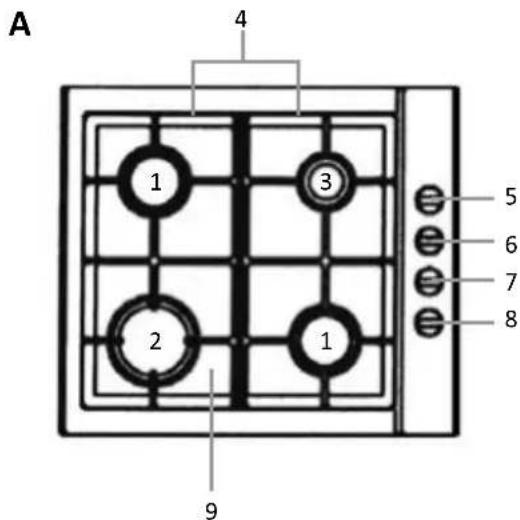
Burners
- Semi-rapid burner
- Rapid burner
- Simmer burner
Kookplaat
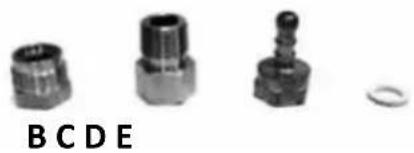
The package contains:
A. 1 × hob
B. 1 × gas feeding coupling M24 × 1 / 2 - gas connection in the Netherlands
C. 1 x gas feeding coupling AG W21,8 x 1/14 - IG KLF (G12) Shell - gas connection in Belgium
D. 1 × gas cylinder nipple
E. 1 x sealing ring
TOMADO
BEFORE FIRST USE
Before you use the appliance for the first time, please do as follows: Carefully unpack the appliance and remove all the packaging material. Keep the material (plastic bags and cardboard) out of reach of children. Check the appliance after unpacking for any damage, possible from transportation. Check that the voltage in your home corresponds with the voltage printed on the bottom of the appliance. Follow the installation instructions in chapter INSTALLATION for installing the hob. Clean the hob and all the accessories with warm water and a mild cleaning detergent. Rinse well and dry thoroughly.
INSTALLATION
The hob comes standard with coupling B (gas connection Netherlands) preassembled. The gas hose can be connected directly to the coupling.
Coupling C is specifically for Belgium and can, when the hob is used in Belgium, be replaced by coupling B.
ATTENTION! NEVER combine a gas hose without using a coupling (B, C or D) and ALWAYS use the enclosed sealing ring!
ATTENTION! NEVER combine multiple couplings. Every coupling must be connected directly to the hob.
- The safety during use can only be guaranteed when the hob is installed correctly and according to the regulations. The installer is responsible for any damage caused by a faulty installation.
- The gas connection must comply with the national and local safety regulations. The gas connection must be made by qualified installer.
- The electrical connection must be made by a qualified electricien. This person is aware of the national and local regulations the installation must comply with.
- The appliance falls under protection class III and can only be used in combination with a grounding conductor connection.
The manufacturer accepts no responsibility for any malfunction or damage caused by incorrect electrical installations. - The appliance must be connected to a fixed installation and the means of disconnecting it from the fixed installation must be installed according to the installation instructions.
- The connection cable must hang freely. Do not tie the power cable or pass it along sharp edges.
- The connection point, the wall socket and/or plug must always be accessible.
- The worktop onto which the hob is placed should be flat.
- Damage caused by incorrect connection, incorrect use or incorrect fitting is not covered by the guarantee.
- Attention: any change to the appliance's interior, including fitting and changing the power cable, must only be performed by a qualified electricien.
TOMADO
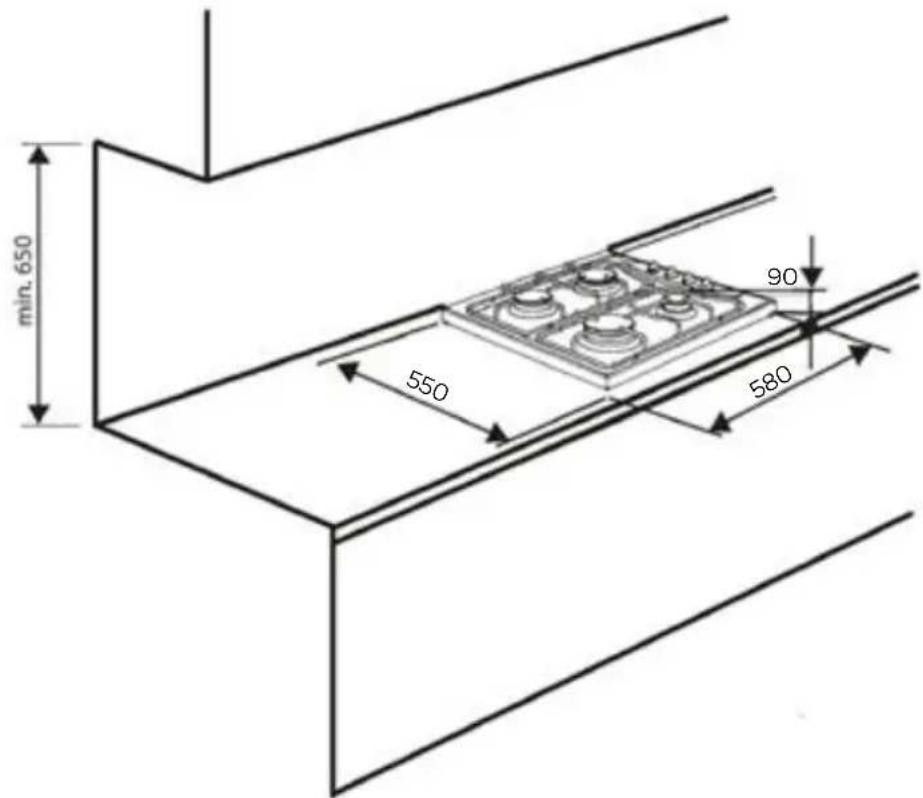
OUTER DIMENSIONS
In the drawings below, all the dimensions are displayed in mm.
Sufficient clearance around the hob is essential for a safe use of the hob. Check that there is sufficient clearance. The minimum distance of the hob to a cooker hood should be at least 650 mm .
GAS CONNECTION
Caution!
The hob should be connected to a gas supply of the particular type of gas that the appliance is manufactured to function with. Information about the type of gas that the hob has been adapted to by the factory is shown on the rating label. The hob should be connected exclusively by an appropriately authorised fitter and only that person has the right to adapt the hob to a different type of gas.
Fitting guidelines
A fitter should:
have a gas fitter's authorisation;
- be acquainted with the information included on the rating label of the hob about the type of gas to which the hob is adapted; the information should be compared with the gas supply conditions at the place of installation;
check:
- airing efficiency, that is efficiency of air exchange in the rooms;
-tightness of gas fitting connections; - effectiveness of alle functional elements of the hob;
- if the electricity supply is adapted to function with a safety ground lead (zero).
regulate the settings of the rotary buttons for the gas burners, to ensure proper operation of the spark ignition and gas leak safety.
Caution!
The hob may only be connected to a liquid gas cylinder of the existing gas supply by an authorised fitter, observing all safety rules.
TOMADO
Connection with a flexible steel hose
If the hob is connected according to the class 1 specifications, only flexible metal hose can be used which meet the valid national regulations. Gas feeding connector must be G 12 '' threaded coupling. Use only pipes and fittings that meet the requirements of the valid standards. Maximum admissible length of the flexible hose is 2000 mm. Make sure the connection is not touching any mobile elements which could damage the hose.
Connection with a stable pipework
The hob comes with a G 12 threaded coupling. The connection to gas supply must be done in a manner that excludes stresses in any point of the pipework or parts of the appliance. Make sure you do not exceed the torque when making the connection (maximum torque is 20 Nm). Otherwise, the connection may be faulty or leaks may occur.
The gas hose should not touch metal elements of the hob back shield.

Important! Each time you replace a reducer, carry out technical inspection of the hob that covers gas valves and proper operation of the flame failure cut-off device.
Caution! On completion of the hob installation, the tightness of all connections should be checked, e.g. applying water with soap. Do not use fire to check tightness.
ELECTRICAL CONNECTION
- Check that the voltage in your home corresponds with the voltage printed on the bottom of the appliance.
- The earthing of the appliance is compulsory by law.
- Attention: the connection point must always be accessible.
ADAPTING THE HOB TO ANOTHER TYPE OF GAS
This operation may only be carried out by an appropriately authorised fitter.
If the gas the hob is to be supplied with differs from the gas provided for the hob by the manufacturer, that is G25/ 25.3 / 25 mbar, burner nozzles must be exchanged and the flame needs to be adjusted.
In order to adapt the hob to burn a different type of gas, you should:
- exchange the nozzles (see the gas tables below);
- adjust the "economical" flame.
Caution! The hobs provided by the manufacturer have burners which are factory-adapted to use the gas specified on their rating labels.
Gas table
| G25/ 25.3-25 mbar* G20/20 | mbar G30/30 mbar | SABAF burners | |||||
| Injector diameter | Injector mark | Injector diameter | Injector mark | Injector diameter | Injector mark | ||
| 1 0.72mm 72 0.72 mm | 72 0.50 mm 50 1 | Simmer burner | 0.95 kW | ||||
| 2 0.97mm 97 0.97 mm | 97 0.65 mm 65 2 | Semi-rapid burners | 1.70 kW | ||||
| 3 1.15mm 115 1.15 mm | 115 0.85 mm 85 | 1 Rapid burner | 2.90 kW | ||||
| Burner flame Re-arming from liquid gas to natural gas Re-arming from natural gas to liquid gas | ||
| Full | 1. Exchange a burner nozzle for the appropriate type according to the gas table. | 1. Exchange a burner nozzle for the appropriate type according to the gas table. |
| Economical | 2. Unscrew an adjusting bolt slightly and adjust the flame size. | 2. Screw in an adjusting bolt slightly and check the flame size. |
In order to perform adjusting operations, take off the knobs.
TOMADO
Surface burners applied do not require adjustment of primary air. A correct flame has distinct internal cones of blue and green colour. A short, humming flame or long, yellow and smoking one, without clearly outlined cones, shows improper quality of gas in the household piping or a damaged or soiled burner. In order to check a flame, heat a burner for around 10 minutes with a full flame, and next turn the valve knob to the economical flame position. The flame should not go out or jump onto the nozzles.
- The rating label on the product indicates for which type of gas your appliance is suitable. Check with the service organisation of Inventum if you want to adjust the appliance for different types of gas. Find the method in the manual of the conversion kit.
| G25/25.3 mbar* | |
| (kW) | |
| 1 0,95 | 1 Simmer burner |
| 2 1,70 | 2 Semi-rapid burner |
| 3 2,90 | 3 Rapid burner |
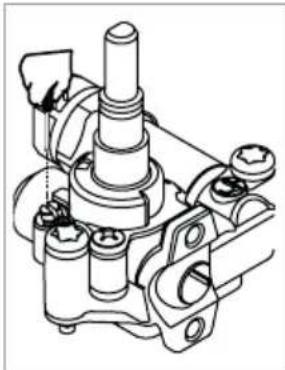
Exchange of a burner nozzle
Unscrew the nozzle with a special socket spanner No 7 and replace with a new one according to a type of gas (see gas table).
Caution! Adapting the appliance to a different type of gas than is indicated by the manufacturer of the hob on the rating label, or purchasing a hob for a different type of gas than supplied to the house, is exclusively the responsibility of the user and the fitter.
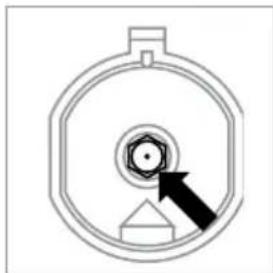
In hobs with a safety device, a knob with a surface burner safety valve is used, fig. Knobs should be adjusted with the burner switched on and set to the economical flame position, using an adjustment screwdriver of the size 2.5mm .
Caution! After adjustment is completed, place a label indicating the type of gas to which the hob is now adapted.
TOMADO
HOW TO USE THE BURNERS
CHOICE OF COOKWARE
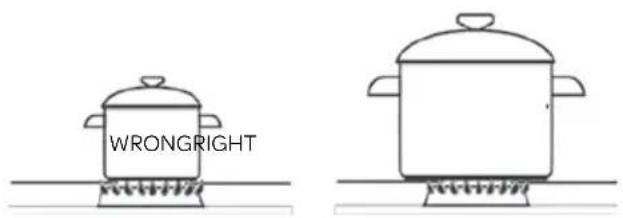
- Always ensure that the flames remain under the pan. When the flames burn around the pan, a lot of energy is lost and the handles from the pan may also become too hot.
- Use cookware that fit the burners in diameter. This reduces the cooking time.
- Use flat bottomed cookware.
- Always use the right amount of liquid for boiling food and use a lid to reduce the cooking time.
- The recommended pan diameter is around 2.5 to 3 times larger than the burner diameter, that is, for:
for a simmer burner - a pan with a diameter of 120 to 150mm
for a semi-rapid burner - a pan with a diameter of 160 to 220mm
- for a wok burner - a pan with a diameter of 200 to 240 mm and the pan height should not be greater than its diameter.
CONTROL KNOBS FOR THE BURNERS
Before operating the hob please make sure that the burner caps are well positioned.
- burner switched off
- large flame
3.economical flame - thermocouple
- ignition
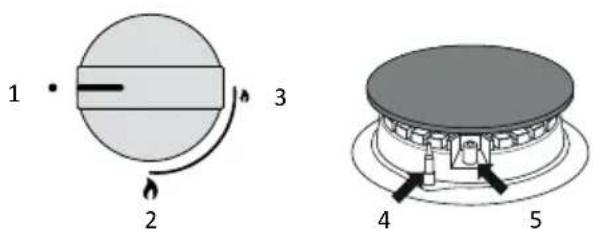
Each control knob has an automatic ignition.
- Press the control knob and turn it anticlockwise to the setting "large flame"
- Hold the control knob down fully for at least 3 seconds between the highest and the lowest flame. The integrated ignition ignites the burner and the flame comes on.
- Hold down the control knob for 10 more seconds after the flame is on to activate the thermocouple. Otherwise the flame extinguishes immediately.
- When the burner is not ignited after 15 seconds, wait one minute before trying to ignite it again.
- When the burner accidentally goes out, the thermocouple safety pilot in each burner will close the gas supply (by boiling over, by drafts, no gas supply, etc.). No flame = no gas!
A correctly adjusted burner has a light blue flame with a clearly visible internal cone. Selection of the flame size depends on the position of the control knob of the burner which has been set:
large flame
6 small flame ("economical flame")
- burner switched off (gas supply is cut off)
CLEANING AND MAINTENANCE
Clean the hob after each use to maintain it in good condition. Food residue can create stubborn stains if not removed directly after use. Use a mild cleaning detergent to clean the hob.
Burner parts and the pan supports should not be cleaned in the dishwasher. The dishwasher detergent can corrode the materials.
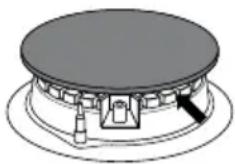
The pan supports, burners and burner caps are removable for easy cleaning of the cooking part.
- First clean the control knobs, burners, burner caps and pan supports.
- Check whether the thermocouple and ignition are clean. If necessary use a toothpick or needle.
Clean the drip tray. - Clean everything again with just a damp cloth and dry it thoroughly.
- Refit the burners. Make sure the openings are aligned for the thermocouple and the ignition.
- Refit the burner caps.
- Refit the pan supports. Place them carefully on the drip tray without sliding.
PERSISTENT STAINS
Persistent stains on the pan supports and burner caps can best be removed with a fluid detergent or a plastic scouring sponge.
Never use aggressive cleaning products or sharp objects to clean the hob.
Persistent stains on stainless steel are best removed with a special stainless steel cleaning product. Always wipe in the direction of the grain to prevent damage to the protective layer.
The surface of the stainless steel drip tray can discolour slightly over time.
PROBLEMS AND SOLUTIONS
If the hob does not function properly, according to you, please try to solve the problem first by checking the points in the table below before contacting the customer department.
| Fault Possible cause | Solution | |
| There is a smell of gas near the hob. | The hob connection is leaking. | Turn off the main gas supply valve. Contact your installer. |
| A burner does not ignite. | ·The plug is not in the socket. ·A fuse is defective/ or switched off in the fuse box. ·Ignition is dirty/damp. ·The burner parts are not placed correctly. ·The burner parts are dirty/damp. ·The main gas supply valve is closed. ·A fault in the gas mains. ·Wrong type of gas used. | ·Put the plug into the socket. ·Replace the fuse or switch on the fuse in the fuse box. ·Clean/dry the ignition. ·Refit the burner and watch the openings for the thermocouple and the ignition. ·Clean/dry the burner parts. ·Open the main gas valve. ·Consult your gas supplier. ·Check whether the gas used is suitable for the appliance. Contact your installer if it is not correct. |
| The burner extinguishes immediately after igniting. | ·The control knob has not been pressed long and/or deep enough (at least 3 seconds). ·The thermocouple is dirty. | ·Keep the control knob fully pressed for at least 3 seconds between the highest and the lowest flame setting. This can take longer the first time because of the gas supply. ·Clean/dry the thermocouple. |
| The burner does not burn evenly. | ·The burner parts are not placed correctly. ·The burner parts are dirty/damp. ·The wrong type of gas is used. | ·Refit the burner and watch the openings for the thermocouple and the ignition. ·Clean/ dry the burner parts. ·Check whether the gas used is suitable for the appliance. Contact your installer if it is not correct. |
TOMADO
RECYCLING
This symbol means that this product should not be disposed of with regular household waste (2012/19/EU).
Observe the applicable rules in your country for the separated collection of electric and electronic products.
By disposing of the product correctly, you prevent negative consequences for the environment and for public health.
The packaging material of this product can be recycled 100% , return packaging material separately.
TOMADO
INSTALLATION AF KOGEPLADEN
Go to www.tomado.com/support to purchase accessories or spare parts.
WARRANTY CONDITIONS
A 24 month warranty is provided for this product. Your warranty is valid if the product has been used in accordance with the user instructions and for the purpose for which it was made. Also the original proof of purchase must be submitted, stating the date of purchase, the name of the retailer and the item number of the product. For extensive warranty information you are referred to our website: www.tomado.com/support
CONDITIONS DE LA GARANTIE


- TOMADO
- APPLIANCE DESCRIPTION
- Burners
- Kookplaat
- The package contains:
- BEFORE FIRST USE
- INSTALLATION
- OUTER DIMENSIONS
- GAS CONNECTION
- Caution!
- Fitting guidelines
- Connection with a flexible steel hose
- Connection with a stable pipework
- ELECTRICAL CONNECTION
- ADAPTING THE HOB TO ANOTHER TYPE OF GAS
- Exchange of a burner nozzle
- HOW TO USE THE BURNERS
- CHOICE OF COOKWARE
- CONTROL KNOBS FOR THE BURNERS
- CLEANING AND MAINTENANCE
- PERSISTENT STAINS
- PROBLEMS AND SOLUTIONS
- RECYCLING
- INSTALLATION AF KOGEPLADEN
- WARRANTY CONDITIONS
- CONDITIONS DE LA GARANTIE
Brand : Tomado
Model : TGH6001S
Category : Cooker