3275PP - Irrigation timer MESTO - Free user manual and instructions
Find the device manual for free 3275PP MESTO in PDF.

| Product type | Pressure sprayer |
| Brand | MESTO |
| Model | 3275PP |
| Max. filling quantity | 5 litres |
| Total capacity | 8 litres |
| Max. spray pressure | 3 bar |
| Max. operating temperature | 40 °C |
| Empty weight | 2.6 kg |
| Max. total weight | 7.6 kg |
| Tank material | Polyethylene |
| Max. volume flow rate | 1 l/min |
| Recoil force | < 5 N |
| Pressure cycles (0 to 3 bar) | Min. 5000 times |
| Residual quantity | < 0.07 l |
| Standard nozzle | Flat jet nozzle |
| Main functions | Spraying cleaning products, disinfectants, construction chemicals |
| Maintenance and cleaning | Rinse after each use, grease seals after 50 uses, clean nozzle and filter |
| Safety | Safety valve, locking knob, piston pressure gauge |
| Spare parts | Use only MESTO parts |
| Warranty | Up to 3 years (statutory) |
Frequently Asked Questions - 3275PP MESTO
User questions about 3275PP MESTO
0 question about this device. Answer the ones you know or ask your own.
Ask a new question about this device
Download the instructions for your Irrigation timer in PDF format for free! Find your manual 3275PP - MESTO and take your electronic device back in hand. On this page are published all the documents necessary for the use of your device. 3275PP by MESTO.
USER MANUAL 3275PP MESTO
Instructions for Use 13
F CH B NL CDN
Mode d'emploi 20
NL B
Welcome and congratulations
for purchasing your new MESTO sprayer. Thank you for the trust you have shown in our brand.
Your satisfaction with MESTO products and services is very important for us.
Please contact us if your expectations are not met.
You will find our address on the title page of these instructions for use.


Make certain to read the instructions for use before using the device!
Keep the instructions for use in a safe place where they can be easily found. Particular safety measures are required when working with the device.
Usage
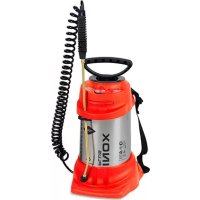
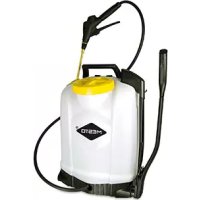
Pressure spraying devices CLEANER 3275PP, 3270PP and PROFI PLUS 3270P, 3275P are designed for the spraying of cleaning and disinfecting agents and of building chemicals, such as for example wall paper solutizer. Pressure spraying devices CLEANER 3275PE, 3270PE are designed for the spraying of alkaline detergents and care products. The manufacturer of the spraying agents has to approve that they can be applied with sprayers.

Improper use may result in dangerous injuries and environmental damage.
Nitric acid, acetic acid and propionic acid must only be used in concentrations of up to 10%, phosphoric acid and sulphuric acid in concentrations of up to 30%, and potassium hydroxide solution and caustic soda in concentrations of up to 20%.
Observe the substance manufacturer's instructions for using the product before each application. The sprayers must only be used outdoors or in well ventilated rooms only.
You should only use other products if harmful effects on the device and endangerment of people and the environment can be excluded. On request, we will provide you with a list of active ingredients used in the sprayer.
Not suitable for
- inflammable liquids
• acids and bases (for exceptions please see above) - wetting agents (tensides)
• viscous or sticky liquids or liquids that form residues (dyes, greases)
• liquids at temperatures above 40 °C
Under no circumstances should you use
- external pressure sources without a MESTO compressed air valve
- for flaming
• for storing and holding liquids.
Safety


Only trained, healthy and rested people may work with the device. You should not be under the influence of alcohol, drugs or medication. Children and adolescents must not use the device. Keep the spraying devices out of the reach of children.
Keep bystanders away during spraying. Take precautions to prevent hazardous substances from being misused.
Wear suitable protective clothing, goggles and respiratory protection when working with hazardous substances.
Never spray on people, animals, electrical devices and lines, into the wind, or into bodies of water.
Avoid ignition sources in the environment if you spray combustible liquids.
Do not leave the device in the sun. Ensure that the device is not heated beyond the maximum operating temperature ( Table 1). Protect the device from frost and ammonia.
Never blow through the nozzles or valves with your mouth.
There is a risk of slipping or tripping on smooth or wet surfaces, snow, ice, on slopes and on uneven terrain.
Repairs and modifications to the tank are not permitted. The effect of the safety valve must not be bypassed or made inoperative.
Use only MESTO spare parts and accessories. We cannot assume any liability resulting from the use of third-party parts.
When pumping, always observe the pressure gauge to ensure that the recommended spraying pressure is maintained ( Table 1 below). After use and before maintenance work, depressurize the device.
Transport the devices in such a way that they are protected against damage and overturning.
| GB | IRL | AUS | USA | NZ | CDN | IND |

You will find the illustrations referred to in the text in the pages 3 – 5 of these instructions for use.
Scope of delivery
Tank [1], pump [2], hose [3], instructions for use [4], spray wand [5], shut-off valve [6], carrying strap [7], bow [27], cap nuts [26]. (Fig. 1a and 1b)
Technical data
| Type of device | CLEANER 3270PP, PE PROFI PLUS 3270P | CLEANER 3275 PP, PE PROFI PLUS 3275P |
| Max. filling amount 10 l (2.64 gal) 5 l (1.3 gal) | ||
| Total contents 12.5 l (3.3 gal) 8 l (2,1 gal) | ||
| Max. spraying pressure 3 bar (44 psi) | ||
| Max. operating temperature 40 °C (104°F) | ||
| Weight when empty | 2.9 kg (6.4 lbs) | 2.6 kg (5.7 lbs) |
| Gross weight max. | 12.9 kg (28.4 lbs) | 7.6 kg (16.5 lbs) |
| Material of tank | polyethylene | |
| Where device is carried | on the side | |
| Technical residual quantity | < 0.07 l | |
| Max. volume flow | 1 l/min | |
| Recoil force | < 5 N | |
| Pressure change from 0 to 3 bar | min. 5000 x | |
Table 1
Assembly
- Attach the carrying strap [7] on the tank. (Fig. 2)
- Push the hose [3] into the fixture [9] and secure it with the cap nut [26]. (Fig. 4)
- Push the hose [3] onto the shut-off valve [6] and secure it with the cap nut [26]. (Fig. 4)
- Screw the spray wand [5] onto the shut-off valve [6] (Fig. 4)
- Screw the bow [27] onto the spray wand [5]. (Fig. 4)
Checks
Visual inspection: Check that tank [1], pump [2], hose [3], shut-off valve [6], piston pressure gauge[8], spray wand [5] and bow [27] with nozzle are undamaged.

Pay special attention to the connections between the tank – hose and the hose – shut-off valve and to the condition of the pump threading and spray wand.
No leaks: Pump up the empty device to 2 bar (Fig. 10).
▶ The pressure must not decrease more than 0.5 bar within 30 minutes
Function: Pull up the piston pressure gauge [8]. (Fig. 3)
▶ The pressure must dissipate.

Using the wheel lock [12] the lever on the shut-off valve [6] can be locked and unlocked. Unintentional spraying is prevented after locking [12b]. (Fig. 12)
▶ If required, reset the wheel lock [12a] and activate the shut-off valve [6]. (Fig. 12)
▶ The shut-off valve must open and close.

Have damaged parts or parts that do not work properly repaired immediately by our customer service department or by service partners authorized by us.
Preparation

Observe the instructions in the section entitled „Safety“.
The device must be in an upright position.
If filling the tank from a water line, ensure that the line or a hose does not project into the tank.
- Pull up the red button on the piston pressure gauge [8] until all excess pressure is released from the tank. (Fig. 3)
- Press the piston rod with handle [10] down and turn it counterclockwise.
▶ The piston rod with handle is locked. (Fig. 5)
- Unscrew the pump [2] from the tank. (Fig. 6)

We recommend you mix the spraying liquid in the device or premix it in an external tank: Fill to 1/3 with water, pour in the spraying agent, and then add more water until full.
- Add the spraying liquid to the tank [1]. (Fig. 7)
- Check the filling level with the scale [11] on the tank. (Fig. 7)
- Screw the pump [2] into the tank. (Fig. 8)
- Press the piston rod with handle [10] down and turn it counterclockwise.
▶ The piston rod with handle is unlocked. (Fig. 9)
- Generate the desired pressure ( Table 2) in tank (Fig. 10).

The maximum pressure should not exceed 3 bar (red line on the piston pressure gauge, Fig. 10). If the maximum pressure is exceeded, the safety valve will engage and release the excess pressure.
- Press the piston rod with handle [10] down and turn it counterclockwise. (Fig. 5)
▶ The piston rod with handle is locked.
Spraying

Observe the instructions in the section entitled „Safety“.
Operate the device only while it is vertical or suspended upright and nearly vertical.
Avoid allowing drops of spray to drift onto areas that are not being treated.
Observe the instructions of the substance manufacturer!
- Hang the device over your shoulder. (Fig. 11)

To prevent dripping, hold the spray wand up when first spraying and activate the shut-off valve until no more liquid mixed with air is emerging from the nozzle.
- If required, reset the wheel lock [12a] and activate the shut-off valve [6]. (Fig. 12)
▶ Spraying may now begin.
- Make certain the optimum spraying pressure is set ( Table 2) on the piston pressure gauge [8] (Fig. 10).
| Spraying pressure Spraying rate with flat jet nozzle (original equipment) | |
| 1.5 bar 0.49 l/min | |
| 2.0 bar 0.56 l/min | |
| 3.0 bar 0.69 l/min | |
Table 2. Linear dependence: spraying rate – spraying pressure
- If the spraying pressure decreases more than 0.5 bar from the optimum level, pump some more.

If liquid mixed with air emerges from the nozzle, the tank is empty.
After Usage

Observe the instructions in the section entitled „Safety“. Never leave spraying agent in the device.
- Pull up the red button on the piston pressure gauge [8] until all excess pressure is released from the tank. (Fig. 3)
- Lock the piston rod with handle [10]. (Fig. 5)
- Unscrew the pump [2] from the tank. (Fig. 6)
- Dilute the remaining quantity twice in a row with 1/2 liter of water each time and spray the resulting liquid onto the treated area.

Collect and dispose of the residual liquid according to all applicable laws, requirements and regulations. Observe the instructions of the substance manufacturer!
-
Wipe off the device with a moist cloth.
-
For drying and storing the device, keep the tank [1] and pump [2] separate in a dry place protected from sunlight and freezing temperatures (Fig. 13).

Clean the protective equipment and yourself every time after usage.
Care and maintenance

Observe the instructions in the section entitled „Safety“.
After using the device 50 times or at least once a year:
- Unscrew the pump [2] from the tank. (Fig. 6)
• Dismantle the pump [2]. (Fig. 14) - Grease the O-ring [13] and the sleeve [14]. (Fig. 15)
- Assemble the pump.
- Lock the piston rod with handle [10] and screw the pump [2] into the tank [1].
- Clean the nozzle [17] under running water. (Fig. 19)
- Unscrew the handgrip [19] from the shut-off valve [6].
- Remove the filter [18] and clean it under running water. (Fig. 20)
• Disassemble the shut-off valve [6]. (Fig. 21)
a) Pull off the ring [21].
a) Loosen the four screws and pull the half shells [20] apart.
b) Screw the sealing cap [25] from the valve body [22] and pull the pressure bolt [24] from the valve body [22]. (Fig. 22)
• Grease the O-rings [23]. (Fig. 22)
- Assemble the shut-off valve [6].

Observe the legal requirements of your country for accident prevention and check the device in regular intervals.
If there are no special rules, we recommend you have the device examined externally by a competent professional every 2 years and subject it to an internal inspection every 5 years.
We would be happy to provide you with an inspection schedule in German or English.
Faults

Use only MESTO spare parts and accessories ( fig. on page 2).
| Fault Cause Remedy | ||
| No pressure builds up in the device. | The pump is not screwed on tightly. | Screw the pump on tightly. |
| O-ring [13] on the pump is faulty. (Fig. 15) | Replace the O-ring. | |
| Diaphragm [14] is defective. (Fig. 16) | Replace the diaphragm. | |
| Liquid flows out of the pump. | Valve disc [15] dirty or defective. (Fig. 17) | Clean or replace the valve disc. |
| Piston pressure gauge does not indicate any tank pressure.Safety valve blows off too early. | Piston pressure gauge [16] is defective. (Fig. 18) | Replace the piston pressure gauge. |
| The nozzle does not spray even though pressure is present. | Nozzle [17] (Fig. 19) or / and filter [18] (Fig. 20) is clogged. | Clean the filter or / and nozzle. |
| The shut-off valve does not close.Liquid emerges without the lever being activated. | O-rings [23] of the pressure bolt [24] are not greased / lubricated. (Fig. 22)Faulty O-rings [23] or pressure bolt [24]. (Fig. 22) | Grease the O-rings of the pressure bolt (dismantle shut-off valve → section „Care and maintenance“)Replace O-ring or pressure bolt. |
Contact address for additional information → Title page.
Warranty
We guarantee that from the time it is first purchased for a period of the legally valid required warranty period (maximum 3 years) this device will not exhibit any material or processing errors. If defects are discovered during the warranty period, MESTO or the distributor in your country will repair the device without charging for the labor or material or (at the discretion of MESTO) replace the device itself or its defective parts.
If such defects are discovered, please contact us immediately. We require the invoice or cash register receipt for purchase of the device.
The warranty does not include wearing parts (seals, O-rings, diaphragm, etc.) or defects, which have occurred due to improper use or unforeseeable circumstances.
CE Declaration of Conformity
In accordance with EC Directive 2006/42/EC, Annex II, No. 1A.
We,
declare under our sole responsibility that the pressure spraying devices of the series 3275, 3270, as supplied meet all the relevant requirements of Directive 2006/42/EC of the EU.
Furthermore the devices correspond to Directive 2014/68/EU for Pressure Equipment.
Rolf Rehkugler is authorized to compile the technical documentation.
Freiberg, 25/04/2016
Bernd Stockburger
- Managing Director -