
GS55 - Mechanical chipper SCHEPPACH - Free user manual and instructions
Find the device manual for free GS55 SCHEPPACH in PDF.
| Product type | Electric garden shredder |
| Brand | Scheppach |
| Model | GS55 |
| Power consumption | 2000 W |
| Voltage / Frequency | 230 V / 50 Hz |
| Motor speed | 4500 min⁻¹ |
| Maximum branch diameter | 40 mm |
| Weight | 10.7 kg |
| Dimensions (L × W × H) | 490 × 370 × 860 mm |
| Wheel diameter | 165 mm |
| Sound pressure level | 96.7 dB(A) |
| Guaranteed sound power level | ≤ 106 dB(A) |
| Protection rating | IP X4 |
| Service mode | S6 / 40% |
| Cutting type | Blade holder disc with reversible blades |
| Reversible blades | Yes, two sides (72 × 29 × 5.3 mm) |
| Shreddable materials | Branches, shrubs, garden waste, paper, cardboard |
| Safety | Motor brake, anti-start safety switch |
| Power supply | Mains 230 V |
| Maintenance | Sharpening and replacement of blades, regular cleaning |
| Wear parts | Blades, blade holder disc (consumables) |
| Warranty | Legal (excluding wear parts) |
Frequently Asked Questions - GS55 SCHEPPACH
User questions about GS55 SCHEPPACH
0 question about this device. Answer the ones you know or ask your own.
Ask a new question about this device
Download the instructions for your Mechanical chipper in PDF format for free! Find your manual GS55 - SCHEPPACH and take your electronic device back in hand. On this page are published all the documents necessary for the use of your device. GS55 by SCHEPPACH.
USER MANUAL GS55 SCHEPPACH
natural_image
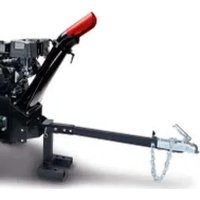
Exterior view of a black and gray industrial machine labeled 'Scheppach' with wheels and a metal frame (no additional text or symbols visible)GS45
| D | GartenhäckslerOriginalbedienungsanleitung | 8 |
| GB | Garden shredderTranslation of original instruction manual | 19 |
| FR | Broyeur pour jardinTraduction des instructions d'origine | 30 |
| IT | Bio-tritturatoreTraduzione dalle istruzioni d'uso originali | 42 |
| NL | TuinhakselaarVertaling van originele handleiding | 53 |
| ES | Trituradora de jardínLa traducción del manual de instrucciones original | 64 |
| PL | Sieczkarnia ogrodowaTłumaczenie oryginalnej instrukcji obsługi | 75 |
| CZ | Drtič zahradního odpaduPřekład originálního návodu k obsluze | 86 |
| SK | Záhradný drvičPreklad originálu návodu na obsluhu | 97 |
| HU | Kerti szecskázógépAz eredeti használati útmutató fordítása | 108 |


natural_image
Mechanical device with labeled parts, showing internal components and a base mount (no text or symbols visible)
Günzburger Straße 69
D-89335 Ichenhausen
VEREHRTER KUNDE,
Description of the symbols
The use of symbols in this handbook is designed to direct your attention to possible risks. You must make sure that you understand the safety symbols and explanations accompanying them. Warnings themselves cannot remove risks and cannot substitute correct action for the prevention of accidents.
 | Read the whole text of the operating instructions thoroughly before start up. |
 | Wear ear protection! |
 | Wear work gloves! |
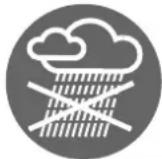 | Protect the machine from moisture. |
 | Wear safety goggles! |
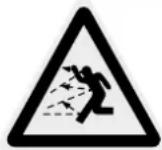 | Danger - Objects may be ejected when the machine is in operation. |
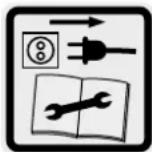 | Do not undertake any cleaning, repair and maintenance work |
 | Keep away all animals and persons not working on the machine. |
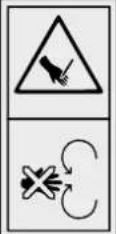 | Important note! Risk of injury due to rotating blade disc !Keep hands and feet outside of the openings when the machine is running. |
 | Do not misuse as a step! |
| ⚠ Attention! | In these operating instructions we have marked the places that have to do with your safety with this sign. |
Table of contents: Page:
- Introduction 22
- Device description 22
- Scope of Delivery 22
- Before starting the equipment 22
- Intended use 23
- Safety notes 23
- Technical Data 26
- Operation 27
-
Maintenance 27
-
Assembly 26
-
Putting into operation 26
-
Electrical connection 28
-
Disposal and recycling 28
-
Trouble shooting 29
1. Introduction
MANUFACTURER:
scheppach
Günzburger Straße 69
D-89335 Ichenhausen
DEAR CUSTOMER
we wish you a pleasant and successful working experience with your new machine.
NOTE:
According to the applicable product liability law the manufacturer of this device is not liable for damages which arise on or in connection with this device in case of:
- improper handling,
- non-compliance with the instructions for use,
- repairs by third party, non authorized skilled workers.
- installation and replacement of non-original spare parts,
- improper use,
- failures of the electrical system due to the non-compliance with the electrical specifications and the VDE 0100, DIN 57113 / VDE 0113 regulations
Recommendations:
Read through the complete text in the operating instructions before installing and commissioning the device.
The operating instructions are intended to help the user to become familiar with the machine and take advantage of its application possibilities in accordance with the recommendations.
The operating instructions contain important information on how to operate the machine safely, professionally and economically, how to avoid danger, costly repairs, reduce downtimes and how to increase reliability and service life of the machine.
In addition to the safety regulations in the operating instructions, you have to meet the applicable regulations that apply for the operation of the machine in your country.
Keep the operating instructions package with the machine at all times and store it in a plastic cover to protect it from dirt and moisture. Read the instruction manual each time before operating the machine and carefully follow its information.
The machine can only be operated by persons who were instructed concerning the operation of the machine and who are informed about the associated dangers. The minimum age requirement must be complied with.
In addition to the safety notes contained in the present operating instructions and the special regulations of your country, the generally recognized technical rules for the operation of woodworking machines must be observed.
We accept no liability for damage or accidents which arise due to non-observance of these instructions and the safety information.
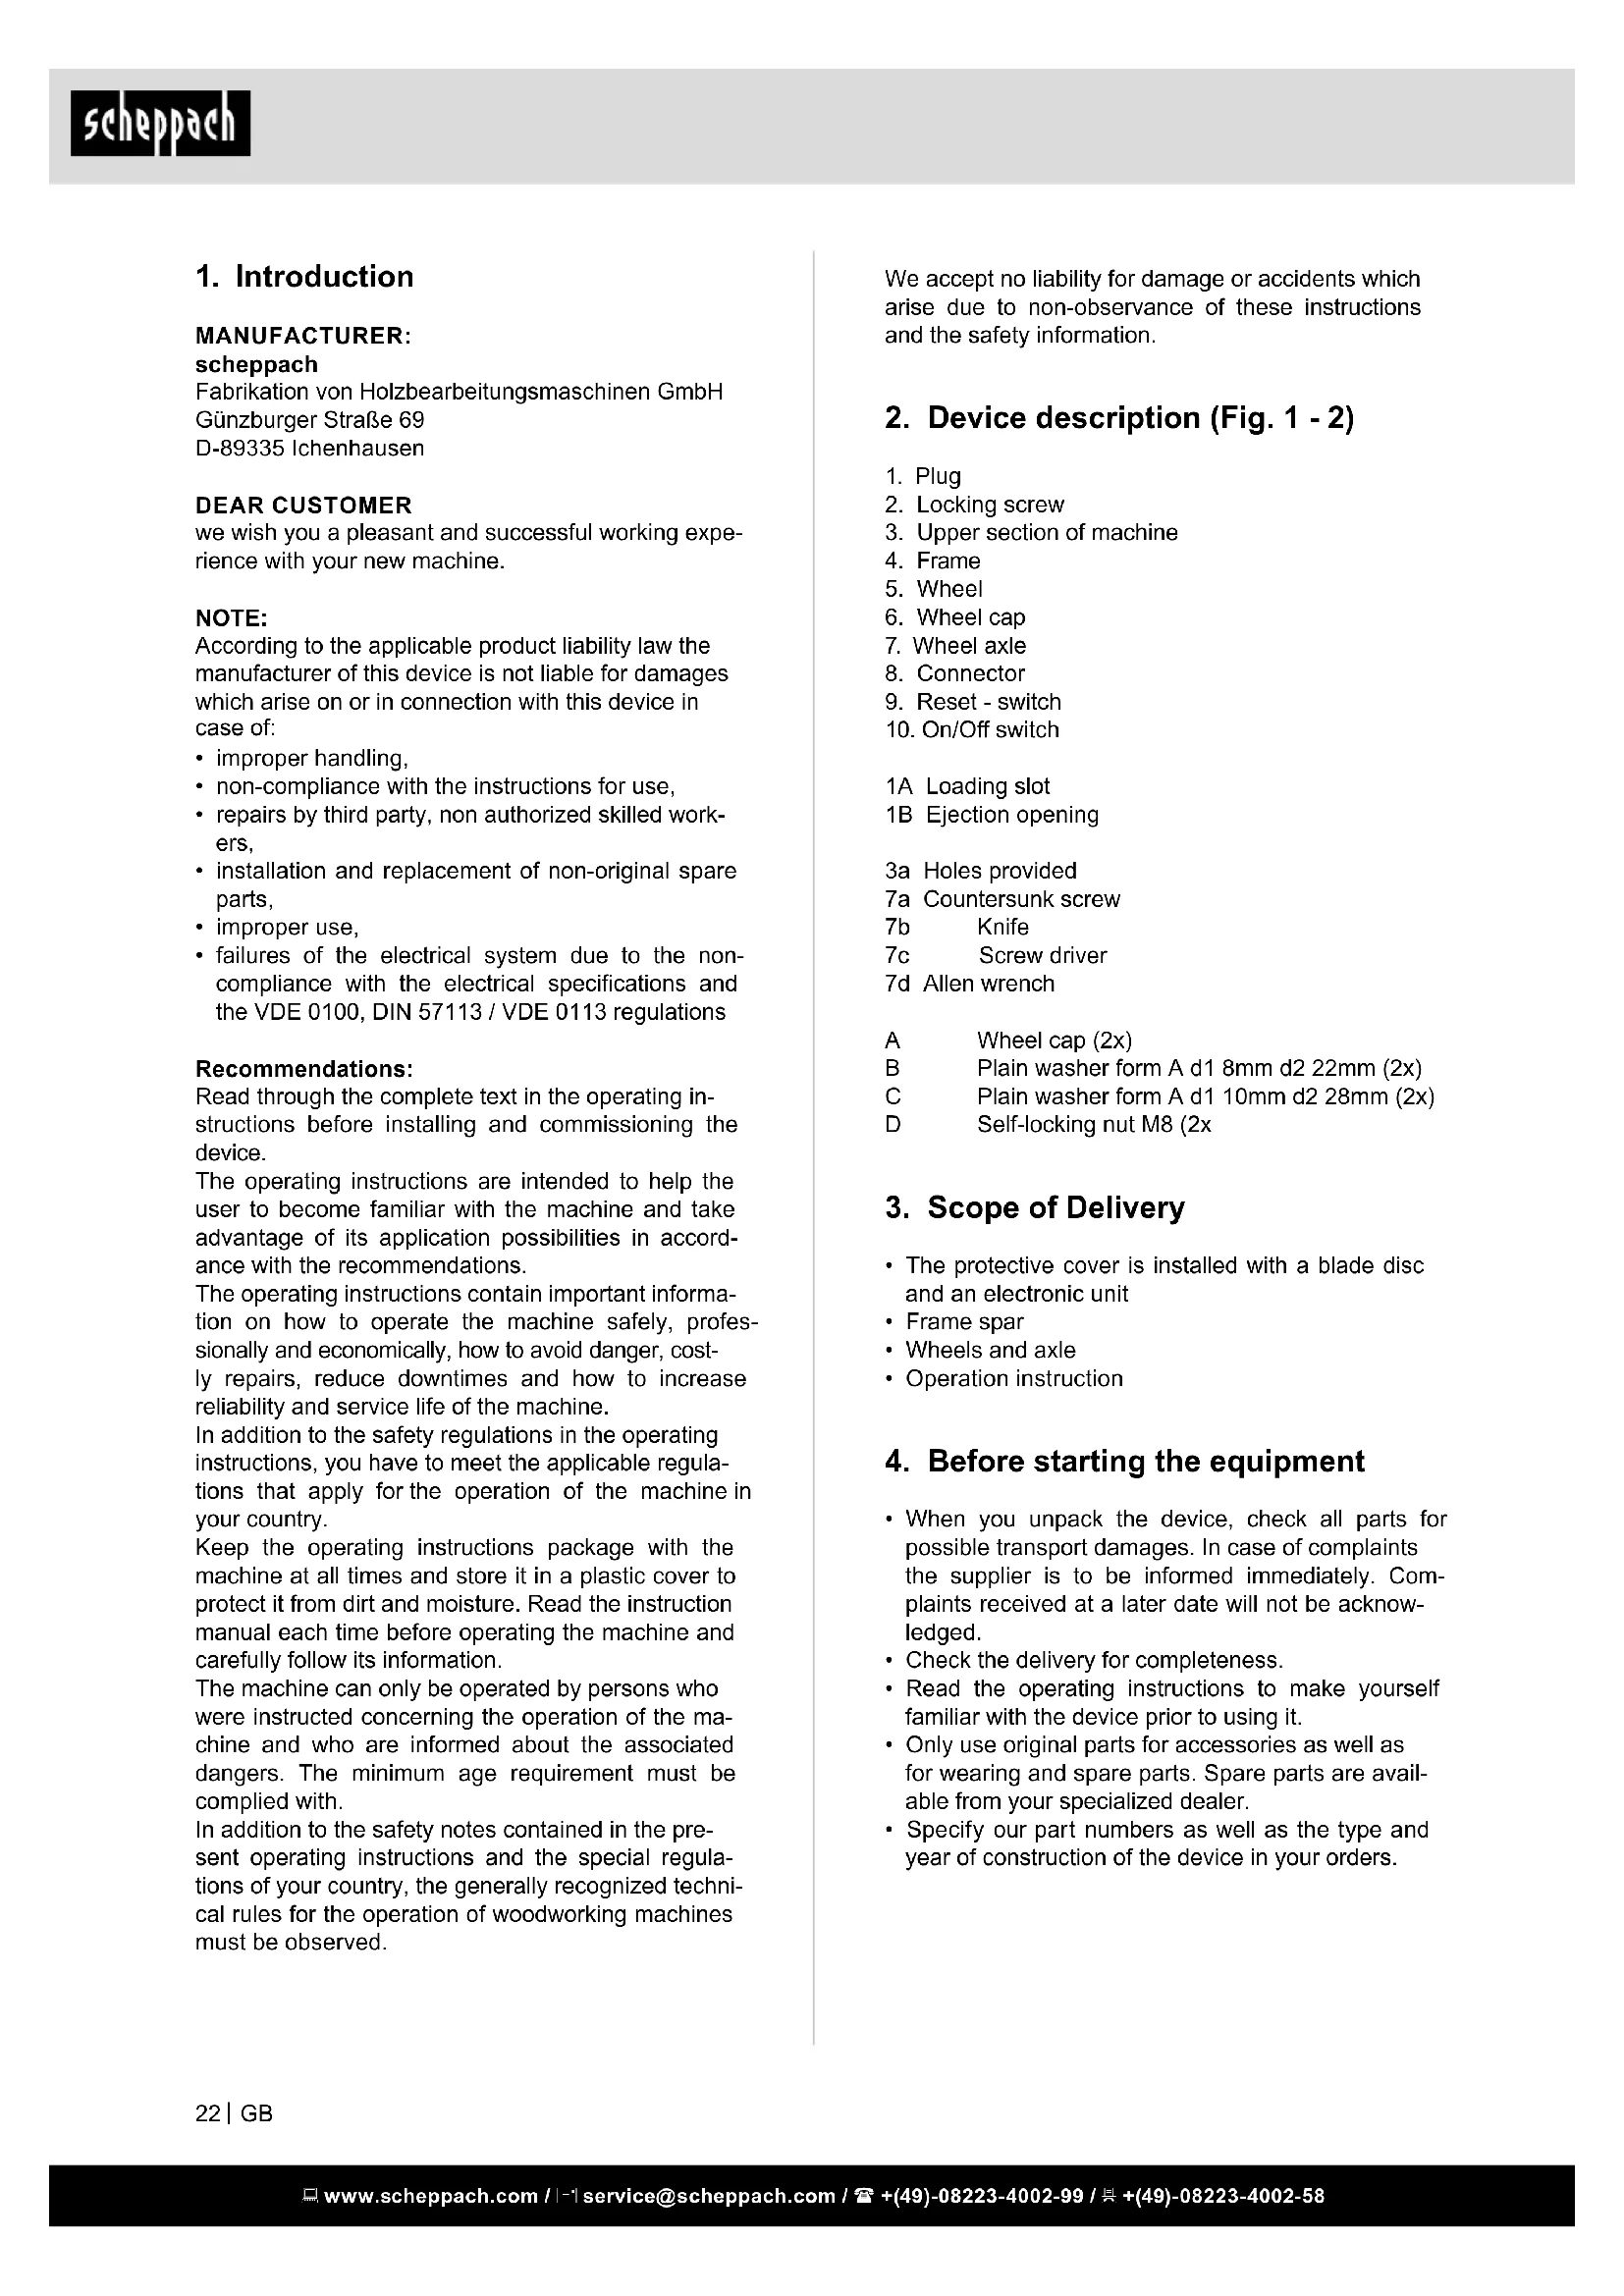
2. Device description (Fig. 1 - 2)
- Plug
- Locking screw
- Upper section of machine
- Frame
- Wheel
- Wheel cap
- Wheel axle
- Connector
- Reset - switch
- On/Off switch
1A Loading slot
1B Ejection opening
3a Holes provided
7a Countersunk screw
7b Knife
7c Screw driver
7d Allen wrench
A Wheel cap (2x)
B Plain washer form A d1 8mm d2 22mm (2x)
C Plain washer form A d1 10mm d2 28mm (2x)
D Self-locking nut M8 (2x
3. Scope of Delivery
- The protective cover is installed with a blade disc and an electronic unit
- Frame spar
- Wheels and axle
• Operation instruction
4. Before starting the equipment
- When you unpack the device, check all parts for possible transport damages. In case of complaints the supplier is to be informed immediately. Complaints received at a later date will not be acknowledged.
- Check the delivery for completeness.
- Read the operating instructions to make yourself familiar with the device prior to using it.
- Only use original parts for accessories as well as for wearing and spare parts. Spare parts are available from your specialized dealer.
- Specify our part numbers as well as the type and year of construction of the device in your orders.
5. Intended use
CE tested machines meet all valid EC machine guidelines as well as all relevant guidelines for each machine.
- The machine has been built in accordance with state-of-the-art standards and the recognized safety rules. Nevertheless, ist use may constitute a risk to life and limb of the user or of third parties, or cause damage to the machine and to other material property.
- The machine must only be used in technically perfect condition in accordance with is designated use and the instructions set out in the operating manual, and only by safety-conscious persons who are fully aware of the risks involved in operating the machine. Any functional disorders, especially those affecting the safety of the machine should therefore be rectified immediately.
- The garden shredder may only be used for cutting twigs, branches, shrubs, garden wastes, paper and cardboard.
- The proper use includes the shredding of
- all types of branches up to a max. diameter (depending on wood species and freshness)
- wilted, moist garden refuse that has already been stored for several days, alternating with branches
- The garden shredders are suitable for private use in gardens and allotments.
- As garden shredders for private gardens and allotments are considered such devices that are not applied in public facilities, parks, and sports facilities as well as in agriculture and forestry on a commercial basis.
- The intended usage also includes compliance with the operating, servicing and repair conditions prescribed by the manufacturer and following the safety instructions included in the instructions.
- Unauthorised modifications on the garden shredder exclude a liability of the manufacturer for damages of any kind resulting from it.
- Any other use exceeds authorization. The manufacturer is not responsible for any damages resulting from unauthorized use; risk is the sole responsibility of the operator.
- Do not put soil or hard objects such as glass, stones, pieces of metal and roots with adhering earth into the garden shredder.
- The safety, work and maintenance instructions of the manufacturer as well as the technical data given in the calibrations and dimensions must be adhered to. The machine may only be used, maintained, and operated by persons familiar with it and instructed in ist operation and procedures. Arbitrary alterations to the machine release the manufacturer from all responsibility for any resulting damages.
- The machine may only be used with original accessories and original tools made by the manufacturer.
6. Safety notes
Before commissioning this product, read and keep to the following advice. Also observe the preventive regulations of your professional association and the safety provisions applicable in the respective country, in order to protect yourself and others from possible injury.
- Pass the safety instructions on to all persons who work with the machine.
- Keep these safety instructions in a safe place.
- Machine including safety cut-out The safety cut-out, including an automatic motor brake, which is attached to the shredder is used for the safety of the machine, preventing the motor being started when the machine is open and the rotating knives could be reached by the operator's hand.
- Repair works on the safety cut out must be carried out by the manufacturer or by companies appointed by the manufacturer respectively.
- Make yourself familiar with the equipment before using it, by reading and understanding the operating instructions. Do not use the machine for unsuitable purposes (see ,Normal intended use' and ,Working with the garden shredder').
- Provide a safe standing position and keep at any time the balance. Do not lean forward. When placing material into the shredder, always stand on the same level as the machine.
- When placing material into the shredder, always stand on the same level as the machine.
- Be observant. Attend to what you do. Start working with rationality. Do not use the device when you are tired or under the influence of drugs, alcohol or medicaments. One moment of carelessness when using the device can result in serious injuries.
- Wear protective goggles, gloves and noise protection while working with the machine.
- Wear suitable work clothes:
- do not wear loose-fitting clothes
- long trousers
- slip-proof shoes
- no loose clothing or such with hanging bands or drawstrings
- Within his area of work the operator is responsible for third parties.
- Do not allow children to play with this machine.
- Keep children away form machine.
- This machine is not intended for use by persons (including children) with reduced physical, sensory or mental capabilities, or lack of experience and knowledge, unless they have been given supervision or instruction concerning use of the machine by a person responsible for their safety. Children should be supervised to ensure that they do not play with the machine.
-
Never allow children or people unfamiliar with these instructions to use the machine. Local regulations may restrict the age of the operator. When not in use store the machine out of reach of children.
-
Do not allow children to perform cleaning and maintenance tasks.
- Never operate the machine if other persons are in the immediate vicinity.
- Keep your workplace in an orderly condition! Untidiness can result in accidents.
- Choose a working position alongside the equipment or behind it. Never stand near the ejection opening.
- Never reach into the filling or ejection opening.
- Keep your face and body away from the filling opening.
- Do not overload the machine! You work better and safer in the given performance range.
- Only operate the machine with complete and correctly attached safety equipment and do not alter anything on the machine that could impair the safety.
- Do not alter the motor controller setting, since the rotary speed controls the safe maximum operating speed, and protects the motor and all rotating parts against damage due to excess speed. Contact the customer service in case of problems.
- Do not operate without the funnel.
- Do not modify the device or parts of the device respectively.
- Close machine properly before enabling motor.
- Do not hose down the device with water. (Origin of danger electric current).
• Take into consideration environmental influences: - Do not use the device in moist or wet ambience.
- Do not leave the machine standing in the rain or use when raining.
- Provide for good illumination.
- To prevent danger of injury to fingers during assembly or cleaning operations hold the cutting mechanism (see pic. "Changing the blades") and wear protecting gloves.
- If the cutting mechanism strikes any foreign object or if the machine should start making any unusual noise or vibration, immediately switch off and allow the cutter to stop. Remove the plug from the mains supply and take the following steps:
- Inspect for damage.
- Replace or repair any damaged parts.
- Check for and tighten any loose parts.
- Switch the machine off and remove the mains plug from the socket when
- Performing maintenance and cleaning work.
- Eliminating faults.
- Check the machine for damage, if foreign objects have landed in the insertion channel
- abnormal machine vibrations
- Checking connecting lines, whether these are knotted or damaged.
- Transporting.
- Carrying out repair work.
- Changing the blades.
-
Leaving unattended (even during short interruptions).
-
If the machine's filling funnel or ejection slot is blocked switch off the motor and disconnect the mains plug before removing material from the filling funnel or ejection slot.
- Check the machine for possible damage: Before further use of the machine the safety devices must be checked carefully for their proper and intended function.
- Check whether movable parts function perfectly and do not stick or whether parts are damaged. All parts must be correctly installed and fulfil all conditions to ensure perfect operation of the machine.
- Damaged safety devices and parts must be properly repaired or exchanged by a recognized, specialist workshop; insofar as nothing else is stated in the instructions for use.
- Damaged or illegible safety labels have to be replaced.
- Store unused equipment in a dry, locked place out of the reach of children.
- The permissible noise level is exceeded during non-stop operation. We therefore recommend the use of ear protection.
• Children under 16 may not operate the machine.
- Check mains cables. Do not use faulty cables.
- Watch for foreign objects during work. Do not insert stones, glass or metal parts.
- Carry out repairs, maintenance and cleaning work only when the drive unit is switched off. Wait until the motor comes to a standstill and pull the mains plug. Caution: The cutting tool continues to move for some time!
- After finnishing work, do not switch off the motor until the machine is completely empty, as it may otherwise be difficult to start up again.
- Observe all safety instructions and warnings attached to the machine. Cut off the external power supply of the machine even if only minor changes of place are envisaged. Properly reconnect the machine to the supply mains before recommissioning.
- When starting to work with the machine again, follow the Operating Instructions.
- Use the machine in the recommended position and on firm, even surface.
- Don't use the machine on a pavement surface with grit-strewed, on which thrown out material could cause injury. Be aware of the cable, risk of stumbling.
- When transporting the machine, walk carefully; do not run.
- Never pick up or carry the machine while the motor is running.
- Don't bring hands, other parts of the body and clothes into the infeed funnel, outfeed channel or near to other moving parts.
- When starting up the machine stay always outside the outfeed zone.
- Switch off the motor as soon as you leave workplace.
- Don't tilt the machine with running motor.
Infeed of material to be chopped Always switch on the motor first!
- We recommend: Wear work gloves, goggles and ear protection.
- Watch for stones and earth when collecting the material.
- Do not put hard objects such as stones, glass, metal parts etc. into your garden shredder.
- Earth wears the cutting blades down fast and should therefore be removed from the material.
- Do not put roots with adhering earth into your garden shredder.
- Wood such as tree cutting etc. requires sharp blades and should be shredded separately to prolong the servicelife of the knives.
- Feed branches in thick end first and push them onto the downstroke part of the knife disc if possible (kickback).
- Pull the material back forcefully, counteracting the automatic pull of the machine, in order to avoid killing the motor when the speed reduces.
- Freshly cut wood requires less force, so large diameter cuttings can be shredded easily.
- Hedge cuttings must be fed in gradually. Some types tend to jam. Push them in with a long piece of wood.
- Shrubs tend to be woody and require sharp blades.
- Bark is easy to shred when damp. We recommend gradual shredding.
- If you want finer shredded results, put the shredded material back into the shredder a second time.
- Paper should be shredded damp and rolled up. Remove the metal staples from cardboard boxes.
- Vegetable waste is normally easy to shred, but may stick due to moisture.
- It is best to save some dry material for the final run. It absorbs the moisture in the machine and cleans the inside of the housing.
- Important: Remove remaining waste from the machine after finishing work. Caution: PULL ELECTRIC PLUG
- To start up the machine again after an interruption of work, the blade housing has to be cleared of shredded material.
Conduct in case of an accident
Start First Aid measures relevant to the injury and request medical help as quickly as possible. Prevent the injured person from further injury and keep him/her rested. For potentially occurring accidents, the First Aid kit, according to DIN 13164, should always be handy at the work place. Material taken from the First Aid kit must be replaced immediately. When you are requesting help, give the following information:
- Location of accident
- Type of accident
- Number of injured people
- Type of injuries
Electrical safety
- Design of the connection cable according to IEC 60 245 (H 07 RN-F) with a core cross-section of at least
- 1.5 mm² for cable lengths up to 25 m
- 2.5 mm² for cable lengths over 25 m
- Long and thin connection lines result in a potential drop. The motor does not reach any longer its maximal power; the function of the device is reduced.
- Plugs and coupler outlets on connection cables must be made of rubber, plasticised PVC or other thermoplastic material of same mechanical stability or be covered with this material.
- The connector of the connection cable must be splash-proof.
- When running the connection line observe that it does not interfere, is not squeezed, bended and the plug connection does not get wet.
- Wind off completely the cable when using a cable drum.
- Do not use the cable for purposes for which it is not meant. Protect the cable against heat, oil and sharp edges. Do not use the cable to pull the plug from the socket.
- Regularly check the extension cables and replace them if they are damaged.
- Do not touch a damaged connection cable before disconnecting it from the mains. A damaged connection cable may cause contact with live parts.
- Do not use any defective connection cables.
- When working outdoors, only use extension cables especially approved and appropriately labelled for outdoor use.
- Do not set up any provisional electrical connections.
- Never bypass protective devices or deactivate them.
- Only hook up the machine by means of a fault-current circuit breaker (30 mA).
- The electrical connection or repairs to electrical parts of the machine must be carried out by a certified electrician or one of our customer service points. Local regulations – especially regarding protective measures – must be observed.
- Damaged mains leads must be replaced by the manufacturer or one of their service workshops or a similar qualified person to prevent dangers.
- Repairs to other parts of the machine must be carried out by the manufacturer or one of his customer service points. Use only original spare. Accidents can arise for the user through the use of other spare parts. The manufacturer is not liable for any damage or injury resulting from such action.
⚠ WARNING! This electric tool generates an electromagnetic field during operation. This field can impair active or passive medical implants under certain conditions. In order to prevent the risk of serious or deadly injuries, we recommend that persons with medical implants consult with their physician and the manufacturer of the medical implant prior to operating the electric tool.
Remaining hazards
The machine has been built using modern technology in accordance with recognized safety rules. Some operating hazards, however, may still exist.
- Even if used properly, residual risks can exist even if the relevant safety regulations are complied with due to the design determined by the intended purpose.
- Observing these instructions, and taking proper care, will reduce the risk of personal injury or damage to the equipment.
- Risk of injury to the fingers and hands, if your hand grasps through an opening and reaches the blade unit.
- Risk of injury to the fingers and hands, when carrying out assembly work and cleaning on the blade unit.
- Touching live parts of opened electrical components.
- Injury caused by kick-back of branches while feeding. Securely hold long, thick branches. Wear personal protective gear such as gloves and safety goggles.
• Health risks caused by noise. Wear personal protective gear (ear protection) - Health risks caused by electricity. When incorrect or damaged mains cables are used. Follows instructions in the manual Electrical Connections.
- Even when all safety measure are taken, some maining hazards which are not yet evident may still be present.
- Remaining hazards can be minimized by following the instructions in Safety Precautions, Proper Use and in the entire operating manual.
7. Technical Data
Dimensions L x B x H (mm) 490 x 370 x 860
| Input height (mm) 860 | |
| Output height (mm) 45 | |
| Infeed opening max. (mm) 40 | |
| Outfeed opening max. (mm) | 45 |
| Wheel ø (mm) 165 | |
| Weight (kg) | 10,7 |
| Branch thickness max. ø (mm) | 40 |
| Blade disc ø (mm) | 171 |
| Saw blde (mm) | 72 x 29 x 5,3 |
| Motor (V/Hz) | 230/50 |
| Consumtion power P1 (W) | 2000 |
| Revolutions (1/min ^-1 ) | 4500 |
| Operation mode | S6/40 % |
| Splashproof | IP X4 |
Subject to technical changes!
Noise Information
Sound emission values determined according to EN ISO 3744:2010, EN11201:2010
Typically the A-weighted noise levels of the product are: Sound pressure level 96,7 dB (A); Sound power level 104,5 dB (A).
2000/14 / EC: the guaranteed sound power level LwA is lower than 106 dB (A). Assessment procedure of conformity according to Annex V.
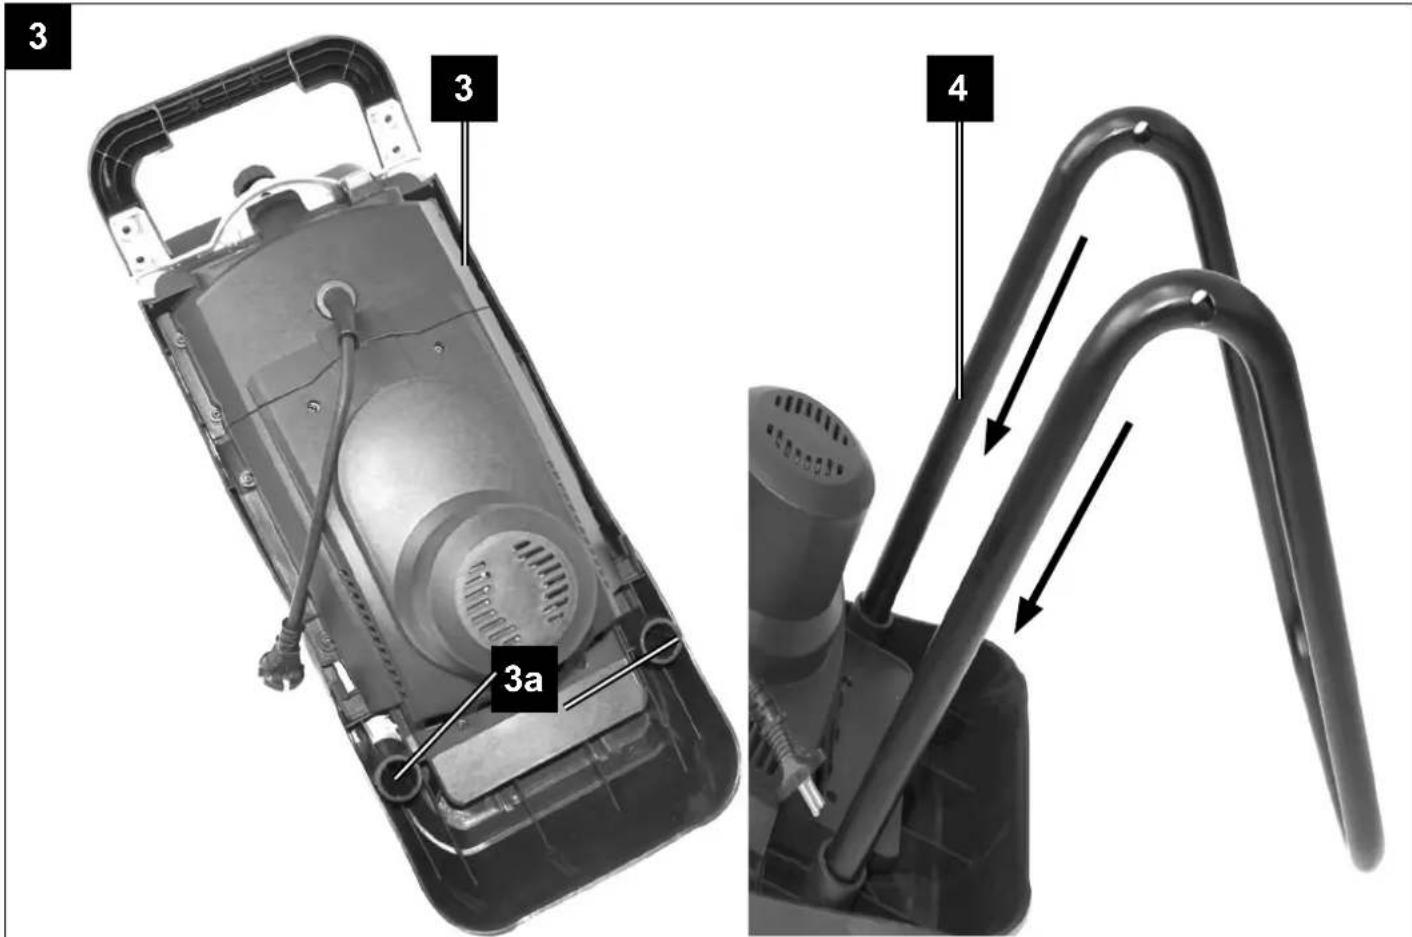
8. Assembly
Your garden shredder is not fully assembled due to technical packing difficulties.
⚠️ ATTENTION! Always make sure the device is fully assembled before start-up!
- Open the box and remove the machine and all of its accessories.
-
Mounting the subframe (Fig. 3)
-
First rotate the upper section of machine (3) (Fig. 3).
-
Insert the subframe (4) into the holes provided (3a) as seen in the Figure.
-
Mounting the idlers (Fig. 4)
• Fit the two idlers (5) as shown in Fig. 4 and 5.
9. Putting into operation
Observe safety notes before putting into operation. The machine may only be operated with fully mounted protection and infeed system.
Starting protection
Your garden shredder can only be started when the top of the housing is correctly closed. The locking screw is simultaneously the screw which fastens the upper and lower housing unit together and the security nut for the starting safeguard. In tightening the screw to the stud (1), contact is made to the circuit breaker and the circuit closer. The motor starts when the on-button is pressed. If the screw is not quite screwed in or the housing is open, the electric circuit is interrupted by the starting safeguard. In pressing the on-button, the motor should not start.
Switching on/off
- The machine can be switched on by pressing the button to „I“.
- In order to switch the machine off again, press the button to „0“.
Motor braking unit
The is fitted with an automatic motor braking unit which becomes effective as soon as the driving motor is switched off.
10. Operation
⚠️ ATTENTION! Observe the safety instructions before the commissioning!
The device may only be commissioned when the protective and intake equipment is fully mounted!
Operating panel (Fig.1)
- On-switch (10): The shredder is started when this button is pressed.
- Off-switch (10): The shredder is stopped when this button is pressed.
Working with the shredder
You shred wilting garden waste and branches that have been stored for several days.
- Connect the shredder to the power supply.
- Put the shredder into operation using the on-switch (10).
- Fill the shredding material into the filling funnel and the material is then drawn in.
- Allow the shredder to fully shred the shredding material introduced before you introduce any new materials.
- Do not use your hands to push down the shredding material, only use a specialist tool for this or other shredding material
- Switch off the shredder after the work has been completed and disconnect this from the power supply.
Changing and grinding the knife
⚠ WARNING! Await complete standstill of cutter. Before working on cutter, remove mains plug!
The reversible steel blade can be used on both sides and can be replaced quickly and easily.
Caution when working: There is a danger to fingers and hands. It is extremely important to use only well sharpened knives.
So please note:
A blunt knife impairs cutting performance and makes work difficult.
A sure sign of a blunt knife is a reduction in automatic pull. Engine heats up, overload protection triggers.
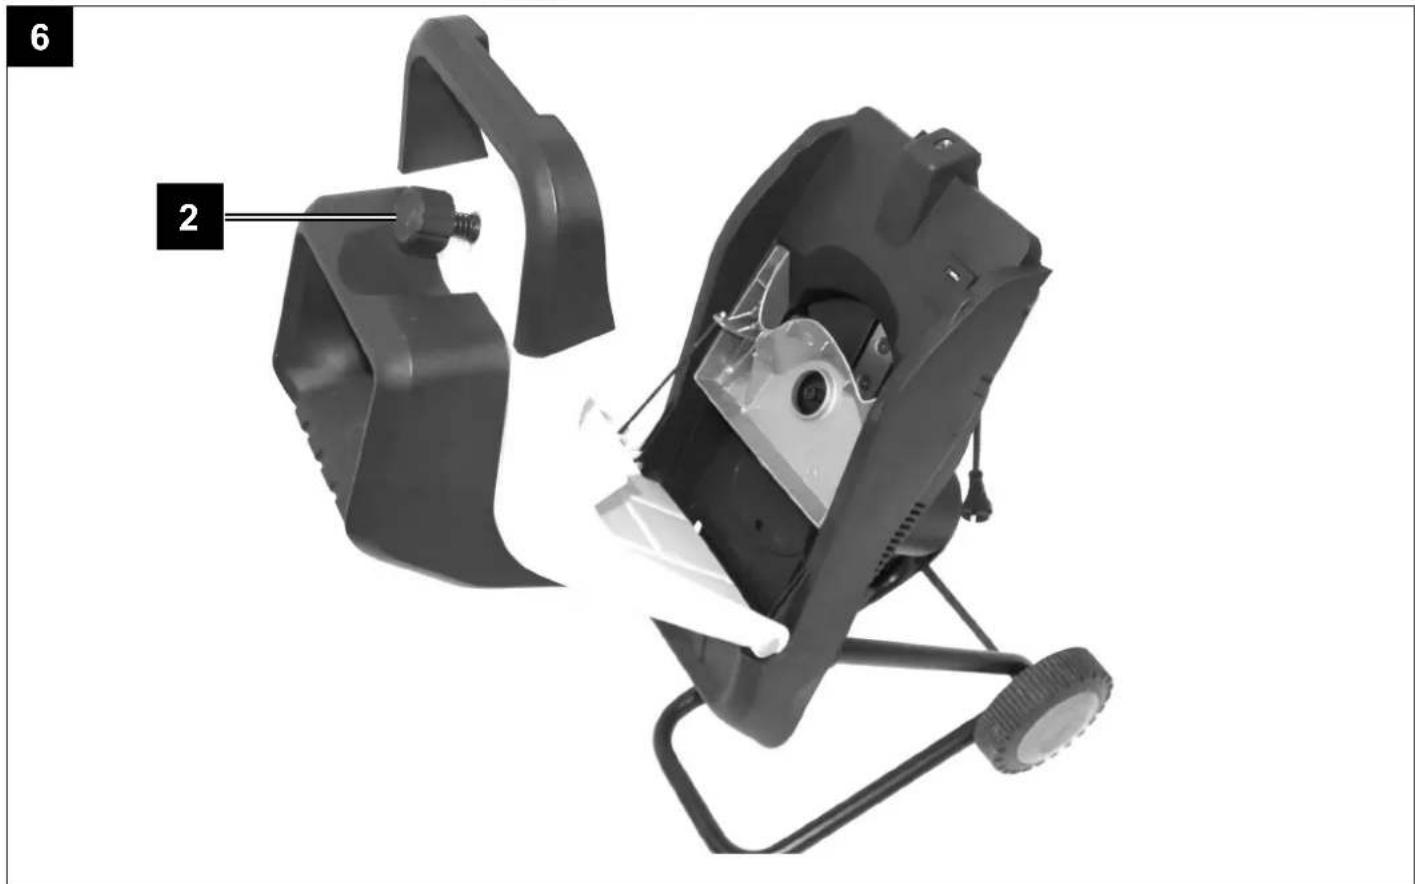
Replacing the blades (Fig. 6-7)
First open the housing by releasing the locking screw (2). Then fold the upper section of the housing outward (Fig. 6).
Then remove the aluminium cover by releasing the eight Phillips screws (Fig.7).
The knife disc remains mounted, (Fig. 7)
With either a small screwdriver or a nail, remove debris from the inner hexagon socket of the blade fastening screw. The T-handle pin-key has to completely reach into the inner hexagon socket in order to unscrew the screw. The screws are tightly screwed in. In mounting the blade, lubricate the flat head screws and tighten well.
Blade removal
The blade, as well as the blade surface area of the cutting disc, must be cleaned of hardened debris material. Upon reinstallation, the blade disc must be mounted exactly as before.
Sharpening the blade
In resharpening the blade, pay close attention to maintaining an even blade-diameter so as to avoid an imbalanced blade.
The new blade has a width of 30 mm. In resharpening the blade, a maximum of only 4 mm may be removed from each cutting edge.
11. Maintenance
When performing maintenance and cleaning work, turn off the motor and pull the plug! Do not spray the machine with water!
Service information
Please note that the following parts of this product are subject to normal or natural wear and that the following parts are therefore also required for use as consumables.
Wear parts*: shredder blade, knife roller, cutting plate, feeding device
* Not necessarily included in the scope of delivery!
Motor and switch
Fitting, repair and maintenance work on the electric unit can only be carried out by a qualified electrician. When returning the motor, always send the entire motor apparatus with the switch.
Please provide the following information in the event of any enquiries:
• Type of current for the motor
• Machine data - type plate
• Machine data - type plate
12. Electrical connection
The installed electric brake motor is ready to be put into operation. The connection meets the relevant VDE and DIN requirements.
The electric brake motor causes the disc blade to come to a near immediate standstill after the machine has been turned off.
Firring, repair and maintenance work on the electric unit can only be carried out by a qualified electrician.
Damaged electrical connection cables
Insulation damage often occurs with electrical connection cables.
Some causes are:
- Pressure points, especially when electrical connection cables are run through window or door cracks.
- Kinks caused by improper handling or mowing of the electrical connection cables.
• Cuts resulting from being run over - Insulation damages caused by pulling the cable out of wall sockets.
- Cracks resulting from aging of the insulation.
Such insulation damaged electrical connection cables cannot be used and are, as a result of their insulation damage. LIFETHREATENING!!
Check the electrical cable connections on a regular basis. When checking the cables, make sure that the cables are not stuck to the electrical network. Electrical cable connections built with seal contacts must meet the relevant VDE and DIN requirements. Only use electrical cable connections with a rating of at least H 07 RN or a rubber sheathed cable. The type rating of the connection cable must be printed on the cable.
Single-phase motor
- The single-phase motor turns in the direction shown in Fig. 7.
- The mains voltage must comply with the specifications on the motor nameplate.
- Extension cables up to 25 m in length must have a cross section of at least 1,5 mm ^2 , above 25 m at least 2,5 mm ^2
- Mains fuse protection is 10 Amps slow-blow.
In accordance with safety regulations, the motor is equipped with a switch featuring an integrated protective circuitbreaker, which cuts off the current in the event of overload.
Overload may be caused by the following:
- longer-duration blockage of the knife disc
- alternately switching on/off of the motor in rapid succession. In the event of a blocked knife disc, remove the cause to the overload. Disconnect the mains plug.
After a short cooling-off time, switch back on the motor.
13. Disposal and recycling
The equipment is supplied in packaging to prevent it from being damaged in transit. The raw materials in this packaging can be reused or recycled. The equipment and its accessories are made of various types of material, such as metal and plastic. Defective components must be disposed of as special waste. Ask your dealer or your local council.
Old devices must not be disposed of with household waste!
This symbol indicates that this product must not be disposed of together with domestic waste in compliance with the Directive (2012/19/EU) pertaining to waste electrical and electronic equipment (WEEE). This product must be disposed of at a designated collection point. This can occur, for example, by handing it in at an authorised collecting point for the recycling of waste electrical and electronic equipment. Improper handling of waste equipment may have negative consequences for the environment and human health due to potentially hazardous substances that are often contained in electrical and electronic equipment. By properly disposing of this product, you are also contributing to the effective use of natural resources. You can obtain information on collection points for waste equipment from your municipal administration, public waste disposal authority, an authorised body for the disposal of waste electrical and electronic equipment or your waste disposal company.
14. Troubleshooting
| Fault Possible cause Remedy | ||
| The motor doesn't start. | The upper housing unit is not properly closed. | Screw in the safety thoroughly |
| The extension cable is defective. Exchange the extension cable or repair it. | ||
| No current is coming out of the outlet. Check the mains fuse. | ||
| The switch is defective. check/change | ||
| The motor is defective, the capacitor is defective | check/change | |
| Shredder material is obstructing the blade disc. | Pull the main plug, open the housing and clean it out. | |
| The motor doesn't do anything, the safety default switches on. | The extension cable has an insufficient cross section | Choose an extension cable with a larger cross section |
| The cable between the power system connection and the shredder is too long. | Create the shortest possible way between the power system connection and the shredder. | |
| The motor is overloaded the safety default switches on. | The quantity of wet shredded material is too high. | Select a smaller quantity of shredded material. Now and then, include dry shredding material |
| The blade and output areas are clogged. | Pull the main fuse, open the housing and clean it out. | |
| The blade is dull. Resharpen or change | ||
| The cable between the power system connection and the shredder is too long. | Choose an extension cable with a larger cross section. | |
| The shredder intake is diminished, reduced cutting capacity. | The blade is either dull or worn out. Turn blade, sharpen blade or replace entirely. | |
| Excessive vibrations/noise | Blade nut/bolt loose Tighten blade nut/bolt | |
| Cutting blade damaged Replace blade | ||
| Machine damaged internally Contact Service Agent | ||
Günzburger Straße 69
D-89335 Ichenhausen
CHER CLIENT:
Günzburger Straße 69,
D-89335 Ichenhausen
EGREGIO CLIENTE,
Günzburger Straße 69,
D-89335 Ichenhausen
GEACHTE KLANT,
Günzburger Straße 69
D-89335 Ichenhausen
ESTIMADO CLIENTE,
Günzburger Straße 69
D-89335 Ichenhausen
SZANOWNY KLIENCIE,
Günzburger Straße 69
D-89335 Ichenhausen
VÁŽENÝ ZÁKAZNÍKU,
Günzburger Straße 69
D-89335 Ichenhausen
VÁŽENÝ ZÁKAZNÍK,
Günzburger Straße 69
D-89335 Ichenhausen
TISZTELT VÁSÁRLÓ,
CE - Declaration of Conformity
| 2014/29/EU | 2004/22/EC | 89/686/EC_96/58/EC | X 2000/14/EC_2005/88/EC | ||
| 2014/35/EU | 2014/68/EU | 90/396/EC | Annex V | ||
| X 2014/30/EU | X 2011/65/EU* | Annex VI Noise: measured LWA = xx dB(A); guaranteed LWA = xx dB(A) P = xx KW; LØ = cm Notified Body: Notified Body No.: | |||
| X 2006/42/EC | |||||
| Annex IV Notified Body: Notified Body No.: Certificate No.: | 2010/26/EC | ||||
| Emission. No: | |||||
Standard references:
EN 55014-1, EN 55014-2, EN 61000-3-2, EN 61000-3-3, EN 60335-1, EN 50434
This declaration of conformity is issued under the sole responsibility of the manufacturer.
The object of the declaration described above fulfils the regulations of the directive 2011/65/EU of the European Parliament and Council from 8th June 2011, on the restriction of the use of certain hazardous substances in electrical and electronic equipment.
Apparent defects must be notified within 8 days from the receipt of the goods. Otherwise, the buyerls rights of claim due to such defects are invalidated. We guarantee for our machines in case of proper treatment for the time of the statutory warranty period from delivery in such a way that we replace any machine part free of charge which provably becomes unusable due to faulty material or defects of fabrication within such period of
time. With respect to parts not manufactured by us we only warrant insofar as we are entitled to warranty claims against the upstream suppliers. The costs for the installation of the new parts shall be borne by the buyer. The cancellation of sale or the reduction of purchase price as well as any other claims for damages shall be excluded. The saw blade is a consumable item and explicitly excluded from any warranty.
Garantie FR


- VEREHRTER KUNDE,
- Description of the symbols
- Table of contents: Page:
- Introduction
- MANUFACTURER:
- scheppach
- DEAR CUSTOMER
- NOTE:
- Recommendations:
- Device description (Fig. 1 - 2)
- Scope of Delivery
- Before starting the equipment
- Intended use
- Safety notes
- Infeed of material to be chopped Always switch on the motor first!
- Conduct in case of an accident
- Electrical safety
- Remaining hazards
- Technical Data
- Noise Information
- Assembly
- ⚠️ ATTENTION! Always make sure the device is fully assembled before start-up!
- Putting into operation
- Starting protection
- Switching on/off
- Motor braking unit
- Operation
- ⚠️ ATTENTION! Observe the safety instructions before the commissioning!
- Operating panel (Fig.1)
- Working with the shredder
- You shred wilting garden waste and branches that have been stored for several days.
- Changing and grinding the knife
- ⚠ WARNING! Await complete standstill of cutter. Before working on cutter, remove mains plug!
- So please note:
- Replacing the blades (Fig. 6-7)
- The knife disc remains mounted, (Fig. 7)
- Blade removal
- Sharpening the blade
- Maintenance
- Service information
- Motor and switch
- Electrical connection
- Damaged electrical connection cables
- Some causes are:
- Single-phase motor
- Overload may be caused by the following:
- Disposal and recycling
- Old devices must not be disposed of with household waste!
- Troubleshooting
- CHER CLIENT:
- EGREGIO CLIENTE,
- GEACHTE KLANT,
- ESTIMADO CLIENTE,
- SZANOWNY KLIENCIE,
- VÁŽENÝ ZÁKAZNÍKU,
- VÁŽENÝ ZÁKAZNÍK,
- TISZTELT VÁSÁRLÓ,
- CE - Declaration of Conformity
- Standard references:
- Garantie FR
Brand : SCHEPPACH
Model : GS55
Category : Mechanical chipper