USER MANUAL GSE45S SCHEPPACH
natural_image
Exterior view of a modern office building (no signage)
GSE45S
| DE | GartenhäckslerOriginal-Anleitung |
| GB | Garden shredderTranslation of the original user manual |
| FR | Broyeur de végétauxTraduction du manuel original |
DE
Only for EU countries.
Do not dispose of electric tools together with household waste material! In observance of European directive 2012/19/EU on wasted electrical and electronic equipment and its implementation in accordance with national law, electric tools that have reached the end of their life must be collected separately and returned to an environmentally compatible recycling facility
FR
Fig. 3

natural_image
Mechanical assembly diagram showing a metal frame with a bracket and a labeled component (no text or symbols present)
Fig. 4
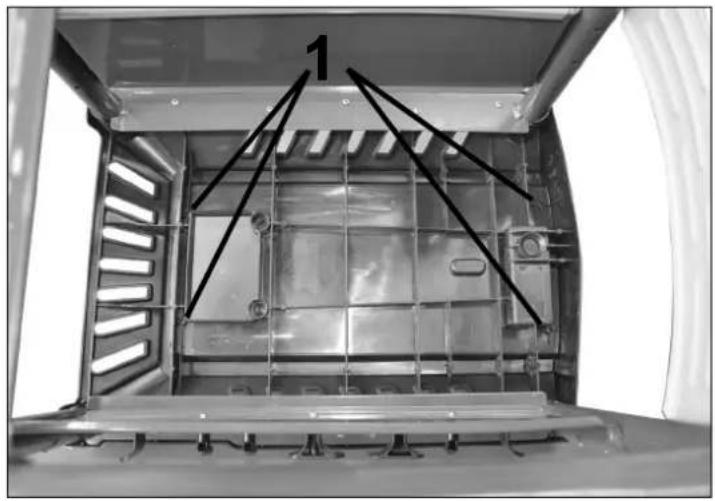
Fig. 5
DE Gartenhäcksler 7
GB Garden shredder 12
Operating instructions
Technical data
| Dimensions LxWxH (mm) | 590x480x925 |
| Blade cylinder ∅ (mm) | 32 |
| Number of blades | 8 |
| Collection box dimensions LxWxH (mm) | 510x285x420 |
| Collection box capacity (l) | 60 |
| Transport wheels ∅ (mm) | 180 |
| Weight kg | 31 |
| Power unit | |
| Motor V/Hz | 230-240/50 |
| Nominal consumption P1 (W) | 2300 |
| Revolutions max. (per min) | 2850 |
| Blade cylinder revolutions max. (per min) | 40 |
| Operating type | S6/40% |
| Protection rating | IP 24 |
Subject to technical changes!
Noise levels
| Guaranteed sound power level LWA 92 dB(A) |
| Measured sound power level LWA 89,1 dB(A) |
| Sound pressure level LpA 82,4 dB(A) | |
| Measurement uncertainty K 2,42 dB(A) | |
Note: The specified sound levels have been determined using a standardised test procedure and can be used to compare different electronic devices. Furthermore, these values can be used to assess in advance the strain on the user caused by the sound.

Warning! Depending on how you use the power tool, the actual values can vary from those stated. Take measures to protect yourself from
noise. Consider the entire work process, i.e. even times during which the power tool works without load or is switched off. Suitable measures include, amongst others, regular maintenance and care of the power tool and the attachments, regular breaks as well as good planning of the work processes.
Explanation of symbols
 | Before initial operation, read the entire operating manual. |
   Wear safety goggles and hearing protection. Wear safety goggles and hearing protection. |
 | Protect the machine from moisture. |
 | Danger - During the operation of the machine, objects can be ejected. |
General notices
- After unpacking, check all parts for possible damage caused by transportation. In the event of complaints, you must contact the distributor without delay. Claims at a later stage will not be accepted.
- Check that the delivery is complete.
- Before handling the device, make yourself familiar with it by reading the operating instructions.
- For accessories, consumables and spare parts, only ever use original parts. Spare parts are available from your stockist.
- Include our item number, the device model and year of manufacture in your order.
Notes
According to the applicable Product Liability Law, the manufacturer of this device is not liable for damage caused to or by this device in the event of:
- improper handling,
• non-compliance with the operating instructions,
• repairs by third parties who are not authorised specialists,
- installation and replacement of non-original spare parts,
- use other than for the intended purpose,
- failure of the electrical equipment in the event of non-compliance with electrical instructions.
We recommend:
Before assembling and commissioning the device, read the entire user manual.
This user manual is designed to make it easier for you to get to know your machine and to use it for its intended purpose. The user manual contains important information about how you can work with the machine in a safe, professional and economic way, how you can prevent hazards, save money on repairs, reduce downtimes and increase the reliability and durability of the machine. In addition to the safety instructions in this user manual, you must also, without fail, observe the regulations relevant to your country for the operation of this machine. Store the user manual in a plastic cover close to the machine, protected from dirt and moisture. It must be read and followed carefully by every user before working with the machine. Only those who have been instructed in the machine's use and taught about associated hazards may use it. The minimum age requirement must be complied with.
In this user manual, we have marked sections concerning your safety with this sign: ⚠
Safety notices ⚠
General
- The shredder is suited only for private and not for commercial use.
- Never leave the shredder unsupervised when it is connected to the mains.
- Keep other people and animals away from the shredder when it is in use.
- Make sure no children are working with the shredder.
- Use the shredder only for its intended purpose.
- If you notice a fault with the shredder, turn it off and put it back into use only when the problems have been resolved.
- Store the shredder in a dry location.
Before commissioning
- Use the shredder only when it has been assembled correctly and completely.
- Make sure the connection cables and machine components are in a faultless condition.
- Make sure the working environment is well lit.
- Make sure that nobody works with the machine who is not familiar with the user manual.
- Make sure the shredder is positioned on level, solid ground.
- Make sure there are no foreign objects in the feed opening.
Protective clothing
- Always wear hearing protection and safety goggles when working with the shredder.
• Always wear tight clothes.
- Wear safety gloves.
Commissioning
- Only shred garden waste such as branches and shrubs with the shredder.
- Make sure no foreign objects such as stones, glass, metal, earth or plastic get into the shredder. This can lead to severe damage to the shredder.
- Always ensure you are balanced and in a stable position. Do not lean over the shredder.
- Protect the connection cables from damage caused by heavy mechanical load, as well as by sharp edges, contact with moving parts,
corrosive liquids etc.
- Do not put your hands into the feed hopper or the output slot - risk of injury from the rotating blade cylinder!
- Turn the shredder off if it starts to vibrate in an unusual way.
- Do not work with the shredder in the rain.
- Turn the shredder off and disconnect it from the mains before leaving the machine.
- Always turn off the shredder first before disconnecting it from the mains.
- Do not use the cable to pull the plug from the socket.
- Caution! The blade cylinder does not come to an immediate standstill after being turned off.
- Do not tilt the shredder while it is being used or connected to the mains.
- Make sure the collection box is not too full because this can lead to kickback by the material.
- Turn the shredder off and disconnect it from the mains when it becomes blocked.
Transport
- Disconnect the shredder from the mains before transporting it.
Electrics
- Only use three-core extension cables with the protective earth conductor connected.
- Only use the shredder if the durability of the mains has more than 100 A per phase.
- Only use extension leads suitable for outdoor use.
Maintenance, repair and cleaning
- Before all maintenance, repair and cleaning work, make sure that the blade cylinder has come to a standstill and the machine is disconnected from the mains.
- Wear gloves when carrying out maintenance, repair or cleaning work.
- Do not modify the shredder's electrical and mechanical components.
Intended use ⚠
- The shredder has been designed to shred fibrous or woody garden waste such as hedge trimmings and tree prunings, branches, bark or pine cones.
- Do not fill the shredder with stones, glass, metal, bones, plastic or textile waste.
- The operator or user is responsible for accidents or risks to other
people or their property.
- Any use other than that expressly permitted in this user manual, can lead to damage to the shredder and represent a serious hazard to the user.
- The manufacturer is not liable for damage caused by unintended use or incorrect operation.
Residual risks ⚠
The machine has been built according to the latest technology and recognised safety rules. However, there is still a chance of residual risks whilst working.
- Injury from recoiling branches when feeding the hopper
• Health risk from noise
• Endangering health from electricity, when using inappropriate
connecting cables
- Additionally, despite all the safety provisions, residual risks can occur which are not obvious.
Residual risks can be minimised by complying with the “Safety notices” and the “Intended use” as well as operating instructions overall.
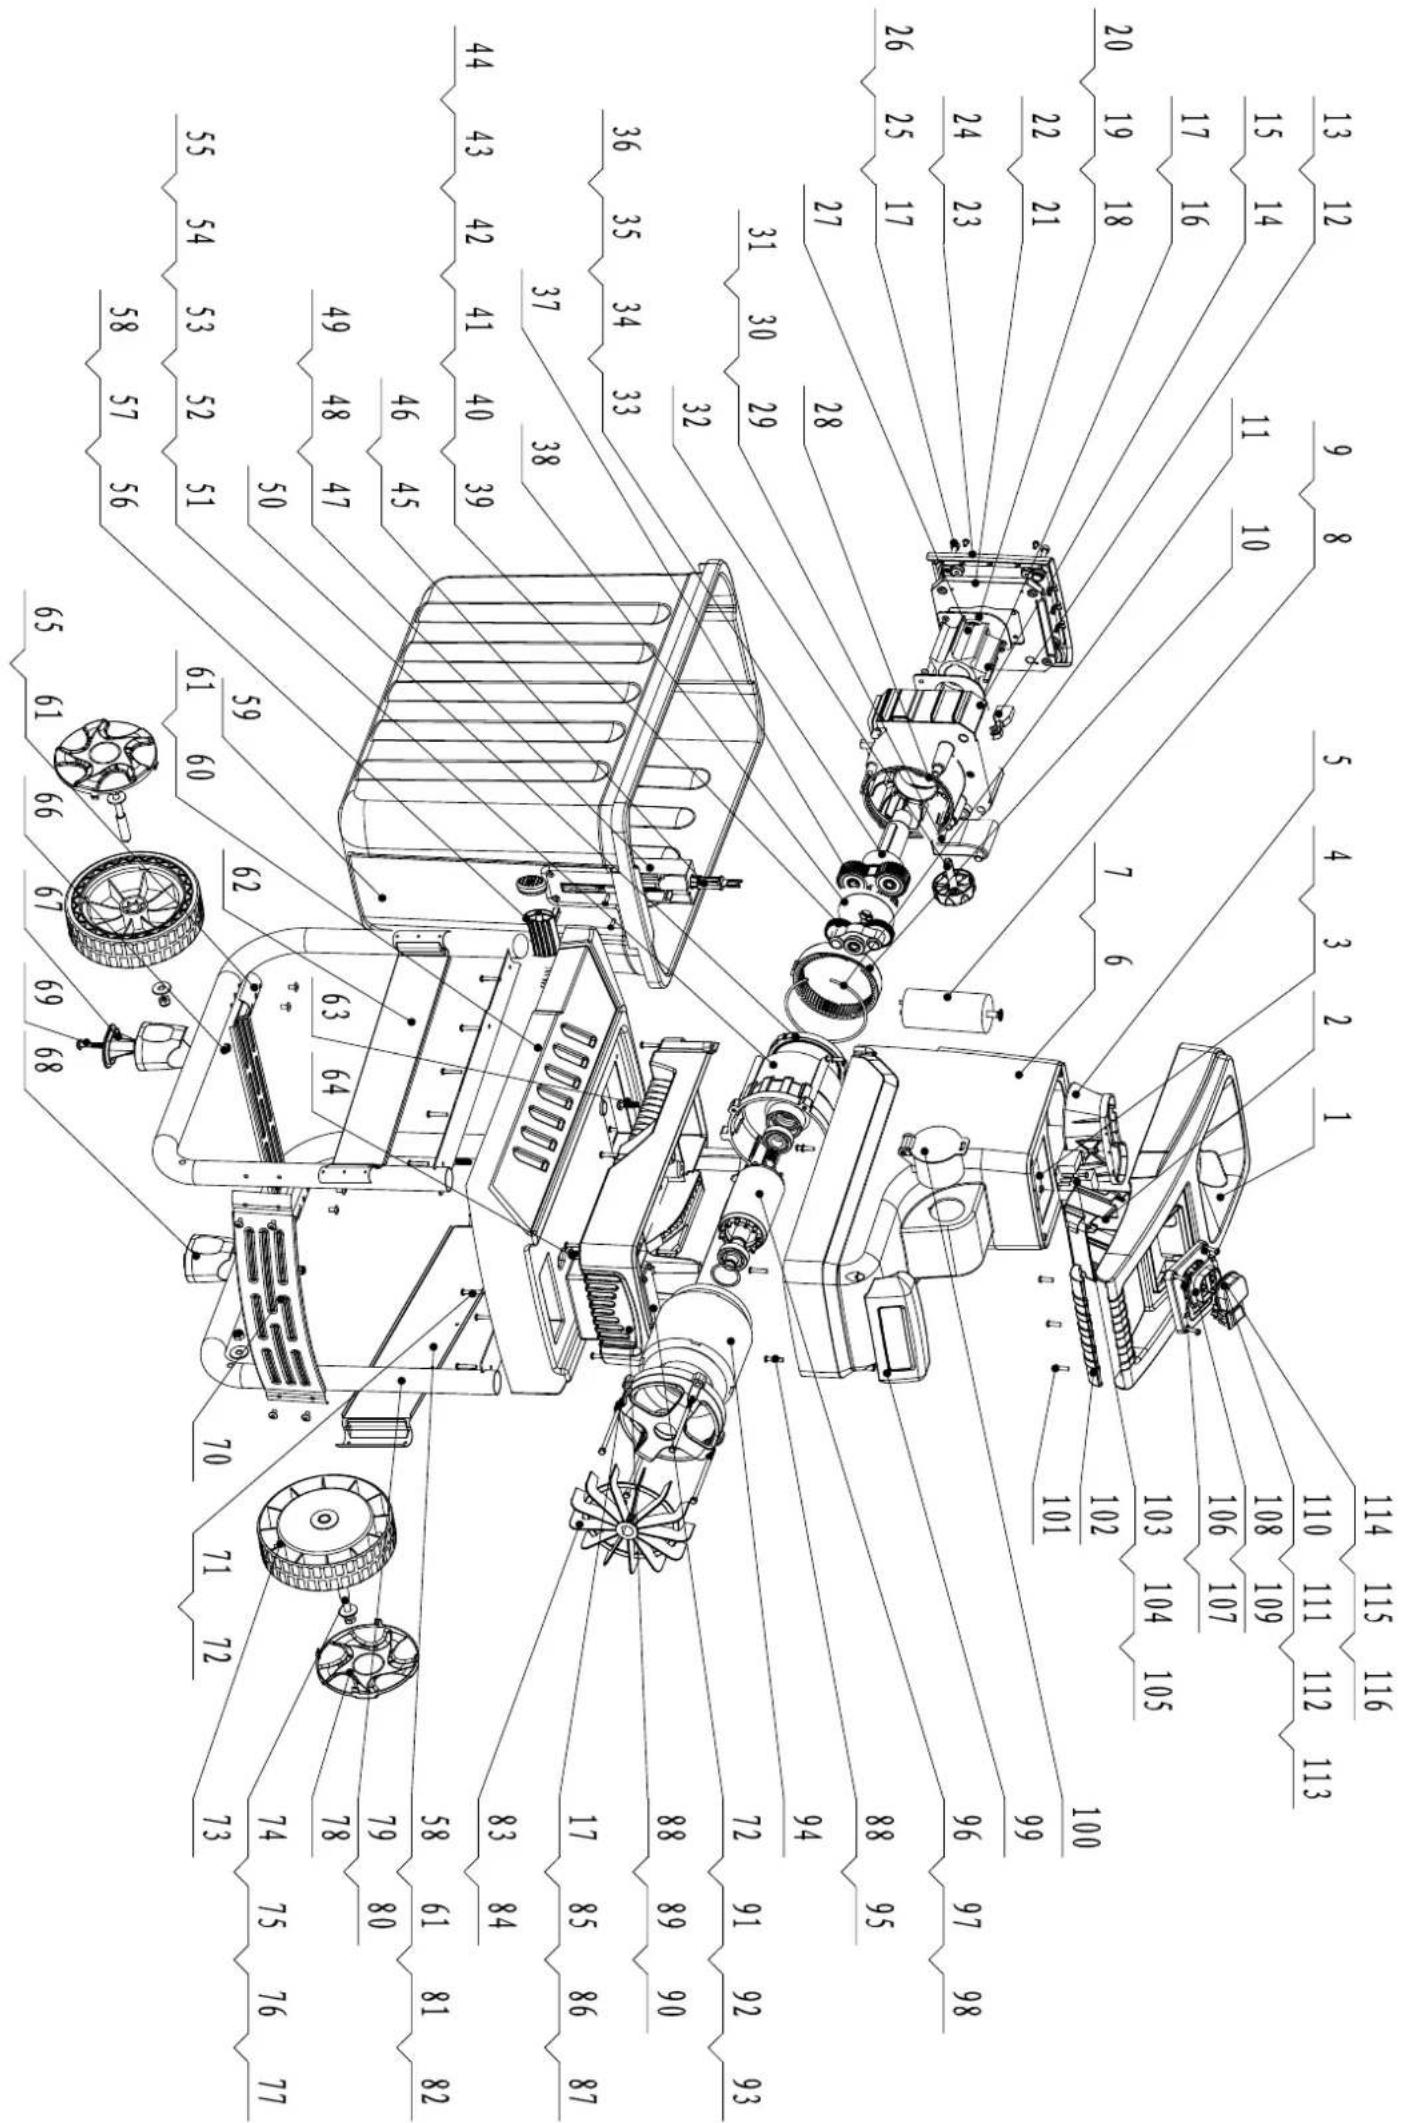
Equipment Fig. 1
- Feed hopper
- Adjustment wheel
- Frame for collection box
- Collection box
- Locking device
- Leg support
- Wheel
- Power supply
- Reset switch
- Switch to change rotational direction of the cylinder
- On switch
- Off switch
Assembly
- Open the box and remove the machine and all accessories.
GB
-
Assembling the wheels (Fig.2)
-
Assemble both wheels (1), as shown in the image.
-
Clip the wheel covers (2) into the wheels (1).
-
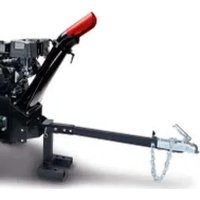
Assembling the leg support (Fig.3)
- Assemble both leg supports (1), as shown in the image.
- Connecting the upper part of the machine with the frame
- Place the upper part of the machine on the ground with the feed
hopper (Fig.1, No.1) upside down.
- Place the frame for the collection box (Fig.1, No.3) on the upper part of the machine.
-
Bolt together both components using the four cross-head screws provided in the holes intended for this (Fig.4, No.1).
-
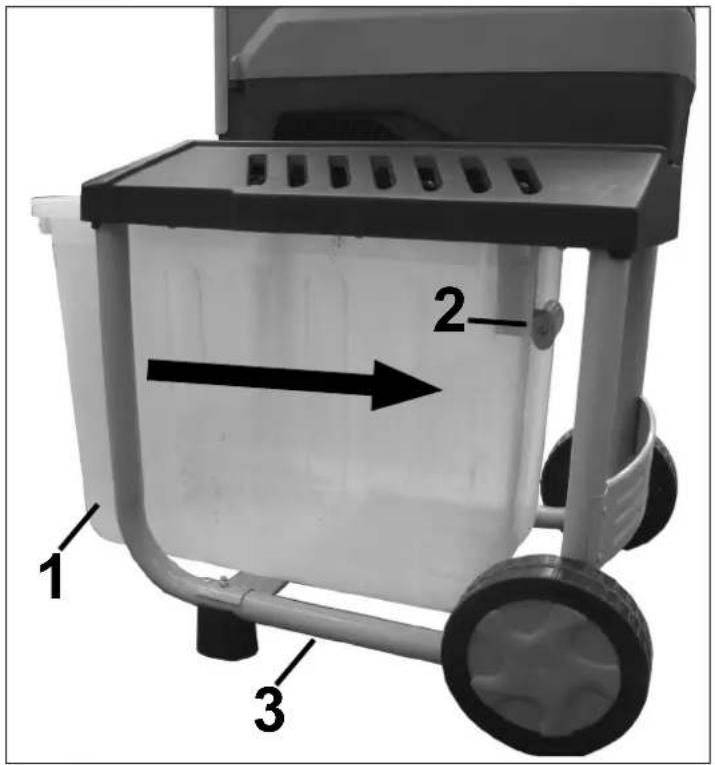
Positioning the collection box (Fig. 5)
-
Set the locking device (2) on the collection box to the lowest position.
- Completely push the collection box (1) into the frame (3).
- Push the locking device (2) on the collection box (1) all the way to the top again.
Commissioning
Warning! The shredder can only be started if the collection box (Fig.1, No.4) has been pushed into the frame (Fig.1, No.3) and the locking device (Fig.1, No.5) is in the upper position.
Control panel Fig.1
• No.10 Manual change of rotational cylinder direction:
- Button „▲“ - anti-clockwise: When this button is pressed, the blade cylinder rotates anti-clockwise. This is necessary when jammed shredding material needs to be freed. This function is only available when the shredder is in operation.
- Button „▲“ - clockwise: This button switches the direction of the blade cylinder from anti-clockwise back to clockwise.
- No.11 On switch: Pressing this button starts the shredder and the blade cylinder rotates clockwise.
- No.12 Off switch: Pressing this button stops the shredder.
Working with the shredder
Alternating with branches, shred withered garden waste and branches that have been stored several days to prevent the shredder from becoming blocked.
- Make sure the collection box (Fig.1, No.4) is pushed into the frame (Fig.1, No.3) correctly and the locking device (Fig.1, No.5) is in the upper position.
- Connect the shredder to the power supply.
- Turn the shredder on by using the on switch (Fig.1, No.11).
- Fill shredding material into the feed hopper (Fig.1, No.1) and it will be drawn in.
- Caution: If the shredding material becomes jammed, use the switch to change the rotational direction of the cylinder (Fig.1, No.10) so it runs anti-clockwise.
- Make sure the shredder has completely shredded the input material before adding new.
- Do not use your hands to push in more shredding material. Use the special pushing device or other shredding material.
- When you have finished working with the shredder, turn it off and disconnect it from the mains.
Emptying the collection box
- Stop the shredder using the off button (Fig.1, No.12).
- Set the locking device (Fig.1, No.5) to the lowest position.
- Pull out the collection box (Fig.1, No.4) and empty it.
- Re-insert the collection box (Fig.1, No.4) and push the locking device (Fig.1, No.5) up again.
Setting the counter blade
The counter blade and the blade cylinder have been ideally adjusted by the manufacturer. Re-adjusting the counter blade is only required if it becomes worn. For maximum performance, it is necessary that the distance between the counter blade and blade cylinder is about 0.50 mm.
- Turn the shredder on.
- Turn the adjustment wheel (Fig.1, No.2) clockwise until you can hear slight grinding sounds.
- When turning the adjustment wheel (Fig.1, No.2) clockwise by half
a turn, the blade cylinder is positioned closer to the counter blade by 0.50 mm.
WARNING: If the shredder blade touches the counter blade, it will be trimmed and small pieces of swarf may fall out of the ejection opening. This is not an error, but it has to be re-adjusted to the required degree because otherwise the counter blade will wear too early.
Overload protection
In the event of overload, e.g. due to branches that are too thick, the equipment automatically switches off.
After a short cooling period (approximately 5 minutes), press the reset switch (pos 9)
Electric connection ⚠
The installed electric motor is connected and operational. The connection complies with relevant VDE and DIN stipulations.
The customer's mains connection as well as the extension lead used must comply with these provisions.
Hazardous electric connections
Insulation damage often occurs on electric connections.
Causes include:
- Pressure marks when connections are guided through windows and doors
- Kinks due to inappropriate attachment or guidance of the connection
• Cuts when the connection is run over
• Insulation damage when being pulled out of the wall socket
• Tears from ageing insulation
Such hazardous electric connections must not be used and are dangerous to life due to the insulation damage.
Regularly check electric connections for damage. Make sure the connection is not connected to the mains when checking. Electric
connections must comply with relevant VDE and DIN stipulations. Only use connections marked H 07 RN. Printing the type designation on the connection is the law.
AC motor
- The power voltage has to be 230 Volt – 50 Hz.
- Extension leads up to 25 m in length must have a cross section of 1.5 mm ^2 , and at more than 25 m length, it has to be at least 2.5 mm ^2 .
- The mains connection is protected against short circuit with a 16 A slow fuse.
Connections and repairs to the electrical equipment may only be carried out by a trained electrician.
If there are any questions, please provide the following data:
• Motor's type of power
• Data from the machine's type plate
When sending back the motor, always send the entire motor unit with switch.
Follow the safety notices!
Cleaning, maintenance and repair
- Cleaning, maintenance and repair work may only be carried out when the motor has been turned off and the machine has been disconnected from the mains.
- Work on the electrical equipment, may only be carried out by trained electricians.
- Wear gloves when handling the cylinder blade.
- Do not spray the shredder with water. Risk of electric shock.
- Always keep the machine, the wheels and the ventilation opening clean. When cleaning, use a brush or a cloth, but not detergents or solvents.
- Before every use, check the machine, and particularly safety devices, for damage such as loose, worn or damaged parts. Check that all
nuts, bolts and screws are tight.
- Check covers and safety devices for damage and correct positioning. Replace if required.
- Store the machine in a dry location and beyond the reach of children.
Troubleshooting
| Problem Possible cause Solution | | |
| Motor does not start. | Collection box not in correct position Insert the collection box correctly and check the locking device (see Commissioning). |
| Motor is overloaded. Turn the shredder on again (see Commissioning). |
| No electricity Have the socket, cable, lead and plug checked by a trained electrician (see Electric connection). |
| Garden waste is not drawn in. | Blade cylinder rotates anti-clockwise. Change the rotational direction (see Commissioning). |
| Shredding material is too soft. Push shredding material with special pushing device for shredder. |
| Blade cylinder has become blocked. Remove blockage (see Commissioning). |
| Shredding material is tangled. Counter blade is not set correctly. Re-adjust counter blade (see Commissioning). |
Subject to change without notice
Documents registar: Christian Drößler
Günzburger Str. 69, D-89335 Ichenhausen
Garantie DE
Apparent defects must be notified within 8 days from the receipt of the goods. Otherwise, the buyer's rights of claim due to such defects are invalidated. We guarantee for our machines in case of proper treatment for the time of the statutory warranty period from delivery in such a way that we replace any machine part free of charge which provably becomes unusable due to faulty material or defects of fabrication within such period of time. With respect to parts not
manufactured by us we only warrant insofar as we are entitled to warranty claims against the upstream suppliers. The costs for the installation of the new parts shall be borne by the buyer. The cancellation of sale or the reduction of purchase price as well as any other claims for damages shall be excluded.
Garantie FR