
EVM8E08Z - Electric oven ELECTROLUX - Free user manual and instructions
Find the device manual for free EVM8E08Z ELECTROLUX in PDF.
| Product Type | Microwave Electric Oven |
| Brand | Electrolux |
| Model | EVM8E08Z |
| Appliance Height | 455 mm (front) / 440 mm (rear) |
| Appliance Width | 595 mm (front) / 559 mm (rear) |
| Appliance Depth | 567 mm (total) / 546 mm (recess) |
| Depth with open door | 882 mm |
| Minimum cabinet width | 560 mm |
| Minimum cabinet height | 444 mm (460 mm under worktop) |
| Minimum cabinet depth | 550 mm |
| Minimum ventilation opening | 560 x 20 mm (lower rear face) |
| Power supply cable length | 1500 mm |
| Microwave power | 100 to 1000 W depending on function |
| Grill intensity levels | Low (Lo) and High (Hi) |
| Cooking modes | Grill, Grill + Microwave, Microwave only, Defrost, Melt, Reheat, Popcorn, Liquids |
| Clock functions | Timer, Cooking time, End of action, Extension, Reminder, Counter |
| Favorite programs capacity | 3 programs |
| Keylock | Yes |
| Cooling fan | Automatic |
| Internal lighting | Yes (energy efficiency class G) |
| Supplied accessories | Turntable set, grill set |
| Materials suitable for microwave | Glass, ceramic, heat-resistant plastic (without metal) |
| Cleaning | Soft cloth, warm water, mild detergent; do not use steam cleaner |
| Safety | Automatic stop when door is opened, child safety, keylock |
| Maintenance data | Model, PNC and serial number on rating plate (front frame of cavity) |
Frequently Asked Questions - EVM8E08Z ELECTROLUX
User questions about EVM8E08Z ELECTROLUX
0 question about this device. Answer the ones you know or ask your own.
Ask a new question about this device
Download the instructions for your Electric oven in PDF format for free! Find your manual EVM8E08Z - ELECTROLUX and take your electronic device back in hand. On this page are published all the documents necessary for the use of your device. EVM8E08Z by ELECTROLUX.
USER MANUAL EVM8E08Z ELECTROLUX
OBCJNYKBAHE HA KJINEHTN
BnHaHn n3noJ3BaIe opuHaJIHn pe3epBHN qactn.
Korato ce cBbP3BaTe c haun oToPn3npaH oTdeI „ObcnykBaHe“, Tp6Ba da nMaTe noD pBka cnEHaT a HOpmaun: MoJeI, PNC, cepneH Homep.
HOpmaTAtMOKe Da 6bDe OTkpuTa Ha Ta6Jkata C OCHOBn daHHN
IpeDynpexJeHne/BnMaHne-IVHOpMaun 3a6e3oNaChOCT
① O67a INΦopMaζη N CbBETN
HOpMaun3aOKoJHaTa cpea
3ana3BaMe cn npaBOTO Ha n3MeHeHn.
CbДьРЖAHNE
- INHΦOPMALÇIŋA 3A BE3OΠACHOCT......3
1.1 Be3onacnoct 3a deua n xopa B
HepaBHOToHNoJoxKeHne. 3
1.2 067a 6e3oNaChocT. 4
- INHCTPYKUIN 3A BE3ONACHOCT... 6
2.1 HcTanaua.. 6
2.2 EneKtpnuecko Cbbp3BaHe 8
2.3 IV3noJ3BaHe 8
2.4 Prnka n nouchTbaHe 9
2.5 Bbtpewho oCBeTneHne 9
2.6 06cnykBaHe.. 10
2.7 IV3XBbPJIaHe... 10
- ONICAHNE HA YPEDA 10
3.1 O6u nperepei 10
3.2 Akcecoapn 10
- KAK DA BKJIIOHBATE N I3KJIIOHBATE ΦYPHATA 11
4.1 KoHTpOJIeH nAHeJ 11
4.2 EkpaH 12
7.1 OnscaHne Ha yHKnIte Ha YacOBnka
IocTaBeTe roTbapcknTe CbdoB E bceHTbpa Ha BbptaTa Ce NOBbpxHocT.
IOnnpt MeKdy DbA npekaneHO ropeuIN nII IN pekaneHO cTydeHn npedMeta MoKe da cyynn BbpTaata Ce NOBbpxHOCT.
Obphe Te nn pa36bpaKeTe xpaHaTa NO cpeaTa Ha BpeMeTo 3a pa3Mpa3raBaHe nn rotBeHe. Ot BpeMe Ha BpeMe pa36bpkBaTe TeuHnte JCTn.
Pa36bpbKaBte xpaHaTa IpeDi cepBupaHe.
IokpnTe xpaHaTa npri rotBeHe n npetOnJnHe.
IocTaBeTe IbXnCata KbM 6yTnIkaT aNN YaWata, KOraTO 3aToNnTe HAnNTK, 3a Da ce rapaHTnpa No-Do6po pa3nPpeDeHne Ha TonnHaTa.
IocTaBeTe xpaHaTbB cyphata 6e3 onakOBKn. NaKeTnpaHnTe roTOBxpaHn MORaT da 6bDat
NoCTaBeHn BbB cyphata camo, Korato onakOBkata e noDxOJa7a 3a MmKpOBbHOBa cyphna (npoetete nHopmaunra Tbpxy onakOBkata).

TOrBeHe B MmKpObBnHOBa cypHa
TOrBte B NOKpNT cBd. Ako nckate xpaHaTa da e xpynkaBa, rotBeTe 6e3 Kanak.
He npekajBaIte C rotBeHTo Ha JCTnra, KaTO n36epTe npekajHo BnCOka HacTpoiKa Ha MOUHOCTTa I npekaiNeHO Dblro BpeMe. XpaHata MoKe Da N3cbxHe, Da N3ropu NIN Da npedn3Bnka NoXap.
He n3no3BaIte cyphata 3a npiroTBHe Ha myca nn OXIOBn C cepynKn, 3aOTo Te Morat da ce npbchAt. IpodunyeTe XblTbKa Ha nbpxeHnte myca, npedn Da rN npTeONJIte.
Ipei nrotbeHe npOdyuYeTe XpaHaTa C KOJa NII Kopa HraKOJIko NbTn.
HapexTe 3eJenHuIte Ha napYeHa c noo6n pa3Mepn.
Cne KaTo N3KJIOUHTe FpyHaTa, N3BaTe Te XpaHaTn I oCTaBeTe Da npeCTOn HrKOJIko MInHyTu, KaTo Taka TOpNINHaTa ige ce pa3npedeN paBHomepHo.

Pa3mpa3raBaHe B MmKpoBbJIHOBa φypha
Noctabete 3aMpa3eHaTaNHepa3OJaKOBaHa XpHa Bbpxy MaIka OsbPaTa HAO6paTHO YHnna CbC cBd IOD He, Ha NoCTaBkata 3a pa3Mpa3BaHe NII INPactMaCOBO CnTO, 3a da ce cb6npa TeuHOCTTa OT pa3Mp3BaHe.
Otctpahepepa3mpa3eHnTe napyeTnocneIOBaTeJHo.
3a nprirotbIHe Ha nIOObe H 3eJeHcyu6e3 Da rpa3Mpa3BaTe, MoKe da n3nOJI3BaTe MIKPOBbJIHOBbTa ypHa Ha NO-BNCOKa MOUHOCT.
10.3ПоIxODЯи rOTBapcKn cIIOBe n MaTePnaJI 3a MnKpOвьЛнОВа
N3noI3BaIte cAmo nOxOJyI rO TBapckn CbIOBe mATEpnaHn 3a MIKPOBbHOBaTa φypHa. N3noI3BaIte doJIHATA tabnua 3a cnpaBAka.
PpOBepeTe CneuKauuTe Ha cBIOBeTe 3a rotBeHe / MaTePnAna npEi ynoTpe6a.
- ENERGETICKÁ ÜCINNOST. 58
13.1 Uspora energia 58
- STRUKTURA NABIDKY 58
14.1 Nabidka 58
14.2 Dilci nabidka pro: Funkce....58
14.3 Dilić nabídka pro: Nastavení...... 59
14.4 Podnabidka pro: Obsluha....59
15.JE TO SNADNE! 59
16. POZNÁMKY K OCHRANE ZIVOTNIHO PROSTREDI 61
1. BEZPEČNOSTNI INFORMACE
WE'RE THINKING OF YOU
Thank you for purchasing an Electrolux appliance. You've chosen a product that brings with it decades of professional experience and innovation. Ingenious and stylish, it has been designed with you in mind. So whenever you use it, you can be safe in the knowledge that you'll get great results every time.
Welcome to Electrolux.
Visit our website to:

Get usage advice, brochures, trouble shooter, service and repair information:
www.electrolux.com/support

Register your product for better service:
www.registerelectrolux.com

Buy Accessories, Consumables and Original spare parts for your appliance:
www.electrolux.com/shop
CUSTOMER CARE AND SERVICE
Always use original spare parts.
When contacting our Authorised Service Centre, ensure that you have the following data available: Model, PNC, Serial Number.
The information can be found on the rating plate.
Warning / Caution-Safety information
1 General information and tips
Environmental information
Subject to change without notice.
CONTENTS
1.SAFETY INFORMATION. 63
1.1 Children and vulnerable people safety 63
1.2 General Safety. 64
2.SAFETYINSTRUCTIONS. 66
2.1 Installation 66
2.2 Electrical connection.. 67
2.3 Use 68
2.4 Care and cleaning.. 68
2.5 Internal lighting 69
2.6 Service.. 69
2.7 Disposal 69
3.PRODUCT DESCRIPTION. 70
3.1 General overview.. 70
3.2 Accessories.. 70
- HOW TO TURN OVEN ON AND OFF...... 70
4.1 Control panel. 70
4.2 Display. 71
- BEFORE FIRST USE. 72
5.1 Initial Cleaning 73
5.2 First connection 73
6.DAILYUSE 73
6.1 How to set the function: Grill + MW, Grill 73
6.2 How to set: Microwave heating functions. 75
6.3 How to use: Microwave quick start 75
6.4 Heating functions.. 76
- CLOCK FUNCTIONS. 77
7.1 Clock functions description.. 77
7.2 How to set: Clock functions.. 77
- HOW TO USE: ACCESSORIES 79
8.1 Inserting accessories.. 79
- ADDITIONAL FUNCTIONS 79
9.1 How to save: Favourites.. 79
9.2 Function lock.. 80
9.3 Cooling fan 80
- HINTS AND TIPS 80
10.1 Cooking recommendations..80
10.2 Microwave recommendations ....80
10.3 Microwave suitable cookware and materials 81
10.4 Recommended power settings for different kinds of food 82
10.5 Cooking tables for test institutes..83
- CARE AND CLEANING 84
11.1 Notes on cleaning. 84
- TROUBLESHOOTING 85
12.1 What to do if. 85
12.2 How to manage: Error codes.....85
12.3 Service data.. 86
- ENERGY EFFICIENCY 86
13.1 Energy saving.. 86
14.MENU STRUCTURE. 86
14.1 Menu.. 86
14.2 Submenu for: Options.. 87
14.3 Submenu for: Setup.. 87
14.4 Submenu for: Service 88
- IT'S EASY! 88
- ENVIRONMENTAL CONCERNS. 89
1. SAFETY INFORMATION
Before the installation and use of the appliance, carefully read the supplied instructions. The manufacturer is not responsible for any injuries or damage that are the result of incorrect installation or usage. Always keep the instructions in a safe and accessible location for future reference.
1.1 Children and vulnerable people safety
- This appliance can be used by children aged from 8 years and above and persons with reduced physical, sensory or mental capabilities or lack of experience and knowledge if they have been given supervision or instruction concerning the use of the appliance in a safe way and understand the hazards involved. Children of less than 8 years of age and persons with very extensive and complex disabilities shall be kept away from the appliance unless continuously supervised.
-
Children should be supervised to ensure that they do not play with the appliance.
-
Keep all packaging away from children and dispose of it appropriately.
- WARNING: The appliance and its accessible parts become hot during use. Keep children and pets away from the appliance when in use and when cooling down.
- If the appliance has a child safety device, it should be activated.
- Children shall not carry out cleaning and user maintenance of the appliance without supervision.
1.2 General Safety
- This appliance is for cooking purposes only.
- This appliance is designed for single household domestic use in an indoor environment.
- This appliance may be used in, offices, hotel guest rooms, bed & breakfast guest rooms, farm guest houses and other similar accommodation where such use does not exceed (average) domestic usage levels.
- Only a qualified person must install this appliance and replace the cable.
- Do not use the appliance before installing it in the built-in structure.
- Disconnect the appliance from the power supply before carrying out any maintenance.
- If the mains power supply cable is damaged, it must be replaced by the manufacturer, its Authorised Service Centre or similarly qualified persons to avoid an electrical hazard.
- WARNING: Ensure that the appliance is switched off before replacing the lamp to avoid the possibility of electric shock.
- WARNING: The appliance and its accessible parts become hot during use. Care should be taken to avoid touching heating elements.
-
Always use oven gloves to remove or insert accessories or ovenware.
-
Use only the turntable and the turntable support designed for this appliance.
- Do not activate the microwave function when the appliance is empty. Metal parts inside the cavity can create electric arcing.
- Metallic containers for food and beverages are not allowed during microwave cooking. This requirement is not applicable if the manufacturer specifies size and shape of metallic containers suitable for microwave cooking.
- WARNING: If the door or door seals are damaged, the appliance must not be operated until it has been repaired by a qualified person.
- WARNING: Only a qualified person can carry out any service or repair operation that involves the removal of a cover which gives protection against exposure to microwave energy.
- WARNING: Do not heat liquids and other foods in sealed containers. They are liable to explode.
- Use only utensils that are suitable for use in microwave ovens.
- When heating food in plastic or paper containers, observe the appliance due to the possibility of ignition.
- The appliance is intended for heating food and beverages. Drying of food or clothing and heating of warming pads, slippers, sponges, damp cloth and similar may lead to risk of injury, ignition or fire.
- If smoke is emitted, switch off or unplug the appliance and keep the door closed in order to stifle any flames.
- Microwave heating of beverages can result in delayed eruptive boiling. Care must be taken when handling the container.
-
The contents of feeding bottles and baby food jars shall be stirred or shaken and the temperature checked before consumption, in order to avoid burns.
-
Eggs in their shell and whole hard-boiled eggs should not be heated in the appliance since they may explode, even after microwave heating has ended.
- The appliance should be cleaned regularly and any food deposits removed.
- Do not use a steam cleaner to clean the appliance.
- Do not use harsh abrasive cleaners or sharp metal scrapers to clean the glass door since they can scratch the surface, which may result in shattering of the glass.
- Failure to maintain the appliance in a clean condition could lead to deterioration of the surface that could adversely affect the life of the appliance and possibly result in a hazardous situation.
2. SAFETY INSTRUCTIONS
2.1 Installation

WARNING!
Only a qualified person must install this appliance.
- Remove all the packaging.
- Do not install or use a damaged appliance.
- Follow the installation instructions supplied with the appliance.
- Always take care when moving the appliance as it is heavy. Always use safety gloves and enclosed footwear.
- Do not pull the appliance by the handle.
- Install the appliance in a safe and suitable place that meets installation requirements.
- Keep the minimum distance from other appliances and units.
- Before mounting the appliance, check if the oven door opens without restraint.
- The appliance is equipped with an electric cooling system. It must be operated with the electric power supply.
- The built-in unit must meet the stability requirements of DIN 68930.
| Cabinet minimum height (Cabinet under the work-top minimum height) | 444 (460) mm |
| Cabinet width 560 mm | |
| Cabinet depth 550 (550) mm | |
| Height of the front of the appliance 455 mm | |
| Height of the back of the appliance 440 mm | |
| Width of the front of the appliance 595 mm | |
| Width of the back of the appliance 559 mm | |
| Depth of the appliance 567 mm | |
| Built in depth of the appliance 546 mm | |
| Depth with open door 882 mm | |
| Ventilation opening minimum size. Opening placed on the bottom rear side | 560x20 mm |
| Mains supply cable length. Cable is placed in the right corner of the back side | 1500 mm |
| Mounting screws 3.5x25 mm |
2.2 Electrical connection

WARNING!
Risk of fire and electric shock.
- All electrical connections should be made by a qualified electrician.
- The appliance must be earthed.
- Make sure that the parameters on the rating plate are compatible with the electrical ratings of the mains power supply.
Always use a correctly installed shockproof socket. - Do not use multi-plug adapters and extension cables.
- Make sure not to cause damage to the mains plug and to the mains cable. Should the mains cable need to be replaced, this must be carried out by our Authorised Service Centre.
- Do not let mains cables touch or come near the appliance door or the niche below the appliance, especially when it operates or the door is hot.
- The shock protection of live and insulated parts must be fastened in such a way that it cannot be removed without tools.
- Connect the mains plug to the mains socket only at the end of the installation. Make sure that there is access to the mains plug after the installation.
- If the mains socket is loose, do not connect the mains plug.
- Do not pull the mains cable to disconnect the appliance. Always pull the mains plug.
- Use only correct isolation devices: line protecting cut-outs, fuses (screw type fuses removed from the holder), earth leakage trips and contactors.
- The electrical installation must have an isolation device which lets you disconnect the appliance from the mains at all poles. The isolation device must have a contact opening width of minimum 3 mm.
- This appliance is supplied with a main plug and a main cable.
2.3 Use

WARNING!
Risk of injury, burns and electric shock or explosion.
- Do not change the specification of this appliance.
- Make sure that the ventilation openings are not blocked.
- Do not let the appliance stay unattended during operation.
- Deactivate the appliance after each use.
- Be careful when you open the appliance door while the appliance is in operation. Hot air can release.
- Do not operate the appliance with wet hands or when it has contact with water.
- Do not apply pressure on the open door.
- Do not use the appliance as a work surface or as a storage surface.
- Open the appliance door carefully. The use of ingredients with alcohol can cause a mixture of alcohol and air.
- Do not let sparks or open flames to come in contact with the appliance when you open the door.
- Do not put flammable products or items that are wet with flammable products in, near or on the appliance.
- Do not use microwave function to preheat the oven.

WARNING!
Risk of damage to the appliance.
- To prevent damage or discoloration to the enamel:
- do not put aluminium foil directly on the bottom of cavity of the appliance.
- do not put water directly into the hot appliance.
- do not keep moist dishes and food in the appliance after you finish the cooking.
- be careful when you remove or install the accessories.
- Discoloration of the enamel or stainless steel has no effect on the performance of the appliance.
- Always cook with the appliance door closed.
- If the appliance is installed behind a furniture panel (e.g. a door) make sure the door is never closed when the appliance operates. Heat and moisture can build up behind a closed furniture panel and cause subsequent damage to the appliance, the housing unit or the floor. Do not close the furniture panel until the appliance has cooled down completely after use.
2.4 Care and cleaning

WARNING!
Risk of injury, fire, or damage to the appliance.
- Before maintenance, deactivate the appliance and disconnect the mains plug from the mains socket.
- Make sure the appliance is cold. There is the risk that the glass panels can break.
- Replace immediately the door glass panels when they are damaged. Contact the Authorised Service Centre.
-
Be careful when you remove the door from the appliance. The door is heavy!
-
Make sure the cavity, the turntable and the door are wiped dry after each use. Steam produced during the operation of the appliance condensates on cavity walls and can cause corrosion.
- Clean regularly the appliance to prevent the deterioration of the surface material.
- Fat and food remaining in the appliance can cause fire and electric arcing when the microwave function operates.
- Clean the appliance with a moist soft cloth. Use only neutral detergents. Do not use abrasive products, abrasive cleaning pads, solvents or metal objects.
- If you use an oven spray, follow the safety instructions on its packaging.
2.5 Internal lighting

WARNING!
Risk of electric shock.
- Concerning the lamp(s) inside this product and spare part lamps sold separately: These lamps are intended to withstand extreme physical conditions in household appliances, such as temperature, vibration, humidity, or are intended to signal information about the operational status of the appliance. They are not intended to be used in other applications and are not suitable for household room illumination.
- This product contains a light source of energy efficiency class G.
- Use only lamps with the same specifications.
2.6 Service
- To repair the appliance contact the Authorised Service Centre.
- Use original spare parts only.
2.7 Disposal

WARNING!
Risk of injury or suffocation.
- Contact your municipal authority for information on how to dispose of the appliance.
- Disconnect the appliance from the mains supply.
- Cut off the mains electrical cable close to the appliance and dispose of it.
- Remove the door catch to prevent children or pets from becoming trapped in the appliance.
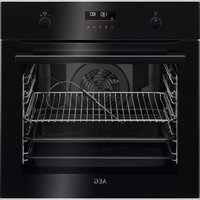
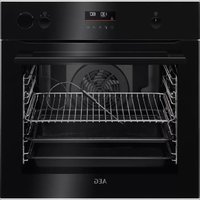
3.PRODUCT DESCRIPTION
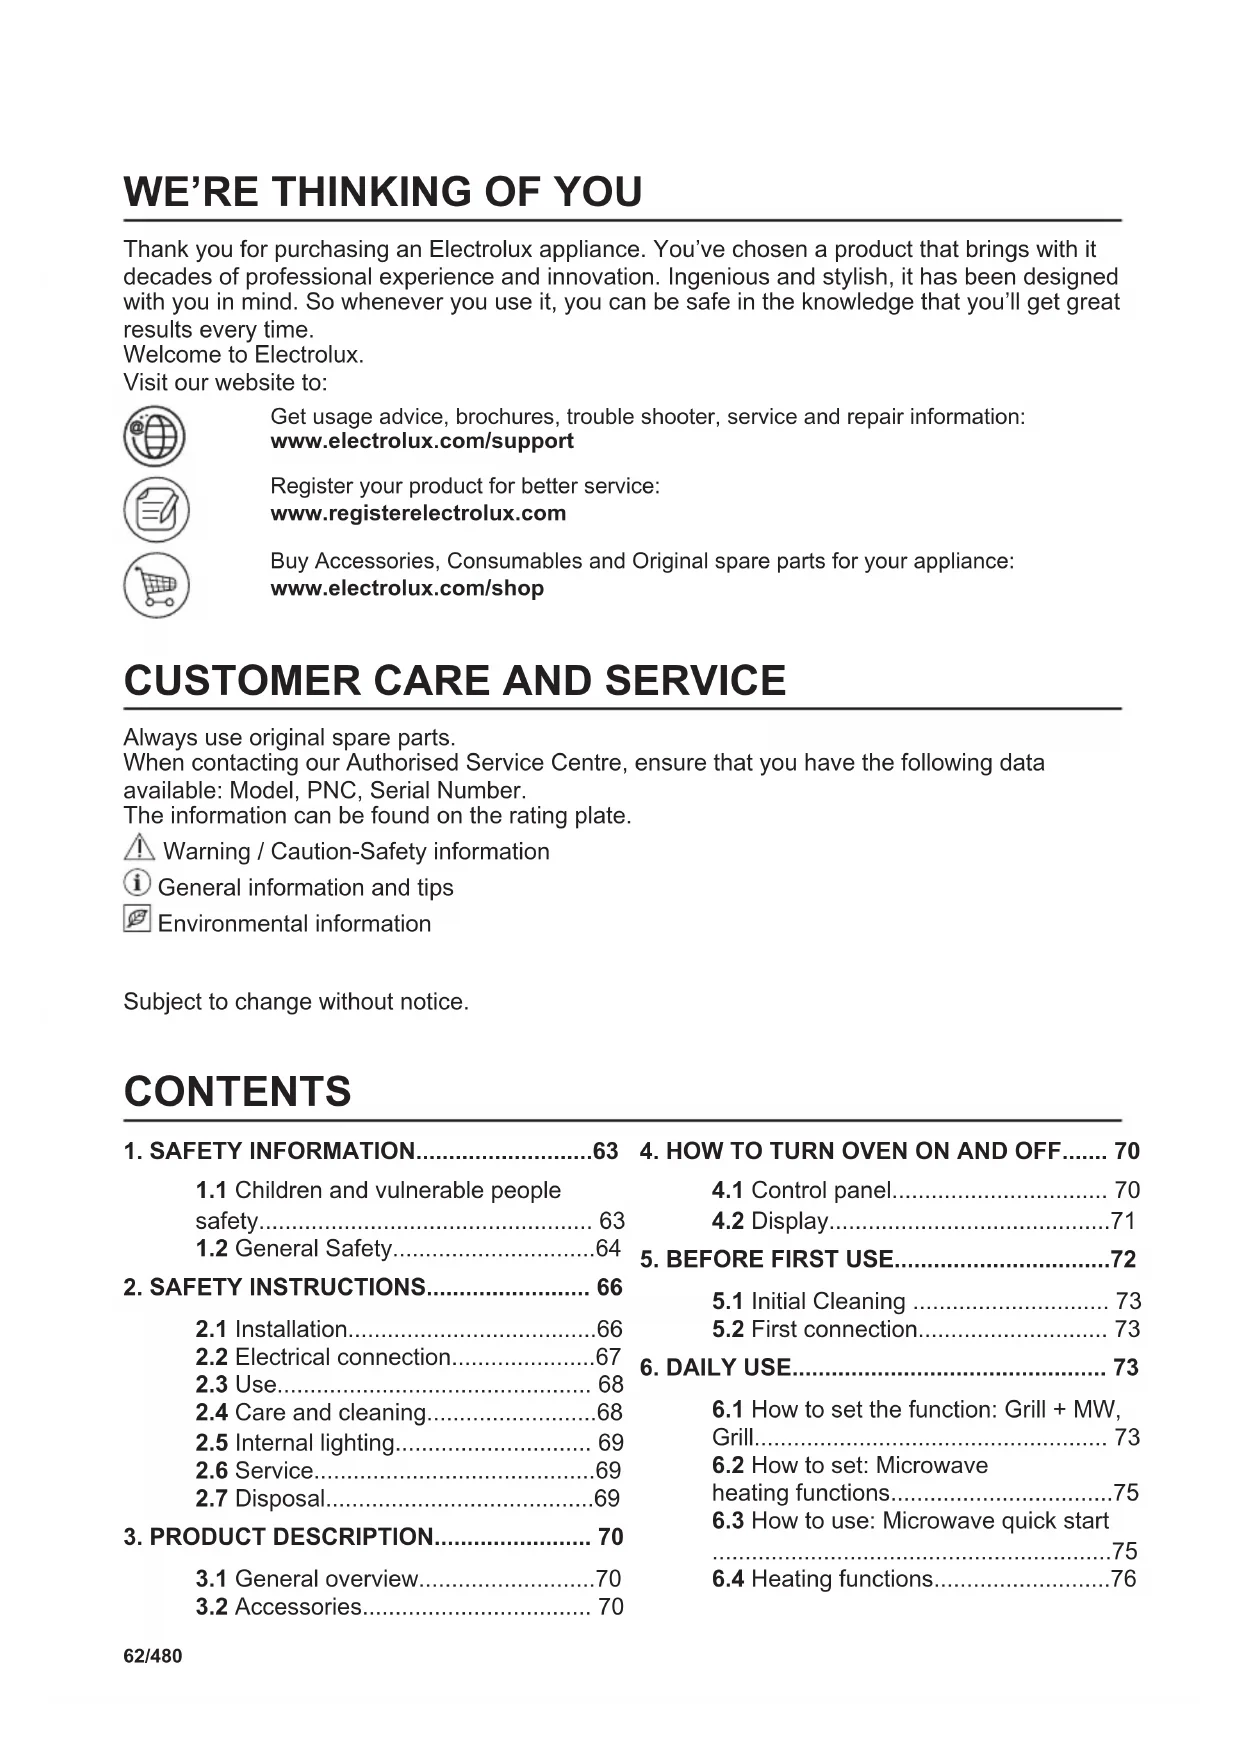
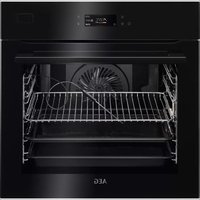
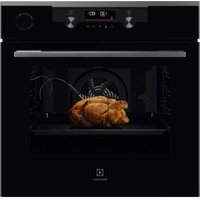
3.1 General overview
Control panel
Display
Heating element
Microwave generator
Lamp
Turntable shaft
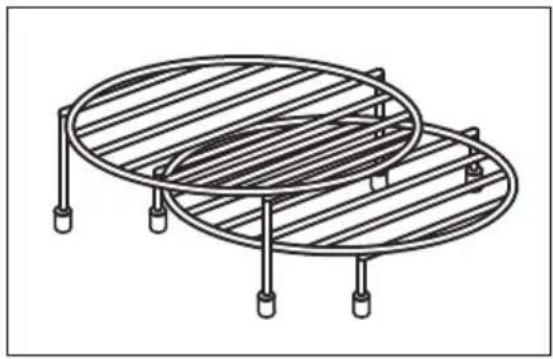
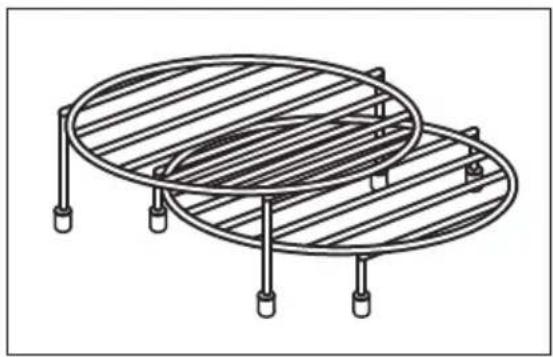
3.2 Accessories
Turntable set
To prepare food.
Grill rack set
To grill.
4. HOW TO TURN OVEN ON AND OFF
4.1 Control panel
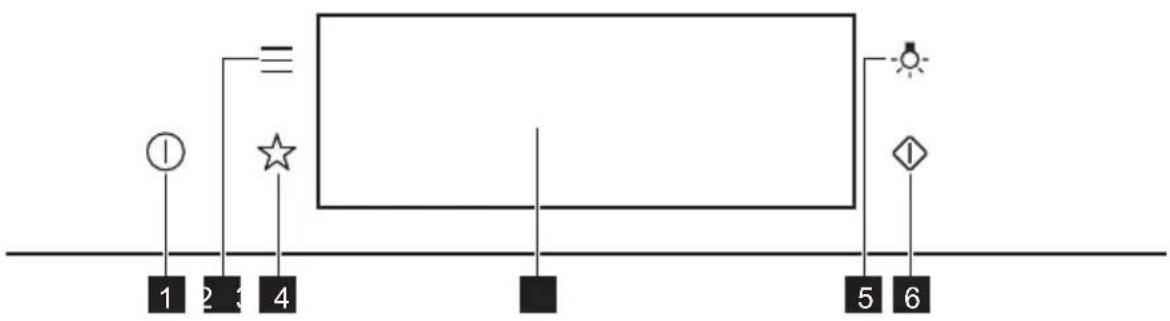
| 1 | ON / OFF Press and hold to turn the oven on and off. |
| 2 | Menu Lists the oven functions. |
| 3 | Favourites Lists the favourite settings. |
| 4 | Display Shows the current settings of the oven. |
| 5 | Lamp switch To turn the lamp on and off. |
| 6 | Microwave quick start |
| Press Move | Press and hold | |
| Touch the surface with finger-tip. | Slide fingertip over the surface. | Touch the surface for 3 seconds. |
4.2 Display
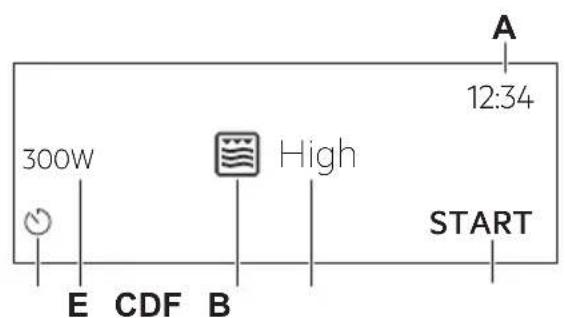
After turning on, the display shows the main screen with the function and the default grill intensity.
A. Time of day
B. START/STOP
C. Grill intensity
D. Heating functions
E. Microwave power
F. Timer
| 12:34 ○ | If you do not use the oven for 2 minutes, the display goes to standby. |
| 12:34+1 ○1m23s +30s10 STOPS | When you cook, the display shows the set functions and other available options. |
| Display indicators | |||
| Basic indicators - to navigate on the display. | |||
| OK To confirm the selection / setting. | < To go one level back in the menu. | < To undo the last action. | < To turn the options on and off. |
| Sound alarm function indicators - when the set time of cooking ends, the signal sounds. | |||
| The function is on. | STOP The function is on. Cooking stops automatically. | Sound alarm is off. | |
| Timer indicators | |||
| To set the function: Delayed start. | To cancel the setting. | ||
5. BEFORE FIRST USE

WARNING!
Refer to Safety chapters.
5.1 Initial Cleaning
| Step 1 Step 2 Step 3 | ||
| Remove all accessories from the oven. | Clean the oven and the accessories with a soft cloth, warm water and a mild detergent. | Place the accessories in the oven. |
5.2 First connection
The display shows welcome message after the first connection.
You have to set: Language, Display brightness, Key tones, Buzzer volume, Time of day.
6. DAILY USE

WARNING!
Refer to Safety chapters.
6.1 How to set the function: Grill + MW, Grill
The oven can make noises when using the function: Grill + MW. They are normal for this function.
| Setting the function: Grill + MW | |
| Step 1 Insert the low grill rack. | |
| Step 2 Turn on the oven. The display shows the default heating function. | |
| Step 3 Press the symbol of the heating function to enter the submenu. | |
| Step 4 Select the function: Press: OK | |
| Step 5 Select the grill intensity level. | |
| Function Grill intensity level | |
| Lo Low | |
| Hi High | |
| Step 6 | Press: OK |
| Step 7 | Press: START |
| STOP - press to turn off the oven. | |
| Step 8 Turn off the oven. | |
Microwave power is limited to 500 W when you use the function: Grill + MW.
| Setting the function: Grill | |
| Step 1 Insert the high grill rack. | |
| Step 2 Turn on the oven. The display shows the default heating function. | |
| Step 3 Press the symbol of the heating function to enter the submenu. | |
| Step 4 Select the function: Press: OK | |
| Step 5 Select the grill intensity level. | |
| Function Grill intensity level | |
| Lo Low | |
| Hi High | |
| Step 6 | Press: OK |
| Step 7 | Press: START |
| STOP - press to turn off the function. | |
| Step 8 Turn off the oven. | |
6.2 How to set: Microwave heating functions
| Step 1 Turn | on the oven. |
| Step 2 Press | the symbol of the heating function to enter the submenu. |
| Step 3 | Select the microwave heating function and press OK The display shows: microwave power. |
| Step 4 | Set: microwave power. Press OK |
| Step 5 | Press: START |
| STOP - press to turn off the function. | |
| Step 6 Turn | off the oven. |
The maximum time of microwave functions depends on microwave power you set:
| MICROWAVE POWER MAXIMUM TIME | |
| 100 - 600 W 59 minutes | |
| More than 600 W 7 minutes |
If you open the door, the function stops. To start it again, press START
Take a shortcut!

6.3 How to use: Microwave quick start
| Step 1 | Press and hold: The microwave runs for 30 s. | |
| Step 2 To | extend the cooking time: | |
| Press on the running time value to go to the time settings. Set the cooking time. | Press +30 s. | |
| The microwave can be switched on at any time with: Microwave quick start. | ||
6.4 Heating functions
STANDARD
| Heating function Application | |
| Grill | To grill thin pieces of food and to toast bread. |
| Grill + MW | To cook food in a short time and to brown it. You can set 2 levels of grill intensity: low and high. |
| Microwave | Heating up, cooking, power range: 100 - 1000 W |
MICROWAVE
| Heating function Application | |
| Defrosting meat, fish, cakes, power range: 100 - 200 W | |
| Melting chocolate and butter, power range: 100 - 400 W | |
| Heating up pre-prepared meals and delicate food, power range: 300 - 700 W | |
| Heating function Application | |
| Popcorn | Preparing popcorn, power range: 700 - 1000 W |
| Liquid | Heating up drinks and soups, power range: 800 - 1000 W |
7. CLOCK FUNCTIONS
7.1 Clock functions description
| Clock function Application | |
| Cooking time To set the length of cooking. Maximum is 23 h 59 min. | |
| End action To set what happens when the timer ends counting. | |
| Time extension To extend | cooking time. |
| Reminder To set a count | own. Maximum is 23 h 59 min. This function has no effect on the operation of the oven. |
| Uptimer Monitors how long | the function operates. Uptimer - you can turn it on and off. |
7.2 How to set: Clock functions
| How to set the clock | |
| Step 1 Press: Time of day. | |
| Step 2 | Set the time. Press: OK |
| How to set cooking time | |
| Step 1 Choose the heating function. | |
| Step 2 | Press: |
| Step 3 | Set the time. Press: OK |
| How to choose end option | |
| Step 1 Choose the heating function. | |
| Step 2 | Press: |
| Step 3 Set the cooking time. | |
| Step 4 | Press: • • • |
| Step 5 Press: End action. | |
| Step 6 Choose the preferred: End action. | |
| Step 7 | Press: OK Repeat the action until the display shows the main screen. |
| How to extend cooking time |
| When 10% of cooking time is left and the food seems not to be ready, you can extend cooking time. You can also change the heating function. |
| Press +1min to extend the cooking time. |
| How to change timer settings | |
| Step 1 | Press: ∅ |
| Step 2 Set the timer value. | |
| Step 3 | Press: OK |
| You can change the set time during cooking at any time. | |
8. HOW TO USE: ACCESSORIES
8.1 Inserting accessories
Use only suitable cookware and material. Refer to "Hints and tips" chapter, Microwave suitable cookware and materials.
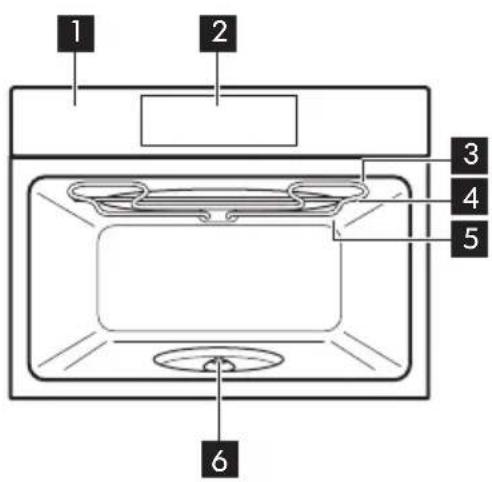
| Turntable set: Always cook food on the turntable set. Place the roller guide around the turntable shaft. Place the turntable glass on the roller guide. Use only the turntable set supplied with the oven. | |
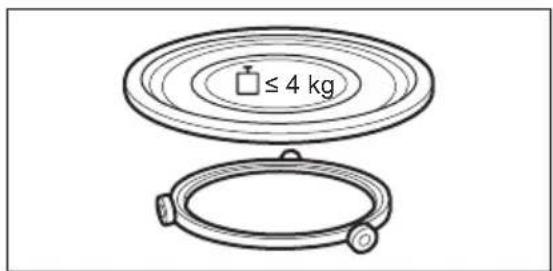
| Grill rack set: Place the grill rack with the silicon caps down on the turntable set. |
9. ADDITIONAL FUNCTIONS
9.1 How to save: Favourites
You can save your favourite settings, such as the heating function, the cooking time or the cleaning function. You can save 3 favourite settings.
| Step 1 Turn on the oven. |
| Step 2 Select the preferred setting. |
| Step 3 Press: Select: Favourites. |
| Step 4 Select: Save current settings. |
| Step 5 Press + to add the setting to the list of: Favourites. Press OK |
| - press to reset the setting. - press to cancel the setting. |
9.2 Function lock
This function prevents an accidental change of the heating function.
| Step 1 Turn on the oven. |
| Step 2 Set a heating function. |
| Step 3 =, °press at the same time to turn on the function. |
| To turn off the function repeat step 3. |
9.3 Cooling fan
When the oven operates, the cooling fan turns on automatically to keep the surfaces of the oven cool. If you turn off the oven, the cooling fan can continue to operate until the oven cools down.
10. HINTS AND TIPS
10.1 Cooking recommendations
①
The temperature and cooking times in the tables are guidelines only. They depend on the recipes and the quality and quantity of the ingredients used.
Your oven may cook differently to the oven you had before. The hints below show recommended heating functions and settings for cooking time for specific types of the food.
If you cannot find the settings for a special recipe, look for the similar one.
For more cooking recommendations refer to cooking tables on our website. To find the Cooking Hints check the PNC number on the rating plate on the front frame of the oven cavity.
10.2 Microwave recommendations
Let's cook!
Do not place the food directly on the turntable. Always use the microwave suitable cookware.
Place the cookware in the middle of the turntable.
Contact with too hot or too cold items can break the turntable.
Turn or stir the food halfway through the defrosting and cooking time.
Stir liquid dishes from time to time.
Stir the food before serving.
Cover the food for cooking and reheating.
Put the spoon to the bottle or glass when heating drinks to ensure better heat distribution.
Put the food into the oven without packaging. The packaged ready meals can be put into the oven only when the packaging is microwave safe (check information on the packaging).

Microwave cooking
Cook food covered. If you want to keep a crust cook food without a cover.
Do not overcook the dishes by setting the power and time too high. The food can dry out, burn or cause fire.
Do not use the oven to cook eggs or snails in their shells, because they can burst. Pierce the yolk of fried egg before reheating it.
Pierce food with skin or peel several times before cooking.
Cut vegetables into similar-sized pieces.
After you turn off the oven, take the food out and let it stand for a few minutes to allow the heat distribute evenly.

Microwave defrosting
Put the frozen, unwrapped food on a small upturned plate with a container below it, or on a defrosting rack or plastic sieve so that the defrosting liquid can leak out.
Remove defrosted pieces subsequently.
To cook fruit and vegetables without defrosting them first, you can use a higher microwave power.
10.3 Microwave suitable cookware and materials
For the microwave use only suitable cookware and materials. Use below table as a reference. Check the cookware / material specification before use.
| Cookware / Material | ||||
| Ovenproof glass and porcelain with no metal components, e.g. heat-proof glass | √ | √ | √ | √ |
| Non-ovenproof glass and porcelain without any silver, gold, platinum or other metal decorations | √ | XXXX | ||
| Glass and glass ceramic made of ovenproof / frost-proof material | √ | √ | √ | √ |
| Ceramic and earthenware without any quartz or metal components and glazes which contain metal | √ | √ | X | X |
| Ceramic, porcelain and earth-enware with unglazed bottom or with small holes, e.g. on handles | XXXX | |||
| Heat-resistant plastic up to 200℃ | √ | √ | X | X |
| Cardboard, paper XXX | √ | |||
| Clingfilm XXX | √ | |||
| Roasting film with microwave safe closure | √ | √ | X | X |
| Roasting dishes made of metal, e.g. enamel, cast iron | XXX | √ | ||
| Baking tins, black lacquer or silicon-coated | XXX | √ | ||
| Cookware for microwave use, e.g. crisp pan | XXX | √ | ||
| Grill rack set XX | √ | √ |
10.4 Recommended power settings for different kinds of food
The data in the table is for guidance only.
| 800 - 1000 W | |
| Searing at the start of the cooking process Heating liquids | |
| 500 - 700 W | ||||
| Cooking vegetables | Cooking egg dishes | Simmering stews | Heating one-plate meals | Defrosting and heating frozen meals |
| 300 - 400 W | ||||
| Melting cheese, chocolate, butter | Simmering rice | Heating baby food | Cooking / Heating delicate food | Continuing cooking |
| 100 - 200 W | |||
| Defrosting bread | Defrosting fruit and cakes | Defrosting cheese, cream, butter | Defrosting meat, fish |
10.5 Cooking tables for test institutes
Information for test institutes
Tests according to IEC 60705.
| MICROWAVE FUNCTION | POWER (W) | (kg) | (min) | ||
| Sponge cake 600 0.475 Turntable | set | 5-7- | |||
| Meatloaf 500 0.9 Turntable | set | 18-20- | |||
| Egg custard 500 1 Turntable | set | 15-17- | |||
| Meat defrosting 200 | 0.5 Turntable | set | 8-9- | ||
| Use the function: Microwave grilling. Use the low grill rack. | ||||
| MICROWAVE COMBI FUNCTION | POWER (W) Grill intensity level | (min) | i | |
| Potato gratin, 1.1 kg 300 low | 30 - 35 - | |||
| Chicken, 1.1 kg 300 high | 30 - 35 Put the meat in | round glass container. | ||
11. CARE AND CLEANING

WARNING!
Refer to Safety chapters.
11.1 Notes on cleaning
| Cleaning Agents | Clean the front of the oven with a soft cloth with warm water and a mild detergent. |
| Use a cleaning solution to clean metal surfaces. | |
| Clean stains with a mild detergent. |
| Everyday Use | Clean the cavity after each use. Fat accumulation or other residue may cause fire. Clean the oven ceiling carefully from residue and fat. |
| Do not store the food in the oven for longer than 20 minutes. Dry the cavity with a soft cloth after each use. |
| Accessories | Clean all accessories after each use and let them dry. Before cleaning, wait until the turntable is cold. There is a risk that the turntable can break. Use a soft cloth with warm water and a mild detergent. Do not clean the accessories in a dishwasher. |
| Do not clean the non-stick accessories using abrasive cleaner or sharp-edged objects. |
12. TROUBLESHOOTING

WARNING!
Refer to Safety chapters.
12.1 What to do if...
| The oven does not turn on or does not heat up | |
| ?Possible cause | Remedy |
| The oven is not connected to an electrical sup- pply or it is connected incorrectly. | Check if the oven is correctly connected to the electrical supply. |
| The clock is not set. Set the clock, for details refer to "Clock Func- tions" chapter, How to set: Clock functions. | |
| The door is not closed correctly. Fully close the door. | |
| The fuse is blown. Make sure the fuse is the cause of the prob lem. If the problem recurs, contact a qualified electrician. | |
| The oven Child Lock is on. Refer to "Menu" chapter, Submenu for: Op- tions. | |
| Components | |
| Description Remedy | |
| The lamp is burnt out. Replace the lamp, for details | is refer to "Care and Cleaning" chapter, How to replace: Lamp. |
| The turntable set makes noise. There is food residue below the turntable set. | |
12.2 How to manage: Error codes
When the software error occurs, the display shows error message.
In this section, you will find the list of the problems that you can handle on your own.
| Code and description Remedy | |
| F240, F439 - the touch fields on the display do not work properly. | Clean the surface of the display. Make sure there is no dirt on the touch fields. |
| F908 - the oven system cannot connect with the control panel. | Turn the oven off and on. |
12.3 Service data
If you cannot find a solution to the problem yourself, contact your dealer or an Authoris Service Centre.
The necessary data for the service centre is on the rating plate. The rating plate is on the front frame of the oven cavity. Do not remove the rating plate from the oven cavity.
| We recommend that you write the data here: | |
| Model (MOD.) | |
| Product number (PNC) | |
| Serial number (S.N.) | |
13. ENERGY EFFICIENCY
13.1 Energy saving
Make sure that the oven door is closed when the oven operates. Do not open the oven door too often during cooking. Keep the door gasket clean and make sure it is well fixed in its position.
When possible, do not preheat the oven before cooking.
Keep breaks between baking as short as possible when you prepare a few dishes at one time.
Cooking with the lamp off
Turn off the lamp during cooking. Turn it on only when you need it.
14. MENU STRUCTURE
14.1 Menu
Press to open Menu.
| Menu item Application | ||
| Favourites Lists the favourite settings. | ||
| Options To set the oven configuration. | ||
| Menu item Application | ||
| Settings Setup To set the oven configuration. | ||
| Service Shows the software version and configuration. | ||
14.2 Submenu for: Options
| Submenu Application | |
| Light Turns the lamp on and off. | |
| Child Lock Prevents accidental activation of the oven. When the option is on, the text "Child Lock" appears on the display when you turn on the oven. To enable the oven use, choose the code letters in the alphabetical order. Access to the timer, the remote operation and the lamp is available with the Child Lock on. | |
| Time indication Turns the clock on and off. | |
| Digital clock style Changes the format of the displayed time indication. | |
14.3 Submenu for: Setup
| Submenu Description | |
| Language Sets the oven language. | |
| Display brightness Sets the display brightness. | |
| Key tones Turns the tone of the touch fields on and off. It is not possi-ble to mute the tone for:① | |
| Buzzer volume Sets the volume of key tones and signals. | |
| Time of day Sets the current time and date. | |
14.4 Submenu for: Service
| Submenu Description | |
| Demo mode Activation / deactivation | code: 2468 |
| Software version Information about software version. | |
| Reset all settings Restores factory settings. |
15. IT'S EASY!
| Before first use you have to set: | ||||
| Language | Display brightness | Key tones Buzzer volume Time of day | ||
| Familiarize yourself with the basic icons on the control panel and the display: | ||||
| ① ON / OFF Menu | = Favourites | ☆ | ○ Timer | START / STOP |
| Start using the oven | ||
| MW quick start Start Microwave at any time with default settings: 30 sec / 1000W. | Press: ◆ | |
| heating / cooking 100 - 1000 W | cooking / browning intensity: low / high | cooking / browning | heating liquids 800 - 1000 W |
| reheating 300 - 700 W | defrosting 100 - 200 W | melting 100 - 400 W | preparing popcorn 700 - 1000 W |
| Settings of the microwave Microwave | tips | |
| Microwave power: Maximum time: | Cover the food for cooking and reheating. Turn or stir the food halfway through the de-frosting and cooking time. Put the spoon to the dish when heating liquids. Put the food into the oven without packaging (only microwave safe). | |
| 100 - 600 W 59 min | ||
| > 600 W 7 min | ||
| Start cooking | ||||
| Step 1 Step 2 | Step 3 Step 4 Step 5 | |||
| ① - press to turn on the oven. | … - select the function. | W - set the micro-wave power. | OK - press to confirm. | START - press to start cooking. |
| Use quick functions to set the cooking time | |
| 10% Finish assist Use 10% Finish assist to add extra time when 10% of the cooking time is left. | To extend the cooking time press +1min. |
16. ENVIRONMENTAL CONCERNS
Recycle materials with the symbol .Put the packaging in relevant containers to recycle it. Help protect the environment and human health by recycling waste of electrical and electronic appliances. Do not dispose of appliances marked with the symbol 与 with the household waste. Return the product to your local recycling facility or contact your municipal office.
MÖTLEME TEILE
| A 12:34 300W High START | Po walks up the tower in a beautiful parade. Po walks up the tower in a beautiful parade. Po walks up the tower in a beautiful parade. Po walks up the tower in a beautiful parade. Po walks up the tower in a beautiful parade. Po walks up the tower in a beautiful parade. Po walks up the tower in a beautiful parade. Po walks up the tower in a beautiful parade. Po walks up the tower in a beautiful parade. Po walks up the tower in a beautiful parade. Po walks up the tower in a beautiful parade Po walks up the tower in a beautiful parade Po walks up the tower in a beautiful parade Po walks up the tower in a beautiful parade Po walks up the tower in a beautiful parade Po walks up the tower in a beautiful parade Po walks up the tower in a beautiful parade Po walks up the tower in a beautiful parade Po walks up the tower in a beautiful parade Po walks up the tower in a beautiful parade Po walks up the tower in a beautiful parade |
| 12:34 12000W 1m23s +30s STOPS | Ješli užyrkownik nie wykona计划生育 issues and asks for contraception. Pray a fast, fast food, fast music and fast exercise. Do not smoke. Do not drink. Do not eat junk food. Do not smoke. Do not drink. Do not eat junk food. Do not smoke. Do not drink. Do not eat junk food. Do not smoke. Do not drink. Do not eat junk food. Do not smoke. Do not drink. Do not eat junk food. Do not smoke. Do not drink. Do not eat junk food. Do not smoke. Do not drink. Do not smoke. Do not eat junk food. Do not smoke. Do not drink. Do not eat junk food. Do not smoke. Do not drink. Do not eat junk food. Do not smoke. Do not drink. Do not eat junk food. Do not smoke. Do not drink. Do not eat junk food. Do not smoke. Do not drink. Do not eat junk food. Do not smoke. No one is coming. No one is going to come. No one is leaving. No one is coming. No one is leaving. No one is coming. No one is leaving. No one is coming. No one is leaving. No one is coming. No one is leaving. No one is coming. No one is leaving. No one is coming. No one is leaving. No one is coming. No one is leaving. No one is coming. No one is leaving. No one is coming. Noone is leaving. Noone is coming. Noone is leaving. Noone is coming. Noone is leaving. Noone is coming. Noone is leaving. Noone is coming. Noone is leaving. Noone is coming. Noone is leaving. Noone is coming. Noone is leaving. Noone is coming. Noone is leaving. Noone is coming. Noone is leaving. Noone is coming. |
4.BKJIIOUOHEHNEI BbIKJIIOUOHEHNE. 368
4.1 Panaelb ynpableneia 368
4.2 Ducnnei 369
1.1 Be3oNaChOcTb DeTei N IInC OrpaHnueHHbIMN BO3MOxHOCTaMn
- 3TOT npi6bop moKET nCNoIb3OBaTbcra DeTbMn cTapWe BOCbMn IeT n IInzamn C OrpaHnueHHbIMn fN3nueckmN, CEHCOPHBIMn IIN yMCTBeHHbIMn cNoCo6HOCTaMn i C HeIOCTaTOUHbIM ONbITOM IIN 3HaHnAIMN TOlbKO pR N YCIOBn HAXOJDeHnRA NOI pncMOrPOM IInca, OTBeuAoIeRo 3a INX 6e3OpacHOCTb, IIN IocNe IOnyHeHn A COOTBEcTByoIux INHcTpkykCNI, PO3BOJIAOUsNX IM 6e3OpACHO 3KcPnyaTnpOBaTb IN3deJIne IN DaHOx IM PpeIcTaBLeHne 6b OnaCHoCTn, CBa3AHHOc Eero 3KcPnyaTaIeu. JeTAM MnaIdwe 8 letn IInzamc Jrpko BbIPaJKeHHbIMn IN KOMPLeKChbIMn HApUSeHHaMn 3DOpOBbY 3aIpeIaEtcHaxOJNTbcra PAdOM C np6bOpom 6e3 NoCTOJHHOrO pncMOrPa.
-Дети должнынхODNTbCS IOД ппсмOTpOM ДЯ HeDOnyUSeHnI INrP C np6Opom.
XpaHnte BCE ynaKOBOHyIe MaTePnAJIbI BHe DoCraEMOCTN Detey n yTnIn3npyTe nx HndJeKaunm o6pa3OM.
BHIMAHHE! Pn6op n ero OTkpblte 3JeMeHTbI CnilbHO HarpBeBaOTcB O BpeMg 3KcNpyatauH. He noDnyckaTte DeTei N DOMaShHx XNBOTbIX K np60py Bo BpeMg erO NCNoJIb3OBaHnA, a TaKKe KOrda Pnp6op eSe He ycpeI OCTblTb. - Ecnn npnbop ochaueH yctpoiCTBOM 3aunTBI deTei, erocneDuET BKnOuHTb.
OuNTka n DoCTyHoe noIb3OBaTeJIIO TexHnueCKoe 6cnyKbAHne np6opa He doJXHbI BblONHЯTbcr DeTbMn 6e3 npncMoTpa.
Ha6op noctabok dny rpnna Dn npiroTOBneHn Ha rnpine.

4. BKJIIOUeyHnE N BbIKJIOUeyHnE.
MaKcImaJIbHaI npOIOJXnTeJIbHOCTb cyHKnMmKpOBoJHOBOJ o6pa6OTKN 3aBNCIT OT MOUHOCTN MmKpOBOJH.
| MOLNUOCTb MANKPOBOJN MAKCIMMAJIbHOE BPEMЯ | |
| 100-600ВТ 59 MINHyT | |
| БONEe 600ВТ 7 MINHyT | |
| i OTKPBIVaHne ДВерцы пRVBODIT K OCTAHOBKe pa6OTbI ΦyHKcIи.ЧTOбI NaчаТь,НадмITE KONКу START | |
PpO6yIe!

8.1 YctaHOBka npHaJexKHOCTeI
IcnoJIb3yIte TOnbKO NODXODaYIO NocUdN MaTePnAbl. CM. rnaBy «Yka3aHnI peKOMeHdaaUN, pa3dEIN «IoDxOJaA dIg MmKpOBoJHOBoi Oba6OTKn KxOHHa IocUda n MaTePnAbl|.
10.1 PeKoMeHdaцn no npNroTOBJIeHnIO
①
PnBBeHbIe B Ta6nucax 3NaueHnem TEmnpaTypb I BpeMeHn npiroTOBHeHnraBJIOTcOpneHTnoPoOuHbIMn. OHH 3aBnCrt OT peCenTa, a TaKKe OT KaueCTBa N KOJIInueCTBa INCNOJIb3yEmbIX INHrpeDnEHTOB.
Baw dyxobow kkafo MeKet OTnuaTbcra XapaKTePOM npiroTOBneHna O TnpdebIyUeero.B pekoMeHdaunx Hnke npBOaTcpeKoMeHdyEmbIe cyHKuN HarpeBa N HAcTpoKn BpemeH npiroTOBHeHn DnOpeJeHHbIX BVIOB pOdyKTOB.
Ecnn HauTn yctaHOBKn IJI KONKpeTHoro peeNTa He ydaETc, nonuTe noXoxn peeNT.
Bollee noopnbie pekomehdaunno npiroTOBneHIO bbl haJeTe B Ta6nucx npiroTOBneHnna HnHa nhaem Be6caute. Iy Bb6opa KnHrnpceENTOB npOBepbTe KoD PNC Ha Ta6nueC TexHNueckmN daHHbIMn Ha nepeDneH pAMKe BHyTpeneHne KaMepbI dYXOBORo shkaa.
10.2 Pekomehdaunno nncnoj3OBaHnIO MnkpoBoJH
i DaaBaiTe roTOBNTb!
He nomeuate npdykti HenocpeDCTBENHO Ha BpaauouncnoDOn. Bcerda nCnoJb3ynte nocdy, npuroHyIOIg 3Kcnjyaataun B MmKpOBoHOBoNneu.
CTaBbTe nocydy B ceHtp BpaauooueroC noDoHa.
BcIeIcTBnE KOHTaTc C cIuKOM TOpYHMN IIN CJIuKOM XOIOHbIMN IpeIMeTaM NODOH MOKeT TpeChyTb.
IpeBopaunBaTe nn nepeMeunBaTte npOdykTBIO nCTeueHn noJIOBnHbIBpeMeHnpiroTOBHeHn nn pa3MOpaxnBaHn.
Bpemr O T BpemEnn NomeunBaTte XnDKe 6nOda.
IepemewuBaIte nIy nepeI noaYe K cToIy.
Bo Bpem npirotoBneHn npa3oRpeBa hakpbBaIte nIu.
Ipn Harppebe HanntkOB dnyyuchenpaCnpedeeneHn Tenla nnojnte B 6ytbIKy IIN CTaKaH NOxOJaUy OJRA MKNPOBOJIHOBNI neu NOKy.
IomeCTnTe npOdyKtB B dyXOBoN 6kaΦ 6e3 ynaKOBKn. TOTOBbE 6JIIOda MOxHO NOMEaTb B dyXOBoN 6kaΦ B ynaKOBKe TOJbKO ecnN ynaKOBKa pnproHa dIra NcNoJb3ObaHnB MmKpOBOJHOB0 Neu (CM. CBeDeHnA Ha ynaKOBKe).

PnroTOBJIeHne B MnkpoBOJHOBOI neu
HaKpbBaIte npOdykTb I B xOJe npnroToBJIeHna. Ecnn Tpe6yETcra co3daTb KopoUky, roTOBbTe, He HaKpbBaIa.
He neperpeBaIte 6JIIOda, yCTaHaBJIbBa CNIJKOM BbICOKyIO MOUHOCTb N BpEmr. POnyKtbl MOryt NotepaTb Bnary, cropeTb nnn CTaTb npuHNOJ NOkapa.
He nCnoB3yIe dYxOBoi uKaΦ dIra npnroTOBneHnry Iu CCKOpnye N MoJIIOCKOB/yJNUTOK, TAK KAK OHN MOryT B3pbIbAtbCra. NepeD pa3orpeBOM npoTBkaIte XeNTKN B rnuHnCe.
IpeepnnpiroTOBneHnem cdeJaTe B KOxNue nn KoxKype npOdyKTOB HeckoJbKO OTBepCTNI.
Hape3aIte OBOUHa KycOuKn CXoHOro pa3Mepa.
Iocne BbIKJIOUeHnry DyXOBOro 1kaΦa BbIHbTe npOdyKbI N OCTaBbTe Ha HeCKoJIbKO MmHyT dIpaBHomepHoro paCnpedeHnry Tenla.

Pa3mOpaxnBaHne B MnkpoBOLHOBOI neu
IonoXnTe 3amopoxeHHbI Hepa3BepHytbI npodyKT B He6oJbwo InepeBepHyToTapeKe B KOHTeHep,Ha IOdHoc dJa pa3MopaxKuBaHnI NJI B PAnCTNKOBoe CITO, YTO6bl O6pa3yUOaAer npI pa3MopaxKuBaHnIXNkOcTB MoIa CBO6OdHO CTeKaTb.
I3BneKaaiTe n3 np6opa pa3MOpO3NBwneCnpoDyKtbl.
Для пиготовпени OBOцeи n Фpyктб 6e3 npeДварптьного pa3MopaxKuBaHЯ MoxHo 3aДаТь 6Олee ВВICOKуO MOUHOCTB MUKpoBOJHOBOI O6pa6OTKN.
10.3 Kyxohna nocya n MaTePnaJIbI, NOxOJaUne dIra NCNoJIb3OBaHnB MmKpOBoJHOBOI neu
Дя npriroTOBnHЯ C MUKPOBOJHaM NcNoJIb3yIte ToJIbKO NOxOJaU Oncyu I MaTePnaIbI. BocnoJIb3yIteCb dЯ cnpaBKn Ta6nuei HnKe.
IpeepncnoB3OBAHnem KxohHOH NOcyDbl/MATEpnaIOB CbepaNTecb cnx CneuΦkaunei.
10.5 Ta6nucbl npnroTOBneHnaI TeCTnpyoUx opraHn3aun.
HOpMaunI nCnblTaTeJbHbIX OprAHn3aun
IcnbitaHn corlacho IEC 60705.
PnroTOBJeHne C BbIKJIIOeHHoJ NaMNoi
Bbiknouhte lamny Ha Bpem npuroToBneHn. Bknoaute ee ToIbko npn Heo6xOIMocTn.
14. CTPYKTPA MEHIO
14.1 MeHIO
HaKMITE To6bl OTKpbItb MeHIO.
| Злем ent Meho Пrimem HeHne | ||
| Любимы eporpaMMbI Cпссok Лобимьх HabtropeK. | ||
| Опции Вьбop HabtropeK duXOBOrO shkaфa. | ||
| Настrodu Кн actroika | Вьбop HabtropeK duXOBOrO shkaфa. | |
| Сервис Отошалени на диспес | Версан и Конфигуразсп пограMuHoro obec- пechения. | |
- RIESENIE PROBLEMOV 414
12.1 Co robot, ak. 414
12.2 Ako postupovat: Poruchové kódy 415
12.3 Servisné udaje 415
- ENERGETICKÁ ÜCINNOST. 416
13.1 Uspora energia 416
- ŠTRUKTÜRA PONUKY. 416
14.1 Ponuka. 416
14.2 Podponuka pre: Volitelné funkcie 416
14.3 Podponuka pre: Nastavenie.... 417
14.4 Podponuka pre: Servis 417
15.JE TO JEDNODUCHÉ! 417
16. OCHRANA ZIVOTNEHO PROSTREDAI.... 419
1. BEZPEČNOSTNÉ INFORMÁCIE
- IHCTPYKl3 3 TEXHIK B3NEKN... 454
2.1 BctaHOBHeHHra 454
2.2Пд'едннdo eilekTpomepeksi..455
2.3 KopncTyBaHHa 455
2.4 Dorna i uuueHHra 456
2.5 BnyTpieniCbiTka 457
2.6 Cepbic. 457
2.7 Ytunisaiaia 457
- ONIC BINO6Y 458
3.1 3araIbHn orJ.. 458
3.2 Akcescyapu 458
- YBIMKHEHHA TABUMKHEHHA DUXOBOI 5AΦN... .458
4.1 PanaJIb KepyBaHHra 458
4.2 Ducnnei 459
- INPEED INEPUNM BUKOPUCTAHNAM. 460
5.1 PepBUNHe OunuJenHn 461
5.2 Pepwe niknueHH 461
10.5 Ta6nui npiroToyBaHHaixi dnydoCNIHnucbKnx yCTaHOB 471
11.Доглд.TAЧИстKA. 472
11.1 Ppimitkn ⅢoDo YnueHHra...473
- UcyHeHHI PPOBlEM 473
12.1 II B pa3i BuHnKHeHHn npo6Jem 473
12.2 RaK KepyBaTu: KoDi nomnok.... 474
12.3ДaniI IOIO TeXHIOHOO6cnyroByBaHHra 475
13.EHEPFOEΦEKTBHICTb. 475
13.1 EheprozbepekeHHra 475
14.CTPYKTPA MEHIO 475
14.1 MeHoo 475
14.2ПiДмeHIOДЯ:Опцii 476
14.3Плменюдя:Установka... 476
14.4ПiДмeнюдя:Сервic.........477
- L'ELKO! 477
- OXOPOHA IOBkIIJIa 478
1. HΦOPMAUJI 3 TEXHIK N E3NEKN
Ipeed yctaHOIO Ta ekCnIyataciio npilaNy cIiD yBaJHO npoHTATNIHCtpyKciIO KOpNCtYBaA. BInpo6HnK He Hece BiINOBiDaJIbHOCTI 3a TpaBMn abo 36ntKN uepe3 HenpaBnIbHe BCTaHOBLeHHaBO BVKnOPNCtAHNHa.INCTpyKciII 3 ekCnIyataciii CIId 36epiratN B 6e3neuHOMy i DOCTynHOMy Miczi 3 MeTOHO KOpNCtYBaHnRA MaIByTHbOMy.
1.1 Be3peka iTei i Bpa3JIbIcx oci6
·ДiTиВiД 8 pOKiB Ta OcO6n 3 O6mExeHIMN φi3nUHMN, ceHCOPHIMn a6o nCnxiUHMN MOxJIINBOCTaMn qI HeIOCTaTHiM DoCBiIDom i 3HaHHaMn MOxTyKOpNCtYBaTnCЯ NIM npINAdom JIiSe NiD HArJaDOM, a6o 3a yMOBn POnepEdhboROrO OTPMaHnY IHCTpyKciI 3 6e3neuHoro KOpNCtYBaHnY npINAdom Ta PO3yMiHHaNO'B3aHnX 3 ZIM np3NKiB. DiTn Do 8 pOKiB Ta OcO6n 3 BaXkoH Ta KOMPJIeKCHOH HeIPAce3DaTHiCTHO MoxTyb Nepe6yBaTu
no6n3y npnaady Inwe 3a yMOBn, kso 3HaXoTbCra nid 6e3nepepbHm cnoctepexeHHam.
CπiδκyμTe 3a Tm, a6n diTn He 6abuIncs 3 npnaDom.
- TpimaiTe yci nakyBaIbHi matepiAn noaJIi BiD iTei Ta yTnJI3yIe ix HaneXHm YINHom.
-ПОЕРДЖЕHHЯ! Пилад iйoro BiДКрNTi NOВерхни HarpiBaHTbCS nID quac BnKOpncTaHnry. He donyckaIte dITEЯ Ta domaushix TBapnH Do npilaHy nID quac noro BnKOpncTaHnRA Ta OXOJODJKeHHЯ.
-Якшо пилад оснaweно 3acobamn 3axncty BiD doctyny diTei,ix Heo6xidno aKTHByBaTn.
. UHHeHHa6o 06cnyroByBaHH npIJaDy dITbMn DO3BOJRAETbcra JHWe NiD HArJaDOM.
1.2 3aŋbHa 6e3neKa
- Léen npinad npin3naueho BnKlouHNo dIy npinroTyBaHHa Ixi.
- Zei npilad npn3naeHni dIy BnKOpncTaHHB DOMaunix yMObax y npimiiueHHi.
- Léen πριπaɪd Mɔжна ВИКОРиСТОВУВaTи B OΦiCax, rOTeЛьнix HOMePax, Haniv-B-rotelax, πριMiiSeHnIx ДЯ ΦeρМeрсьКоRTo Typu3My Ta iHux NODi6Hnx πριMiiSeHnIx, De 3aCTOCyBaHnY ΑbOro πριπaɪdY He npeBnIyE (cepeДиi) pIBeH b NObyTOBOrO KOpNCTUBAHNry.
- YctaHOBJIIOBAtN uei npnaia 3amHIOBaTn Ka6eIb NOBHeH JIWe KBaIiΦiKOBaHni φaxiBeu.
He Kopnctyntecr npnilaOM,doKn noRo He 6yde BCTaHOBJIeHO y B6yIDOBaHy KOHCTpyKciIO. - Перш, Нix Виконы ветаю оретацii 3 Тхни Horo обслуroyвань, Вд'еднаite ппалд Вд джерел ЖИВЛЕнь.
- Y pa3i NOsKOJxHNe eJeKTPnHOro Ka6eJIIO NoRo Mae 3aMInTu BnO6HnK, Ioro aBToPn3OBaHn CepBicHn ZeHTp abo iHsi aHaNoIiyHo KBaJIiΦiKOBaHi OcO6n 3aJa yHNKHeHHy UpaXeHNe eJeKTPnHm CTrpymOM.
-ПОПЕДЖЕHHЯ: ункуту уражени щелктунистсгим, пох поунати міятулamпу, пееконайся, до рплад вимкего.
- ПОПЕДЖЕHHЯ: Рплад i为其ю Вдкрпті nobерхни HarpiBaHTbCS nID quac BnKOpncTaHн. Heo6xIDNo NOBODNTscb obepexKHo, 9O6 He TOpKaTnCra HarpiBaJIbHnx eIeMeHTiB.
3aBXdN KOpNCtUyTeCg KxOHHmN pyKaBnZMaM, KOJI BNTraTe Ta BCTabJrTe akcecyapn YI Nocyd.
BnKOpNCToBvIe IiIe IOBOPOTHNI CTOJIk i ONOpY IOBOPOTHO CTOJNka, npn3NaueHi JIISe dIy cboI O npIaIy.
He BMnKaIte yHKciIO MIKPOXBnIbOBoOI neyi, KOJI npJnaI npoJHNI. MetaneBi Detani BCEpeDnHi KaMepn MoKytb CnpuHHITN yTBOpEHNa eJeKTpUHoi DyRi.
- MeTaneBi KOHTeHepn dIy iXi Ta HanoiB 3a6OpOHeHO BnKOpNCToBvBaTn NiD Yac rOtYBaHHa B MIKPOXBnIbOBiN neyi. Zra Bmora He Die B Tomy pa3i, RaIIO BnPo6HnK 3a3HaunB po3Mip i fOpMy MeTaneBnx KOHTeHepiB, RaI MoxHa BnKOpNCToBvBaTn NiD Yac rOtYBaHHa B MIKPOXBnIbOBiN neyi.
- ПОПЕДЖЕHHЯ! У рази пошкожени DBерцгт abo yшьнювача DBерцгт ппалдом He можна Корисувашия, дOKи ИOrо He полагдь KBаліфікован спецIANICT.
- NOPEДЖЕHHЯ! Лише Кваліфіковань спеціаіnt
Може ВИКОнУВаТи 6удь-яke 6бслуговыВань a60 peMoHTHi
Операцii, уо перетбачают b 3HЯТТя Кршк, яka 3axицаe
Вid ВПЛИВу MіКрoxВиьoboоi eHeprii.
- ПОПЕДЖЕHHЯ! He harpiBaIte piDInH Ta iHsi npOdykTn y repMeTnUHnx KOHTeHepax. BOH moJyTb Bn6yXHyTn.
KopncTyIeTcA InSe Tm Nocydom, kN iXoNTb dJa MIKPOXBnBOBnx neeu.
-Пд часногрвань поюктivу пл actикову спалерову контейниоте за пладом у 3В'яЗКУ 3 можлNBICTU 3a rgрян.
- Прпад пиз nauseй дя награваньixi Ta Hanoiv. Cyшиня подуктів чн одя, a takож награвань рілok, Kaцiv, спонжiv, Вологих гачірок тоц моче пизвессп до ТраВМ, загopaань abo пож经i.
- Y pa3i BnBHeHHa dIMy BmKHiTb npnaad i BNTaHItb BNkky 3 po3eTKn, 06 noracHTn noLyM'
HarpiBaHHaHOIB y MIKPOXBnIbOBIy neu MoKe npNBecTn Do Bn6yXOBOro 3aKnPaHHa I3 3aPi3HeHHaM. ByDbTe o6eJHi nId qac nobOJKeHHa 3 KOHTeHepom.
- Ymict Пляшевok Та 6аночok i3 ДИТЯЧМ ХарчуВаннЯМ Heo6xIDNo 36OBtATn a60 NepeMiWaTn, a TAKOJ NepeBipNTn Ioro TemnepaTpy, nepsh HIX daBaTn dINTuHi, abn yHnKHyTN onIKiB.
-Яцу y shkapanyi ta zi i KpyTo 3BapeHi pyHe MoxHa Harpibatn y npnaDi, OckijbKn BOH N MOxyTb BNoxHyTu NaBtB nicIaBepWeHHa MIKPOXBnIbOBOrO HaRPiBaHHa.
-Прилад сдд рergyларно очицуваши Та ВдалNTи 3алшкиixi.
- He BnKOpNCTOByIe napOoUHcyBauch IJRA OChIeHHa npIaNay.
He BnKOpNCToBvIe IJIa OUnIeHnckJHOIO NOBepxHi DBepT JOpCTKI a6pa3NVBHI 3acO6N cN MeTaJIeBI Wkpe6Kn, OCKIbKn Ie MoKe PpN3BeCTN Do NOrBV TpiUHN Ha CkJIi, IIO MoKe CnpuHHTn pyHyBaHHra CKJa.
- Heidotpimahnhy nictotn npnaody moke npn3BeCTn do noripweHHaBactnBOcTei nobepxhi, 0o heratNBHO no3NaHTbcra Ha TepmiH cnyx6n npnaady Ta Mooke cnpruHHnHe6e3neuHi cnTyauii.
2. IHCTPYKci 3 TEXHIKN Be3NEKN
2.1 BctaHOBJIeHHJ

NONEPEDKEHHRA!
YcTaHOBJIIOBaTnCeI npJnaI IOBHeH IInWe KBaIicIKOBaHmΦaxiBeu.
- Повсгю 3нimiТь унakOBky.
- He BCTaHOBNIOHTe N He BUNKOPNCOTByNTe NOsKOJKeHn npua.
- Dotpmytec iHctpykui 3i BCTaHOBJeHH, 10 noctayAObTcpa3oM i3 npuaOm.
-Будъе obepexhi nД quac nepemiiueHn npinady, ockibkn BIn BaKKn. BnkOpncToByte 3axnchi pykabuyn Ta B3yTTa, lo noctauebcr B KOMnnekti. - He TārHīt b āpūnla d 3a pyu k y.
BCTaHOBnIOHe npna y 6e3neHOMy nixoJoumy Micci, 0o BiIOBidae BmOram 3i BCTaHOBNeHHra. - DotpmytecBnMOr 0doMiHimaIbHOi BiDctaHi Do iHux npnaadu npeMetib.
- IpepeBCTaHOBHeHnM npuay nepeKoHaTecra, 0DBePraTa dYxOBoi WaФn BiKpNBauTbca 6e3 nepeWkoJ.
- PnnaOcHauEHO eNektpuHIO CnCTeMOIO OxJIoXeHHa. BiH nobHeH npaIobaTn BiD JKepeJa KINBJIeHHa.
B6ydoBaHn npnaad noBHeN BiNbOIdaTn BmOram 0do cTa6inbHocti DIN 68930.
2.5 BnHytpiHn npicBitka

PONEPEDKEHHRA
He6e3neKa BpaXeHHr eNeKtpnHm CtpymOM.
- CTOCOBH Noamn BCEpeDHHI cboR O BnpO6y Ta 3aAchnx lamn, 0 npOdaIOb8c8 OkpEmo: Li lamnn npn3HaueHi dny BnKOpNCtAHN y NobYTOBx npnlaDax 3 ekCTpeMaJIbHMn fi3nHmN yMOBAMn, TAKMn k Tempehpatya, Bi6paiz, BOJorictb, a6o npn3HaueHi dna HadaHn I nΦopMaui npo CTAH pOBoTH npuJaNy. BOHn He npn3HaueHi dny BnKOpNCtAHN 3 IHsOTo MeTOO Ta He npndaTHi dny OCBITHeHH NObYTOBx npmiiEhb.
- Y ybomy Bnpo6i e Dxepejo cbItJa KJacy eHeproeefektubHOcti G.
BukopncToByTe JnIe NaMNoUckn 3 TaKIMN K TexHcHMM XapaKTepNCtIKaMn.
2.6 CepBic
-Дя ремонту пида узеварсяdo abtopиobahoro cepbichoro uehtpy.
BukopucobyIte Inue opurihbHi 3anachi qactHn.
2.7 Ytvnizia

NONEPEDEXEHHRA
IcHyE He6e3neKa 3aDyWeHHN.
- Ito iHopmaiio 3 HaneXhoi yTnI3aui npnaLy 3BepHiTbcra do opraHIB MyHicnnaJIbHOI Blaani.
Bid'edhaTe npnlaD bID eJekTpomepeKi.
BipixTe Ka6eJb eNeKtpuHoro KINBHeHHa 6JIn3bKO do npnlaTy ta yTunl3yIte noro. - Pπi6epiβ φikcaTOp DBePμT, ξo6 yHemoxJnBntuix 3aunHeHHy, kIoo diTu, a6o domaHi TBapHn ONHrTaBCR BCEpeDnHi npNJady.
LcE npOdyKT no Bmicty He6e3neuHnx peoBn H BiINOBIaC BmOram TexHiHoro perIaMeHTy 06mExHHRA BnKOpNCTaHHr DeAKNx He6e3neuHnx peoBn B eJIeKtpuHOMy Ta eJIeKtpoHHOMy 06naHaHHi (noCTaHOBa Ka6iHeTa MInicTpiv YkpaIH N9139 BiD 10 6pe3Hra 2017p.)
3. ONIC BINOBOY
3.1 3aŋbHn oŋra

PanaHbKepyBaHHa
Ducnnne
HarpiBaIbHn eJemeHT
MikpoxBnboBn rehepaTOp
Jamna
BaN NOBOPOTHO CTOJINA
3.2 Akcecyapn
PobopoTHn CTJN
Длгпготуваннixi.
KoHcTpkyuia pewiTkn dna rpnla
Дя npirotoybaHHHa rpnJI.
4. YBIMKHEHHA TBAUMKHEHHaYXOBOI 1AΦN
4.1 Панель керваимя

8.1 BctaHOBJIeHHaKcecyapiB
BnKopncToByte nIwe BiIDNoBIDHn NocyD i MaTepiAn. DnB. po3dIn «NocyD i MaTepiAn, 1oPiXODaTb dIra MIKPOXBnJIb» rIaNv «Iopadn Ta peKOMeHdauii|.
i DaaBaiTe roTyBaTu!
He knaiItb npOdyKtn 6e3nocepEnHbO Ha nobOpOTn CToIHK. 3aBxdi KopncTytecra nocydom, npdaTHm dIy BnKOpNCtAHN y MIKPOXBnJbOBi neyi.
NoctabTe nocyd y cHTp nobOpOTHO r cTOnnka.
Yepe3 KOHTaKT i3 3aHaTTo raprHmN a6o 3aHaTTo XOIoHmN ppeMeTaMn NOBOpOTn CTOnIK MOKe IONaMaTnCra.
IpeBepHb a6o nepemiaute ctpaby nicra 3aBepuHnnoIOBHH nuacy po3MopOxyBaHHn roTyBaHH.
Pomiuyte piDHHuac BiD acy.
PomiwaTe cTpaBy nepei noaueo.
HakpmbaTe ctpaby niD yac npiroTyBaHHn i po3irpiBaHHn.
IocTabe Ioxky y nIyA6o cKny npn iirpBaHHi HanoB dny 3a6e3neHnKpaorO po3noiny tenna.
KnaiB npOyKTn y niv 6e3 ynaKOBKn. Facobai roTObi cTpaBN MOxHa cTabNTu y niv Jnwe kio ixHry naKOBKa iDxOoNTb dIy BnKOpNCtAHNy MIKPOXBnIBoBi nevi (nepeBipTe IHopMaciIO Ha ynaKOBci).

TotyBaHHa 3 BnKOpNCtAHHm MikPOxBnJIb
ToTyIe cTpaBn iD KpUkoIO. JaKIo Bn XOueTe 36epertN cKOpHky, roTyIte cTpaBv 6e3 KpUkN.
He neperpibaiTe cTpaBn, BCTaHOBbUH 3aHaITo BUCOKy NOTyXHicTb i Yac. Ika MoKe MiczMn nepecoxHyTu, NiDropitn a6o 3aropitncra.
He BnKOpncToBnyTe niv dny npnroTyBaHnry aeCyb y uKapayni, ockinbKn icHy e 3arpo3a ix po3pnbAHn. PpokoiTb KOBtOK aeChi nepei ii niirpiBaHHm.
Nepsh hix roTybaTn npOdykTu 3i uKipkoIO, cnid kInbka pa3IB npOKoJIoTN ix.
Oboqi cniHapiaTuHa oDHaKoBi 3a po3Mipom LMaTKn.
Pio3noiinocraipbHOMipHO.

Po3MopoOxyBaHHa 3 BnKOpNCtAHHm MIKPOXBnJIb
Ioknaitb 3amopoxeHy ctpaby 6e3 ynaKOBn Ha MaIeHbky nepeBepHyTu TapiKy, po3MiueHy HAd KOHTeINHePOM, a6o Ha niCTaBky dIy po3MOpoxeHHN YI NpactIKOBe CnTO, 06 pIDHa, 0yTbOpIOEtbcra npi po3MOpoxyBaHHi, MOrla CTikatN.
Notim BnmiBpo3MopOKeHi WMaToUKN.
BnKOpNCToByBaTn 6IbB WBCOKy NtYxHicTB MIKPOXBnB.
10.3 Nocyd i MaTepiann, 0o NiIxOaTb dJa BnKOpncTaHHa MIKPOXBnIbOBnx neayx
Y mikpoxbnboBnx neay BnKOpncToByte JInse BiINOBiHn nocyd i MaTepiann. IJIa doBikn DnB. Tabniu HnKye.
Ipeed BnKOpncTaHHm O3HaHOMTeecr 3 xapaKtepcntnKamn nocdy / MaTepiany.
- OBCJNYKBAHE HA KJINEHTN
- CbДьРЖAHNE
- OnscaHne Ha yHKnIte Ha YacOBnka
- TOrBeHe B MmKpObBnHOBa cypHa
- Pa3mpa3raBaHe B MmKpoBbJIHOBa φypha
- 10.3ПоIxODЯи rOTBapcKn cIIOBe n MaTePnaJI 3a MnKpOвьЛнОВа
- BEZPEČNOSTNI INFORMACE
- WE'RE THINKING OF YOU
- CUSTOMER CARE AND SERVICE
- CONTENTS
- SAFETY INFORMATION
- Children and vulnerable people safety
- General Safety
- SAFETY INSTRUCTIONS
- Installation
- WARNING!
- Electrical connection
- Use
- Care and cleaning
- Internal lighting
- Service
- Disposal
- 3.PRODUCT DESCRIPTION
- General overview
- Accessories
- HOW TO TURN OVEN ON AND OFF
- Control panel
- Display
- BEFORE FIRST USE
- Initial Cleaning
- First connection
- DAILY USE
- How to set the function: Grill + MW, Grill
- How to set: Microwave heating functions
- How to use: Microwave quick start
- Heating functions
- STANDARD
- MICROWAVE
- CLOCK FUNCTIONS
- Clock functions description
- How to set: Clock functions
- HOW TO USE: ACCESSORIES
- Inserting accessories
- ADDITIONAL FUNCTIONS
- How to save: Favourites
- Function lock
- Cooling fan
- HINTS AND TIPS
- Cooking recommendations
- Microwave recommendations
- Let's cook!
- Microwave cooking
- Microwave defrosting
- Microwave suitable cookware and materials
- Recommended power settings for different kinds of food
- Cooking tables for test institutes
- Information for test institutes
- CARE AND CLEANING
- Notes on cleaning
- TROUBLESHOOTING
- What to do if...
- How to manage: Error codes
- Service data
- ENERGY EFFICIENCY
- Energy saving
- MENU STRUCTURE
- Menu
- Submenu for: Options
- Submenu for: Setup
- Submenu for: Service
- IT'S EASY!
- ENVIRONMENTAL CONCERNS
- MÖTLEME TEILE
- Be3oNaChOcTb DeTei N IInC OrpaHnueHHbIMN BO3MOxHOCTaMn
- BKJIIOUeyHnE N BbIKJIOUeyHnE.
- YctaHOBka npHaJexKHOCTeI
- PeKoMeHdaцn no npNroTOBJIeHnIO
- ①
- Pekomehdaunno nncnoj3OBaHnIO MnkpoBoJH
- i DaaBaiTe roTOBNTb!
- PnroTOBJIeHne B MnkpoBOJHOBOI neu
- Pa3mOpaxnBaHne B MnkpoBOLHOBOI neu
- Kyxohna nocya n MaTePnaJIbI, NOxOJaUne dIra NCNoJIb3OBaHnB MmKpOBoJHOBOI neu
- Ta6nucbl npnroTOBneHnaI TeCTnpyoUx opraHn3aun.
- HOpMaunI nCnblTaTeJbHbIX OprAHn3aun
- CTPYKTPA MEHIO
- MeHIO
- BEZPEČNOSTNÉ INFORMÁCIE
- HΦOPMAUJI 3 TEXHIK N E3NEKN
- Be3peka iTei i Bpa3JIbIcx oci6
- 3aŋbHa 6e3neKa
- IHCTPYKci 3 TEXHIKN Be3NEKN
- BctaHOBJIeHHJ
- NONEPEDKEHHRA!
- BnHytpiHn npicBitka
- PONEPEDKEHHRA
- CepBic
- Ytvnizia
- NONEPEDEXEHHRA
- ONIC BINOBOY
- 3aŋbHn oŋra
- Akcecyapn
- YBIMKHEHHA TBAUMKHEHHaYXOBOI 1AΦN
- Панель керваимя
- BctaHOBJIeHHaKcecyapiB
- i DaaBaiTe roTyBaTu!
- TotyBaHHa 3 BnKOpNCtAHHm MikPOxBnJIb
- Po3MopoOxyBaHHa 3 BnKOpNCtAHHm MIKPOXBnJIb
- Nocyd i MaTepiann, 0o NiIxOaTb dJa BnKOpncTaHHa MIKPOXBnIbOBnx neayx
Brand : ELECTROLUX
Model : EVM8E08Z
Category : Electric oven