VB130 - Video conferencing system AVer - Free user manual and instructions
Find the device manual for free VB130 AVer in PDF.

| Product Type | Video Conferencing System |
| Brand | AVer |
| Model | VB130 |
| Power Supply | 12V DC with power adapter |
| Main Connectivity | USB 2.0 and USB 3.1 Type-B, USB 2.0 Type-A, Ethernet, mini USB for extension microphone |
| Microphone | Built-in microphone array, 4 to 5 meter range |
| Speaker | Built-in |
| Camera | Zoom lens, lens cover, PTZ |
| Fill Light | Yes, adjustable in temperature and level |
| AI Functions | Smart Framing, Audio Tracking, Audio Framing, Audio Preset Tracking, Presentation Mode, Audio Barrier |
| Remote Control | Yes, with AAA batteries |
| Control Software | PTZApp 2 (downloadable) |
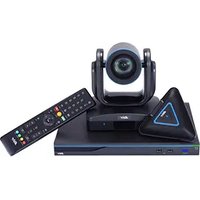
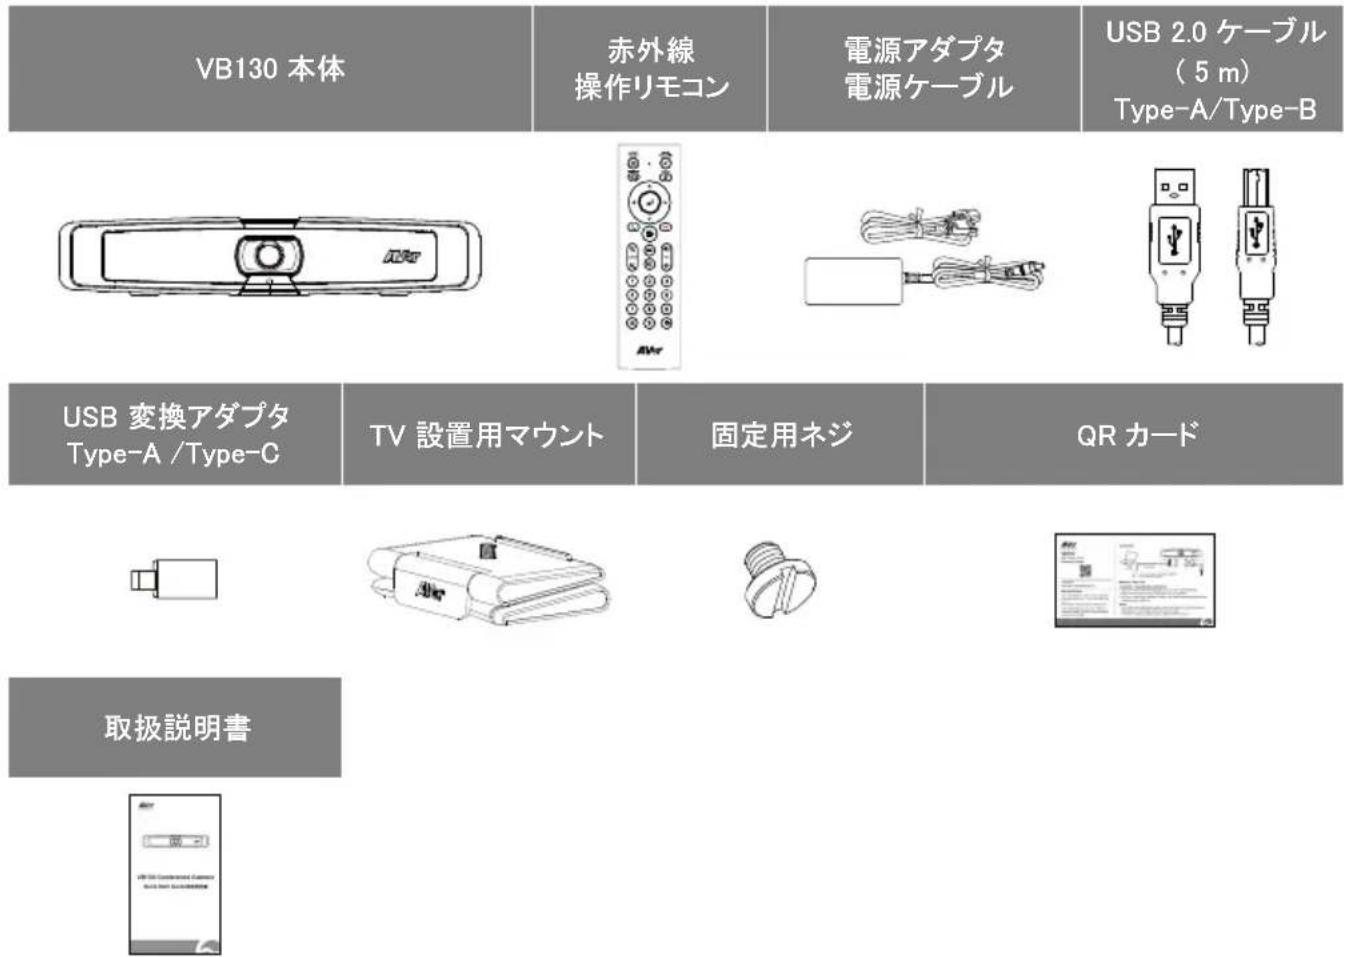
| Included Accessories | Remote control, power adapter, USB 2.0 cable, USB-A to C adapter, wall or screen mount kit, tripod screw, QR card, Velcro strap |
| Optional Accessories | USB 3.1 extension (10/20/30 m), MicroB extension microphone, wall mount kit, wireless dongle, USB 3.1 Type-B cable (3 m), screen mount kit |
| Security | Kensington anti-theft device |
| LED Indicator | Status indicators (blue, red, orange, white, purple) |
| Maintenance and Cleaning | Clean with a soft, dry cloth |
| Spare Parts and Repairability | Optional accessories available |
| Recommended Use | Video conferencing, meetings, classrooms |
| Bluetooth Support | Yes, via optional wireless dongle |
Frequently Asked Questions - VB130 AVer
User questions about VB130 AVer
0 question about this device. Answer the ones you know or ask your own.
Ask a new question about this device
Download the instructions for your Video conferencing system in PDF format for free! Find your manual VB130 - AVer and take your electronic device back in hand. On this page are published all the documents necessary for the use of your device. VB130 by AVer.
USER MANUAL VB130 AVer
natural_image
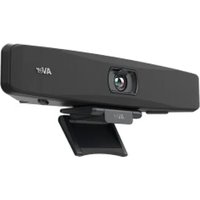
Line drawing of a vehicle rear view with AVer logo, no text or symbols presentVB130 Conference Camera
Quick Start Guide | 安装指南
安装指南 | 取扱説明書
빠른 가이드!Mode d'emploi
*The power cord will vary depending on the standard power outlet of the country where it is sold.
**Depending on different regions, it may include screen mount or wall mount kit in the package.
Optional Accessories
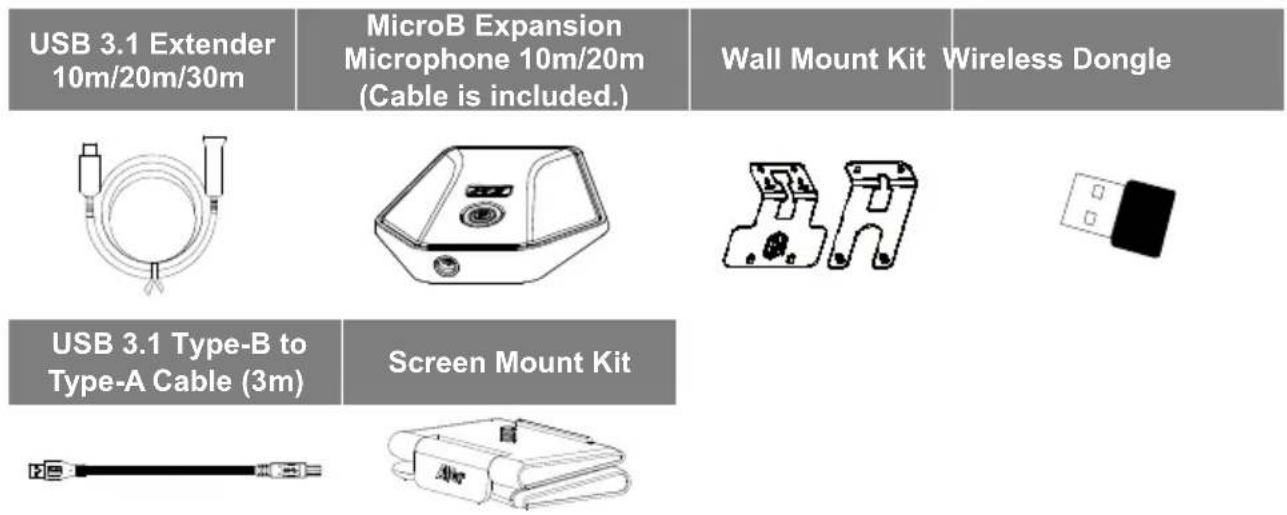
*Optional Accessories will vary depending on the country where it is sold.
Overview
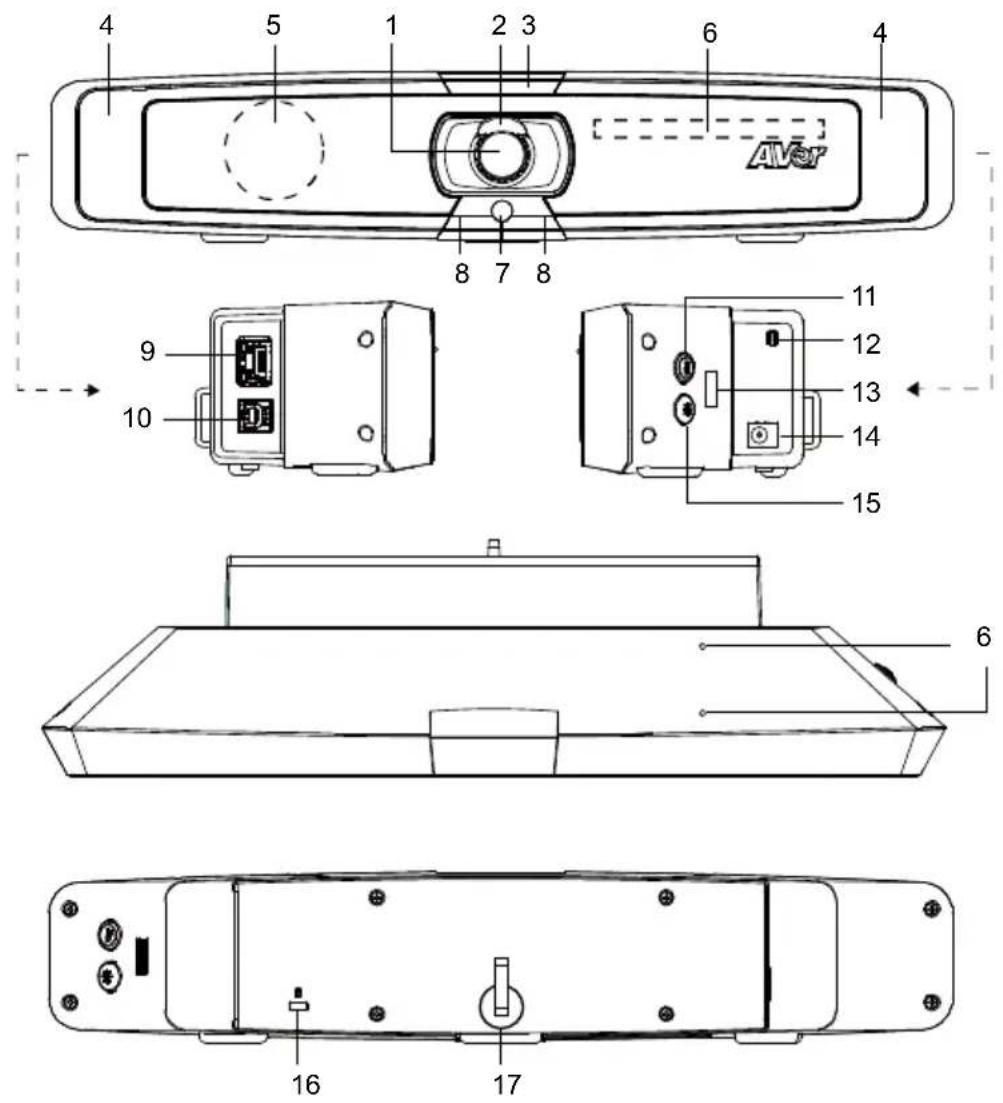
(1) Lens
(2) Lens Cover
(3) LED Indicator
(4) Fill Light
(5) Speaker
(6) Microphone Array Area
(7) Color Sensor
(8) IR Sensor
(9) Ethernet Port
(10) USB 3.1 Type-B Port
(11) Color Temperature Button
(12) Mini USB Port for Expansion Microphone
(13) USB 2.0 Type-A Port
(Only for Wireless Dongle*)
(14) DC 12V Power Jack
(15) Light Level Button
(16) Kensington Lock
(17) Velcro Strap
*Wireless dongle is an optional item in certain countries. Please contact your local dealer for purchasing.
LED Indicator
Power on: Blink blue once
Start-up: Solid red
Power on completely but no USB connection: Solid orange
Power and USB cable connected but device is idle or a call on hold: Solid white
Video and audio on: Solid blue
Calling: Fast blink white or blue depending on original status
Video mute and audio on (During a call): Solid purple
Video on and audio mute (During a call): Solid red
A second calling: Fast blink white, blue, or purple depending on original status
Control Fill Light
■ Hold either temperature button or light level button for 2-3 sec to switch on/off fill light function.
■ Hold both temperature button 📄 and light level button ✦ together for 2\~3 sec to switch between auto/manual light adjustment.
■ For more details, please refer to user manual.
Remote Control
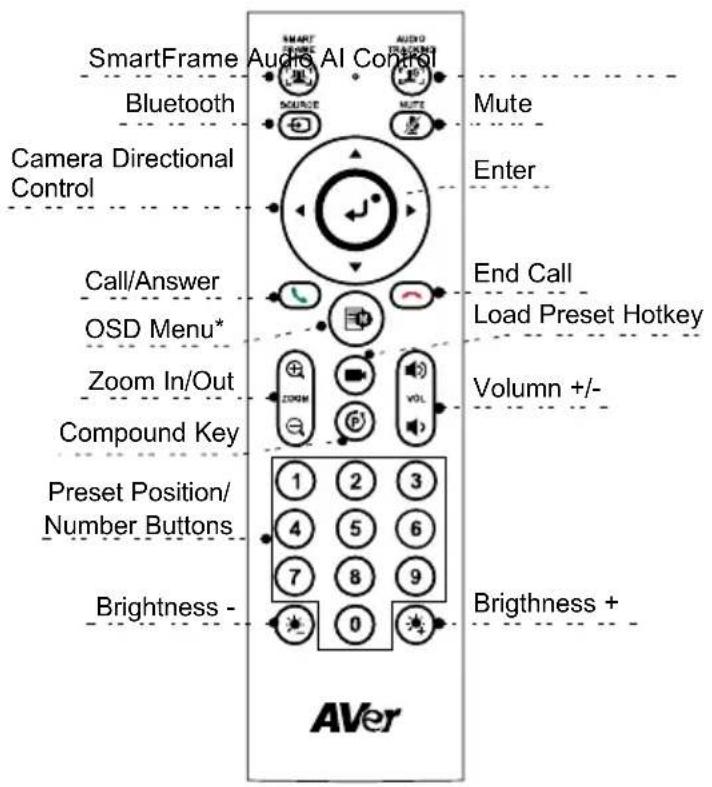
[Note] AAA batteries required
*Not supported for VB130
■ SmartFrame (☐) One-click automatic FOV adjustment to fit all participants in screen for one time. Press and hold the button for 1\~2 sec to switch from manual to auto framing mode or Off.
■ Audio AI Control (PS) Press and hold the button for 1\~2 sec to switch modes among Audio tracking, Audio frame, Audio Preset Tracking, Presentation mode, Audio fence and Off.
[Note] Audio AI function supports up to 4\~5 meters away from camera.
■ Bluetooth ( ) Hold it for 1\~2 sec to enable Bluetooth pairing with mobile phone. Short press it again to disconnect Bluetooth.
[Note] Wireless dongle is an optional item. Please contact your local dealer for purchasing.
■ Enter (J) Press it to show the current AI function on screen such as Auto Framing.
- Load Preset Hotkey ( ) Press it to move to preset position as user has set in sequence.
■ Number 0\~9: Long press the number button to set preset point. One-click the number key to load preset point.
■ FOV: Press Ⓞ then Ⓞ to change field of view.
■ WDR: Press Ⓥ then ⓣ to enable/disable the WDR function.
■ Presentation mode: Press Ⓞ then Ⓩ setup presentation area while under presentation mode.
■ RTMP: Press Ⓓ then ⓝ enable/disable the RTMP streaming function.
■ Long press either 🙏 or 🚙 button for 1\~2 sec to turn on/off the fill light function.
■ When fill light is off, press / button to increase/decrease image brightness.
■ When fill light is on, press ⏻ button to increase/decrease light level.
Installation
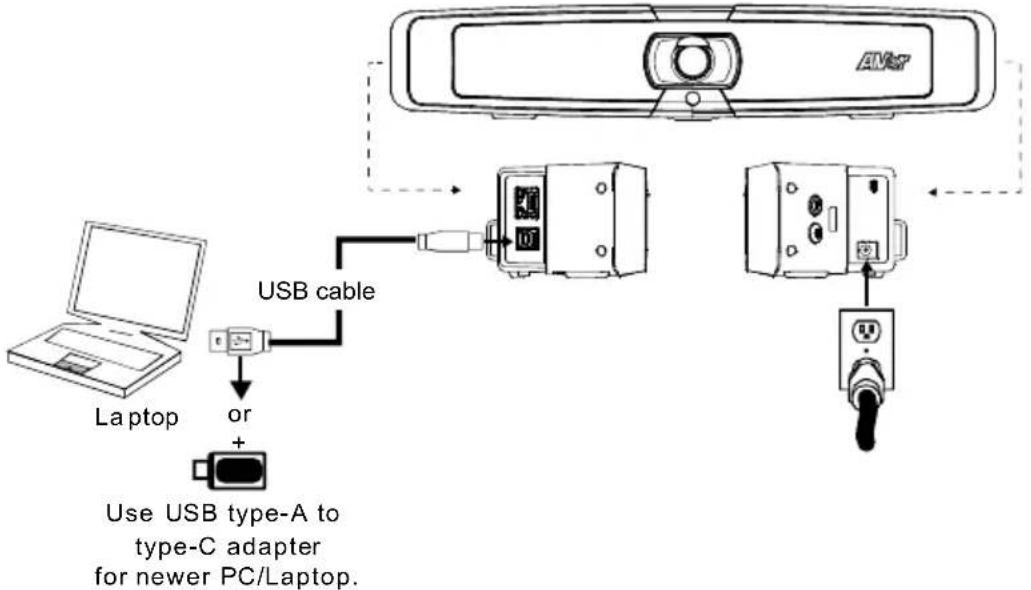
- Connect VB130 to PC/laptop with provided USB 2.0 cable and connect the power cord of VB130 to power wall outlet.
[Note] Use the supplied Velcro strap to secure and manage the cable.
flowchart
graph TD
    A["Laptop"] -->|USB cable| B["Device 1"]
    B --> C["Device 2"]
    C --> D["Device 3"]
    D --> E["Device 4"]
    style A fill:#f9f,stroke:#333
    style B fill:#ccf,stroke:#333
    style C fill:#cfc,stroke:#333
    style D fill:#fcc,stroke:#333
    style E fill:#cff,stroke:#333
- Install wireless dongle. Plug it into the USB 2.0 type-A port. Use remote control or PTZApp 2 to enable Bluetooth function. Enable Bluetooth of mobile phones to find VB130 and connect it to use VB130 as external microphone and speaker during a conference meeting.
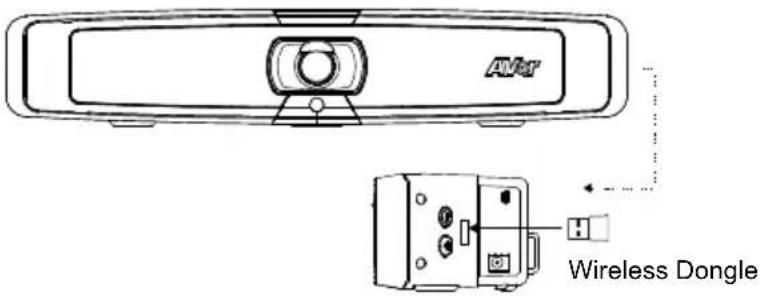
[Note] The wireless dongle is an optional item in certain countries. Regarding detailed settings of Bluetooth, please refer to user's manual.
Install PTZApp 2
Please go to https://www.aver.com/download-center (Global),
https://www.avereurope.com/download-center (Europe) or https://www.averusa.com/business/support/
(USA) to download the PTZApp 2. After downloading, double-click on the file and follow the on-screen instructions to complete the installation.
After installing the PTZApp 2, double-click on the PTZApp 2 icon to run the application.
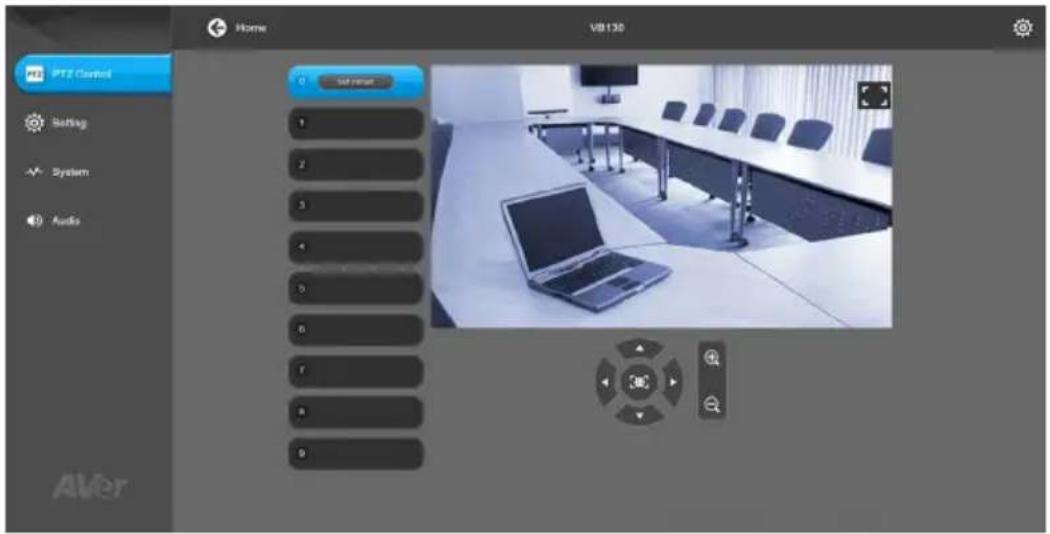
Use PTZApp 2
You can use the PTZApp 2 to set up AI tracking functions, pan, tilt and zoom the camera and some advanced image and audio settings. Please refer to the user's manual for details.
FEDERAL COMMUNICATIONS COMMISSION
NOTE: This equipment has been tested and found to comply with the limits for a Class A digital device, pursuant to part 15 of the FCC Rules. These limits are designed to provide reasonable protection against harmful interference when the equipment is operated in a commercial environment. This equipment generates, uses, and can radiate radiofrequency energy and, if not installed and used in accordance with the instruction manual, may cause harmful interference to radio communications. Operation of this equipment in a residential area is likely to cause harmful interference in which case the user will be required to correct the interference at his own expense.
FCC Caution: Any changes or modifications not expressly approved by the party responsible for compliance could void the user's authority to operate this equipment.
This device complies with part 15 of the FCC Rules. Operation is subject to the following two conditions: (1)
This device may not cause harmful interference, and (2) this device must accept any interference received, including interference that may cause undesired operation.
Warning:
This is a class A product. In a domestic environment this product may cause radio interference in which case the user may be required to take adequate measures.
Risk of Explosion if Battery is replaced by an Incorrect Type. Dispose of Used Batteries According to the Instructions.
COPYRIGHT
©2021 AVer Information Inc. All rights reserved.
MORE HELP
For FAQs, technical support, software and user manual download, please visit:
Global: https://www.aver.com/download-center/
USA: https://www.averusa.com/business/support/
European Headquarters: https://www.avereurope.com/download-center/
Technical Support:
Global: https://aver.com/technical-support
USA: https://averusa.force.com/support/s/contactsupport
European Headquarters: https://www.avereurope.com/technical-support/
CONTACT INFORMATION
Global
AVer Information Inc.
https://www.aver.com
8F, No.157, Da-An Rd.,
Tucheng Dist.,
New Taipei City 23673,
Taiwan
Tel: +886 (2) 2269 8535
USA
AVer Information Inc.
https://www.averusa.com
668 Mission Ct.,
Fremont, CA 94539, USA
Tel: +1 (408) 263 3828
Toll-free: +1 (877) 528 7824
Technical support: support.usa@aver.com
European Headquarters
AVer Information Europe B.V.
https://www.avereurope.com
Westblaak 134, 3012KM,
Rotterdam, The Netherlands
Tel: +31 (0) 10 7600 550
Technical support: eu.rma@aver.com
包装内容物
https://www.aver.com
https://www.aver.com
新北市土城区大安路157号8楼
电话:(02)2269-8535
パッケージ内容
©2021 AVer Information Inc. All rights reserved.
その他のサポート
https://www.aver.com
https://www.aver.com
8F, No.157, Da-An Rd., Tucheng Dist.,
New Taipei City 23673, Taiwan
Tel: +886 (2) 2269 8535
Siège européen
AVer Information Europe B.V.
https://www.avereurope.com
Westblaak 134, 3012KM, Rotterdam, Pays-Bas
Tel: +31 (0) 10 7600 550
Assistance technique : EU.RMA@aver.com
https://www.avereurope.com/download-center
https://www.aver.com
8F, No.157, Da-An Rd., Tucheng Dist.,
New Taipei City 23673, Taiwan
Tel.: +886 (2) 2269 8535
Sede europea
AVer Information Europe B.V.
https://www.avereurope.com
Westblaak 134, 3012KM, Rotterdam, The Netherlands
Tel.: +31 (0) 10 7600 550
https://www.aver.com
8F, No.157, Da-An Rd., Tucheng Dist.,
New Taipei City 23673, Taiwan
Tel: +886 (2) 2269 8535