
EVC900 - Video conferencing system AVer - Free user manual and instructions
Find the device manual for free EVC900 AVer in PDF.

| Product Type | Video Conferencing System |
| Brand | AVer |
| Model | EVC900 |
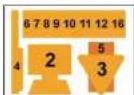
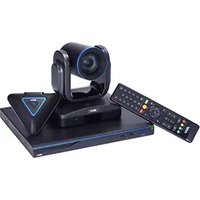
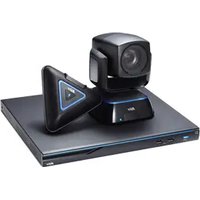
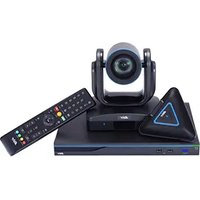
| Package Contents | Main unit, camera, microphone, remote control, DVI to HDMI converter, power adapter, power cord, VGA cable, mini-DIN 8-pin microphone cable, HDMI cables (x2), camera cable, RJ-45 cable, AAA batteries, quick installation guide, warranty card, rear panel label |
| Network Connectivity | RJ-45 (Ethernet), H.323, SIP, H.460, HTTP, Telnet protocols |
| Video Connectivity | HDMI (x2), VGA, DVI (via converter) |
| Video Resolution | Full HD (1080p) - estimated |
| Audio Connectivity | External microphone (mini-DIN 8-pin), audio output via HDMI |
| Power Supply | Power adapter, power cord included |
| Installation Wizard | Step-by-step wizard on first startup (language, network, etc.) |
| Network Configuration | Static IP, PPPoE, DHCP; NAT, port forwarding, H.460 gatekeeper |
| Default IP Address | 192.168.0.1 |
| Used Ports | 1719 (UDP), 1720 (TCP), 30000-30299 (TCP/UDP), 80 (TCP), 23 (TCP), 5060 (TCP/UDP) |
| Security | H.460 firewall traversal, port forwarding, gatekeeper access control |
| Remote Control | Infrared, Home, Network, Double, Call buttons |
| OSD Menu | Displayed via TV or monitor, accessible via remote control |
| Web Interface | HTTP (port 80) for remote configuration |
| Cleaning | Wipe with a soft dry cloth; do not use liquids |
| Repairability | Contact a qualified professional; spare parts available on request |
| Warranty | Warranty card included |
| General Information | Full manual available for download at notice-facile.com |
Frequently Asked Questions - EVC900 AVer
User questions about EVC900 AVer
0 question about this device. Answer the ones you know or ask your own.
Ask a new question about this device
Download the instructions for your Video conferencing system in PDF format for free! Find your manual EVC900 - AVer and take your electronic device back in hand. On this page are published all the documents necessary for the use of your device. EVC900 by AVer.
USER MANUAL EVC900 AVer

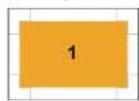
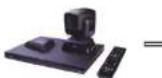
1. Main System
5. Power Adapter

6. Power Cord

7.VGA Cable

8. DVI to HDMI
Converter

9. Mini Din 8 pin MIC Cable

10.HDMI Cable

e x 2 11. Camera Cable

,RJ-45 Cable

13. Warranty Card

14. Quick Installation Guide

15. Back Panel Label

16. AAA Batteries

Layer 1
Accessory Pack
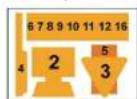
Layer 2
Camera, Microphone, Remote, Adapter, Cables, and Batteries
Layer 3
Main System
English
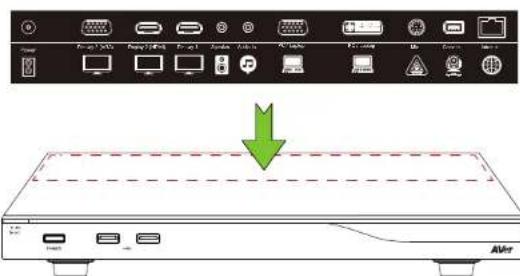
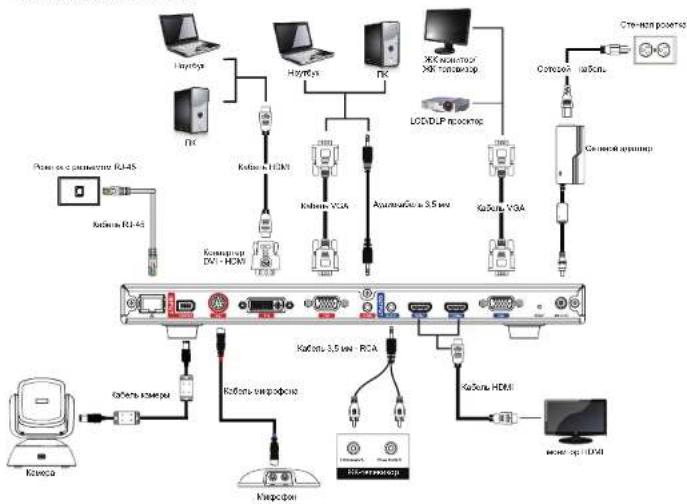
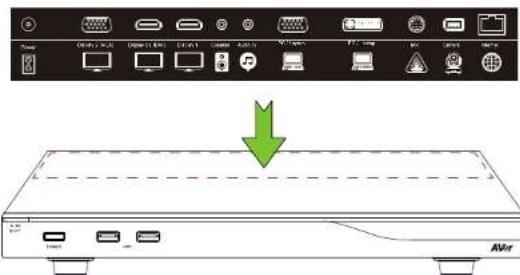
Connection Diagram
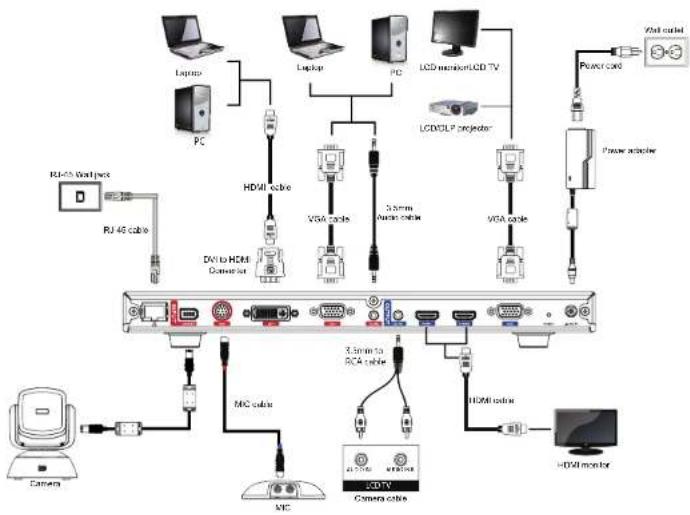
Please put the panel label on the main system so that users can easily plug/unplug all cables from the front.
English-1
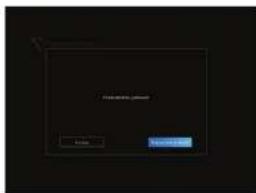
Setup Wizard
For the first time using AVer EVC system, the Installation Wizard will guide you to setup your EVC system step by step. After completing the wizard setup, user may start to use your EVC system.
- Connect your EVC system well and turn on the power.
After your EVC system starting, user will see the
Installation Wizard screen shown up.
- Language: Select the language of your EVC system.
Press to expand the drop-down list. Then, us
or tion to move the selection and press to
make the selection.
- After selecting, press to move to "Next" option and
press go to the next step.
-
Follow the instructions and complete your settings.
-
Click "Finish" to complete the Installation Wizard setup
and go to home menu.
- Please press on the remote to start making a call.


Network Quick Setup Guide
Default IP address: 192.168.0.1.
Please change your EVC's IP address at the start.
There are three possible setup scenarios for most video conferencing users, if yours is:
- Public IP Configuration (Outside of Firewall).
- Private IP Configuration (Behind Firewall with Port Forwarding). Please refer to the following table "EVC H.323 Related Port Usage for Firewall Setup" for your firewall Port forwarding setup.
- H.460 Gatekeeper with Firewall Traversal. Please refer to the following table "EVC H.323 Related Port Usage for Firewall Setup" for your firewall Port forwarding setup.
EVC H.323 Related Port Usage for Firewall Setup
(Pleaseset the followingports in portforwarding in your firewall before start installing yourEVC)
| Port Function Type | ||
| 1719 | Gatekeeper | UDP |
| 1720 H.323 | Call setup TCP | |
| 30000 - 30299 | Control and media for audio, video, content, and data/FECC | TCP and UDP |
| 80 | HTTP Interface (WebTool) | TCP |
| 23 | Telnet | TCP |
| 5060 | SIP | TCP and UDP |
Scenario 1 - Public IP Configuration (Outside of Firewall)
Your EVC is connecting directly to the internet.


Internet
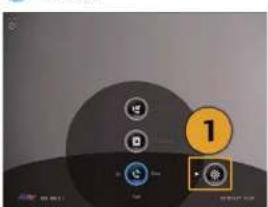
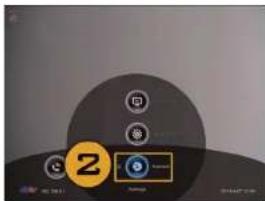
- From the remote press "Home"->


"Setting".


m : x = 1 或 3x + 4y + 1 = 0
- Press "LAN Configuration".
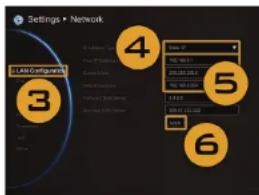
- And In the drop-down list "Obtain IP address", choose "Static IP" or "PPPoE".
Static IP: Input the "IP address", "Subnet Mask" and "Default Gateway".
- PPPoE: Input the PPPoE login "User name" and "Password".
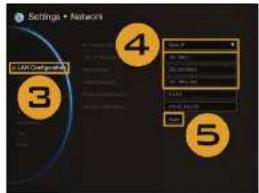
Static IP setting
PPPoe setting
- Select "Apply" and press (Enter).
- Press "Home" on the remote to return to the home menu.
- Press the (Call) button on the remote and you are ready to make your first call.
Scenario 2 -Private IP Configuration (Behind Firewall with Port Forwarding)
Your EVC is connecting to the Internet through a firewall.

EVC


Internet
1.From the remote press "Home"->

- Pres

Network".
"Setting".
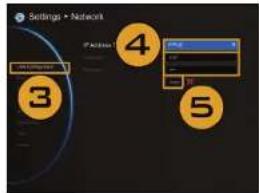
- Press "LAN Configuration".
- And In the drop-down list "Obtain IP address", choose "Static IP".
- Manually input the "IP address", "Subnet Mask" and "Default Gateway".
- Select "Apply" and press Enter
- Press (Back) on the remote to return to previous menu. (If you have H.323 ALG enabled, skip to step 10).
- In the same page, go to "Firewall" and press Enter).
- Select "ON" in the NAT Configuration check box and enter the IP address in the "NAT Public (WAN) Address" field.
- Press the "Home" button on the remote to return the home menu.
- Press the Call button on the remote and you are ready to make your first call.
Scenario 3-H.460 Gatekeeper with Firewall Traversal
Your EVC is connecting to the internet through a firewal and you have a Gatekeeper outside the firewal.
EVC

Firewall
Gatekeeper

Internet
- From the remote press "Home"->

"Setting".


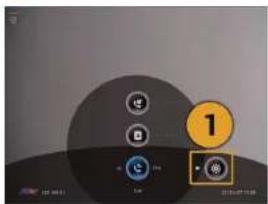

- Press "LAN Configuration".
- And In the drop-down list "Obtain IP address", choose "Static IP".
- Manually input the "IP address", "Subnet Mask" and "Default Gateway".
- Select "Apply" and press (Enter).
- In the same page, go to "Gatekeeper" and press Enter).
- Enter the IP address of your Gatekeeper in the "Galekeeper IP Address" field and enable the "Use Gatekeeper" check box.
- Enable the 'Enable H.460 Firewall Traversal' option.
- Press the "Home" button on the remote to return the home menu.
- Press the (Call) button on the remote and you are ready to make your first call.

Troubleshooting
- Make sure you have changed your default IP address. The default IP address is 192.168.0.1, in order not to conflict with other devices in the same LAN, please change your IP address at the start.
- Video conference call is established but no video or voice.
If you are connecting to AVer EVC with firewall, make sure you have done the port forwarding correctly. For non H.323 ALG firewall, please set the NAT configuration and the WAN IP address on AVer EVC system is entered.
We suggest having a fixed public IP address for AVer EVC system. With dynamic public IP address, it will change after a certain period which depends on your local ISP.
There is a routing issue if you installed two AVer EVC systems sharing one public IP address.
-
Unable to connect to other Video Conferencing systems.
-
Check to see if you dial the correct IP address.
- Ensure the power status of the device from the other site is on.
- Verify if the firewall blocks the inbound traffics from the other site.
-
Verify if the other site rejected your Video Conferencing call.
-
Unable to see the OSD.
-
Check to see if your cable is connecting correctly.
Make sure your system and display are well-connected and then reboot your system. (Your display should be switched on before you reboot your system). -
Press "Dual" button on remote controller (User needs to keep pressing until OSD menu is shown).
-
Cannot open WebTool by IE 9 and IE 10.
-
Click (Tools) in IE.
Select F12 developer tools.
Change Document Mode to Internet Explorer 9 standards - Disable intranet sites in Compatibility View. Go to "Tools" → "Compatibility view settings".
- Unclick the checkbox "Display intranet sites in Compatibility View" and then click "Close".
For more information, please visit and download EVC user manual at our website http://www.aver.com
AVerEVC
Guía de instalación
Assistant installation

9.Ka6bI MmKPOΦHa MinD 8-KOHTAKTH

10. Ka6enb HDMIX2

11. KaebnbKaemepbI

12. Ka6enb RJ-45

13. FaphtnHnHaA kapta

14.KpataKoe pykoBOCTBO NO yCTAHOBK

15. Маркорова на заима поиме

16.Батapestи AAA

YPOBcHb1
Komnnekt akcecyapob
YpOBeHb2
Kamepa, MmP0D0Hn, nynbT Ny, Cst. aadtnep, KaBem, 6atapepn

YpOBeHb 3
TnabHbBnOK
Pycckn
Cxema noKJIuOeHn
PooanyiCTa,pa3MeCTHTe MapKIOPOBky NOKIOUOHeHn HA KOpnyce rnaBHorO 6noka CNTEmb, YTO6bl
nonb0BATEH MOrN NERKO NOcOeHNrTb/OTcoeHNrTb KaEBn OT nepeHne naHEn.
MacTepeyctaHOBK
EcnBbHcnonb3yete CnCTemy AVer EVC BnepbIe. Mactep yctahOBKn NmOKeT Bam Hacptonb CnCTemy EVC 3a 3aRoM. Nocne 3abepHnmaPobTu MaTepe yctahOBKn Nl630Batenb MoKet Hauatb Hncnbl3oBaTb CnCTemy EVC.
- PoiocoeiHnTe BCE qactn CnCTeMbE EVC uBkIOuHTenrntAHHe. Nocne aanycKa CmCTeMbE EVC nonb3oBaTeNB yBNDHT kpran MaTepa yCTaHOBKn.
- RaBik: Bbepnte RaBk CnCTemEVC, HaxMNTe KhoNky
TOb6B BoHTB BapKpbBaOuINcCnCOK.C
NOMOUBIO KHONKIN PEMeuaItecbno
CNCKY HAKMITE DnA BbOpa HyKHO 3aHcHIN.
3. BbBpaRabHK, HaxMMte DnepexoKa KnyHkTy
"Jaee Hn HxMHTe ,Tto6bI neepuK cneyoucemy
uary.
4.CnedyIte HNCTpyKUNM dna 3abepeHnHaHcTPOKn.
5. Haxmte "Toto" dna 3aepuHn npoBtmaCTepa yctahOAnu npeyDnte a rnaHoe MeHO.
6. HaxMMTE KONKy Ha NynBe Tpy dny BbINaHHeHHBbl0Ba.
KpaTkoe pyKOBoDCTBO no HacTpOKe ceTN
IP-adppec no yomohannio: 192.168.0.1.
BcamomHauane n3mehnTE IP-epc cncTeMbEVC.
MeTc TpB03MoxhBx CueHApn HacPoKm IP-aepca dIa 6oIbWmHCTBa nIb3oBAten cHCTe BIDOKOHepoHcui:
- KOnfmyraaun CnybnnHbIM IP-anepeom (3npeenamn 6p3nMay3pa)
- Konfumprauca n cacthblm IP-apecom (3a 6p3nmdaypom, c nepehanpaenem nptoB) O6paTInTeC b kcndeynoien Tabnue "HacptpoKa npToB 6p3nmdaypa dna EVC H. 323"dnn HactpoKn npocanpaBnHnnpoTob Bawero 6p3nmdaypa.
3.Ip8paTHHK.H.460cO6xoJOMb6pHmay3pa.O6paTKeB K CTeyouoe TaBnue "HaCtpoKa noptOB 6pHmay3paEVC H.32"nHrAeCTPOKnpeHApaaBnHn noptOB BaIeO 6pHmay3pa.

Hactpoika npotOB 6p3Hmayapa dna EVC H.323
(YctahOBITE cneDyoume npbI B paadene nepenapnabennno npro8 baewero 6paHmay3pa, npekde HcHauTb YCTAHOBKY CHTeMbEVC)
Cuehapn 1-KoHpIpyaunc npy6nHbIM IP-aDpecom (a npedeam6p3Hmaypa)
Baa cncTeMa EVC noKnIouaTcK NHTepHety HAprrmyio.

- He ydaetc0rKpbItb WebTool c nomouhIOE 9 n IE 10.
HaxMMTe KONky (NHCtpymeHTb) B IE.
Bb6epnre "CpectBa pa3pa6toHka F12".
H3MeHHTe"PexHMdoKymHnTa"Ha cTaHnapt dna Internet Explorer 9.
OTKIOHHTCABHbHTPAHETB"TPOCMTOPE BPOKIMECOBMECTMOCT".3aHNTBE "NCHCPDMHTB", "HaTPOKHNPCOMPTA B POKIMECOBMECTMOCT".
Y6epnte pnaok c noa "Otoopaatb y3n HHTpacetn B peKHMec coBmectHMOCT" 3aTeM
**Ia noyen Hbone noopobno HnnpoMaun, noxanycta, 3arpyshtpe pyko0dctbo nolsoBteHnCTeMu EVC c hawero caHa http://www.aver.com
P/N:300AV2AA-D3G

- English
- Setup Wizard
- Network Quick Setup Guide
- EVC H.323 Related Port Usage for Firewall Setup
- Scenario 1 - Public IP Configuration (Outside of Firewall)
- Scenario 2 -Private IP Configuration (Behind Firewall with Port Forwarding)
- Scenario 3-H.460 Gatekeeper with Firewall Traversal
- Troubleshooting
- AVerEVC
- Guía de instalación
- Assistant installation
- MacTepeyctaHOBK
- KpaTkoe pyKOBoDCTBO no HacTpOKe ceTN
- Hactpoika npotOB 6p3Hmayapa dna EVC H.323
- Cuehapn 1-KoHpIpyaunc npy6nHbIM IP-aDpecom (a npedeam6p3Hmaypa)
Brand : AVer
Model : EVC900
Category : Video conferencing system