
ACP51EUZ - Docking station TARGUS - Free user manual and instructions
Find the device manual for free ACP51EUZ TARGUS in PDF.
| Product Type | USB 2.0 Docking Station with Video for Laptop |
| Brand | Targus |
| Model | ACP51EUZ |
| Dimensions (approx.) | 20 x 10 x 3 cm |
| Weight (approx.) | 200 g |
| Power Supply | External AC power adapter (included) |
| Video Connectivity | 1 x DVI (max 2048 x 1152, 32-bit) |
| USB Ports | 2 x USB 2.0 white (500 mA) + 2 x USB 2.0 black (1 A) |
| Network Port | 1 x RJ-45 Ethernet 10/100 |
| Audio Connectivity | 1 x 3.5 mm stereo output + 1 x 3.5 mm microphone input |
| Main Functions | Port expansion, external display, network, audio, high-power USB charging |
| Compatible Operating Systems | Windows XP SP3, Vista SP1, Windows 7 |
| Minimum Requirements | Intel Pentium or equivalent processor, USB 2.0 port, CD-ROM drive |
| Maintenance and Cleaning | Dust with a soft, dry cloth. Do not use liquids. |
| Safety | Use only the supplied power adapter. Do not expose to moisture. |
| Spare Parts and Repairability | No user-serviceable parts. If problems occur, contact Targus support. |
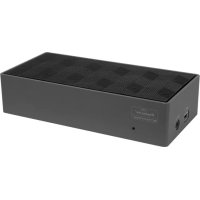
| General Information | USB 2.0 docking station with video function. Allows connection of up to 4 USB devices, an external display, an Ethernet network, and audio peripherals. |
| Box Contents | Docking station, USB upstream cable, power adapter, driver mini CD, user guide |
Frequently Asked Questions - ACP51EUZ TARGUS
User questions about ACP51EUZ TARGUS
0 question about this device. Answer the ones you know or ask your own.
Ask a new question about this device
Download the instructions for your Docking station in PDF format for free! Find your manual ACP51EUZ - TARGUS and take your electronic device back in hand. On this page are published all the documents necessary for the use of your device. ACP51EUZ by TARGUS.
USER MANUAL ACP51EUZ TARGUS
82210 Manufactured or imported by Targus Europe Ltd., Hounslow, Middlesex. TW4 5ZD, UK. All rights reserved. Targus is either a registered trademark or trademark of Targus Group International, Inc. in the United States and/or other countries. Features and specifications are subject to change without notice. All trademarks and registered trademarks are the property of their respective owners.
User Guide
Targus USB 2.0 Laptop Docking Station with Video
Targus USB 2.0 Laptop Docking Station with Video
Table of Contents
GB-English
USB 2.0 Laptop Docking Station With Video 4
DE-Deutsch
Congratulations on your purchase of the Targus USB 2.0 Laptop Docking Station with Video. This portable expansion module allows you to connect through a single USB connection up to 4 USB devices, monitor, network (Ethernet/LAN) connection, speakers and microphone.
The docking station also offers two, Targus Power Ports providing twice the USB spec for high power devices, and USB ports that are widely spaced for larger adapters.
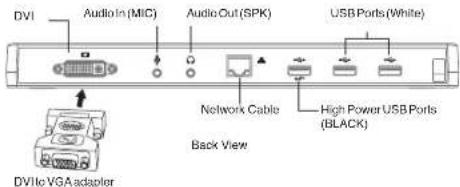
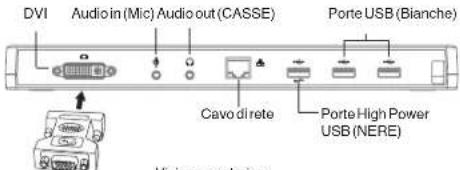
The Docking Station provides the following ports:
DVI Single Link (supports up to 2048 x 1152 at 32 bit color)
- Two 3.5 mm Audio: (1) stereo out (1) microphone in
RJ-45 Ethernet 10/100
- Two USB2.0 (White)
- Two USB Power Ports (Black) - providing current up to 1 Ampere
Package Contents
In addition to this user guide, the package contains:
Targus USB 2.0 Laptop Docking Station with Video
High-speed USB2.0 upstream cable
-Driver software CD (mini CD)
- AC power adapter (required)
System Requirements
Hardware
-PC with an Intel Pentium processor or equivalent
-CD-ROM drive (support mini CD)
-USB version 2.0 port
- AC power source (AC adapter required)
Operating System
Mircosoft WindowsXP with Service Pack 3
Mircosoft Windows Vista with Service Pack 1
Mircosoft Windows7

NOTE: WHEN CONNECTED TO A USB VERSION 1.1 PORT ON YOUR COMPUTER, THE DOCKING STATION'S PERFORMANCE LEVEL WILL BE LESS THAN OPTIMAL AND THE VIDEO PORT WILL NOT FUNC TION PROPERLY. FOR BEST RESULTS, CONNECT IT TO A USB VERSION 2.0 PORT.
Taurus USB 2.0 Laptop Docking Station with Video
Installing the Device and Drivers
To use the Targus Docking Station, you must first install the driver onto your computer. Then, connect the docking station to your computer and Windows plug-and-play will install the hardware drivers for each port.

WARNING: YOU MUST INSTALL THE DOCKING STATION SOFTWARE BEFORE CONNECTING IT TO YOUR COMPUTER. OTHERWISE, THE DOCKING STATION WILL NOT WORK PROPERLY.
Installing the Docking Station Driver
Installing the docking station driver enables your operating system to recognize the docking station and its ports once it's connected.
1 Turn on your computer.
2 Insert the driver software CD into your computer's CD-ROM drive.
If setup does not begin automatically, click Start, Run, and enter D:\ Setup.exe (where D: is the path of your CD-ROM drive) and then click OK.
3Follow any on-screen instructions to complete the installation.
4 Click Finish and restart your computer when prompted.
Targus USB 2.0 Laptop Docking Station with Video
Connecting the Docking Station to Your Computer
After installing the docking station software, you are ready to connect the docking station to your computer. To do this:
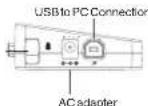
1 Connect the supplied AC power adapter to the AC power jack on the docking station.
2 Connect one end of the USB cable to the docking station and the other end into an available USB 2.0 port on your computer.

WARNING: THE DOCKING STATION WILL NOT FUNCTION PROPERLY WITHOUT THE AC ADAPTER PLUGGED INTO AN AC OUTLET.
DO NOT CONNECT ANY DEVICES TO THE DOCKING STATION UNTIL THE INSTALLATION IS COMPLETED.
Taurus USB 2.0 Laptop Docking Station with Video
Targus USB 2.0 Laptop Docking Station with Video
Docking Station Ports
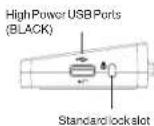
Lockloop
Right side Left side
Green Tx light illuminates when connected to a network and the yellow Rx light flashes when data is transmitting to or from the network.

NOTE: THE DOCKING STATION SUPPORTS HOT SWAPPING OF THE NETWORK CABLE
Connecting New Devices
To avoid possible damage when connecting a new device, do not force the cable connector into the port on the docking station. If the cable connector does not attach smoothly, turn the connector over and try attaching it again.
Connecting to a Local Area Network
To connect an ethernet cable with RJ-45 connect, attach the cable connector to the ethernet/network port on the docking station. Additional procedures to connect to an actual network depend on the type of network you are using. Contact your network administrator for detailed instructions.
Connecting a USB Device
To connect a USB device, plug it into a USB port on the docking station and follow the additional instructions provided with the device. All four USB ports meet USB hi-speed requirements by providing 480Mbps through-put and 500mA of power.
The white USB ports are high-speed ports that provide standard 500mA of power. The black USB power ports are high-speed ports that provide up to 1Amp.
Connecting and Configuring an Audio Device
- Plug your headphones or speakers into the green 3.5mm Audio Out port on the docking station.
- To connect a microphone, plug it into the mono Audio In port.
- The sound and mic should come out automatically when you plug the docking station. Make sure that both speaker and microphone volume is not set to MUTE.
- To manually enable your headphones or speakers in case automatic transfer is not possible
For Windows XP
Go to the Control Panel and choose Sound and Audio. Select the Audio tab. Under Sound Playback, change Preferred Device to USB Multimedia Audio Device from the drop down list.
- Click Apply, then click OK.
For Windows Vista
Go to the Control Panel and select Sound. Under the Playback tab, check that USB Audio Device is set as the default. If it is, click OK. If it isn't, select it, click SetDefault, then click OK.
For Windows 7
Go to the Control Panel and select Hardware and Sound. and choose Sound. Under the Playback tab, check that USB Audio Device is set as the default. If it is, click OK. If it isn't, select it, click Set Default, then click OK.

NOTE: AUDIO DEVICES WILL NOT WORK SIMULTANEOUSLY ON THE PORT STATION AND THE HOST COMPUTER

CAUTION: ALL AUDIO OR MULTIMEDIA APPLICATIONS MUST BE TERMINATED BEFORE SWITCHING BETWEEN THE PORT STATION AUDIO OUTPUT AND THE HOST COMPUTER AUDIO OUTPUT.
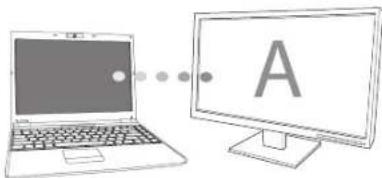
Connecting to a Monitor or LCD
Any monitor or LCD connected to the video port of the docking station will be limited to a maximum resolution of 2048 x 1152 at 32 bit color

NOTE: THE MAXIMUM RESOLUTION OF 2043 x 1152 IS ONLY SUPPORTED IF THE MONITOR OR LCD IS PLUGGED INTO THE DOCKING STATION BEFORE CONNECTING THE DOCKING STATION TO THE NOTEBOOK. IF THE MONITOR OR LCD IS PLUGGED INTO THE DOCKING STATION AFTER THE DOCKING STATION IS CONNECTED TO THE NOTEBOOK, THE RESOLUTION IS SET TO 1024 x 758.
Taurus USB 2.0 Laptop Docking Station with Video
Controlling the Display using Docking Station's Video Menu Options
Video menu options can be accessed by right-clicking on the Docking Station icon in the system tray or through the Windows Display Properties.
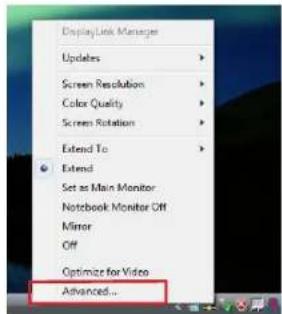
Windows XP / Windows Vista
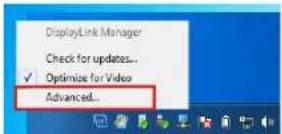
Windows 7
Targus USB 2.0 Laptop Docking Station with Video
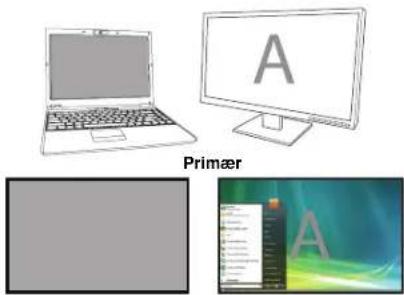
Extend: You are using your notebook screen as your primary display and your monitor or LCD is a secondary screen.
To set the display into this mode, select 'Extend' in the Docking Station Icon application menu. The device will now be extending in the direction it was the last time the display was in this mode. For more control, navigating to the 'Extend To' submenu and selecting one of the options will not only put the device into extend mode, but will also place it to the Left/Right/Above/Below the main (primary) monitor.

Extend Mode


Taurus USB 2.0 Laptop Docking Station with Video
Targus USB 2.0 Laptop Docking Station with Video
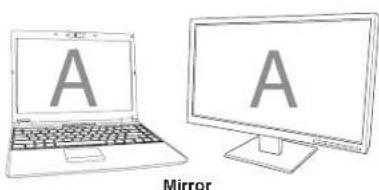
Mirror: You are using your notebook screen as your primary display and your monitor or LCD replicates your notebook screen.
To set the display into this mode, simply select 'mirror' from the docking station icon application menu. The resolution, colour depth and refresh rate of the primary screen are replicated on the monitor connected to the docking station graphics adapter.

NOTE: IF THE MONITOR CONNECTED TO THE DOCKING STATION SUPPORTS A LOWER RESOLUTION THAN THE PRIMARY FIGURE FITS ON THE EXTERNAL SCREEN, WHERE THE MONITOR CONNECTED TO THE DOCKING STATION IS OF A LARGER SIZE THAN THE PRIMARY SCREEN THE IMAGE WILL BE LETTER-BOXED TO KEEP THE ASPECT RATI CORRECT.


Primary (Notebook Monitor Off): You are using your monitor or LCD as your primary display and your notebook screen is turned off. (only accessible via windowsdisplay properties)


Taurus USB 2.0 Laptop Docking Station with Video
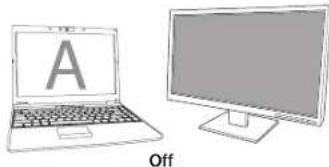
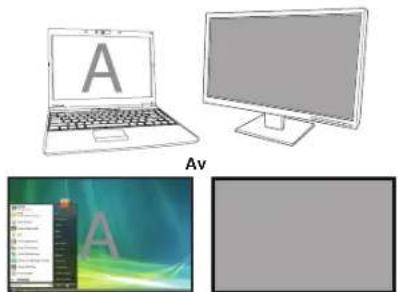
Off: You are using your notebook screen as your primary display and your monitor or LCD is turned off.


Targus USB 2.0 Laptop Docking Station with Video
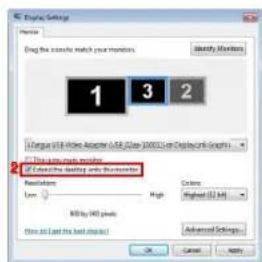
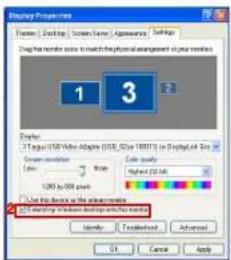
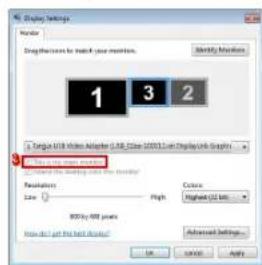
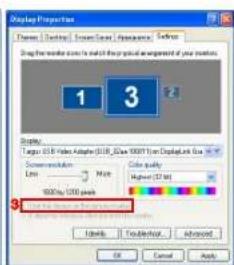
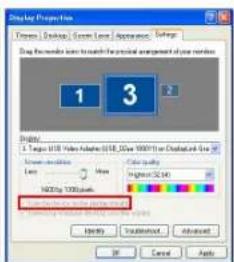
Controlling the Display using Windows Display Properties (for Windows XP and Vista)
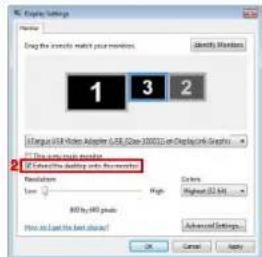
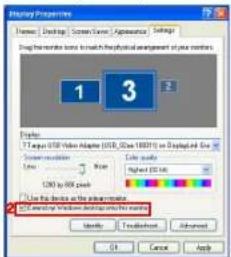
Docking Station's video setting can also be configured from the Windows Display Properties dialog box. To do this on Windows Vista, right click on the desktop, click on "Personalize" and then select the Display Settings' link. The corresponding feature is available in Windows XP by right clicking on the desktop, selecting 'Properties' and then navigating to the Settings' tab.
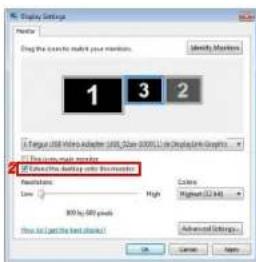
Windows Vista
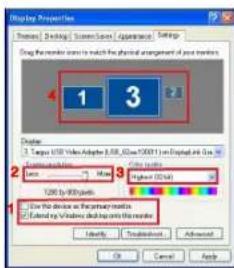
Figure 1
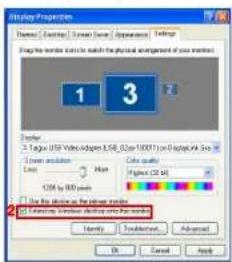
WindowsXP
Taurus USB 2.0 Laptop Docking Station with Video
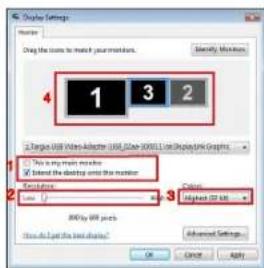
Extend Mode: To set the display into this mode, check the box marked 'Extend my Windows desktop onto this monitor' (1 in Figure 1). Arrange screen resolution and colour quality using the appropriate controls (2 and 3), and arrange its position with respect to the other monitors on the extended desktop in using the drag area(4).
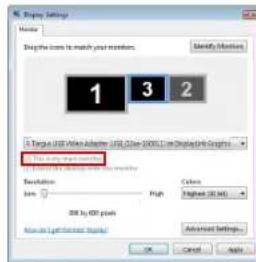
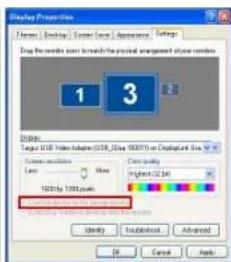
Mirror Mode: To set the display into mirror mode, simply uncheck the box marked 'Extend the desktop onto this monitor' (1 in Figure 1 on previous page.).
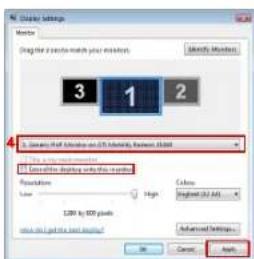
Setting the Primary Display: To make the monitor attached to the Docking Station as the primary display, follow the instructions below:
Targus USB 2.0 Laptop Docking Station with Video
- In Display Properties window, using the drop down list, select the monitor that is attached to the Docking Station.

Windows Vista
WindowsXP
Taurus USB 2.0 Laptop Docking Station with Video
Targus USB 2.0 Laptop Docking Station with Video
- After selecting the corresponding monitor, check the box next to "extend the desktop onto this monitor" (for Vista) or "extend my Windows desktop onto this monitor" (for XP).
Windows Vista
WindowsXP
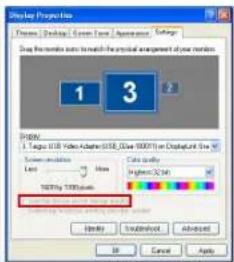
- Then, check the box next to "This is my main monitor" (for Vista) "Use this device as the primary monitor" (for XP).
Windows Vista
WindowsXP
- Click "Apply".
Taurus USB 2.0 Laptop Docking Station with Video
- Select the Laptop monitor using the drop down list and uncheck the box "extend the desktop onto this monitor" (for Vista) or "Extend my Windows desktop onto this monitor" (for XP) and click "Apply".
Windows Vista
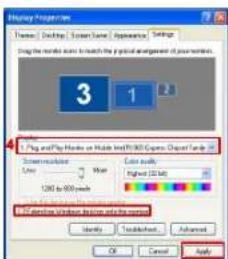
WindowsXP

NOTE: IT IS POSSIBLE TO WORK MORE CONVENTIONLY WITH A LAPTOP BY SETTING ITS ACTION ON LID CLOSED TO DO NOTHING AND SETTING THE DOCKING TO PRIMARY MODE. THE LAPTOP LID CAN THEN BE CLOSED AND THE LAPTOP USED WITH THE EXTERNAL KEYBOARD AND MOUSE
The monitor attached to the Docking Station stays primary if the PC enters hibernate or suspend mode or is rebooted. If the Docking Station is detached, the laptop's display becomes primary again.
Upon reconnection, the monitor attached to the Docking Station will return to primary mode.
Targus USB 2.0 Laptop Docking Station with Video
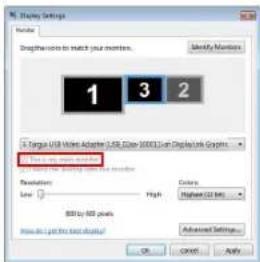
Controlling the Display using Windows Display Properties (for Windows 7)
Docking Station's video setting can also be configured from the Windows Display Properties dialog box. To do this on Windows 7, right click on the desktop, click on "Personalize" and then select the Display" and then "Change display setting' link. Or right click on Targus USB Video adapter" icon in the notification area and choose "advance".
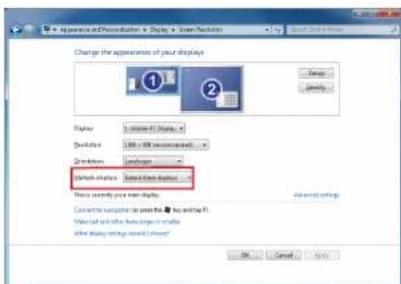
The various display output setting can be controlled by choosing the options provided in the "multiple display" drop-down list. Choose the desired setting and click "apply". The screen will refresh and confirm ok by selecting "keep changes".
Automatic Updates
Automatic Updates is a product maintenance feature from DisplayLink. The automatic update mechanism ensures that the Docking Station's graphics Adapter has the most up-to-date drivers and software, providing the user with increased performance and stability.
Disconnecting the Docking Station
If the Docking Station is powered off or the USB cable is removed from the computer, the display blanks. All windows and icons will shift to the primary screen.
On reconnection or powering up of the Docking Station, the display returns to the same mode as it was before disconnection. However, windows and icons that were previously on the screen will not be moved back.
Using USB Devices That Require More Power
Some devices, which use large amounts of power, such as printers and optical drives, should be plugged into the USB Power Ports. These ports will provide up to 1000mA of power - double the power on standard USB ports.
Supported Resolution
| Resolution Refresh Rates available at 32bit | Resolution Refresh Rates available at 32bit | ||
| 640x4806067 | 727585 | 1280x8006075 | 85 |
| 720x4805060 | 1280x96060 | ||
| 768x5765060 | 1280x10246075 | ||
| 800x6005660 | 727585 | 1360x76860 | |
| 832x62475 | 1366x7686075 | 85 | |
| 800x48060 | 1400x105060 | ||
| 848x48060 | 1440x90060 | ||
| 1024x60060 | 1800x120060 | ||
| 1024x7686070 | 7285 | 1680x105060 | |
| 1152x86475 | 1920x10805060 | ||
| 1152x87075 | 1920x120060 | ||
| 1280x7205060 | 2048x115260 | ||
Actual support resolutions area depend on the support of connected monitor.
Troubleshooting
Device Not Working
- Make sure that the device is fully inserted into the correct port on the docking station.
- Plug the device into a different port on the docking station. If it still doesn't work, test the device by connecting it directly to your computer.
- Verify that you ran the Setup or Install program for the device.
- Make sure that the device appears in Device Manager. For more information refer to "Verifying Devices are Installed"
- Disconnect all devices from the docking station and reconnect them, one at a time. Check that each device works before plugging in the next one.
- Each USB port is equipped with over-current protection. Should a USB device draw more current than the USB port can supply, the port will shut down. To re-enable the port, unplug the device and go to Device Manager or to the message in the system tray and choose the Reset option. You can then plug the device back into the USB port. If a shut down reoccurs, check the power requirements of the device.
Product Limitations
Some devices may halt temporarily when a high data transfer is occurring. For example, your mouse may respond slowly while a graphic print job is printing or while you are experiencing heavy network traffic. We recommend the following guidelines:
- Do not transfer data to or from multiple high-speed devices, such as a digital camera or scanner, at the same time.
- If speed degradation does occur, close other programs that use a USB device to improve device performance.
Verifying Devices are Installed
You can view the devices installed on the docking station from the Device Manager window in System Properties. Right-click My Computer, Properties, then click the Hardware tab, and then the Device Manager button.
From the Device Manager window, expand the following:
-DisplayAdapters:
-Displaylink Graphic Adapter (XP only)
-Displaylink Mirror Adapter (XP only)
NetworkAdapters
- High speed USB Ethernet Adapter
Sound, Video and Game Controllers:
-USB Audio Device
-USB Display Adapters
-Targus USB Video Adapter
Monitor
-TargusUSBVideoAdapter
FAQ - DisplayLink
DisplayLink provides this support website to help answer questions. This may answer any questions you may have.
http://www.displaylink.com/support/index.php
DE-Einführung
Mircosoft WindowsXP with Service Pack 3
Mircosoft Windows Vista with Service Pack 1
Mircosoft Windows7

Taurus USB 2.0 Laptop Docking Station with Video
Targus USB 2.0 Laptop Docking Station with Video
Taurus USB 2.0 Laptop Docking Station with Video
Targus USB 2.0 Laptop Docking Station with Video
Taurus USB 2.0 Laptop Docking Station with Video
Targus USB 2.0 Laptop Docking Station with Video
Taurus USB 2.0 Laptop Docking Station with Video
Targus USB 2.0 Laptop Docking Station with Video
Taurus USB 2.0 Laptop Docking Station with Video
Targus USB 2.0 Laptop Docking Station with Video
Taurus USB 2.0 Laptop Docking Station with Video
Targus USB 2.0 Laptop Docking Station with Video
Installation of dockingstationens driver
Ved installation af dockingstationens driver er det muligt for styresystemet at genkende dockingstationen ogdensporte, nardener tilsluttet.
1 Taend fordin computer
2 SaT driverssoftware CDen idin computers CD-ROMdrev.
Taurus USB 2.0 Laptop Docking Station with Video
Spejl: du anvender din notebook som primaer skaerm,og din monitorller LCD kopierer din notebooks skaerm.
For at indstille visning i/DDonne tilstand,vaelges'mirror'-ikonet i Dockingstationens applikations-menu.Den primaere skarmns oplesning,farvedybe og formyesehastigedkopierespmonitoren forbundettil dockingstationensgrafiske adapter.

NOTE: HVIS DEN MONITOR, DER ER FORBUNDET TIL DOCKINGSTATIONEN, HAR EN LAVERE OPLOSINGEND DEF PRIMATURE BILLEDF, PASSEER DEN TIL DEN FKSTRINE SKEFMR. HYDR DEN MONITOR. SOM ER FORBUNDET TIL DOCKINGSTATIONEN, HAR HEN IGUE DE BILLEDF, PRIMATURE SKEFMR. VII. BILLEDF BLIVE INADRMFT OR AT BIBHOLDE BILLEDFORAATET.


62
Targus USB 2.0 Laptop Docking Station with Video
Prämér: (Notebook Monitor Off (slukket)): Du anvender din monitor erer LCD som din primäre skarm og din notebook skarm er slukket. (du kan kun fä adgang via Windows Skarmindstilling).
Taurus USB 2.0 Laptop Docking Station with Video
Targus USB 2.0 Laptop Docking Station with Video
Taurus USB 2.0 Laptop Docking Station with Video
Targus USB 2.0 Laptop Docking Station with Video
Taurus USB 2.0 Laptop Docking Station with Video
- Nár du har valgt den tilsvarende monitor, sættes kryds i boksen ved sider af "extend the desktop onto this monitor" (udvid skrivebordet over til这部分 skárm) (for Vista) er "Extend my Windows desktop onto this monitor" (udvid Windows skrivebordet over til这部分 skárm) (for XP).
Windows Vista
WindowsXP
Targus USB 2.0 Laptop Docking Station with Video
- Derefter sættes kryds i boksen ved sider af "This is my main monitor" (dette er den primæ saerkm) (for Vista) eller Use this device as the primary monitor"(anvend denen saerkm som primæ saerkm) (for XP)

Windows Vista
WindowsXP
- Klikpä "Apply" (anwend)
Taurus USB 2.0 Laptop Docking Station with Video
Targus USB 2.0 Laptop Docking Station with Video
Taurus USB 2.0 Laptop Docking Station with Video
Targus USB 2.0 Laptop Docking Station with Video
Taurus USB 2.0 Laptop Docking Station with Video
Targus USB 2.0 Laptop Docking Station with Video
Administrar la pantalla utilizando Windows Display (para Windows XP y Windows Vista
Taurus USB 2.0 Laptop Docking Station with Video
Targus USB 2.0 Laptop Docking Station with Video
Taurus USB 2.0 Laptop Docking Station with Video
Targus USB 2.0 Laptop Docking Station with Video
Taurus USB 2.0 Laptop Docking Station with Video
Targus USB 2.0 Laptop Docking Station with Video
Taurus USB 2.0 Laptop Docking Station with Video
Targus USB 2.0 Laptop Docking Station with Video

Paaantoinen (Primary)


Taurus USB 2.0 Laptop Docking Station with Video
Pois paalta (Off): Kaytat kannettavasinayttopaanayttanasija monitorisi tai LCD: sion pois paalta.

Pois paälä


Targus USB 2.0 Laptop Docking Station with Video
Nayton hallinta Windowsin nayton ominaisuuksa kayttamalla (Josinulla on Windowa XPta/Vista)
Taurus USB 2.0 Laptop Docking Station with Video
Targus USB 2.0 Laptop Docking Station with Video
Taurus USB 2.0 Laptop Docking Station with Video
- Kun olet valinnut vastaavan monitorin, valits ruutu vaihtoehdolle "laajenna tyopoyta tahan monitorin (extend the desktop onto this monitor)" (Vista) tai "laajenna Windows tyopoytani tahan monitorin (extend my Windows desktop onto this monitor)" (XP).

Windows Vista

WindowsXP
Targus USB 2.0 Laptop Docking Station with Video
- Valisse sitten vaihtoeho Tam on paanayttoni (This is my main monitor) (Vista) Kalyta tata laitella paanayttona Use this device as the primary monitorXP).
Windows Vista
WindowsXP
Taurus USB 2.0 Laptop Docking Station with Video
Targus USB 2.0 Laptop Docking Station with Video
Nayton hallinta kayttamalla Windows Nayton ominaisuuksa (Jossinulla on Windows 7)
Targus USB 2.0 Laptop Docking Station with Video
Targus USB 2.0 Laptop Docking Station with Video
Taurus USB 2.0 Laptop Docking Station with Video
Targus USB 2.0 Laptop Docking Station with Video
Taurus USB 2.0 Laptop Docking Station with Video
Targus USB 2.0 Laptop Docking Station with Video
Taurus USB 2.0 Laptop Docking Station with Video
Targus USB 2.0 Laptop Docking Station with Video
Taurus USB 2.0 Laptop Docking Station with Video
Targus USB 2.0 Laptop Docking Station with Video
Taurus USB 2.0 Laptop Docking Station with Video
Targus USB 2.0 Laptop Docking Station with Video
Taurus USB 2.0 Laptop Docking Station with Video
Targus USB 2.0 Laptop Docking Station with Video
Collegare la Docking Station al computer
Portedella Docking Station
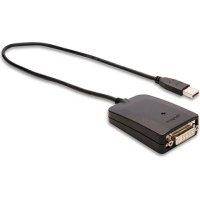
Van DVIaar VGA adapter
Targus USB 2.0 Laptop Docking Station with Video
Targus USB 2.0 Laptop Docking Station with Video
Taurus USB 2.0 Laptop Docking Station with Video
Targus USB 2.0 Laptop Docking Station with Video
Taurus USB 2.0 Laptop Docking Station with Video
Targus USB 2.0 Laptop Docking Station with Video
Taurus USB 2.0 Laptop Docking Station with Video
Targus USB 2.0 Laptop Docking Station with Video
Taurus USB 2.0 Laptop Docking Station with Video
Targus USB 2.0 Laptop Docking Station with Video
Taurus USB 2.0 Laptop Docking Station with Video
Targus USB 2.0 Laptop Docking Station with Video
Taurus USB 2.0 Laptop Docking Station with Video
Targus USB 2.0 Laptop Docking Station with Video
Taurus USB 2.0 Laptop Docking Station with Video
Disconnettere la Docking Station
Targus USB 2.0 Laptop Docking Station with Video
Taurus USB 2.0 Laptop Docking Station with Video
Targus USB 2.0 Laptop Docking Station with Video
Taurus USB 2.0 Laptop Docking Station with Video
Targus USB 2.0 Laptop Docking Station with Video
Taurus USB 2.0 Laptop Docking Station with Video
Targus USB 2.0 Laptop Docking Station with Video
Taurus USB 2.0 Laptop Docking Station with Video
Targus USB 2.0 Laptop Docking Station with Video
Taurus USB 2.0 Laptop Docking Station with Video
Targus USB 2.0 Laptop Docking Station with Video
Taurus USB 2.0 Laptop Docking Station with Video
Installereenhetenogdriverne
For a bruke Targus-dokkingstajonen ma clu first installer driven pa datamaskinen din. Kobe deleteret dokkingstajonen til datamaskinen din, sa vil Windows plug-and-play installer maskinvarredriverne for hver port.

ADVARSEL: DU MA INSTALLERE PROGRAMMVAREN FOR DOKKINGSTASIONEN FOR DU KOLBER DEN TIL DATAMASKINEN. ELLERS VIL IIKE DOKKINGSTASIONEN FUNGERE ORDENTLIG.
Targus USB 2.0 Laptop Docking Station with Video
Taurus USB 2.0 Laptop Docking Station with Video
Targus USB 2.0 Laptop Docking Station with Video
Taurus USB 2.0 Laptop Docking Station with Video
Targus USB 2.0 Laptop Docking Station with Video
Taurus USB 2.0 Laptop Docking Station with Video
Targus USB 2.0 Laptop Docking Station with Video
Taurus USB 2.0 Laptop Docking Station with Video
Targus USB 2.0 Laptop Docking Station with Video
Taurus USB 2.0 Laptop Docking Station with Video
Targus USB 2.0 Laptop Docking Station with Video
NOTICE: A DOCKING STATION (BASE DE LIGACAO) SUPORTA HOT SWAPPING (TROCA SEM INTER-
Taurus USB 2.0 Laptop Docking Station with Video
Targus USB 2.0 Laptop Docking Station with Video
Taurus USB 2.0 Laptop Docking Station with Video
Targus USB 2.0 Laptop Docking Station with Video
Taurus USB 2.0 Laptop Docking Station with Video
Targus USB 2.0 Laptop Docking Station with Video
Taurus USB 2.0 Laptop Docking Station with Video
Targus USB 2.0 Laptop Docking Station with Video
Taurus USB 2.0 Laptop Docking Station with Video
Targus USB 2.0 Laptop Docking Station with Video
Taurus USB 2.0 Laptop Docking Station with Video
Targus USB 2.0 Laptop Docking Station with Video
Taurus USB 2.0 Laptop Docking Station with Video
Targus USB 2.0 Laptop Docking Station with Video
Taurus USB 2.0 Laptop Docking Station with Video
Spegel: Du anvander din notebookkarm som din primara display och din monitor aller LCD replikerar din notebooksskarm.
Targus USB 2.0 Laptop Docking Station with Video
Taurus USB 2.0 Laptop Docking Station with Video
Av: Du anvander din notebooksskarm som din primara skarm smtidigt som din monitor erller LCD ar avstangda.
Targus USB 2.0 Laptop Docking Station with Video
Taurus USB 2.0 Laptop Docking Station with Video
Targus USB 2.0 Laptop Docking Station with Video
Taurus USB 2.0 Laptop Docking Station with Video
Targus USB 2.0 Laptop Docking Station with Video
- Efter det att du vait den overensstammande monitorn, kontrllerera boxen bredvid "extend the desktop onto this monitor" (utoka skrivbordet tillenna monitor) (for Vista) erer "extend my Windows desktop onto this monitor" (utoka mitt Windows skrivbord tillenna monitor) (for XP).
Windows Vista
WindowsXP
- Därefter, kontrollera boxen bredvid "This is my main monitor" ("Detta ar min huvudmonitor") (for Vista) "Use this device as the primary monitor" ("Användenna erhet som primär monitor") (for XP).
Windows Vista
Windows XP
4.Klickapä "Apply"(Applicera)
Taurus USB 2.0 Laptop Docking Station with Video
Targus USB 2.0 Laptop Docking Station with Video
- Table of Contents
- GB-English
- DE-Deutsch
- The Docking Station provides the following ports:
- Package Contents
- System Requirements
- Hardware
- Operating System
- Installing the Device and Drivers
- Installing the Docking Station Driver
- Connecting the Docking Station to Your Computer
- Docking Station Ports
- Connecting New Devices
- Connecting to a Local Area Network
- Connecting a USB Device
- Connecting and Configuring an Audio Device
- For Windows XP
- For Windows Vista
- For Windows 7
- Connecting to a Monitor or LCD
- Controlling the Display using Docking Station's Video Menu Options
- Controlling the Display using Windows Display Properties (for Windows XP and Vista)
- Controlling the Display using Windows Display Properties (for Windows 7)
- Automatic Updates
- Disconnecting the Docking Station
- Using USB Devices That Require More Power
- Troubleshooting
- Device Not Working
- Product Limitations
- Verifying Devices are Installed
- FAQ - DisplayLink
- DE-Einführung
- Installation of dockingstationens driver
- Administrar la pantalla utilizando Windows Display (para Windows XP y Windows Vista
- Nayton hallinta Windowsin nayton ominaisuuksa kayttamalla (Josinulla on Windowa XPta/Vista)
- Nayton hallinta kayttamalla Windows Nayton ominaisuuksa (Jossinulla on Windows 7)
- Collegare la Docking Station al computer
- Portedella Docking Station
- Disconnettere la Docking Station
- Installereenhetenogdriverne
Brand : TARGUS
Model : ACP51EUZ
Category : Docking station