WDC 225 - Vacuum Cleaner HUSQVARNA - Free user manual and instructions
Find the device manual for free WDC 225 HUSQVARNA in PDF.
| Product Type | Wet and dry vacuum for commercial use |
| Brand | Husqvarna |
| Model | WDC 225 |
| Dimensions (L x W x H) | 377 x 392 x 550 mm |
| Weight | 7.5 kg |
| Supply voltage | 110-120 V |
| Rated power | 1000 W |
| Frequency | 50/60 Hz |
| Electrical protection class | Class II (double insulation) |
| Protection rating (IP) | IPX4 |
| Airflow rate | 3200 l/min |
| Maximum vacuum | 210 mbar |
| Sound pressure level | 72 dB(A) ±2 |
| Vibrations (ISO 5349) | < 1.5 m/s² |
| Tank capacity (estimated) | 20 liters |
| Main functions | Suction of dry dust and liquids; blower function; socket for electric tool (depending on model) |
| Filter cleaning system | Semi-automatic (manual shaking) |
| Filter | Washable dust filter, optional filter bag for dry use |
| Included accessories | Floor nozzle, crevice tool, extension tube, hose, handle |
| Maintenance | Emptying the tank, cleaning/replacing the filter, replacing the filter bag |
| Safety | Double insulation; automatic float shut-off in liquid suction; do not vacuum hazardous materials |
| Repairability | Husqvarna spare parts; service at authorized center |
Frequently Asked Questions - WDC 225 HUSQVARNA
User questions about WDC 225 HUSQVARNA
0 question about this device. Answer the ones you know or ask your own.
Ask a new question about this device
Download the instructions for your Vacuum Cleaner in PDF format for free! Find your manual WDC 225 - HUSQVARNA and take your electronic device back in hand. On this page are published all the documents necessary for the use of your device. WDC 225 by HUSQVARNA.
USER MANUAL WDC 225 HUSQVARNA
WDC 220, WDC 225, WDC 325L
EAC
EN Operator's manual 7-17
text_image
Exploded view diagram of a vacuum cleaner with numbered parts for identification and assembly reference.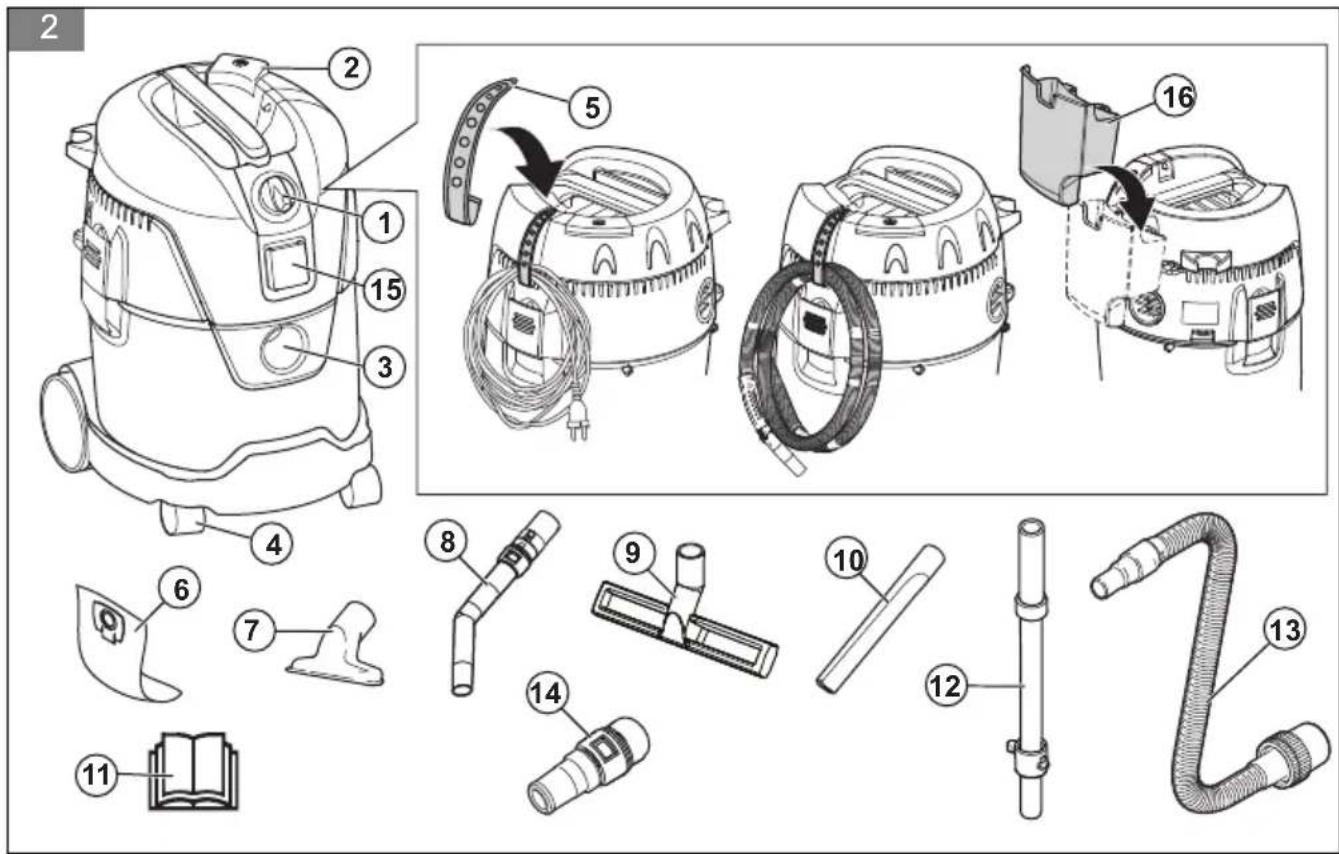
text_image
Technical diagram of a vacuum cleaner with numbered parts and exploded view, including labeled parts 1 through 16.
text_image
3 CE7
natural_image
Line drawing of a vacuum cleaner with directional arrows indicating motion (no text or symbols)9
natural_image
Line drawing of a mechanical device with exploded view and component assembly (no text or symbols)10
text_image
Diagram showing three electrical switch components with directional arrows indicating rotation or connection.11
natural_image
Technical line drawing of a mechanical component with internal components and directional arrows (no text or symbols)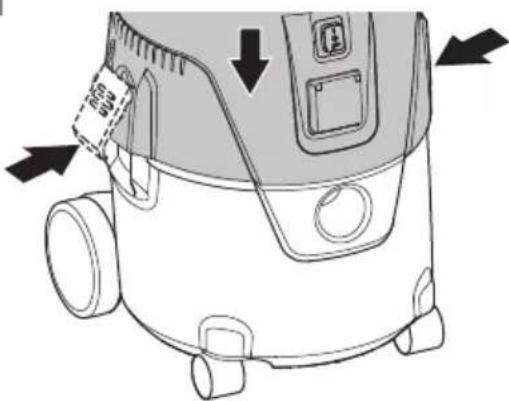
natural_image
Line drawing of a vacuum cleaner with directional arrows indicating motion (no text or symbols)13

natural_image
Line drawings of two different vacuum cleaner setups with arrows indicating motion (no text or symbols)
natural_image
Line drawing of a vacuum cleaner with attached housing and control panel (no text or symbols)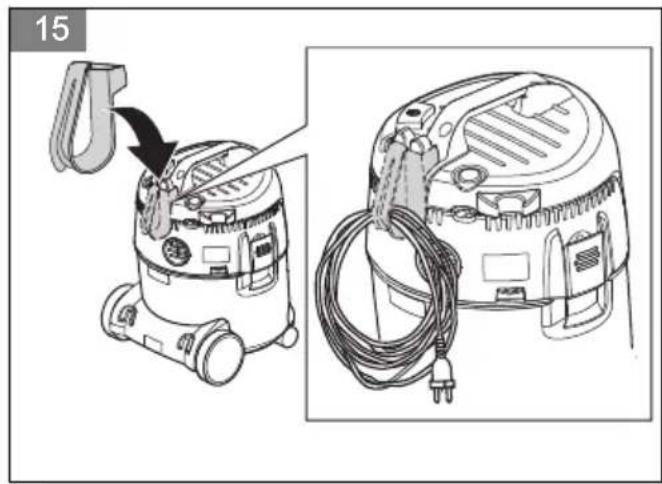
natural_image
Illustration of a vacuum cleaner with attached cable and plug, shown from two different angles (no text or symbols)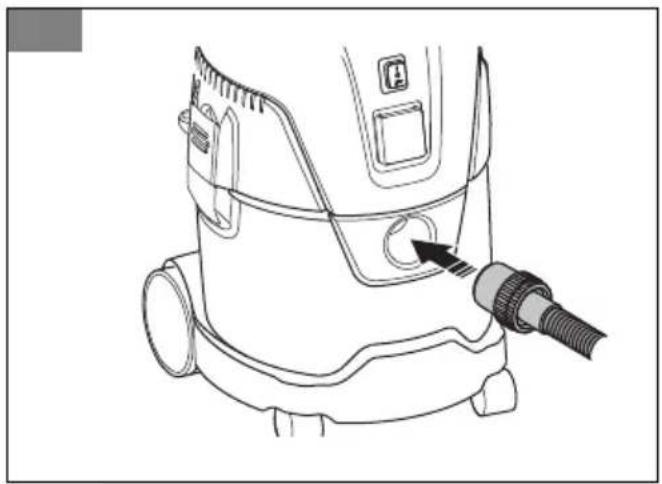
natural_image
Line drawing of a vacuum cleaner with a hose inserted, showing no text or symbols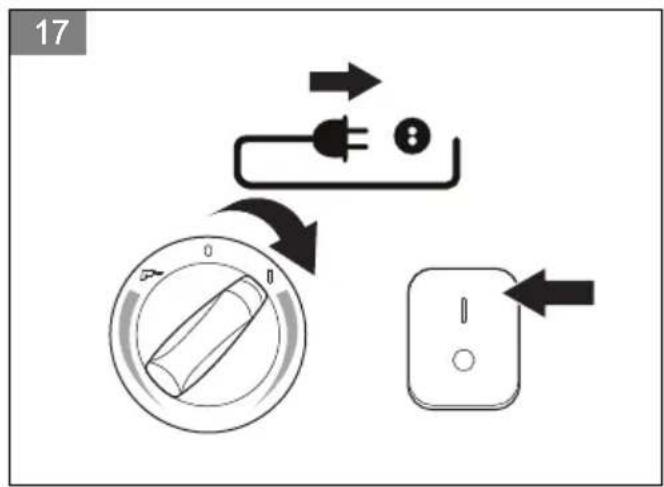
text_image
17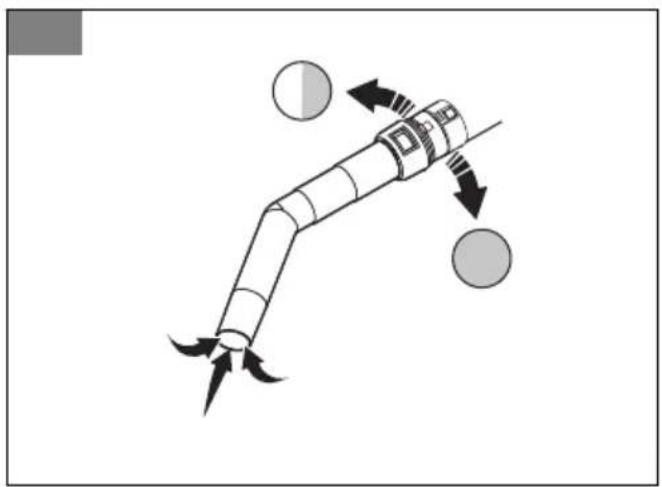
natural_image
Diagram of a mechanical linkage with directional arrows indicating motion (no text or symbols)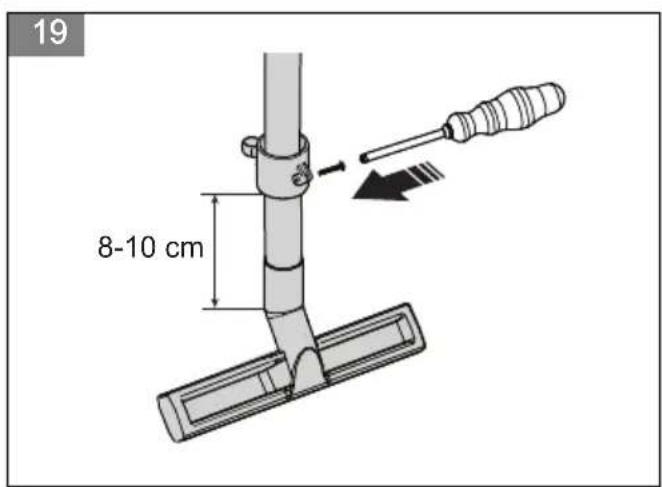
text_image
19 8-10 cm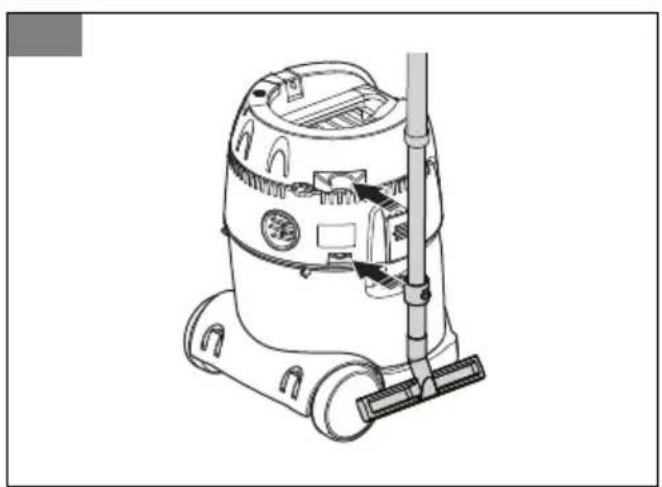
natural_image
Line drawing of a vacuum cleaner with handle and control panel (no text or symbols)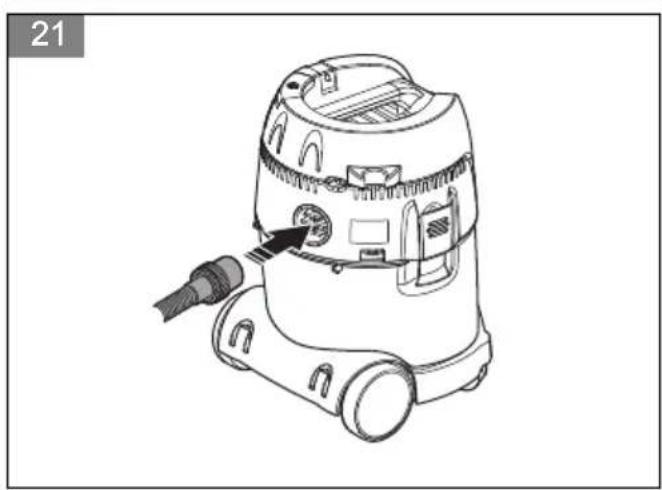
natural_image
Line drawing of a vacuum cleaner with a probe inserted, no text or symbols present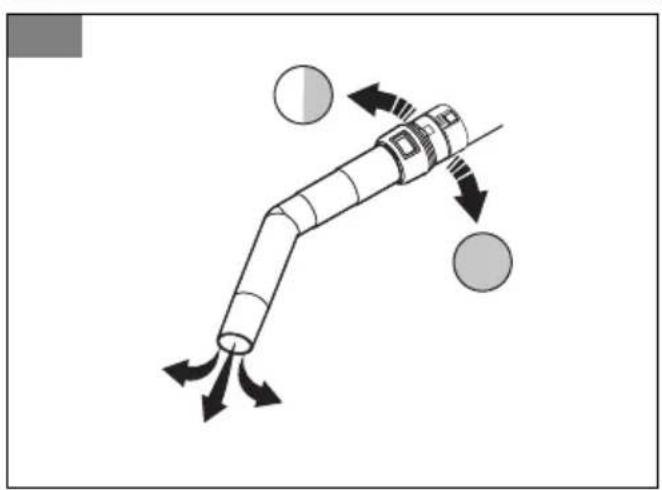
natural_image
Diagram of a mechanical linkage with directional arrows indicating motion (no text or symbols)23
natural_image
Simple line drawing of a switch and its corresponding control panel (no text or symbols)24
text_image
Diagram showing two connected pipe fittings labeled A and B with directional arrows indicating assembly or connection points.25
natural_image
Diagram showing two types of connectors: a cylindrical connector with threaded end and a straight pipe fitting with a black arrow indicating direction (no text or symbols)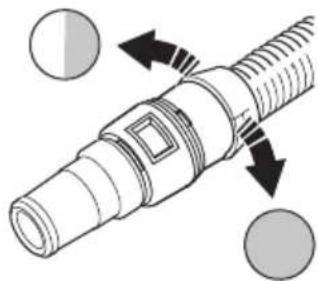
natural_image
Diagram of a mechanical connector with directional arrows indicating movement or force (no text or symbols)27
natural_image
Line drawing of a vacuum cleaner with attached electrical plug and cable (no text or symbols)28
text_image
Diagram showing a rotary switch mechanism with labeled terminals and directional arrows indicating rotation or flux.
text_image
Diagram showing a cable being inserted into a plug with an icon indicating the right-hand rule for inserting a component.29
natural_image
Line drawing of a mechanical device with a tool and arrow indicating motion (no text or symbols)


text_image
31 A B 3x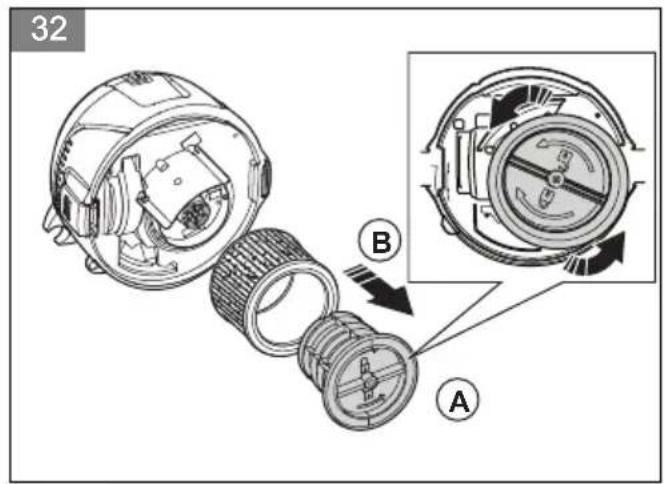
text_image
32 B A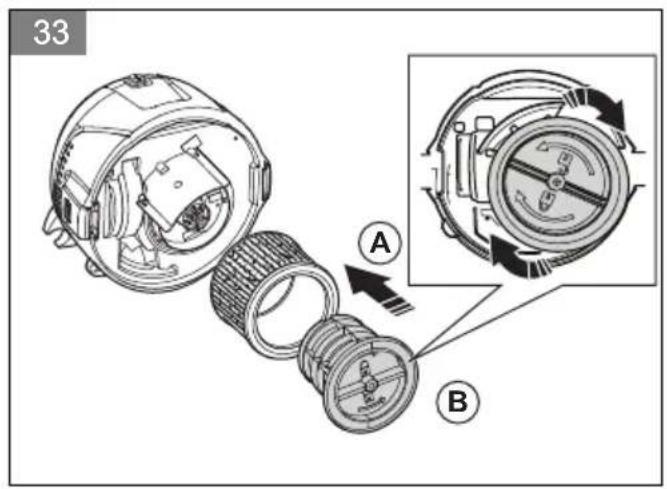
text_image
33 A B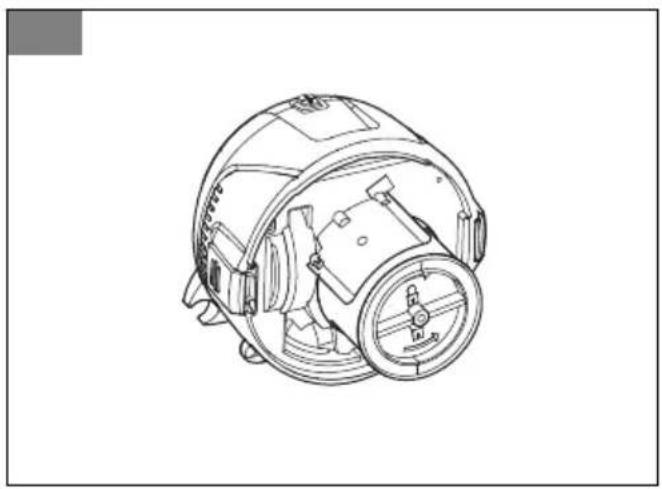
natural_image
Technical line drawing of a mechanical device with no visible text or symbols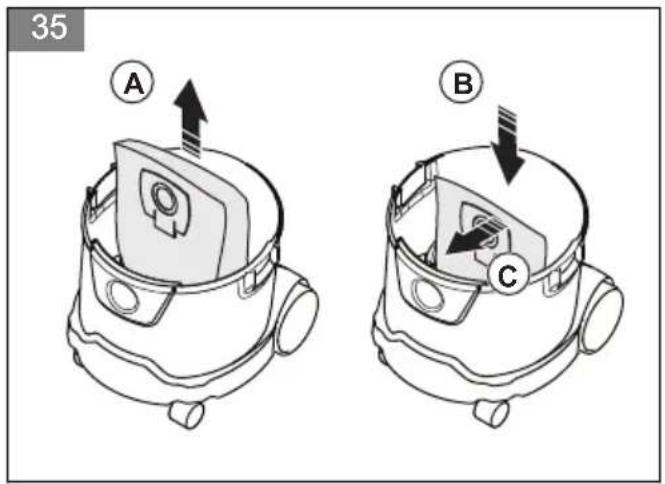
text_image
35 A B CContents
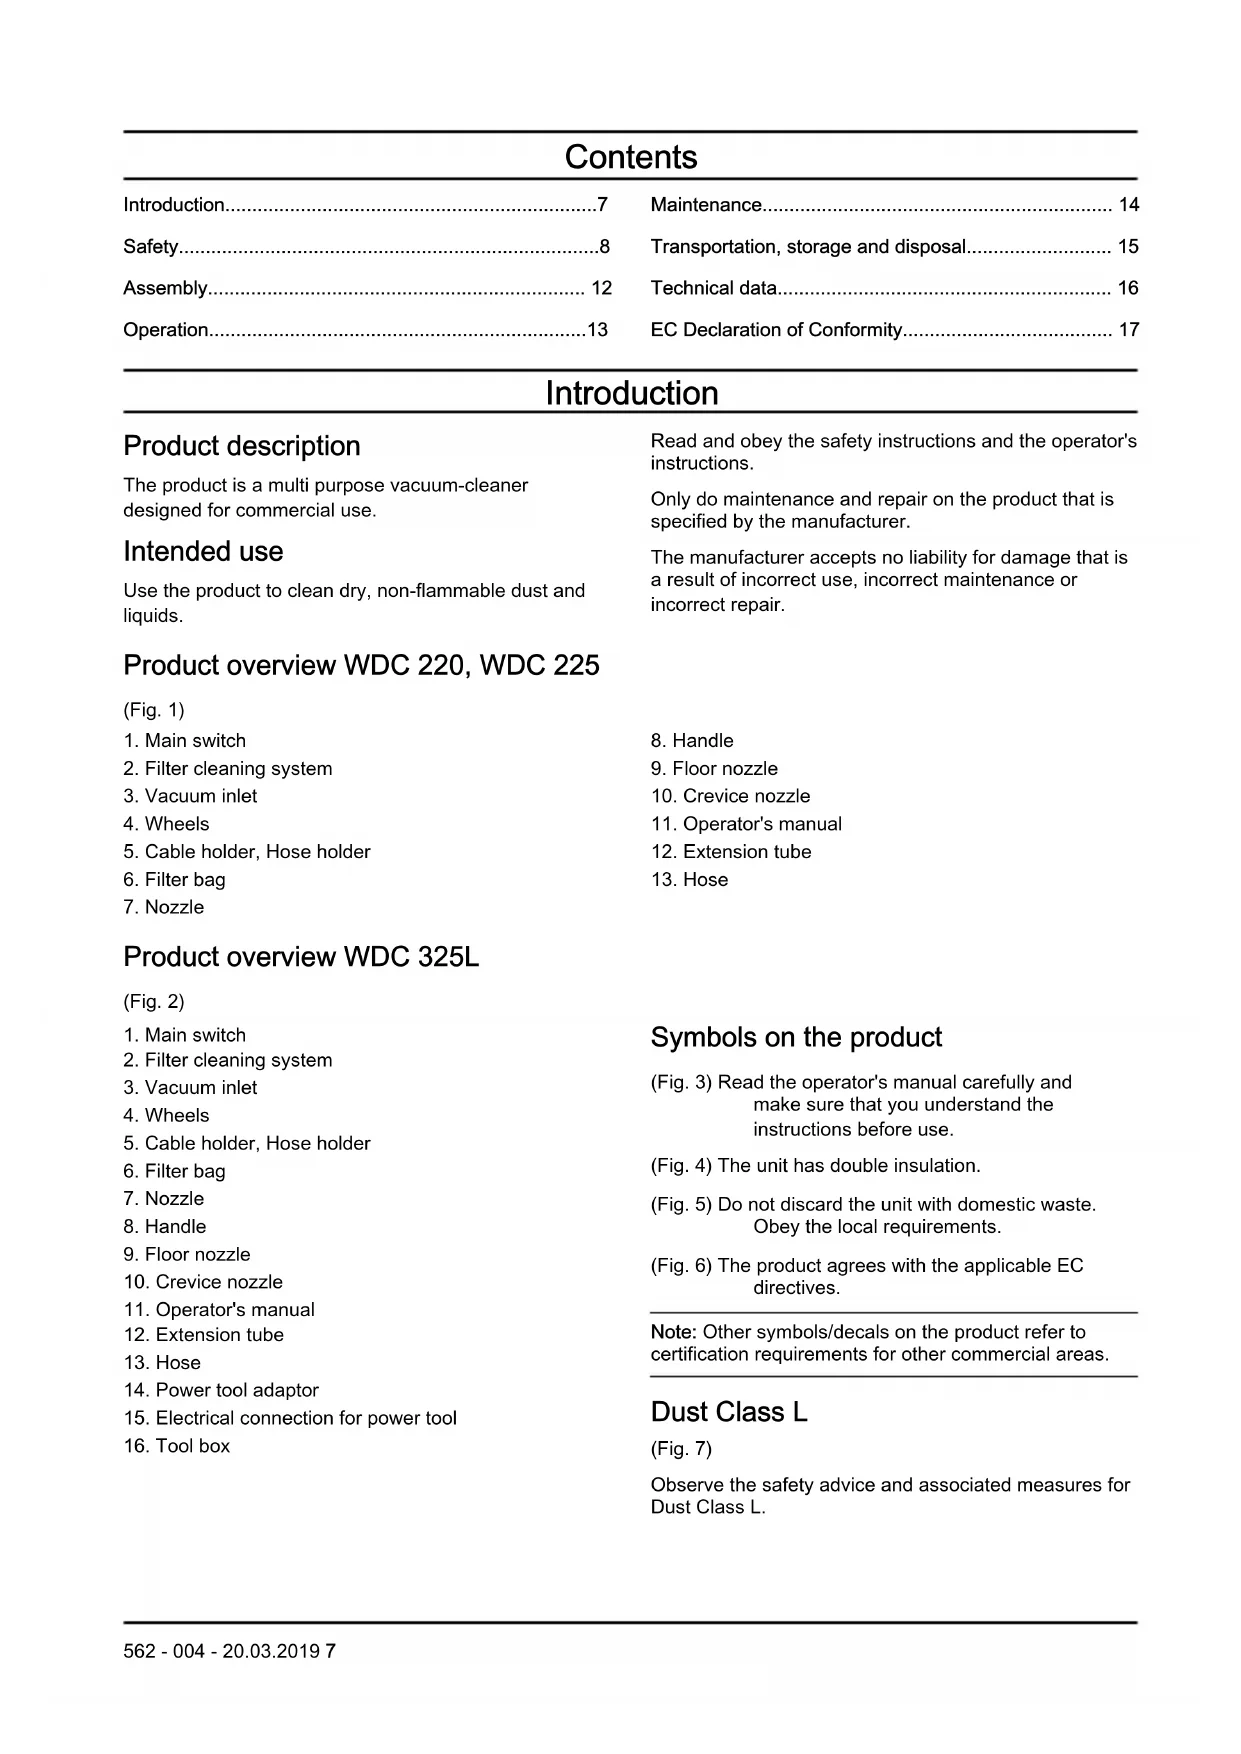
Introduction....7
Safety....8
Assembly.... 12
Operation....13
Maintenance.... 14
Transportation, storage and disposal.... 15
Technical data.... 16
EC Declaration of Conformity.... 17
Introduction
Product description
The product is a multi purpose vacuum-cleaner designed for commercial use.
Intended use
Use the product to clean dry, non-flammable dust and liquids.
Product overview WDC 220, WDC 225
(Fig. 1)
- Main switch
- Filter cleaning system
- Vacuum inlet
- Wheels
- Cable holder, Hose holder
- Filter bag
- Nozzle
Product overview WDC 325L
(Fig. 2)
- Main switch
- Filter cleaning system
- Vacuum inlet
- Wheels
- Cable holder, Hose holder
- Filter bag
- Nozzle
- Handle
- Floor nozzle
- Crevice nozzle
- Operator's manual
- Extension tube
- Hose
- Power tool adaptor
- Electrical connection for power tool
- Tool box
Read and obey the safety instructions and the operator's instructions.
Only do maintenance and repair on the product that is specified by the manufacturer.
The manufacturer accepts no liability for damage that is a result of incorrect use, incorrect maintenance or incorrect repair.
- Handle
- Floor nozzle
- Crevice nozzle
- Operator's manual
- Extension tube
- Hose
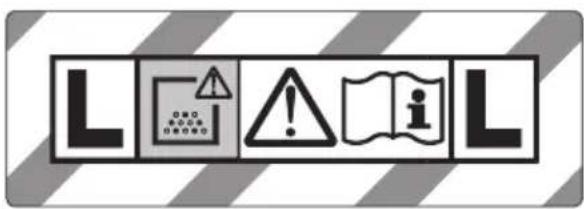
Symbols on the product
(Fig. 3) Read the operator's manual carefully and make sure that you understand the instructions before use.
(Fig. 4) The unit has double insulation.
(Fig. 5) Do not discard the unit with domestic waste. Obey the local requirements.
(Fig. 6) The product agrees with the applicable EC directives.
Note: Other symbols/decals on the product refer to certification requirements for other commercial areas.
Dust Class L
(Fig. 7)
Observe the safety advice and associated measures for Dust Class L.
Product liability
As referred to in the product liability laws, we are not liable for damages that our product causes if:
• the product is incorrectly repaired.
- the product is repaired with parts that are not from the manufacturer or not approved by the manufacturer.
- the product has an accessory that is not from the manufacturer or not approved by the manufacturer.
- the product is not repaired at an approved service center or by an approved authority.
Safety
Safety definitions
Warnings, cautions and notes are used to point out specially important parts of the manual.
WARNING: Used if there is a risk of injury or death for the operator or bystanders if the instructions in the manual are not obeyed.
CAUTION: Used if there is a risk of damage to the product, other materials or the adjacent area if the instructions in the manual are not obeyed.
Note: Used to give more information that is necessary in a given situation.
General safety instructions
WARNING: Read the warning instructions that follow before you use the product.
- If the product and/or an accessory is damaged it must be repaired by an approved service center. Do not use a damaged product.
- Do not let a child operate the product. Do not let a person, without knowledge of the instructions operate or do maintenance on the product.
• The product must only be operated under supervision.
• Make sure that you always monitor a person, with
decreased physical capacity or mental capacity, that uses the product.
• Children must be monitored to make sure that they do not play with the product.
- Do not use dangerous work procedures.
- Do not use the product without the filters in correct position.
- Stop the product and disconnect the mains plug in the following situations:
• Before cleaning and maintenance.
- Before repair.
• If there is foam or liquid in the area.
- Do not go away from the product when it is connected. Disconnect the mains plug when it is not in operation and before maintenance.
- Do not use the product if the cord or the plug is damaged. Hold the plug, not the cord, to disconnect. Do not hold the plug or the product with wet
hands. Reset all controls before disconnecting.
- Do not pull the product by the cord. Do not use the cord as a handle. Do not close a door on the cord, or pull the cord around sharp edges or corners. Do not run the product on the cord. Keep the cord away from hot surfaces.
- Keep hair, loose clothing, fingers and all parts of the body away from openings and moving parts. Do not put objects into the openings or use with the opening blocked. Keep the openings free of dust, lint, hair, and anything else that can decrease the flow of air.
• Do not vacuum clean dangerous dust with WDC 220, WDC 225. - Do not vacuum clean flammable or flammable liquids such as gasoline. Do not use the product in areas where such products may be.
- Do not vacuum clean anything that is burning or smoking, such as cigarettes, matches or hot ashes.
-
Be careful when cleaning on stairs.
-
If foam or liquid comes from the product, stop the product immediately.
- Do not use the product as a water pump.
- Connect the product to a correctly grounded mains socket. The socket outlet and the extension cable must have an operative protective conductor (only applicable to non double-insulated products).
• Make sure that there is good airflow at the work area. - Do not use the product as a ladder or step ladder.
- When dust removers are used, the rate at which air is exchanged in the room must be adequate if the exhaust air from the vacuum cleaner is blown into the room. Obey the national regulations before use.
- For Dust Class L products, WDC 325L, tell and train the operator before use:
• How to use the product.
• The risks of the material to be picked up.
- Safe disposal of the picked up material.
- For Dust Class L products, WDC 325L, the following applies:
- Use the product to clean dry, non-flammable dust and liquids, dangerous dusts with OEL ^1) value > 1mg/m ^3 . Dust Class L (IEC 60335-2-69). The dust with this class has OEL ^1) values > 1mg/m ^3 .
• Products with the Dust Class L, has a tested filter material. The maximum degree of permeability is 1%. There is no special requirement for disposal.
Note: Refer to local laws. They can regulate the age of the operator.
Safety for double-insulated products

WARNING: Only use the product as given in this manual and only with the manufacturer's recommended accessories.

WARNING: Only applicable to UK: Read these important instructions. These instructions have been prepared with safety and efficiency paramount. The operator must be trained by an approved instructor and must understand these instructions for operation. The operator must know all the related regulations and legislation in force at the time of operation.
WARNING: Before you connect the product: Make sure that the mains voltage and the mains frequency of the power supply match the data on the rating plate of the wet/dry vacuum cleaner.

WARNING: This product has double insulation. Use only Husqvarna replacement parts. See instructions on how to do service on double-insulated products.
WARNING: The product has a special cord. If the cord is damaged, it must be replaced by a cord of the same type. This is available at approved service centers and dealers and must be installed by approved personnel.
WARNING: Service on a double-insulated product requires knowledge of the system. In a double-insulated products, two systems of insulation are provided instead of grounding. No grounding means is provided on a double-insulated product, nor should a mean for grounding be added to the appliance. Service must be done only by approved service personnel. Replacement parts for a double-insulated product must be identical to the parts they replace. A double-insulated product is marked with the words "DOUBLE INSULATION" or "DOUBLE INSULATED." A symbol may also be used on the product.
Electrical safety
- It is recommended that the vacuum-cleaner should be connected via a residual current circuit breaker.
- Arrange the electrical parts (sockets, plugs and couplings) and lay down the extension lead so that the protection class is maintained.
- Connectors and couplings of power supply cords and extension leads must be watertight.
Extension lead
- As an extension lead, only use the version specified by the manufacturer or one of a higher quality.
- When using an extension lead, check the minimum cross-sections of the cable:
| Cable length | Cross section | |
| < 16 A < 25 A | ||
| < 20 m 1.5 mm | ^2 | 2.5 mm^2 |
| 20-50 m 2.5 mm | ^2 | 4.0 mm^2 |
WARNING: The upper section of the vacuum-cleaner contains live components. Contact with live components leads to serious or even fatal injuries.
- Never spray water on to the upper section of the vacuum-cleaner.
WARNING: Electric shock due to faulty mains connecting lead. Touching a faulty mains connecting lead can result in serious or even fatal injuries.
- Do not damage the mains power lead (for example by driving over it, pulling or crushing it).
- Regularly check whether the power cord is damaged or shows signs of ageing.
• If the electric cable is damaged, it must be replaced by an authorized Husqvarna distributor or similar qualified person in order to avoid a hazard. - In no circumstances should the power supply cord be wrapped around fingers or any part of the operator's body.
CAUTION: The appliance socket (only on some models) is only designed for the purposes defined in the operating instructions. The connection of different
appliances can result in damage.
- Prior to plugging in an appliance, always stop the product and the appliance that is to be connected.
- Read the operating instructions to the appliance to be connected and observe the safety notes contained in these.
CAUTION: Damage due to unsuitable mains voltage. The appliance can be damaged as a result of being connected to an unsuitable mains voltage.
• Make sure that the mains voltage and the mains frequency of the power supply match the data on the rating plate of the wet/dry vacuum cleaner.
Safety instructions for operation
To clean liquids

CAUTION: Do not clean flammable liquids.
- Remove the filter bag before you start to clean liquids. Do a check that the float or the water level limit function correctly.
- Use a special filter element or filter screen.
- If foam comes from the product, stop the work immediately and empty the tank.
WARNING: Do not clean dangerous materials. This can cause injuries.
- Do not clean the following materials:
- dangerous dust
- hot materials, for example burning cigarettes and hot ash.
- flammable, explosive, aggressive liquids, for example gasoline, solvents, acids and alkalis.
- flammable, explosive dust, for example magnesium or aluminum dust.
Spare parts and accessories
CAUTION: Only use spare parts and accessories for the safety of the product.
- Use only spare parts and accessories from Husqvarna.
- Use only the brushes supplied with the product or referred to in the operator's manual.
Explosive or flammable atmosphere

CAUTION: Do not use the product in explosive or flammable atmospheres. Do not use the product near liquids, gas or fume that can cause flammable atmospheres.
Blower function
WARNING: Dust can cause health problems. The product has a blower function. Do not blow the outgoing air randomly in closed areas. Use the blower function only with a clean hose.
Safety instructions for maintenance
WARNING: Read all warning instructions that follow before you do maintenance on the product.
To empty the dirt container

CAUTION: Cleaned material can be dangerous to the environment. Discard the dirt referring to legal regulations.
Assembly
WARNING: Read and understand the safety chapter before you assemble the product.
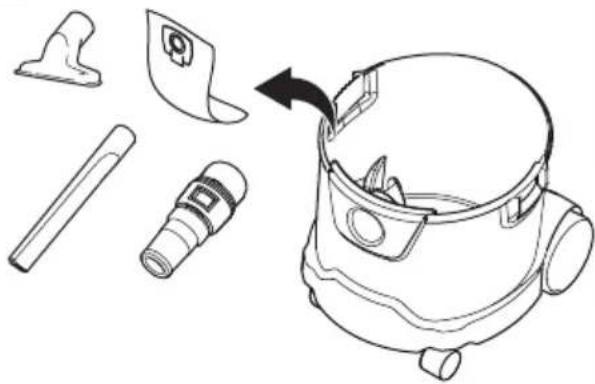
To do before installation
- Unlock the clasps and lift off the motor unit. (Fig. 8)
- Remove the accessories from the dirt container. (Fig. 9)
- Make sure that all parts are included. See the product overview. Necessary tools: Screwdriver.
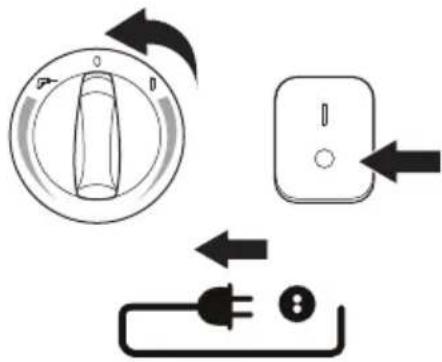
To install the filter bag
- Put the main switch to the "0" position.
- Disconnect the product. (Fig. 10)
- Unlock the clasps and lift off the motor unit. (Fig. 8)
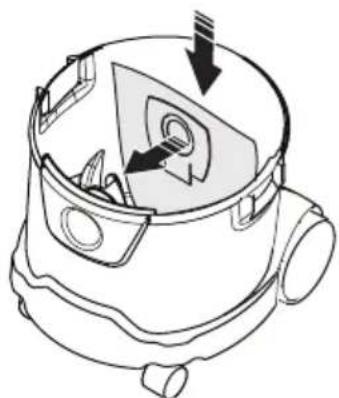
- Put the filter bag in the dirt container.
-
Attach the cardboard part of the filter bag on the vacuum inlet. Make sure that the rubber membrane is passing past the heightening of the vacuum inlet. (Fig. 11)
-
Put the motor unit on the dirt container and lock the clasps. (Fig. 12)
To attach the accessories
- Put the accessories in their position for easy access. (Fig. 13)
- Attach the tool box at the rear of the product. (Fig. 14)
- Attach the holder for the cable and the hose at the rear of the product. (Fig. 15)
To install the hose
- Put the hose in the vacuum inlet on the front of the product. (Fig. 16)
- Connect the appliance into the mains.
- Put the main switch to the "I" position. (Fig. 17)
- Adjust the suction power on the handle or by the main switch*. *Only on some models. (Fig. 18)
To install the tube holder
-
Move the tube holder vertically on the extension tube.
-
Use a screwdriver to install the tube holder on correct height of the extension tube. (Fig. 19)
-
Park the extension tube at the holders on the rear of the product. (Fig. 20)
Operation
Introduction
WARNING: Before you operate the product, you must read and understand the safety chapter.
To start the product
Before the product is used, make sure that the frequency and voltage shown on the rating plate is the same as the mains voltage.
- Make sure that the main switch is in position "0". (Fig. 10)
- Do a check that correct filters are in position in the product.
- Put the hose into the vacuum inlet at the front of the product. Push the hose forward until it is installed tightly in position in the vacuum inlet. (Fig. 16)
- Connect the two extension tubes with the handle. Twist the extension tubes to make sure that they are correctly in position.
- Attach a nozzle to the extension tube. Select the nozzle after the type of material that is to be cleaned.
- Connect the plug into the mains.
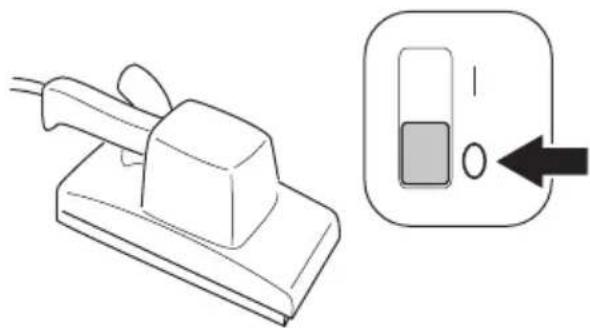
- Put the main switch into position "I" to start the product. (Fig. 17)
To stop the product
- Put the main switch into position "0" to stop the product.
- Disconnect the plug from the mains. (Fig. 10)
To use the blow function
- Put the hose in the opening on the rear of the product. (Fig. 21)
- Connect the plug into the mains.
- Put the main switch to the "l" position. (Fig. 17)
- Adjust the blow power on the handle or by the main switch*. *Only on some models. (Fig. 22)
To use the power tool socket\*
*Only on some models.

CAUTION: Follow the operating instructions and safety instructions for appliances connected to the power tool socket.
Note: The maximum power consumption of the connected tool is told in section Technical data on page 16.
- Make sure that the switch on the power tool is in position "0". (Fig. 23)
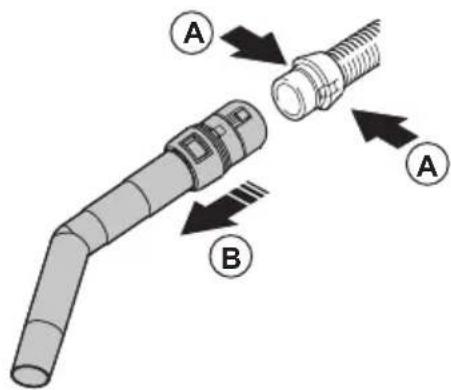
- Disconnect the handle from the hose. Press the hatches on the hose end (A) and pull out the handle (B). (Fig. 24)
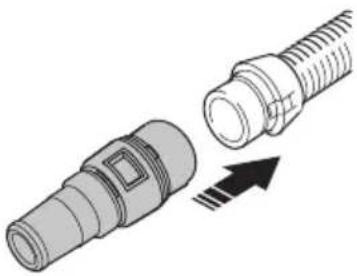
- Connect the power tool adaptor. (Fig. 25)
- Adjust the suction power on the power tool adaptor or by the main switch*. *Only on some models. (Fig. 26)
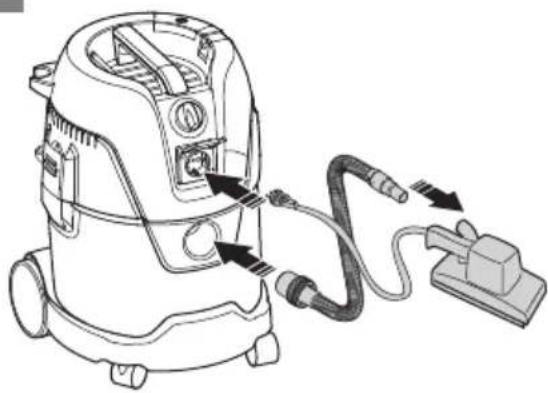
- Connect the hose to the vacuum inlet of the product and to the power tool. Connect the cable of the power tool to the electrical connection of the product. (Fig. 27)
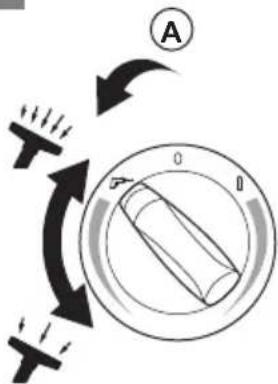
- Make sure that the switch on the power tool is in position "0". (Fig. 23)
- Turn the main switch on the product to the power tool position (A).
- Put the switch of the power tool to "I" (B). (Fig. 28)
Note: You can start and stop the product with the main switch on the product (A) or on the power tool (B).
To clean liquid
Note: The product has a float system that stops the airflow through the product at the maximum liquid level.
CAUTION: Do not clean liquid without the float system in position.
- Make sure that the filter and the filter tension (the float system) is in position, see To replace the filter on page 15. Remove the filter bag if it is installed.
- Use the floor nozzle to clean liquid.
- At the maximum liquid level, a noticeable change of the motor sound is heard. The suction power decreases.
- Stop the product, see To stop the product on page 13.
- Empty the dirt container, see To empty the dirt container after liquid pick up on page 14.
Maintenance
Introduction
WARNING: Before you do maintenance, you must read and understand the safety chapter.
For all servicing and repair work on the product, special training is necessary. We guarantee the availability of professional repairs and servicing. If your dealer is not a service agent, speak to them for information about the nearest service agent.
Regular service and inspection
- Regular service and inspection of the product must be done by qualified personnel referring to related legislation and regulations.
- Electrical tests for ground continuity, insulation resistance, and condition of the flexible cord must be done frequently.
- If a defect is found, the product must be removed from service and repaired by an approved service technician.
Maintenance of Dust Class L products
The following applies for Dust Class L products, WDC 325L.
-
During maintenance and cleaning, use the product safely for maintenance personnel or other persons.
• In the maintenance area: -
Use filtered mandatory airflow.
- Use protective clothing.
- Clean the maintenance area so that no harmful material get out in other areas.
- If the parts can not be cleaned satisfactorily during maintenance and repair:
- Put the parts in correctly sealed bags.
- Discard the parts referring to legal regulations.
To empty the dirt container after liquid pick up
- Stop the product, see To stop the product on page 13.
- Disconnect the hose from the vacuum inlet by pulling out the hose.
- Unlock the clasps and lift off the motor unit. (Fig. 8)
- Empty the dirt container by tilting it rearward and put the liquids into a floor drain. * Handle only on some models. (Fig. 29)

CAUTION: Always empty and clean the dirt container and the float system after liquid pick up. Do not pick up liquid
without the float system and filter installed in the product.
- Put the motor unit on the dirt container and lock the clasps. (Fig. 12)
To empty the dirt container after dry pick up
- Stop the product, see To stop the product on page 13.
- Unlock the clasps and lift off the motor unit. (Fig. 8)
- Do a check to see if the filter bag is full.
- Remove the filter bag if it is full.
CAUTION: Do not pick up dry material without the filter and the filter bag in position.
- Install a new filter bag, see To install the filter bag on page 12.
Note: The suction efficiency of the product depends on the dimension and quality of the filter and the filter bag. Use only Husqvarna filter and filter bags.
- Put the motor unit on the dirt container and lock the clasps. (Fig. 12)
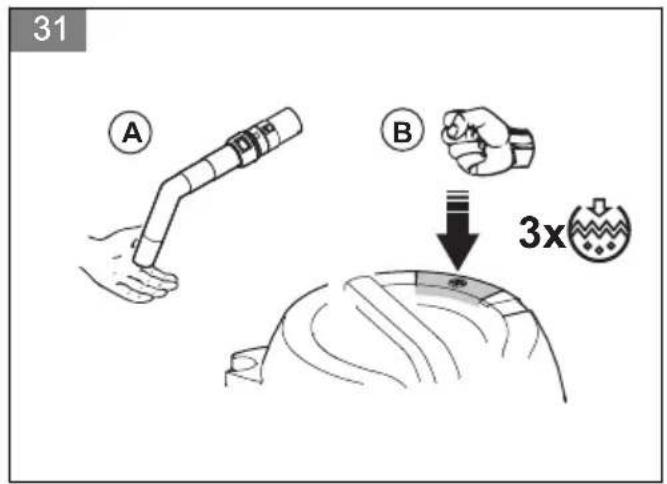
To clean the filter, filter cleaning system
The product has a semi-automatic filter cleaning system. Use the filter cleaning system regularly, at the latest when the cleaning performance is no longer sufficient. Regular use of the filter cleaning system increases the life of the filter.
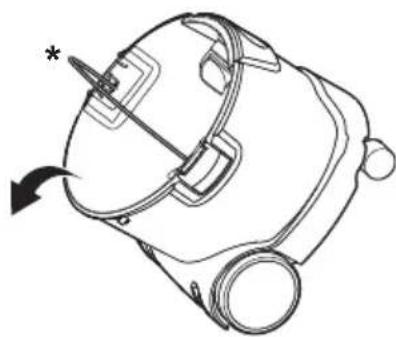
- Clean the filter when the suction power is no longer sufficient. (Fig. 30)
- Put the hose in the vacuum inlet on the front of the product. (Fig. 16)
-
Connect the appliance into the mains.
-
Put the main switch to the "I" position. (Fig. 17)
-
Put the handle in your hand (A) to make suction into your hand.
-
Beat the filter cleaning button 3 times with your fist (B). (Fig. 31)
-
If the suction power is not sufficient, remove the filter, see To replace the filter on page 15.
-
Shake, brush or wash the filter to clean it.
-
Let the filter dry.
-
Install the filter, see To install the filter bag on page 12.
To clean the product externally
- Stop the product, see To stop the product on page 13
- Clean the product with a dry cloth, and a small quantity of spray polish.
To replace the filter
The product is designed for continuous heavy work. Depending on the number of running hours, the dust filter should be replaced.
- Stop the product, see To stop the product on page 13
- Unlock the clasps and lift off the motor unit. (Fig. 8)
- Rotate the filter tension (A) counter clockwise and pull it out. Pull out the filter (B). (Fig. 32)
- Install the new filter (A). Install the filter tension (B) and rotate it clockwise. (Fig. 33)
-
Make sure that the filter and the filter tension is in position. (Fig. 34)
-
Put the motor unit on the dirt container and lock the clasps. (Fig. 12)
To replace the filter bag
- Stop the product, see To stop the product on page 13.
- Unlock the clasps and lift off the motor unit. (Fig. 8)
- Do a check to see if the filter bag is full. Remove the filter bag if it is full.
- Pull the cardboard part of the old filter bag from the vacuum inlet.
- Lift the filter bag (A) and discard it.
- Put the new filter bag in the dirt container (B).
- Attach the cardboard part of the filter bag on the vacuum inlet (C). Make sure that the rubber membrane is passing past the heightening of the vacuum inlet. (Fig. 35)
- Put the motor unit on the dirt container and lock the clasps. (Fig. 12)
Transportation, storage and disposal
Transportation and storage
• After use:
- Disconnect the plug from the mains when the product is not in operation.
- Wind up the cord starting from the product.
- Use the cable holder to attach the cord on the motor unit.
- Wind up the hose.
- Use the hose holder to attach the hose on the motor unit.
- Transport:
- Close all clasps on the motor unit.
- Do not tilt the product if there is liquid in the dirt container.
- Do not use a crane hook to lift the product.
- Storage:
- Keep the product in a dry and frost free area.
To recycle the product
Follow these steps to make the product unusable.
- Disconnect the plug from the mains.
- Cut the power cord.
- Do not discard the product in usual domestic waste.
Disposal (in accordance with 2012/19/EC):
The product must not be added to normal household waste. It must be disposed of in line with local environmental regulations.
Make sure that the product is discarded through or via your municipal recycling collection centre.
(Fig. 5)
Technical data
Technical data
| EU/CH GB AU/N | NZ US | ||||||
| WDC 220 | WDC 325L W | DC 220 WDC | 325L WDC | 220 WDC 325 | L WDC 225 | ||
| Voltage, V 220-240 220-240 220-240 | 240 220-240 | 220-240 220- | 240 220-240 | 110-120 | |||
| Power P_iec , W 1000 1200 | 1000 1000 | 1000 1000 1000 | |||||
| Connected load for ap- pliance socket, W | - | 2400 /1100 | -1900 | -1300 - | |||
| Frequency, Hz 50/60 50-60 50/60 | |||||||
| Fusing, A 10 16/10 13 13 | 10 10 15 | ||||||
| Protection category (moist, dust) | IPX4 | ||||||
| Protection class (electri-cal) | II(Fig. 4) | I | II(Fig. 4) | I | II(Fig. 4) | I | II(Fig. 4) |
| Air volume flow, l/min 3600 3700 3600 | 3600 3600 3600 3600 3600 3600 3600 3600 3600 3600 3600 3600 3600 3600 3600 3600 3600 3600 3600 3600 3600 | ||||||
| Air volume flow, cfm | 127 | 130 | 127 | 127 | 127 | 127 | 113 |
| Vacuum, mbar | 210 | 235 | 210 | 210 | 210 | 210 | 210 |
| Sound pressure level at 1 m, EN 60704-1, dB(A) +/- 2 | 72 | ||||||
| Vibration ISO 5349, m/s2+/- 1 | <1,5 | ||||||
| Weight, kg | 7,5 | 8,5 | 7,5 | 8,5 | 7,5 | 8,5 | 7,5 |
| Width, mm | 377 | 376 | 377 | 376 | 377 | 376 | 377 |
| Depth, mm | 385 | 392 | 385 | 392 | 385 | 392 | 392 |
| Height, mm | 506 | 533 | 506 | 530 | 506 | 530 | 550 |
EC Declaration of Conformity
EC Declaration of Conformity
Husqvarna AB, SE-561 82 Huskvarna, Sweden, tel: +46-36-146500, declares that the vacuum-cleaner Husqvarna WDC 220, 3325L complies with the requirements of the COUNCIL'S DIRECTIVE:
• of May 17, 2006 "relating to machinery" 2006/42/EC
- of February 26, 2014 "relating to electromagnetic compatibility" 2014/30/EU
The following standards have been applied:
EN 60335-1:2012+A11:2014, EN 60335-2-69:2012, EN 55014-1:2006+A1:2009+A2:2011, EN 55014-2:2015, EN 61000-3-2:2014, EN 61000-3-3:2013
If not otherwise stated, the above listed standards are the latest published versions.
Huskvarna, 2018-08-01

text_image
Conwn GCornelia Ekbladh, Director Product Management
المحتويات
مقدمة.... 18
السلامة....19
الجميع....22
التشغيل....23
الصيانة 24
Cornelia Ekbladh, Director Product Management
Inhalt
Einleitung....64
Sicherheit....65
Montage....70
Betrieb....70
Wartung....72
Cornelia Ekbladh, Director Product Management
Περιεχόμενα
Εισαγωγή....77
Ασφάλεια....78
Συναρμολόγηση....83
Λειτουργία....84
Συντήρηση 85
Cornelia Ekbladh, Director Product Management
目次
はじめに……171
安全性....172
組立....176
操作....176
メンテナンス.... 177
搬送、保管、廃棄....179
主要諸元.... 180
EC 適合性宣言....181
はじめに
製品の説明
Cornelia Ekbladh, Director Product Management
Sadržaj
Uvod.... 310
Bezbednost....311
Sklapanje....315
Rukovanje....316
Održavanje.... 317
Transport, skladištenje i odlaganje.... 318
Tehnički podaci....319
EZ deklaracija o usaglašenosti....320
Uvod
Opis proizvoda
Proizvod je višenamenski usisivač dizajniran za komercijalnu upotrebu.
Oblast primene
Koristite proizvod za usisavanje suve, nezapaljive prašine i tečnosti.
Pregled proizvoda WDC 220, WDC 225
(SI. 1)
-
Glavni prekidač
-
Sistem za čišćenje filtera
-
Ulaz za usis
-
Točkići
-
Držač kabla, držač creva
-
Filter vrećica
-
Nastavak
Pregled proizvoda WDC 325L
(SI. 2)
-
Glavni prekidač
-
Sistem za čišćenje filtera
-
Ulaz za usis
-
Točkići
-
Držač kabla, držač creva
-
Filter vrećica
-
Nastavak
-
Drška
-
Nastavak za pod
-
Nastavak za uglove
-
Korisničko uputstvo
-
Produžna cev
-
Crevo
-
Adapter za električni alat
-
Električni priključak za električni alat
-
Kutija za alat
Original instructions
الأصلية الإرشادات
Оригинални инструкции
Původní pokyny