SHF 1800 A2 - Deep fryer SILVERCREST - Free user manual and instructions
Find the device manual for free SHF 1800 A2 SILVERCREST in PDF.
| Product Type | 9-in-1 Hot Air Fryer |
| Brand | SilverCrest |
| Model | SHF 1800 A2 |
| Power | 1800 W |
| Mains Voltage | 220-240 V ~ 50/60 Hz |
| Protection Class | I |
| Max. Rotating Basket Capacity | 1.5 kg |
| Temperature Range | 40 to 200 °C |
| Automatic Programs | 9 programs (fries, steak, fish, shrimp, pizza, poultry, cakes, rotisserie, drying, reheating) |
| Touch Screen | Yes, with temperature and time display |
| Rotation Function | Yes, for rotating basket and rotisserie |
| Interior Lighting | Yes, auto-off after 2 min |
| Included Accessories | Rotating basket with lid, rotisserie spit, 2 chicken skewers, 8 shashlik skewers, 2 holding disks, drip tray, 3 perforated plates (2 deep, 1 flat), handle |
| Accessory Cleaning | Dishwasher safe |
| Body Cleaning | Damp cloth and mild detergent |
| Warranty | 3 years (HOYER Handel GmbH) |
| Service Countries | France and Belgium |
| Article Number (IAN) | 351606_2007 |
| Safety | Do not immerse, hot surfaces, do not cover air vents |
Frequently Asked Questions - SHF 1800 A2 SILVERCREST
User questions about SHF 1800 A2 SILVERCREST
0 question about this device. Answer the ones you know or ask your own.
Ask a new question about this device
Download the instructions for your Deep fryer in PDF format for free! Find your manual SHF 1800 A2 - SILVERCREST and take your electronic device back in hand. On this page are published all the documents necessary for the use of your device. SHF 1800 A2 by SILVERCREST.
USER MANUAL SHF 1800 A2 SILVERCREST
natural_image
Exterior view of a modern air fryer with digital display and food preparation bowl (no visible text or symbols)9-IN-1 HEISSLUFTFRITTEUSE SHF 1800 A2 9-IN-1 AIR FRYER SHF 1800 A2 FRITEUSE À AIR CHAUD 9 EN 1 SHF 1800 A2
GB IE Operating instructions
9-IN-1 AIR FRYER
text_image
Exploded view diagram of a smart appliance with numbered parts for identificationInhalt
natural_image
Diagram of a trash bin with a lid and internal structure, showing mechanical components and directional arrows (no text or symbols)natural_image
Technical illustration of a mechanical device with a mesh basket and internal components (no text or symbols)natural_image
Technical line drawing of a mechanical clamp or bracket assembly with diagonal lines (no text or symbols)text_image
Diagram illustrating door lock mechanism with warning symbols and labeled componentstext_image
Diagram illustrating lock mechanism and safety symbols, showing lock state with warning sign and lock mechanism with lock symbolnatural_image
Technical illustration of a mechanical assembly with a bolt, nut, and hexagonal components (no text or symbols)natural_image
Technical illustration of a mechanical clamp or bracket assembly (no text or symbols)natural_image
Technical line drawing of a mechanical assembly with two circular components connected by a rod (no text or symbols)natural_image
Mechanical assembly diagram showing a chain of gears and a shaft with a valve, no text or symbols present.natural_image
Technical illustration of a mechanical assembly with gears and tubing (no text or symbols)- Overview 27
- Intended purpose 28
- Safety information 28
- Items supplied 31
- How to use 32
- The touch display at a glance 33
- The programs at a glance 34
- Using the accessories 35
- Preparation tips 36
- Assembly 39
10.1 Rotating basket.... 39
10.2 Inserting the rotating basket/rotary spit.... 40
10.3 Rotary spit for chicken or roast meat.... 41
10.4 Kebab set 42
- Operation 43
11.1 Power connection.... 43
11.2 The touch display.... 43
11.3 Switching on/off.... 43
11.4 Switching on the lighting.... 44
11.5 Manual settings 44
11.6 Switching on the rotation function 44
11.7 Using Programs 44
11.8 Interrupting the cooking process.... 45
11.9 End of the cooking process 45
12. Cleaning 45
13. Storage 46
14. Disposal 46
15. Trouble-shooting 46
16. Technical specifications 47
17. Warranty of the HOYER Handel GmbH 47
1. Overview
1 Device/hot air fryer
2 Touch display
3 Heating element (at the top of the interior)
4 Release button (for rotary spit and rotating basket)
5 Oven door
6 Inspection window
7 Locking screw (on support discs and chicken skewers) (4x)
8 Chicken skewers
9 Marking (on the rotary spit)
10 Rotary spit
11 Handle (to insert/remove the rotary spit and the rotating basket)
12 Rotating basket
13 MAX Marking for the maximum filling level of the rotating basket
14 Lid (of the rotating basket)
15 Kebab skewer (8x)
16 Support discs (for the kebab skewers)
17 Tray / grease drip tray
18 Grid tray
19 Recessed grip
20 Power cable with mains plug
21 Air outlet with spacer (on the back)
Thank you for your trust!
Congratulations on the purchase of your new hot air fryer 9 in 1.
For safe handling of the product and in order to get to know the entire range of features:
- Read these user instructions thoroughly prior to initial use.
- Above all, observe the safety information!
- The device should only be used as described in this copy of the user instructions.
- Keep these user instructions for information purposes.
- If you pass the device on to someone else, please include this copy of the user instructions. The user instructions are a part of the product.
We hope you enjoy using your new hot air fryer 9 in 1!
Symbols on your device

This symbol warns you against touching the hot surface.

The food-safe material of devices with this symbol will not change the taste or smell of food.
2. Intended purpose
The hot air fryer is intended for the cooking of food in hot air at a temperature of up to max. 200 °C.
The hot air fryer is designed for private, domestic use. The hot air fryer must only be used indoors.
This device must not be used for commercial purposes.
Foreseeable misuse
The hot air fryer is not suitable for heating liquids.
3. Safety information
Warnings
If necessary, the following warnings are used in this copy of the user instructions:

DANGER! High risk: failure to observe this warning may result in injury to life and limb.
WARNING! Moderate risk: failure to observe this warning may result in injury or serious material damage.
CAUTION: low risk: failure to observe this warning may result in minor injury or material damage.
NOTE: circumstances and specifics that must be observed when handling the device.
Instructions for safe operation
- This device can be used by children from the age of 8 and people with restricted physical, sensory or intellectual abilities or people without adequate experience and/or understanding, if they are supervised or instructed on how to use this device safely and if they are aware of the resulting dangers. Children must not play with the device. Cleaning and user maintenance must not be performed by children unless they are older than 8 years and supervised.
- Children under the age of 8 must be kept away from the device and the power cable.
- During operation, the surfaces of the device may become hot. Do not touch any hot parts of the device such as the air outlet on the back or the inspection window of the oven door.
- Use the handle to lift out the hot rotating basket/rotary spit.
- Use oven gloves or potholders to touch the hot accessories.
- During frying, hot steam escapes from the air outlet. Be careful not to put your hands into the steam.
- If the mains power cable of this device should become damaged, it must be replaced by the manufacturer, the manufacturer's customer service department or a similarly qualified specialist, in order to avoid any hazards.
- This device is not intended to be operated using an external timer or a separate remote control system.
- Please take note of the chapter on cleaning (see "Cleaning" on page 45).

DANGER for children
- Packing materials are not children's toys. Children should not be allowed to play with the plastic bags: there is a risk of suffocation.

DANGER to and from pets and livestock
Electrical devices can represent a danger to pets and livestock. In addition, animals can also cause damage to the device. For this reason you should keep animals away from electrical devices at all times.

DANGER for birds
Birds breathe faster, distribute the air differently in their bodies and are significantly smaller than humans. For this reason, it may be dangerous for birds to inhale even the smallest smoke quantities, which develop while this device is in operation. When using this device, birds should be relocated into a different room.

DANGER! Risk of electric shock due to moisture
- Protect the device from moisture, water drops and water splashes.
The device, the power cable and the mains plug must not be immersed in water or any other liquids. - If liquid gets into the device, disconnect the mains plug immediately. Have the device checked before reusing.
- If the device has fallen into water, pull out the mains plug immediately, and only then remove the device from the water. Do not use the device again, and have it checked by a specialist workshop.
- Never touch the device with wet hands.

DANGER! Risk of electric shock
- Do not use the device if the device or the power cable has any visible damage, or if the device has previously been dropped.
- If you use an extension cable, it must be sufficient for the technical data of this device.
- Do not connect the device by using a multiple socket. By doing so the socket might be overloaded.
- Lay the power cable such that no one can step on it, get caught on it, or trip over it.
- Connect the mains plug only to a correctly installed, easily accessible earthed wall socket with voltage corresponding to the rating plate. The wall socket must still be easily accessible after connection.
- Ensure that the power cable cannot be damaged by sharp edges or hot spots. Do not wrap the power cable around the device.
- When setting up the device, make sure that the power cable is not trapped or crushed.
- Even after it has been switched off, the device is not completely disconnected from the mains. In order to fully disconnect it, pull out the mains plug.
To pull the mains plug out of the wall socket, always pull on the mains plug, and never on the power cable. - Disconnect the mains plug from the wall socket ...
... after every use, ... if there is a fault, ... when you are not using the device, ... before you clean the device and ... during thunderstorms.
To avoid any risk, do not make modifications to the product. Repairs must be carried out by a specialist workshop or the Service Centre.

DANGER - Fire hazard
- Never leave the device unattended while it is plugged in.
- Never leave the hot air fryer unattended during operation. You will thus be able to detect possible problems early on due to unusual smells or noises.
- Never cover the device or place it on soft objects (e.g. towels).
- Make sure that there is free space on all sides and above the device.
- Under no circumstances remove the spacer on the back of the device.
- Do not use the hot air fryer directly under wall units or wall sockets and not near to any curtains, paper or any similar flammable objects.
- The hot air fryer should only be operated on a stable, flat, non-slip, dry and non-flammable work surface, in order to prevent it from tipping over or slipping away.

DANGER! Risk of injury through burning
- Do not touch the hot surfaces of the device or the interior. Use oven gloves or potholders.
- Allow the device to cool down completely before you clean it or put it away.
- Do not move or transport the hot air fryer while it is switched on.
WARNING! Risk of material damage
- Only use original accessories.
- Never place the device on hot surfaces (e.g. hot plates) or near to heat sources or open fire.
- Make sure that the surface under the device is dry.
-
Make sure that the food will not touch the hot heating element at the top of the interior and become stuck there.
-
Do not overfill the rotating basket / rotary spit. Please observe the reference values in these instructions.
- Do not clean using sharp objects or abrasive cleaning agents.
The device is fitted with non-slip plastic feet. As furniture is coated with a variety of different varnishes and acrylics, and treated with different cleaning agents, it cannot be completely ruled out that components are contained in some of these substances that could damage and soften the plastic feet. If necessary, place a non-slip mat under the device.
4. Items supplied
1 hot air fryer 1
1 tray / grease drip tray 17
3 grid trays 18 (2x deep, 1x shallow)
1 rotary spit 10
2 chicken skewers 8
(incl. 2 locking screws 7)
2 support discs 16
(incl. 2 locking screws 7)
8 kebab skewers 15
1 rotating basket 12
1 lid (for the rotating basket) 14
1 handle 11
1 copy of the user instructions
1 recipe book
5. How to use
- Remove all packing material. In particular the interior must be completely free of packaging remains such as polystyrene particles.

DANGER - fire hazard!
Make sure to remove the cardboard at the top of the interior!
- Carefully remove the accessories.
- Remove protective films and adhesive strips from the device, but do not remove the rating plate on the underside of the device.
- Check that all accessories are present and undamaged.
- Clean the device and all accessories before using for the first time (see "Cleaning" on page 45).
- Use the recessed grips 19 to transport the device.
- Place the device 1 on a dry, level, non-slip, heat-resistant surface.

DANGER - fire hazard!
On the back of the device 1 you will find the air outlet with spacer 21. Hot air escapes from the air outlet during operation.

text_image
21- Never cover the air outlet 21.
- Never remove the spacer 21.
- Do not use the hot air fryer directly under wall units or wall sockets and not near to any curtains, paper or any similar flammable objects.
- Make sure that there is free space on all sides and above the device.
- Only insert the mains plug 20 into a wall socket after the device 1 has been assembled for the desired purpose.
NOTE: when in operation for the first time, some smoke and odour may be generated by the device. This is due to the assembly materials used for the heating element and is not a fault in the product. Ensure adequate ventilation.
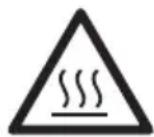
6. The touch display at a glance
22 23 24 25 26 27 28 29
text_image
190 °C Min + - 33 32 31 3022 +/- Temperature buttons: setting the cooking temperature
23 Hot air symbol: flashes when the hot air function is in operation
24 A temperature is displayed
25 A cooking time is displayed
26 Numbers display (e.g. temperature, cooking time)
27 °C Temperature unit
28 Min Cooking time unit
29 +/- Timer buttons: setting the cooking time
30 Rotation button: switching the rotation function on/off; rotation symbol: flashes when the rotation function is switched on
31 Start/Stop button
32 Light button: switching the interior lighting on/off; light symbol: flashes when the interior lighting is switched on
33 Program buttons (see "The programs at a glance" on page 34); program symbols
7. The programs at a glance
| Symbol in the touch display | Program / use | Preset temperature (adjustable range) | Preset time (adjustable range) |
 | French fries 200 °C | (40 - 200 °C) | 15 min.(1 - 60 min) |
 | Steaks, chops 175 °C | (40 - 200 °C) | 25 min.(1 - 60 min) |
 | Fish 165 °C | (40 - 200 °C) | 15 min.(1 - 60 min) |
 | Shrimps 160 °C | (40 - 200 °C) | 12 min.(1 - 60 min) |
 | Pizza 180 °C | (40 - 200 °C) | 15 min.(1 - 60 min) |
 | Poultry in pieces, e.g. legs 175 °C | (40 - 200 °C) | 30 min.(1 - 60 min) |
 | Cakes and baked goods 160 °C | (40 - 200 °C) | 30 min.(1 - 60 min) |
 | Rotary spit for roasting a whole chicken or a small piece of roast joint | 190 °C(40 - 200 °C) | 30 min.(1 - 60 min) |
 | Dehydration of fruit and vegetables, e.g. apple rings | 40 °C(40 - 80 °C) | 2 hours(2 - 24 hours) |
 | Heating ready-cooked dishes 200 °C | (40 - 200 °C) | 3 min.(1 - 60 min) |
8. Using the accessories
| Accessory Function/use | |
| Tray / grease drip tray 17 | Push in on the bottom to catch dripping and crumbling food. This makes cleaning easier.Slide in as a closed baking tray on the desired rail for foods that drip to a greater extent and for which the heat is mainly required from above, e.g. for gratinating. |
| Grid trays 18 | The hot air can circulate easily through the holes in the grid trays. This promotes the even distribution of heat.Several grid trays can be used at the same time. If necessary, replace after half the cooking time.For food dehydration and baking large food items, use the shallow grid tray where appropriate.For the preparation of all foods that do not drip to a significant extent and for which even heating is desired, e.g. poultry cuts, fish fingers, shrimps, French fries, deep-frozen pizza. |
| Rotating basket 12 | For French fries, wedges, sweet potato chips, vegetables in pieces and similar foodFor particularly even heating from all sides, the rotating basket 12 turns during the cooking process. For this, the rotation function 30 must be switched on.Fill the rotating basket 12 only loosely up to the MAX 13 mark (maximum quantity: 1.5 kg).Use the handle 11 to insert and remove.NOTE:for raw ingredients, mix in approx. 1/2 tablespoon of oil. This prevents sticking to the rotating basket 12 and improves the taste. This is not necessary for deep-frozen French fries and similar products, as these are already pre-fried. |
| Chicken skewers 8 + rotary spit 10 | A grilled chicken or small roast can be attached with the help of the chicken skewers 8 to the rotary spit 10.Please note the markings for the maximum size on the rotary spit 10.Note the maximum quantity of 1.5 kg.When the program for the rotary spit is used, the rotation function 30 is automatically activated. It can also be turned on/off by pressing the rotation button 30.Use the handle 11 to insert and remove. |
| Kebab skewers 15 + support discs 16 + rotary spit 10 | For meat/vegetable skewers.The kebab skewers 15 are hooked into the support discs 16 and can be cooked evenly with the help of the rotation function 30. Note the markings on the rotary spit 10.Note the maximum quantity of 200 g per skewer and 1.6 kg in total.Use the handle 11 to insert and remove the assembled kebab skewer wheel. |
9. Preparation tips
The hot air fryer 9 in 1 combines many different functions in one device. You can, for example:
- Fry with hot air
- Grill a chicken or a roast on the rotary spit
- Bake pizza
- Prepare many frozen ready meals (e.g. chicken wings, fish fingers, cheese or vegetable sticks)
- Bake biscuits or muffins
- Grill kebab or vegetable skewers
- Dehydrate apple rings or other fruit
- Gratinate food
In this chapter you will find some tips and a cooking table with examples as a guideline for the quantity, cooking time and temperature.
Further examples, tips and recipes can be found in the enclosed recipe booklet.
Quantities
- Always prepare only small quantities at the same time. How to obtain the best results.
- Fill the rotating basket 12 at most up to the MAX 13 marking. In this way the French fries or similar food will be evenly browned.
- The grid trays 18 and the tray 17 should be loosely filled so that the hot air can easily circulate.
- When preparing whole chickens or roasts, note the maximum size markings on the rotary spit 10.
-
With all foods, make sure that they do not come into contact with the heating element 3.
-
Note the following maximum weights:
- Rotating basket 12: 1.5 kg
- Rotary spit 10 with chicken skewers 8: 1.5 kg
- Rotary spit 10 with kebab skewers 15: 1.6 kg
Temperature and cooking time
- The information on temperatures and cooking times in the cooking table are reference values. The temperature and cooking time may vary depending on the texture, size and quantity of the food, as well as your taste.
- Acrylamide may be carcinogenic. In order to reduce the formation of acrylamide as much as possible, browning the food too much should be avoided.
- For deep-frozen products, please refer to the specifications for hot air fryers or convection ovens.
Even browning
- The rotation function 30 ensures even browning on all sides.
- When cooking in the rotating basket 12, you can further improve this process by mixing approx. 1/2 a tablespoon of oil with any raw ingredients beforehand and not overfilling the rotating basket 12.
- When cooking simultaneously on more than one grid tray 18 take them out after half the cooking time. Turn the ingredients on the trays and change the insertion height of the trays.
- Use ingredients of uniform thickness or size.
Cooking table
| Food Tips | Quantity (approx.) | Time* | Temperature* | |
| French fries (thin, deep-frozen products, pre-fried) | - ProgramUse the rotating basket 12 and switch on the rotation function 30.- Also possible: grid trays 18 | 350 g 15 | - 17 min. 200 °C | |
| French fries (thick, deep-frozen products, pre-fried) | 350 g 15 | - 20 min. 200 °C | ||
| French fries (home-made) | - ProgramAdd 1/2 tablespoon of oil and mix well- Use the rotating basket 12 and switch on the rotation function 30.- Also possible: grid trays 18 | 400 g | 18 - 22 min. | 200 °C |
| Chicken legs (fresh) | - ProgramUse grid trays 18. | 300 g per leg | 30 min. 180 °C | |
| Chicken nuggets (deep-frozen products) | - Use grid trays 18. | 200 g | 10 - 15 min. | 200 °C |
| Fish fingers (deep-frozen products) | - Use grid trays 18. | 200 g | 7 - 10 min. | 200 °C |
| Mozzarella sticks (deep-frozen products) | - Use grid trays 18. | 200 g | 4 - 6 min. | 180 °C |
| Muffins | - ProgramPlace baking tins on the tray 17 | 9 in total | 15 - 20 min. | 160 °C |
| Baked potatoes (floury cooking) | - Pre-cook for 15 minutes.- Wrap in aluminium foil. | 6 in number weighing 150 g each | 40 min. 180 °C | |
| Apple rings (dehydration) | - ProgramUse grid trays 18.- Change the insertion height of the grid trays every 30 minutes. | 500 g | 2.5 - 3 hours | 80 °C |
| Chicken wings (deep-frozen products) | - ProgramUse grid trays 18. | 400 g 15 | - 18 min. 200 °C | |
| Meat/vegetable skewers | - Use kebab skewers 15 (with support discs 16 + rotary spit 10).- Switch on the rotation function 30. | 1 kg 20 | min. 200 °C | |
| Roasting | - Use chicken skewers 8 to attach to the rotary spit 10.- If necessary, tie together with kitchen thread to avoid protruding parts.- Switch on the rotation function 30. | max. 1.5 kg | 50 min. 180 °C | |
| For pieces of roast meat, the cooking time and cooking temperature depend on the weight and which piece of meat you use. A good guideline is the core temperature, which you can measure with a roast thermometer. Tables with core temperatures for different types of meat can be found in cookbooks or on the Internet. | ||||
| Chicken (whole) | - Use chicken skewers 8 to attach to the rotary spit 10.- If necessary, tie together with kitchen thread to avoid protruding parts.- Program | max. 1.5 kg | 40 - 45 min. | 200 °C |
* Variables in bold type are to be adjusted manually.
10. Assembly
10.1 Rotating basket
Required parts
Rotating basket 12
Lid (for the rotating basket) 14
Handle 11
Tray / grease drip tray 17
Procedure
- Slide the grease drip tray 17 at the bottom on to the floor of the interior.
- Fill the French fries (or other ingredients) up to the MAX 13 marking (but not beyond) into the rotating basket 12.
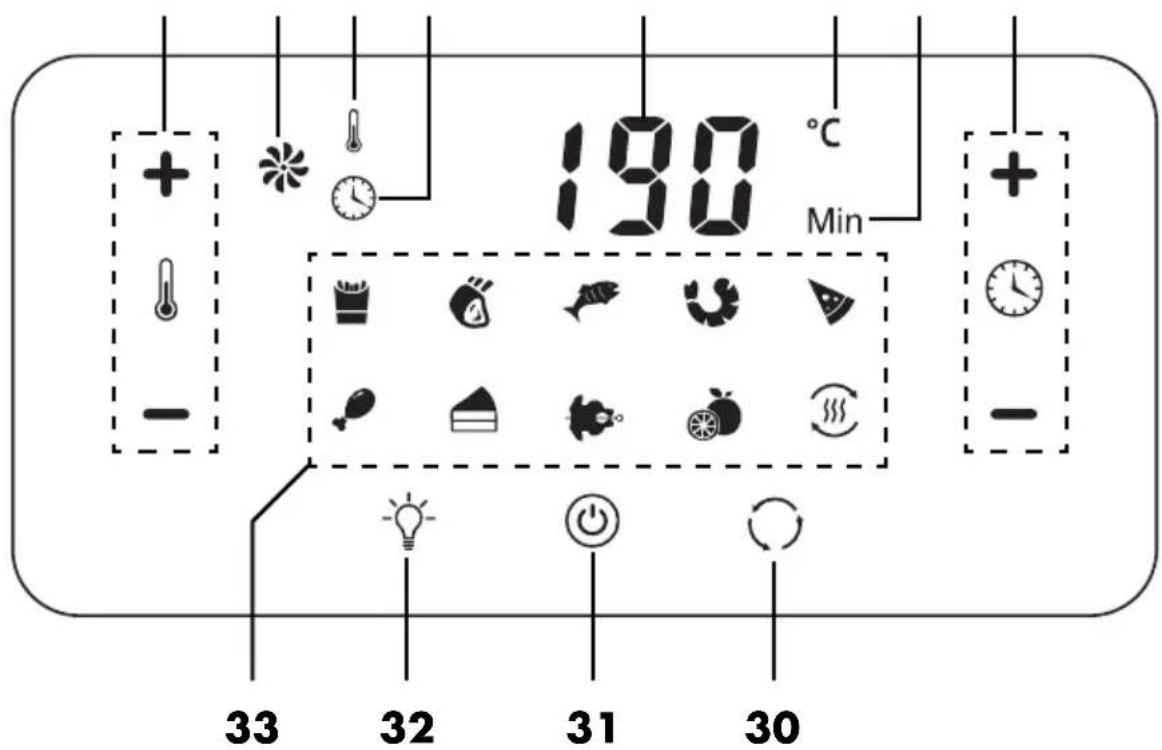
natural_image
Diagram of a trash bin with a lid and lock mechanism, showing internal waste disposal (no text or symbols)- Place the lid 14 on the rotating basket 12. The indentations on the lid must be placed over the small lugs on the basket (see illustration).
- To close, turn the rotating basket 12 so that one lug is pointing in the direction of the closed lock symbol.
natural_image
Technical illustration of a mechanical device with a mesh basket and internal components (no text or symbols)- Insert the closed rotating basket 12 into the device 1 with the help of the handle 11 (see "Inserting the rotating basket/rotary spit" on page 40).
10.2 Inserting the rotating basket/rotary spit

DANGER of burns!
- It is important to use the handle 11 and oven gloves to put the rotating basket 12 / rotary spit 10 into the hot oven (e.g. after preheating).
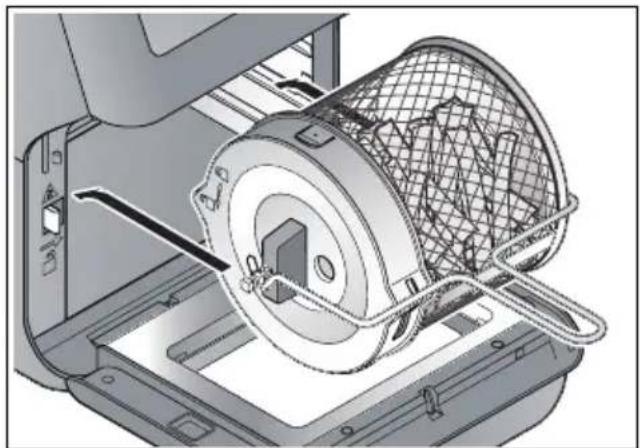
For the rotation function, the ready-mounted rotating basket 12 or the rotary spit 10 is hooked into the device with the attached chicken/meat to be roasted or assembled kebab skewers 15:
natural_image
Technical line drawing of a mechanical clamp or bracket assembly with diagonal lines (no text or symbols)- First of all, hang the rotating basket 12 / rotary spit 10 on the right-hand side of the interior in the recess.
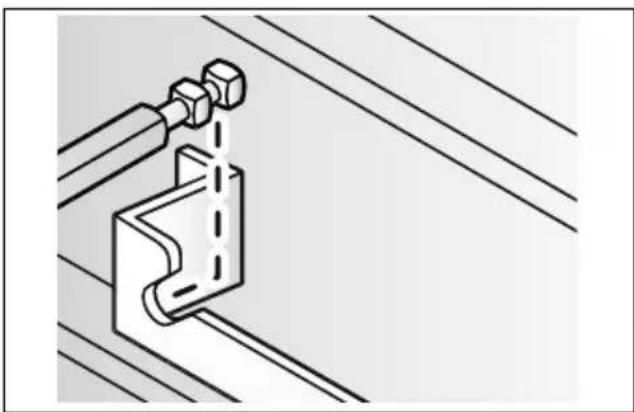
text_image
Diagram showing door lock mechanism with warning symbols and labeled components- Press the release button 4 to the right and hang up the rotating basket 12 / rotary spit 10 on the left-hand side.
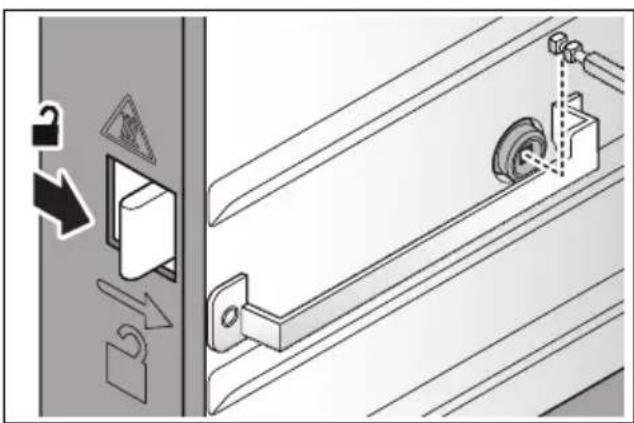
natural_image
Diagram showing a door lock mechanism with warning symbols and a close-up of a mechanical component (no text or labels)-
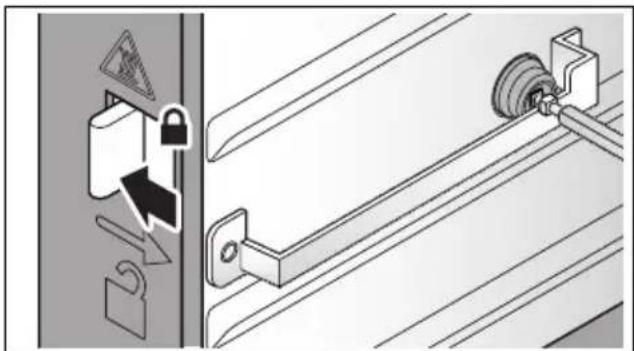
Let the release button 4 go in order to lock the rotating basket 12 / rotary spit 10 on the left-hand side. The square does not have to fit exactly yet. When the rotation function starts, the square will automatically position itself correctly.
-
To remove, press and hold down the release button 4 to the right while lifting out the rotating basket 12 / rotary spit 10 with the handle 11.
10.3 Rotary spit for chicken or roast meat
Required parts
Rotary spit 10
2 chicken skewers 8
Handle 11
Tray / grease drip tray 17
The right size for the chicken/ roast joint
natural_image
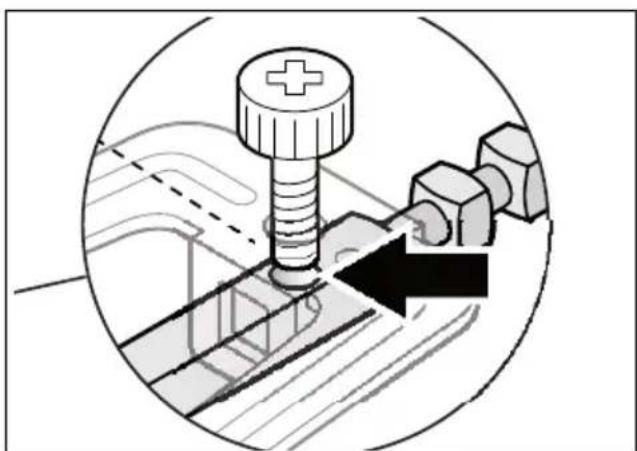
Technical illustration of a mechanical assembly with a bolt, nut, and hexagonal components (no text or symbols)The rotary spit 10 has small markings 9 on both ends (see arrow). Note: these markings 9 are located only on one side of the square.
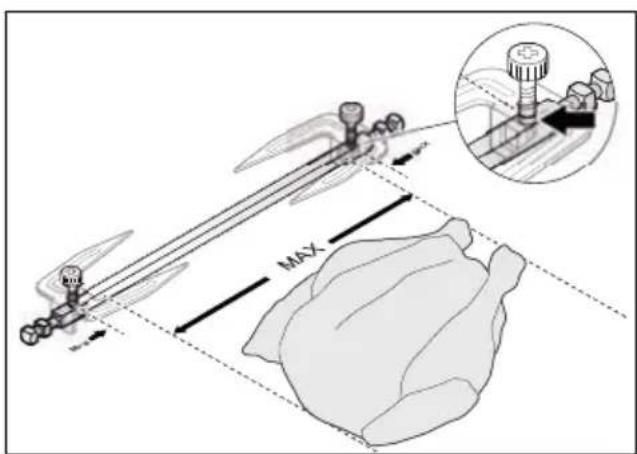
text_image
MAXThe markings 9 indicate the outermost positions where the locking screws 7 may be fastened. The maximum length of the chicken or roast joint is slightly smaller.
Make sure that the roast will not come into contact with the heating element 3 during cooking with the rotation function:
- The skewered roast should be evenly distributed around the rotary spit 10 and not be too thick.
- Tie loose or protruding parts of the roast with kitchen thread to the roast itself. During cooking parts of the roast must not come loose.
Procedure
- Slide the grease drip tray 17 at the bottom on to the floor of the interior.
natural_image
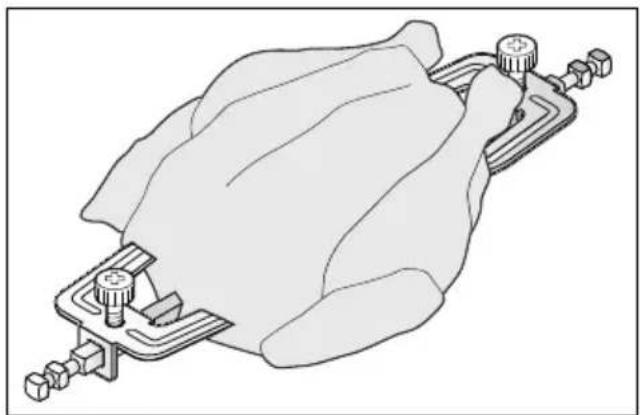
Technical line drawing of a mechanical clamp or bracket assembly (no text or symbols)-
Position the chicken or roast joint in the middle of the rotary spit 10.
-
Insert the two chicken skewers 8 with both square holes each on to the ends of the rotary spit 10.
-
Push the chicken skewers 8 so far together that the piece of meat is held firmly. Tighten the locking screws 7 in this position.
-
Use the handle 11 to insert the rotary spit 10 into the device 1 (see "Inserting the rotating basket/rotary spit" on page 40).
10.4 Kebab set
Required parts
Rotary spit 10
2 support discs 16
8 kebab skewers 15
Handle 11
Tray / grease drip tray 17
Procedure
- Slide the grease drip tray 17 at the bottom on to the floor of the interior.
natural_image
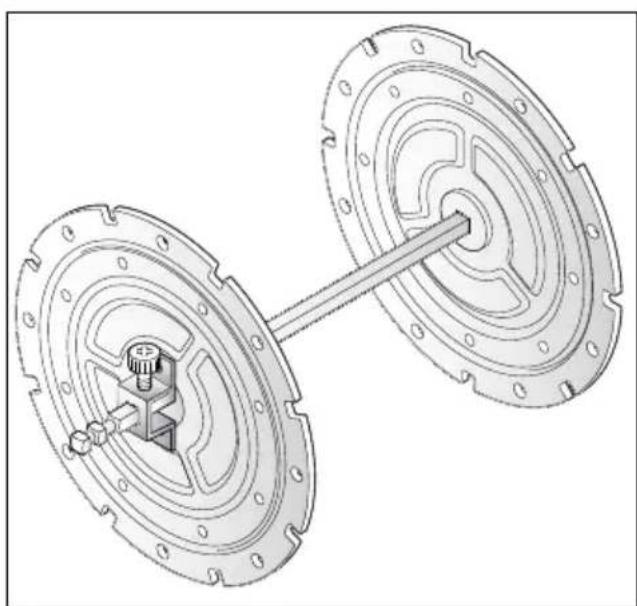
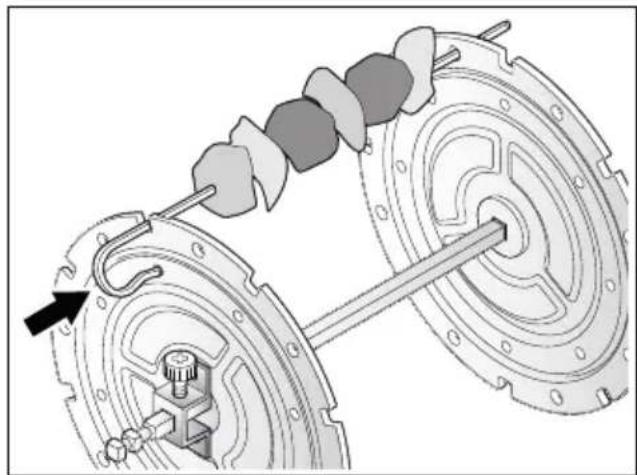
Technical illustration of a mechanical assembly with two circular components connected by a rod (no text or symbols)-
Attach the two support discs 16 at the ends of the rotary spit 10. The locking screws 7 must be aligned exactly to the markings 9.
-
Cut the ingredients into pieces of maximum 3 cm in diameter.
-
Place the ingredients on the kebab skewers 15. Leave the length of the handle at the top free and at the bottom at least 2.5 cm.
natural_image
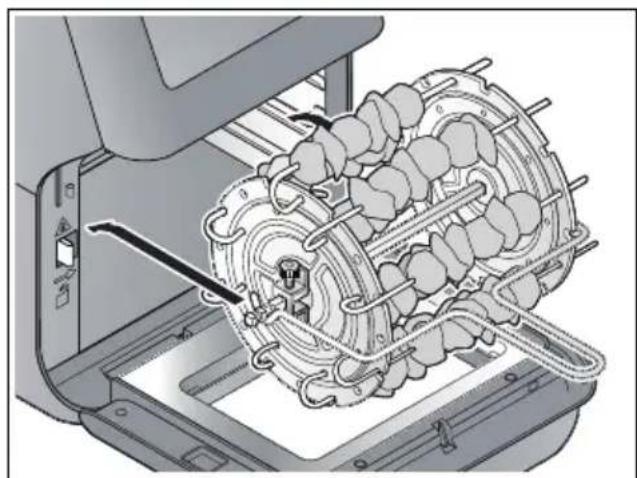
Mechanical assembly diagram showing a gear shift mechanism between two wheels (no text or symbols)- Insert the kebab skewers 15 into the support discs 16 as shown:
- the lower end into a round hole in the outer ring,
- the upper end through a notch in the edge and a round hole in the inner ring. Press the upper end of the kebab skewer 15 against the support disc 16 until you feel it click into place.
- Attach all 8 kebab skewers 15 in this way.
NOTE: you can also only use 4 kebab skewers 15. In that case use every second notch so that the kebab skewers are evenly distributed.
natural_image
Technical illustration of a mechanical assembly with gears and tubing (no text or symbols)- When all the kebab skewers 15 are attached, use the handle 11 to insert the kebab skewer wheel into the device 1 (see "Inserting the rotating basket/rotary spit" on page 40).
11. Operation

DANGER of burns!
- During operation, the surfaces of the device may become hot. Do not touch any hot parts of the device such as the air outlet 21 on the back or the inspection window 6.
- Use the handle 11 to lift out the hot rotating basket 12 / rotary spit 10.
- Use oven gloves or potholders to touch the hot accessories.
- During frying, hot steam escapes from the air outlet 21. Be careful not to put your hands into the steam.
- Do not move or transport the hot air fryer 1 while it is switched on.
11.1 Power connection
- When the device 1 has been installed for the desired purpose, insert the mains plug 20 into an earthed wall socket which corresponds to the specifications on the rating plate. The wall socket must also be easy to reach after switching on the device.
- All indications in the display 2 light up briefly.
- An acoustic signal is heard.
- Then the symbol for the Start/Stop button 31 will light up. The device is in standby mode.
11.2 The touch display
On the touch display 2 there are symbols that only display certain functions, e.g. the hot air symbol ✦23.
Other symbols (also) represent a button, e.g. the Start/Stop button 31. The term 'buttons' is used in this instructions for buttons and keys to make the text easier to read.
11.3 Switching on/off
- Press the Start/Stop button ⏻ 31 in order to switch on the device 1 from standby.
- The symbols in the display 2 are shown.
- The set temperature and cooking time are displayed alternately.
- Press the Start/Stop button ⏻ 31 again in order to start the device 1 with the selected settings or the selected program.
- The hot air symbol ✦ 23 flashes.
- The set temperature and cooking time are displayed alternately.
- The cooking time is counted down.
- If necessary, the program symbol 33 is displayed.
- If you want to stop the process while the device 1 is running, press the Start/Stop button ⓢ1.
- The display 2 shows OFF.
- The fan continues to run and the hot air symbol *23 flashes.
- After approx. 20 seconds the fan will stop and 5 signal tones are heard. The device 1 is in standby mode.
Only the symbol ⏻ 31 can be seen in the display 2.
Quick start function
After you have selected a program or carried out manual settings, the device 1 will start automatically approx. 5 seconds after the last entry.
11.4 Switching on the lighting
When the light symbol 📋 32 is visible in the display 2, you can switch the interior lighting on and off:
- Press the light button 📋 32 to switch the lighting on or off again.
- The light symbol 🎨 32 flashes while the lighting is on.
- The lighting will switch off automatically after approx. 2 minutes.
11.5 Manual settings
While the device 1 is switched on, the temperature buttons ⚠+/-22 and the timer buttons ⚡+/-29 are visible. You can use these to change the settings for temperature and cooking time whenever you like, e.g. even if a program is already running.
- With the temperature buttons ⚠ +/- 22 you can set the temperature between 40 °C and 200 °C:
- Press briefly for 5 °C steps.
- Keep pressed for fast forward/reverse.
- With the timer buttons ⏻ +/- 29 you can set the cooking time between 1 and 60 minutes:
- Press briefly for 1-minute steps.
- Keep pressed for 5-minute steps.
NOTE: when the food dehydration program is set, the temperature can only be adjusted up to a maximum of 80 °C. The cooking time can be set between 2 (02:00) and 24 (24:00) hours in 30-minute steps.
11.6 Switching on the rotation function
When the rotation symbol 30 is visible in the display 2, you can switch the rotation function on and off manually:
- Press the rotation button ○ 30 to switch the rotation function on or off again.
- The rotation symbol ○ 30 flashes while the rotation function is on.
NOTES:
- When the rotary spit program is set, the rotation function is switched on automatically.
- If you use the rotary spit 10 or the rotating basket 12 with a different program, switch on the rotation function manually.
11.7 Using Programs
The device has preset programs for many foods and types of preparation. When you select a program, you can also carry out the following settings at any time
- Temperature
- Cooking time
-
Switch on/off the rotation function
-
Prepare the food and place it into the device (see "Using the accessories" on page 35) with the appropriate accessory.
-
Select the desired program (see "The programs at a glance" on page 34) and use the cooking table as a guide (see "Cooking table" on page 37).
-
Switch the device on using the Start/Stop button ③1.
-
Press the desired program button 33. The corresponding symbol flashes.
-
If necessary, make manual adjustments to the temperature and cooking time.
-
Start the cooking process with the Start/Stop button 31.
- The program symbol is permanently displayed. The others are hidden.
- The hot air symbol ✦ 23 flashes.
11.8 Interrupting the cooking process
You can interrupt the cooking process at any time, e.g. to check the degree of browning or, in the case of more than one grid tray 18 to change the positions.
- Open the oven door 5 during the cooking process.
The lighting is switched on, the fan and the rotation function stop.
- To continue the cooking process, close the oven door 5 again.
11.9 End of the cooking process
- When the program has run to the end, the display 2 shows OFF. The fan continues to run for approx. 20 seconds before the device is switched to standby and 5 beeps are heard.
- You need a heat-resistant surface and a plate or bowl (pre-heated if necessary).
- Remove the accessories with the ready-to-eat food from the oven with oven gloves or potholders.
- Hold down the release button 4 to the right while lifting out the rotating basket 12 / rotary spit 10 with the handle 11.
- Place the accessories on the heat-resistant surface and transfer the food to the prepared plate / bowl.
- Allow the device and accessories to cool down before cleaning them.
12. Cleaning

DANGER of burns!
- Let the device 1 cool down before moving or cleaning it.

DANGER! Risk of electric shock!
- Pull out the mains plug 20 from the wall socket before cleaning the hot air fryer 1.
- The hot air fryer 1 must not be immersed in water.
WARNING! Risk of material damage!
- Do not clean using sharp objects or abrasive cleaning agents.
Accessories
- Remove coarse food residues.
- Dismantle the accessories into their individual components.
- Pay attention to the small locking screws 7.
- All accessories (except for the device 1 and the power cable 20) can be cleaned in the dishwasher.
NOTE: you can also clean these parts by hand with warm water and detergent. Then rinse thoroughly with clean water.
- Soak burnt-in food leftovers beforehand.
- Let all parts dry completely before you put them away or use the device again.
Housing
- Wipe the device 1 from the outside with a damp cloth with a little mild detergent.
- Dry with a tea towel.
Interior
- Clean the interior with a soft sponge, a little water and mild detergent.
- Wipe several times with a damp microfibre cloth, which you wash and wring out from time to time.
- Dry with a tea towel.
13. Storage
- Before putting the hot air fryer 1 away, make sure that
- the mains plug 20 has been pulled out;
- the device has cooled down and
- all parts are completely dry again.
14. Disposal
This product is subject to the provisions of European Directive 2012/19/EC. The symbol showing a wheelie bin crossed through indicates that the product requires separate refuse collection in the European Union. This applies to the product and all accessories marked with this symbol. Products identified with this symbol may not be discarded with normal household waste, but must be taken to a collection point for recycling electric and electronic appliances.
This recycling symbol marks e.g. an object or parts of the material as valuable for recycling. Recycling helps to reduce the consumption of raw materials and protect the environment.

Packaging
When disposing of the packaging, make sure you comply with the environmental regulations applicable in your country.
15. Trouble-shooting
If your device fails to function as required, please try this checklist first. Perhaps there is only a minor problem, and you can solve it yourself.

DANGER! Risk of electric shock!
- Do not attempt to repair the device yourself under any circumstances.
| Fault | Possible causes / Actions |
| No function | Has the device been connected to the power supply?Check the connection. |
| Food not yet ready after the recommended time | Was the quantity too large or the pieces too thick?Was the temperature or cooking time set too low? |
| Fresh French fries or the like are sticking to the walls of the rotating basket 12. | Mix a little cooking oil with the French fries before cooking. |
| The food on the grid trays 18 brown at different rates. | The heating element 3 is located at the top. This is why the food on the upper tray browns faster. Replace the trays after half the time, or more often if cooking for longer periods.Turn the food over from time to time. |
| The rotary spit 10/rotating basket 12 rotates unevenly. | Stop the rotation function and check whether the food is unevenly distributed or the weight is too high. |
16. Technical specifications
| Model: SHF 1800 A2 | |
| Mains voltage: 220 – 240 V ~ 50/60 Hz | |
| Protection class: I | |
| Power rating: 1800 W |
NOTE: no action by the user is required to switch the product between 50 and 60 Hz. The product adjusts itself for both 50 and 60 Hz.
Symbols used
 | Geprüfte Sicherheit (certified safety). Devices must comply with the generally acknowledged rules of technology and the German Product Safety Act (Produkt-sicherheitsgesetz - ProdSG). |
 | With the CE marking, HOYER Handel GmbH declares the conformity with EU guidelines. |
 | This symbol reminds you to dispose of the packaging in an environmentally friendly manner. |
 | Recyclable materials: cardboard (except corrugated cardboard) |
| ~ | AC voltage |
 | The symbol identifies parts that can be cleaned in the dishwasher. |
 | It is a recyclable product which is subject to an extended producer responsibility and for which the rules of waste separation apply. |
Subject to technical modifications.
17. Warranty of the HOYER Handel GmbH
Dear Customer,
your device is provided with a 3 year warranty starting with the purchase date. In the event of product defects, you are entitled to statutory rights against the vendor. These statutory rights are not restricted by our warranty presented in the following.
Warranty conditions
The warranty period starts with the purchase date. Please keep the original purchase receipt in a safe place. This document is required to verify the purchase.
If within three years from the purchase date of this product a material or factory defect occurs, the product will be repaired or replaced by us – at our discretion – free of charge to you, or the purchase price will be refunded. This warranty implies that within the period of three years the defective device and the purchase receipt are presented, including a brief written description of the defect and the time it occurred.
If the defect is covered by our warranty, the repaired or a new product will be returned to you. No new warranty period starts with a repair or replacement of the product.
Warranty period and statutory claims for defects
The warranty period is not extended when the warranty has been claimed. This also applies to replaced and repaired parts. Any damages and defects already existing at the time of purchase must be reported immediately upon unpacking. Repairs arising after the expiration of the warranty period are subject to a charge.
Warranty coverage
The device was produced carefully according to strict quality guidelines and tested diligently prior to delivery.
The warranty applies to material or factory defects.
Excluded from the warranty are wear parts subject to normal wear and damages to fragile parts, e.g. switches, batteries, lamps or other parts manufactured from glass.
This warranty expires if the product is damaged, not used as intended or not serviced. For the proper operation of the product, all instructions listed in the operating instructions must be observed carefully. Any form of use and handling that is advised against in the operating instructions or warned against must always be avoided.
The product is only intended for private and not for commercial use. In the case of incorrect and improper treatment, use of force and interventions not performed by our authorised Service Centre, the warranty shall cease.
Handling in case of a warranty claim
In order to ensure prompt processing of your matter, please observe the following notes:
- Please keep the article number
IAN: 351606_2007 and the purchase receipt as a purchase verification for all inquiries. - The article number can be found on the rating plate, an engraving, the title page of your instructions (in the bottom left), or as a label on the rear or underside of the device.
- If faulty operation or other defects occur, first contact the Service Centre listed in the following by telephone or email.
- Then, you are able to send a product reported as defective free of charge to the service address specified to you, including the purchase receipt and the information on the defect and when it occurred.
At www.lidl-service.com you can download this and many other manuals, product videos and installation software.

text_image
PDF ONLINE www.lidi-service.comThis QR code takes you directly to the Lidl Service website (www.lidl-service.com), where you can enter the article number (IAN)
351606_2007 to open your user instructions.

Service Centre
GB Service Great Britain
Tel.: 0800 404 7657
E-Mail: hoyer@lidl.co.uk
IE Service Ireland
Tel.: 1890 930 034
(0,08 EUR/Min., (peak))
(0,06 EUR/Min., (off peak))
E-Mail: hoyer@lidl.ie
MT Service Malta
Tel.: 80062230
E-Mail: hoyer@lidl.com.mt
CY Service Cyprus
Tel.: 8009 4409
E-Mail: hoyer@lidl.com.cy
IAN: 351606_2007

Supplier
Please note that the following address is no
service address. First contact the aforementioned Service Centre.
HOYER Handel GmbH
Tasköprüstraße 3
22761 Hamburg
GERMANY
Sommaire
natural_image
Diagram of a trash bin with a lid and internal structure, showing mechanical components and directional arrows (no text or symbols)natural_image
Technical illustration of a mechanical device with a mesh basket and internal components (no text or symbols)natural_image
Pure technical diagram of a mechanical clamp or bracket assembly without any text, numbers, or symbolstext_image
Diagram showing mechanical assembly with labeled parts and directional arrows, including a warning sign and lock mechanism.natural_image
Diagram showing a door lock mechanism with warning symbols and a separate view of a mechanical component (no text or labels)natural_image
Mechanical assembly diagram showing a bolt, nut, and bolts with a directional arrow (no text or labels)natural_image
Technical line drawing of a mechanical component with mounting brackets and a central body (no text or symbols)natural_image
Technical line drawing of a mechanical assembly with two flanged components connected by a shaft (no text or symbols)natural_image
Mechanical assembly diagram showing a gear shift mechanism between two wheels (no text or symbols)natural_image
Technical illustration of a mechanical assembly with gears and shafts (no text or symbols)natural_image
Diagram of a trash bin with a lid and internal structure, showing mechanical components and directional arrows (no text or symbols)natural_image
Technical illustration of a mechanical device with a mesh basket and internal components (no text or symbols)natural_image
Technical line drawing of a mechanical clamp or bracket assembly with diagonal lines (no text or symbols)text_image
Diagram showing door lock mechanism with warning symbols and labeled componentstext_image
Diagram illustrating lock and locking mechanism with warning symbols and labeled componentsnatural_image
Mechanical assembly diagram showing a bolt, nut, and bolt head with a directional arrow (no text or labels)natural_image
Technical line drawing of a mechanical clamp or bracket assembly (no text or symbols)natural_image
Technical line drawing of a mechanical assembly with two circular components connected by a rod (no text or symbols)natural_image
Mechanical assembly diagram showing a hand operating a spring-loaded component with a rotating wheel (no text or symbols present)natural_image
Technical illustration of a mechanical assembly with gears and tubing (no text or symbols)natural_image
Diagram of a trash bin with a lid and internal structure, showing mechanical components and directional arrows (no text or symbols)natural_image
Technical illustration of a mechanical device with a mesh basket and internal components (no text or symbols)natural_image
Technical illustration of a mechanical clamp or bracket assembly with diagonal lines (no text or symbols)text_image
Diagram illustrating door lock mechanism with warning symbols and labeled componentstext_image
Diagram illustrating door lock mechanism with warning symbols and labeled componentsnatural_image
Mechanical assembly diagram showing a bolt and nut assembly with a directional arrow (no text or symbols)natural_image
Technical illustration of a mechanical clamp or bracket assembly (no text or symbols)natural_image
Technical illustration of a mechanical assembly with two circular components connected by a rod (no text or symbols)natural_image
Mechanical assembly diagram showing a rotating wheel with attached components and a directional arrow (no text or symbols)natural_image
Mechanical assembly diagram showing a motor or gear assembly inside a device housing (no text or symbols visible)natural_image
Diagram of a trash bin with a lid and lock mechanism, showing internal waste disposal (no text or symbols)natural_image
Technical illustration of a mechanical device with a mesh basket and internal components (no text or symbols)natural_image
Technical line drawing of a mechanical clamp or bracket assembly with diagonal lines (no text or symbols)text_image
Diagram illustrating door lock mechanism with warning symbols and labeled componentstext_image
Diagram illustrating door lock mechanism with warning sign, lock symbol, and gear mechanismnatural_image
Technical illustration of a bolt and nut assembly inside a circular frame, showing mechanical components without any text or symbols.natural_image
Technical line drawing of a mechanical component with mounting brackets and a central housing (no text or symbols)natural_image
Technical line drawing of a mechanical assembly with two circular components connected by a rod (no text or symbols)natural_image
Mechanical assembly diagram showing a gear shift mechanism between two wheels (no text or symbols)natural_image
Mechanical assembly diagram showing a motor or gear mechanism inside a housing (no text or symbols visible)natural_image
Diagram of a trash bin with a lid and lock mechanism, showing internal waste disposal (no text or symbols)natural_image
Technical illustration of a mechanical device with a meshed component and internal structure (no text or symbols)natural_image
Technical line drawing of a mechanical clamp or bracket assembly with diagonal lines (no text or symbols)text_image
Diagram showing door lock mechanism with warning symbols and labeled components- Stlačte odblokovacie tlačidlo 4 doprava a zaveste otočný kôš 12 / otočný ražeň 10 na l'avej strane.

natural_image
Diagram showing a door lock mechanism with warning symbols and a close-up of a mechanical component (no text or labels)natural_image
Technical illustration of a mechanical assembly with a bolt, nut, and hexagonal components (no text or symbols)natural_image
Technical illustration of a mechanical clamp or bracket assembly (no text or symbols)natural_image
Technical line drawing of a mechanical assembly with two flanged components connected by a central shaft (no text or symbols)natural_image
Mechanical assembly diagram showing a hand operating a spring-loaded component with a separate wheel assembly (no text or symbols visible)natural_image
Mechanical assembly diagram showing internal components of a motor or gear assembly (no text or labels visible)natural_image
Diagram of a trash bin with a lid and internal structure, showing mechanical components and directional arrows (no text or symbols)natural_image
Technical illustration of a mechanical device with a mesh basket and internal components (no text or symbols)natural_image
Pure technical diagram of a mechanical clamp or bracket assembly without any text, numbers, or symbolstext_image
Diagram illustrating door lock mechanism with warning sign, lock, and tire assembly instructionstext_image
Diagram illustrating door lock mechanism with warning symbols and labeled componentsnatural_image
Mechanical assembly diagram showing a bolt and nut assembly with a directional arrow (no text or symbols)natural_image
Technical line drawing of a mechanical clamp or bracket assembly (no text or symbols)natural_image
Technical line drawing of a mechanical assembly with two flanged components connected by a rod (no text or symbols)natural_image
Mechanical assembly diagram showing a gear shift mechanism between two wheels (no text or symbols)natural_image
Technical illustration of a mechanical assembly with gears and tubing (no text or symbols)natural_image
Diagram of a mechanical device with a lid and internal mesh structure, showing internal components and directional arrows (no text or symbols)natural_image
Technical illustration of a mechanical device with a mesh basket and internal components (no text or symbols)natural_image
Technical line drawing of a mechanical clamp or bracket assembly with diagonal lines (no text or symbols)text_image
Diagram showing safety warning symbols and mechanical components, including lock, lock, and gear mechanismnatural_image
Diagram showing a door lock mechanism with warning symbols and a close-up of a mechanical component (no text or labels)- Slip oplåsningsknappen 4 for at läse drejekurven 12 / drejespiddet 10 på venstre side.
natural_image
Technical illustration of a mechanical assembly with a bolt, nut, and hexagonal components (no text or symbols)natural_image
Technical illustration of a mechanical clamp or bracket assembly (no text or symbols visible)natural_image
Technical illustration of a mechanical assembly with two circular components connected by a rod (no text or symbols)natural_image
Mechanical assembly diagram showing a gear shift mechanism between two wheels (no text or symbols)natural_image
Mechanical assembly diagram showing a motor or gear assembly with no visible text or symbols- I displayet 2 vises OFF.